Diagram 3D NB04-W001 User manual

North British Railway (NBR)
Perishable Goods (Fish or Milk) Van
4mm scale (“OO” “EM” or “P4”)
Laser cut
MDF, card and acrylic kit.
Adhesive, paint not included. Wheels, axleguards, buffers etc. not included.
4mm scale kit suitable for “OO” “EM” “P4” etc
NB04-W001
NBR
Perishable Goods
(Fish or Milk) Van
Website:
www.Diagram3D.com
Contents
of this kit
MDF parts
This kit contains:
1. SmartFrame
Upper and lower frame plus alignment clips.
2. MDF body parts for this vehicle.
Cardboard
panels
3. Cardboard panels –a total of 5 panels
There are two layers for the van sides and ends.
Layer
Description
Layer 1
Window Frames and droplights
Layer 2
Van side panelling, end panelling (no steps)
Layer
Description
Layer 1
Window Frames and droplights
Layer 2
Van side panelling, end panelling (with steps)
The contents of the layers above are orientated so that they cannot be confused
during assembly.
A single panel is provided containing steps and (optional) roof.
Sundry
Parts
2 x long glazing bars
Roof
A 3D printed roof is included with this kit.
Axleguards
The axleguard kit D3D-05 is included with this kit, pleae refer to its instructions for
assembly details.
www.Diagram3D.com
Assembly Instructions
North British Railway (NBR) Perishable Goods (Fish or Milk) Van 4mm scale (“OO” “EM” or “P4”)
© Copyright 2022 Diagram3D, all
rights reserved
Page 1
Not
included
Adhesive to attach the parts. PVA (“woodworking glue”) is
recommended for the MDF parts.
Craft knife, Clamps, weights or other tools
Paint and filler
Wheels, bearings, Buffers, couplings etc.
Intended
Audience
This kit is intended to reduce the time, complication and labour associated with
the construction of a detailed model of this model using accurate pre-cut layers
which can be conveniently assembled in the supplied SmartFrame without
specialist knowledge to give the same quality, or better, as traditional methods.
The choice of underframe and other details is left to the modeller.
Hints on
assembly
Separate
parts by
cutting the
reverse side
of the fret.
Pre-assemble
and check
parts at each
stage.
Seal
Cardboard
components.
Separating MDF components cleanly is more easily accomplished by
completing the half etched portions on the reverse of the fret rather than cutting
from the front.
Do not separate components from layers until assembly is complete or
instructed to do so.
At each stage, once the required components have been separated from the
frets, test the assembly without glue to ensure that the parts are trimmed
correctly and fit properly before final assembly with adhesive.
Allow as much time as needed for the adhesive to set.
Fill any gaps and smooth surfaces for optimal results
It is strongly advised that cardboard parts are sealed with a fixative (obtainable
from art shops) before assembly.
The assembly steps are recommendations and should not be taken as
definitive.
Copyright
Statement
The entire contents of this document including but not restricted to the
text, images, drawings and components, method of construction, design
and intellectual content are the copyrighted property of Diagram3D. No
part of this document or design may be used altered or copied without
the express written consent of the design and copyright owners. This
document was published in 2015 CE.
SmartFrame
Preparation
(Applies to all
versions of
SmartFrame)
Total
preparation
and assembly
time about 2
minutes.
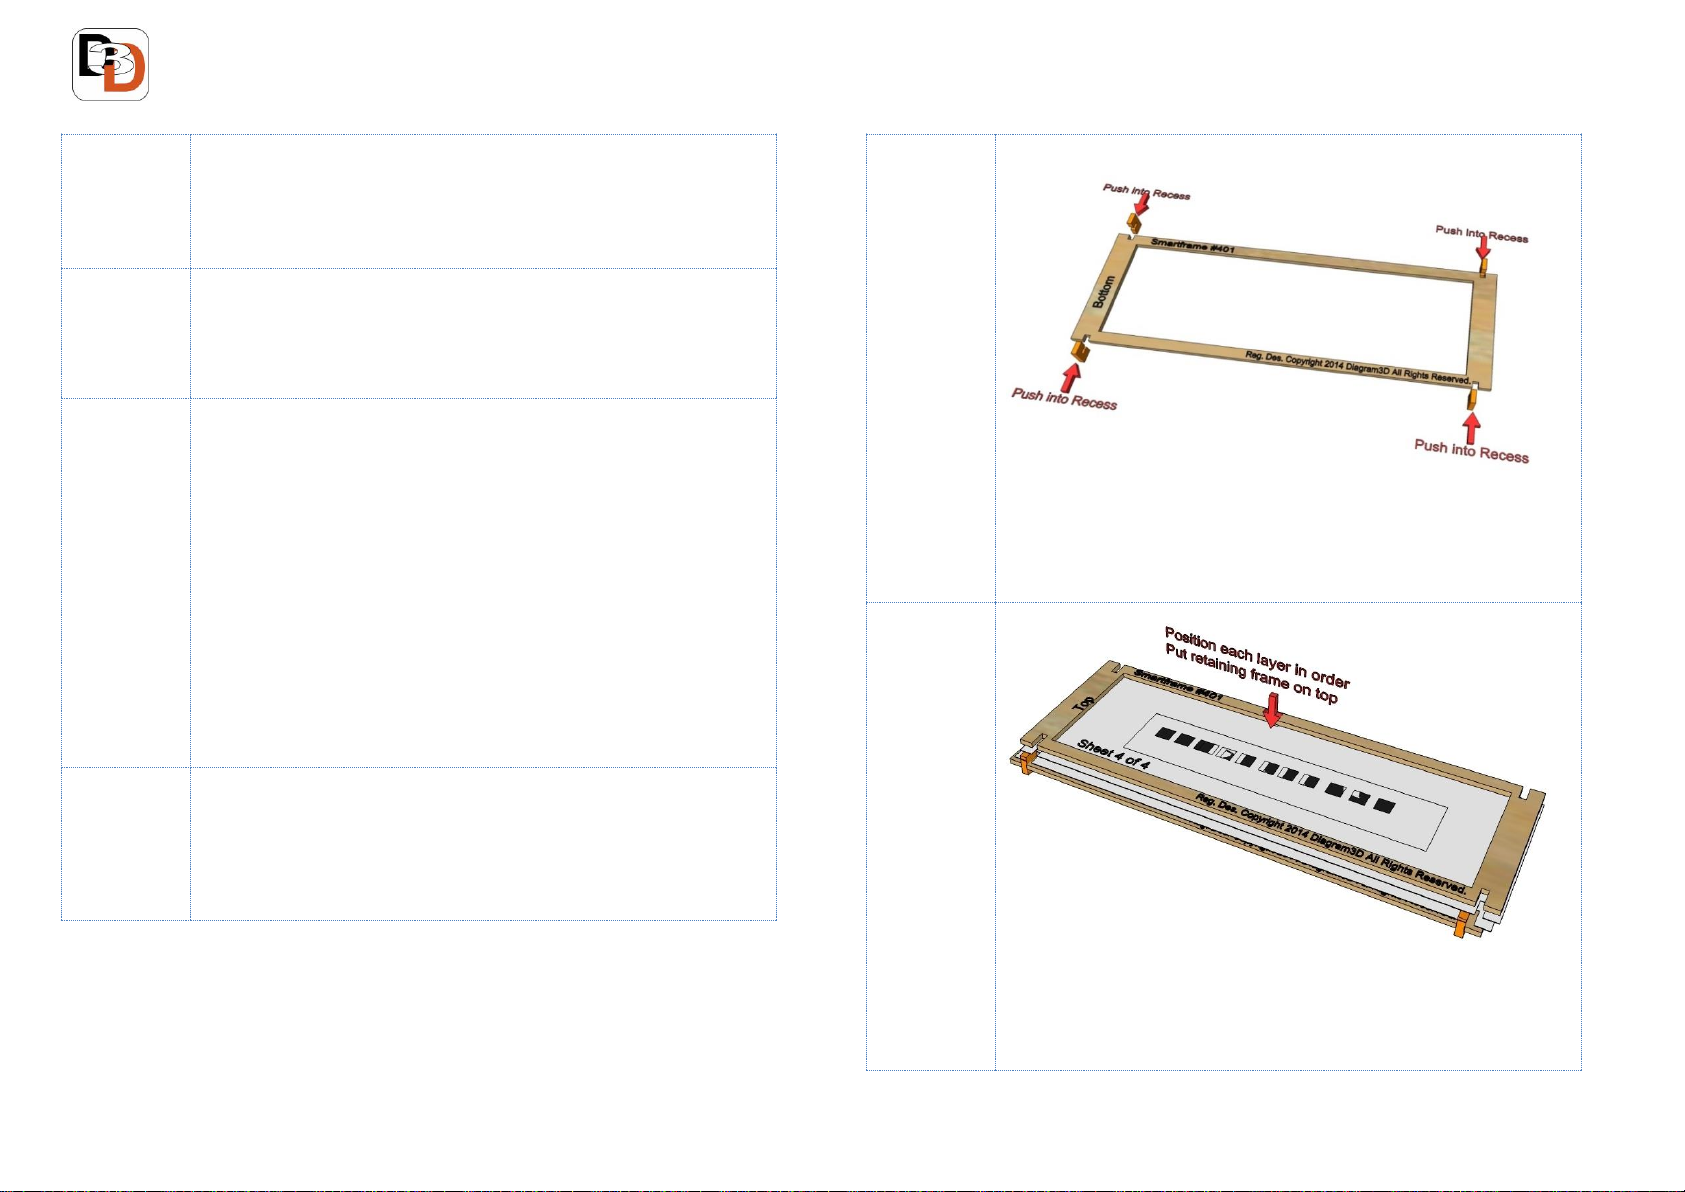
Attach the clips to the bottom section of the SmartFrame as shown below:
Hint: Partially insert the clips into the slots and gently press the clips into
position on each side. An extra clip is provided. Avoid excessive pressure. Visit
our website for further constructional information including a video and gallery
of models.
SmartFrame
General Hints
on using the
SmartFrame
The following diagram illustrates how to use the SmartFrame:
Position the layers of the same description in ascending order on the lower
frame beginning with the first layer. The layers have the legend “1 of x”, “2 of x”
and so on. Hint: Do not force the individual layers into position, assemble each
layer at an angle so that one side is in position and then gently position the
other side into place. When assembled, extra pressure can be applied with
www.Diagram3D.com
Assembly Instructions
North British Railway (NBR) Perishable Goods (Fish or Milk) Van 4mm scale (“OO” “EM” or “P4”)
© Copyright 2022 Diagram3D, all
rights reserved
Page 2
rubber bands or “bulldog clips” on the ends of the frame.
Van Sides
and ends
Total
preparation
and assembly
time about 10
minutes.
Allow
sufficient
time for the
adhesive to
dry
thoroughly
There are two layers for each side and end.
Layer
Description
Layer 1
Window Frames and droplights, end (no steps)
Layer 2
Van side panelling, end panelling (no step detail)
Insert these layers into the SmartFrame in order as described above. Apply
adhesive and put aside until dry. Now repeat this process for the other side:The
steps can be attached now in the slots provided.
Hint: The individual layers can be painted in advance to simulate the window
frames, main body and lining detail. When thoroughly dry, detach the van sides
using a sharp craft knife.
Layer
Description
Layer 1
Window Frames and droplights, end (with steps)
Layer 2
Van side panelling, end panelling (with step detail)
Chassis
Total
preparation
and assembly
time about 15
minutes.
Allow
sufficient
time for the
adhesive to
dry
thoroughly
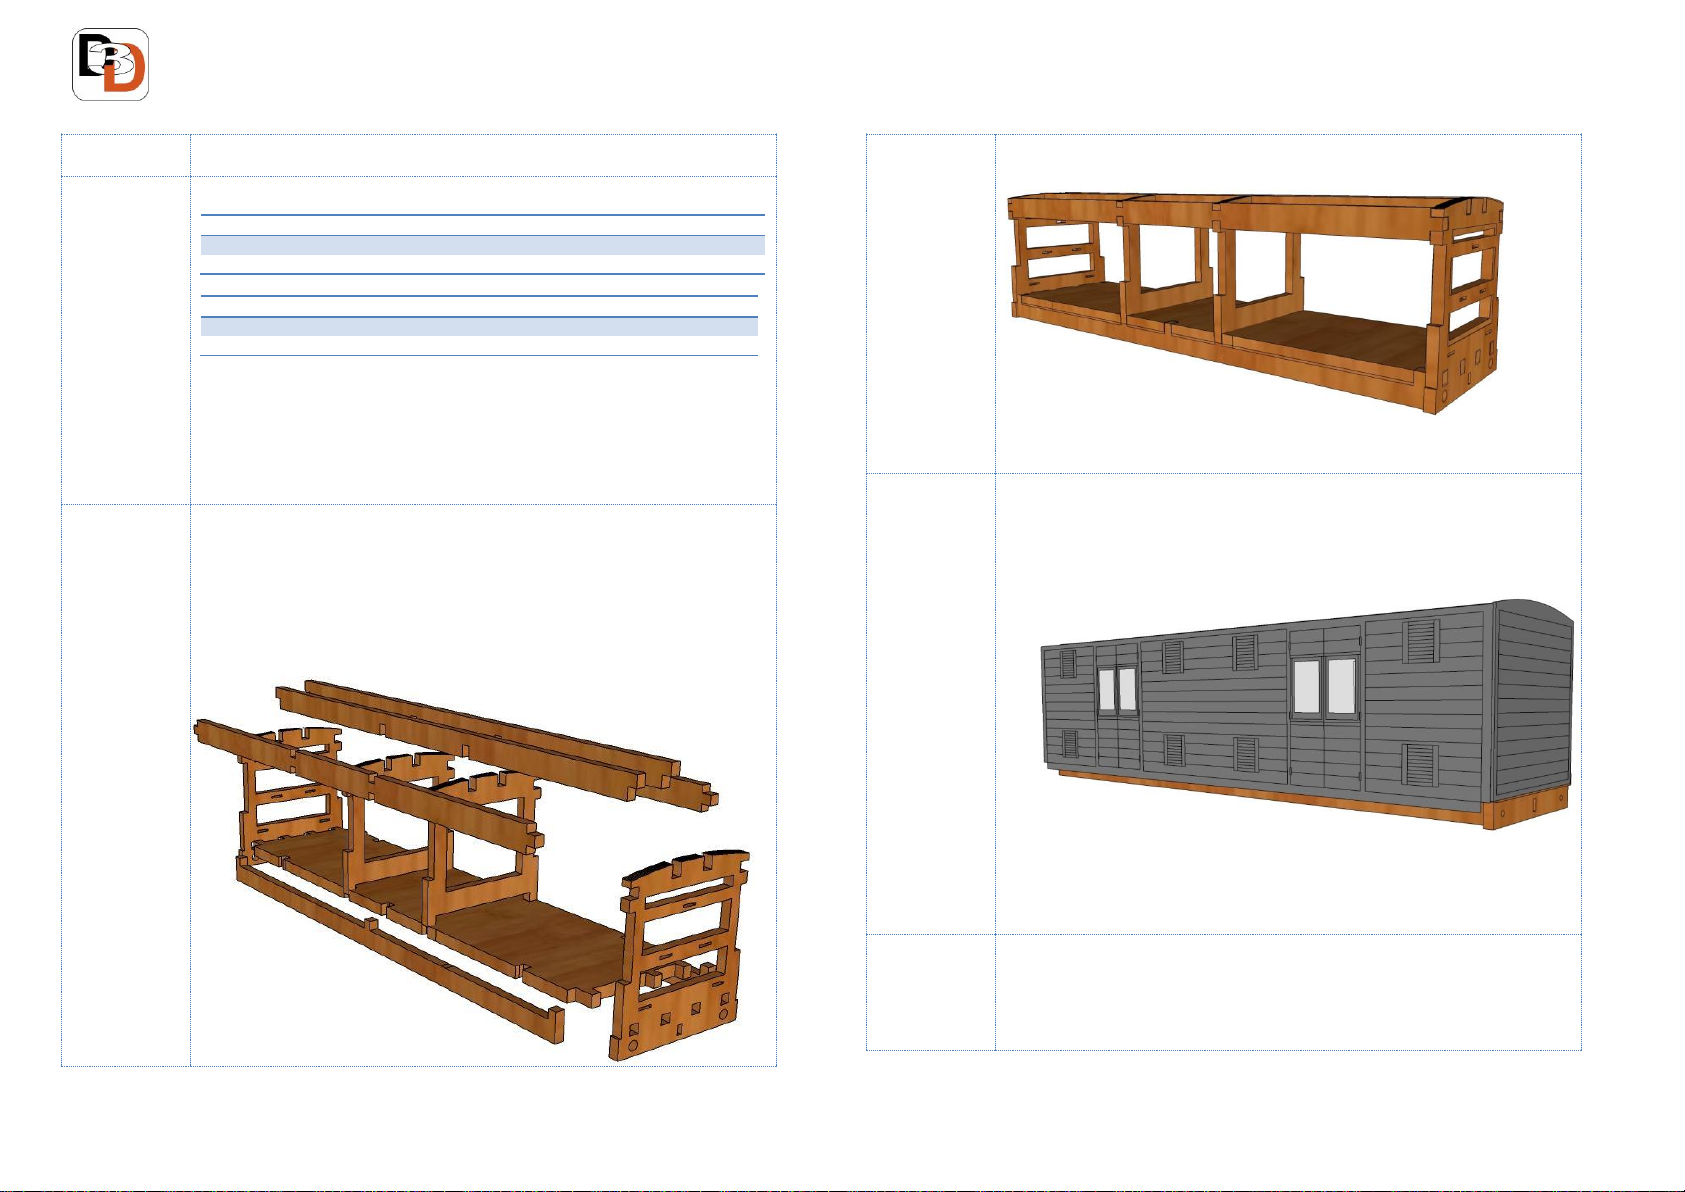
The chassis and superstructure of this model is made from MDF. It comprises a
floor, two internal partitions, four stretchers for the roof and two solebars. These
are illustrated below showing their relative positions. Separate these
components and ensure that they fit correctly and any unwanted excess
material has been removed.
The completed body should look like the image below: Hint: Take care to
ensure that the ends are square.
When the assembly is thoroughly dry, the surfaces can be lightly sanded to
remove any imperfections, ensuring a good fit for the roof, sides and ends.
Glazing &
Final
assembly
Total
preparation
and assembly
time about 20
minutes.
Allow
sufficient
time for the
adhesive to
dry
thoroughly
The van sides overlap the MDF chassis and overlap the ends. There is a slight
indentation in the MDF ends which accommodates the sides and they are also
notched to match the buffer beams. Attach the sides and ends to the MDF
chassis. The long window glazing bars supplied fit into the slots which are pre-
cut into the partitions.The glazing bars are fractionally shorter than the van
sides
Hint: the glazing can be delayed until the van is painted by the modeller.
The long glazing bars can be slotted into position prior to the attachment
of the final end of the van body.
Roof
Total preparation
and assembly time
about 5 minutes.
Allow sufficient
time for the
adhesive to dry
thoroughly
Attach the 3D printed roof to the body, taking care to centralise it with the body.

www.Diagram3D.com
Assembly Instructions
North British Railway (NBR) Perishable Goods (Fish or Milk) Van 4mm scale (“OO” “EM” or “P4”)
© Copyright 2022 Diagram3D, all
rights reserved
Page 3
Underframe
This was a six wheeled van. The diagram wheelbase was 20 feet divided
equally between the three axles.
Finally…
Congratulations on completing this kit. We hope you enjoyed making it as much
as we did.. If you enjoyed making this kit then take time to visit
www.Diagram3D.com to find similar items.
Our website has
Free downloads of historical information.
Current downloadable assembly instructions for all of our products
Document revised and updated May 2022 E&OE
Other Diagram 3D Toy manuals

Popular Toy manuals by other brands


Spinmaster
Spinmaster PIXO BITZ instructions

HeliArtist
HeliArtist 600 Scale Fuselage B0105 instruction manual

marklin
marklin BR 218 user guide

Hasbro
Hasbro NERF Power Moves Marvel Black Widow instructions

V-tech
V-tech Go! Go! Smart Wheels Lift &Fix Repair Shop user manual

iKarus
iKarus Dragstair user manual