DiamaPro Systems DP-JSX-10 User manual

OWNER’S MANUAL
DP-JSX-10
WALK-BEHIND SAW
OPERATION & MAINTENANCE MANUAL
SAVE THESE INSTRUCTIONS FOR FUTURE REFERENCE

INTRODUCTION
Thank you for purchasing a DIAMAPRO SYSTEMS® product.
This manual provides information and procedures to safely operate and
maintain the DP-JSX-10. For your own safety and protection from injury,
carefully read, understand, and observe the safety instructions described
in this manual. Keep this manual or a copy of it with the machine. If you
lose this manual or need an additional copy, please contact DiamaPro
Systems®. This machine is designed and built with user safety in mind;
however, it can present hazards if improperly operated and serviced.
Please follow the operating instructions carefully. If there are any questions
regarding operating or servicing of this machine, please contact
DiamaPro Systems®.
Disclaimer: DiamaPro Systems® and its aliates take no responsibility
for any damage, injury or death resulting from the incorrect or unsafe use
of this product. Use of this product should be undertaken by competent
persons only. It is the operator’s responsibility to ensure that the following
safety procedures are followed. If you are unsure, do not operate this
product.
1.1 KNOW THE RULES & YOUR EQUIPMENT
Most Job sites have rules governing equipment use & maintenance.
Before starting at a new work location, check with the supervisor or
safety coordinator. Ask about any rules or regulations you need to
abide. OSHA enforces federal laws within the United States that apply
to the safe operation, application, & maintenance of equipment on job
sites. It is the employer’s responsibility to comply with these laws.
Do not operate this machine unless you have read the operations and
maintenance manual carefully. Read any additional instructions included
from other manufacturers and organizations and the Masonry and
Concrete Saw Manufacturers Institute. Learn the applications and limita-
tions as well as the specic potential hazards related to this tool.
1.2 RECEIVE PROPER TRAINING
Do not operate this machine unless you have received operational and
maintenance training from a DiamaPro Systems® representative or from
an authorized distributor for DiamaPro Systems®.
1.3 PROTECT YOUR FEET
Observe all applicable local, state and federal safety regulations. Wear
OSHA approved foot protection.
1.4 PROTECT YOUR EYES
Observe all applicable local, state and federal safety regulations. Wear
OSHA approved safety glasses.
1.5 PROTECT YOUR LUNGS
Breathable silica may be generated by use of this product. Silica can
cause severe and permanent lung damage, cancer, and other serious
diseases. Do not breathe the dust. Do not rely on your sight or smell to
determine if the dust is in the air. Silica may be in the air without a visible
dust cloud. If air monitoring equipment for silica is not provided by your
employer at your work site, you MUST wear appropriate respiratory
protection when using or servicing the machine. If dry cutting, be sure
to use a HEPA ltered dust collector. Consult your employer and OSHA
regarding the appropriate respiratory protection.
1.6 PROTECT YOUR HEARING
Observe all applicable local, state and federal safety regulations. Wear
OSHA approved hearing protection.
1.7 DRESS PROPERLY
Do not wear loose clothing or jewelry that can be caught in moving parts.
Wear protective hair covering to contain long hair. Keep hair away from
1. SAFETY INSTRUCTIONS
motor air vent. Rubber gloves and non-skid footwear are recommended
when working outdoors.
1.8 AVOID A DANGEROUS ENVIRONMENT
Do not expose machine to rain. Do not use machine in wet conditions.
Keep work area well lit. When working at an elevated location, pay atten-
tion to articles and persons below.
1.9 BEWARE OF HIDDEN DANGERS IN CONCRETE
Rebar or utility lines may be buried in concrete. Disconnect the power to
any utility lines. If these items are to be missed, clearly mark the area. If
these items are to be cut, check the blade manufacturer’s guidelines on
material to be cut.
1.10 KEEP WORK AREA CLEAN. DO NOT RUN OVER
ANYTHING
Loose objects could be thrown from crack. Make sure area to be cut is
clear from people and any loose objects, nuts, bolts, etc. Never run over
any loose objects
1.11 KEEP CHILDREN AND VISITORS AWAY
Do not allow anyone to stand in line with the blade path. Do not let children
or visitors contact machine or extension cord. Keep children and visitors
away from the work area.
1.12 AVOID FLAMMABLE LIQUIDS OR GASES
Engines and diamond blades produce heat and sparks during operation.
Never use machines in dangerous sites containing ammable, combustible
or explosive materials such as lacquer, paint, benzene, thinner, gasoline,
gases, and adhesive agents.
1.13 AVOID CONTACT WITH HOT BLADE AND BLADE
GUARD
The blade and blade guard become hot during operation and remain hot
after stopping the engine. Do not touch the blade and blade guard without
proper hand protection.
1.14 KEEP FIRM GRIP ON MACHINE
During normal operation as instructed in Section 6.0, keep a rm hold on
the handle grips and maintain control of the machine until the blade
completely stops.
1.15 CHECK BLADE AND MACHINE ROTATION
DIRECTION
Never operate a blade in the wrong rotation direction. Check the machine
rotation direction and blade direction when mounting a blade.
1.16 CHECK BLADE MAXIMUM ALLOWABLE SPEED
Check the maximum operating speed of the machine and blade. Never use
a blade rated less than the machine’s maximum speed rating.
1.17 CHECK BLADE FOR CRACKS, DAMAGE, AND
MISALIGNMENT
Never use a cracked, damaged, or misaligned blade. After mounting blade,
rotate by hand to check for proper alignment.
1.18 CHECK DIAMOND BLADE FOR WARNINGS
Many diamond blades contain a chemical known to the state of California
to cause cancer and/or birth defects or other reproductive harm. Diamond
blades improperly used are dangerous. Comply with American National
Standards Institute Safety Code B71 and Occupational Safety & Health Act
covering SPEED, SAFETY GUARDS, FLANGES, MOUNTING PRO-
CEDURES, GENERAL OPERATING RULES, HANDLING, STORAGE&
INSPECTION AND GENERAL MACHINE CONDITIONS. Read Diamond
Blades Safety Manual before use.

1.19 DO NOT FORCE WRONG SIZE OR TYPE BLADE
ONTO MACHINE
Do not force a blade onto the machine shaft or alter the size of the arbor
mounting hole. Be certain that the drive pin is in place through the blade
when tightening the blade nut. Never add a drive pin hole or modify a
blade.
1.20 USE CORRECT SAW AND ACCESSORIES
Do not force a small saw to do the job of a heavy-duty saw. Do not use the
saw for improper applications. Never cut material for which the blade was
not designed. Check blade manufacturer’s guidelines on material to be
cut.
1.21 STORE IDLE EQUIPMENT
The machine, blades and tools should be stored in a dry and secure loca-
tion when not in use. Keep equipment out of reach of children.
1.22 DO NOT FORCE SAW
The saw will do the job better and safer at the rate for which it was
designed.
1.23 OBTAIN MATERIAL SAFETY DATA SHEET (MSDS)
FOR ALL WORK SURFACE MATERIALS
This includes primers, all coatings, adhesives, tile and crack lling materi-
als, etc. Do not attempt to cut, clean out or remove material without MSDS
information. Consult MSDS sheet for hazards information. Be aware that
some materials are explosive as a dust.
1.24 DO NOT OVERREACH
Keep proper footing and balance at all times.
1.25 MAINTAIN MACHINE WITH CARE
Keep machine clean and follow maintenance procedures for better and
safer performance. Keep handles dry, clean, and free from oil and grease.
Follow instructions for lubricating and changing accessories.
1.26 REMOVE ADJUSTING TOOLS
Form a habit of checking to see that tools such as adjusting wrenches are
removed from the machine and properly stored before starting the engine.
1.27 STAY ALERT
Watch what you are doing. Use common sense. Do not operate machine
when you are tired or fatigued.
1.28 DO NOT USE DRUGS, ALCOHOL, MEDICATION
Do not operate machine while under the inuence of drugs, alcohol,
or any medication.
1.29 KEEP THE RIGHT PARTS IN THE RIGHT
POSITIONS
Do not operate machine with parts missing or improperly mounted.
1.30 CHECK DAMAGED PARTS
Verify all machine guards are in good condition and will function properly
before using the machine. Check for alignment of moving parts, binding of
moving parts, breakage of parts, mounting, and any other conditions that
may aect machine operation. A guard, power switch or other part that is
damaged should be properly repaired or replaced by an authorized service
center unless indicated elsewhere in this instruction manual. Do not oper-
ate machine if lever or engine on/o switch does not function properly.
1.31 SECURELY MOUNT ACCESSORIES AND BLADES
TO THE MACHINE
Extra care must be taken when using saws on an elevated location to pre-
vent injury to someone on a lower level in the event the tool or accessory
should drop. Do not operate without fall protection for operator and debris
protection for public.
1.32 NEVER TOUCH THE MOVING PARTS
Never touch moving parts such as blades, belts and others.
1.33 STOP OPERATION IMMEDIATELY IF ANY
ABNORMALITY IS DETECTED
Stop using machine immediately if any abnormalities are observed during
operation. Examples of abnormalities include unusual noise and vibration.
1.34 WHEN REPLACING A PART, USE THE SAME TYPE
AND QUALITY
When replacing a component part with a new one, use only the same
type and quality of new part. Never attempt to repair a machine if you are
unfamiliar with proper procedures and techniques required.
1.35 NEVER DISABLE THE LEVER
Do not modify, disable, or attempt to permanently engage the lever. Do not
operate a machine if lever is not functioning. This could lead to serious
injury or death.
1.36 LOAD AND UNLOAD SAFELY
Use proper heavy lifting procedures. Read & understand manuals before
loading & unloading.
1.37 STORAGE
Always store equipment properly when it is not being used. Equipment
should be stored in a clean, dry location and out of reach of children.
1.38 SAVE THESE INSTRUCTIONS
Refer to this operations and maintenance manual as well as any additional
instructions included from other manufacturers and organizations and the
Masonry and Concrete Saw Manufacturers Institute®.
Never permit anyone to operate the machine without proper instructions.
DUST WARNING
Cutting, especially when DRY cutting, generates dust that comes
from the material being cut, which frequently contains silica.
When dry cutting, be sure to use a HEPA ltered dust collector.
Silica is a basic component of sand, quartz, brick clay, granite and
numerous other minerals and rocks. Exposure to excessive amount
of such dust can cause:
n Respiratory diseases (aecting your ability to breath), including
chronic bronchitis, silicosis and pulmonary brosis from exposure
to silica. These diseases may be fatal;
nSkin irritation and rash; and
nCancer according to NTP* and IARC*
*National Toxicology Program, International Agency for Research
on Cancer
Take precautionary steps
nAvoid inhalation of and skin contact with dust, mist and fumes;
nWet cut when feasible, to minimize dust;
nWear and ensure that all bystanders wear appropriate respiratory
protection such as dust masks designed to lter out microscopic
particles. (See OSHA 29 CFR Part 1910.1200)
California Prop 65 Warning: Use of this product can cause
exposure to materials known to the State of California to cause
cancer and/or birth defects or other reproductive harm.
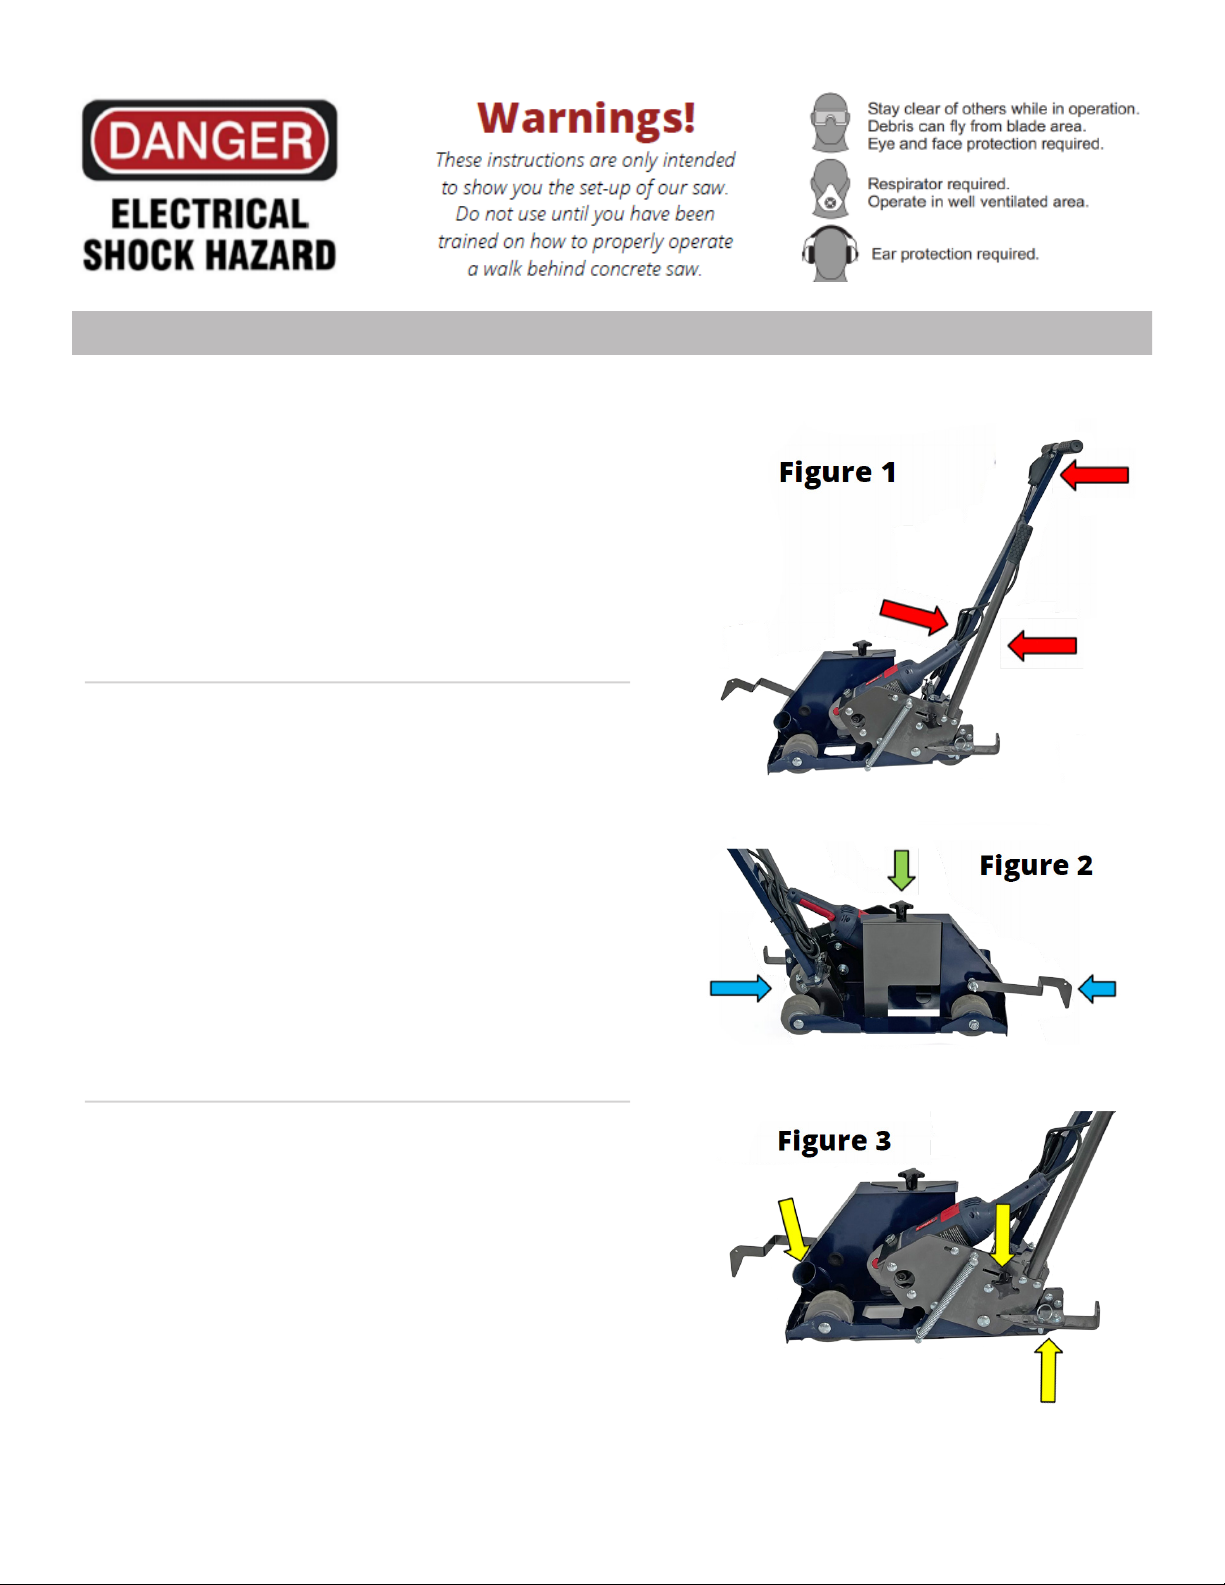
PRODUCT SET-UP
Set-Up: Red Arrows (Fig. 1)
1. Install the control and lift handle as shown in Fig. 1.
2. Hang cord on handle cord rest. Secure on rest using
the factory provided twist tie.
3. Apply powerhead trigger lock. Plug cord into the
electrical box.
Never leave the unit plugged in while unattended or while
replacing the blade
Blade Installation: Green Arrows (Fig. 2)
1. Unplug the power cord from the electrical box.
Remove the blade guard.
2. Remove outer blade clamp and install the blade.
3. Firmly tighten the blade.
We recommend using a DiamaPro Systems® 8” Diamond Blade
Blade Pointer Alignment: Blue Arrows (Fig. 2)
1. After proper blade installation, align the rear pointer
and the blade with a known straight edge.
2. Using the supplied washer/shims, align the front
pointer to the known straight edge. Be sure to tighten
the front pointer bolt.
Feature Call Outs: Yellow Arrows (Fig. 3)
n2-inch dust port: Minimum 250 CFM required
nBlade depth adjustment knob. Loosen knob and slide
left or right to set blade depth.
nFoot lever locks the motor in the UP position. Be sure
to install the lock-out pin while not in use and for
transportation.
Call 470-977-2323 or visit our website www.diamaprosystems.com for our terms and conditions
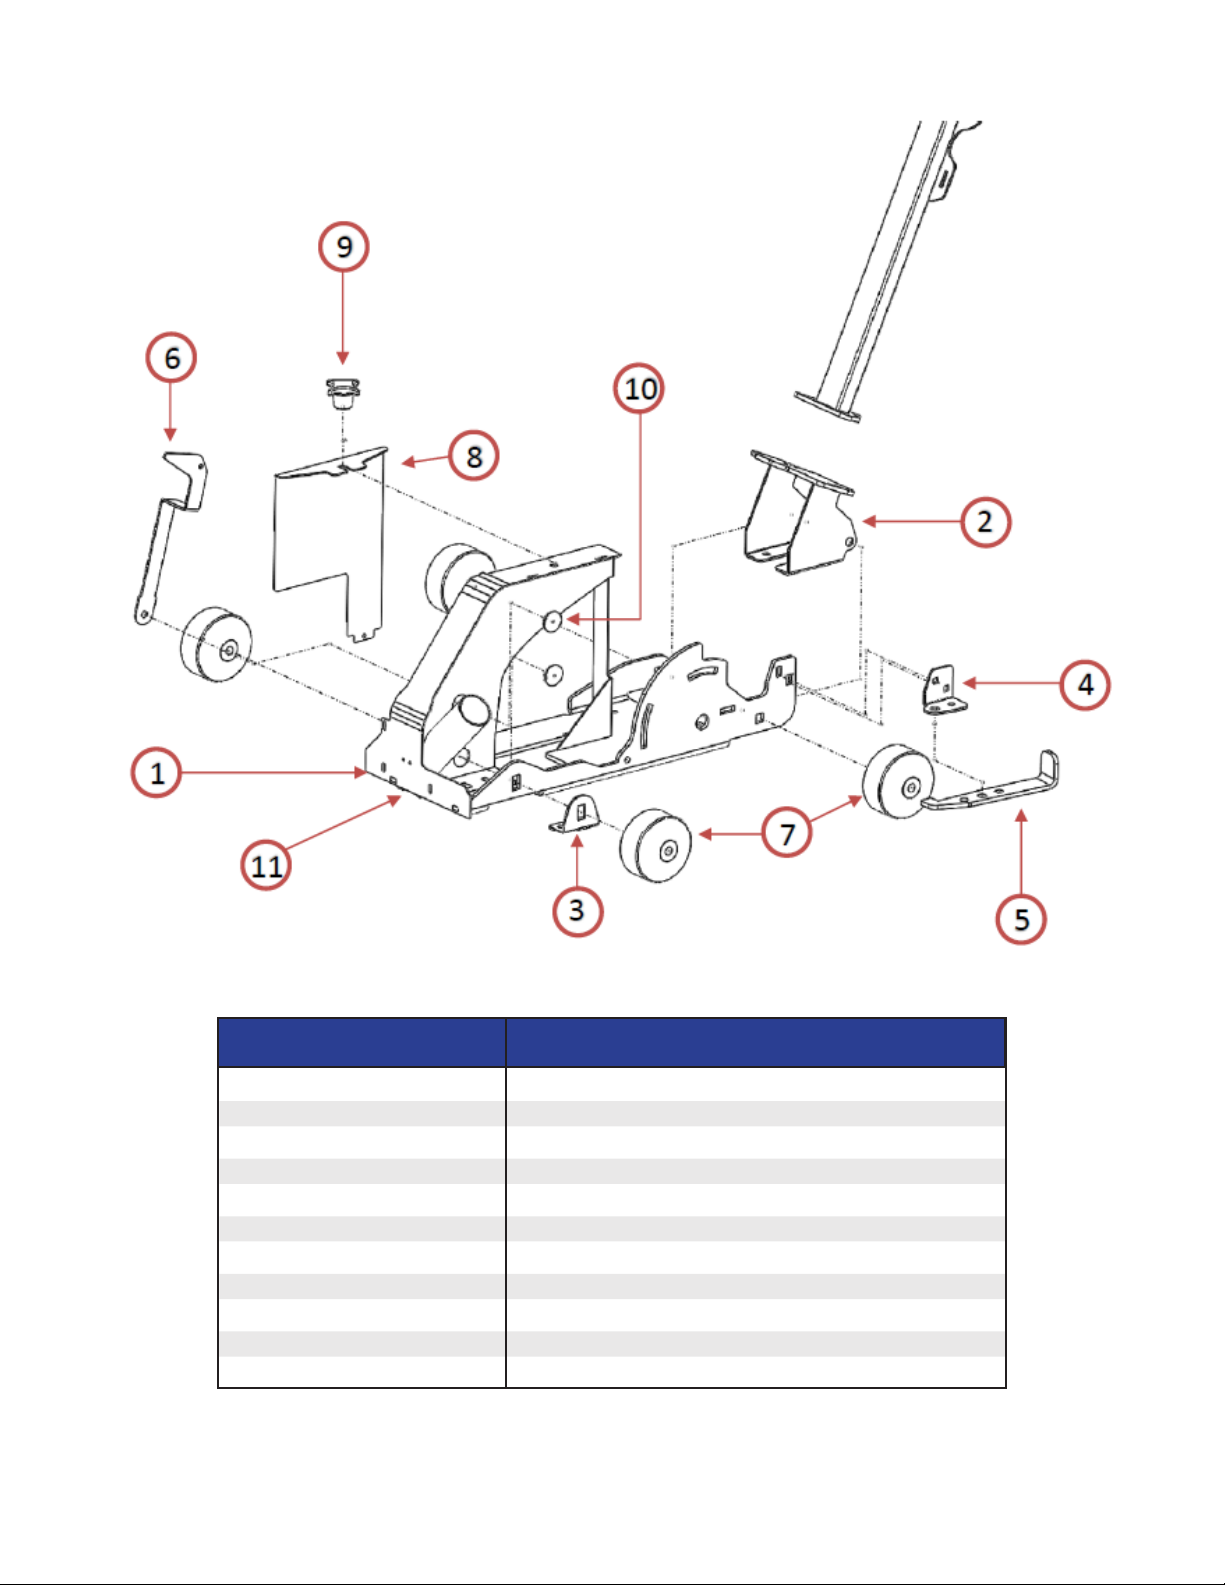
Part Number
10 - 1
10 - 2
10 - 3
10 - 4
10 - 5
10 - 6
10 - 7
10 - 8
10 - 9
10 - 10
10 - 11
Description
SAW BASE
HANDLE/REAR WHEEL MOUNT
ADJUSTABLE FRONT WHEEL MOUNT
MOTOR LOCK MOUNT
MOTOR LOCK
BLADE POINTER
WHEELS (SOLD INDIVIDUALLY)
BLADE GUARD
4-ARM KNOB
HOLE PLUG
DUST DEFLECTOR
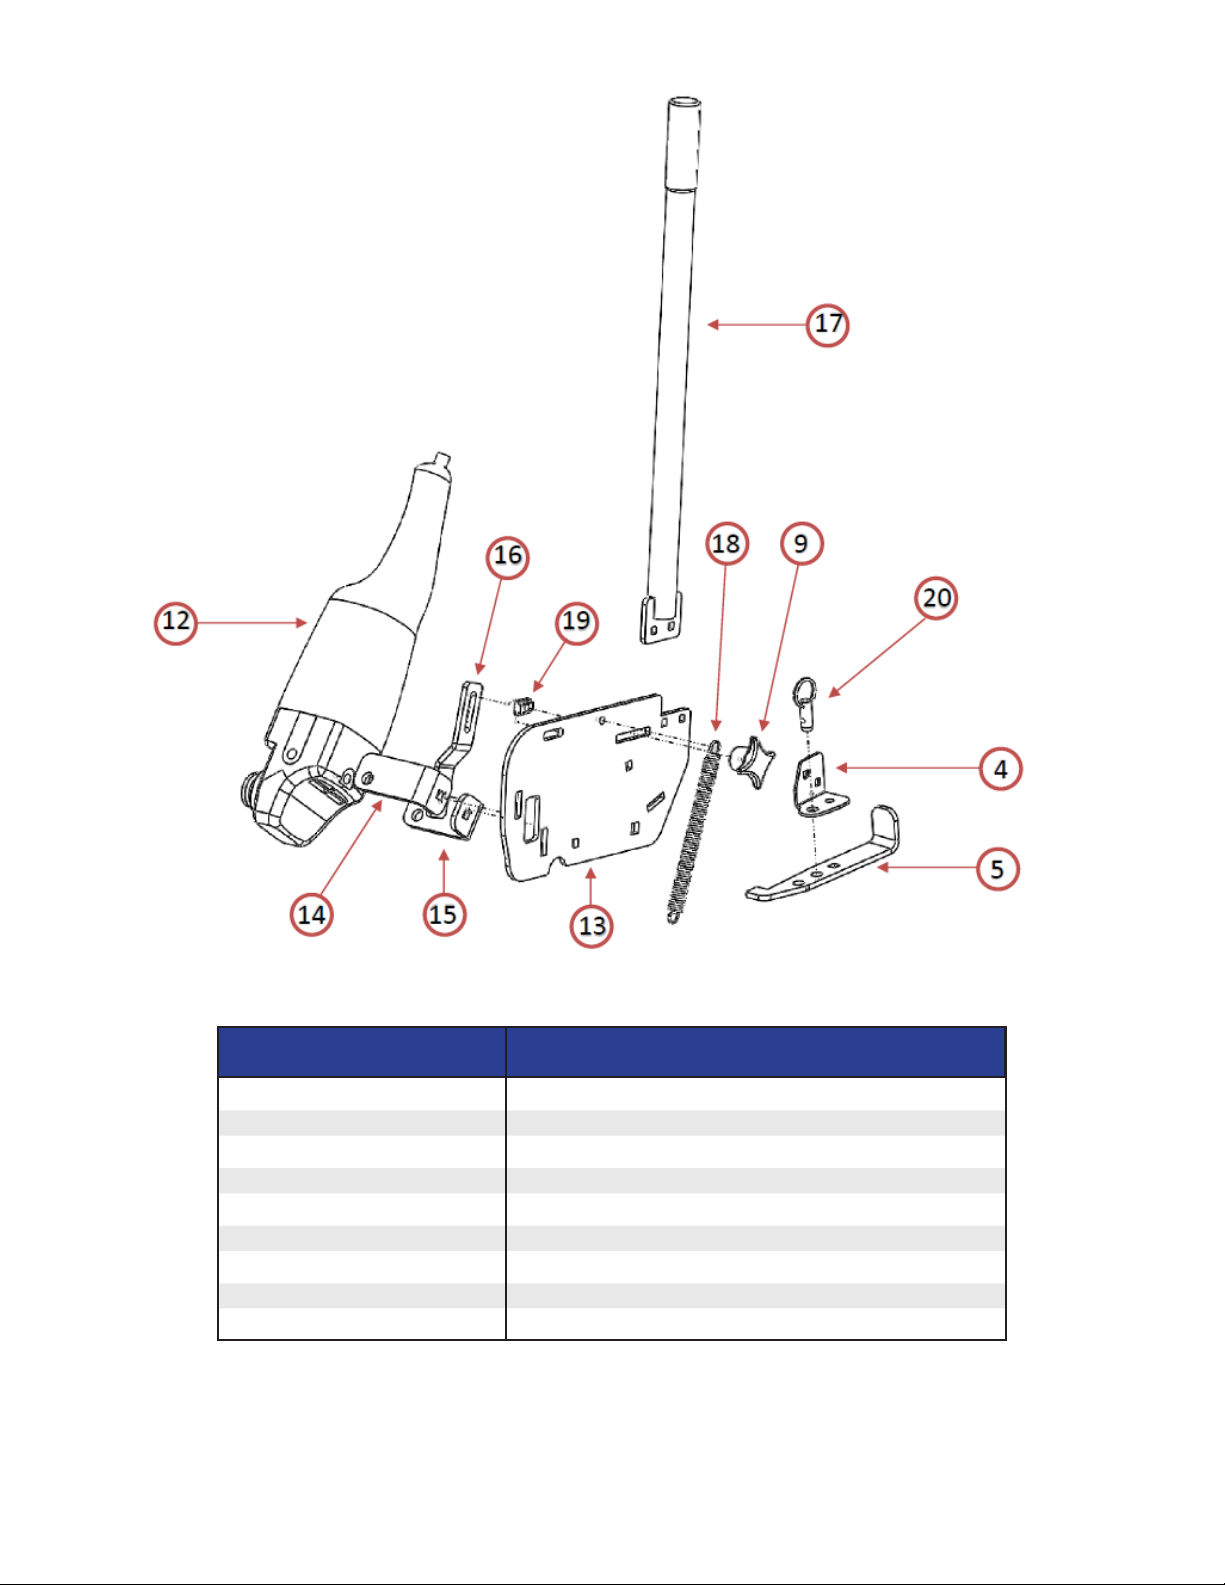
Part Number
10 - 12
10 - 13
10 - 14
10 - 15
10 - 16
10 - 17
10 - 18
10 - 19
10 - 20
Description
DP-HGX-7
MOTOR MOUNTING PLATE
UPPER MOTOR MOUNT
LOWER MOTOR MOUNT
CENTER MOTOR MOUNT
LIFT/LOWER HANDLE
TENSION SPRING
DEPTH STOP
DETENT PIN

Part Number
10 - 21
10 - 22
10 - 23
10 - 24
10 - 25
Description
COMPLETE ASSEMBLY
HANDLE
HANDLE GRIP
CORD WRAP
ELECTRICAL BOX

DiamaPro Systems®
3343 Peachtree Road NE
Suite 145 #24
Atlanta, GA 30326
470-977-2323
Table of contents
Other DiamaPro Systems Saw manuals


