Diamond Kinetics SwingTracker DKST02 User manual

SwingTracker User Guide
Model: DKST02
User Guide

PACKAGE CONTENTS
What Comes in the Box
USING YOUR SWINGTRACKER SENSOR
Attach SwingTracker Sensor to your Bat
Turn On your Sensor
Pair your Sensor
Remove your Sensor from the Charging Mount
Turn Off your Sensor
Charge your Sensor
Check Battery Life and Power
SWINGTRACKER APP
Download the Mobile App
Create an Account
SWING SESSION
Start a Swing Session
Damage Potential
3D View
Video Capture
End Session
History
Bluetooth
CONNECTIONS AND GROUPS
Connections
Groups
SWINGTRACKER SWING MEASURES
SENSOR CARE INSTRUCTIONS
Moisture
Storage
Temperature Sensitivity and Storage
Technical Specifications
SUPPORT
Customer Support
Return Policy and Warranty
Compliance and Certifications
Symbol Definitions
Disposal and Recycling Information
Compliance Statement

IMPORTANT PLEASE READ CAREFULLY BEFORE USING YOUR SWINGTRACKER TM
SENSOR
This User Guide contains important safety, handling and warranty information, as
well software license information for your SwingTracker sensor. Please read
carefully before using your sensor.
Failure to follow these safety instructions could result in fire, electric shock or other
personal injury and/or damage to your SwingTracker sensor or other property.
● When you perform a repetitive activity, such as swinging a bat, you may
experience occasional discomfort or fatigue. Consult a physician if issues
persist.
● Your SwingTracker sensor contains sensitive electronic components. Do not
attempt to modify or repair your SwingTracker sensor yourself. Disassembling
your sensor will void the manufacturer’s warranty.
● The SwingTracker sensor contains small parts and is a choking hazard. It is
not appropriate for children under the age of three.
● Your SwingTracker sensor is splash proof. However, do not use your
sensor in rain or submerge under water.
● Do not overstretch the sensor strap. It is only intended for use with the
SwingTracker sensor.
● Unplug the USB power cable and discontinue use if it has become
damaged or has been exposed to rain, liquid or excessive moisture.
PACKAGE CONTENTS
What comes in the Box
● Sensor
● Sensor Mount
● Sensor Strap
● Charging Station with USB connection
● Storage Pouch
Works with the free SwingTracker iOS App
USING YOUR SWINGTRACKER SENSOR
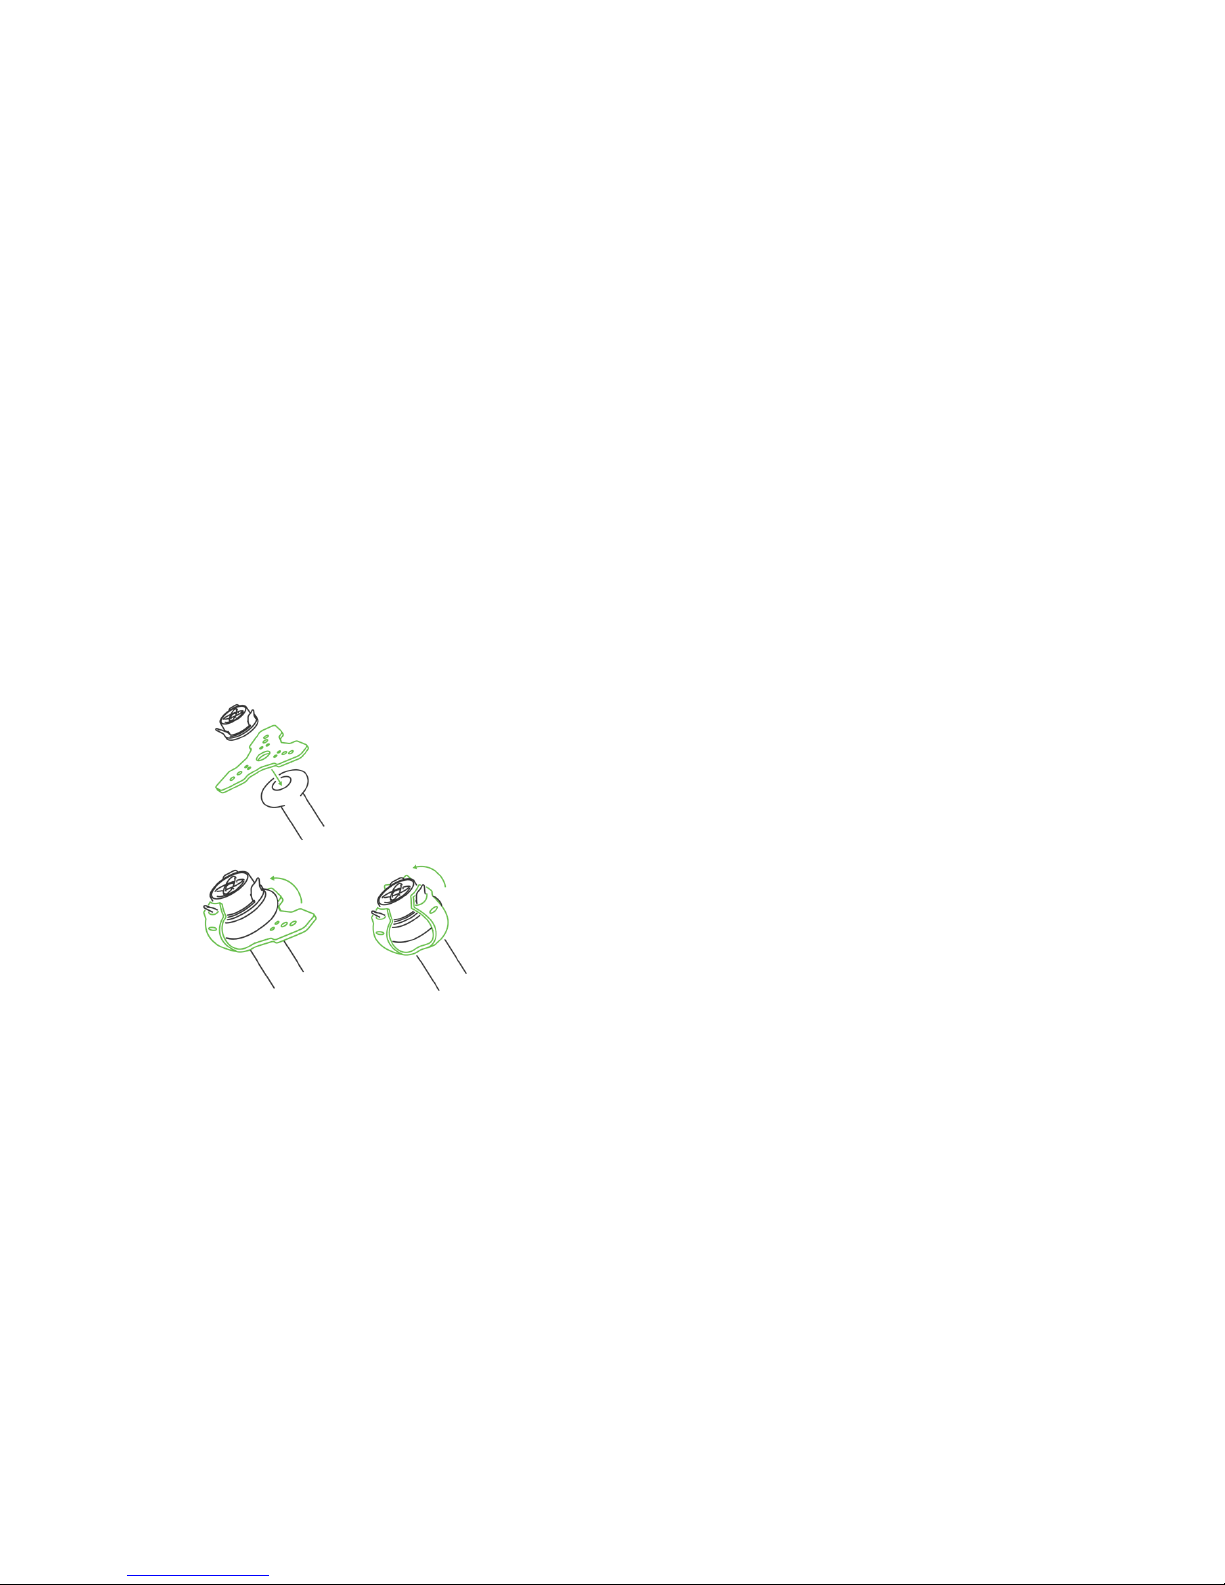
Attach SwingTracker Sensor to your Bat
Place the end of your bat on a firm surface with the knob
pointing upward. Stretch the round hole in the center of the
sensor strap over the knob. Position the sensor
mount on top of the bat knob. Hold the sensor
mount in place with one hand.
Pull one of the strap ends over a sensor mount
wing, using the top hole in the strap. Pull each
of remaining two strap ends on the respective
sensor mount wing.
Confirm that the sensor is firmly secured by nudging it. If the sensor mount is
loose, you can secure the mount using the second hole at the top of the
strap.
Your SwingTracker sensor should be attached to your bat on the knob end
only using a SwingTracker strap. Do not use any other mechanism to attach
your sensor to your bat; doing so will void the manufacturer’s warranty.
Turn On your Sensor
With the sensor attached, tap the bottom of bat on the ground twice to turn on the
sensor. The light will begin to flash quickly. When you pair your sensor under Settings
on your device, the light will flash slowly.

Pair your Sensor
You will need to pair the SwingTracker sensor to your iOS device to collect
data.
● Go to Settings > Bluetooth
● Enable Bluetooth in the Settings Menu, if it is not already on.
● Select the "SwingTracker” sensor.
If you do not see SwingTracker in the device list
● Confirm that the sensor is on
● Confirm that the sensor is charged.
● Check that it is not connected to another nearby iOS device.
● Confirm SwingTracker is close to the iOS device and try again.
Remove your Sensor from the Charging Mount
To remove sensor from mount, push down and turn the sensor
counter-clockwise 1/8 turn to unlock. Remove internal sensor from sensor
mount. Sensor light will change from a blinking red to a solid green light when
fully charged.
Turn off your Sensor
When your sensor is on and paired, use the Settings menu at the bottom left of your
screen (3 bars stacked on top of each other). Select Sensor and then Sensor Off.
You will then see a red light on your SwingTracker sensor to signal the sensor shutting
off. The sensor will turn off automatically if the sensor does not move for 15 minutes.
Charge your Sensor
Remove the sensor from the sensor mount.
Plug the charging station into a powered USB
port. Place the SwingTracker in the center of the
charging station. The sensor light will change
from a blinking red to a solid green light when
fully charged.
When charging your sensor, you are not able to transfer swings to your
device that you have taken while in Disconnected Mode. To transfer swings
from a Disconnected Mode session, remove your sensor from the charger
and use the SwingTracker app to begin to transfer swing data.
Never force a charge cable into the USB port of your SwingTracker
charging station. If the charge contact does not easily fit, confirm that
they are properly aligned before attempting to insert again.
ONLY use the USB charging cable provided to charge your
SwingTracker sensor. Diamond Kinetics is not responsible for the
operation of third-party accessories.
Check Battery Life and Power
Determine Battery Charge: To determine the battery level of your sensor, use the
Settings menu at the bottom left of your screen (3 bars stacked on top of each
other). Select Sensor. Here you will be able to see all of the information of your
sensor including, Sensor Battery Level. The sensor will blink red and app will alert
you when the battery is low.
Sleep Mode: The sensor will go into sleep mode and the light will stop blinking if you
stop using it for five minutes. It will automatically wake up and the green power light
will turn on once the sensor is picked up.
The battery will last up to 7 hours with continuous use.
SWINGTRACKER APP
Download the Mobile App
Download and install the SwingTracker Baseball or
SwingTracker Softball app from the iOS App Store.
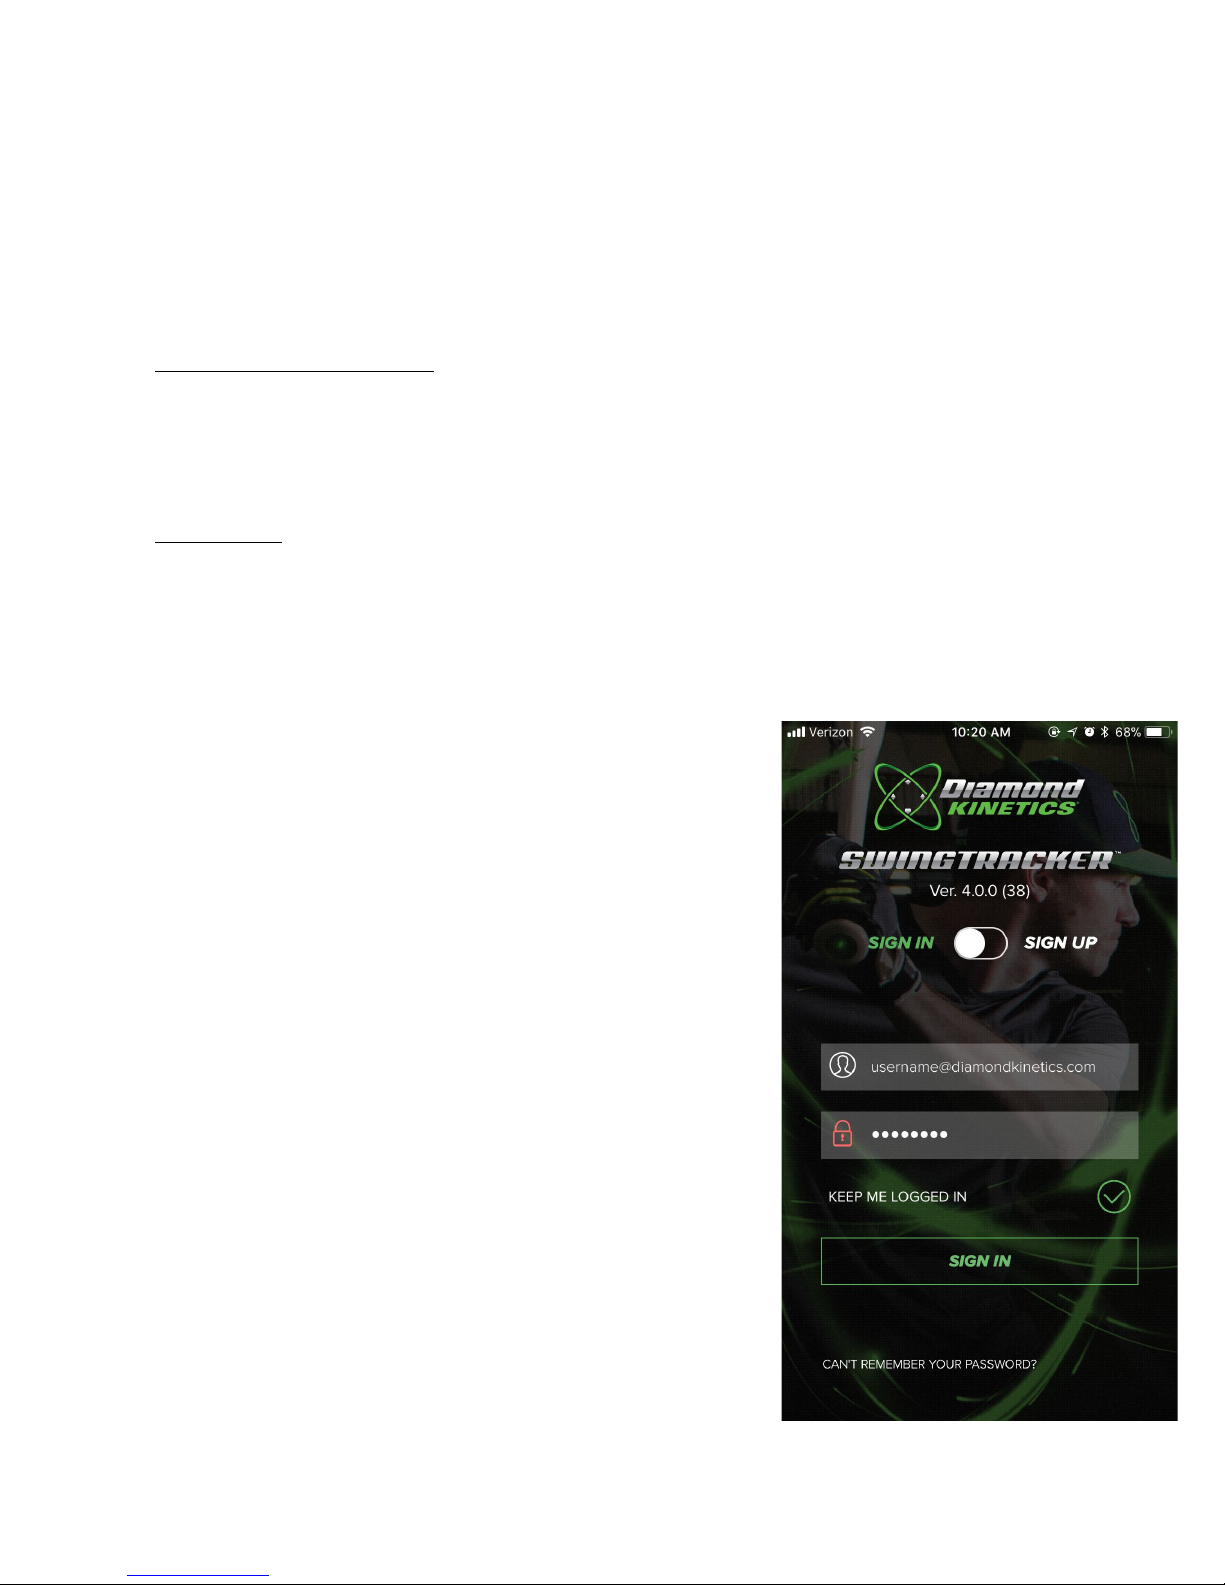
Create an Account
Open the SwingTracker App. Select
SIGN UP, choose COACH or
PLAYER and your skill level. Once
you select continue, you can enter
your profile information to customize
your SwingTracker experience.
Swing Session
Start a Swing Session
To start your first swing session, select Swing Now! on
the bottom left of the screen.
You will then be asked to provide the details of your

current swing session. You must select a batters stance, bat, session type and Load
Position to take swings. The SwingTracker app will guide you to set your Load
Position.
We recommend setting your usual Load Position. This will enhance the accuracy of
your data. You should periodically reset your Load Position to get the most accurate
analysis.
DK Tip: Here are a few tips to capture the best data:
●Get to your natural load point
●Pause the bat for a second or two before taking a swing
●Do not move the bat excessively when capturing swings
When selecting your bat, you can select an existing bat or Add A Bat. Once you select
all of the details of your new bat, select Save to use the bat in future batting sessions. If
you are using a ‘smart’ bat make sure to set that as your bat and that you are using an
embedded sensor.
DK Tip: If you do not see your bat Model or Manufacturer listed, select other.
If you see Sensor Not Connected, double check your Bluetooth that your sensor is
paired to your phone. If you see a Video Unavailable message go into the settings on
your phone and allow SwingTracker access to your video.
Additional details are provided in the Advanced Settings option listen in the session
setup.
Once entering all of the Session Setting information, select CONTINUE at the bottom
of the Session Settings screen.
You can now Swing Away!
When taking swings your swings will automatically appear in the swing session. You
will have several different views in which you can see your current swings in. At the
bottom right-hand corner of the screen you should see four icons stacked on top of
each other.. The top icon (Field) is Damage Potential. The second icon is 3D View.
You can switch between these views while either in your current session or later in
history.
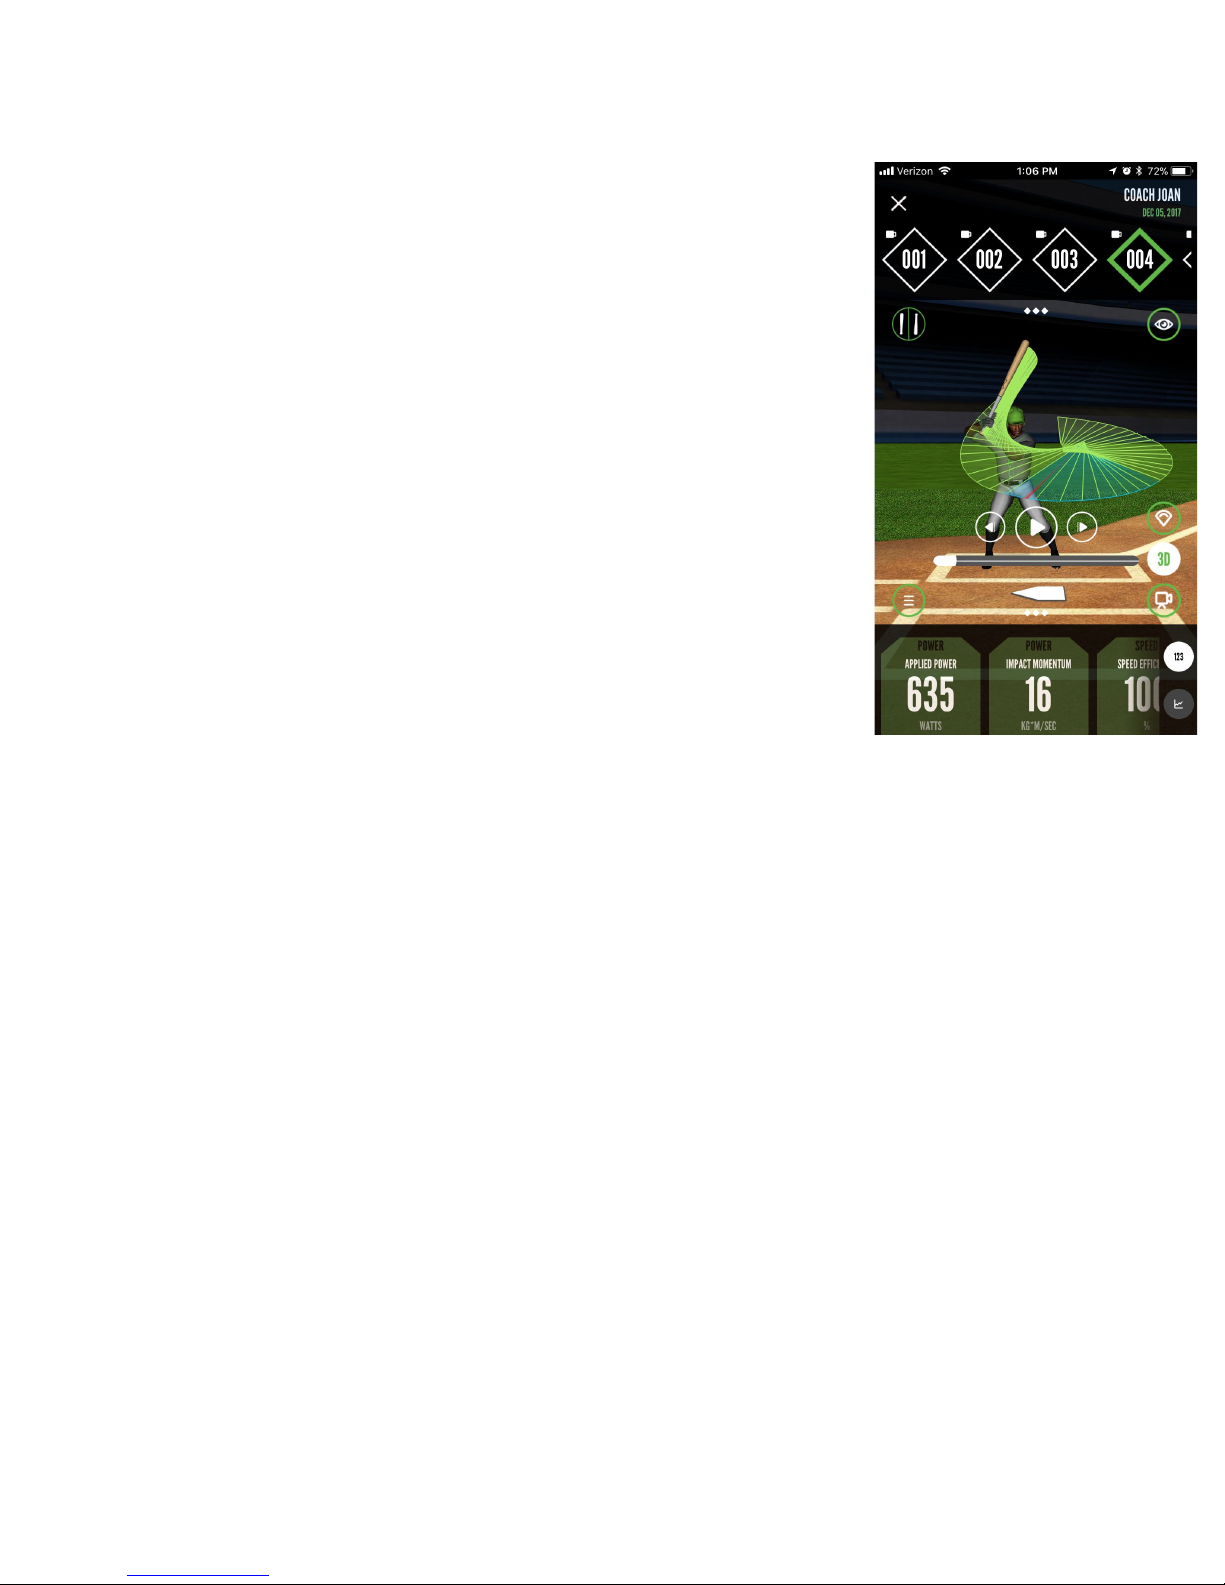
Damage Potential
To access Damage Potential select the Field Icon located on the
right side of your swing session screen. Damage Potential
measures the potential
exit velocity and the potential
carry
distance of the ball.
3D View
To access 3D View select the 3D Icon located on the right side of
your swing session screen. 3D View will give you a 3D rendering
of your swing. You’re able to compare the 3D views and videos of
different swings. To do this select the circle on the left of your
screen with two bats. diamonds at the top of your screen and then
the icon that looks like a diamond over another diamond to the
right of that pull down menu.
Video Capture
To access Video Capture select the Camera Icon located on the
right side of your swing session screen. Video Capture allows
you to take a video of your swing.
DK Tip: Make sure that the person taking video is at a safe distance from the
hitter during the batting session.
End of Session
To end your current swing session select the ‘X’ in the top left-hand corner of your
swing session screen.
History View
To view history select the Calendar Icon on the right side of the menu at the bottom
of the home screen.
By selecting the History you will be taken to a screen with a calendar on it. Days that
have a circle around them represent days that a swing session was taken. When you
select a day, it will list below the calendar all the sessions taken on that day. Double
click on a specific session to look at that sessions history.
To view your performance select the Graph Icon at the top right of the screen. This
view allows you to track your performance in different metrics and see the trends
between them over time.

Disconnected Mode
Disconnected mode allows you to take swings with your sensor when not connected
via Bluetooth to your phone. In disconnected mode your sensor will hold up to 128
swings. To create a swing session from these swings you will need to connect your
sensor via Bluetooth, go into the app and when prompted select “Create Session”. If
you select the swings will permanently be deleted.
CONNECTIONS AND GROUPS
Connections
PitchTracker allows you to connect with your teammates and friends. To add a
connection select the Settings menu in the bottom left corner of your dashboard.
Select Groups. At the top of this screen you should see a rectangle that says
Groups and a rectangle that says Connections. Select Connections. At the top
right of this screen you should see a menu icon. By selecting that you will be able to
manage your connections by adding or deleting them.
Once you add a connection an invitation will be sent to them to accept. To manage
and check your invitations login to the web app at
http://app.diamondkinetics.com/#/performance.
When you connect with other users you will be able to view their history and data and
they will be able to view yours.
Groups
The groups feature in the app allows you to manage teams and lots of connections.
To create a group select the Settings menu in the bottom left corner of your
dashboard. Select Groups. At the top of this screen you should see a rectangle that
says Groups and a rectangle that says Connections. Select Groups. At the top
right of this screen you should see a menu icon. By selecting that you will be able to
manage your groups; you can create, join or delete groups.
When creating a group you have a choice to make it open for anyone to join, open for
players to request to join or closed, invitation only. The user who creates the group
will be set-up as the administrator of the group. The administrator is able to view
everyone’s data and history that is in the group. Members of the group will be able to
view each others
You are able to view and manage groups when logged into the web app at:
http://app.diamondkinetics.com/#/performance.

SWINGTRACKER SWING MEASURES
Your SwingTracker system measures over 10 different metrics related to your
swing. These metrics are sorted into four categories:
Speed, Power, Quickness and Control
.
For more information on SwingTracker metrics please visit the SwingTracker
Science section of our website.
SENSOR CARE INSTRUCTIONS
Moisture
The SwingTracker sensor is splash-proof, however significant exposure to water may
cause damage to your sensor.
● Do not use your sensor in the rain.
● Do not spill any food or liquid on your sensor.
If your sensor gets wet, dry it thoroughly before using or charging. Do not attempt to
dry it with an external heat source, such as a microwave, oven or hair dryer.
SwingTracker sensors that are damaged as a result of exposure to liquids are not
serviceable and are not covered by the Manufacturer’s Warranty.
Storage
Store your SwingTracker sensor in a cool, dry place at room temperature using the
small storage bag provided with your order.
Temperature Sensitivity and Storage
Avoid exposing your SwingTracker sensor to extreme temperatures. Operate your
sensor between 32° and 95° F (0° and 35° C).
Avoid dramatic changes in temperature or humidity when using your SwingTracker
sensor, as condensation may form within the sensitive electronic components of
your sensor.
Technical Specifications
SwingTracker is compatible with the following devices:
iPhones: iPads:
iPhone 5 iPad Pro 10.5”

iPhone 5c iPad Pro 12.9” (2nd gen)
iPhone 5S iPad Pro 9.7”
iPhone 6 iPad (5th gen)
iPhone 6 Plus iPad Pro 12.9” (1st gen)
iPhone SE iPad Air 2
iPhone 6S iPad mini 4
iPhone 6S Plus iPad mini 3
iPhone 7 iPad Air
iPhone 7 Plus iPad mini 2
iPhone 8 iPad (4th gen)
iPhone 8 Plus iPad (3rd gen)
iPhone X
Online data can be viewed on both PCs and Macs using the following supported
browsers: Internet Explorer (10 and above), Google Chrome, Firefox, Safari.
SUPPORT
Videos, FAQs, troubleshooting and other support is available at
diamondkinetics.com/support and in the Settings section of your app.
Customer Support
You can contact Customer Support at [email protected] or by using the
in-app Chat feature found in the Support section of the Settings menu located in the
bottom left corner of your screen.
Warranty
Diamond Kinetics provides a 1 year warranty that begins at the time of purchase. The
warranty covers all manufacturing defects.
This warranty is limited and not applicable to:
●Sensors that have been abused, misused, altered in any way or
mistreated
●Sensors that have been submerged in or exposed to water
● Sensors that have not been stored improperly
In order to receive replacement, original package must be returned with all contents.
In no event will Diamond Kinetics be responsible for any injury caused from using the

sensor.
Diamond Kinetics provides a 1-year manufacturer's warranty. For more information
visit: www.diamondkinetics.com/support
Compliance and
Certifications
Symbol Definitions
Federal Communications Commission
Model: DKST02
FCC ID: 2ABWR-DKST02
Industry Canada Model:
DKST02
IC: 12312A-DKST02
Disposal and Recycling Information
Your SwingTracker sensor should be disposed of separately from household waste.
Take the sensor to a collection point designated by local authorities that accept
batteries and other similar waste. Not all collection points accept products for free.
The separate collection and recycling of your product at the time of disposal will
help conserve natural resources and ensure that it is recycled in a manner that
protects human health and the environment.
Compliance Statement
This device complies with part 15 of the FCC Rules. Operation is subject to the
following two conditions: (1) this device may not cause harmful interference, and
(2) this device must accept any interference received, including interference that
may cause undesired operation.
(1) L’appareil ne doit pas produire de brouillage; (2) L’appareil doit accepter tout
brouillage radioélectrique subi, même si le brouillage est susceptible d’en
compromettre le fonctionnement.
Note
: This equipment has been tested and found to comply with the limits for a
Class B digital device, pursuant to part 15 of the FCC Rules. These limits are
designed to provide reasonable protection against harmful interference in a
residential installation. This equipment generates, uses and can radiate radio
frequency and, if not installed and used in accordance with the instructions, may
cause harmful interference to radio communications. However, there is no

guarantee that interference will not occur in a particular installation. If this equipment
does cause harmful interference to radio or television reception, which can be
determined by turning the equipment off and on, the user is encouraged to try to
correct the interference by one or more of the following measures:
● Reorient or relocate the receiving antenna.
● Increase the separation between the equipment and receiver.
● Connect the equipment to an outlet on a circuit different from that to which
the receiver is connected.
● Consult the dealer or an experienced radio/TV technician to help.
U.S. Patents: 7,021,140 and 7,234,351
Table of contents


