Diamond Products Carbon SC User manual
IMPORTANT: READ OPERATOR'S MANUAL CAREFULLY
Please fill out & return your warranty card!
OPERATOR'S MANUAL
CARBON SC EXTRACTOR
DP80410
Diamond Products
www.diamondproductsus.com
Printed in the U.S.A.

Warranty Information
Welcome…and congratulations on the purchase of yourDiamond Products US product. This instruction manual
is a guide for operating and servicing your unit. Read this manual completely before operating this unit.
Proper operation and service are essential to the efficient functioning of this unit. When maintained correctly,
this unit will have a long, trouble-free life. Any questions pertaining to operating or servicing this unit should be
directed to your nearest dealer.
Information in this document is subject to change without notice and does not represent a commitment on the
part of Diamond Products US.
Model:
Date of Purchase:
Serial Number:
Dealer:
Address:
Phone Number:
Sales Representative:
Warranty Information
Thank you for purchasing a Diamond Products US product. Warranty registration is quick and easy.
Your registration will allow us to serve you better over the lifetime of the product.
To register your product, email your warranty card information to:
-2-
Operator's Manual
Diamond Products
13
4
6
7
8
9
10
11
5
2
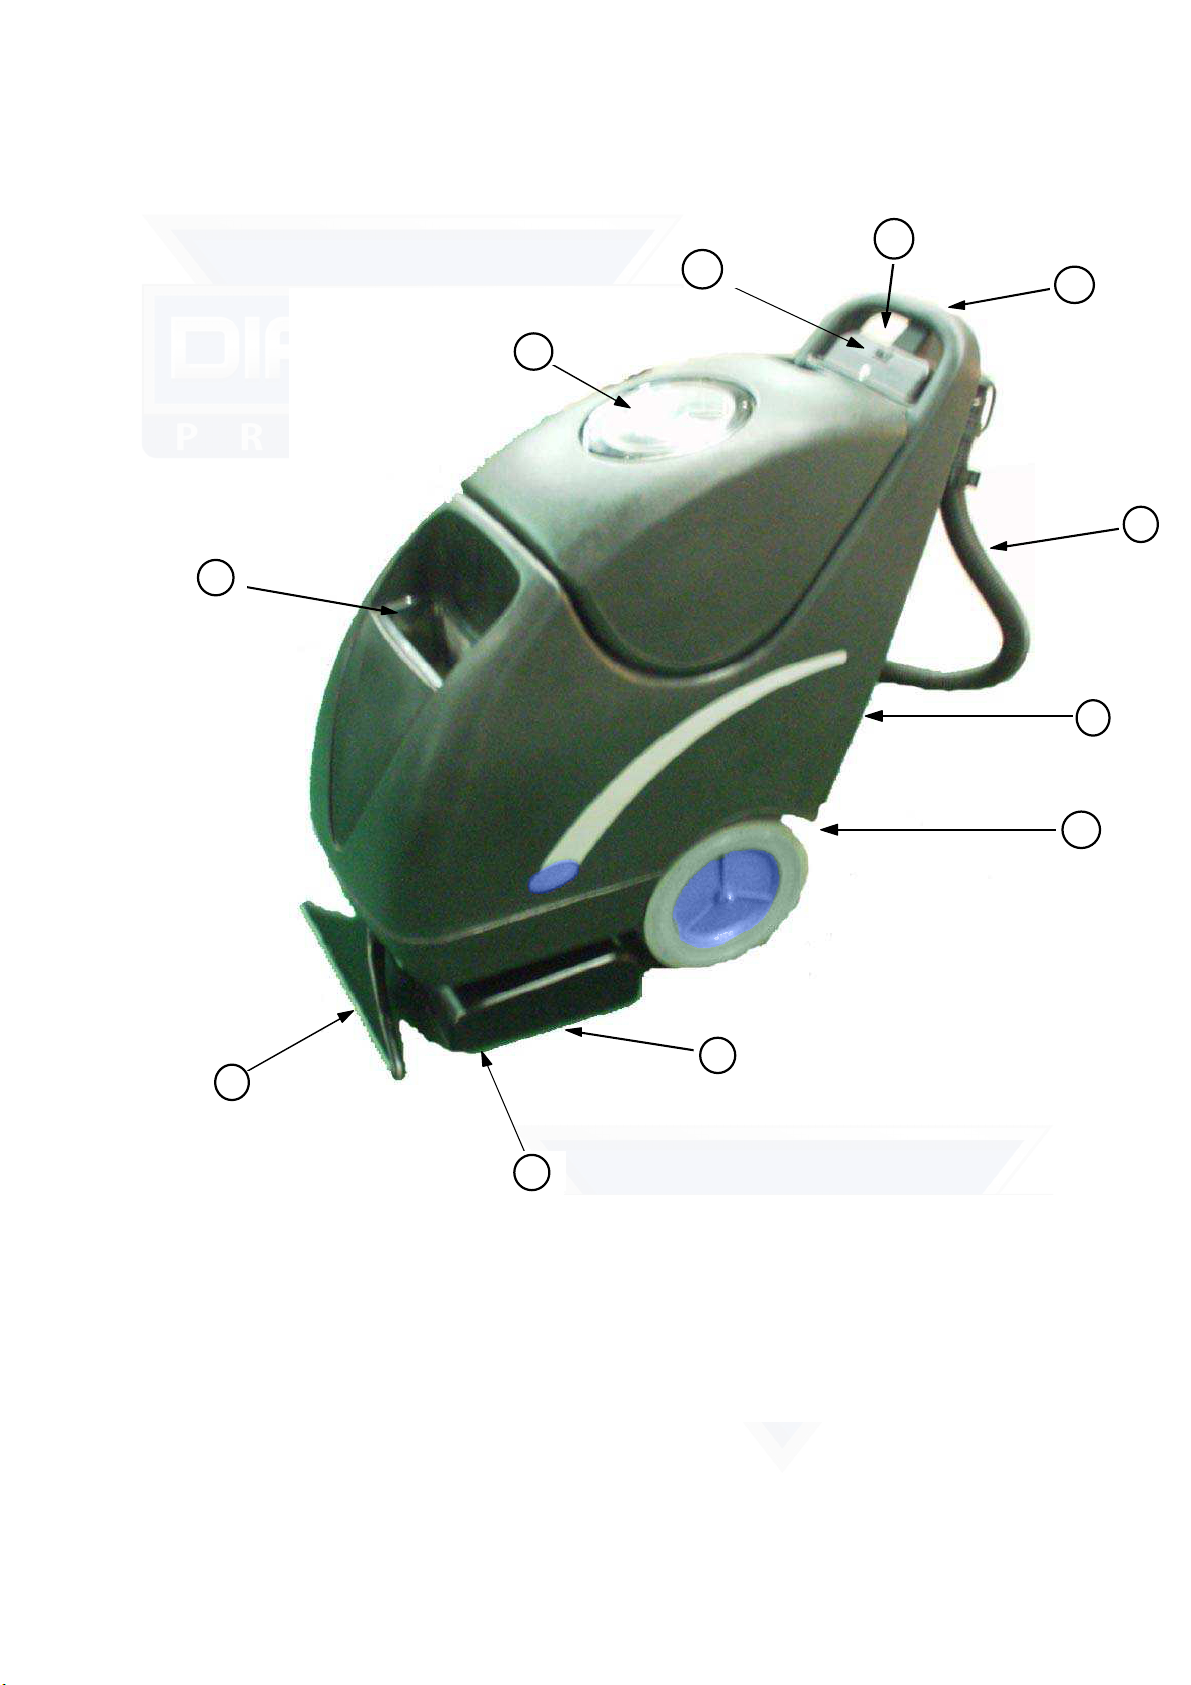
MACHINE COMPONENTS
1) Vacuum / pump on/off switc
h
7) Spray jets
2) Brush circuit breaker 8) Brush assembly
3) Brush / spray on/off button 9) Pickup hea
d
4) Drain hose 10) Solution tank fill port
5) Accessory tool solution hookup 11) Recovery tank lid
6) B
r
ush raise and lower foot pedal
-3-
Operator's Manual
Diamond Products

SAFETY PRECAUTIONS
GROUNDING INSTRUCTIONS
General – This carped extraction machine
shall be grounded while in use to protect
the operator from electric shock. The
machine is provided with a three-contact
grounding type attachment plug to fit the
proper grounding type receptacle. The
green (or green & yellow) conductor in the
cord is the grounding wire. Never connect
this wire to other than the grounding pin of
the attachment plug.
This machine is for use on a nominal 120-
volt circuit and has a grounding plug that
resembles the plug illustrated in figure
below. Make sure that the machine is
connected to an outlet having the same
configuration as the plug. No adapter
should be used with this machine.
This machine is intended for commercial
use. It is constructed for use in an indoor
environment and is not intended for any
other use. Use only recommended
accessories.
All operators shall read, understand and
exercise the following safety precautions:
1) Do not operate machine:
- Unless trained and authorized
- Unless you have read and
understand operators manual
- In flammable or explosive areas.
- With damaged or modified cord or
plug.
- If not in proper operating condition.
- In outdoor areas.
- In standing water.
- Without filters in place.
- With the use of unapproved extension
cords.
2) Before operating machine:
- Make sure all safety devices are in
place and operate properly.
3) When using machine:
- Mix and handle any chemicals
according to manufacturer’s
recommendations
- Do not run machine over cord.
- Do not pull machine by cord or plug.
- Do not pull cord around sharp edges
or corners.
- Do not unplug by pulling on the cord.
- Do not stretch cord.
- Do not handle plug with wet hands.
- Keep cord away from heated
surfaces.
- Do not pick up flammable materials
or reactive metals.
- Report machine damage or faulty
operation immediately.
4) Before leaving or servicing machine:
- Turn off machine.
- Unplug power cord from outlet.
5) When servicing machine:
- Unplug cord from outlet.
- Use manufacturer supplied or
approved replacement parts.
- Avoid moving parts. Don’t wear
loose clothing.
-4-
Operator's Manual
Diamond Products

CARBON SC
EXTRACTOR SETUP
!!! Read operators manual thoroughly
prior to operating or servicing this
machine!!!
Carefully check the shipping carton for
signs of damage. Report any carton
damage to carrier immediately.
Check carton contents to ensure carton is
complete. Contact your Diamond Products
distributor if anything is missing.
Contents:
•Carpet Extractor
•Short “bleeder” vacuum hose
•50’ extension power cable
!!! Read operators manual
thoroughly prior to operating or
servicing this machine!!!
1) Using a hose or bucket, fill tank with a
maximum of 10 gallons of hot water.
2) Add distributor recommended cleaning
solution
!!! Do not use flammable liquids or
operate machine in or near
flammable liquids or vapors!!!
3) Connect the supplied extension power
cable to the machine. Plug cord into a
grounded wall outlet. (see grounding
instructions)
4) Drop the brush head to the floor with
the foot release pedal on the back of
the machine.
MACHINE OPERATION
PRIOR TO EXTRACTING CARPETS
1) Inspect power cable and extension
cable for damage. Replace cable if
damage is found.
2) Vacuum carpet to remove debris prior
to extracting carpet.
CARPET EXTRACTING
1) Turn on vacuum / pump switch.
NOTE: Solution will only spray when
the brush / spray button is pushed.
2) To start cleaning, push the brush /
spray button and begin to pull the
machine backwards.
NOTE: For best cleaning results, pull
back on the machine at a pace of
approx. 10 feet in 15 seconds.
3) Release brush / spray button at the end
of the path, and continue to pull
machine back for another 12 inches to
pick up excess solution.
4) Tip machine back onto the transport
wheels and push forward to begin next
path.
OPERATING HINTS
1) Overlap cleaning path by approx. 2
inches
2) Work away from power outlet and
power cable in order to avoid damage
to the power cable.
-5-
Operator's Manual
Diamond Products

3) Continually check for foam buildup in
recovery tank. Use a distributor
recommended foam control solution.
NOTE: Excessive foam buildup will not
activate the float shut-off and may cause
damage to the vacuum motor.
4) Repeat extraction path on heavily
soiled areas.
5) If brush stops spinning, there may be
an obstruction in the brush. Unplug the
power cable, raise the brush off the
floor and check for an obstruction.
Check & reset the brush circuit breaker
located on the control housing.
6) When recover of the dirty solution ends,
or the solution tank is empty, you must
drain the recovery tank. (see TANK
DRAINING)
USE OF ACCESSORY TOOLS
NOTE: Prior to cleaning upholstery, be
sure to read cleaning instructions provided
by the manufacturer.
1) Disconnect black vacuum hose off the
back right side of the machine.
Connect (optional) accessory vacuum
hose to area where the standard
vacuum hose was removed.
2) Connect (optional) accessory solution
hose to brass quick connect coupler
located on the back of the machine.
3) Connect (optional) accessory tool to
solution and vacuum hoses.
4) Turn on vacuum / pump switch.
5) Operate accessory tools as needed.
6) When cleaning is completed, relieve
water pressure from solution lines by
turning off vacuum / pump switch and
then squeeze trigger for 4 seconds.
DRAINING TANKS
DRAINING SOLUTION TANK
1) Disconnect vacuum hose from back of
machine and connect the “bleeder”
vacuum hose (included with machine)
to the machine back.
2) Remove the solution tank filter at the
fill area and place end of “bleeder”
hose into the bottom of the tank.
3) Turn on vacuum / pump switch &
vacuum out the remaining solution.
DRAINING RECOVERY TANK
1) Turn off machine, unplug and remove
power cable.
2) Unhook drain hose off the back of the
machine and remove drain hose
stopper.
3) Drain dirty solution into floor drain.
4) Replace drain hose stopper and
reattach hose to back of machine.
MACHINE MAINTENANCE
To keep the machine performing well
for many years, please follow the
following maintenance procedures.
!!! Always confirm that the machine
is unplugged prior to performing
any maintenance or repairs!!!
DAILY MAINTENANCE
1) When cleaning operation is complete
for the day, drain and rinse the
recovery tank thoroughly with clean
water.
2) Remove remaining solution from
solution tank.
3) Remove float shut-off (ping pong ball
in cage) from recovery tank and clean
with water.
-6-
Operator's Manual
Diamond Products

4) Remove and inspect brass spray jets. If
necessary, clean jets in acetic acid
solution.
NOTE: Do not clean brass jets with a
pointed object, as it will damage the jets.
5) Check brush assembly & remove any
debris or carpet fibers.
6) Check pick up head and remove any
debris or carpet fibers.
7) Check condition of the stainless steel
pickup shoes on the pickup head. The
shoes must contact the floor for the
whole length of the pickup head.
Replace as necessary.
8) Clean machine with a nonabrasive
cleaner.
9) Inspect power cable for any damage.
Replace if necessary.
MONTHLY MAINTENANCE
1) Flush pump & plumbing with an acetic
acid solution to dissolve any chemical
buildup.
Mixing Instructions:
a) Premix 16 oz. or an acetic acid
solution with 2 gallons of water and
pour into solution tank.
b) Turn vacuum / pump switch on
c) Put machine head over floor
drain and operate machine for 50
seconds.
d) Shut machine down and allow
remaining solution to sit in
machine overnight.
e) The following day, spray out
remaining solution and flush
system again with 3 gallons of
clean water.
2) Inspect machine for water leaks.
3) Lubricate wheels with a water resistance
lubricant.
4) Check machine for loose or missing
nuts, screw and bolts and replace as
necessary.
MACHINE STORAGE
1) Prior to storing the machine, ensure the
solution and recovery tanks are clean
and empty of any solution.
2) Store machine in upright position in a
dry area, with the brush head off the
floor.
3) Remove recovery tank clear lid to
allow for air circulation.
NOTE: If you are storing the machine in
an area which can freeze, be sure both
tanks and the solution plumbing are empty
of all water and dry!
-7-
Operator's Manual
Diamond Products
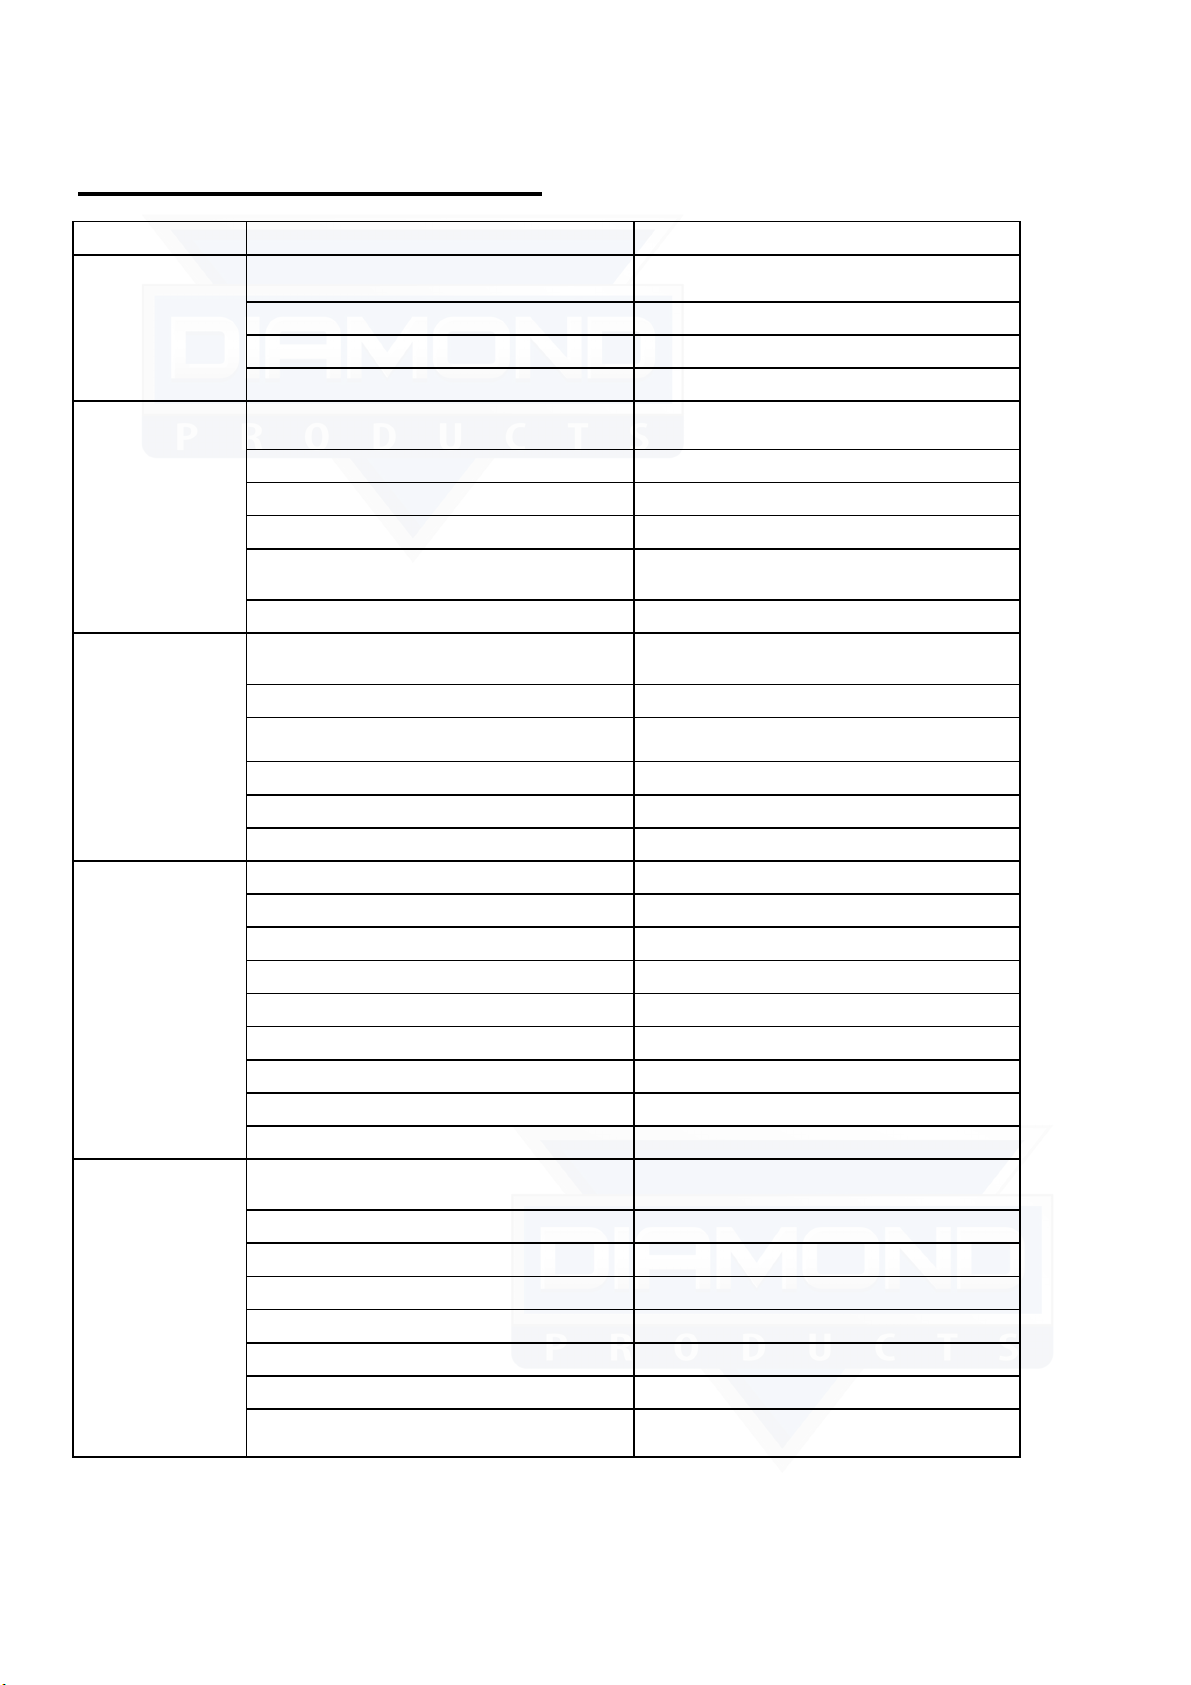
BASIC TROUBLESHOOTING
PROBLEM CAUSE SOLUTION
Machine doesn't
work Not plugged in to power source Plug into a grounded outlet
Faulty power cable Contact Diamond Products Distributor
Faulty extension power cable Replace with new extension power cable
Building circuit breaker tripped Reset circuit breaker
Solution pump not
working Vacuum / pump switch not on Turn on switch
Vacuum / pump switch faulty Contact Diamond Products Distributor
Faulty solenoid Contact Diamond Products Distributor
Faulty solution pump Contact Diamond Products Distributor
Pump overheated Determine cause and allow 30 minutes for
pump to cool
Loose or broken wiring Contact Diamond Products Distributor
Vacuum motor not
working Vacuum / pump switch not on Turn on switch
Vacuum / pump switch faulty Contact Diamond Products Distributor
Vacuum motor thermal overload tripped Check for obstruction and allow 30 minutes
to cool
Faulty vacuum motor Contact Diamond Products Distributor
Worn carbon brushes Contact Diamond Products Distributor
Loose or broken wiring Contact Diamond Products Distributor
Poor pick up Air leaking around clear recovery lid Ensure recovery lid is firmly tightened
Clogged float shut-off Remove float shut-off and clean off debris
Float shut-off is activated Drain recovery tank
Loose drain hose stopper Ensure stopper is securely in place
Loose vacuum hose connections Ensure vacuum hose connections are tight
Defective vacuum hose Replace vacuum hose
Loose vacuum hose cuffs Ensure cuffs are secure to the hose
Damaged or loose pickup head shoes Contact Diamond Products Distributor
Pulling machine too fast Slow down cleaning operation
Uneven or no
solution spray Solution tank is empty or low Fill solution tank
Vacuum / pump switch not on Turn on switch
Dirty or plugged spray tips Clean or replace spray tips
Improper spray tip size or spray angle Contact Diamond Products Distributor
Worn spray tips Contact Diamond Products Distributor
Faulty solution pump Contact Diamond Products Distributor
Plugged solution tank filter Clean or replace filter
Pinched or kinked solution hose Check for obstructions and kinks and reroute
or replace if needed
-8-
Operator's Manual
Diamond Products

-9-
Operator's Manual
Diamond Products

DIA NOPART
NUMBER DESCRIPTION NO
REQ'D
1 VV67161 CLEAR DOME, FRICTION FIT 1
2 VV67163 GASKET, CLEAR DOME 1
3 VA13477 SELF-TAPPING SCREW,ST4X15 2
4 VV67109 BEND, TUBE 2
5 VV67301 COUPLER 2
6 VV67302 GASKET, COUPLER 1
7 VV67108 ELBOW 1
8 VF81226 COUPLER VAC HOSE 1
9 VV67705 DRAIN HOSE 1
10 VV67113-1 VAC HOSE 1
11 VV10113 CLAMP, HOSE 2" 2
12 VV20509 SCREW, RHM M5X10 SST 4
13 VV13601 WASHER, LOCK, SST Ø5 2
14 VV50712 CLAMP, CORD 3
15 VV67503 SWITCH 1
16 VV67509 BUTTON, SWITCH 1
17 VV67504 CIRCUIT BREAKER, 2A 1
18 VF14126 SCREW, M5X12, HEX 3
19 GV40215 CORD WRAP 1
20 VV67111 CLAMP, DRAIN HOSE 1
21 VV67501 SWITCH HOUSING 1
22 VF99008 STRAIN RELIEF 1
23 VV13511 WASHER, TEETH, ¢32
24 VF14212 SCREW, M3X25 2
25 VV67507 CORD 1
26 VV67116 POWER CORD 2
27 VV67505 BUSHING, CORD, 90°1
28 VV13652 NUT, LOCK, M3 2
29 VV67508 BRACKET, SWITCH 1
30 VV20291 WASHET, LOCK, ¢42
31 VF13491 SCREW, M4X12 2
32 VF44203 SWITCH ASSY 1
33 VV67105 CONNECTOR 1
34 GT13032 WASHER, PLAIN, Ø6XØ16X1.5 1
35 VV13607 WASHER, LOCK, SST Ø6 1
36 GT13056 SCREW, M6X16, PH 1
37 VV80128 BARB, HOSE 1
38 VV80115 ELBOW, STRECT 45°1
39 VV80125A NUT, COUPLING 1
40 VV20667 WASHER, LOCK, INTERNAL TOOTH 1
41 VV60509 GASKET, SOLUTION, INTAKE 1
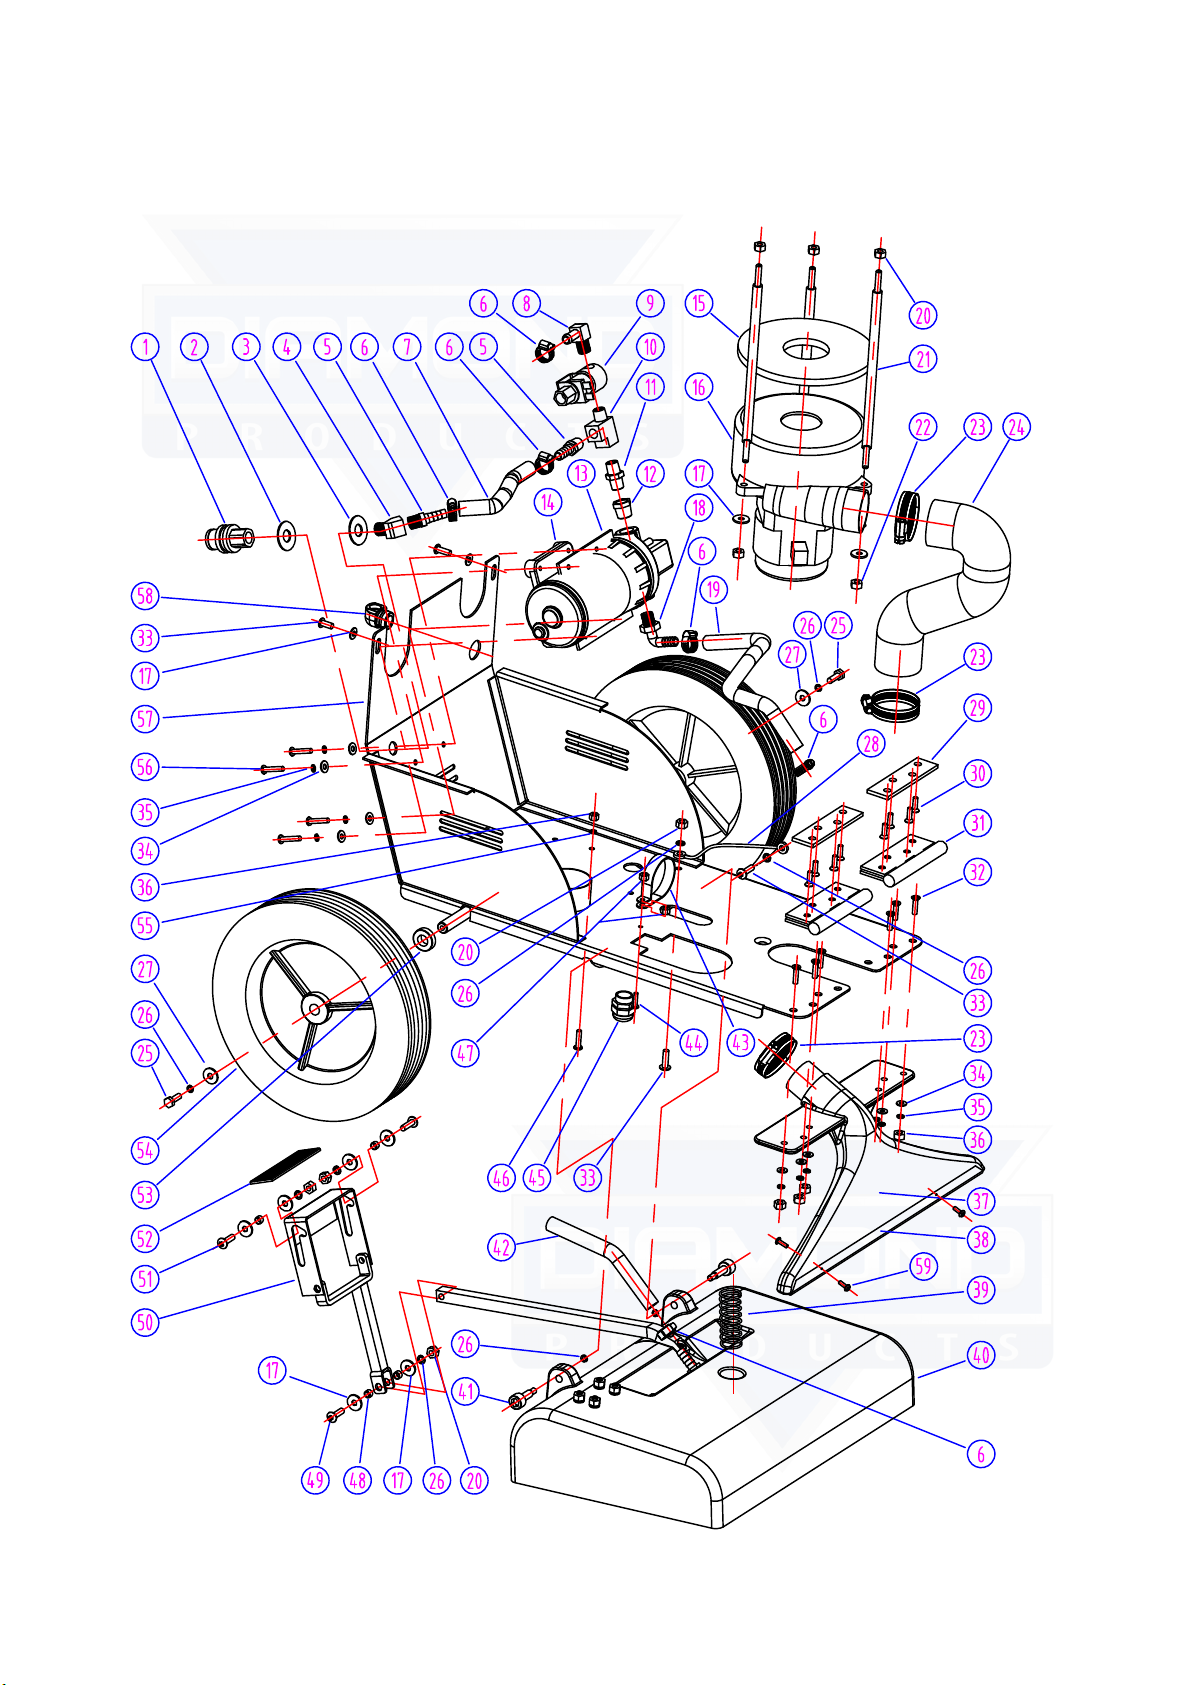
PARTS LIST
-10-
Operator's Manual
Diamond Products

DIA NOPART
NUMBER DESCRIPTION NO
REQ'D
PARTS LIST
42 VV20276 WASHER, PLAIN 1
43 VV80125 COUPLING 1
44 VV10411 STRAINER, LINE 1
45 VV67101 SOLUTION TANK 1
46 VF47035A LOGO 1
47 VV67107 FILTER 1
48 VA13471 SCREW, ST5X10 2
49 VV67102 RECOVERY TANK 1
50 VF81504 FLOAT, SHUT-OFF 1
51 VV67305 BEND 1
52 VV13664 WASHER,PLAIN,¢4¢12X1 4
53 VF13491 SCREW,M4X12,SST 2
54 VV67162 RUBBER HINGE 1
55 VF81403A ELBOW, 90º, BRASS 1
56 VV67708 TUBING 1
57 VF82090 CLAMP(16-20) 1
58 VV67711 ELBOW, 90º, BRASS 1
59 VV67118 LABEL, RIGHT 1
60 VF80331 DECAL, WARNING 1
61 VV67119 LABEL,LEFT 1
62 VF99010C CIRCUIT BREAKER,17A 1
-11-
Operator's Manual
Diamond Products
-12-
Operator's Manual
Diamond Products

DIA NOPART
NUMBER DESCRIPTION NO
REQ'D
PARTS LIST
1 RD80208 COUPLER,QUICK CONNECT 1
2 VV20274 WASHER,PLAIN,Ø13.5XØ32X1.5 1
3 VV20274A WASHER,PLAIN,Ø14XØ32X1.5 1
4 VV80115 ELBOW,STRECT,45°1
5 VV80128 BARB,HOSE 2
6 VV10114 CLAMP,HOSE,3/8" 6
7 VV67114 HOSE,HIGH PRESSURE 1
8 VV67607 BARB,PUMP 1
9 VV67604 SOLUTION SOLENOID,110V/60HZ 1
10 VV67606 CONNECTOR,THREE-WAY 1
11 VV67603 CONNECTOR 1
12 VV67602 BARB,PUMP 1
13 VV67601 MOUNTING FRAME,PUMP 1
14 VV67605 PUMP,115V,100PSI 1
15 VF81503 GASKET,VAC MOTOR 1
16 ZD63000A VAC MOTOR,3-STAGE,120V 1
17 GT13032 WASHER,SST,PLAIN,Ø6XØ16X1.5 11
18 VV80210 BEND,NYLON,PUMP 1
19 VV67117 HOSE,SOLUTION 1
20 VF13521 NUT,SST,M6 6
21 VF81508 STUD 3
22 VF14506 NUT,LOCK,SS,M6 3
23 VV10113 CLAMP,HOSE 2" 3
24 VV67152 EXHAUST HOSE,Ø48 1
25 VF13495 BOLT,M6X16,HEX 2
26 VV13607 WASHER,LOCK,Ø6 11
27 VF13551 WASHER,SST,PLAIN,Ø6XØ22X1.5 2
28 VF82028 CABLE 1
29 VV67104 SPACER 2
30 VF13512 SCREW,FH,M5X15,SST 8
31 VV60406S HINGE,SST,4" 2
32 GT13058 SCREW,FH,SST,M5X22 6
33 GT13056 SCREW,SST,PH,M6X16 4
34 VF13474A WASHER,SST,PLAIN,Ø5XØ15X1 10
35 VV13601 WASHER,LOCK,Ø5 10
36 VV13633 NUT,SST,M5 7
37 VV67140 CARPET PICK-UP TOOL 1
38 VV67142 STAINLESS STEEL SHOES 2
39 VV67407 SPRING 1
40 VV67400 MOUNTING BASE ASSY,BRUSH 1
-13-
Operator's Manual
Diamond Products
DIA NOPART
NUMBER DESCRIPTION NO
REQ'D
PARTS LIST
41 VV67110 SHOULDER SCREW 2
42 VV67115 HOSE,SPRAYING 1
43 VV67120 CLAMP 1
44 VA13473 SCREW,RHM,M4X16,SST 1
45 VV67405 STRAINER 1
46 VV13635 SCREW,RHM,M5X20,SST 1
47 GT13014 NUT,NYLON,INSERT,M4 2
48 VV67106 SPACER 4
49 VA13478 SCREW,M6X35,HEX 1
50 VV67103A FOOT STEP 1
51 VF14127 SCREW,RHM,M6X20,SST 2
52 VV67121 ANTISKID PLATE 1
53 VV60113S WASHER,WHEEL,AL 2
54 VA75004 WHEEL,10" 2
55 VF13604 WASHER,Ø5 1
56 VV13634 SCREW,RHM,M5X30,SST 4
57 VV67200 BOTTOM PLATE,ASSY 1
58 VV67505 BUSHING,90º,CORD 1
59 VF143001 SCREW,PH,M3X4,SST 6
-14-
Operator's Manual
Diamond Products

-15-
Operator's Manual
Diamond Products

DIA NOPART
NUMBER DESCRIPTION NO
REQ'D
PARTS LIST
1 VV67403-2A LIFT BAR 1
2 VV99926-1 RECTIFIER 1
3 VV13601 WASHER,LOCK,SST,Ø5 5
4 VV13633 NUT,SST,M5 5
5 VV13634 SCREW,SST,PH,M5X30 1
6 VA13475 SCREW,PH,SST,M5X25 2
7 VV67407 SPRING 1
8 VV20501 SCREW,PH,SST,M5X14 2
9 VV13662 WASHER,PLAIN,Ø5XØ12X1 6
10 VV67401 MOUTING BASE,BRUSH 1
11 VV80128 BARB,HOSE 1
12 VV67423 INSERT,SPRAYER BODY 2
13 VV67421 SPRAYER BODY 1
14 VV67422 SPRAY TIP 4
15 VV67435 MOTOR,110V 1
16 VV67433 GASKET 1
17 VV67431-1 BOTTOM PLATE 1
18 GT13054 SCREW,BH,M5X12,SST 10
19 VF13512A SCREW,FH,SST,M5X18 4
20 VV67412 BRUSH 1
21 VV67417 GASKET 2
22 VV67414 FRAME,BRUSH 2
23 VV67404 PLATE 1
24 VV67406 GASKET 1
25 VF14024 BEARING 2
26 VF14023 SEAL 2
27 VV67411 SHAFT,BRUSH 1
28 VV67413 AXLE,PULLEY 1
29 VV67416 SPACER 1
30 GT13059 SCREW,HEX,SOCKET 4
31 VV67415 DRIVEN PULLEY 1
32 VV67402 BELT 1
33 VV67432 DRIVING PULLEY 1
34 VV67424 NOZZLE BODY 4
35 VV67436 MOUNTING BRACKET,MOTOR 1
36 GT13032 WASHER,SST,PLAIN,Ø6XØ16X1.5 4
37 VV13607 WASHER,LOCK,Ø6 4
38 VF13521 NUT,SST,M6 4
39 VV67405 STRAIN RELIEF 1
40 VV67408 POWER CORD 1
41 VV67410 BRUSH ASSEMBLY 1
-16-
Operator's Manual
Diamond Products
-17-
Operator's Manual
Diamond Products

DIA NOPART
NUMBER DESCRIPTION NO
REQ'D
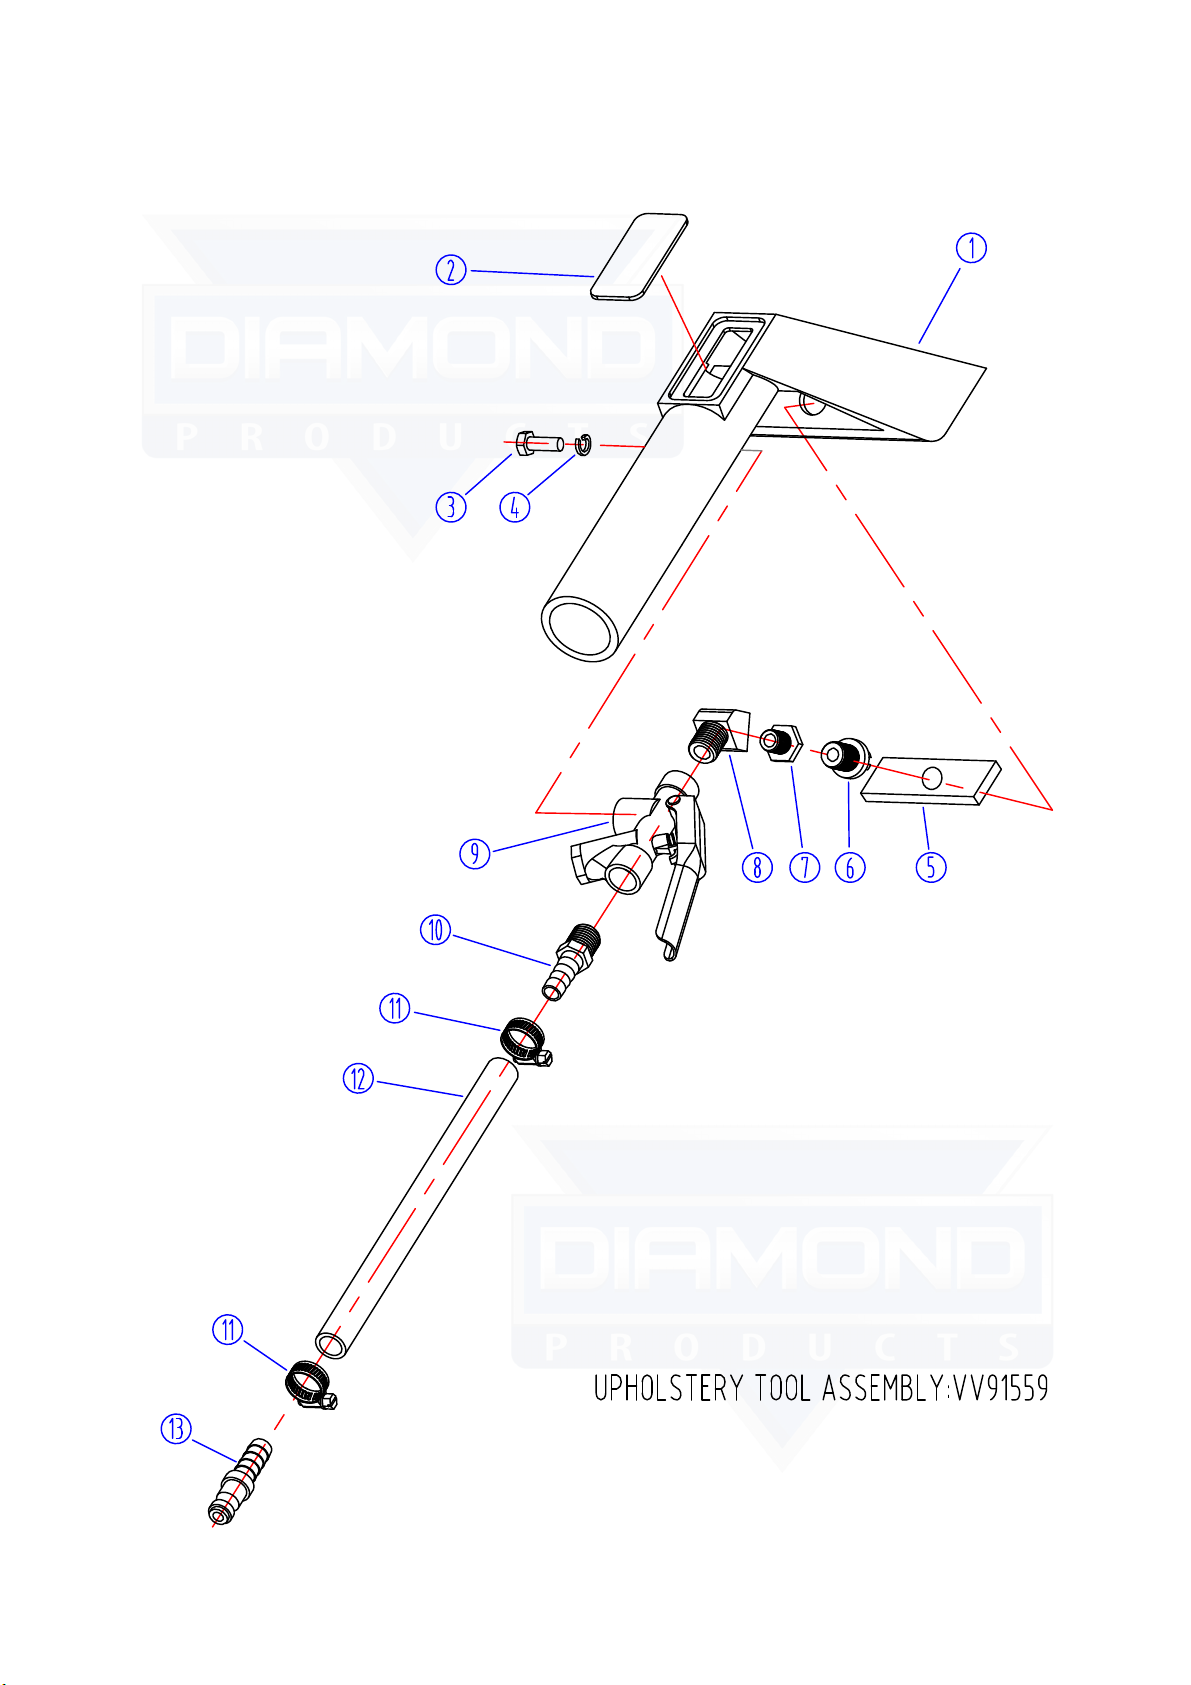
PARTS LIST
1 VV40328 UPHOLSTERY TOOL 1
2 VV40328-6 WINDOW,HAND TOOL 1
3 VV20071 SCREW,5/16-18X5/8"L,HH 1
4 VV20298 WASHER,LOCK,5/16“L,SST 1
5 VV60531 GASKET 1
6 VV80159 NOZZLE,SPRAY TIP,80º1
7 VV80105 BUSHING,BRASS 1
8 VV80115 ELBOW,STREET,45 DEGREES 1
9 VV10933 TRIGGER VALVE 1
10 VV80128 BARB,HOSE 1
11 VV10114 CLAMP,HOSE 3/8” 2
12 VV85317 SOLUTION HOSE,3/8” 1
13 VV80241 BARB,HOSE MAIL PLUG 1
-18-
Operator's Manual
Diamond Products

-19-
Operator's Manual
Diamond Products
DIA NOPART
NUMBER DESCRIPTION NO
REQ'D
PARTS LIST
1 VV60220 CUFF, 1 1/2" 2
2 VV67703 HOSE,VACUUM 1
3 VV20652 TIE,CABLE 16
4 VV80241 HOSE BARB,MAIL PLUG,SST 1
5 VV10114 CLAMP,HOSE,3/8”,SST 2
6 VV67704 HOSE,SOLUTION,16'LONG 1
7 VV80128 HOSE BARB 1
8 RD80208 COUPLER,QUICK CONNECT 1
9 VV67703A VACUUM HOSE ASSEMBLY 1
10 VV67704A SOLUTION HOSE ASSEMBLY 1
-20-
Operator's Manual
Diamond Products
This manual suits for next models
1
Table of contents
Other Diamond Products Floor Machine manuals


Popular Floor Machine manuals by other brands


Kärcher
Kärcher BR/BD 530 XL BAT Package manual

Tacony
Tacony Powr-Flite M1200-3 Operator's manual

Ghibli & Wirbel
Ghibli & Wirbel O 143 U 10 Use and maintenance

Santoemma
Santoemma GRACE HP Using and maintenance manual

KENT
KENT 20 Specifications

Nilfisk-Advance
Nilfisk-Advance 9087240020 Instructions for use