Diamond Tech Studio Pro Precision 2000 User manual


CONTENTS
Your PRECISION 2000™ has been shipped partially assembled. Carefully remove saw and parts from their packaging.
BEFORE YOU BEGIN
READ AND FOLLOW ALL INSTRUCTIONS CAREFULLY.
KEEP OUT OF REACH OF CHILDREN. WARNING: This product contains small parts that may be a choking hazard to
small children.
•After unpacking all components, assemble band saw on a firm level surface to prevent saw from tilting or rocking.
• Be sure the power switch is in the OFF position before plugging in the band saw.
•Always disconnect band saw from electrical outlet before setting up or servicing.
• Use a properly grounded and tested outlet. Under no circumstances should you ever modify the plug.
• Wear proper apparel. Never wear loose fitting clothes, neckties, jewelry and gloves that may get caught in the saws
moving parts.
• Remove all wrenches from the work surface before usingband saw. Leavingwrenchesattached while operatingthistool
may result in damage to the machine and/or injury to the operator.
•Always wear safety glasses. Everyday eyeglasses have only impact resistant lenses; they are not safety glasses.
• Wear dust mask when cutting with wood or metal blade.
• Never turn on band saw while glass or working materials are touching the blade.
•Always hold material being cut firmly against cutting table.
• Feed materials at a slow easy pace into the blade. Avoid sudden twisting of the blade; which may cause kinking
or breaking.
• Never leave saw running unattended. Turn power OFF when not in use.
• Do not operate while under the influence of medication or alcohol.
•To ensure top performance keep band saw properly maintained.
WARNING: Dust created during sawing, grinding or other construction activities may contain chemicals know in to the
State of California to cause cancer, birth defects or other reproductive harm. Some examples of these chemical are:
•Lead from lead-based paint or came
•Crystalline silica from bricks, cement and othermasonary products.
•Arsenic and chromium from chemically-treated lumber.
Your risk from these exposures varies, depending on how often you do this type of work. To reduce your exposure to these
chemicals: work in a well ventilated area and work with approved safety equipment such as dust masks rated to filter
our microscopic particles.
1 - Band Saw Body with Water Bottle and
Lower Wheel Reservoir
2 - Cutting Table
3 - Miter Gauge
4 – Electrical Cord
5 - Adjusting Wrenches
6 – Studio Pro™ Diamond Blade
7 – The “Chopper” Wood Blade
8 - Additional Blade Guide
9 - Drain Tubing
PRECISION 2000™ DELUXE ALSO INCLUDES
10 - Rubber Tubing
11 - Multispeed Rheostat
12 - Adjustable Recirculating Water Pump
13 - Reservoir Tray
1
2
3
4
5
6
7
9
11
12
13
10
8

ASSEMBLY INSTRUCTIONS
A. Table Installation
1) Remove table mounting bolts located directly behind the blade with a hex wrench. Loosen and remove the
table alignment screw, washer and wing nut, on the front of the cutting table.
2) While holding the table with the slot opening directly behind the blade, carefully slide the diamond blade through
the slot (Fig.1).
3) Secure cutting table to the saw body with the table mounting bolts. Return alignment screw, washer and wing nut
to the front of the cutting table and tighten.
B. Blade Removal and Installation
Studio Pro™ Diamond, Wood or Metal blades are installed and removed in the same fashion. A Diamond Blade comes pre-
installed, however should it become loose in shipment or if you need to replace a blade, follow these instructions.
1) Remove cutting table alignment screw, washer and wing nut from the front of the table.
2) Loosen brass thumb screws, located on the left side and on the back of the saw, until upper cover slides up and off easily.
3) Tilt saw backwards and loosen screw located underneath the lowercover. Rotate plastic tab away from the base of
the cover (Fig.2) and slide cover off.
3) With the upper and lower blade wheels exposed, place a hand on the top of the upper blade wheel and press down
firmly (Fig.3). Slide worn blade off the wheel.
Fig.2 Fig.3
Fig.1
Fig.5 Fig.6
Fig.4
4) To install a new blade, slide new blade through the opening in the table and wrap blade around lower wheel with
the diamond or teeth facing you and away from the saw (Fig.4). When installing a wood blade, install with the teeth
pointing downward. Place a hand on the top of the upper blade wheel, press down firmly. Once upper wheel is in
the downward position, center new blade on the upper wheel (Fig.5), then slowly release the wheel.
5) The blade should be centered on both the upperand lowerblade guide grooves (Fig.6), refer to Blade Guide
Adjustment and Blade Tracking, page 3. The wood blade will track differently than the diamond blade. The wood blade
will ride center on the bottom and towards the back of the upperwheel, never in the center or front.
6) Once the blade is properly installed, reinstall upper and lower covers, table alignment screw, washer and
wing nut.

C. Water Systems
The PRECISION 2000™ comes equipped with brass water supply nozzle and large capacity water bottle, offering better
water flow to the front of the blade for increased cooling and lubrication.
1) Remove water bottle cap and fill with approximately 24 oz. of water. Replace cap but do not screw lid on
tightly. A moderately loose lid will prevent a vacuum from occurring.
2) When ready to cut, open water valve on the bottom of the bottle by pushing the lever downward (Fig.7). Water
should begin to flow freely from the water nozzle mounted on the blade guide assembly. Water nozzle is factory set
to flow on the front of the blade. However, some movement may have occurred during shipment. To adjust position
of the nozzle, loosen the hex screw on the side of the blade guide assembly (Fig.8) and adjust the brass nozzle into
proper position so the water flows to the front of the blade, retighten screw.
3) The water should drain off the work surface, through the 2 holes on the left side of the table, draining into the
lower wheel cover which acts as a reservoir.
4) The PRECISION 2000™ is equipped with a large drainage spout at the base of the saw (Fig.9). Connect tubing to
this spout and secure with locking clip. Place the open end of tube into a collection tray, bucket or sink.
WARNING: When using a Diamond Blade, never operate saw if there is insufficient water at the point of cutting, as this
will cause damage tothe blade.
USE AND MAINTENANCE
A. Blade Guide Adjustment
The PRECISION 2000™ comes with lower and upper blade guides. Correct alignment of these guides is essential to
proper glass cutting and extending blade life.
1) The blade should pass through the grooves of the upper and lower blade guides with the back edge of the blade
resting slightly inside the grooves. To adjust, use a small hex wrench and loosen the set screw located on the
right side of the lower (Fig.10) or upper blade guide assembly (Fig.11). Slide the blade guide back or forward to
achieve proper positioning. The blade should pass vertically through the guides when viewed from the side. The
PRECISION 2000™ blade guides can be rotated 3 times for extended guide wear.
NOTE: Blade guides should be inspected and adjusted after approximately 3 hours of use. Frequent replacement
of blade guides is recommended to maintain cutting accuracy and extend blade life.
B. Use of Miter Gauge for straight edge or angle cuts
1) Set guide at the desired angle by loosening thumb screw and rotating position mark on the silver bar to
desired angle.
2) Tighten screw to secure setting. Place angle guide into the channel on the work surface.
3) Place materialagainst the straight edge guide and feed the material slowly intothe blade (Fig.12) pushingback tothe
guide. The band saw isdesigned for intricate radiuscutting; however the miter gauge will permit straight edge cutting
when needed.
C. Blade Tracking
Each PRECISION 2000™ is fully tested and adjusted before it is shipped. Occasionally, additional tracking adjustments
are necessary due to movement in shipping. Ideally the blade should be positioned 1/8” - 1/16” (3.75 - 1.66 mm) from
the back wall of the upper wheel.
*Excess tubing can be cut and removed using household scissors.
Fig.7 Fig.8 Fig.9

Fig.11
Fig.10 Fig.12
1) Turn OFF power switch.
2) Remove upperand lowercovers and waterbottle toaccess tracking/lockingknob located behind the upperwheel(Fig.13).
3) Loosen the knob closest to the saw, this is the locking mechanism (Fig.14). Loosening this knob will allow for free
movement of the wheel.
4) If the blade is riding too far forward on the top wheel, tilt it slightly forward by turning the top adjusting knob
(See Fig.14) to the right (clockwise). The wheel should then start to tilt slightly forward while the bottom of the
wheel will move slightly backwards, towards the saw body. Turn the blade wheels by hand to test alignment.
When satisfied with the position, turn locking knob to secure alignment in place. Return the water bottle and
wheel covers to their normal operating positions.
Fig.14
Fig.13
5) If the blade is riding too far backward against the back, turn the tracking knob to the left (counterclockwise)
so the upper wheel tilts slightly towards the saw body while the bottom of the wheel tilts away from the saw
body (Fig.15). Turn blade wheel by hand to test adjustment. When satisfied with the position, turn locking knob to
secure alignment in place. Replace the water bottle and wheel covers.
D. Upper Blade Guide Arm
The position of the upper guide assembly should be 1/4” from the top of the material being cut (Fig.15).
1) To adjust height of blade guide assembly, loosen tension knob on back of saw and raise or lower the arm
assembly (Fig. 16). Once in the desired position, tighten knob.

PRECISION 2000 DELUXE ASSEMBLY INSTRUCTIONS
A. Reservoir Installation
1) Place reservoir on a firm level surface, toprevent saw from tilting or rocking. The small compartment of the reservoir
should be on the left side of the saw.
2) Lift saw and insert feet intothe 4 openings in the reservoir base (Fig. 17).
B. Recirculating Water System
The durable recirculatingwaterpump and reservoir tray collectsand recycles water.
1) Remove waterbottle and tubing from the saw and set aside.
2) Place the PRECISION 2000™with the reservoir on a solid level work surface, flat-side facing forward.
3) Insert pump valve intothe top of the recirculatingwaterpump. Place pump in the left rearcompartment of the
reservoir (Fig.18). Press down on the pump toactivate the suction cups, securingpump tothe bottom of the reservoir.
4) Connect the plastic tubingtothe top of the pump. Note: Runningthe plastic tubingunderwarm waterwill make
it easiertoinsert intothe stem. Next, connect the opposite end intothe top of the brass waternozzle on the upper
guide assembly (Fig.19). Plug pump’s electricalconnector intoan outlet or power strip.
5) Fill the reservoir with approximately 2” of water(Approximately 3 quarts) before use.
6) To test pump, the saw must be turned on. Be sure the blade hasbeen properly installed and there are no
obstructions that may interfere with its operation and blade movement. DONOT attempt totouch the blade or
blade wheels while the machine isturned on.
7) Test pump and water flow by turning machine on at a slowspeed. Water should begin to flow freely from the water
nozzle mounted on the upperblade guide assembly. Ifnecessary, adjust position of nozzle so water flow is directed
at the front of the blade (See Fig.8).
8) If large pockets of airappearin the hose line, thismay stop the flowof water to the blade. If this should occur,
turn the saw off. Remove the hose from the pump nozzle without removingthe pump from the waterand let the
hose drain. Reattach the hose and start the saw again. Small airbubbles may persist in the line, but these will not
interfere with sufficient flow to the blade.
WARNING: Never operate saw ifthere isinsufficient water at the point of cutting, as this will cause damage tothe blade.
Fig.15 Fig.16
Fig.18 Fig.19
Fig.17

C. Rheostat Installation
Use of Rheostat allows blade speed to slow down for intricate or delicate cuts. Slowing the speed will also prevent
glass from heating too rapidly, which may cause glass to glow red or crack.
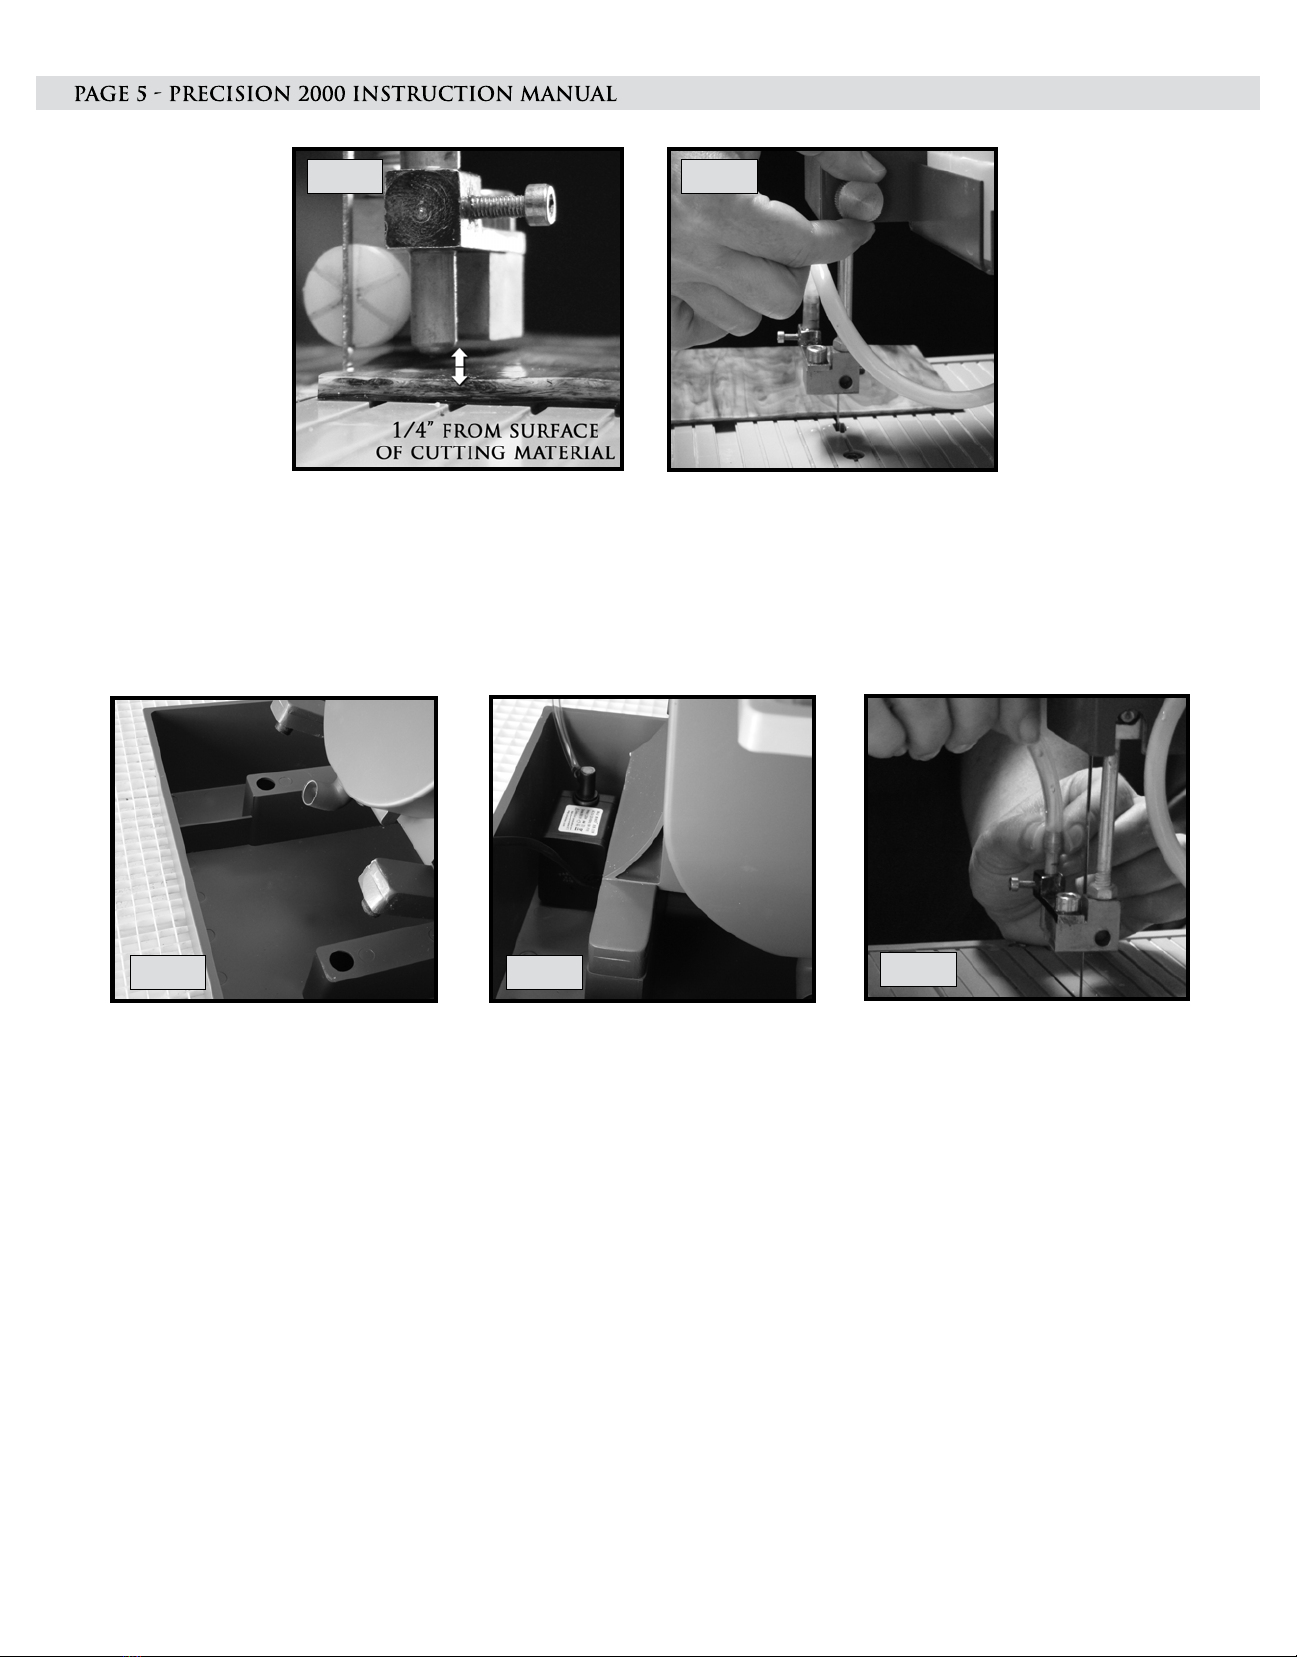
1) Remove the power cord from the saw. Plug rheostat into power cord outlet located on the right side of the saw
underneath the ON/OFF switch (Fig.20).
2) Plug the saw power cord into the rheostat (Fig.21).
3) Plug both the pump and rheostat into a dedicated power strip with an on/off toggle switch. Using a power strip
will allow you to turn the pump and saw on and off safely at the same time.
QUICK TIPS
1) Do not force materials into the blade. Ease the materials into the blade, turning as you go to create your pattern.
Avoid twisting the blade on tight curves.
2) To back out of a cut, turn the saw off and ease the material away from the blade.
3) Clean band saw after each use with lukewarm water.
4) When storing for extended periods of time, remove blade and drain water supply system.
5) Use a waterproof pen to mark your pattern on the material. For added protection allow the ink to dry and use a
Chap Stick™ or rubber cement over line before cutting.
6) When cutting material the highest blade speed will usually result in the fast and smoothest cutting. Use a slower
speed when working with delicate materials or making very tight turning radius.
7) When cleaning the wood blade, it is best to avoid using abrasive cleaners, as they can scratch the surface of the
blade which may affect performance. Additionally, scratches in the surface of the blade will fill with pitch, making it
more difficult to clean the next time. To clean blades, soak with oven cleaner.
8) Should the blade jam in material being cut, immediately turn OFF power switch and wait until all moving parts have
stopped. Gently free work materials, holding blade against the blade guides to prevent it from stretching or badly
twisting. Back out of the cut if needed. Inspect blade for kinks and ensure there is no remaining debris in the blade
path which may have caused the jam.
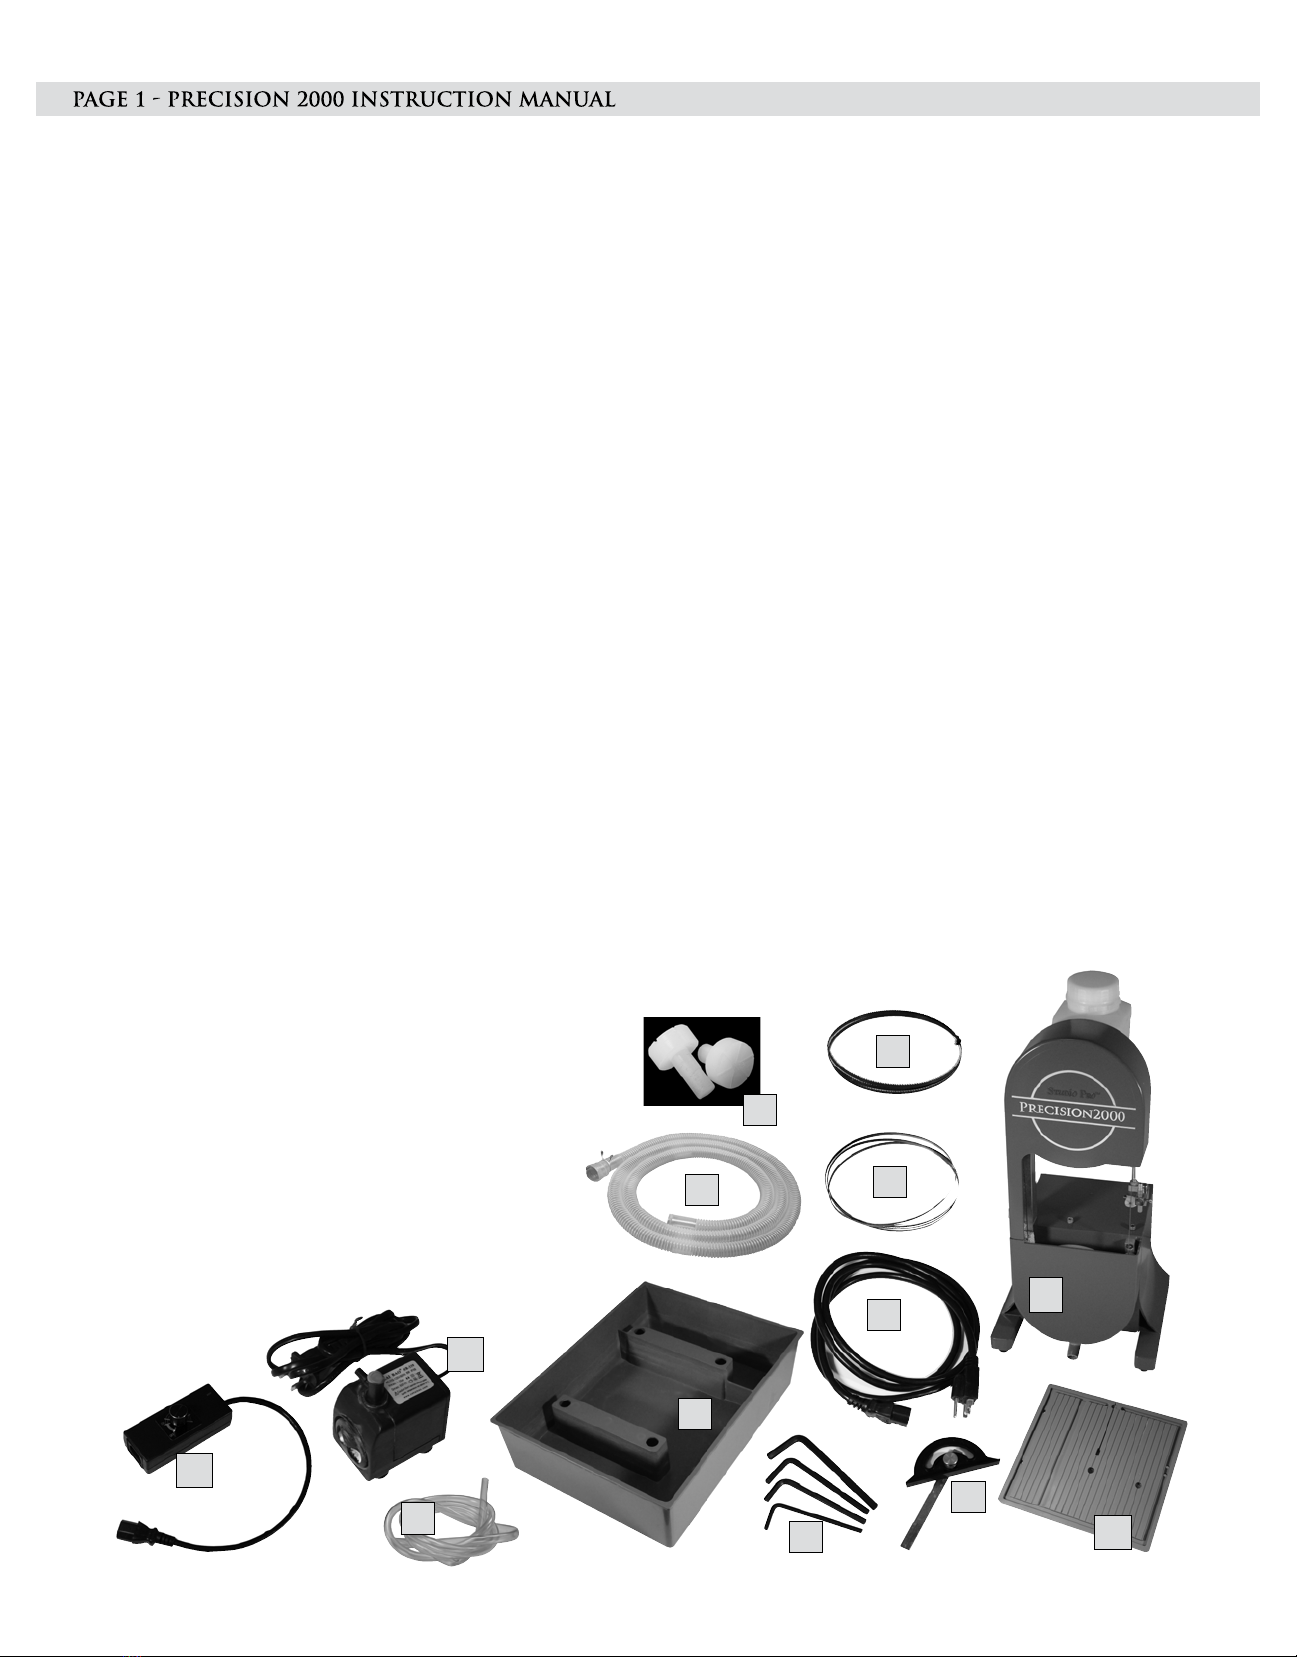
ADDITIONAL PARTS
rebmuNmetImetIrebmuNmetImetI
PRECISION 2000™ DIAMOND BLADE #22 PRECISION 2000™ FUSE HOLDER #P654
PRECISION 2000™ “THE CHOPPER”WOOD BLADE #WB0450 PRECISION 2000™ ANGLE GUIDE #P656
PRECISION 2000™ BLADE GUIDES #513 PRECISION 2000™ UPPER WHEEL #P674
576P#LEEHWREWOL™0002NOISICERP056P#ROTOM™0002NOISICERP
119P#ELTTOBRETAW™0002NOISICERP356P#ESUF™0002NOISICERP
Diamond Tech offers a Diamond Blade repair service should a blade break with ample diamond remaining. Return blade to
Diamond Tech, Blade Repair Service, 5600 Airport Blvd., Suite C, Tampa, FL 33634. When returning a blade for repairs,
make sure you include your name, addresses, daytime phone number @ area code, saw model and type of payment.
Blade repair service does not cover wood or metal cutting blades. For International and special handling, please include
extra postage and shipping instructions Blade Repair Fees (U.S. Dollars):
Precision2000,DL1000,DL3000,DL3000XL, Speedster,SpeedsterXL...........................................................$25.00
DL5000.................................................................................................................................$45.00
Fig.21
Fig.20

All Precision 2000™ Band Saw and accessories are manufactured to high quality standards and are
serviced by highly qualified technicians.
Precision 2000 Band Saw is warranted to the original purchaser for three full years from the original
purchase date. During the three year period, if you feel the Precision 2000™ Band Saw is not performing
for a Return Authorization Number. Equipment will not be accepted at Diamond Tech without a Return
Authorization Number.
If returning the Band Saw for evaluation or repair, be sure to include your Name, Address, Daytime Phone
Number with Area Code and a letter explaining the specific problem you are encountering. You will be
contacted if any necessary parts or service are not covered under the warranty.
Date of purchase ___ / ___ / ___
Mark the Return Authorization Number clearly on every package! DO NOT SEND THIS PRODUCT BACK
WITHOUT SUCH PRIOR AUTHORIZATION! Return postage and insurance are the responsibility of the
consumer. Diamond Tech will return your equipment postage paid and insured if it is under warranty. Any
Band Saw no longer under warranty will be returned at the owner’s expense. Diamond Tech reserves the
right to repair or replace faulty equipment at its discretion. The Precision 2000™ Band Saw is warranted
against defective materials or workmanship. If the Precision 2000™ Band Saw suffers damage due to
customer modifications and/or is used for any application other than that for which it was designed, this
warranty is void. This warranty does not include damage due to: (A) neglect (B) accident (C) unreasonable
use (D) improper maintenance (E) any other causes not attributed to defects in material or workmanship.
This warranty specifically excludes the Precision 2000™ Band Saw blades and/or guides. Any implied or
otherwise explicit guarantees made through merchandiser of this product are not covered in this warranty
coverage agreement and are expressly disclaimed.
IMPORTANT NOTE: This machine was designed for certain applications only. Diamond Tech strongly
recommends that this machine NOT be modified and/or used for any application other than that for
which it was designed. If you have any questions relative to its application, please contact us and we
will advise as to it proper use.
5/2014
Diamond Tech
Studio Pro™Precision 2000 3 Year Warranty
Diamond Tech, USA
5600 Airport Blvd. Suite C, Tampa, Florida 33634
Tech Support: 813-806-2923 (U.S.A., Canada) 813-806-2923 (International)
www.DiamondTechCrafts.com
Table of contents
Other Diamond Tech Saw manuals