Diamond Tools SawMaster SDT-410 User manual

Switch Figure 1
11614 Sterling Ave. Suite 103 • Riverside, CA 92503 • USA
Phone 909-688-2358 • Fax 909-688-0228
SawMaster Diamond Tools, Inc.
Owner's Manual English Espanol
Thank you for buying wet tile/concrete hand held saw.
To ensure your safety and satisfaction. Carefully read through this owner’s manual before
using the product.
Wheel diameter 110 mm (4-5/16”) - 125 mm (5”)
Wheel arbor diameter 20 mm (25/32”)
Max. Cutting capacities at 45º at 90º
With 4-1/2”(110 mm) blade 13/16”(21 mm) 1-3/8”(34 mm)
With 5”(125 mm) blade 1”(26 mm) 1-5/8”(41.5 mm)
Input 1,000 W
-1
No load speed 12,000 min
Overall dimensions
Net weight 2.9 kg (6.4 lbs)
204 X 220 X 157 mm
(8-1/16” X 8-1/2” X 6-3/16”)
SAFETY PRECAUTIONS
• Never use the machine improperly or work in an unsafe manner.
• Always wear safety goggles, dust mask, and ear protection while operating the saw (to comply with ANSI-Z87.1).
• Always remain alert when the saw is in use. Failure to pay attention on the operator’s part may lead to serious injury.
• Before you start working, familiarize yourself with the work site and its surroundings. Take notice of circumstances which may
impede working or traffic, observe soil conditions (good bearing or not), and take measures to ensure safety (i.e. the shielding of
roadworks from public traffic).
• Take measures to ensure that the machine is in a safe and trouble-free condition prior to usage. Use the machine only when all
protective devices (i.e. guards, noise absorbers, emergency-off devices) are operating in the intended locations.
• A visual check of the machine must be made at least once a shift to ensure that visible damages or faults are recognized. Any
changes (including changes in the performance or behavior of the machine) must be reported to the supervisor. If necessary, stop
the machine at once and secure it.
• In the case of a malfunction stop the machine immediately and secure it. Fix the problem as soon as possible.
• For starting and stopping the machine follow the operating instruction steps and observe any indicator lights.
• Before switching the machine on make sure that the activated machine will be of no danger to anyone.
1. Make sure that the tool is only connected to the voltage marked on the name
plate.
2. Never use the tool if its cover or any bolts are missing. If the cover or bolts have
been removed, replace them prior to use. Maintain all parts in good working
order.
3. Always secure tools when working in elevated positions.
4. Never touch the blade or other moving parts during use.
5. Never start a tool when its rotating component is in contact with the work piece.
6. Never lay a tool down before its moving parts have come to a complete stop.
7. ACCESSORIES: The use of accessories or attachments other than those
recommended in this manual might present a hazard.
8. REPLACEMENT PARTS: When servicing use only identical replacement parts.
INSTRUCTIONS FOR SAFE HANDLING
SPECIFICATIONS UNPACKING
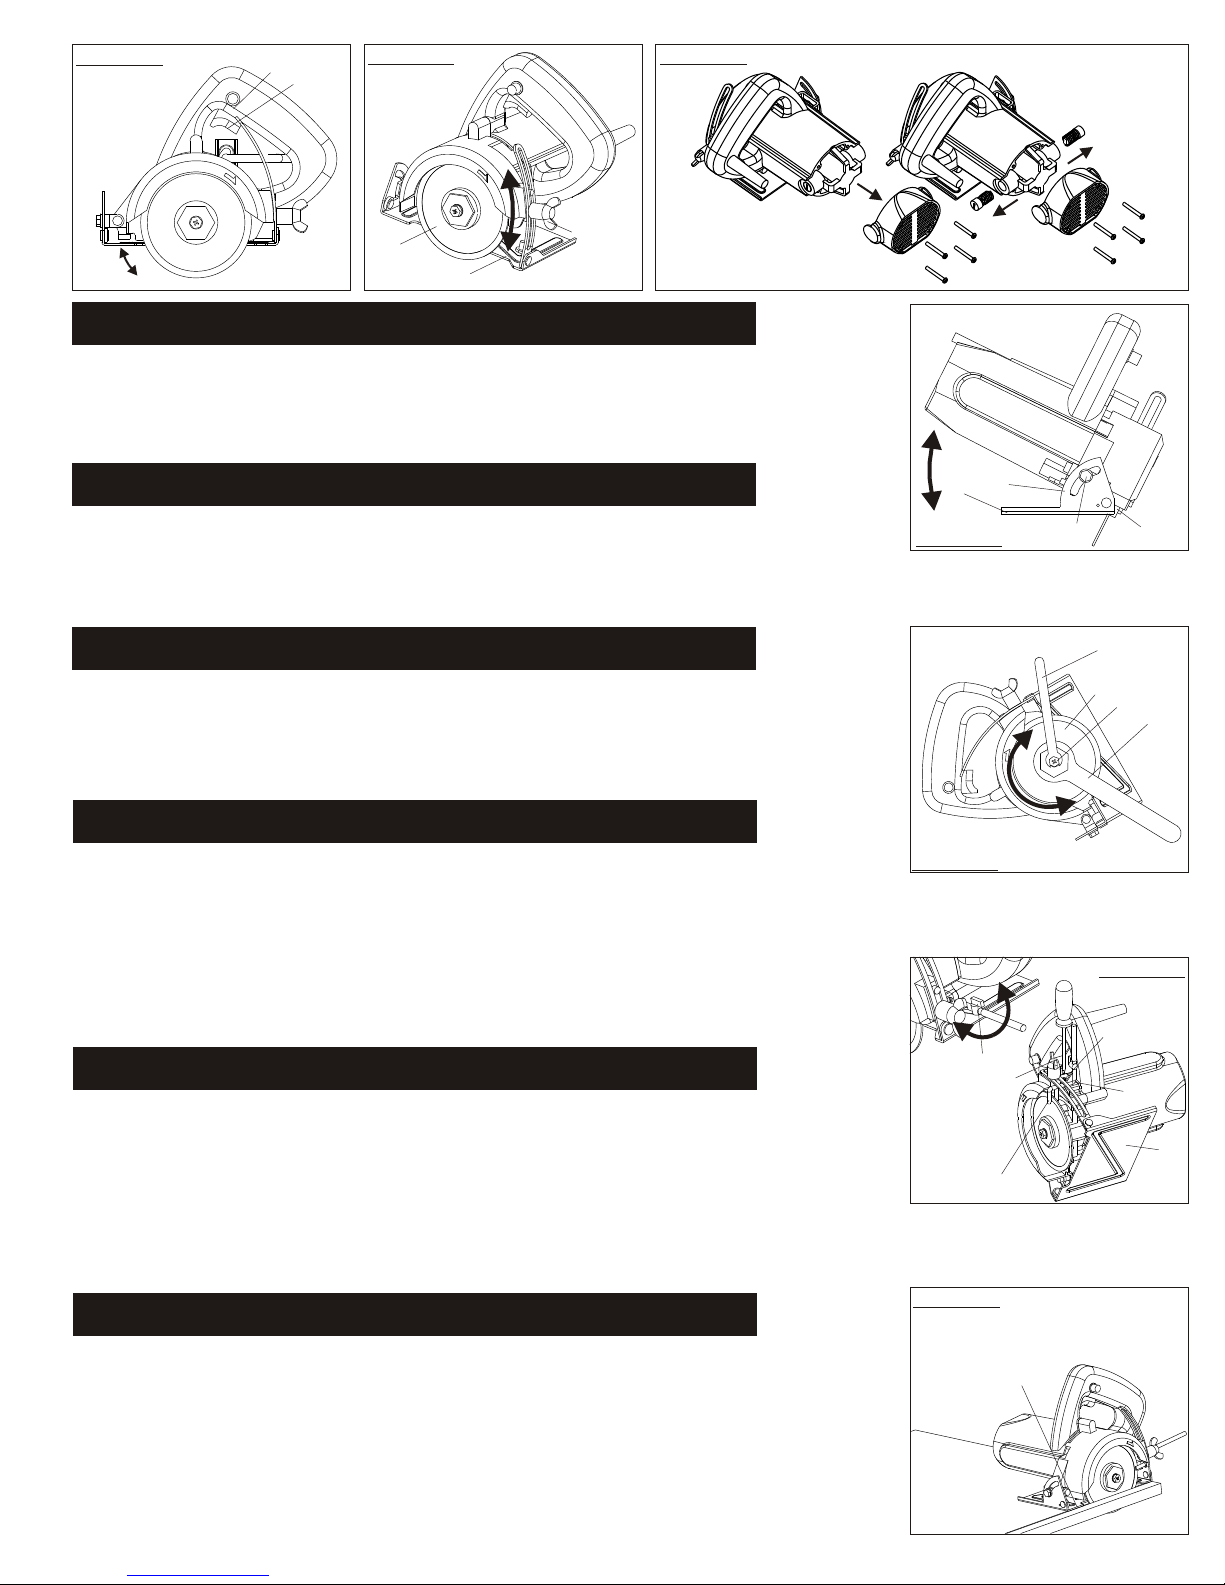
1. The saw can be adjusted to cut at angle between 0° and 45°.
2. Loosen the nut (5) of the scale (6) and tilt the base plate (4) to the desired angle.
3. At the desired angle, re-tighten the nut so the position is secure.
NOTE: Adjustments to the saw should not be made while the saw is running!
1. Loosen 4 screws from rear of Carbon Brush Motor and remove the black plastic cover.
2. Loosen the cap counter clockwise from each side of the Carbon Brush Housing, then remove
the used Spring carbon brushes and replace with new carbon brush.
3. Reverse the unpacking procedure after you install the new carbon brush and tighten the housing brush cap.
1. Loosen the bolt (3), and lower the base plate (4) as far as possible and tighten the bolt.
2. Set the water-device (15) with the provided screws (16).
3. Connect the end of the provided pipe to a water source (tap).
4. Turn on the tap to water the blade.
5. Use the adjustment lever (18) to adjust the amount of water. Position “A” is open and “B”
is closed.
1. To adjust the saw’s cutting depth, loosen the bolt (3).
2. Move the base plate (4) to the desired depth and tighten the bolt.
3. The distance that the blade (8) protrudes from the base of the saw is the saw’s cutting
depth.
1. Loosen the bolt (11) , and remove the outside flange.
2. Remove the blade (8) from the inside flange and drive shaft.
3. Place the new blade so that it is against the inside flange on the driving shaft.
4. Now place the outside flange against the blade and tighten the bolt firmly with the wrench
set (12). (Direction A is to tighten, while direction B is to loosen the bolt.)
with the wrench set provided (12)
To make precise cuts, pencil the desired cuts and follow the line using the edge (19) of the
base plate to follow the line. To initiate the cut, place the saw so that blade does not yet touch
the work piece and activate the saw. When the blade reaches its apparent maximum rpm, push
the machine forward to begin the cut. The machine should be pushed with uniform and even
pressure while performing the cut.
Adjusting the Cutting Angle Figure 4
Carbon Brush Replacement Figure 3
Mounting the Watering Device Figure 6
Adjusting the Cutting Depth Figure 2
Replacing the Diamond Blade Figure 5
Operating Figure 7
NOTE: The machine should be unpowered during this operation (unplugged)!
The blade markings should be visible from the outside.
NOTE: Make sure the water outlet (14) is not touching the blade.
English
Open the container, carefully lift the hand held
saw by the handles and place it on a flat, level
working area. Be certain that you have the
following items before you discard the
container.
• Saw
• Universal Wrench
• Water Tube Assembly
• Ø4-1/2" Saw Blade
• Owners Manual
8.
4.
3.
FIGURE 2 FIGURE 3
Step 1
Step 2
4. 6.
7.
5.
FIGURE 4
A
B
11.
13.
12.
8.
FIGURE 5
A
B
18.
3.
16.
15.
4.
14.
FIGURE 6
14.
FIGURE 7
SDT-410 Hand Held Saw
Continue Next Page...
NOTE: While cutting, be sure to wear rubber gloves and insulated foot wear to
prevent electric shocks.
1. 2.
FIGURE 1
• The saw is activated by pressing the
trigger(1), to deactivate the saw release the
trigger.
• To keep the saw on, press the lock button
(2) while pressing the trigger. Press the
trigger again to deactivate the lock.
Switch Figure 1
11614 Sterling Ave. Suite 103 • Riverside, CA 92503 • USA
Phone 909-688-2358 • Fax 909-688-0228
SawMaster Diamond Tools, Inc.
Owner's Manual English Espanol
Thank you for buying wet tile/concrete hand held saw.
To ensure your safety and satisfaction. Carefully read through this owner’s manual before
using the product.
Wheel diameter 110 mm (4-5/16”) - 125 mm (5”)
Wheel arbor diameter 20 mm (25/32”)
Max. Cutting capacities at 45º at 90º
With 4-1/2”(110 mm) blade 13/16”(21 mm) 1-3/8”(34 mm)
With 5”(125 mm) blade 1”(26 mm) 1-5/8”(41.5 mm)
Input 1,000 W
-1
No load speed 12,000 min
Overall dimensions
Net weight 2.9 kg (6.4 lbs)
204 X 220 X 157 mm
(8-1/16” X 8-1/2” X 6-3/16”)
SAFETY PRECAUTIONS
• Never use the machine improperly or work in an unsafe manner.
• Always wear safety goggles, dust mask, and ear protection while operating the saw (to comply with ANSI-Z87.1).
• Always remain alert when the saw is in use. Failure to pay attention on the operator’s part may lead to serious injury.
• Before you start working, familiarize yourself with the work site and its surroundings. Take notice of circumstances which may
impede working or traffic, observe soil conditions (good bearing or not), and take measures to ensure safety (i.e. the shielding of
roadworks from public traffic).
• Take measures to ensure that the machine is in a safe and trouble-free condition prior to usage. Use the machine only when all
protective devices (i.e. guards, noise absorbers, emergency-off devices) are operating in the intended locations.
• A visual check of the machine must be made at least once a shift to ensure that visible damages or faults are recognized. Any
changes (including changes in the performance or behavior of the machine) must be reported to the supervisor. If necessary, stop
the machine at once and secure it.
• In the case of a malfunction stop the machine immediately and secure it. Fix the problem as soon as possible.
• For starting and stopping the machine follow the operating instruction steps and observe any indicator lights.
• Before switching the machine on make sure that the activated machine will be of no danger to anyone.
1. Make sure that the tool is only connected to the voltage marked on the name
plate.
2. Never use the tool if its cover or any bolts are missing. If the cover or bolts have
been removed, replace them prior to use. Maintain all parts in good working
order.
3. Always secure tools when working in elevated positions.
4. Never touch the blade or other moving parts during use.
5. Never start a tool when its rotating component is in contact with the work piece.
6. Never lay a tool down before its moving parts have come to a complete stop.
7. ACCESSORIES: The use of accessories or attachments other than those
recommended in this manual might present a hazard.
8. REPLACEMENT PARTS: When servicing use only identical replacement parts.
INSTRUCTIONS FOR SAFE HANDLING
SPECIFICATIONS UNPACKING
1. The saw can be adjusted to cut at angle between 0° and 45°.
2. Loosen the nut (5) of the scale (6) and tilt the base plate (4) to the desired angle.
3. At the desired angle, re-tighten the nut so the position is secure.
NOTE: Adjustments to the saw should not be made while the saw is running!
1. Loosen 4 screws from rear of Carbon Brush Motor and remove the black plastic cover.
2. Loosen the cap counter clockwise from each side of the Carbon Brush Housing, then remove
the used Spring carbon brushes and replace with new carbon brush.
3. Reverse the unpacking procedure after you install the new carbon brush and tighten the housing brush cap.
1. Loosen the bolt (3), and lower the base plate (4) as far as possible and tighten the bolt.
2. Set the water-device (15) with the provided screws (16).
3. Connect the end of the provided pipe to a water source (tap).
4. Turn on the tap to water the blade.
5. Use the adjustment lever (18) to adjust the amount of water. Position “A” is open and “B”
is closed.
1. To adjust the saw’s cutting depth, loosen the bolt (3).
2. Move the base plate (4) to the desired depth and tighten the bolt.
3. The distance that the blade (8) protrudes from the base of the saw is the saw’s cutting
depth.
1. Loosen the bolt (11) , and remove the outside flange.
2. Remove the blade (8) from the inside flange and drive shaft.
3. Place the new blade so that it is against the inside flange on the driving shaft.
4. Now place the outside flange against the blade and tighten the bolt firmly with the wrench
set (12). (Direction A is to tighten, while direction B is to loosen the bolt.)
with the wrench set provided (12)
To make precise cuts, pencil the desired cuts and follow the line using the edge (19) of the
base plate to follow the line. To initiate the cut, place the saw so that blade does not yet touch
the work piece and activate the saw. When the blade reaches its apparent maximum rpm, push
the machine forward to begin the cut. The machine should be pushed with uniform and even
pressure while performing the cut.
Adjusting the Cutting Angle Figure 4
Carbon Brush Replacement Figure 3
Mounting the Watering Device Figure 6
Adjusting the Cutting Depth Figure 2
Replacing the Diamond Blade Figure 5
Operating Figure 7
NOTE: The machine should be unpowered during this operation (unplugged)!
The blade markings should be visible from the outside.
NOTE: Make sure the water outlet (14) is not touching the blade.
English
Open the container, carefully lift the hand held
saw by the handles and place it on a flat, level
working area. Be certain that you have the
following items before you discard the
container.
• Saw
• Universal Wrench
• Water Tube Assembly
• Ø4-1/2" Saw Blade
• Owners Manual
8.
4.
3.
FIGURE 2 FIGURE 3
Step 1
Step 2
4. 6.
7.
5.
FIGURE 4
A
B
11.
13.
12.
8.
FIGURE 5
A
B
18.
3.
16.
15.
4.
14.
FIGURE 6
14.
FIGURE 7
SDT-410 Hand Held Saw
Continue Next Page...
NOTE: While cutting, be sure to wear rubber gloves and insulated foot wear to
prevent electric shocks.
1. 2.
FIGURE 1
• The saw is activated by pressing the
trigger(1), to deactivate the saw release the
trigger.
• To keep the saw on, press the lock button
(2) while pressing the trigger. Press the
trigger again to deactivate the lock.

MAINTENANCE
1. After use, check the tool to make sure that it is in top condition.
2. Adjustments should not be made while the motor is running.
3. Always disconnect the power cord from the outlet before changing
removable or expandable parts (blade, bit, sanding paper, etc.), lubricating
or working on the unit.
Warning: To ensure safety and reliability, all repairs should be
performed by an AUTHORIZED SERVICE CENTER or other
QUALIFIED SERVICE ORGANIZATION.
Espanol
Diametro de rueda 110 mm (4-5/16”) - 125 mm (5”)
Diametro del soporte de la rueda 20 mm (25/32”)
Max capacidad de corte at 45º at 90º
Con rueda 4-1/2”(110 mm) 13/16”(21 mm) 1-3/8”(34 mm)
Con rueda 5”(125 mm) 1”(26 mm) 1-5/8”(41.5 mm)
Entrada 1,000 W
-1
Velocidad sin carga 12,000 min
Dimensiones totales
Net weight 2.9 kg (6.4 lbs)
204 X 220 X 157 mm
(8-1/16” X 8-1/2” X 6-3/16”)
ESPECIFICACIONES DESEMPAQUE
PRECAUCIONES Y SEGURIDAD
• Nunca use la maquina de una manera impropia o trabaje de una manera insegura.
• Siempre use gafas de seguridad, mascarilla para el polvo, y proteccion para los oidos cuando se encuentre operando la sierra
(cumpliendo con ANSI-287.1).
• Permanezca siempre alerta cuando la sierra este en uso. La falta de atencion por parte del operador podria conducir a daños
serios.
• Antes de empezar a trabajar, familiarizese usted mismo con el lugar de trabajo y sus alrededores, tomando en cuenta las
circunstancias que pudieran impedir el trabajo o la circulacion libre. Observe la condiciones del terreno (buen apoyo o no), y tome
medidas que garantizan la seguridad por ejemplo el correcto aislamiento de los accesos al trabajo de la circulacion publica.
• Tomo medidas para garantizar que la maquina este en condiciones seguras, y libre de problemas antes de usarla. Use la maquina
solamente cuando todos los dispositivos de proteccion esten operando en la forma indicada, por ejemplo: cubiertas, silenciadores,
y dispositivos de desactivacion.
• Una revision visual debera hacerse al menos una vez cada turno para asegurar que los daños visibles o fallas sean localizadas.
Cualquier cambio debera ser reportado al supervisor, incluyendo cambios en le rendimiento o comportamiento de la maquina; si es
necesario apaguela y asegurela.
• En caso de malfuncionamiento apague la maquina inmediatamente y asegurela. Arregle el problema lo mas pronto posible.
• Para prender y apagar la maquina siga las instrucciones de operacion, y observe la luces indicadoras.
• Antes de encender la maquina este seguro de que la misma no sera de ningun riesgo para alquien.
REGLAS DE TRABAJO
1. Verifique que la herramienta este enchulada en una alimentacion cuyo voltaje corresponde al voltaje indicado en la placa de
indentificacion.
2. No utilice la herramienta en ningun caso si faltara la tapa de proteccion o alguna de las tuercas. Si se ha retirado la tapa de
proteccion o las tuercas, coloquelas nuevamente en su lugar antes de utilizar la maquina. Controle que todos los elementos esten
en perfectas condiciones de utilizacion.
3. Sujete siempre firmemente su maquina si debe trabajar en un sitio elevado.
4. No toque, en ningun caso, la cuchilla, la fresa, la muela o cualquier, otro elemento en rotacion.
5. En ningun caso ponga en marcha la herramienta cuando el elemento de corte (el que trabaja en rotacion) esta en contacto con la
pieza que va a trabajar.
6. No suelte la maquina hasta que todas sus piezas moviles se hayan detenido completamente.
7. ACCESORIOS: La utilizacion de accesorios o de equipos que no figuren en las recomendaciones de este manual puede resultar
peligrosa.
8. PIEZAS DE REPUESTO: En caso de necesitar una reparacion, utilice exclusivarnente piezas de repuesto identicas a las de la
maquina.
Abra el empaque cuidadosamenta y levante
la sierra usando las asas del armazon
depositandola en terreno plano y nivelado en
el area de trabajo. Asegurese de que usted
cuenta con los siguientes componentes
antes de desechar el empaque:
• Sierra
• Llave Universal
• Conjunto deTubo de Agua
• Ø4 1/2" Cuchilla de la Sierra
• Manual de Propietario
Gatillo
1. Esta herramienta puede arrancar y parar apretando y soltando el gatillo (1).
2. Para hacerlo funcionar continuamente, oprima el boton del seguro (2)
Mientras mantiene apretado el gatillo. Apriete nuevamente para soltar
el seguro.
Adjuste de la Profundidad de Corte Figure 2
Adjuste del angulo de Corte Figure 4
NOTA: Esta absolutamente probido hacer ajustar con el motor en marcha. Ajuste el angulo de corte sin que se vea
afectado el ajuste de profundidad de corte. De lo contrario la brida exterior (7) puede tocar la pieza trabajada.
1. Afloje el perno (11) con la llave (13)y desmonte la brida exterior (7).
2. Remueva la cuchilla (8) del borde interior en el eje propulsor(9).
3. Instale la nueva cuchilla contra el borde interior el el eje propulsor (10).
4. Ahora ponga el borde exterior en contra de la cuchilla y apriete la tuerca firmemente con la llave.
Precaucion: Las marcas de rueda deben estar visibles desde afuera.
NOTA: Lamaquina debera estar apagada haciendo esta operacion (Desconectela)! L as marcas de la cuchilla deberan
ser visibles por afuera.
1. Afloje el perno de ajuste (3) y baje completamente la placa de la base (4) y apriete con el perno de ajuste.
2. Instale el tapon de agua (15) con el tornillo (16).
3. Instale el conector (17) del suministro de agua en el grifo.
4. Abra el grifo y moje la rueda.
5. Utilice la palanca de ajuste (18) para ajustar la cantidad de agua. Esta abierta en la posicion “A” y cerrada en la posicion “B”.
Precaucion: Compruebe que rueda esta centrada entre las salidas (14).
NOTA: Este seguro que la salida del agua no toque la cuchilla.
Cambio de la Rueda Figure 5
Instalacion del Suministro de Agua Figure 6
1. Cuando corte la pieza trabajada, mueva la herramienta por la linea dibujada para el corte, utilizando el borde (19) de la place
de la base.
2. Primero apoye solo la parte delantera de la placa de la base sobre la pieza trabajada a cortar (para que la rueda no toque
todavia el trabajo) y apriete el gatillo.
3. Cuando la rueda alcance su velocidad maxima, empuje la maquina hacia adelante para empezar a cortar. Siga empujando la
maquina con una fuerza uniforme y pareja hasta competar el corte.
NOTA: Cuando este cortando asegurese de usar guantes de plastico y zapatos de insulacion para prevenir electro
Cutacion.
Funcionamiento Figure 7
Mantenimiento
1. Luego de utilizarla, revise la herramienta para controlar que se encuentre en perfecto estado de funcionamiento.
2. No effectu ninguna regulacion mientras el motor este en marcha.
3. Desenchufe el cable de alimentacion del receptaculo, antes de cambiar las piezas removibles o que no sean reutilizables
(cuchilla, fresa, papel de lija, etc.),y antes de lubricar o de efectuar cualquier manipulacion con la unidad.
Some dust created by power sanding, sawing, grinding, drilling, and other
construction activities contains chemicals known to cause cancer, birth
defects or other reproductive harm. Some examples of these chemicals are:
•Lead from lead-based paints,
•Crystalline silica from bricks and cement and other masonry products, and
•Arsenic and chromium from chemically-treated lumber.
Your risk from these exposures varies, depending on how often you do this
type of work. To reduce your exposure to these chemicals: work in a well
ventilated area, and work with approved safety equipment, such as those dust
masks that are specially designed to filter tout microscopic particles.
WARNING
1. Para ajustar la profundidad de corte, afloje el perno (3).
2. Desclice la place base (4) a la profundidad deseada y vuelva a
apretar firmiente el perno.
3. La distancia en que sobresale (8) la sierra deside la base es la
Profundidad del corte.
Cepillo de Carbon Reemplazar Figure 3
1. Afloje los 4 tornillos dela parte de atras del cepillo de carbon en el motor y
remueva la cubierta de plastico negra.
2. Afloje la tapadera en contra de las manesillas del reloj de cada lado del
alojamiento del cepillo de carbon, despues remueva el resorte del cepillo de
cabon y reemplacelo con el nuevo cepillo de carbon.
3. Para empacar haga el mismo proceso pero en reversa despues de que instalo
el nuevo cepillo de cabon y apreto, la tapadera del alojamiento del cepillo.
1. La sierra puede ajustarse para cortar angulo entre 0º y 45º.
2. Afloje la tuerca (5) de la escala (6) e incline la placa de la base
(4) al angulo deseado.
3. Al angulo deceado reajuste la tuerca para asegurar la sierra.
Gatillo Figure 1

1. DANGER! Keep hands away from cutting area and blade. If both hands are holding the saw, they cannot be cut
by the blade.
Keep your body positioned to either side of the saw blade, but not in line with the saw blade. KICKBACK could cause
the saw to jump backwards.
Do not reach underneath the work. The guard can not protect you from the blade below the work.
WARNING: Read and understand all instructions. Failure to follow all instructions listed below, may result in
electrical shock, fire and/or serious personal injury.
Work Area
Keep your work area clean and well lit. Cluttered benches and dark areas are prone to accidents.
Do not operate power tools in explosive atmospheres, such as in the presence of flammable liquids, gases or
dust. Power tools create sparks which may ignite the dust or fumes.
Keep bystanders, children, and visitors away while operating a power tool. Distractions can cause you to loose
control.
Double insulated tools are equipped with a polarized (one blade is wider than the other.) This plug will fit in a
polarized outlet only one way. If the plug does not fully fit in the outlet, reverse the plug. If it still does not fit,
contact a qualified technician to install a polarized outlet. Do not change the plug in any way. Double insulation
eliminates the need for the three wire ground power cord and ground power supply system.
Avoid body contact with grounded surfaces such as pipes, radiators, ranges and refrigerators. There is an
increased risk of electrical shock if your body is grounded.
Don’t expose power tools to rain or wet conditions. Water entering a power tool will increase the risk of electrical
shock.
Do not abuse the cord. Never use the cord to carry the tools or pull the plug from an outlet. Keep cord away
from heat, oil, sharp edges, or moving parts. Replace damaged cords immediately. Damaged cords increase the
risk of electric shock.
When operating a power tool outside, use an outdoor extension cord marked “W-A” or “W”. These cords are rated
for outdoor use and reduce the risk of electric shock.
Stay alert, carefully watch what you are doing and use common sense when operating a power tool. Do not use
tool while tired or under the influence of drugs, alcohol or medication. The lack of attention while operating power
tools may result in serious personal injury.
Dress properly. Do not wear loose clothing or jewelry. Contain long hair. Keep your hair, clothing, and gloves
away from moving parts. Loose clothing, jewelry, or long hair can be caught in moving parts.
Avoid accidental starting. Be sure switch is off before plugging in. Carrying tools with your finger on the switch or
plugging in tools that have the switch are extremely dangerous and prone to accidents.
Use clamps or other practical way to secure and support the workpiece to a stable platform. Holding the
work by hand or against your body is unstable and may lead to loss of control.
Do not force tool. Use the correct tool for your application. The correct tool will do the job better and safer at
the rate for which it is designed.
Do not use the tool if switch does not turn on or off. Any tool that cannot be controlled with the switch is
dangerous and must be repaired.
Disconnect the plug from the power source before making any adjustments, changing accessories, or
storing the tool. Such preventive safety measures reduce the risk of starting the tool accidentally.
Store idle tools out of reach of children and other untrained persons. Tools are dangerous in the hands of
untrained users.
Maintain tools with care. Keep cutting tools sharp and clean. Properly maintained tools with sharp cutting
edges are less likely to bind and are easier to control.
Check for misalignment or binding of moving parts, breakage of parts, and any other condition that may
affect the tools operation. If damaged, have the tool serviced before using. Many accidents are caused by
poorly maintained tools.
Tool service must be performed only by qualified repair personnel. Service or maintenance performed by
unqualified personnel could result in a risk of injury.
When servicing a tool, use only identical replacement parts. Follow instructions in the Maintenance section
of this manual. Use of unauthorized parts or failure to follow Maintenance instructions may create a risk of electrical
DANGER! Keep hands away from cutting area and blade. If both hands are holding the saw, they cannot be cut
by the blade.
Keep your body positioned to either side of the saw blade, but not in line with the saw blade.
Do not reach underneath the work. The guard cannot protect you from the blade below the work.
NEVER hold the piece being cut in your hands or across your leg. It is important to support the work properly to
minimize body exposure, blade binding, or loss of control.
Always use blades with correct size and shape arbor holes. Blades that do not match the mounting hardware of
the saw will run eccentrically, causing loss of control.
Never use damaged or incorrect blade washers or bolts. The blade washers and bolt were specially designed for
your saw. for optimum performance and safety of operation.
SPECIFIC SAFETY RULES:
General Safety and Rules
Electrical Safety
Personal Safety
TOOL USE AND CARE:
SERVICE:
SPECIFIC SAFETY RULES AND SYMBOLS:
Remove adjusting keys or switches before turning the tool on. A wrench or a key that is left attached a rotating
part of the tool may result in personal injury.
Keep proper footing and balance at all times and do not overreach. Proper footing and balance enables better
control of the tool in unexpected situations.
Use safety equipment. Always wear eye protection. Dust mask, non-skid safety shoes, hard hat, or hearing
protection must be used for appropriate conditions.
Table of contents
Languages:


