Diasend Transmitter User manual

Quick guide for Glooko users
diasend® is a Glooko brand
diasend® Transmitter

2

3
Contents
Find your device ............................................................................................................4
General information......................................................................................................5
Product description..................................................................................................................................................................................5
Supported devices....................................................................................................................................................................................5
Warnings.....................................................................................................................................................................................................5
How to start using the diasend® Transmitter...........................................................6
Plug diasend® Transmitter into a power outlet ..................................................................................................................................6
diasend® Transmitter is ready to use when.........................................................................................................................................6
Connect the diabetes device to diasend® Transmitter......................................................................................................................7
Upload data ...............................................................................................................................................................................................7
Log in to your Glooko account...............................................................................................................................................................7
Understand the diasend®Transmitter lights .......................................................................................................................................8
Transmitter lights during successful upload .......................................................................................................................................8
Compatible devices and transmission methods ....................................................9

4
Glucose meter CGM Insulin pump Insulin pen
Find your device
Abbott
FreeStyle Freedom Lite........................................................................................9
FreeStyle InsuLinx .................................................................................................9
FreeStyle Libre ........................................................................................................9
FreeStyle Lite...........................................................................................................9
FreeStyle Optium Neo..........................................................................................9
FreeStyle Precision Neo ......................................................................................9
Precision Xtra...........................................................................................................9
Acon Laboratories
On Call® Advanced ................................................................................................9
On Call® Plus ............................................................................................................9
On Call® Resolve.....................................................................................................9
On Call® Vivid ...........................................................................................................9
AgaMatrix
WaveSense Jazz™ ..................................................................................................9
Animas
OneTouch Ping (meter)........................................................................................9
Animas
OneTouch Ping (pump)......................................................................................15
Vibe........................................................................................................................... 15
Arkray
GlucoCard 01 .........................................................................................................10
GlucoCard Expression .......................................................................................10
GlucoCard Shine ..................................................................................................10
GlucoCard Vital.....................................................................................................10
Relion Confirm......................................................................................................10
Relion Prime...........................................................................................................10
Ascensia
Contour Next One................................................................................................10
Contour Plus One.................................................................................................10
B. Braun
Omnitest 5 ..............................................................................................................10
Beurer
GL50 evo..................................................................................................................10
Bayer (Ascensia)
Breeze 2 ...................................................................................................................10
Contour....................................................................................................................10
Contour Link ..........................................................................................................10
Contour Next .........................................................................................................10
Contour Next EZ...................................................................................................10
Contour Next Link................................................................................................10
Contour Next Link 2.4.........................................................................................10
Contour Next USB................................................................................................10
Contour USB ..........................................................................................................10
Contour XT..............................................................................................................10
Roche
Accu-Chek Aviva Combo.................................................................................. 12
Accu-Chek Aviva Connect ................................................................................11
Accu-Chek Aviva Expert ................................................................................... 12
Accu-Chek Aviva Nano...................................................................................... 12
Accu-Chek Aviva Plus Black ............................................................................ 12
Accu-Chek Aviva Plus Silver ............................................................................ 12
Accu-Chek Compact Plus ................................................................................ 12
Accu-Chek Guide .................................................................................................11
Accu-Chek Insight (meter).............................................................................. 12
Accu-Chek Nano ................................................................................................. 12
Accu-Chek Performa......................................................................................... 12
Accu-Chek Performa Connect........................................................................11
Accu-Chek Performa Nano............................................................................. 12
i-SENS
Alphacheck Professional ..................................................................................10
CareSens N.............................................................................................................10
CareSens N POP...................................................................................................10
CareSens N Voice.................................................................................................10
Nipro/Trividia
TRUE METRIX ........................................................................................................11
TRUE METRIX AIR .................................................................................................11
TRUEresult..............................................................................................................11
LifeScan
OneTouch Select Plus Flex ...............................................................................11
OneTouch Ultra2 ..................................................................................................10
OneTouch UltraMini............................................................................................10
OneTouch Verio ...................................................................................................11
OneTouch Verio Flex ...........................................................................................11
OneTouch Verio IQ...............................................................................................11
OneTouch Verio Sync..........................................................................................11
OneTouch Verio Pro ............................................................................................11
Prodigy
AutoCode................................................................................................................11
Sanofi
BGStar ......................................................................................................................11
MyStar Extra...........................................................................................................11
Wellion
Calla Dialog.............................................................................................................11
Ypsomed
mylife Pura..............................................................................................................11
mylife Unio..............................................................................................................11
Insulet
OmniPod.................................................................................................................14
OmniPod Dash......................................................................................................14
Dexcom
G4 Platinum........................................................................................................... 13
G4 Platinum with S hare ................................................................................... 13
G5.............................................................................................................................. 13
Tandem
t:flex...........................................................................................................................14
t:slim .........................................................................................................................14
t:slim X2....................................................................................................................14
t:slim G4...................................................................................................................14
mylife OmniPod....................................................................................................14
Accu-Chek Insight (pump)............................................................................... 12
Menarini
GlucoMen areo......................................................................................................11
GlucoMen areo 2K................................................................................................11
GlucoMen Gm........................................................................................................11
GlucoMen LX Plus ................................................................................................11
GlucoMen Visio .....................................................................................................11

5
General information
Product description
Supported devices
Warnings
diasend® Transmitter is indicated for use by health care professionals in health care facilities to transfer predefined data
from home monitoring devices to a server database. The device can be used as a stand-alone product or in combination
with the Glooko System.
To get started, you will need:
1. A compatible blood glucose meter, insulin pump, or continuous glucose monitor (CGM);
2. The diasend® Transmitter;
3. A Glooko account with Population Tracker access;
4. The device upload cable specific to the diabetes device. Please note that Glooko does not provide
these cables. If you are missing a specific cable, please contact the device manufacturer.
The Glooko device system for Glooko Application does not measure, interpret, or make decisions on the data it conveys nor
is it intended to provide automated treatment decisions or be used as a substitute for professional judgment. All medical
diagnosis and treatment are to be performed under the supervision and oversight of an appropriate healthcare provider.
All patient medical diagnoses and treatments are to be performed under supervision of qualified healthcare professionals!
diasend® is not intended to provide automated treatment decisions or to be used as a substitute for professional healthcare
judgment. diasend® is not intended for emergency calls or for transmission or indication of any real-time alarms or time-
critical data! diasend® is not intended as a substitute for direct medical supervision or emergency intervention.

6
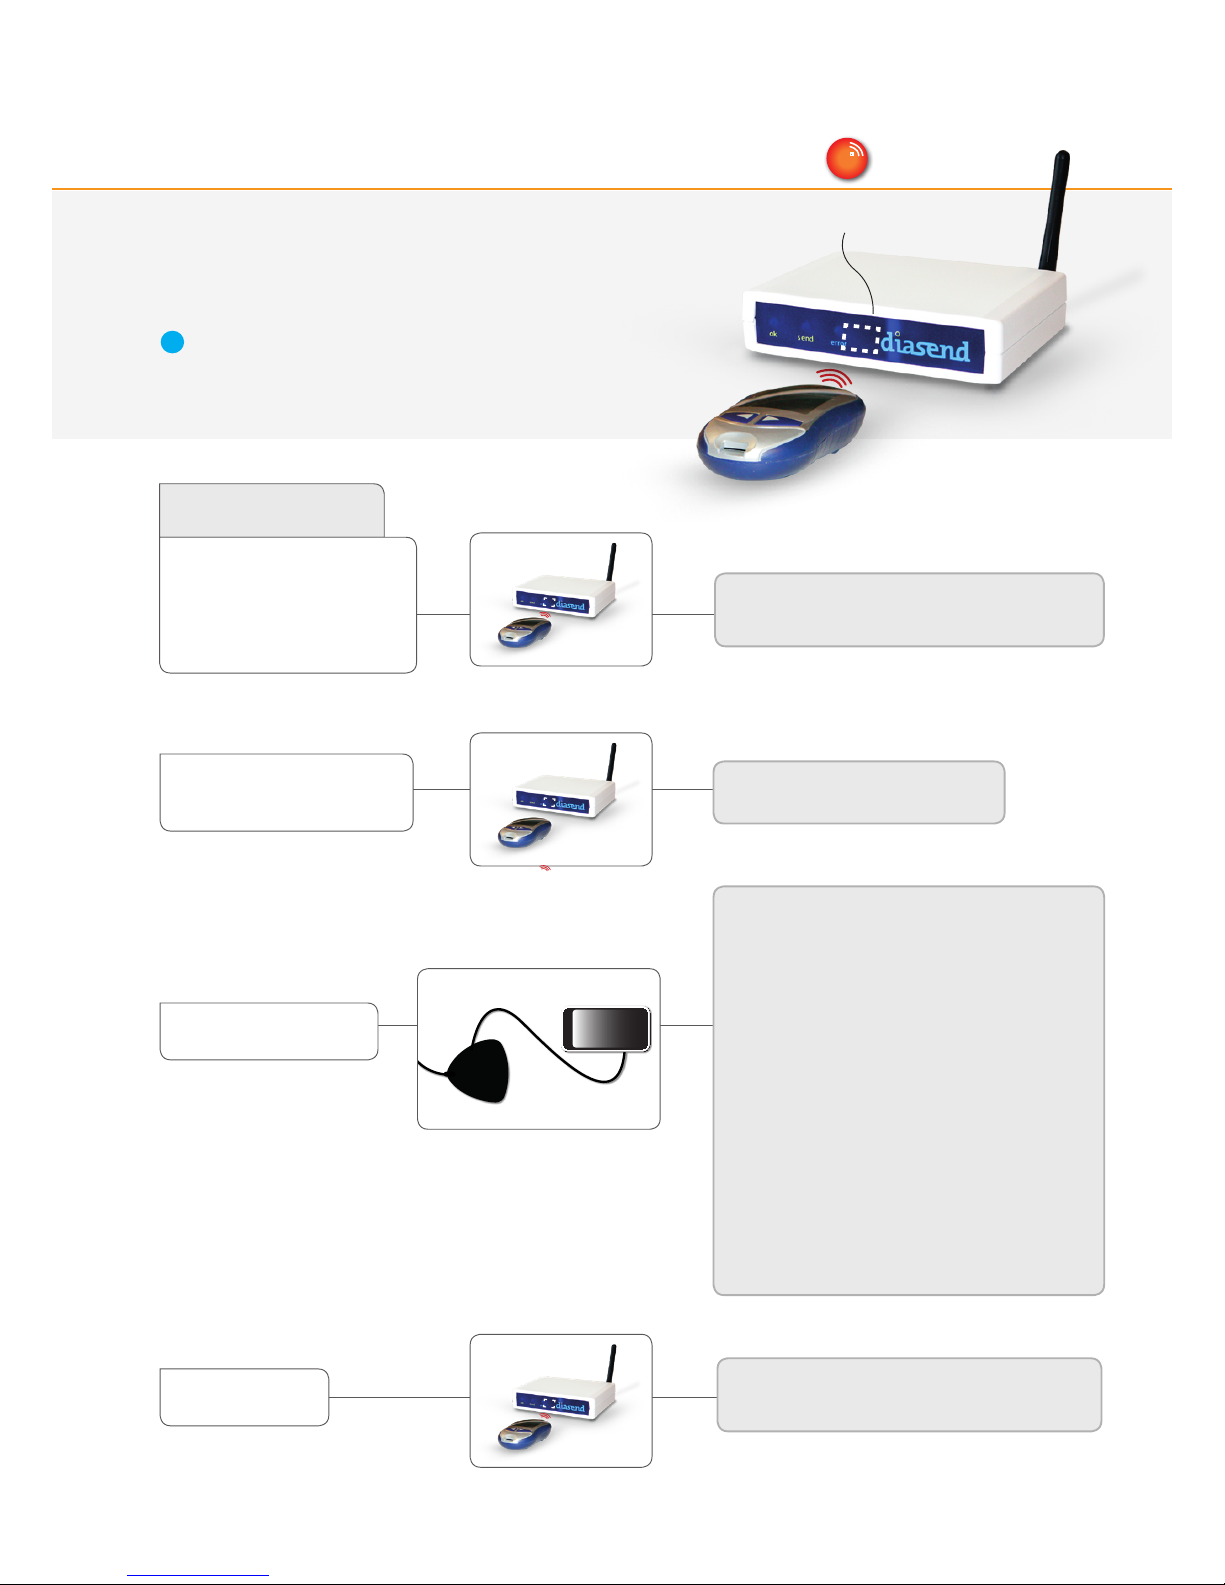
Plug diasend® Transmitter into a power outlet
and allow the Transmitter to boot up.
diasend® Transmitter is ready to use when:
How to start using diasend®Transmitter
1
2
1. Green ok indicator has stopped flashing.
Slow flashing means the Transmitter is starting up.
Rapid flashing means the Transmitter is updating.
2. Blue send indicator is flashing slowly.
Note: if you have a USB hub connected to the diasend® Transmitter,
please note that the USB hub must be powered by its own power supply.
diasend® Transmitter uploads glucose data from the FDA cleared meters, insulin pumps, and CGMs listed below.
i
Quick guide for Glooko users

7
IR
Connect the diabetes device to diasend® Transmitter
Upload data
Log in to your Glooko account
Each patient device connects in one of the following three manners:
• USB cable (USB port or USB hub)
• Bluetooth (requires specific Bluetooth adapter)
• Infrared (built-in IR receiver or for some devices a SmartPix cable).
Rapid blue
flashing
Wait until green ok
indicator is lit
Connect the patient device - the blue send indicator will
flash rapidly whilst uploading the data.
Wait until the blue send indicator stops flashing rapidly
and the green ok indicator is lit.
Once the green ok indicator is lit, you can view the data at:
https://my.glooko.com
3
4
5
1
2
3
Go to https://my.glooko.com to
log in to your Population Tracker.
Navigate to the Assign Devices tab
to retrieve the uploaded data.
For more information about using the Population Tracker, please refer to the:
Population Tracker Instructions for Use Guide or the Population Tracker Sponsored Edition Instructions for Use Guide
at https://support.glooko.com
i

8
1
1. Connect diasend®
Transmitter to a power outlet
2. The green ok light will flash
slowly for a few minutes when
starting up.
3
5
6
3. The send light will flash
slowly. The Transmitter is now
in stand-by mode and is ready
for use.
4. Connect a diabetes device to the
Transmitter.
5. The send light will flash rapidly
as the data is being uploaded.
6. If the upload was successful, the
green ok light will be a steady green
light and the blue send light will start
flashing slowly again. The Transmitter
is now ready for another upload.
diasend® Transmitter lights during successfull upload
• SLOW FLASHING
The green light flashes
slowly when the transmitter
is connecting to the GSM
network.
• RAPID FLASHING
The Transmitter is updating
itself. The green light will flash
rapidly during a sustained
period of time. You can start
using the transmitter once the
blue light flashes slowly again.
• STEADY LIGHT ON
The green light signals a
successful upload when it has a
steady light.
• SLOW FLASHING
The transmitter is
ready for use.
• RAPID FLASHING
Data is being uploaded.
• STEADY LIGHT ON
A red steady light signals that the latest
upload was not successful. This is most
likely due to temporary issues related to the
wireless GSM network. Please try to upload
the patient device again.
• RAPID FLASHING
The red light flashes rapidly alongside the
green light when the Transmitter cannot find
a network.
send light
ok light
error light
Understand the diasend® Transmitter lights:
4
2
The following sequence of lights illustrates a successful upload using diasend® Transmitter:

9
marked with a W
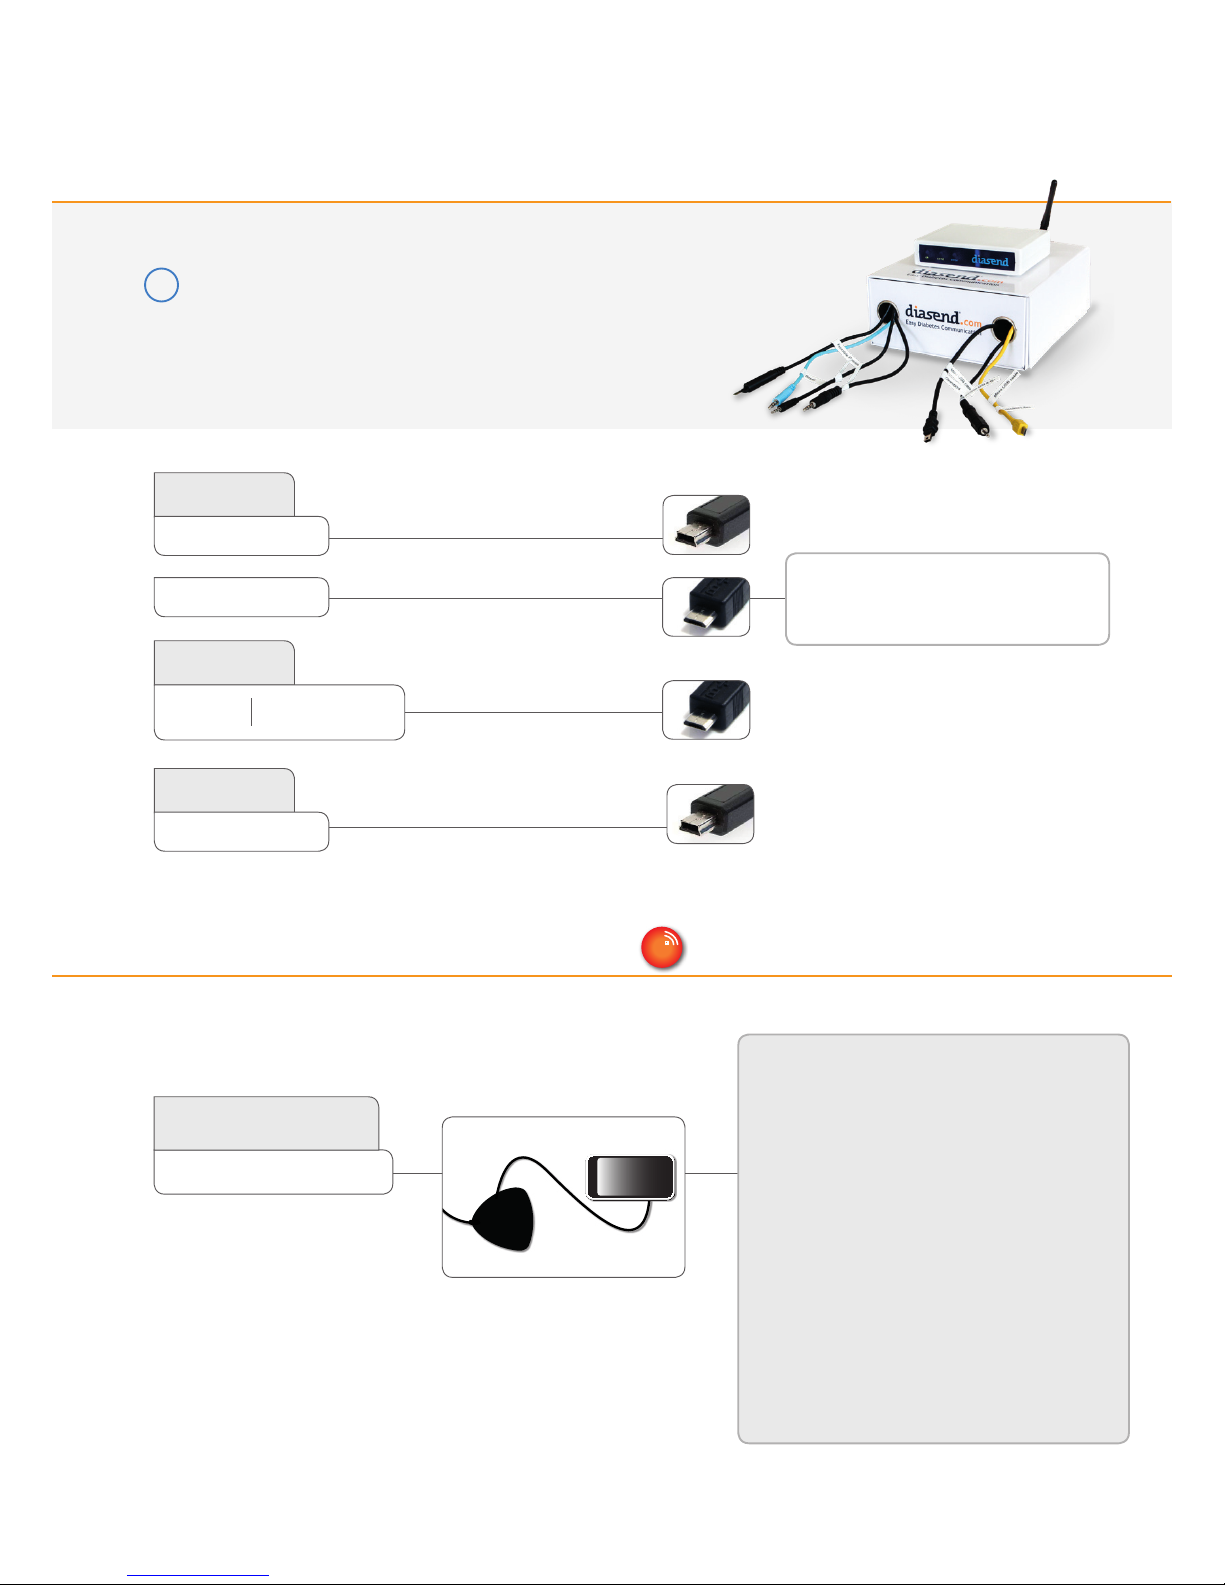
Blood glucose meters – connected with USB cable
Compatible devices and transmission methods
Below are instructions on how to upload diabetes data from a compatible device using diasend® Transmitter. Unless
explicit upload instructions are provided for the device, you simply need to connect it to the Transmitter or USB hub with
its specific USB cable and it will upload automatically.
You will need a Glooko account with Population Tracker access.
The data uploaded using the diasend® Transmitter will synchronize with
your Population Tracker account, which can be accessed with your
Glooko professional account login information. Internet (cellular network)
is necessary for the uploaded data to synchronize to the Glooko server.
diasend® Transmitter uploads glucose data from the FDA cleared
meters, insulin pumps, and CGMs listed below.
If you are using a USB hub, please make sure that it is
connected to a power outlet as well as the diasend® Transmitter.
Glucose meters
CGM devices
Insulin pumps
i
i
Abbott FreeStyle USB
cable (2.5 mm)
Connect and press the meter’s
Mand Sbuttons.
Please note that FreeStyle Libre is
currently compatible in Europe only!
Connect and press and hold the
meter’s Sbutton.
On Call USB cable
(2.5 mm)
On Call USB cable
(2.5 mm)
AgaMatrix USB cable
Abbott Xceed USB cable
Connect and press the meter’s
power button.
Abbott
FreeStyle InsuLinx
FreeStyle Libre
FreeStyle Precision Neo
FreeStyle Optium Neo Micro USB
Acon Laboratories
On Call® Advanced On Call® Resolve
On Call® Plus On Call® Vivid
FreeStyle Freedom Lite FreeStyle Lite
AgaMatrix
WaveSense Jazz™
Precision Xtra
Animas
OneTouch Ping (meter) Mini USBMini USB

10
Arkray USB cable
(2.5 mm)
USB port on meter
Connect and press the meter’s
power button.
Connect and press the meter’s
Mbutton.
Bayer’s blue USB
cable (3.5 mm)
Bayer’s blue USB cable (3.5 mm)
Continued from previous page
Blood glucose meters – connected with USB cable
i-Sens USB cable
(2.5 mm)
Medcore Care + GlucoCard
Expression USB cable (3.5 mm)
Connect and press any button.
Connect and select PC Link in the
main menu on the meter.
Connect and press the meter’s
power button.
LifeScan USB cable
(2.5 mm)
Connect then push the meter’s
Sbutton (Cbutton).
i-Sens USB cable
(2,5 mm)
USB port on meter
Micro USB
Micro USB
Arkray
Glucocard 01
Glucocard Vital
Relion Confirm
Relion Prime
Ascensia
Bayer (Ascensia)
Breeze 2
Glucocard Shine
Glucocard Expression
Contour Next One Contour Plus One
Contour Next
Contour Next Link
Contour Next Link 2.4
Contour Next USB
Contour USB
Contour
Contour Link
Contour Next EZ
Contour XT
Mini USBMini USB
i-SENS
Alphacheck Professional
CareSens N
CareSens N POP
CareSens N Voice
LifeScan
OneTouch Ultra2 OneTouch UltraMini
Micro USB
Omnitest 5
B. Braun
Beurer
GL50 evo

11
Continued from previous page
Blood glucose meters – connected with USB cable
Nipro TRUEresult USB docking station
Connect and place the meter in the
docking station.
Once connected, upload should start within
20 seconds aer connecting the cable. If not,
go to the main menu on the meter. Go to
My data > Data Transfer > Reports, and connect
the meter to the USB cable again.
(Please do not hold down the two arrow buttons.)
Sanofi USB cable
marked with:
Menarini white USB cable (2,5 mm) If the meter displays: E-3, disconnect
it wait until the display is o, then
connect the meter again.
Menarini blue USB cable (3.5 mm)
Wellion Calla USB cable
(3,5 mm)
Connect and select PC Link in the main menu
on the meter.
Menarini GlucoMen areo
USB cable (2,5 mm)
mylife Pura
USB cable
Connect and press the meter’s
power button.
GlucoMen areo GlucoMen areo 2K
GlucoMen Gm
OneTouch Verio
OneTouch Verio Flex
OneTouch Select Plus Flex
OneTouch Verio IQ
OneTouch Verio Sync
OneTouch VerioPro
Micro USB
Mini USB
Nipro / Trividia
TRUE METRIX
TRUE METRIX AIR
TRUEresult
BGStar MyStar Extra
Prodigy
AutoCode Mini USB
Roche Accu-Chek
Aviva Connect
Performa Connect
Guide Micro USB
Sanofi
Menarini
GlucoMen LX Plus
Wellion
Calla Dialog
Ypsomed
mylife Pura
mylife Unio Mini USB
LifeScan
GlucoMen Visio
12
IR
IR
IR
IR
Blood glucose meters – with infrared connection IR
IR eye on Transmitter
Set the meter in upload mode by following the instructions below.
Place the glucose meter’s top end directed towards the IR eye on
the diasend® Transmitter.
Please make sure to keep the device completely still during the upload.
Do not remove the device until the green ok indicator is lit.
i
Activate IR transmission by pressing and holding
the two arrow buttons until two arrows appear tin the
display.
In the main menu, go to My data and
select Data transfer.
Activate IR transmission by pressing and holding
the buttons Sand Mbelow the display until two arrows
appear in the display.
Roche Accu-Chek
Aviva Nano
Aviva Plus Black
Aviva Plus Silver
Nano
Performa
Performa Nano
Compact Plus
Aviva Combo
Aviva Expert
Accu-Chek Aviva Solo
Insight
IR connection – No cable needed
IR connection – No cable needed
IR connection – No cable needed
Smart Pix 2 cable
Note! Connect the Insight handset/glucose meter
with a micro USB cable to the Smart Pix 2.
1. Connect the Smart Pix 2 cable to the Transmitter
and wait for the blue indicator on the Smart Pix 2
to start flashing slowly.
2. Connect the Insight handset to
the Smart Pix 2 with a micro USB cable.
3. In the handset menu select Connect to PC and
press OK.
4. Ensure that the pump is within reach of the Insight
handset.
5. The blue indicator on the Smart Pix 2 is on while
the data is being transmitted from the device to
the Smart Pix 2.
6. The blue indicator turns itself o and both
Smart Pix 2 and device emit a sound to signal that
the data is being transmitted from the
Smart Pix 2 to the Transmitter. Do not disconnect
the Smart Pix 2 yet!
7. Wait for the Transmitter to signal the upload was
successful (green ok indicator has a steady light).
13
If you are using a USB hub, please make sure that it is
connected to a power outlet as well as the diasend® Transmitter.
i
CGMs - connected with USB cable
If the upload doesn’t start, disconnect
the receiver, select Shutdown in the
menu to turn the receiver o. Turn the
receiver on again and connect it to the
transmitter.
Micro USB
G4 Platinum
G4 Platinum with Share
G5
Dexcom
14
If you are using a USB hub, please make sure that it is
connected to a power outlet as well as the diasend® Transmitter.
i
Insulin pumps – with infrared cable IR
Insulin pumps - connected with standard USB cable
1. Connect the Smart Pix 2 cable to the Transmitter
and wait for the blue indicator on the Smart Pix 2
to start flashing slowly.
2. Connect the Insight handset to
the Smart Pix 2 with a micro USB cable.
3. In the handset menu select Connect to PC and
press OK.
4. Ensure that the pump is within reach of the Insight
handset.
5. The blue indicator on the Smart Pix 2 is on while
the data is being transmitted from the device to
the Smart Pix 2.
6. The blue indicator turns itself o and both
Smart Pix 2 and device emit a sound to signal that
the data is being transmitted from the
Smart Pix 2 to the Transmitter. Do not disconnect
the Smart Pix 2 yet!
7. Wait for the Transmitter to signal the upload was
successful (green ok indicator has a steady light).
Smart Pix 2 cable
Note! Connect the Insight handset/glucose meter
with a micro USB cable to the Smart Pix 2.
Tandem
t:flex
t:slim
t:slim X2
t:slim G4
Insulet
Ypsomed
OmniPod
mylife OmniPod
OmniPod Dash
Mini USB
Mini USB
Micro USB
Micro USB
1. Connect the OmniPod’s PDM
to your computer.
2. Push its power button.
Insight
Roche Accu-Chek

15
IR
IR
Insulin pumps – with infrared connection IR
1. Suspend the pump. (MAIN MENU, scroll to
Suspnd/Resum and press OK;
Suspend is highlighted).
2. Press OK.
3. Place the pump with its back towards
the IR eye on the Transmitter.
4. When the transmission is finished:
Resume pump (MAIN MENU, scroll to
Suspnd/Resum and press OK;
Resume is highlighted). Press OK.
IR eye on Transmitter
For the Animas pumps: Please make sure that the pump is suspended and
the screen is illuminated when transmission begins (the screen does however
not need to be illuminated during the entire transmission). Keep the pump
completely still and do not remove the pump until the green ok indicator is lit.
Animas
OneTouch Ping (pump)
Vibe
IR connection – No cable needed

16
16
A2039v3D QG_US_diasend_transmitter_for_glooko_users (2018-10-03)
Need help? Contact Glooko support:
Website: https://support.glooko.com
Call support: 1-800-206-6601 Option 1
SMS/text message support: 650-720-5310
Table of contents
Popular Medical Equipment manuals by other brands


Lowenstein Medical
Lowenstein Medical Azeer VENTIlogic LS instructions

Schiller
Schiller AT-102 Service handbook

Sunrise Medical
Sunrise Medical Guardian IC-5142 User instructions

Gaymar
Gaymar MEDI-THERM III Service manual

Olympus
Olympus VorticCatchV Retrieval Basket Quick reference guide

Albrecht
Albrecht HYPEX LITE User instructions