Dickinson NEWPORT EXPLORER Manual

Dickinson Marine #101 - 17728 66 Ave,
Surrey, BC, Canada, V3S 7X1
Toll Free: 1-800-659-9768
Email: info@dickinsonmarine.com
INSTALLER: Leave this manual with the appliance. CONSUMER: Retain this manual for future reference.
—Do not store or use gasoline or other flammable vapors and
liquids in the vicinity of this or any other appliance.
—WHAT TO DO IF YOU SMELL GAS
• Do not try to light any appliance.
• Evacuate all persons from the vehicle immediately.
• Shut off the gas supply at the gas container or source.
• Do not touch any electrical switch or use any phone or radio in
the vehicle.
• Do not start the vehicle’s engine or electric generator.
• Contact the nearest gas supplier or qualified service technician
for repairs.
• If you cannot reach your gas supplier, or qualified technician,
contact the nearest fire department.
• Do not turn on the gas supply until the gas leak(s) has been
repaired.
—Installation and service must be performed by a qualified
installer, service agency or the gas supplier.
WARNING:
FIRE OR EXPLOSION HAZARD Failure to
follow safety warnings exactly could result in serious injury,
death, or property damage.
This appliance may be installed in an OEM installation
manufactured home (USA only) or mobile home and must
be installed in accordance with the manufacturer’s
instructions and the Manufactured Home Construction and
Safety Standard, Title 24 CFR, Part3280,in the United
States, or the Standard for installation in Mobile Homes,
CAN/CSA Z240 MH Series, in Canada.
A manufactured home (USA only) or mobile home OEM
installation must conform with the Manufactured Home
Construction and Safety Standard, Title 24 CFR, Part 3280,
or, when such a standard is not applicable, the Standard
for Manufactured Home Installations, ANSI A225.I/NFPA
501A, or Standard for Gas Equipped Recreational Vehicles
and Mobile Housing, CSA 2240.4
This appliance is only for use with the type of gas
indicated on the rating plate. This appliance is not
convertible for use with other gases.
NEWPORT
EXPLORER
Model # 00-NEW-EXPLORER
INSTALATION
& OPERATING
INSTRUCTIONS
Serial #: _ _ _ _ _ _ _ _ _ _ _ _ _ _ _ _ _ _ _ _ _ _
!

Service notes:
1
All rights reserved. No part of this manual may be reproduced without permission in
writing from Dickinson Marine. Dickinson also reserves the right to modify or change
without notice, any materials, applications, equipment, accessories, and/or prices. All
dimensions, measurements and weights are approximate.
Appliance model:
@dickinsonmarine1932
dickinsonmarine.com
/dickinsonmarine
@dickinsonmarine
www
Serial No.:
Fuel Type:
Date of purchase:
We’d love to see your Dickinson Marine pictures & videos, please follow, tag us and share!

TABLE OF CONTENTS
Page#
1
2
2
3
3
4
5
6
6
7
8
9
10
11
12
12
12
13
14
15
16
17
18
19
20
21
22
23
24
25
26
27
28
………………………………………………………….…...Service notes
1. INTRODUCTION
……………………………….……………………….……..……Since 1932
…………………………….…………..General Appliance Warnings
………………………………LP Gas cylinder specs & installation
…………………………………………………………….……….….Warranty
………………………………………………..Conditions & Limitations
2. ABOUT THIS APPLIANCE
……………………………………….…………..…About this Appliance
……………………………………..………………………………………....FAQ
……………………………………….……..Dimensions & Clearances
……………………………………….……..…Ratings & Specifications
………………………………………….………………….….Direct Venting
……………………………………………………..Internal Components
3. INSTALLATION GUIDE
………………………………….…...Where to Install the Fireplace
…………………………………………………………….Heating Capacity
………………………….….Choosing an optimal install location
……………………………………………………….…Chimney Assembly
…………………………………………………………Chimney variations
…………………………………………….……Unsupported variations
………………………………………………………….…………..Cap install
…………………………………………….……Mounting the Fireplace
…………………………………….…Mounting the Fireplace cont’d
.………………..…………………………………….…Flue Guard Install
.………………..…………………………Flue Guard Install Options
…………………………………………………Propane Gas Connection
..…………………………………Propane Gas Connection options
……………………….Propane Gas Connection Options cont’d
……….………..Safely Completing the Propane Connection
………………………………………………………….………..…Fan Power
…………………………………………………………..AA Battery Install
………………………………..……Read This Before First Lighting
29
29
30
31
32
32
33
34
34
34
35
36
37
38
39
39
40
41
42
43
44
45
46
47
47
48
48
49
49
50
51
52
4. FIREPLACE OPERATION
……………………………………..……………….Lighting Instructions
……………………………………………………….Modes Of Operation
….….…………………………………………………………..Hot Air Vents
5. FIREPLACE MAINTENANCE
………………………………………………………General Maintenance
……………………………….Removing & Replacing the Window
6. TROUBLESHOOTING
……………………………….….…List of Troubleshooting Guides
…………………………………………………………..Technical Support
................................................Fireplace won’t light
…………………………….Fireplace lights but quickly goes out
…………….………Fireplace goes out unexpectedly while on
………………………………………………Fan not working correctly
7. APPENDIX
………………..……………………………………………………….Directory
…………………………………..1.1 Cleaning the Propane Orifice
..…….1.2 Cleaning the Thermocouple/Valve Connection
.………………………………………..1.3 Adjust & Inspect Burner
………………………………1.4 Gas Knob Contacts Front Panel
………………………………………1.5 Sparker Probe Adjustment
……………………………………………1.6 Replace Thermocouple
……………………………………………….…..1.7 Fan Replacement
………………………………………1.8 Replace High Heat Sensor
……………………………………………….1.9 Replace Battery Box
……………………………………………2.0 Replace Sparker Probe
…………………………………………..2.1 Replace ignition
Button
……………………………………………2.2 Replace Speed Control
……………………………………………………2.3 Replace Gas Valve
…………………………………………2.3 Replace Gas Valve cont’d
8. GLOSSARY OF TERMS
9. LIST OF ILLUSTRATIONS
2
Since 1932, Dickinson Marine have been among the most well known producers of marine appliances on the market.
The uncompromising quality and legendary robustness of Dickinson appliances have earned them a place in the hearts of
sailors and fishing crews for decades. Still manufactured today using the most modern methods & high quality materials
available, Dickinson stoves & heaters are now available for more applications than ever. Every Dickinson appliance is
assembled by highly trained personnel and undergoes rigorous quality controls at every step of the process. At Dickinson
we’re pleased to be able to offer you tough & reliable heating systems to keep you warm wherever your adventures may
to take you.
Thank you for choosing a Dickinson Appliance! In order to get the most out of your new
Dickinson appliance, please read all of the warnings and technical specifications found
on the following page and throughout this instruction manual.
1. INTRODUCTION
Serial No.:

GENERAL APPLIANCE WARNINGS
Leak test all connections before first use
Leak test connections after each tank refill
Always check the heater, tank and hose connections prior to each use
This heater is configured for propane. Do not use natural gas.
Never use charcoal, lava rocks or any other source of solid fuel in this heater
Ensure that flames are coming out of the entire burner. Occasionally insects can enter when the unit isn’t in use and create
blockages which can lead to malfunctions or burner fires.
Never check for leaks using an open flame. Use soapy water on the connections and look for bubbles.
Never use or store gasoline or any other flammable vapors or liquids in or near your heater
Keep children and pets away from a hot appliance. DO NOT allow children to operate.
Do not leave this heater unattended when in use.
Keep any electrical cords away from the heater when it’s in use
DO NOT operate while under the influence of drugs or alcohol
Do not use any other regulator other than ones supplied by or ordered from Dickinson Marine
Parts of the heater become hot when in use. To avoid burns DO NOT touch any of the hot surfaces.
This heater is not intended for commercial use.
Adhere to all clearances listed in this manual.
Do not use this appliance if any part has been underwater. Immediately call a qualified service technician to inspect the
appliance and to replace any part of the control system and any gas control which has been underwater.
Toddlers, young children, and others may be susceptible to accidental contact burns. A physical barrier is recommended if th ere
are at-risk individuals in the house. To restrict access to a fireplace or stove, install an adjustable safety gate to keep toddlers,
young children, and other at-risk individuals out of the room and away from hot surfaces.
Clothing or other flammable material should not be placed on or near the appliance.
Any safety screen, guard, or barrier removed for servicing an appliance must be replaced prior to operating the appliance.
Label all wires prior to disconnection when servicing controls. Wiring errors can cause improper and dangerous operation after
servicing. Verify proper operation after servicing.
Installation and repair should be done by a qualified service person. The appliance should be inspected before use and at least
annually by a professional service person. More frequent cleaning might be required due to excessive lint from carpeting,
bedding material etc. It is imperative that control compartments, burners, and circulating air passageways of the appliance be
kept clean.
LP GAS CYLINDER SPECS & INSTALLATION
•Heater and its individual shutoff valve must be disconnected from the gas supply piping system during any pressure testing of that
system at test pressures in excess of ½ PSI (3.5kPa)
•The heater must be isolated from the gas supply piping system by closing its individual manual shut-off valve during any pressure
testing of the gas supply piping system in equal or less than ½ PSI (3.5 kPa)
•The LP gas supply cylinder to be used MUST be constructed and marked in accordance with the specifications for LP gas cylinde rs,
U.S. Department of Transportation (DOT) or the standard for cylinders, spheres and tubes for the Transportation of Dangerous
Goods, CAN/CSA-B339.
•The propane supply cylinder system must be installed with proper vapor withdrawal capabilities.
•A pressure regulator must be used in the operation with this unit.
•Any replacement regulators must be of those specified by the appliance manufacturer.
3
CAUTION! FAILURE TO ADHERE TO THE
SAFETY WARNINGS LISTED IN THIS MANUAL
COULD RESULT IN DAMAGE TO PROPERTY
OR SEVERE PERSONAL INJURY!

WARRANTY
We at Dickinson wish to maintain a reasonable and easy system for returns, warranty, returns and exchanges. To accomplish this, we
would like to inform you of some helpful guidelines and procedures to use and follow when sending back product to the Dickins on
Marine. All correspondence regarding returns, warranties and exchanges will go through the factory of Dickinson Marine in Surrey, BC,
Canada and the product must be returned to this location.
DICKINSON WARRANTY POLICY
Dickinson Marine appliances are covered under limited warranty for a period of one year dated from the purchase of the product by the
end user with proof of purchase or a registered warranty. The warranty page at the end of this manual should be copied for your records
and returned to Dickinson to activate your warranty within 90 days of your purchase. You can also activate it online at
dickinsonmarine.com/contact. In order to activate your warranty the warranty page must be mailed back to us or the warranty must be
registered online. In order to access after sales service within the warranty period without completing your warranty registration, proof
of purchase must be presented.
1. Customers can contact Dickinson Marine directly to
settle any warranty issues. We are pleased to help. Call us
toll free 1-800-659-9768 or email:
info@dickinsonmarine.com
3. If a customer is returning a complete product they
believe to be defective, we ask them to confirm that the
product has been assembled and put into use correctly. If
you are not sure please call 1-800-659-9768 to book a
phone consultation with tech support. Dickinson Marine will
not provide credit for used products that are not defective.
In these cases, it is best to call the factory to determine if
the product is being used correctly, has been assembled
correctly or is in fact defective.
4. All products being sent back to Dickinson Marine must
have a Return Authorization Number. Contact us at
Dickinson Marine toll free 1-800-659-9768 or e-mail
info@dickinsonmarine.com to obtain a Return Authorization
Number (RA#). This allows us to track and process your
return. Once you have received an RA# from us, ship to the
address below. We recommend you ship using the mail
service insured and retain a tracking number. Customers are
responsible for the shipping costs for all returns and
exchanges. Please note that in order to obtain an RA#
number we may ask you to provide proof of purchase,
photographs or video recordings demonstrating the issue in
question.
2. Products that are demonstrably older than the warranty
period or those that have obviously been misused will not be
returned, exchanged, or repaired.
Non-defective Returns & Exchanges: Dickinson reserves the right to apply a 20% restocking fee for non-defective
returns & exchanges. An RA #will be needed from the factory to facilitate any return. Credits will be made at the last
purchased price for that part number.
Dickinson Marine Returns
#101-17728 66th Avenue
Surrey, BC
V3S 7X1, Canada
4
Dickinson Marine
#101-17728 66th Avenue,
Surrey, BC
V3S 7X1 Canada
Tel: 604-574-8641
Fax: 604-574-8659
E-mail:
Website:
www.dickinsonmarine.com
PLEASE FILL OUT AND MAIL, FAX OR EMAIL US A COPY OF THIS CARD TO REGISTER YOUR WARRANTY, OR REGISTER
YOUR WARRANTY ONLINE AT dickinsonmarine.com/contact

WARRANTY CONDITIONS & LIMITATIONS
WARRANTY PROVISIONS: Dickinson warrants this product to be free of defects in workmanship and materials for a period of one
year. This warranty is limited to claims submitted in writing within a one-year period following the date of purchase. If any part of your
new product fails because of a manufacturing defect within the warranty period Dickinson offers to replace said parts free of charge,
provided, however, that such parts have not been improperly repaired, altered or tampered with or subjected to misuse, abuse or
exposed to corrosive conditions. This warranty, however, is limited by certain exclusions, time limits and exceptions as listed below.
Read these limitations and exclusions carefully.
TIME LIMIT: This warranty is given too and covers only the original purchaser. Coverage terminates one year from the date of
purchase for parts replacement.
EXCLUSIONS: This warranty does not cover or include : (a) Any normal deterioration of the product and appearance of items, due to
wear and/or exposure; (b) any guarantees, promises, representations, warranties or service agreements given or made by an
authorized distributor or other person selling this product, other than those specifically stated herein; (c) any damage or defect due to
accident, improper repair, alteration, unreasonable use including failure to provide reasonable and necessary maintenance, misuse or
abuse of the equipment, or exposure to corrosive conditions. This warranty is conditioned upon normal use, reasonable and necessary
maintenance and service of your product, and written notice being given promptly upon Buyer's discovery of a warranty claim,
pursuant to paragraph 6 below. Reasonable and necessary maintenance is 29 maintenance which you are expected to do yourself or
have done for you. It is maintenance, which is necessary to keep your product performing its intended function and operating at a
reasonable level of performance.
DAMAGE LIMITATION WARNING: IN NO EVENT SHALL Dickinson BE LIABLE FOR ANY INCIDENTAL OR CONSEQUENTIAL
DAMAGES, INCLUDING (BUT NOT LIMITED TO) LOSS OF USE OF THE PRODUCT, LOSS OF TIME, INCONVENIENCE,
EXPENSES FOR TRAVEL, LODGING TRANSPORTATION CHARGES, LOSS BY DAMAGE TO PERSONAL PROPERTY OR LOSS OF
INCOME, PROFITS OR REVENUE.
ORAL OR IMPLIED WARRANTY LIMITATIONS: The foregoing warranty is exclusive and in lieu of all other warranties, written or
oral, expressed or implied, including but not limited to any warranty or merchantability or fitness for a particular purpose.
TRANSFER LIMITATIONS: This warranty is not assignable or transferable. It covers only the original purchaser.
CLAIM PROCEDURE: In the event of a defect, problem or that a breach of this warranty is discovered, in order to protect any
warranty rights you must promptly notify Dickinson. Give name, address, and model name, location of unit, description of problem and
where you can be reached during business hours.
RESERVED RIGHT TO CHANGE: Dickinson reserves the right to make changes or improvements to products it produces in the future
without imposing on itself any obligations to install the same improvements in the products it has previously manufactured.
SECOND OR SUBSEQUENT OWNER: Dickinson does not give any warranty to secondary or subsequent purchasers, and it disclaims
all implied warranties to such owners.
INSPECTION: To assist you in avoiding problems with your product and to validate this warranty you are required to do the following:
(a) read the warranty; (b) inspect the product. Do not accept delivery until you have examined the product with your supplier ; (c) ask
questions about anything you do not understand concerning the product.
OWNER REGISTRATION: Fill out the WARRANTY CARD within 90 days from the date of delivery.
WARRANTY: WARRANTY COVERAGE REQUIRES THE RETURN OF THE FILLED OUT WARRANTY PAGE IN THIS MANUAL, OR
THE WARRANTY MUST BE REGISTERED ONLINE. YOU MUST REGISTER YOUR WARRANTY WITH US IN ORDER FOR THE
APPLIANCE TO BE COVERED UNDER OUR LIMITED WARRANTY.
5
(PLEASE PRINT)
DICKINSON WARRANTY REGISTRATION FORM
Name:
Address line 1:
Address line 2:
Telephone:
E-mail:
Model name:
Serial No.:
Date of purchase:
Purchased from:
I confirm have read and understand the Limited Warranty and the contents of the
Instruction Manual and agree to the terms and conditions.
Date: Signature:
Please register your warranty with Dickinson Marine. Fill out and send back this warranty registration, or register online at
dickinsonmarine.com/contact. Make sure to include the serial number of your appliance for our records.
No warranty will be extended for improper installations. Use of any unapproved materials, equipment, installation procedures and/or
unsafe usage will result in a voided warranty. Do not use any substitutes for components such as the regulator, valve, burner or fan
other than ones supplied & approved by Dickinson. Dickinson Marine accepts no liability for any damage or loss of service resulting
from unapproved modifications.

6
2. ABOUT THIS APPLIANCE
CERAMIC WINDOW GLASS
The viewing window is made from a thick slab of transparent ceramic
specifically developed for fireplaces. This material was chosen for its
high impact resistance, thermal shock resistance and overall
toughness.
(See Fireplace Maintenance, page 32-33)
AIRTIGHT BURN CHAMBER
The firebox of the heater is kept airtight by means of advanced high
temperature gaskets and a sealed stainless steel construction.
(See Fireplace Maintenance, page 33)
PUSH BUTTON LIGHTING
Pressing the button on the right side of the heater (not
pictured) will activate the sparker inside the heater, quickly
igniting the burner.
(See Fireplace Operation, page 29)
FULLY STAINLESS STEEL BODY
Every panel of the heater is manufactured from stainless
steel, both inside and out, ensuring longevity.
(See Fireplace Maintenance, page 32)
QUIET
BLOWER FAN
Equipped with a 12v three
inch boxer fan with a low
power draw (.4 amps) to
spread heat more rapidly.
(See Fan wiring, pages
26-27)
DUAL HOT AIR VENTING
Both the top of the heater and the hot air vent will discharge hot air.
With the blower fan off heat will emit from the top grill, and with fan
on, heat will blow from the vent above the window.
(See Hot Air Vents, page 31)
HEAT ISOLATING CONSTRUCTION
The outer panels of the heater are configured to not conduct
heat from the firebox within, minimizing burn risks from the
outside of the appliance.
(See Children & Pets, page 13)
EASY
CONTROLS
ACCESS
Swing open the hatch
beneath the heater to access
the controls compartment for
servicing or maintenance.
(See section Internal
Components, page 11)
EXHAUST & FRESH AIR INTAKE
ISOLATED FROM THE ROOM
Separate exhaust vent and fresh air intake keep the flame burning
reliably and the atmosphere inside the room safe.
(See Direct Venting, page 10)
Resists blowouts
in wind speeds
up to 60km/h
(See FAQ, page 7)
Firebox is sealed
against water
entry, resists
splashes &
moisture
(See Fireplace
Maintenance, page 33)
Protective window
grate shields
vulnerable
individuals from
accidental burns
(See Fireplace
Maintenance, page 33)
Combustion
tested for use
up to 5000 feet
above sea level
(See FAQ, page 7)

7
FREQUENTLY ASKED QUESTIONS
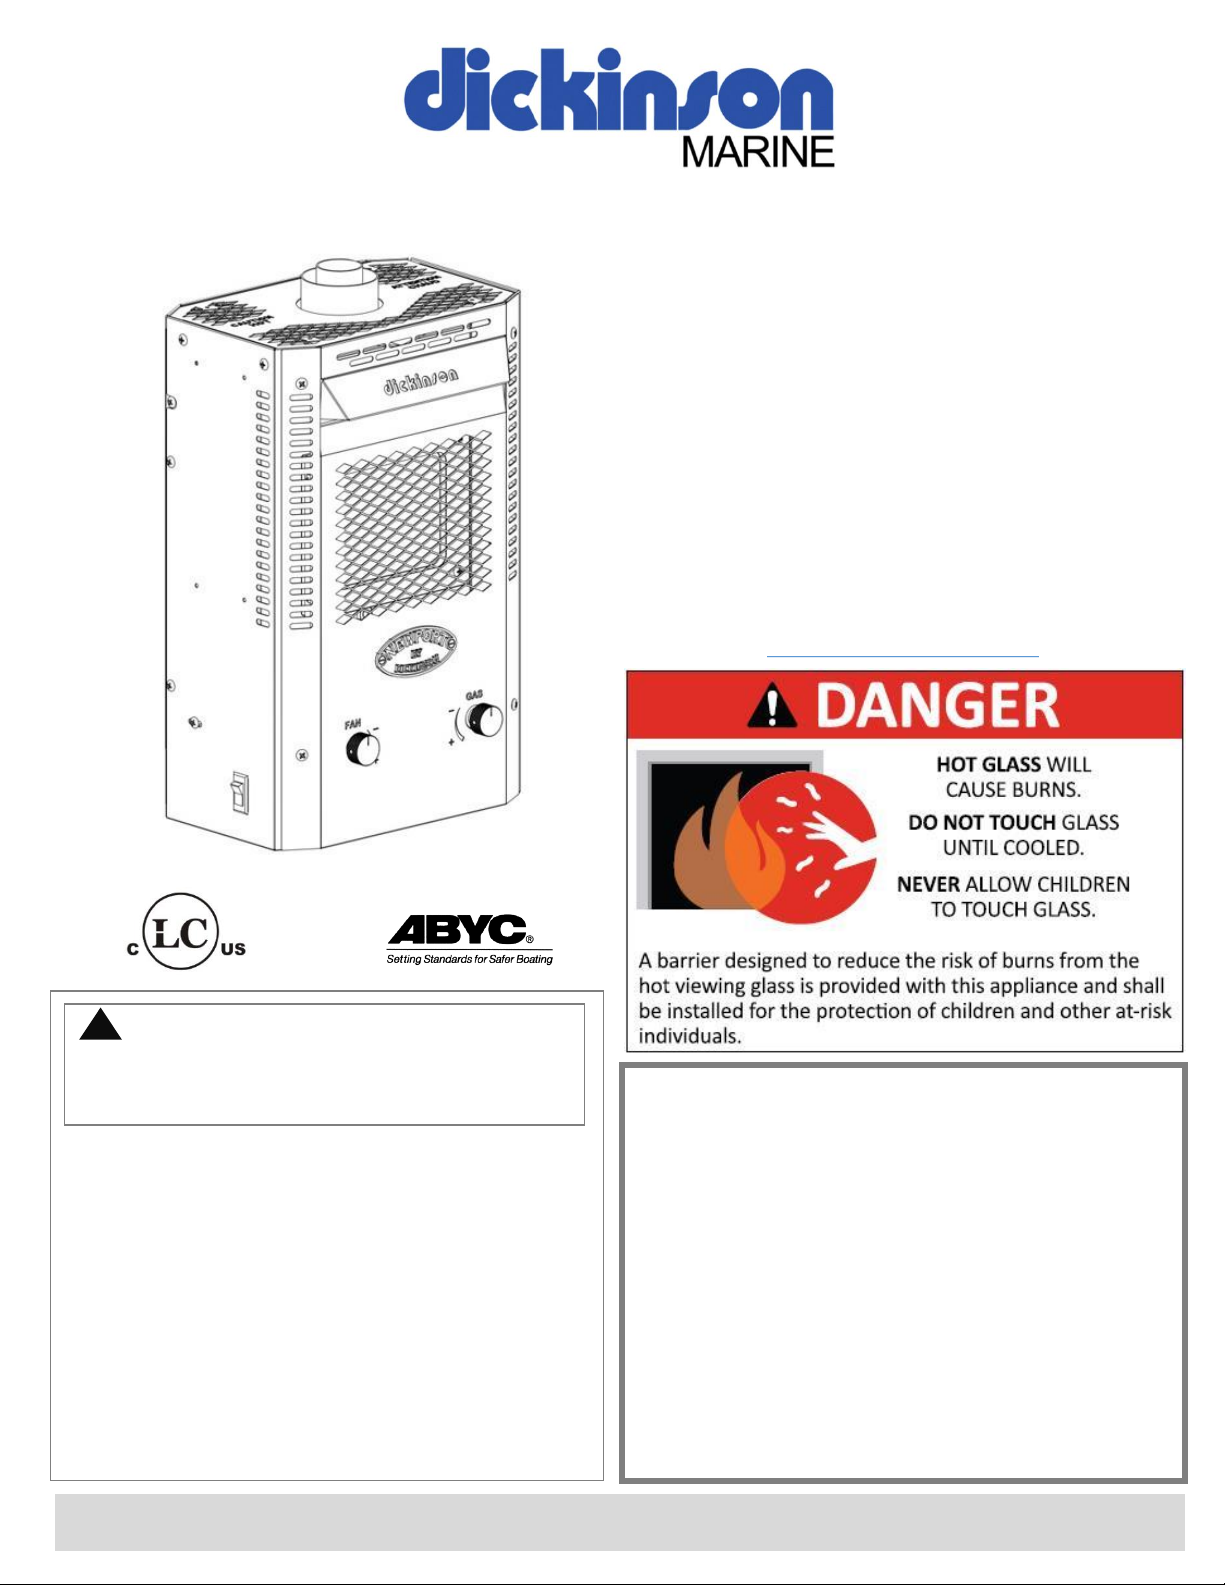
The Explorer propane fireplace
The Dickinson Model Explorer is a direct vent propane gas
fireplace approved for manufactured home, mobile home and
onboard marine installations. Broadly based on the popular
Dickinson propane boat heaters, the Explorer also features
several upgrades that have granted it certification for a use in
a wider range of environments. For decades now, the name
Dickinson has been a byword for reliability among the
fishermen and boaters of the Pacific Northwest. We’re very
pleased to now offer that same legendary reliability to our
valued customers for use on land as well as at sea.
What is a direct vent appliance?
Direct vent means that the fireplace both vents and draws in
air from outside the structure. This means that the fireplace
won’t deplete the room’s oxygen, allow exhaust or smoke to
enter the space or introduce additional moisture into the air.
The fire inside the Explorer burns completely isolated from the
atmosphere in the room.
What parts do I need to install this
fireplace?
The Explorer fireplace comes with everything it needs to be
installed into a structure or vehicle. Additionally, in order to
connect the fireplace to a fuel tank, you’ll need to obtain and
install a low pressure regulator and low pressure fuel hose as
well. These are not included with this appliance
(see pages 23-24)
Where can this fireplace be installed?
The Explorer is ANSI/CSA approved for install in manufactured
homes, mobile homes and ABYC approved for use aboard
boats. The fireplace is capable of heating a maximum area of
approximately 230 square feet. This is assuming a ceiling
height within the normal range and a location within temperate
climate zones. The ability to build and accumulate heat within
the space will also depend on the age and quality of the
structure’s construction and insulation. This fireplace is
intended for Indoor use only.
How safe will Children, at risk individuals
and pets be around this fireplace?
During its design and development the Explorer fireplace was
subjected to extensive in house and independent safety tests.
The Explorer fulfills all safety requirements and has passed all
safety tests stipulated in ANSI Z21.88-2019 / CSA 2.33-2019;
CSA 2.17-2017 and ABYC A-26-2018. The outer shell and
interior parts pf the fireplace can become a potential burn
hazard when the fireplace is or has been in operation. Every
effort has been made to reduce the burn hazard potential of
the fireplace shell. The operational controls of the fireplace are
prevented from absorbing heat and remain safe to operate at
all times.
Every appropriate precaution should be taken to protect
children, at risk individuals and pets from coming into contact
with the fireplace or its controls. Additional barriers may be
required to keep them away from danger. This fireplace must
never be left to run unattended for any length of time.
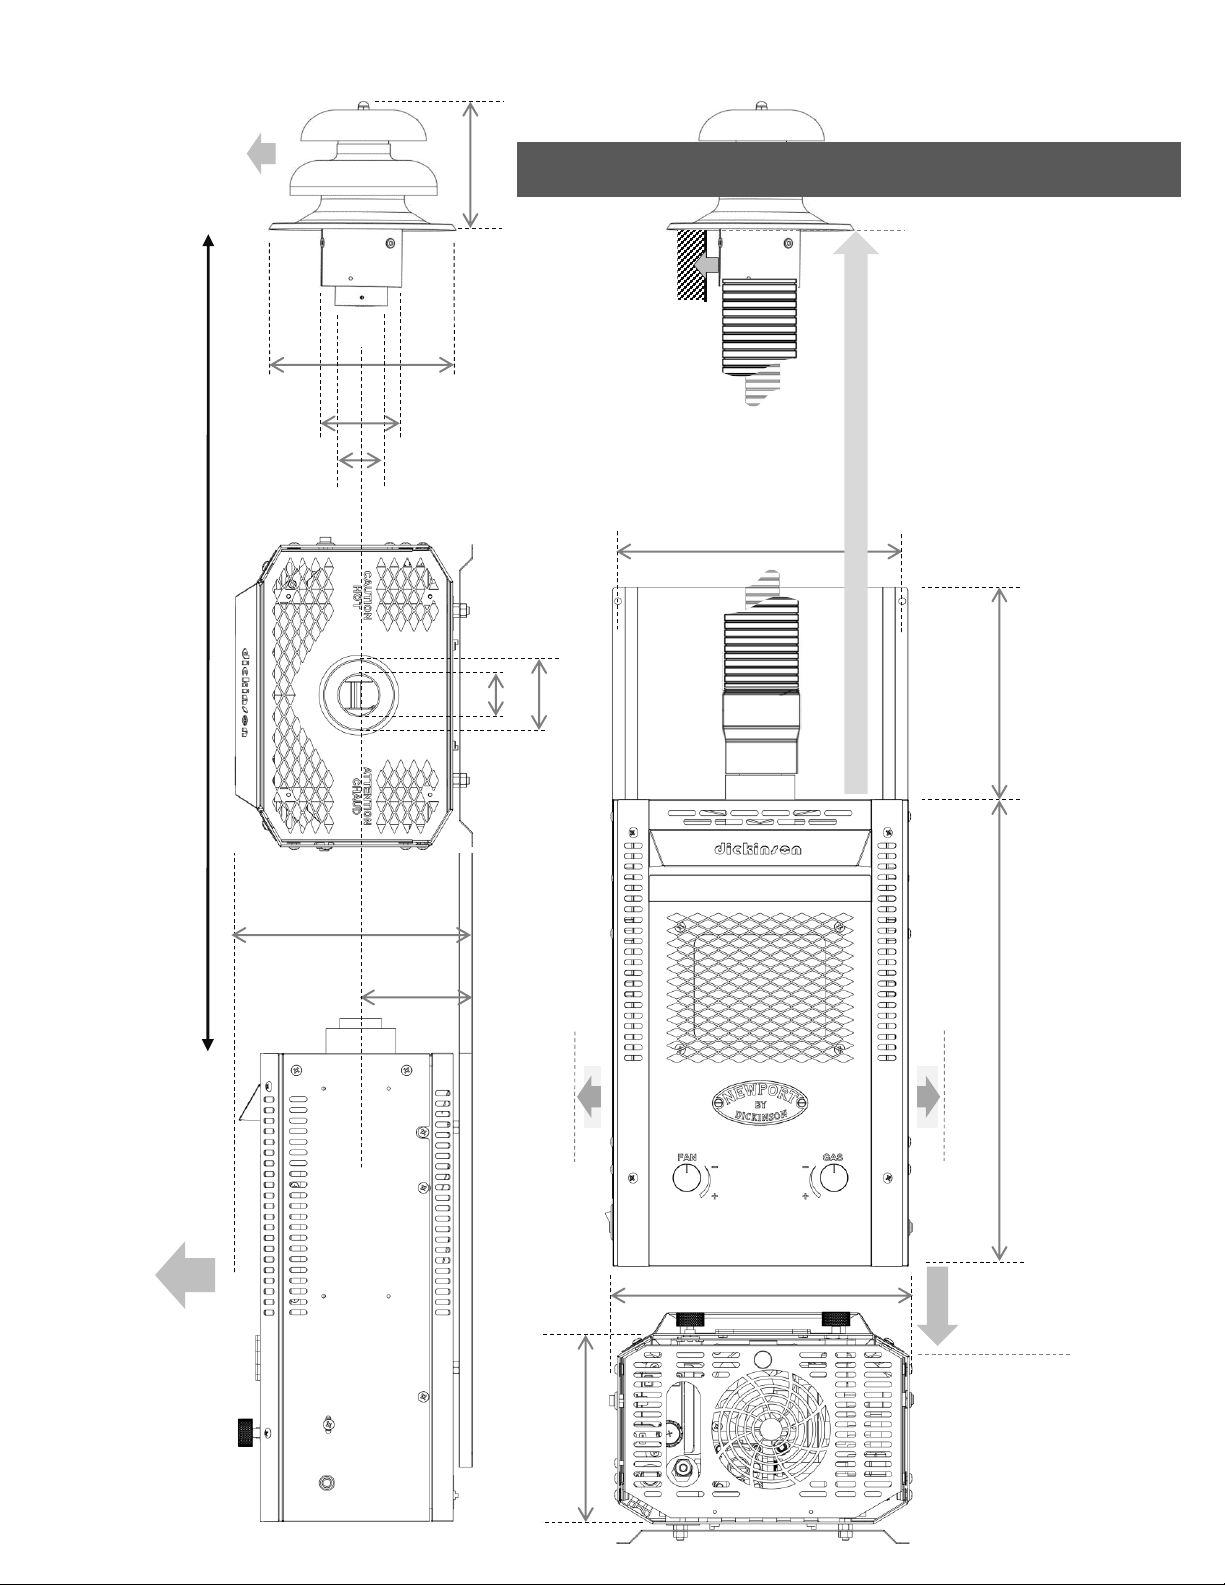
How important is the chimney?
The length and shape of your chimney is the most important
consideration when choosing a spot to install your fireplace. In
order to burn reliably the fireplace requires both its venting
and air intake to conform to the manufacturers venting
requirements. Chimneys must be no shorter than 21”and no
longer than 56”. Within this range any bends introduced to the
chimney should be gradual not sharp. 90 degree bends and
horizontal, wall exits are not feasible. Ensuring your chimney
is able to vent and draw in air freely is key to reliable fireplace
operation.
Does this fireplace need a low pressure
regulator?
Yes, this fireplace is rated for fuel input of no more than 11
inches of water column, which is equivalent to 0.39 pounds
per square inch (PSI) The pressure of a refillable propane
bottle ranges from 100-200 PSI, so a low-pressure regulator
must be used to reduce incoming pressure to 0.39 PSI. YOU
MUST NEVER ATTEMPT TO CONNECT THE FIREPLACE TO
FUEL WITHOUT A LOW PRESSURE REGULATOR!
Can this fireplace be used at higher
altitudes?
Yes, the Explorer fireplace is tested and approved under CSA
2.17-2017 for use at an altitude range of to 0-5000 feet above
sea level. No fuel input reduction or modifications are required
to operate the fireplace at elevations within this range. For
elevations above 5000 feet a 4% reduction in fuel volume
would be recommended per every 1000 feet of elevation.
How will the fireplace be affected by
rain, wind and snow?
The Explorer fireplace has been designed to keep working in
poor weather conditions. The chimney cap is designed to resist
rain and has a wind splitter to ensure it can still vent in high
winds. If the chimney cap becomes covered with snow, expose
a small area beneath both bells on one side to allow exhaust
to exit and air to enter –the heat of the cap will melt the rest
of the snow away from it, preventing snowmelt from entering
the chimney.
Can the Fireplace operate without
electrical power?
Yes, the appliance can be run as normal without the optional
blower fan being connected to power. The appliance will still
require power from 1 AA battery to generate a spark inside the
combustion chamber and ignite the flames.
Have other questions?
If you have any questions about our product that are not
answered by this manual, we’d be happy to answer them!
Email info@dickinsonmarine.com with your Dickinson Product
enquiries.

ALL MEASUREMENTS IN INCHES
DIMENSIONS & CLEARANCES
8
10.750”
17.000” 7.750”
8.250”
3.950”
10.250”
5.375”
6.375”
⌀1.700”
⌀2.650”
MIN. FLUE LENGTH: 21.000”
MAX. FLUE LENGTH: 56.000”
min. 6 INCH
CLEARANCE
BENEATH
min. TWO INCH CLEARANCE
min. 20 INCH
CLEARANCE
BETWEEN
HEATER AND
CEILING
HEATER MUST
BE INSTALLED
WITH
DEPICTED
SAFETY
CLEARANCES
IN PLACE
6.750”
8.000”
⌀2.500”
⌀1.500”
BOTTOM VIEW
TOP VIEW
min. 20
INCH
CLEARANCE
IN FRONT
min. 0.5 INCH
CLEARANCE
AROUND CAP
SLEEVE
CAP MUST BE min.
20 INCHES AWAY
FROM VENTS OR
REFUELING
POINTS
FIG 2
FIG 3
FIG 4
FIG 5
FIG 6

9
RATINGS & SPECIFICATIONS
Part no. 00-NEW-EXPLORER
Model name Newport Explorer fireplace
Product type Vented Gas Fireplace Heater
Conforms to ANSI Z21.88-2019 / CSA 2.33-2019;
CSA 2.17-2017; ABYC A-26-2018
Max. electrical input rating 12 Vdc, 0.4 Amp
Fuel type LP propane
Max. fuel input rating 11 inH2O (0.397 PSI)
BTU/hr 4,700
Maximum Capacity 230 sq. ft
Ignition control manual
Gas control manual
pilot No
Thermostatic control No
Orifice drill size #D71 (0.66mm)
High limit switch °F -2 low / 392 high
High Limit conforms to RoHS; CSA C22.NO.0:20; UL 873; EN 60730-1
Thermocouple type fast-acting
Thermocouple output voltage decay Max. 30 seconds
Valve rating 2PSI ; 40,000 BTU/hr
Regulator rating Adjustable max. ½ PSI inlet
Regulator conforms to ANSI Z21.18-2007 / CSA 6.3-2007
Blower Fan 12 Vdc; 0.4 amp; 67 CFM; 44.2 dbA
Resistor rating 250 Ohms
Ignition power 1.5v DC, AA battery
Sparker Frequency Hz ≥ 4.0
Battery terminal conforms to ANSI Z21.92-2001 / CSA 6.29-2001
Vent pipe diameter ⌀1.500”
Air intake diameter ⌀2.500”
min/max Venting lengths 21” / 56”
Ducting wall thickness .015”
Flue pipe pressure rating PSI 5
Window glass Transparent Ceramic Glass Panel
Thermal shock resistance °F ≤ 1292
Window Gasket Graphite laminate
Max Temperature exposure °F 698
Install Clearances 21” above ; 6” below ; 2” at sides
Mounting Wall mounting with metal back plate
Flue mounting Adjacent to wall with flue-guard installed
THE Explorer PACKAGE CONTAINS
1x
direct vent propane fireplace
1x
1.5”
⌀x 28” inner vent pipe
1x
2.5”
⌀x 28” outer air intake pipe
4x
spacer springs for vent pipe
1x
vent/intake deck cap
1x
deck cap rubber sealing gasket
1x
deck cap interior trim dress ring
1x
hardware for cap attachment
1x
flue guard kit (options A or B)
1x
installation and operating instructions
1x
1.5V
AA Battery
What’s In The Box?
In case of any questions regarding the
contents of your appliance packaging please
enquire at <info@dickinsonmarine.com>
?

DIRECT VENTING
FUEL
Inside The Firebox
The Explorer is a direct vent
gas fireplace. It produces heat
from within a sealed firebox by
means of combustion.
Because this firebox is sealed
air-tight, it will only vent via
the attached chimney. Using
the attached air intake pipe, the
heater is also only able to
access air from outside of the
structure. This means that
smoke, exhaust and unpleasant
smells cannot enter the living
space from the fireplace.
The heater will not deplete
oxygen from inside the living
space except in cases where it
has been installed improperly
without adhering to the
instructions in this manual.
To ensure efficient and proper
operation, a direct vent
fireplace must always be
installed per the manufacturers
instructions. Failure to do so
may result in unpredictable or
unsatisfactory operation.
The Fire Triangle ∆
Every fire relies on the
same 3 elements to
sustain itself –Oxygen,
Fuel and Heat. These make
up the fire pyramid. This
drawing illustrates how
these 3 elements are kept
in balance inside the
Explorer’s firebox.
FIG 7
10
EXHAUST
FRESH AIR
The Direct Vent Exchange
As the heater burns, it will immediately begin to produce
exhaust. Because this exhaust is hot it rises rapidly,
entering the chimney vent pipe above. As exhaust is
funneled into the narrow vent pipe it begins to travel at a
greater speed.
This column of hot gas inside the chimney creates draft.
The draft draws exhaust up the chimney and out of the
top bell of the chimney cap. As this happens it creates a
vacuum inside the air-tight firebox, fresh air immediately
rushes down the chimney’s intake pipe to fill the heater.
As fresh air enters the burn chamber it feeds the fire
inside, keeping it burning steadily. Because this
combustion is completely sealed off from the room the
fireplace is located in, conditions inside the space will not
affect the operation of the fireplace.
In order to draw in the correct amount of fresh air
required to feed to fireplace, the Explorer must have a
chimney of at least 21 inches in length. Bends will
diminish the draft in the chimney - chimneys with bends
should not be too short. The sharper the bend, the more
the draft in the chimney will be reduced.
(see pages 15-16)

11
a
b
c
d
INTERNAL COMPONENTS
ab
c
d
e
Battery Box
#23-052 High Heat Sensor
#19-161
Control Valve
#19-020
Built-in Regulator
#19-500
Sparker Probe
#SPARK-1
fFan Speed Control
#01-998
f
gBlower Fan
#01-999
hFan ON/OFF switch
#01-073
iThermocouple
#02-014
jignition Button
#19-502
g
h
j
FIG 9
FIG 11
FIG 13
FIG 14
FIG 15
FIG 16
FIG 19
This appliance comes equipped with a
12 VDC; 0.40 A optional blower fan.
This fan does not need to be connected
to operate the appliance. Expected Fan
volume max. 44.2 dbA. CFM = 67.
If applicable this fan must be grounded
in accordance with local codes, or in
accordance with National Electrical
Code ANSI/NFPA 70 (United
States) or with The Canadian
Electrical Code CSA C22.1-18-2018
THIS APPLIANCE IS EQUIPPED FOR
NATURAL (LP/PROPANE) GAS ONLY.
Max. inlet pressure 11”water
column. Regulator inlet adjustable ½
PSI.
This appliance must be installed
in accordance with local codes, if
any; if none, follow ANSI
Z223.1/NFPA 54 or CSA B149.1.
FIG 20
FIG 21
FIG 22
This appliance is equipped with a
4.0 Hz spark ignition powered by 1
x 1.5v DC, AA battery. The battery
terminal resists water ingress for up
to 72 hours at a max. depth of 10”.
The battery terminal conforms to
ANSI Z21.92-2001 / CSA 6.29-
2001.
Fan components Fuel Manifold Ignition Components
EXTERNAL COMPONENTS
(Not included)
*Low pressure regulator (one appliance): 19-151
**Regulator/Tank fittings kit (for 19-151 only): 19-152
2 stage Low pressure regulator (2 or more appliances): 19-162
Disposable propane bottle regulator kit: 19-150
***Low pressure fuel hose (10ft/20ft): 19-100-10/19-100-20
Chimney extensions (10” / 28”): 19-005/19-000
110V AC to 12V DC Transformer Plug: 19-211
Solenoid shut off valve: 19-153
The CONTROLS COMPARTMENT houses
all of the heaters primary controls and
safety devices. The components inside
this space form the 3 different systems
needed to operate the fireplace;
•The 12v Fan system
•The 1.5v sparker system
•The gas manifold system
e
i
*This fireplace MUST be installed with a regulator
**Required for 19-151
***This appliance must be connected to it’s
regulator using a low pressure fuel hose.
Thermocouple

12
3. INSTALLATION GUIDE
WHERE CAN YOU INSTALL THIS FIREPLACE?
Choosing a suitable install location for the fireplace is key to getting optimal performance out of it. A suitable install location is one that
can accommodate all the manufacturers install requirements for the appliance. Please pay close attention to the safety clearances,
min. and max. chimney lengths, fuel and power hookup requirements stipulated in this manual. Failure to meet one or more of
these install requirements may result in unsatisfactory or unreliable operation of the fireplace. Please note that Dickinson bear no
responsibility for unsatisfactory performance damage or loss resulting from non-conforming product installations that do not meet the
requirements in this manual.
The Explorer can be used in conjunction with alternative heat
sources, or on its own as a lone source of heat. If the heater is
going to be the main or only source of heat, it will be necessary
to verify that it provides enough BTU to comfortably heat the
space it is intended for.
What is BTU?
BTU stands for British Thermal Unit. 1 BTU is roughly the
equivalent of the amount of energy that is released when you
light one match. This is roughly enough heat energy to heat 1
pound of water by 1 degree Fahrenheit. BTU is the energy unit
most commonly used in the calculating of AC and heating
requirements.
Basic BTU calculation
As a general rule of thumb, for every square foot of the space
you wish to heat you’ll need roughly 20 BTU of heat energy.
This estimate makes a few assumptions however, it assumes
that;
•The space has a standard ceiling height of between 7-9 feet
•The space is well insulated with minimal heat loss
•The space is located in a climate zone without extreme
temperature lows
Provided that the proposed install location falls within these
criteria, the formula below can be used to work out the
approximate BTU required to heat a space.
No.of sq ft. x 20 = approximate requirement in BTU
Example: 200 (sq ft.) x 20 =4000 (BTU)
This calculation tells us that the Explorer, which generates 4500
BTU/hr meets the minimum requirements to serve as a primary
heat source for a well insulated, 200 sq ft. space located in a
temperate climate.
Because we know that the maximum BTU output of the Explorer
is 4500 BTU/hr, we can also work out the maximum square
footage that the Explorer is potentially able to heat under the
same conditions as above;
4500 (BTU) ÷ 20 =225 (sq ft.)
From this we can see that the biggest area the Explorer can
potentially be expected to heat on its own under the conditions
described above is roughly 225 sq ft.
HEATING CAPACITY
Other Factors
Several factors need to taken into account when calculating the
BTU needs and possible variations for the space you wish to heat.
Some of the factors mentioned below are more obvious than
others, but all of them have the potential to affect how efficiently
and reliably the fireplace will be able to heat the space.
Insulation condition: Insulation condition is an assessment of
how well insulated a structure or vehicle is. This will depend on
the thickness and type of insulation used, it’s rated R-value, it’s
age and condition. An older home will likely have less effective or
degraded insulation compared to a newer home insulated with
newer, modern materials.
Windows: Windows typically have poor thermal resistance
compared to walls even if a space is well insulated. Poorly fitting
window frames will also lead to heat loss. Double glazed windows
will help retain more heat where applicable. The use of thermal
curtain liners can help to reduce heat loss.
Climate: the BTU needed to heat a given space will vary
Depending on the climate zone. For example, heating a well
insulated space with minimal heat loss in Atlanta, Georgia will
require less BTU overall than it will take to heat the same well
insulated space if it was located in Anchorage, Alaska.
Number of inhabitants: Every inhabitant (human and animal)
sharing the space will dissipate body heat, contributing to a
temperature increases. This effect is more noticeable in smaller
rather than larger structures.
Elevation: Elevation, altitude and atmospheric pressure will also
effect how the fireplace is able to burn. Oxygen is less plentiful as
you travel up in altitude, making it harder for the fireplace to
draw in enough clean mixing air for combustion. As a result, the
flames may become richer, with less blue flame and more
orange. Rich, orange propane flames don’t generate nearly as
much heat as blue flames, so the richer the flames are the less
heat is being generated.
Dead spots: In order to heat a room, the hot air introduced and
the colder air present must be able to flow freely. Dead spots in
the room where air movement is reduced by partitions or the
placement of furniture can prevent this from happening.

13
CHOOSING AN OPTIMAL INSTALL LOCATION
Choosing an unsuitable install location for your Explorer fireplace may result in unsatisfactory or poor performance from the fireplace
without it being defective. The fireplace has strict chimney requirements, and its safety clearances must be taken into consideration
when choosing where to install it. Below are the most important considerations to keep in mind while selecting the right spot for the
fireplace.
Chimney run
Often underestimated, the length and shape of
your chimney is the most important install
consideration that can affect the performance
of the fireplace! Longer, straighter chimneys
always offer better venting performance than
shorter chimneys with bends will. If at all possible,
always choose an install location that will allow for
the install of the 28”chimney pipes without the
need to bend them. If bends in the chimney are
unavoidable, you can achieve an offset of bend of
between 1-10 inches without significantly affecting
the chimney’s draw. Any install locations that
won’t allow for the full length of chimney pipe or a
reasonably straight run should not be considered
unless unavoidable. Any locations that require a 90
degree chimney bend or wall mounted, horizontal
exit cannot be considered.
(See Chimney Variations, pages 15-16)
Outside venting
Where the chimney exits will also be critical to the
fireplace’s operation. Keep in mind that the
chimney cap is both an exit and an intake. If any
adjacent or overhanging structures trap exhaust
and cause it to linger, it could be drawn back into
the fireplace and unbalance combustion. A
chimney cap placed in an updraft may also cause
issues with combustion.
(See Chimney Cap Install, page 17)
Safety clearances
The safety clearances for the fireplace were
determined during extensive safety testing and
must be applied in all installations for the safety of
property and people in the vicinity of the fireplace.
If an install location won’t allow for these
clearances to be observed, a safer alternative
location for the fireplace which can accommodate
the safety clearances must be chosen. Dickinson
accept no responsibility for unsatisfactory
performance as a result of an unapproved install.
(See Dimensions & Clearances, page 8)
Replacing an existing fireplace?
When installing a fireplace it often seems to make
the most sense to utilize the location of a
fireplace. While this can certainly be true, the
manufacturers installation requirements will differ
from appliance to appliance. Different fireplaces
will have varying requirements for chimney
diameters, heights, safety clearances and other
considerations. For this reason, the location of an
old fireplace may be less than ideal or even
unsuitable for the installation of the Explorer. If in
doubt, please contact Dickinson Marine with your
questions.
(See Unsupported Variations, page 16)
Heating Capacity
Determining how big of a space the fireplace will
be able to comfortably keep warm is very
important when choosing where to install it.In
cases where the fireplace is installed in a space
beyond its capacity to heat, in a poorly insulated
room or in a location subjected to substantially low
outside temperatures, it will likely fail to provide
enough heat. This does not mean the fireplace is
defective. In order to operate normally the
fireplace must be determined to be suitable for the
space intended.
(See Heating Capacity, page 12)
Children & pets
Every effort has been made to make sure that the
Explorer poses a minimal safety risk to children,
pets and other vulnerable individuals who may be
sharing the space the fireplace is located in.
Despite the safeguards built into the appliance
however, utmost care must be taken to make sure
vulnerable individuals who may be in the vicinity of
the fireplace cannot come into contact with it
accidentally or on purpose. A folding fireplace
screen or other barrier can be can be erected a
safe distance in front of the fireplace for
protection. Children and at risk individuals should
never be allowed to remain in the vicinity of the
fireplace unsupervised while in operation, and
must never be allowed to operate the fireplace
controls.
(See Flue Guard Install, pages 20-21)

14
CHIMNEY ASSEMBLY
The efficiency of a chimney can make all the difference to the fireplace. A poorly configured chimney may cause the fireplace to become
extinguished unexpectedly, refuse to light, or burn unreliably. The effectiveness of a chimney will be affected by it’s overall shape,
length and install tolerances. Below are some examples of both effective and ineffective chimneys.
Establishing good chimney connections
For any shape or size of chimney, the chimney must be seated tightly onto the fireplace, it must also be
seated all the way into the chimney cap, and it must be installed with the spring spacers provided. If the
chimney is not seated into the fireplace/cap correctly, you risk an exchange of exhaust/combustion air which
may extinguish the flames. The spring spacers are intended to keep the 2 pipes separated at all times –
before attaching the chimney pipes to the heater & cap make sure these springs are present and evenly
spaced along the inner pipe –without these spacers, the pipes may touch one another, preventing the
chimney from doing its job.
Insert to
Max. depth
Insert to
Max. depth
⌀1.5”
VENT
PIPE
⌀2.5”
INTAKE
PIPE
SEAT VENT PIPE AND INTAKE
PIPE ONTO THE FLUE
COLLARS ON THE FIREPLACE
AS FAR AS THEY WILL GO
FIG 23
FIG 24
Vent/Intake Spacers
The inner vent pipe has 4 spring spacers installed to prevent the inner & outer pipes from touching. If the
outer pipe were to make contact with the inner pipe, the hotter vent pipe would conduct significant heat into
the cooler outer intake pipe. If this happens, air intake may be restricted. Position the springs evenly along
the inner pipe for a straight chimney. For a chimney bend, place the springs in such a way that they will
prevent the pipes from touching where they bend.
SPRING
SPACERS
Poorly assembled chimney
The inner vent pipe touches
the walls of the outer intake
pipe
FIG 26
A GOOD SEAL MUST BE
ACHIEVED ON BOTH PIPE
CONNECTIONS TO ACHIEVE
STABLE COMBUSTION
Insert to
Max. depth

15
Where the fireplace is mounted and where the chimney will exit and connect to the chimney cap will
determine the shape of the flexible chimney pipe.
While the chimney pipes are flexible, the fireplace’s requirements are not.
The fireplace relies entirely on the chimney for it’s exhaust and air (oxygen) intake. The exchange of these
gasses takes place via the chimney and will not happen efficiently unless the chimney is configured
correctly. The following pages give examples of good, acceptable and bad chimney installs.
CHIMNEY VARIATIONS
A. Vertical >
A completely vertical, full
length chimney is the best
option for the fireplace. It
produces the strongest
exhaust draft and strongest
air intake pull. Fireplaces
with a vertical chimney are
the least vulnerable to wind
and the effects of wind and
atmospheric pressure at
higher elevations.
B. 1-5” Offset >
C. 5-10” Offset >
If a completely vertical chimney
proves impossible, an offset of
1-5” can be introduced without
noticeably affecting the action
of the burner. A 5” offset
chimney will still draft and draw
in air very effectively.
MAX. 56 INCHES
MIN. 21 INCHES
D. Min/Max >
Lengths
If an offset of more
than 5 inches is
required, it can be
accomplished without
significantly affecting
the action of the
burner, so long as the
bends in the chimney
are gradual and not
abrupt. The chimney
pipes must also be
prevented from
touching by means of
the 4 spring spacers.
A chimney can be
cut down or
extended*within
these limits without
greatly affecting
the action of the
burner. Extended
and shortened
chimneys work best
in a vertical
configuration.
Please note that
bends in an
extended or
shortened chimney
can affect its ability to draw in air efficiently, and may
cause the fireplace to become extinguished
unexpectedly.
#19-000 – 2.5” x 28” Flue Extension kit (with clamp)
#19-005 – 2.5” x 10” Flue Extension kit (with clamp)
A10 inch offset will
require a 3 piece offset
flue guard. See page 20-
21
A 1-5 inch offset will
require a 3 piece offset
S-type flue guard. See
page 20-21
FIG 27 FIG 28
FIG 29
FIG 30
FIG 31
A vertical chimney
will require a V type
flue guard. See
page 20-21
* Chimney extension kit sizes available

16
There are chimney configurations that will not support the action of the fireplace and must be expected to
result in unsatisfactory operation. These unsupported chimney configurations severely reduce the
chimney’s ability to draw air into the fireplace which may cause it to be extinguished. Unsupported
chimney variations leave the fireplace vulnerable to blowouts.
Attempting to install a chimney and operate the fireplace using an unsupported chimney
variation will result in unsatisfactory or unpredictable operation!
UNSUPPORTED VARIATIONS
E. Less than
21 inches >
F. Horizontal
exits >
G. Low-points >
LESS THAN
21 INCHES
A chimney cut shorter than
the stipulated minimum
length will render the
fireplace vulnerable to
blowouts. A very short pipe
will even struggle to draw in
air. A chimney cut too short
also won’t allow for the
required 20 inches of safety
clearance above the
fireplace.
It’s not possible to configure
the fireplace’s chimney so
that it exits at 90 degrees to
the orientation of the
fireplace. This is because of
the airtightness of the firebox
and how it draws in air. This
configuration baffles the air
intake making it too weak to
adequately support the
fireplace.
H. Sharp bends & elbows v
Low points in a
chimney will likely
impede the
vent/intake
severely enough
to prevent the
fireplace from
staying on at all.
Elbows and sharp bends in the
chimney discourage both exhaust
and air intake. Elbows and sharp
bends are especially detrimental
on lower sections of the chimney
pipe. Any bends that are
necessary should be as gradual
as possible, bending the pipe
slightly along it’s whole length.
Bends to complete an offset of
more than 10 inches are not
recommended.
A chimney configuration with a
continuous upward travel is
required.
FIG 32 FIG 33
FIG 34 FIG 35
It may not be possible to replace a previous model Dickinson fireplace or
other appliance with this fireplace in the same configuration. This fireplace
may not support the chimney types, configurations and systems used on
other appliances including other Dickinson fireplace heaters. The safe
clearance requirements, electrical and fuel connection of this fireplace may
also differ from any previously installed appliances.
Where this fireplace may be replacing a similar or previous model,
due attention must be paid to the warnings and recommendations
specific to this fireplace included in this manual.
Other appliances and models
90°

CHIMNEY CAP INSTALL
A. Clearances &
Obstacles >
B. Pitched roof v
The cap must be safely
removed from obstacles
like overhanging eaves
and flammable hazards
like fuel filler caps.
C. Leveling block v D. Textured & rough surfaces v
!
A cap can be installed on
a surface with a pitch of
20 degrees or less
without adaptation.
Please note that caps
installed on an angle are
best located on the lee
side of a roof or
structure. Avoid locating
an angled cap at the
peak or edge of a roof or
where it will be exposed
to the brunt of prevailing
winds.
For surfaces with a pitch greater than 20
degrees a custom manufactured leveling
block should be used. The leveling block
should have a sufficient clearance from
the chimney pipe passing through it and a
wooden leveling block may be lined inside
with non-flammable material for added
heat resistance.
Heat and weather resistant sealant is
recommended for installs on textured or rough
surfaces where the rubber gasket makes
incomplete contact with a roof’s surface
3 INCH HOLE ⌀
6 INCH ⌀
Dress ring
Assembly of the cap through the 3 inch exit
hole should be completed with the provided
rubber gasket and hardware to seal the
flange against water entry.
The dress ring is mounted
from underneath around
the exiting chimney for a
neater, finished look.
Mounting
Install tip:
As the cap forms the
termination point for the
chimney, it is easiest to
mount it first, before
mounting the fireplace and
chimney below.
See pages 18-19
The cap is electro-polished
for an extremely smooth
and extremely corrosion-
resistant finish.
FIG 37
FIG 38
FIG 39
FIG 40
FIG 41
Rubber gasket
17
Chimney cap replacement part: #19-051

18
MOUNTING THE FIREPLACE
?
Before permanently mounting the fireplace or
cutting a permanent hole for its chimney exit,
please make sure you’ve completely read and
understood the safety clearance and install
requirements listed in the manual.
1. 2.
3. 4.
After cutting an exit in a spot determined to
fulfill all install requirements, mount the cap in
place as the first step to mounting the fireplace.
Mounting the cap first will make it easier to
install the fireplace and chimney correctly
The wall liner can be removed from the fireplace
and used to facilitate approximate measuring for
the appliance. The plastic border on the wall liner
is located at the height of the flue connection.
Measuring 28” up from this will help verify that
the chimney will reach from the cap down to the
proposed install location. Make sure to allow for
some compression of the chimney pipes during
final mounting.
Insert the sheet metal coupling end of the 1.5
inch vent pipe onto the smaller of the fireplace’s
2 flue collars. With the vent pipe FIRMLY
attached about ½ an inch onto the collar, space
the spring spacers as needed and attach the 2.5
inch outer vent pipe in the same way, pushing it
onto the heater about ½ inch. Please note that
once attached and subject to heat, these collars
can prove difficult to separate.
5. With the two pipes attached to the fireplace,
reattach the wall liner and lift the whole
fireplace and its chimney roughly into place.
Maneuver the pipes so that they insert up
into the chimney cap ferrules –someone
helping guide these in is advised. With the
fireplace’s chimney fully inserted into the cap
(give it a final ‘push’ upwards to make sure
it’s seated as far up as it will go) you can
mark the position of the top two mounting
holes in the wall liner.
Getting someone to mark the holes while you
hold the fireplace in position is recommended.
If working alone, position the fireplace and
then support it with one hand for long enough
to accurately mark the two top hole positions
(fig 46)
FIG 42
FIG 43
FIG 44
FIG 45
FIG 46

19
Once the holes for attaching the top of the wall
liner have been marked, you can use the
detached wall liner to line up with them and
mark the positions of the 2 lower cutouts that
the liner will rest on.
Attach the lower mounting hardware and then again
lift the fireplace with it’s attached wall liner up,
inserting the pipes into the cap. When this is done,
line up the fireplace/wall liner with the lower
mounting screws and seat it so that the cutouts rest
on them. When you’re sure the fireplace is installed
without gaps where the pipe meets the cap, tighten
all 4 mounting screws.
To correct an install that’s pitched forward or
backward, washers can be placed under the
attachment points for an angle correction. A
fireplace that is pitched backward on an angle may
allow the flame to make contact with the glass
barrier and firebox construction which will interfere
with combustion conditions and may overheat or
damage the appliance.
7. 8.
9. 10.
MOUNTING THE FIREPLACE cont’d
0° 90°
After mounting the fireplace, make certain it’s
sitting as level as possible to ensure optimum
conditions for the burner flame. Loosen the
mounting screws to shift the heater slightly to a
0°angle if required, then tighten the screws
again to secure the heater in place.
FIG 47
FIG 48
FIG 49
FIG 50
Lower
cutout
This manual suits for next models
1
Table of contents
Other Dickinson Heater manuals