Dictaphone Walkabout Trek User manual

PORTABLE DIGITAL RECORDER
User Guide
Walkabout Trek®

Walkabout Trek®

i
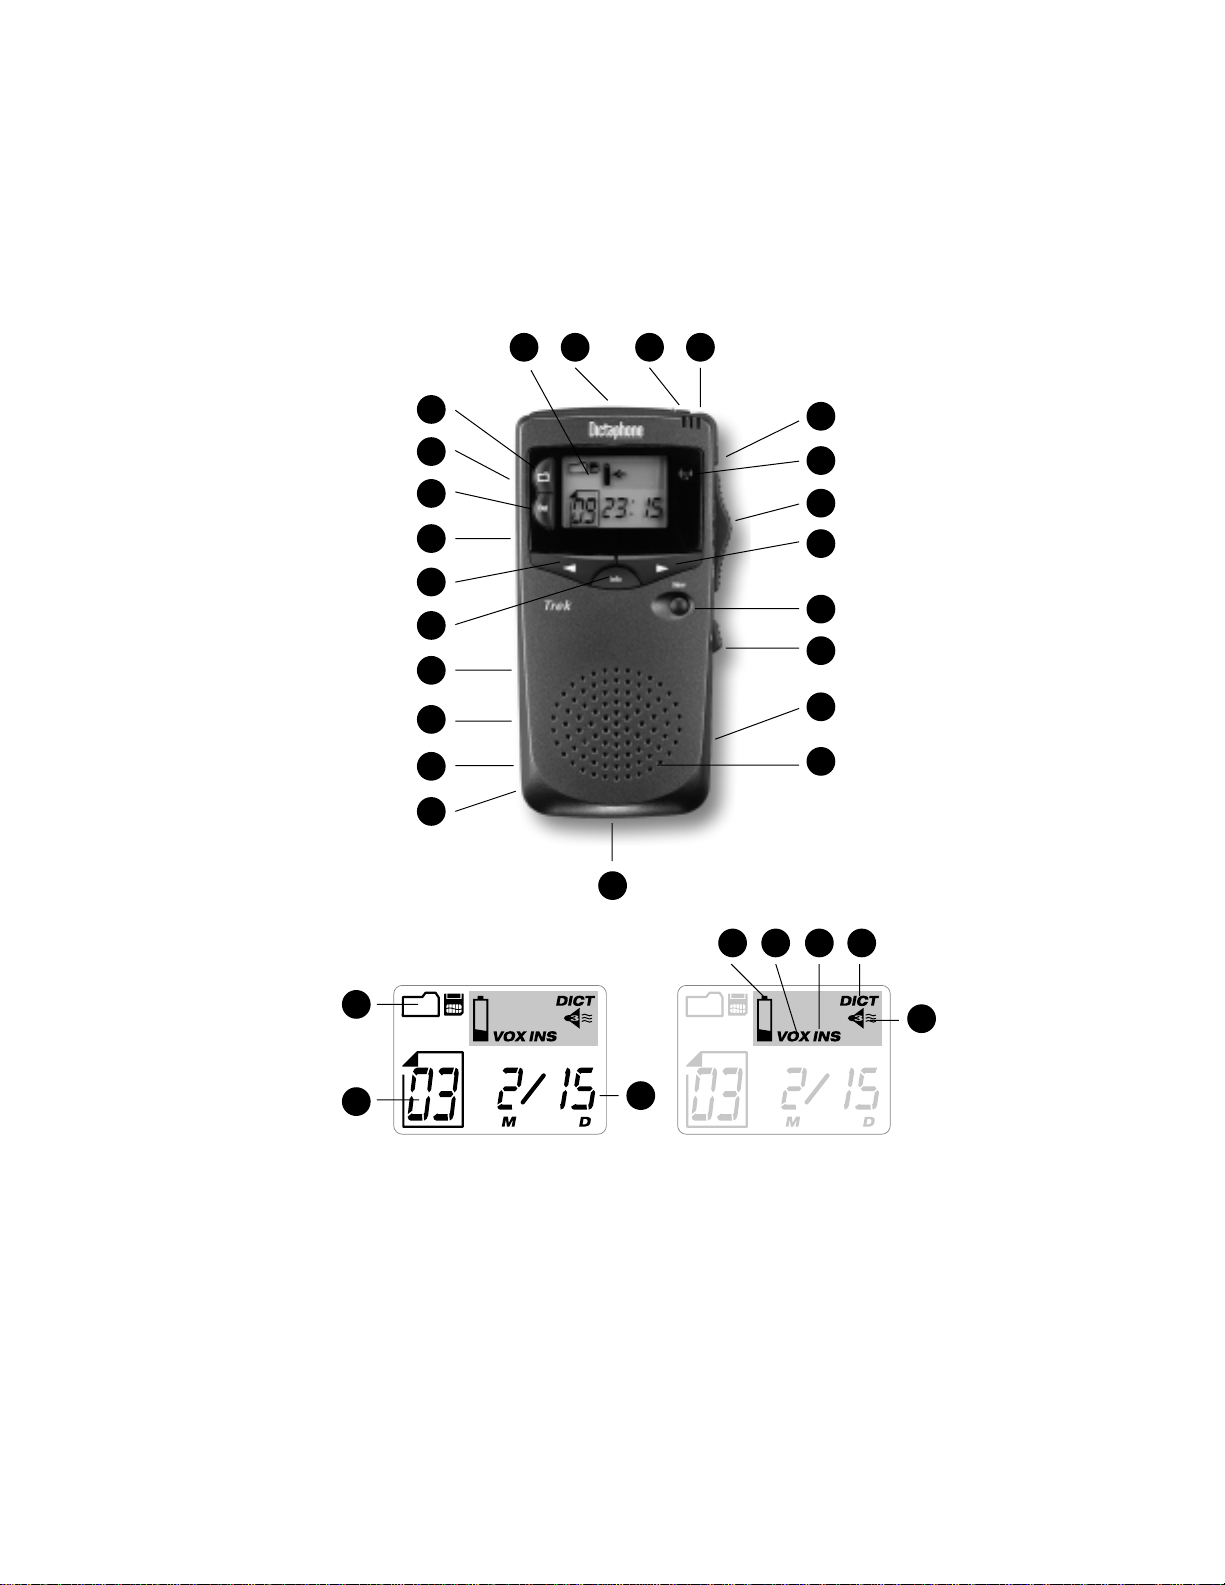
Main Display Screen Data Settings Window Data
1 2 4
5
6
7
8
9
10
11
12
13
14
15
16
17
18
19
20
21
22
23
24
25 26
27 28 29 30
31
3

Controls and Indicators
Display Screen -View basic voice message data and current
option settings.
Voicedata™ S Card Door
Voicedata S Card Eject button - Press to open door and
remove Voicedata card.
Microphone
Back Light button – Press to brighten the display for ten seconds,
twice to cancel.
Record Indicator
Slide Control – Use this four-position control to Record, Stop,
Play or Rewind a voice message.
Right Arrow button – Press to move forward to the next voice
message or the next group of Trek options.
New button – Press to create a new voice message, or to add cue
marks when recording or playing back a message.
Fastforward – Press and hold to advance the current voice
message.
Battery Compartment (back)
Speaker
PC Parallel Interface (bottom) – Connects the Trek Portable to a
Walkabout Docking Station.
Reset (back, inside battery compartment) – Insert a paper clip to
restart the Trek Portable.
AC Adapter (DC 3V)
Earphone Jack (Ear)
Microphone Jack (Mic)
Info button – Press briefly for voice message information or hold
18
17
16
15
14
13
12
11
10
9
8
7
6
5
4
3
2
1
ii

iii
Controls and Indicators
for a few seconds to access Trek options.
Left Arrow button – Press to move backward to the previous
voice message.
On-Off Switch
Del button –Press to delete a section of a voice message, an entire
message, or all the messages in the current Voice Folder.
Volume control – Adjusts playback volume.
Voice Folder button – Press to change Voice Folders.
Voice Folder icons – Indicates the selected Voice Folder.
Message Number – Identifies the current message in the selected
Voice Folder.
Date of Message – The date the current voice message was
created.
Low Battery Indicator – Appears when you need new alkaline
batteries or need to recharge your NiCad batteries.
Voice Activated Recording (VOX) – Indicates that the recording
process will pause when there is no sound.
Voice Insert (INS) or Overwrite (OVR) mode – Either INS or
OVR will appear to indicate the current recording mode selected.
Dictation (DICT) or Conference (CONF) mode – DICT or CONF
will appear to indicate if the microphone sensitivity is high or
low.
Voice Quality Setting – Indicates the current voice quality setting
from "3" for the highest to "1" for the lowest quality.
31
30
29
28
27
26
25
24
23
22
21
20
19

Overview . . . . . . . . . . . . . . . . . . . . . . . . . . . . . . . . . . . . . . . . . . . . . . . . 1
Features. . . . . . . . . . . . . . . . . . . . . . . . . . . . . . . . . . . . . . . . . . . . . . . . . . 1
PC-Connectivity. . . . . . . . . . . . . . . . . . . . . . . . . . . . . . . . . . . . . . . . . . . . . 1
Getting Started. . . . . . . . . . . . . . . . . . . . . . . . . . . . . . . . . . . . . . . . . . . . 2
What’s In The Box . . . . . . . . . . . . . . . . . . . . . . . . . . . . . . . . . . . . . . . . . . . 2
Installing the Batteries . . . . . . . . . . . . . . . . . . . . . . . . . . . . . . . . . . . . . . . . . 2
Turning On the Portable . . . . . . . . . . . . . . . . . . . . . . . . . . . . . . . . . . . . . . . . 2
Entering Date/Time Settings . . . . . . . . . . . . . . . . . . . . . . . . . . . . . . . . . . . . . 3
To Change the Date/Time Formats:. . . . . . . . . . . . . . . . . . . . . . . . . . . . . . . . . 3
To Set the Date and Time: . . . . . . . . . . . . . . . . . . . . . . . . . . . . . . . . . . . . . . 3
Using the Trek Digital Recorder . . . . . . . . . . . . . . . . . . . . . . . . . . . . . . . 5
Recording a Voice Message . . . . . . . . . . . . . . . . . . . . . . . . . . . . . . . . . . . . . . 5
Using the Voice Folders . . . . . . . . . . . . . . . . . . . . . . . . . . . . . . . . . . . . . 6
Selecting a Voice Folder . . . . . . . . . . . . . . . . . . . . . . . . . . . . . . . . . . . . . . . . 6
Recording in a Selected Folder . . . . . . . . . . . . . . . . . . . . . . . . . . . . . . . . . . . . 7
Playing Back Voice Messages . . . . . . . . . . . . . . . . . . . . . . . . . . . . . . . . . 8
Selecting a Voice Message. . . . . . . . . . . . . . . . . . . . . . . . . . . . . . . . . . . . . . . 8
Playing Back a Voice Message . . . . . . . . . . . . . . . . . . . . . . . . . . . . . . . . . . . . 8
Editing Voice Messages. . . . . . . . . . . . . . . . . . . . . . . . . . . . . . . . . . . . . . 9
Adding Cue Marks . . . . . . . . . . . . . . . . . . . . . . . . . . . . . . . . . . . . . . . . . . . 9
Adding Recorded Information . . . . . . . . . . . . . . . . . . . . . . . . . . . . . . . . . . . . 9
To Append Information:. . . . . . . . . . . . . . . . . . . . . . . . . . . . . . . . . . . . . . . . 9
To Insert Information: . . . . . . . . . . . . . . . . . . . . . . . . . . . . . . . . . . . . . . . . 10
To Overwrite Information: . . . . . . . . . . . . . . . . . . . . . . . . . . . . . . . . . . . . . 10
Deleting Recorded Information . . . . . . . . . . . . . . . . . . . . . . . . . . . . . . . . . . . 11
Deleting Voice Messages . . . . . . . . . . . . . . . . . . . . . . . . . . . . . . . . . . . . 12
Deleting Specific Messages . . . . . . . . . . . . . . . . . . . . . . . . . . . . . . . . . . . . . 12
Deleting All Messages in a Folder . . . . . . . . . . . . . . . . . . . . . . . . . . . . . . . . . 12
Inserting Trek into a Docking Station . . . . . . . . . . . . . . . . . . . . . . . . . . 13
Trek Options . . . . . . . . . . . . . . . . . . . . . . . . . . . . . . . . . . . . . . . . . . . . 14
Record Options. . . . . . . . . . . . . . . . . . . . . . . . . . . . . . . . . . . . . . . . . . . . . 14
Beep Option . . . . . . . . . . . . . . . . . . . . . . . . . . . . . . . . . . . . . . . . . . . . . . . . . . . . . . . . . . 15
Voicedata S Card Handling . . . . . . . . . . . . . . . . . . . . . . . . . . . . . . . . . . . . . . . . . . . . . . . 16
Installing and Formatting a New Voicedata S Card . . . . . . . . . . . . . . . . . . . . . . . . . . . . . 16
Ejecting the Voicedata S Card . . . . . . . . . . . . . . . . . . . . . . . . . . . . . . . . . . . . . . . . . . . . . 16
Parts and Accessories . . . . . . . . . . . . . . . . . . . . . . . . . . . . . . . . . . . . . . 17
Screen Messages . . . . . . . . . . . . . . . . . . . . . . . . . . . . . . . . . . . . . . . . . . 18
Trek Specifications . . . . . . . . . . . . . . . . . . . . . . . . . . . . . . . . . . . . . . . . 19
iv
Contents

Overview
Congratulations on your purchase of the Walkabout™ Trek Portable
from Dictaphone! The Trek Portable is a state of the art digital recorder
with easy-to-understand controls to make your work and life more
productive.
Features
You may use the Trek Portable to:
• Record digital voice messages on internal memory or a Voicedata S
card.
• Playback, delete, or edit any message.
• Check the record date and time for any message.
• Define date, time, record and alarm options.
PC-Connectivity
With the Trek Portable, you can integrate PC power with the
convenience of a totally portable tapeless recorder. The Walkabout
Docking Station and Desktop software allow you to transfer digital
voice messages between the Portable and your PC. Voice message data
may be transferred after you insert the Portable into a Docking Station
(see Inserting Trek into a Docking Station).
1
Overview
Transferring Data between Trek and your PC
Trek
Portable Cable
Connected to
your PC
Walkabout Docking
Station

Getting Started
Before you start recording voice messages on your Trek Portable, you
need to perform a few initial steps described below.
What’s In The Box
Check to make sure you received all the following items with this
operating guide in the Walkabout Trek shipping box:
• Trek Portable with a Voicedata S card installed
• Portable carrying case
• 2 AA alkaline batteries
• Voicedata S card labels and protective sleeve
• Docking Station Adapter Bracket
Installing the Batteries
The Trek Portable requires two AA alkaline batteries, two Nicad
Rechargeable batteries, or a DC 3V Power Supply. The batteries may be
installed as follows:
1Push and slide the battery compartment door (11) downward.
2Insert new batteries according to the label in the compartment. Lower
and slide the cover back to its original position.
Do NOT mix alkaline and rechargeable batteries; for best
performance, use only fresh batteries. If you are using alkaline
batteries, the DC 3V Power Supply will not damage them.
If you do not intend to use the Trek Portable for some time, remove
the batteries to avoid possible leakage.
Turning On the Portable
Slide the On/Off button (20) to the On position. If the Trek Portable is
turned on and is not used for five minutes, it will go into a Sleep mode.
Press any button to reactivate the unit.
If you turn on the Trek Portable when the slide control (7) is in the
Record, Play or Rew position, the word ( (Stop) will appear.
Return the slide control to the Stop position.
2
Getting Started

Entering Date/Time Settings
Enter date and time settings when you first start to use the Portable, or
whenever you change batteries.
To Change the Date/Time Formats:
The Trek Portable supports two date formats YY/MM/DD and
YY/DD/MM. There are also two time formats including a 12-hour
setting, identifying the time as AM or PM, and a 24-hour setting. You
may select different date and time formats as follows:
1Press the Info (Information) button (18) for a few seconds until you
hear an audible beep and/or the characters (Settings) appear on
the display screen.
2Press the Right Arrow button (8) until the characters
(International Date Format) appear.
3Press the Info (Information) button again.
4You should see either "12 hr" (12 Hour Clock) or "24 hr" (24 Hour
Clock). Press the Right Arrow button until the time format that you
want is displayed.
5Press the Info button again to select it.
6Now you should see numbers in the format "M/D" or "D/M" (where,
M = the month and D = the day of the month). Press the Right
Arrow button until the date format that you want is displayed.
7To return to the main display screen, press the Info button until you
hear an audible beep or press this button for a few seconds and
release to return to the main display.
To Set the Date and Time:
1Press the Info (Information) button (18) for a few seconds until you
hear an audible beep and/or the characters (Settings) appear on
the display screen.
2Press the Right Arrow button (8) until the
screen displays the date setting as shown
at right:
3
Getting Started
Date Setup

3Press the Info button to modify the current date information. The first
year digit ("9" above) should blink.
4To change the blinking digit, press the Right Arrow button until the
correct digit is displayed.
5Press the Info button to continue to the next digit, use the Right
Arrow to adjust the digit.
6Repeat Step 5 to change the first set of digits identifying the month or
the day of the month (depending on the date format selected), then
both digits identifying the month or day.
7When the correct date is set, press the Info button again to cause all
the date digits to stop blinking.
8Press the Right Arrow button to adjust the time setting shown below:
4
Getting Started
Time Setup
9Press the Info button to cause both the hour digits ("16" above) to
blink
10 Press the Right Arrow button until the correct hour digit(s) are
displayed.
11 Press the Info button to cause the first minutes digit ("2" above) to
blink, then press the Right Arrow button to change the digit.
12 Repeat Step 11 to change the other minutes digit.
13 When the correct time is set, press the Info button again to cause all
the time digits to stop blinking.
14 To return to the main display screen, press the Info button until you
hear an audible beep or press this button for a few seconds and release
to return the main display.

Using the Trek Digital Recorder
This section describes how to use the Trek Portable as a digital voice
recorder. Similar to the controls on a conventional analog recorder, the
slide control on the Portable may be moved to four positions to record,
stop, play, or rewind a voice message.
Recording a Voice Message
When you first start to use your Trek Portable, the message number "00"
will appear in the bottom left corner of the display screen. You can
record a new voice message and test the Trek recording features as
follows:
1Move the slide control (7) to the Record position to start recording
a message.
2The following display will appear showing the recording time elapsed
in the message in minutes and seconds.
5
Using the Trek Digital Recorder
Record Screen
3You may press the New button (9) while you are recording to add up
to 10 cue marks to the message. Each time you press New, the word
(Cue) will appear on the display screen.
4To end the voice message, move the slide control to the Stop position.
5If you would like to review your new voice message, move the slide
control to Rewind, then to Play.
6Use the Volume control (22) to adjust the playback volume.
After you record the first message in a Voice Folder, press the New
button to record each additional message (see Record in a Selected
Folder). Otherwise, you will append recorded information to the current
message.

Using the Voice Folders
The Trek Portable allows you to organize all of your voice messages in
separate Voice Folders. Each folder can store up to 99 messages in
chronological order.
Selecting a Voice Folder
1Press the Voice Folders button (23) to select one of four sets of icons
representing different Voice Folders as follows (the first two folders
are not available if the Voicedata S card is not inserted in your Trek
Portable):
Select… For Voice Folder…
Voice Folder 1 on the Portable’s internal memory.
Voice Folder 2 on the Portable’s internal memory.
Voice Folder 3 stored on the removableVoicedata S card.
Voice Folder 4 on the removableVoicedata S card.
2Note that each time you enter a new Voice Folder, the numberof the
last message in the folder will be displayed with the date the message
was recorded.
6
Using the Voice Folders
Checking Voice Folders
Current Voice
Folder Selected
Number of Last
Message
Date the
message was
recorded

Recording in a Selected Folder
1Press the Voice Folders button (23) to select a Voice Folder.
2Press the Info button (18) once to view the time the current voice
message was recorded, and again to check the total recording time
left in the selected Voice Folder:
7
Using the Voice Folders
Time Left Display
When you are recording in a Voice Folder, the warning (Full)
will flash 15 seconds before the end of the recording time in the folder.
At the end of the recording time, will flash continually.
3Move the slide control (7) to the Record position to append
information to the last message in the folder (Message 04 in the above
sample); or press the New button (9) and move the slide control to
Record to record a new voice message.
4You may also press the Left Arrow button (19) to go to a previous
message, and move the slide control to Record to append information
(i.e., add voice data to the end of) any selected message in the current
Voice Folder.
When you are recording information or a new message in one of
the Voice Folders on the Voicedata S card, do NOT attempt to
remove the card from the Trek Portable.
After you record a new voice message, the selected folder will contain
the new message with the following assigned to it:
• A message number.
• The current date and time.

Playing Back Voice Messages
Selecting a Voice Message
1Press the Voice Folders button (23) to select a Voice Folder.
2Press the Right and Left Arrow buttons (8) and (19) to go to
different messages. The number of each message is displayed with
the date the message was recorded as shown below.
8
Playing Back Voice Messages
Date Recorded Display
3You may also press the Info button (18) to view the time the current
message was recorded.
Time Recorded Display
Playing Back a Voice Message
1Move the slide control (7) to the Play position to play back any
message in a Voice Folder.
2Press the Right Arrow button (8) to go the next cue mark in
the message or the Left Arrow button (19) to go to the previous
cue mark.
If you move the slide control to Play when a message is not selected
on the display screen, the word (Stop) will appear. Return the
slide control to the Stop position and select a message.

Editing Voice Messages
This section describes how to add cue marks to an existing voice
message, add recorded information, or delete information.
Adding Cue Marks
1Press the Voice Folders button (23) to select a Voice Folder.
2Select the message that you want to edit using the Left/Right Arrow.
3After you select the correct message, move the slide control (7) to the
Play position to play back the message.
4Press the New button (9) to add a cue mark at a specific point in the
message. The word (Cue) will appear on the display screen as
the cue mark is inserted. You may add up to 10 cue marks to each
message.
Adding Recorded Information
You may append information to an existing voice message, and either
insert or overwrite information as described in this section.
To Append Information:
Additional recorded information can be appended to the end of any
voice message as illustrated below.
9
Editing Voice Messages
Appending Information
Voice
Message New Data
You can append information to a voice message if either the INS or
the OVR setting is displayed in the Settings window.
1Press the Voice Folders button (23) to select a Voice Folder.
2Select the message that you want to edit with the Left/Right Arrow.
3After you select the correct message, simply move the slide control
(7) to the Record position to add voice data to the end of the message.

To Insert Information:
If the INS record mode setting is displayed in the Settings window on
the display screen, you may insert new information at any point in a
voice message.
10
Editing Voice Messages
Inserting Information
Voice
Message
New Data
If the OVR setting is displayed in the Settings window, change the
setting to INS (see Record Options).
1Press the Voice Folders button (23) to select a Voice Folder.
2Select the message that you want to edit with the Left/Right Arrow.
3After you select the correct message, move the slide control (7) to the
Play position.
4When you reach the point in the message where you want to insert
new information, move the slide control to Stop.
5Move the slide control to Record to insert new information.
To Overwrite Information:
If the OVR record mode setting is displayed in the Settings window on
the display screen, you may overwrite or replace any information in a
voice message with new information.
Overwriting Information
Voice
Message
New Data

If the INS setting is displayed in the Settings window, change the
setting to OVR (see Record Options).
1 Press the Voice Folders button (23) to select a Voice Folder.
2 Select the message that you want to edit with the Left/Right Arrow.
3 After you select the correct message, move the slide control (7) to
the Play position.
4 When you reach the start of the recorded information that you want to
overwrite or replace, move the slide control to Stop.
5 Move the slide control to Record to overwrite the existing
information with new recorded information.
Deleting Recorded Information
You may also delete any recorded information in a voice message.
11
Editing Voice Messages
Deleting Information
Voice
Message
Deleted Data
1Press the Voice Folders button (23) to select a Voice Folder.
2Select the message that you want to edit with the Left/Right Arrow.
3Move the slide control (7) to Play to begin playing back the message.
4To begin deleting a section of the message, press the Del button (21).
5The word (Cut) will replace the elapsed time, and a flashing
scissors will appear above the message number:
6At the end of the recorded section that you want to delete, press the
Del button again.
7The scissors will stop flashing and (Cut) will begin to flash. You
have a few seconds to press Del again to delete the marked section of
the message. Otherwise, the section will not be deleted

Deleting Voice Messages
You may delete any voice message in a selected Voice Folder, or all the
messages in a folder as described in this section.
Deleting Specific Messages
1Press the Voice Folders button (23) to select a Voice Folder.
2Select the message that you want to edit with the Left/Right Arrow.
3Press the Del button (21) to delete the current message.
4When the characters (Delete) appear on the display screen, you
will have a few seconds to press the Del button again to delete the
message. Otherwise, the message will not be deleted.
Deleting All Messages in a Folder
1Press the Info button (18) for a few seconds until you hear an
audible beep and/or the characters (Settings) appear on the
display screen.
2Press the Voice Folders button (23) to select a Voice Folder.
3Press the Del button (21) to delete all the messages in the selected
Voice Folder.
4When the characters (Delete) followed by (All) flash on
the display screen, you will have a few seconds to press the Del
button again to delete all the messages in the folder. Otherwise,
the messages will not be deleted.
5To return to the main display screen, press the Info button until you
hear an audible beep or press this button for a few seconds and
release to return to the main display.
12
Deleting Voice Messages

Inserting Trek into a Docking Station
You may use the Walkabout Docking Station and Desktop software to
transfer voice messages between your Trek Portable and PC. The
Portable may be inserted into a Docking Station as follows:
1Slide the adapter bracket into the back of the Docking Station cradle
as shown below.
2Insert your Trek Portable on top of the adapter bracket in the
Docking Station cradle. You should hear a snap when the Portable
is seated properly.
3The Portable indicator light on the top right of the Docking Station
should turn green to indicate that the Portable has been properly
inserted into the Docking Station.
13
Inserting Trek into a Docking Station
Inserting the Trek Portable into a Docking Station
Trek Portable
Adapter
Bracket
Walkabout
Docking Station
Portable
Indicator

Trek Options
In addition to the options that allow you to select date/time formats and
delete all the messages in a selected Voice Folder, you may enter Record
and Beep options as described in this section.
Record Options
1Press the Info button (18) for a few seconds until the characters
(Settings) appear on the screen.
2Press the Right Arrow button (8) to go to the characters
(Record).
3Press the Info button to scroll through these Record Option settings
and the Right Arrow button to select specific settings.
Setting… To specify… Select…
CONF or DICT Microphone Sensitivity • CONF (conference mode) - Increase
microphone sensitivity.
• DICT (dictation mode) –
Decrease microphone sensitivity.
VOX VoiceActivated • 00 – Pause recording when
Recording silent
• _ _ – Record continuously.
INS or OVR Voice Insert or • INS – Insert new information within
Overwrite the current message.
• OVR – Record over existing data in
the current message.
Voice Quality • Longest available recording time and
lowest audio quality.
•Second longest recording time and
medium quality.
•Shortest available recording time
and best audio quality.
14
Trek Options
Table of contents
Other Dictaphone Recording Equipment manuals
Popular Recording Equipment manuals by other brands

DMP Electronics
DMP Electronics 734 Installation sheet

HHB
HHB Portadat PDR1000TC operating instructions

Siemens
Siemens SIMATIC HMI KTP700F Mobile Quick install guide

Custom Audio Electronics
Custom Audio Electronics RS-10 operating guide

Denon Professional
Denon Professional DN-7000AVP user guide

Roland
Roland TD-7 owner's manual