DIEBOLD NIXDORF P1200 User manual

Diebold Nixdorf CUPS Driver User Guide
P1200
STANDARD POS PRINTER
CUP Driver Manual
DieboldNixdorf.com
Diebold Nixdorf CUPS Driver User Guide
Revision Record
Rev. No.
Date Sections
Description
01 01 Oct, 2020
--- First Release
02 02 Dec, 2020
11, 29 1) Add information about page size and media
2) Update CUPS driver restriction information
03 25 May, 2021
1, 10-23,
29, 31
1) Add new model DN P1300
2)
Add support for POSPrinter with dual station support
(Receipt with Slip)
3) Add limitation for CentOS 6 slip station printing limitation
04 14 Jul, 2021
11, 20, 31
1) Modify printer details
2) Add information for slip station document control
3)
Add limitation when using CUPS driver printing on different
printer model but using same interface
05 08 Oct, 2021 31, 32 1) Modify “SLED SP3” to “SLED 11 SP3”
2) Add limitation for PDF printing not working with long PDF title
3) Add limitation for RS232 prinitng
NOTEs:
Novell and SUSE are registered trademarks, and the SUSE logo is a trademark, of Novell, Inc. in the
UnitedStates and other countries.
Linux is a registered trademark of Linus Torvalds.
CUPS is the standards-based, open source printing system developed by Apple Inc. for macOS
®
and other
UNIX
®
-like operating systems.
In addition, the company names and product names in this document may be registered trademarks or
trademarks of each company.
TM and ® marks are not displayed for registered trademarks or trademarks of each company in this document

Diebold Nixdorf CUPS Driver User Guide
Table of Contents
1.
General ........................................................................................................................................................ 1
1.1.
Introduction .......................................................................................................................................... 1
1.2.
Notes.................................................................................................................................................... 1
1.3.
Target Operation System..................................................................................................................... 1
1.4.
Target Devices..................................................................................................................................... 1
2.
Architecture Overview.................................................................................................................................. 2
3.
Setup............................................................................................................................................................ 3
3.1.
Installing CUPS Driver for SUSE Linux ............................................................................................... 3
3.2.
Installing CUPS Driver for CentOS...................................................................................................... 4
3.3.
Setup Printer........................................................................................................................................ 5
3.3.1.
Add Printer ................................................................................................................................... 5
3.3.2.
USB Interface .............................................................................................................................. 6
3.3.3.
Serial Port .................................................................................................................................... 6
3.3.4.
LAN interface ............................................................................................................................... 7
3.4.
Set Default Printer ............................................................................................................................... 8
3.5.
Set Default Options.............................................................................................................................. 8
4.
Print Options .............................................................................................................................................. 10
4.1.
Resolution .......................................................................................................................................... 10
4.2.
Printer Details .................................................................................................................................... 11
4.3.
Media/Paper Options ......................................................................................................................... 11
4.4.
Input Image Format ........................................................................................................................... 14
4.5.
Print Image Format ............................................................................................................................ 15
4.6.
Dithering Option................................................................................................................................. 16
4.7.
Feed and Cut Option ......................................................................................................................... 18
4.8.
Paper Conservation ........................................................................................................................... 19
4.9.
Slip Document Control....................................................................................................................... 20
4.10.
Cash Drawer...................................................................................................................................... 21
4.10.1.
Cash Drawer Pin........................................................................................................................ 21

Diebold Nixdorf CUPS Driver User Guide
4.10.2.
Cash Drawer Open .................................................................................................................... 21
4.10.3.
Cash Drawer Pulse.................................................................................................................... 22
4.10.4.
Cash Drawer Station.................................................................................................................. 23
4.11.
Logging .............................................................................................................................................. 24
4.11.1.
Log Level ................................................................................................................................... 24
4.11.2.
Log Count .................................................................................................................................. 25
4.12.
Example CMD Printing ...................................................................................................................... 26
Example 1) Print a grayscale image at top of page in portrait mode ........................................................ 26
Example 2) Print monochrome image (using CUPS monochrome image) ............................................... 26
Example 3) Print monochrome image, using Clustered Ordered Dither ................................................... 26
Example 4) Open cash drawer pin 1 after document finish printing.......................................................... 26
Example 5) Enable message to log file. Maximum log file is 10. .............................................................. 26
Example 6) Print on slip station ................................................................................................................. 26
5.
Restrictions and Cautions.......................................................................................................................... 27
5.1.
Print Options ...................................................................................................................................... 27
5.2.
Paper Size ......................................................................................................................................... 27
5.3.
Print Job Not Printing......................................................................................................................... 28
5.4.
Printer Status ..................................................................................................................................... 28
5.5.
Slip Station Resolution vs Paper Size ............................................................................................... 29
5.6.
CUPS Restriction............................................................................................................................... 29
5.6.1.
PageSize vs media option ......................................................................................................... 29
5.6.2.
CentOS 6 Custom Page Size not working................................................................................. 30
5.6.3.
Doc not printing correctly using LibreOffice on SLED 11 SP3 .................................................. 30
5.6.4.
PDF printing using command line on SLED 11 SP3 not working correctly. .............................. 31
5.6.5.
LibreOffice’s print properties is not working on SLED 11 SP3. ................................................. 31
5.6.6.
CentOS 6 slip printing not working with input image format “Color (RGB)” .............................. 31
5.6.7.
Multiple USB printer printing ...................................................................................................... 31
5.6.8.
PDF printing not working with long PDF title ............................................................................. 32
5.7.
RS232 Printing................................................................................................................................... 32

Diebold Nixdorf CUPS Driver User Guide
When using RS232 interface for Slip printing, please make sure the Slip paper length is same or more than
the printout paper length................................................................................................................................ 32
5.8.
CUPS Restriction............................................................................................................................... 33
6.
References ................................................................................................................................................ 33
6.1.
Enable CUPS Service........................................................................................................................ 33

1
Diebold Nixdorf CUPS Driver User Guide
1. General
1.1. Introduction
The Diebold Nixdorf (hereinafter referred to as “DN”) CUPS driver user manual (hereinafter referred to as “this
Manual”) is mainly describes the setup steps and specific behavior for CUPS Linux driver. For specifications
not provided in this Manual, please refer to the CUPS documentation.
The CUPS documentations can found from the following web site:
CUPS Home Page: https://www.cups.org/
1.2. Notes
Before reading this Manual, please note the following:
•To use or duplicate a part or whole of this Manual without the permission of Diebold Nixdorf is prohibit.
•This Manual is subject to change without prior notice.
•Slip station support by CUPS driver release kit by version V2.0.0.0 and onward.
1.3. Target Operation System
Operating Systems 32bits 64bits
SUSE Linux Enterprise Desktop (SLED) 11 SP3
SUSE Linux Enterprise Desktop 12
CentOS 6.10
CentOS 7 (2003)
1.4. Target Devices
POSPrinter Model USB RS232 Ethernet
DN P1200
DN P1300
2
Diebold Nixdorf CUPS Driver User Guide
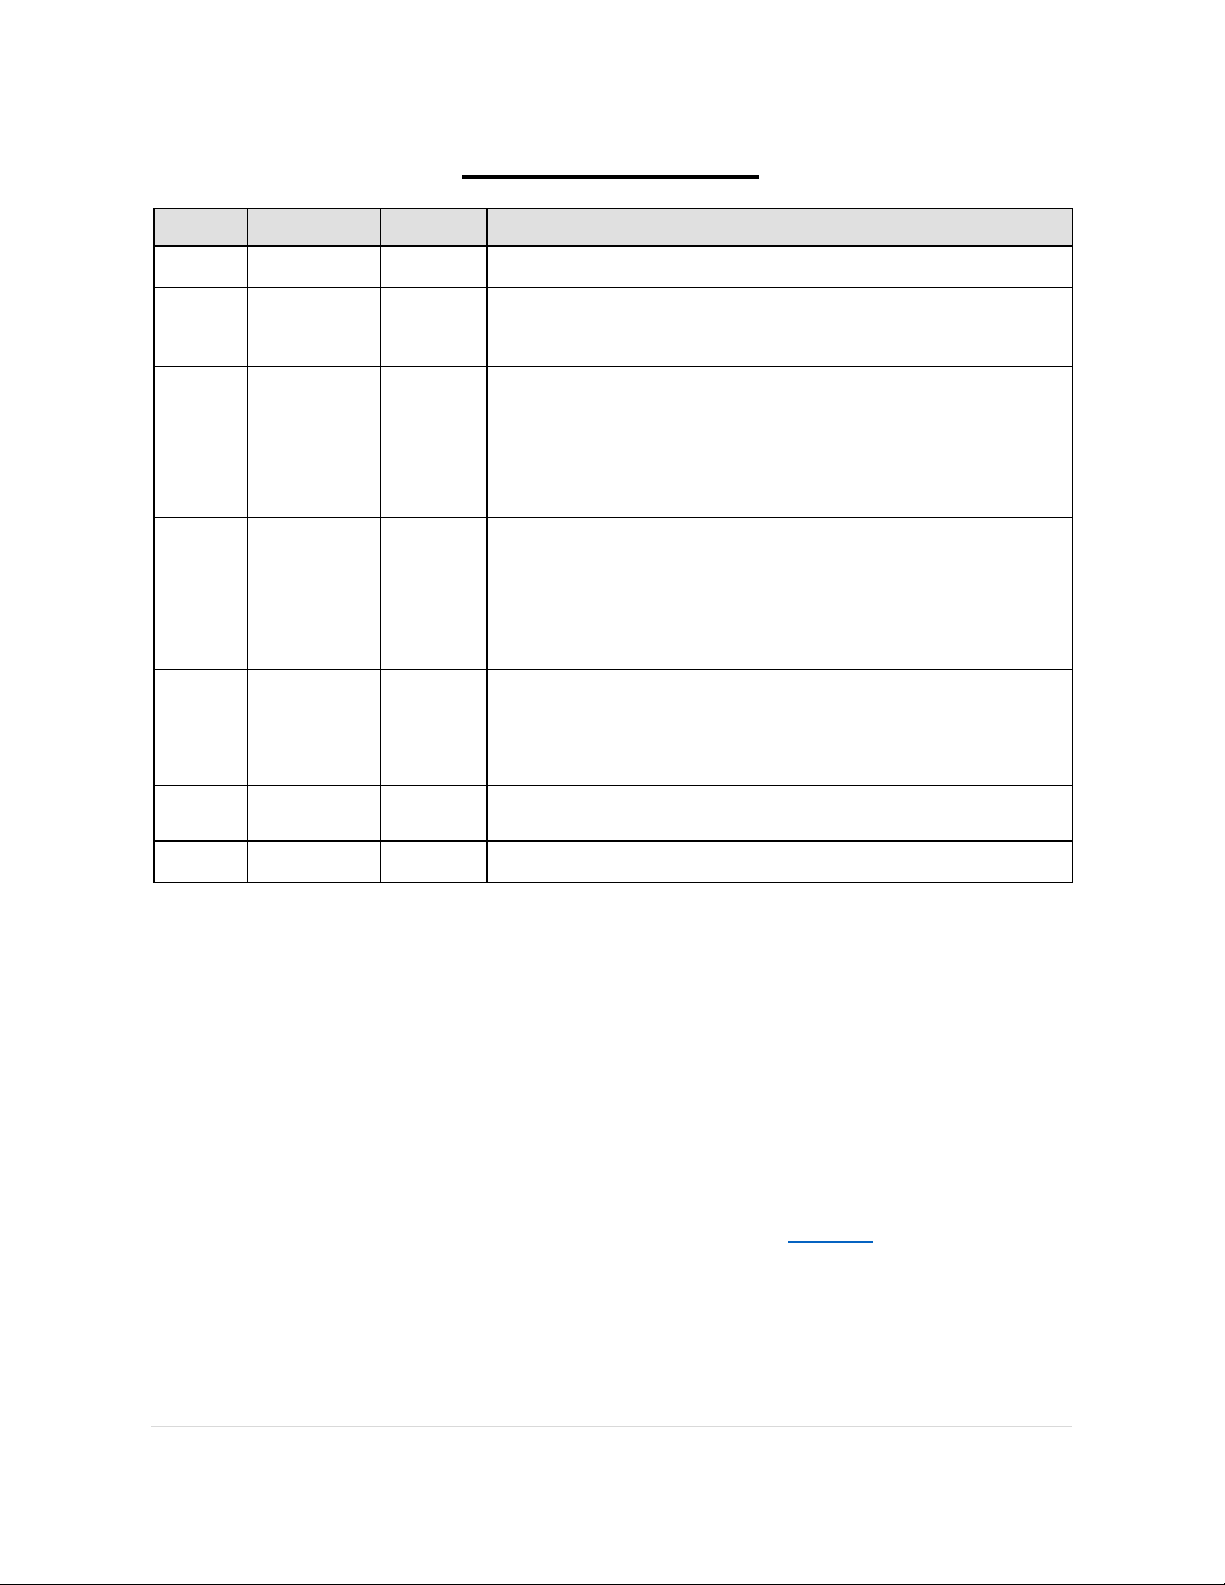
2. Architecture Overview
CUPS driver provides POS Printer printing functionality on Linux operating system.
The software components shown below are required for execution environment.
: The shaded area indicates the CUPS Driver components

3
Diebold Nixdorf CUPS Driver User Guide
3. Setup
3.1. Installing CUPS Driver for SUSE Linux
1. After download the driver kit, extract the zip file to local file system.
2. For SUSE Linux, run “install_suse.sh” as root privilege. CUPS components will install to system.
3. On Linux, if *.sh file cannot be execute, it will need to add the executable rights to the script. For example,
if install.sh cannot be execute:
] chmod +x install_suse.sh
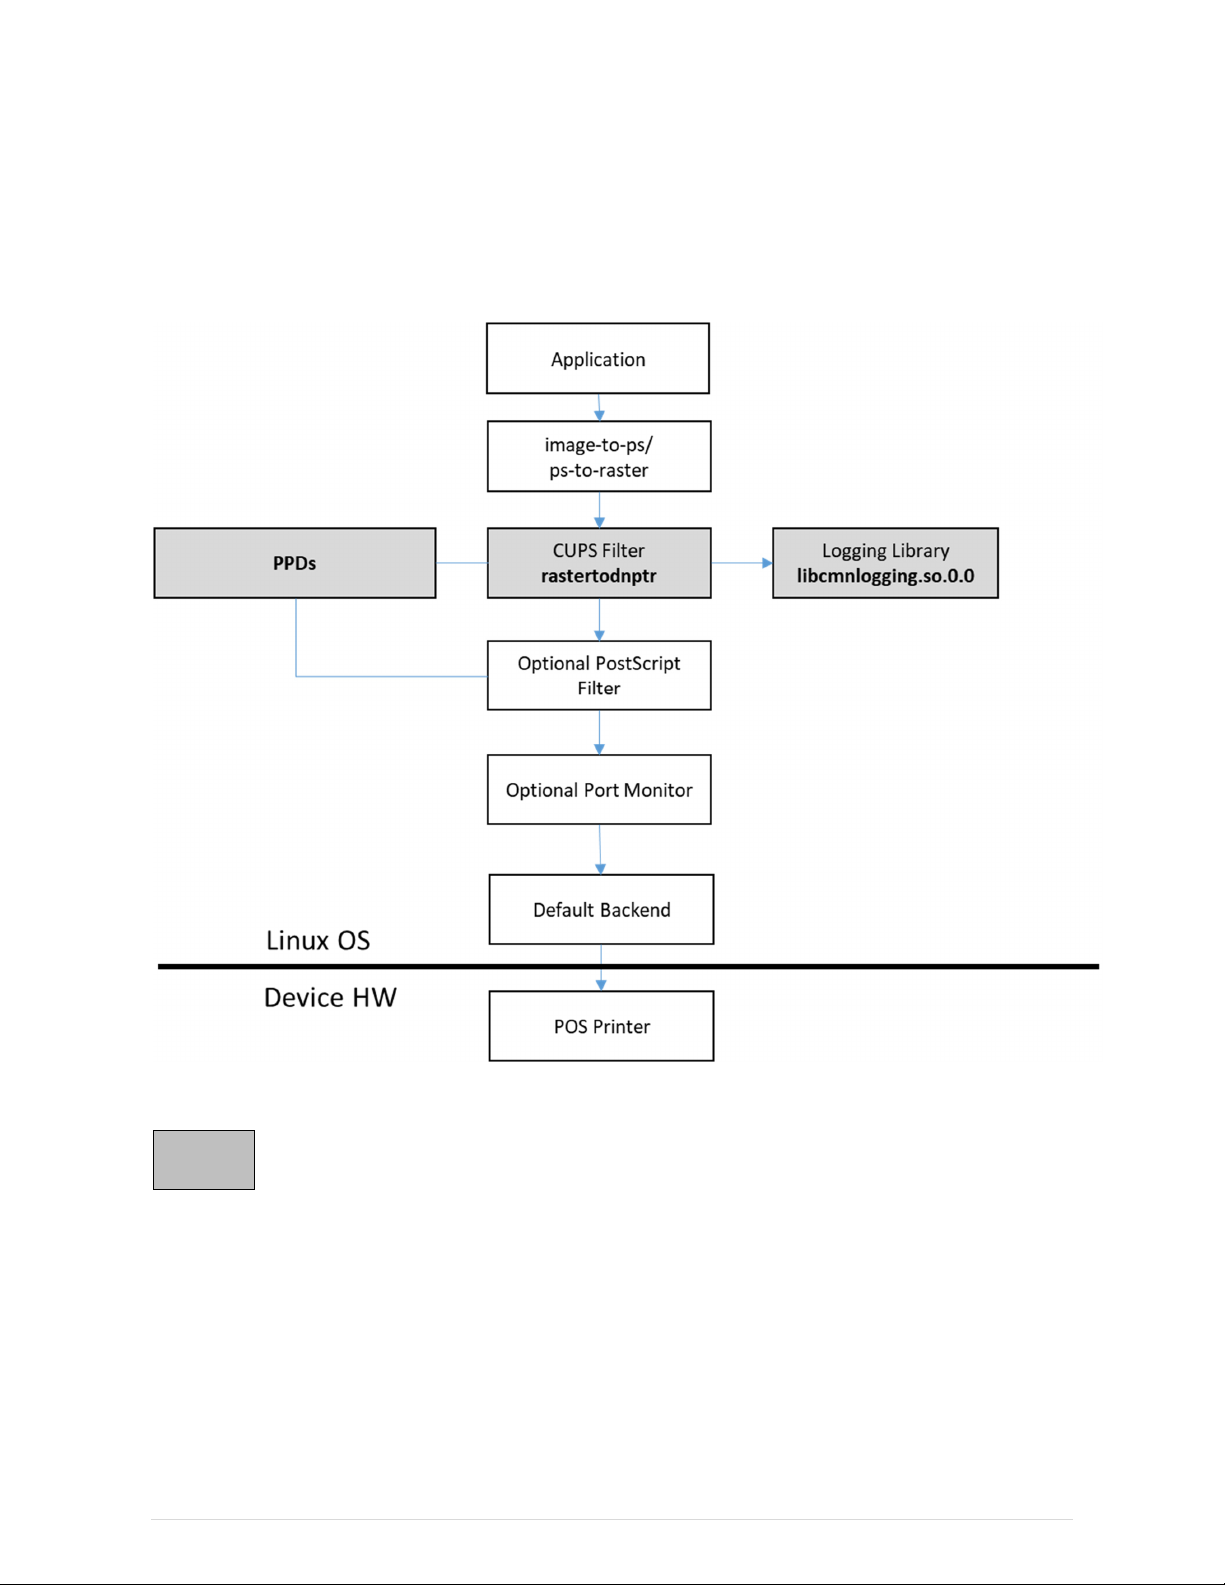
4. CUPS driver component can be remove by running “uninstall.sh” as root privilege.
a.
NOTE:
The uninstallation should run after printer using DN CUPS driver already delete from system.
b. When “Do you wish to continue (Y/N)?” appear, key in “y” to continue uninstallation if the entire
printer using DN driver already delete from CUPS printer list.
4
Diebold Nixdorf CUPS Driver User Guide
3.2. Installing CUPS Driver for CentOS
1. After download the driver kit, extract the zip file to local file system.
2. For CentOS, run “install_centos.sh” as root privilege.
3. On Linux, if *.sh file cannot be execute, it will need to add the executable rights to the script. For example,
if install.sh cannot be execute:
] chmod +x install_centos.sh
4. CUPS driver component can be remove by running “uninstall.sh” as root privilege.
a.
NOTE:
The uninstallation should run after printer using DN CUPS driver already delete from system.
b. When “Do you wish to continue (Y/N)?” appear, key in “y” to continue uninstallation if the entire
printer using DN driver already delete from CUPS printer list.
5
Diebold Nixdorf CUPS Driver User Guide
3.3. Setup Printer
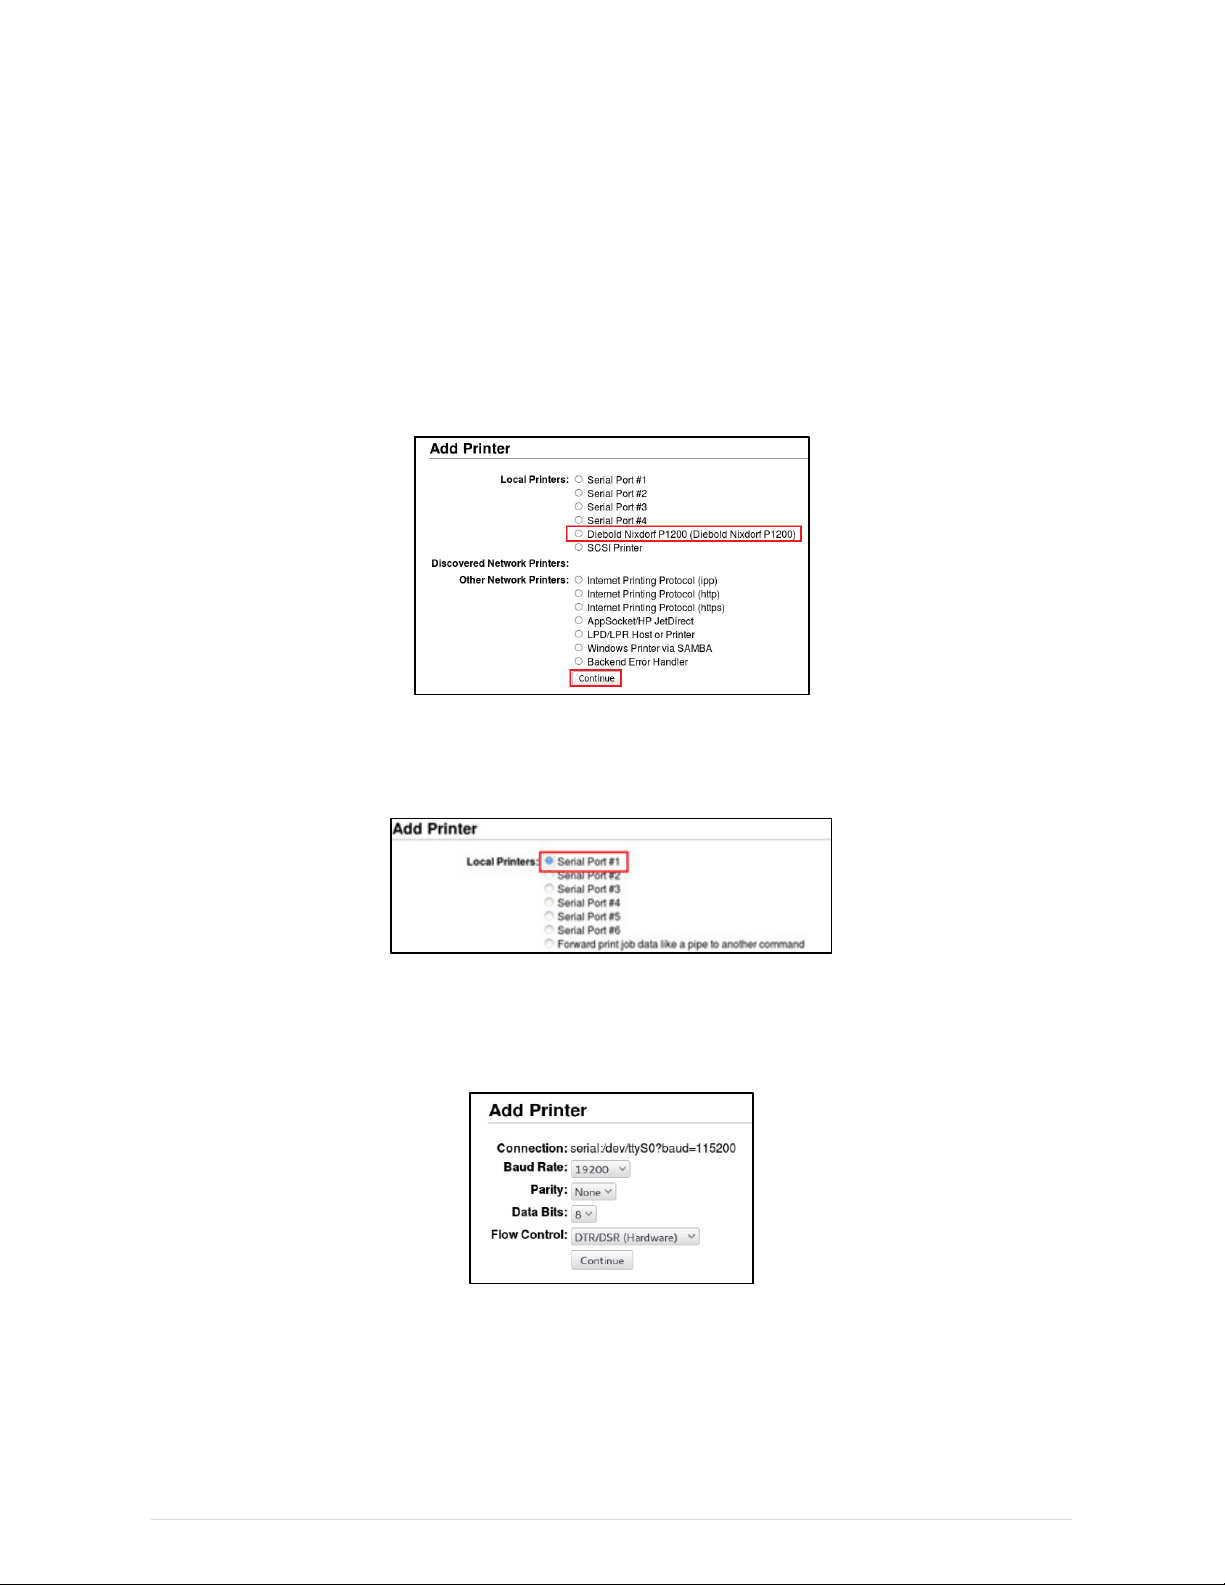
Following steps show how to add printer using CUPS Administrator page.
It is require connecting printer before proceed “Add Printer”.
3.3.1. Add Printer
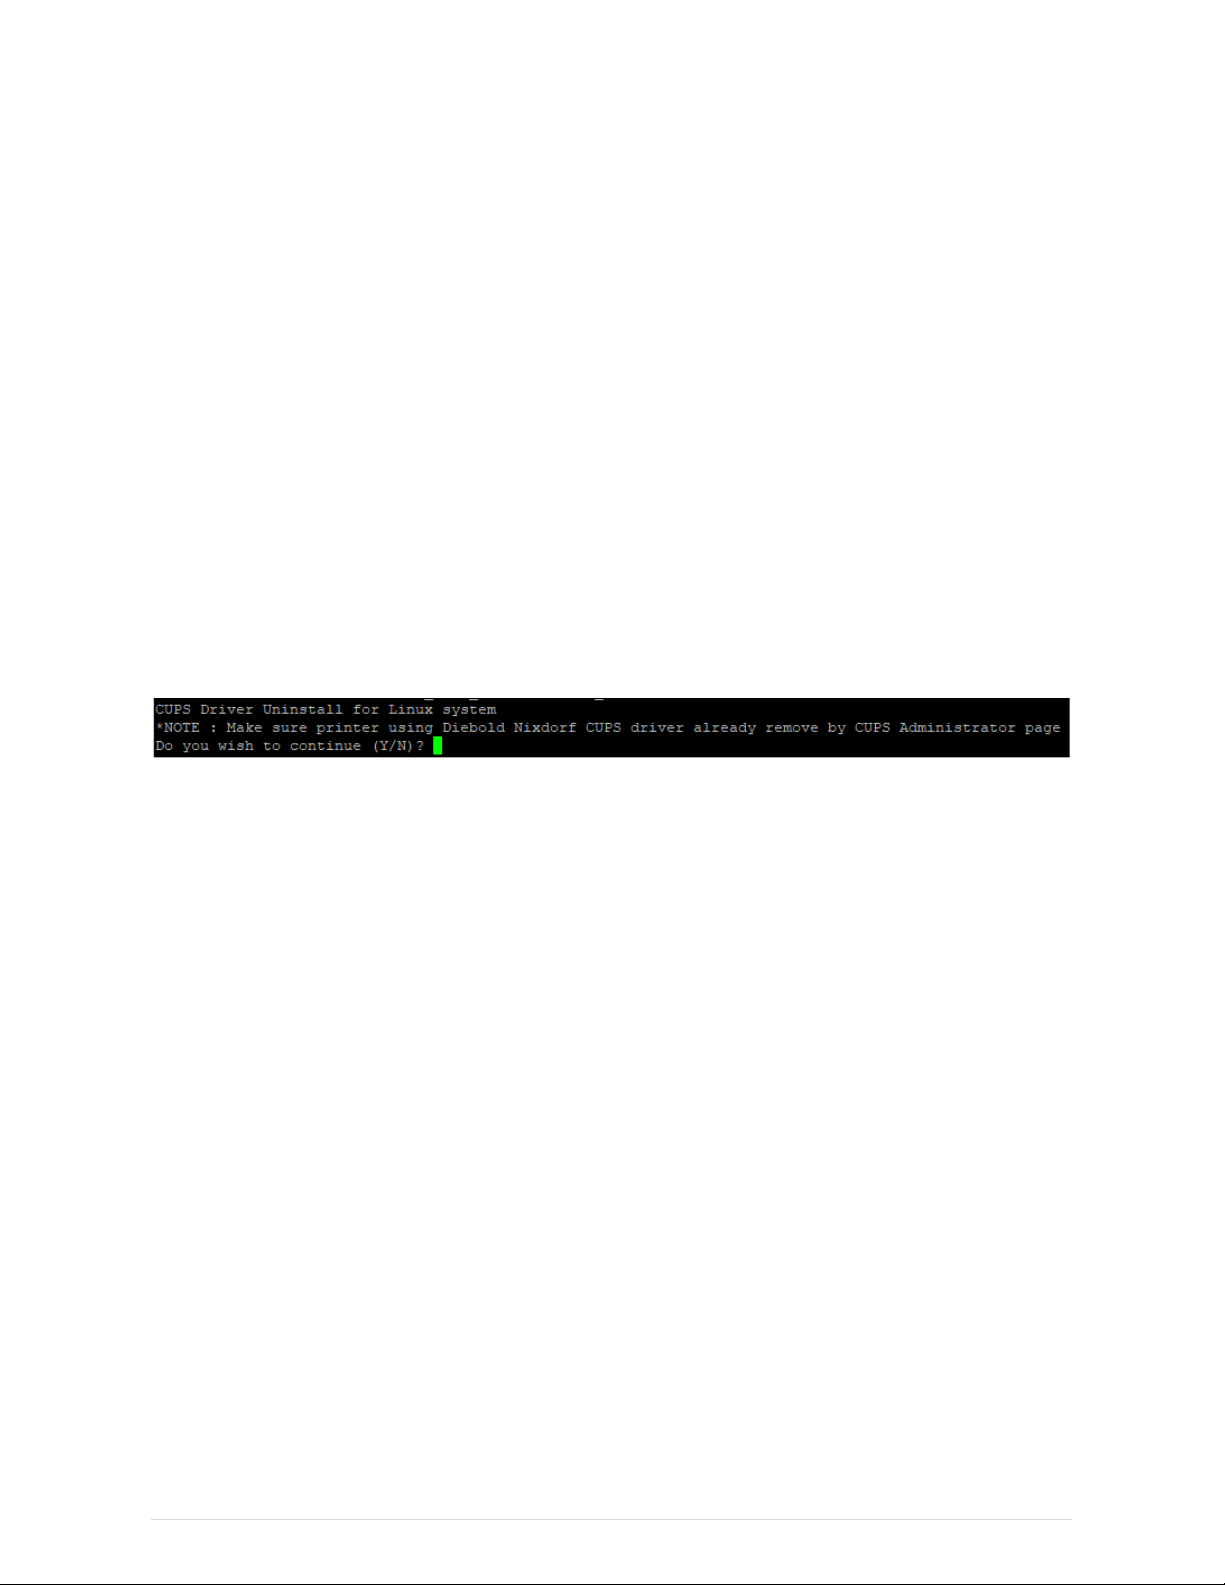
1. Launch any browser, go to CUPS control page with URL “localhost:631”.
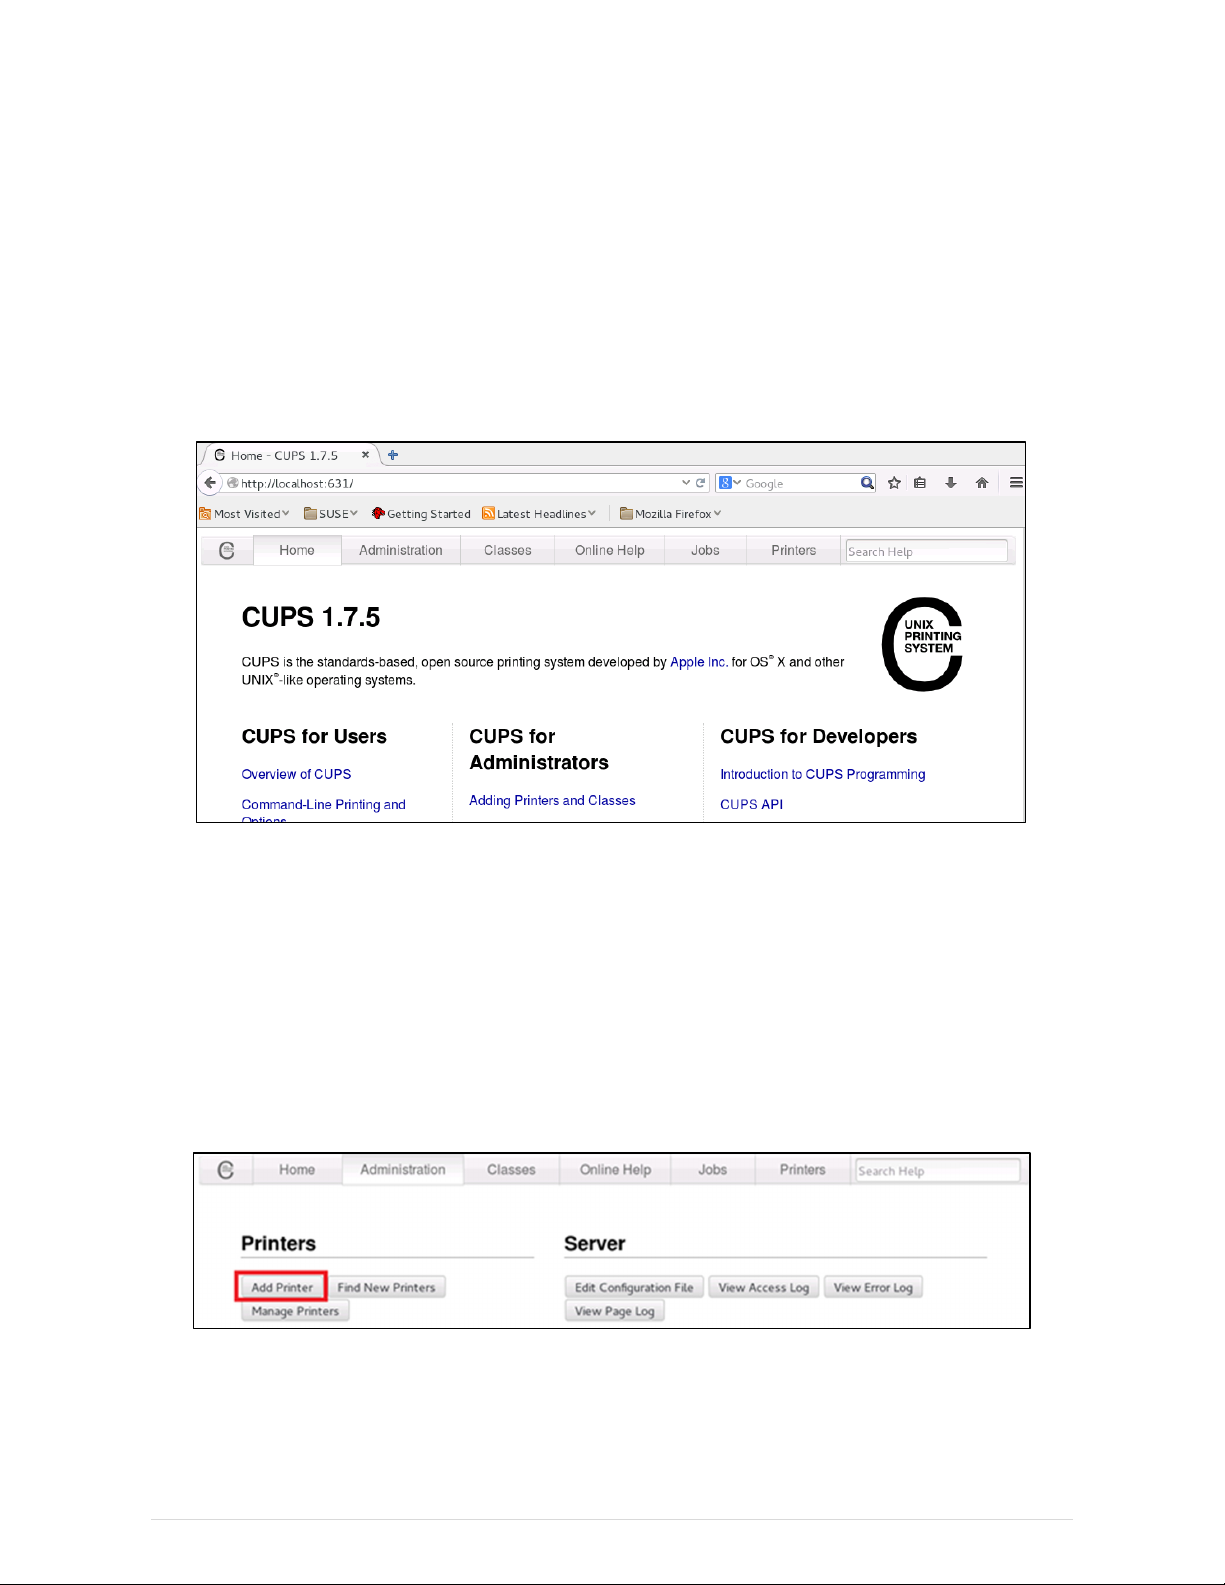
2. Select “Administration” “Add Printer”.
a. When dialog appear to request username and password, please key in username with root privilege
and correct password.
b. On older CUPS system, USB port is not show in next page. However, printer can be detect using
“Find New Printers” at this step.
3. Next, setup POS Printer’s port interface.
6
Diebold Nixdorf CUPS Driver User Guide
3.3.2. USB Interface
If printer connected, its USB port will appear under “Local Printers”. Select correct port and press “Continue”.
If printer connected but is not showing here, the possible reasons include:
•
Printer automatically added by CUPS system when connect. Please check printer list and make sure
system add printer using correct driver. If not, it will need to delete printer and add printer again.
•
Older CUPS system is not showing USB interface. Please refer previous step 2.b) for details.
3.3.3. Serial Port
First, select correct serial port and press “Continue”. For example, /dev/ttyS0 means “Serial Port #1”.
Second, configure correct serial port settings; setting value must match with printer device’s hardware setting.
After set, press “Continue”.

7
Diebold Nixdorf CUPS Driver User Guide
3.3.4. LAN interface
First, select “AppSocket/HP JetDirect” and press “Continue”
Second, set correct IP address and TCP port value in connection string. Connection string format is
“socket://<
IP address
>:<
TCP Port #
>”.
For example, for POS Printer’s IP address is 192.168.1.216 and TCP port value is 9100, the connection
string will be “socket://192.168.1.216:9100”

8
Diebold Nixdorf CUPS Driver User Guide
3.4. Set Default Printer
When send print job using command line and getting “no system default destination message”, the default
destination can be set using “lpoptions” command, for example:
] lpoptions -d Diebold_Nixdorf_P1200
3.5. Set Default Options
This to configure default options when perform printing for each printer. This setting can be access via CUPS
control page.
1. Select printer to configure from printer list.
2. After printer’s control page display, select “Set Default Options” from Administration drop down list.
3. The selected printer support options will display. Now user can configure default option to use in printing.
9
Diebold Nixdorf CUPS Driver User Guide
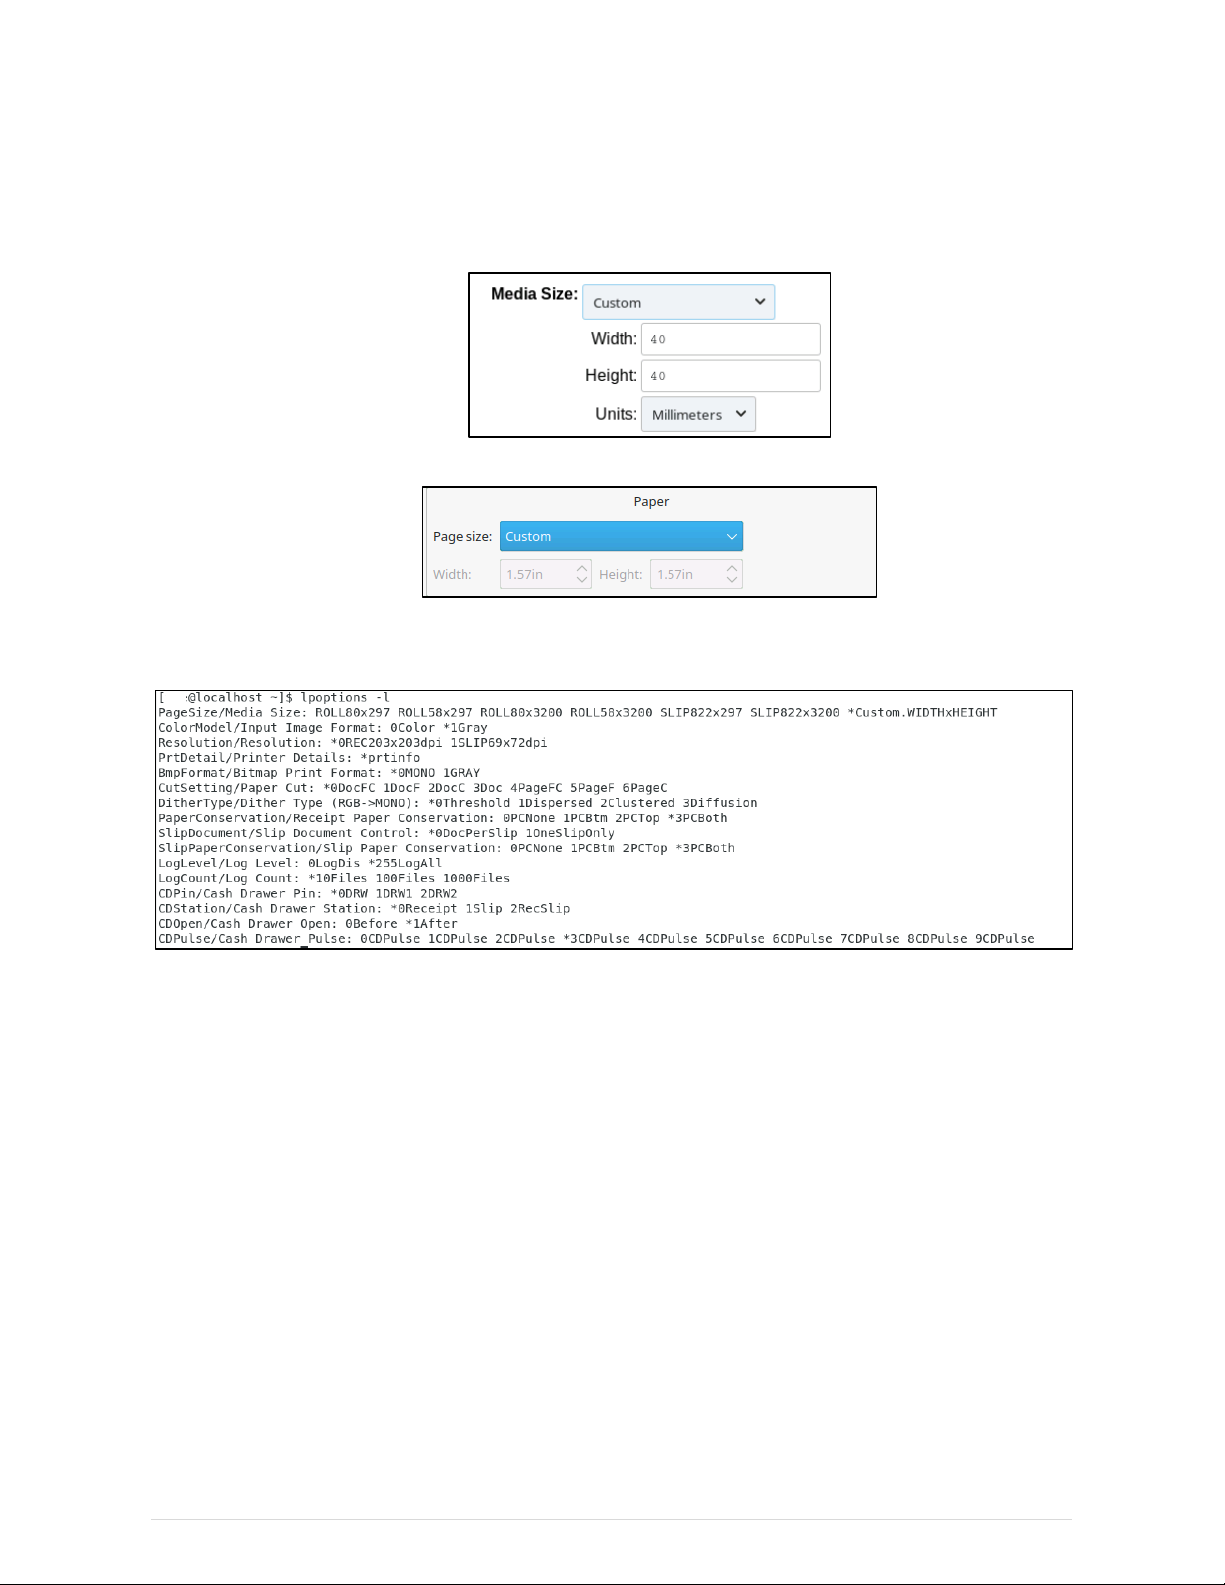
4. For options support custom parameter, it is require configuring default option’s “Custom” value before
use in printing. Please refer to “4 Print Options” for supported options detail.
For example, in order to use custom page size in next printing. First, it needs to set the desire page
size in “Set Default Options”
After that, when perform printing select “Custom” for “page”.
5. When print job send using command line, the default options can be check by command:
] lpoptions –l
6. The default option for command line (lp or lpr) can be change using command:
] lpoptions –o <
name
>=<
support value
>
For example, to change Paper Cut setting to “Document[NoFeed,Cut]”, command is:
] lpoptions -o CutSetting=2DocC
7. The lpoptions default options value might not affect setting value in “Set Default Options” page and
vice versa. To change “Set Default Options” setting value, please perform step 1. to 3. or by command:
] sudo lpadmin -p <printer name> -o <name>=<support value>
For example, to change custom paper size for DN P1200 printer:
] sudo lpadmin -p Diebold_Nixdorf_P1200 -o PageSize=Custom.50x50mm
10
Diebold Nixdorf CUPS Driver User Guide
4. Print Options
This chapter describes printing options supported by CUPS driver. It also describe how to control the option in
print command line by “-o name=value [ ... name=value ]”. For restriction and cautions, please refer
“5.1 Print Options” for more details.
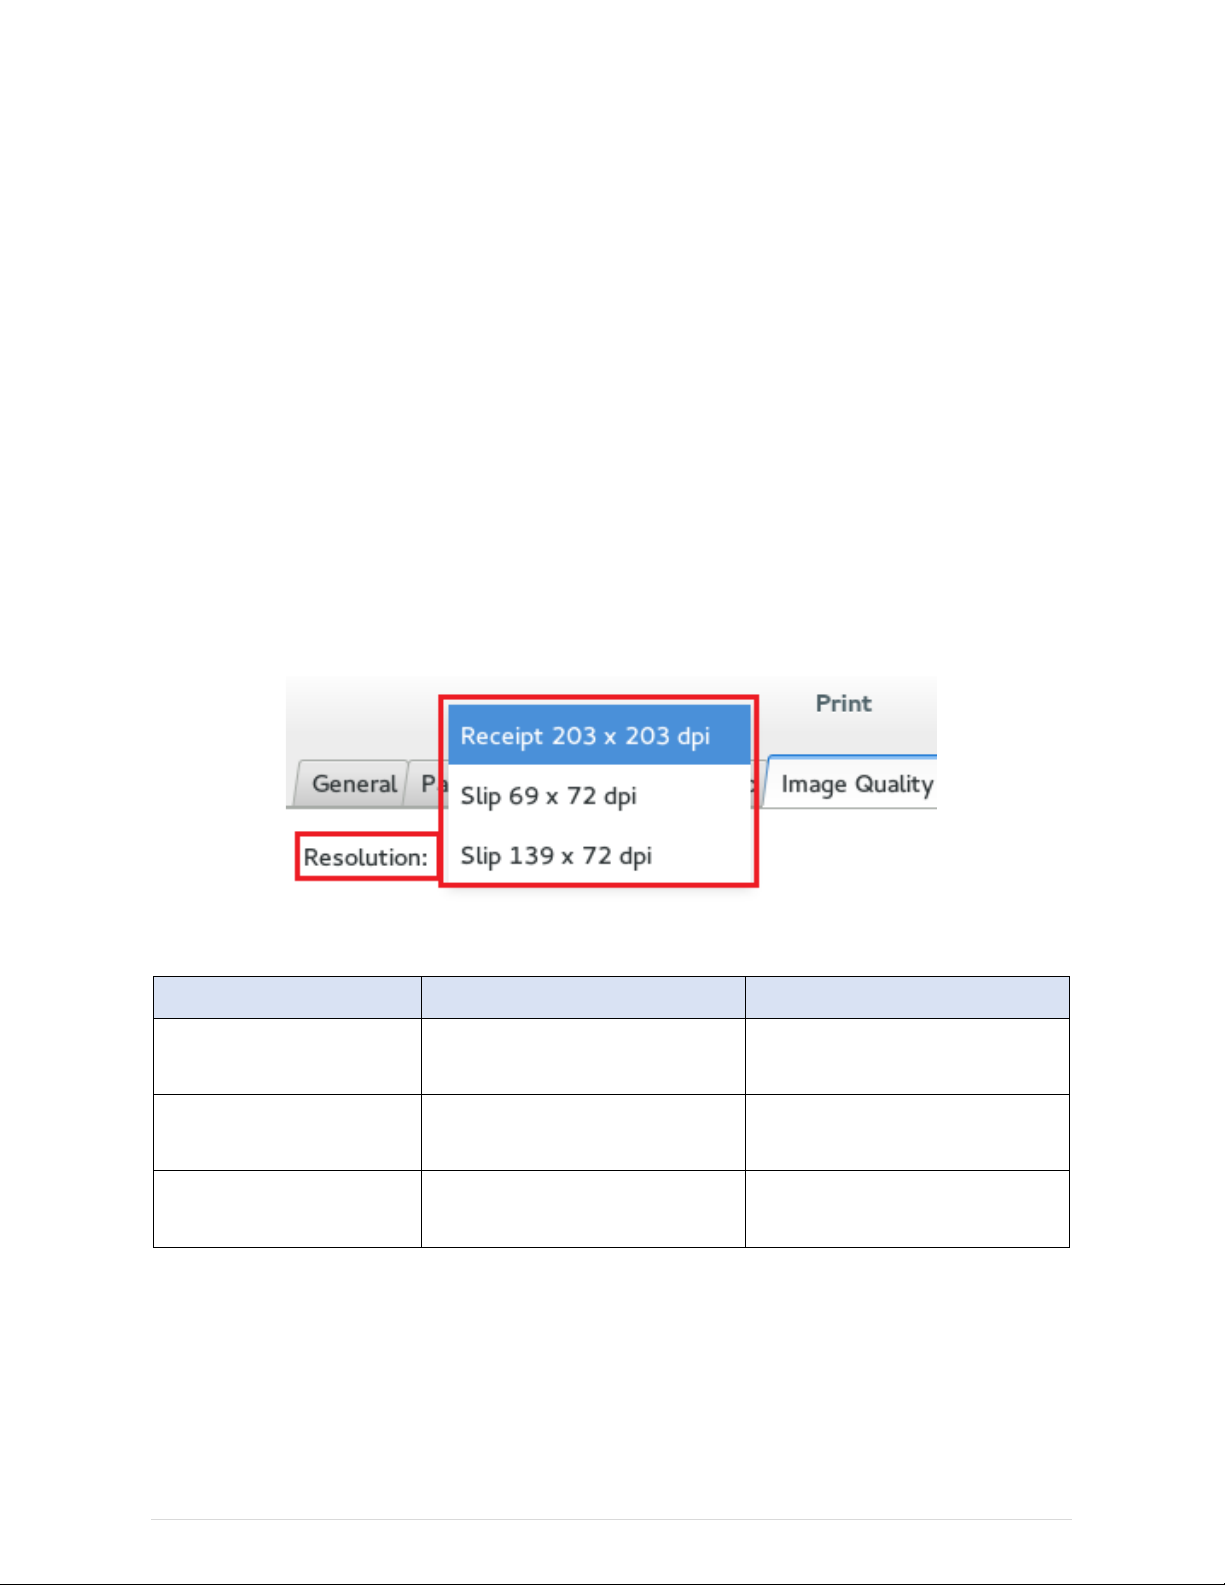
4.1. Resolution
On CUPS driver V2.x.x.x onward, slip station printing will be support. On POSPrinter model that supports slip
station, user can control printing station by using resolution selection. This option will not show selection if
current POSPrinter model only support single resolution printing.
For details of resolution vs paper size, please refer to “5.5 Slip Station Resolution vs Paper Size”.
Following shows current supported resolution.
Name Command Description
Receipt 203 x 203 dpi
[Default]
Resolution=0REC203x203dpi Printing using receipt station
Slip 69 x 72 dpi Resolution=1SLIP69x72dpi Printing using slip station with 69.5 x
72 dpi
Slip 139 x 72 dpi Resolution=2SLIP139x72dpi Printing using slip station with 139 x
72 dpi
NOTE
: In command line, the exact value string for Resolution must send in order for setting to take effect. For
other options, only the front integer of value will take into process.

11
Diebold Nixdorf CUPS Driver User Guide
4.2. Printer Details
This option is not mean for controlling. It simply display current PPD supported printer model and resolution
information. Following shows an example printer details for DN P1200 POS Printer:
Printer details are as follows:
Name Model Resolution
Diebold Nixdorf P1200 DN P1200 203dpi x 203dpi
Diebold Nixdorf P1300 DN P1300
Receipt:
203dpi x 203dpi
Slip:
69dpi x 72dpi
139dpi x 72dpi
4.3. Media/Paper Options
This option is use to control the size of paper size for printing. For details of resolution vs paper size, please
refer to “5.5 Slip Station Resolution vs Paper Size”.
Following shows available define paper size in list; Slip paper size will only appear on POS Printer with slip
station support:
Name Command
Paper size 80 * 297 mm
[Default]
media=ROLL80x297
Paper size 58 * 297 mm media=ROLL58x297

12
Diebold Nixdorf CUPS Driver User Guide
Paper size 80 * 3200 mm media=ROLL80x3200
Paper size 58 * 3200 mm media=ROLL58x3200
Slip paper size 82.2 * 297 mm media=SLIP822x297
Slip paper size 82.2 * 3200 mm media=SLIP822x3200
When printing, standard printing option “media” can use to select the paper size for current printing. However,
to change paper size for every printing, “PageSize” is use instead. When “PageSize” is set, the “media” option
will be supersede by “PageSize” setting value.
The maximum paper size for receipt station can support is as following. However, the actual value only printable
area width. For example, DN P1200 actual print width is 72.07mm (576 dots) so the width show in paper is 2.84
inch (~72.13 mm) instead of 3.14 inch for paper width 80mm.
For CUPS version supports custom paper size, user can define custom paper size in “Set Default Options”. In
order to use custom paper size, it is require configuring “Media Size” before “Custom” in “Paper source” can
use properly.
Following table shows the maximum and minimum value for custom paper size on single
receipt
station POS
Printer:
Minimum Maximum
Unit mm Points mm Points
Width
25.4 72.0 72.0 204.3
13
Diebold Nixdorf CUPS Driver User Guide
Height
25.4 72.0 3200.0 9070.9
Following table shows the maximum and minimum value for custom paper size on single
dual station
POS
Printer (support slip station):
Minimum Maximum
Unit mm Points mm Points
Width
25.4 72.0 81.8 232.0
Height
25.4 72.0 3200.0 9070.9
NOTE
: For dual station POS Printer, the printing will fail on receipt station if now the custom paper size is over
the receipt station printable area. This is because slip station support bigger paper size compare with receipt
station.
When print using command line, paper size can be control using “-o media”. Following shows example
command line for different paper size:
Example 1) Using define “Paper size 80 * 297 mm”
] lp -o page-ranges=4-5 -o fit-to-page -o media=ROLL80x297 test.pdf
Example 2) Using custom paper size with 80 x 100 mm (
input width should exclude left/right margin
)
] lp -o page-ranges=4-5 -o fit-to-page -o media=Custom.
72
x100mm test.pdf
14
Diebold Nixdorf CUPS Driver User Guide
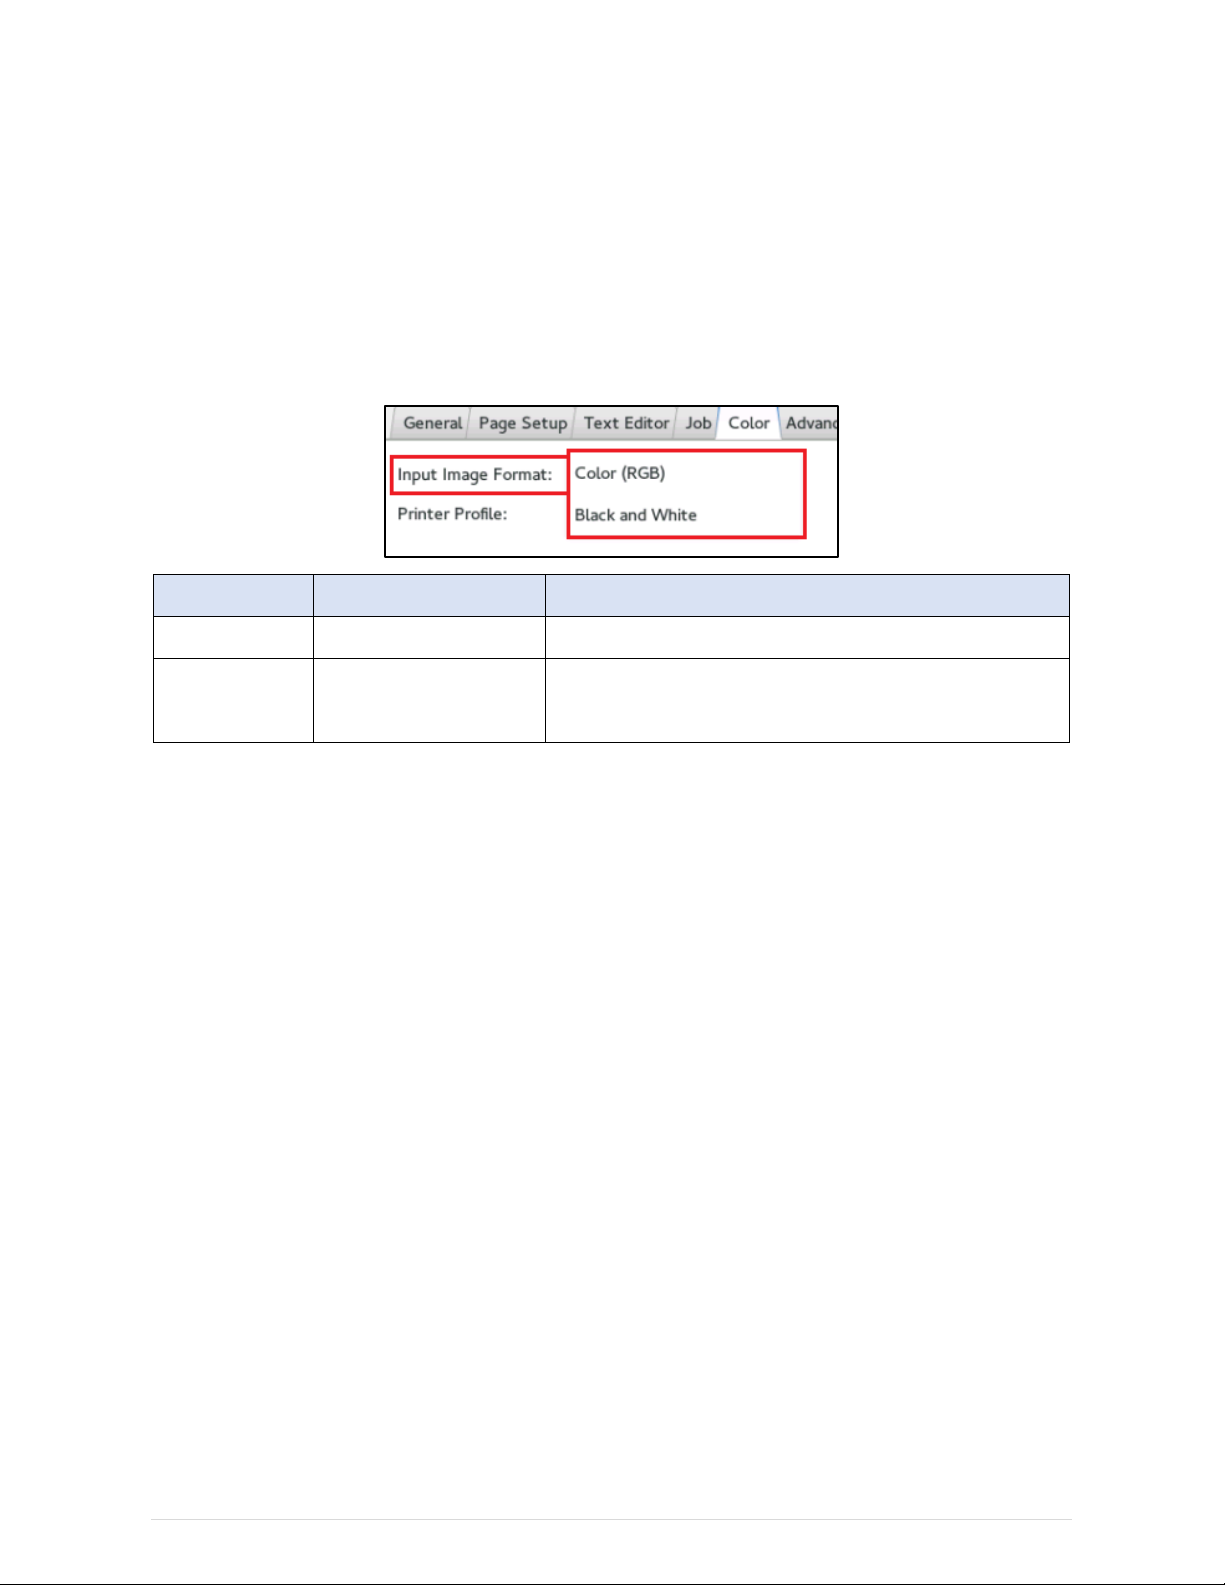
4.4. Input Image Format
This option is use to control input raster format receive by filter from CUPS. “Color (RGB)” supports more bitmap
printing control and functionally. “Black and White” is optimize for monochrome print speed, as filter does not
require performing color to monochrome conversion. Please refer to “4.5 Print Image Format” and “4.6 Dithering
Option” for more details.
Name Command Description
Color (RGB) ColorModel=0Color Raster graphic with pixel data in 24bits “RGBRGB…” format
Black and White
[Default]
ColorModel=1Gray Raster graphic with pixel data in 1 bit per pixel format.
NOTE: In command line, the exact value string for ColorModel must send in order for setting to take effect. For
other options, only the front integer of value will take into process.
15
Diebold Nixdorf CUPS Driver User Guide
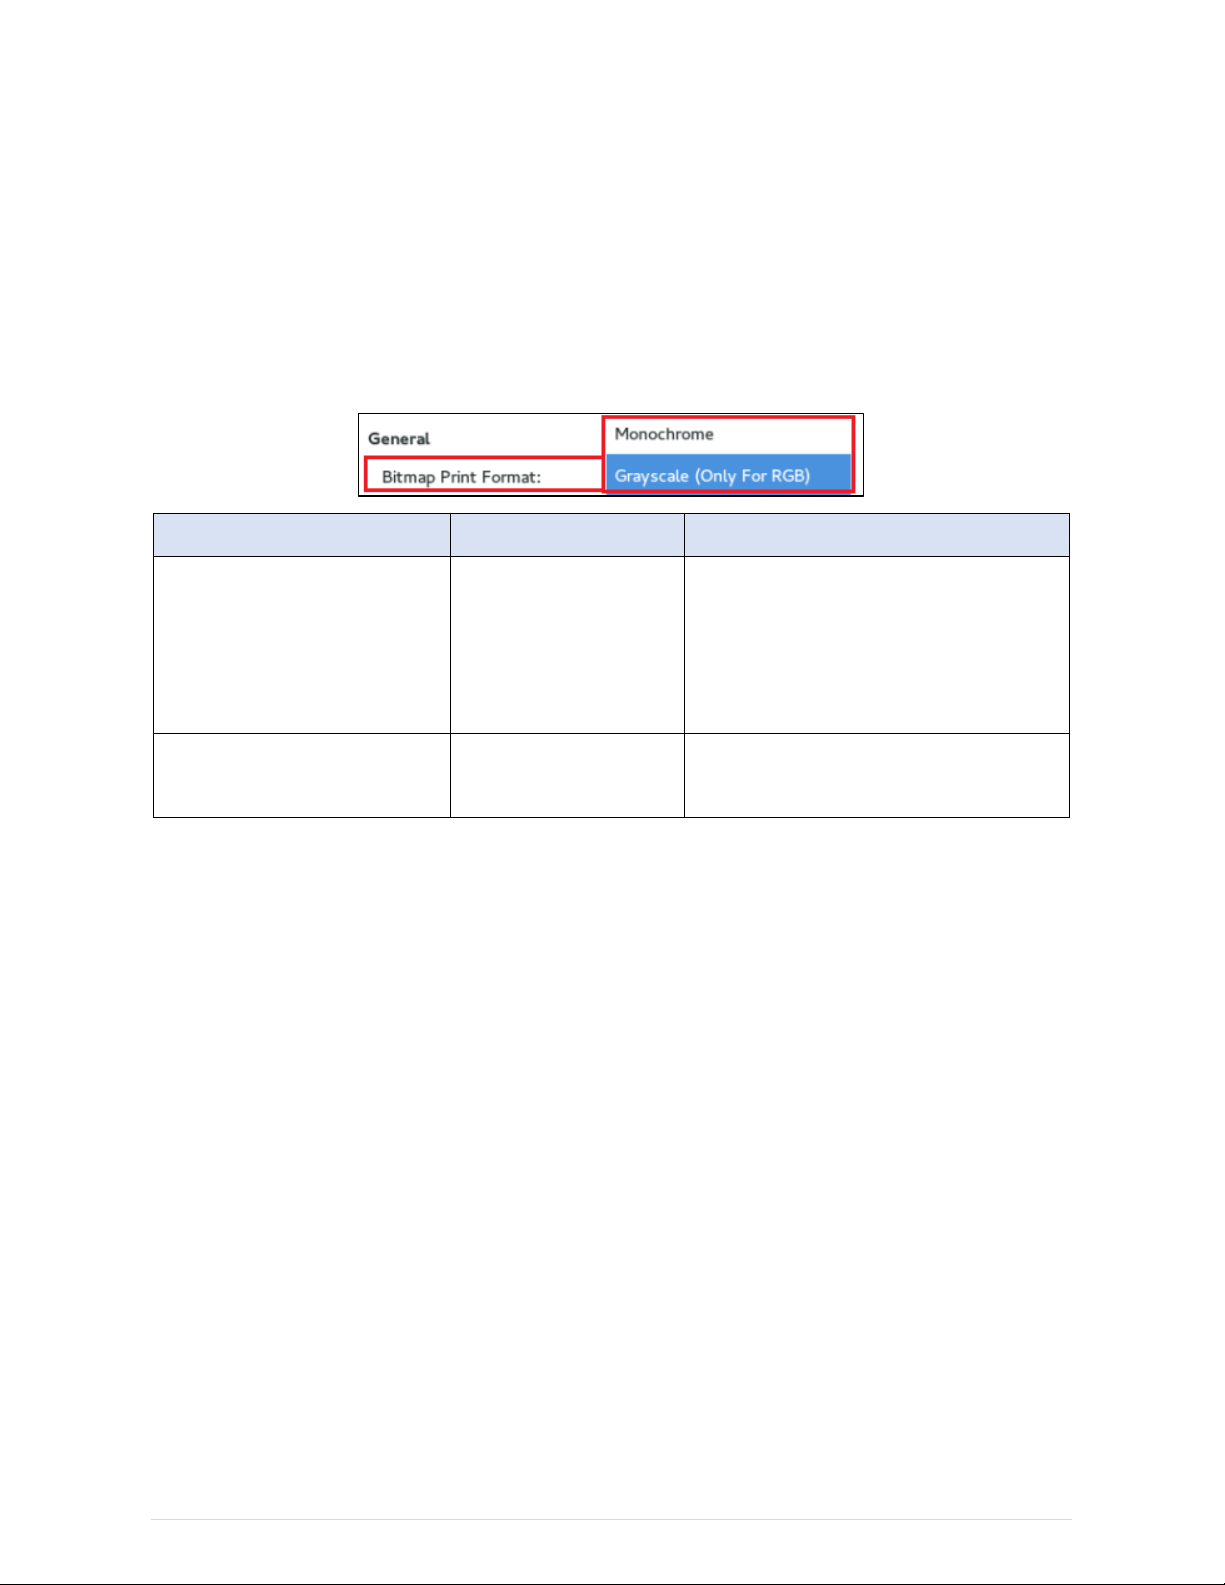
4.5. Print Image Format
This option to control print out image on POS Printer, which supports both monochrome and grayscale printing.
Grayscale printing only working if “Input Image Format” is “Color (RGB)”, otherwise monochrome will be print
even though grayscale option is select. Please refer “4.4 Input Image Format” for more details.
Slip station printing will always use monochrome in printing. This option will be ignore if now is slip printing.
Name Command Description
Monochrome
[Default]
BmpFormat=0MONO
BmpFormat=0
Print using monochrome command. If input
format is “Color (RGB)”, monochrome
conversion will base on dithering option.
Please refer “4.6 Dithering Option” for more
details.
Grayscale (Only For RGB) BmpFormat=1GRAY
BmpFormat=1
Print using grayscale command
No support on slip station printing
Other manuals for P1200
3
Table of contents
Other DIEBOLD NIXDORF Printer manuals

DIEBOLD NIXDORF
DIEBOLD NIXDORF P1300 User manual

DIEBOLD NIXDORF
DIEBOLD NIXDORF P1200 User manual

DIEBOLD NIXDORF
DIEBOLD NIXDORF TH250 User manual

DIEBOLD NIXDORF
DIEBOLD NIXDORF P1200 User manual

DIEBOLD NIXDORF
DIEBOLD NIXDORF TH210-VI User manual

DIEBOLD NIXDORF
DIEBOLD NIXDORF P1200 Owner's manual

DIEBOLD NIXDORF
DIEBOLD NIXDORF P1300 Operating instructions


