digades dguard User manual
Guard your life Protect your bike
Installation Guide

Define places to
install the parts
•start with the dguard®
module
•hide the GPS
antenna (place it
black side up)
•if required, dismount
the fairing and/or fuel
tank.
Cable harness
•place harness
next to original
harness
•attach the
dguard®button
to the handlebar
(or on upper
clamp)
•connect cable
harness to
module
Powersupply
(+ & - )
•if possible,
connect both
wires directly to
the battery; if not,
use steady
current and
ground (frame)
Live terminal for
ignition
•connect the
ignition positive
wire at „terminal
15“ – by the
circuit diagram.
Sometimes the
rear light is an
easy solution.
Connect the
cable harness to
the remaining
parts
(Plug and Play)
Calibrate the
dguard via the
digades portal
installation dguard®
Process of parts installation dguard®:
•the dguard®module needs cellular reception and should therefore not be mounted directly
under metal parts of the motorbike.
•choose a hidden installation location (and one that provides maximum protection in the
event of an accident) for the dguard®module within the motorbike frame (e.g. under the
body seat, in the rear of the frame, behind fairing or behind side panel)
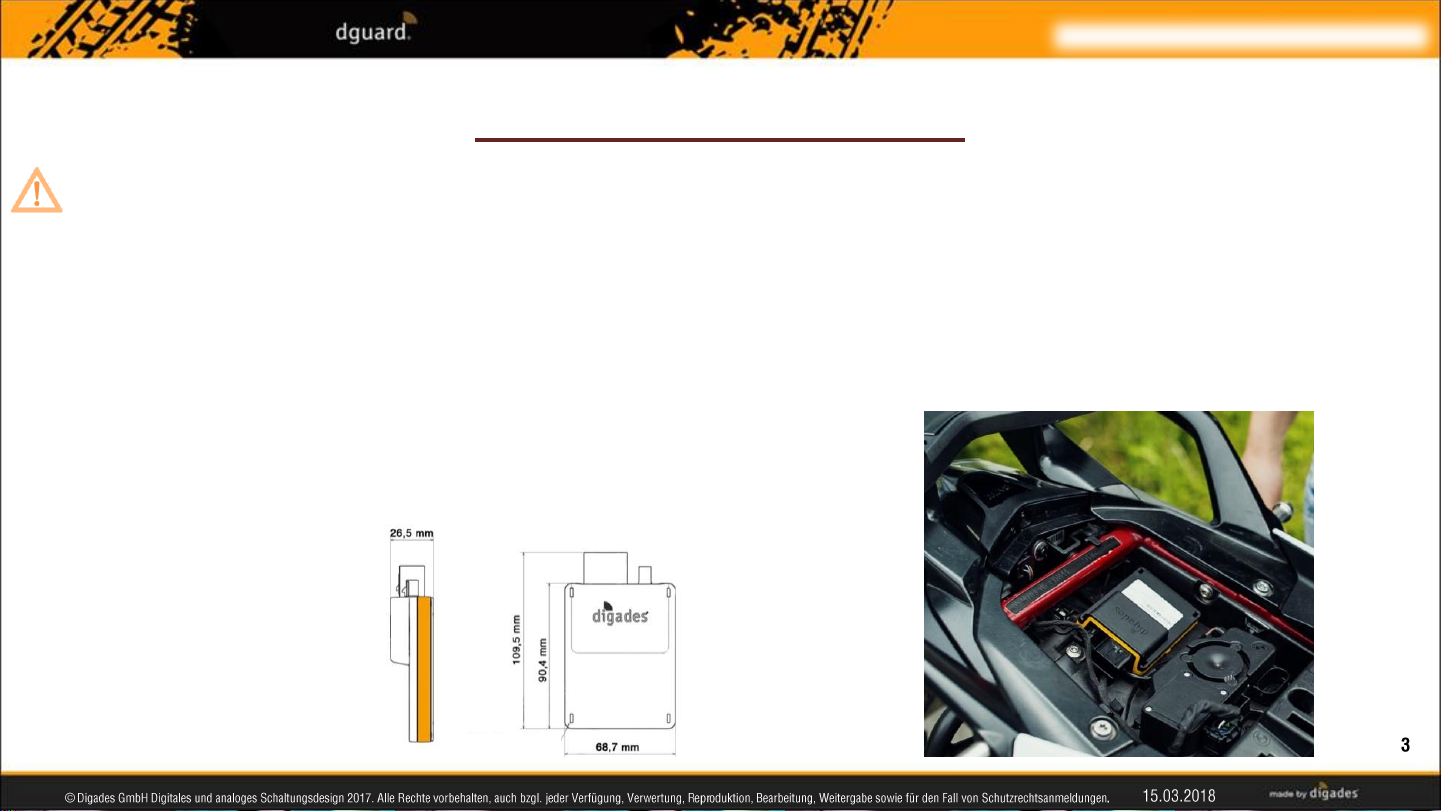
•check dimensions of the dguard®module before starting with the installation
•make sure that there is enough space to install it
•fix/glue the module before you start with the calibration
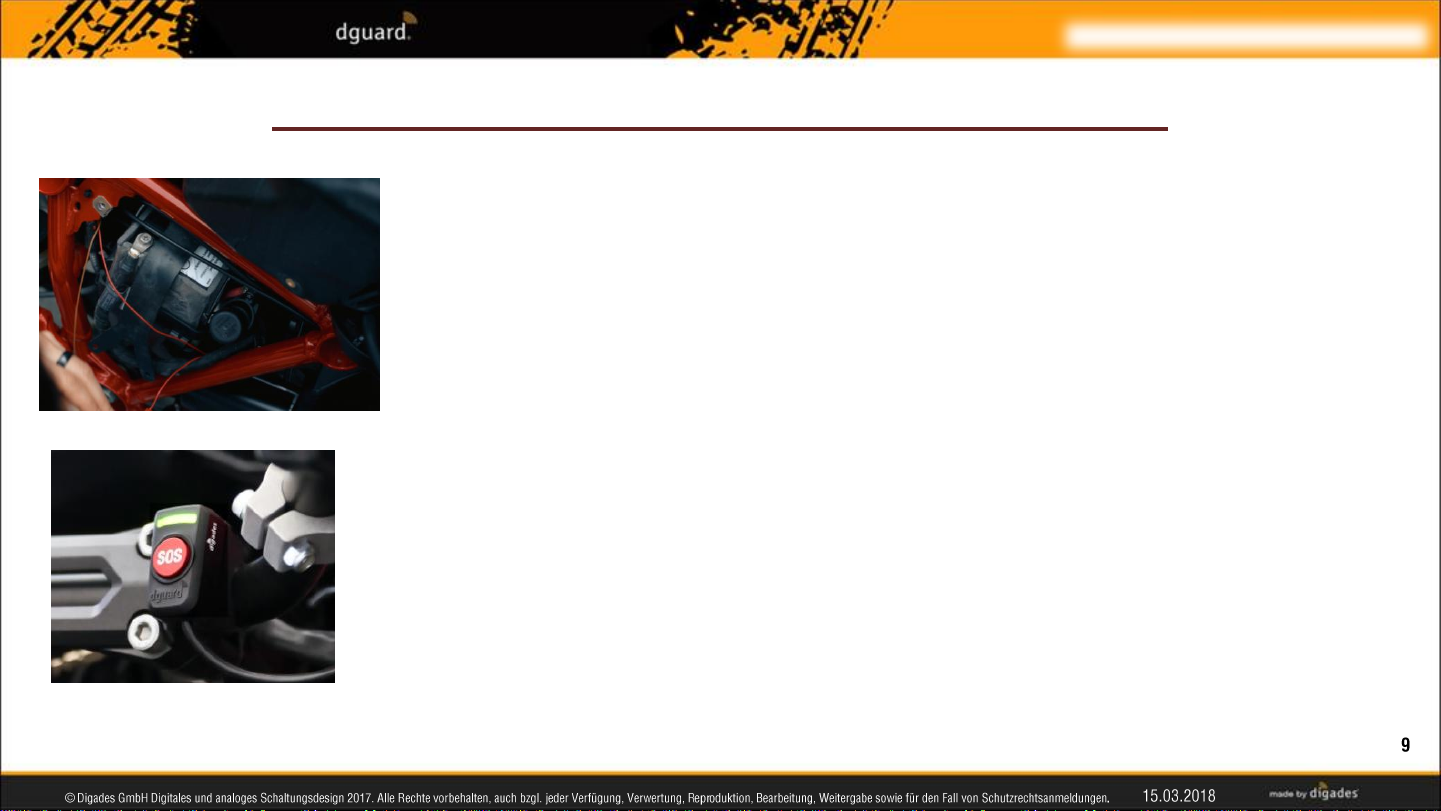
installation dguard®
advice - dguard® module:

WARNING!
The dguard®module’s backup battery is designed to have a service life of 10 years. Contact your distributor
once your backup battery has reached the end of its service life. They will help you with the replacement.
The dguard®module is the main interface for accident detection and anti-theft warning and is thus the heart
of your dguard®system. The dguard®module contains the SIM chip required to place an emergency call.
Observe the following requirements at the installation location:
Choose a hidden location (and one that provides maximum protection in the event of an accident) within the
motorbike frame (e.g. under the seat or in the rear of the frame).
INSTRUCTION
Note the cutout for the pressure compensation membrane on the adhesive pad for the dguard®module. Do
not stick anything on the pressure compensation membrane. You can see it on the rear side of the module.
WARNING!
To guarantee full functionality in the event of an accident and to avoid false alarms, ensure that the dguard®
module is properly fixed positioned after installation.
installation dguard®
advice - dguard® module:
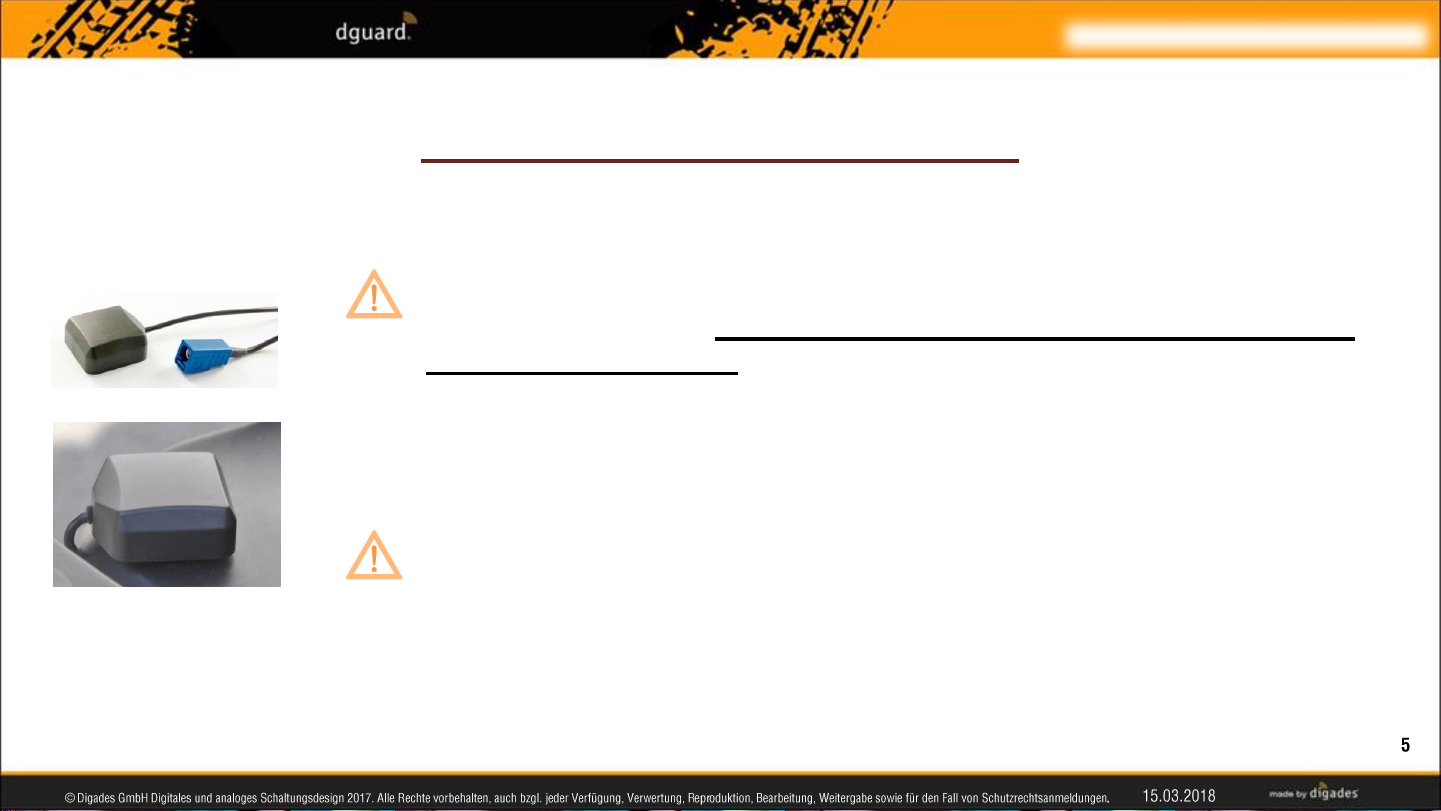
•the GPS antenna must be directly connected to the dguard® module
•when you connect the GPS antenna with the module correctly, you
will hear a *CLICK*. Please double-check that the connector is
plugged in carefully!
•it is recommended to install the GPS antenna hidden or not visible
•make sure that there is sufficient space for the adhesive pad (place
it black side up)
•ensure that no metal parts (the frame, top case …) interfere with
reception
•plastic frame parts do not interfere with reception
installation dguard®
advice - dguard® GPS-antenna:
•generally all parts should stay away from heat sources like
the exhaust and the radiator
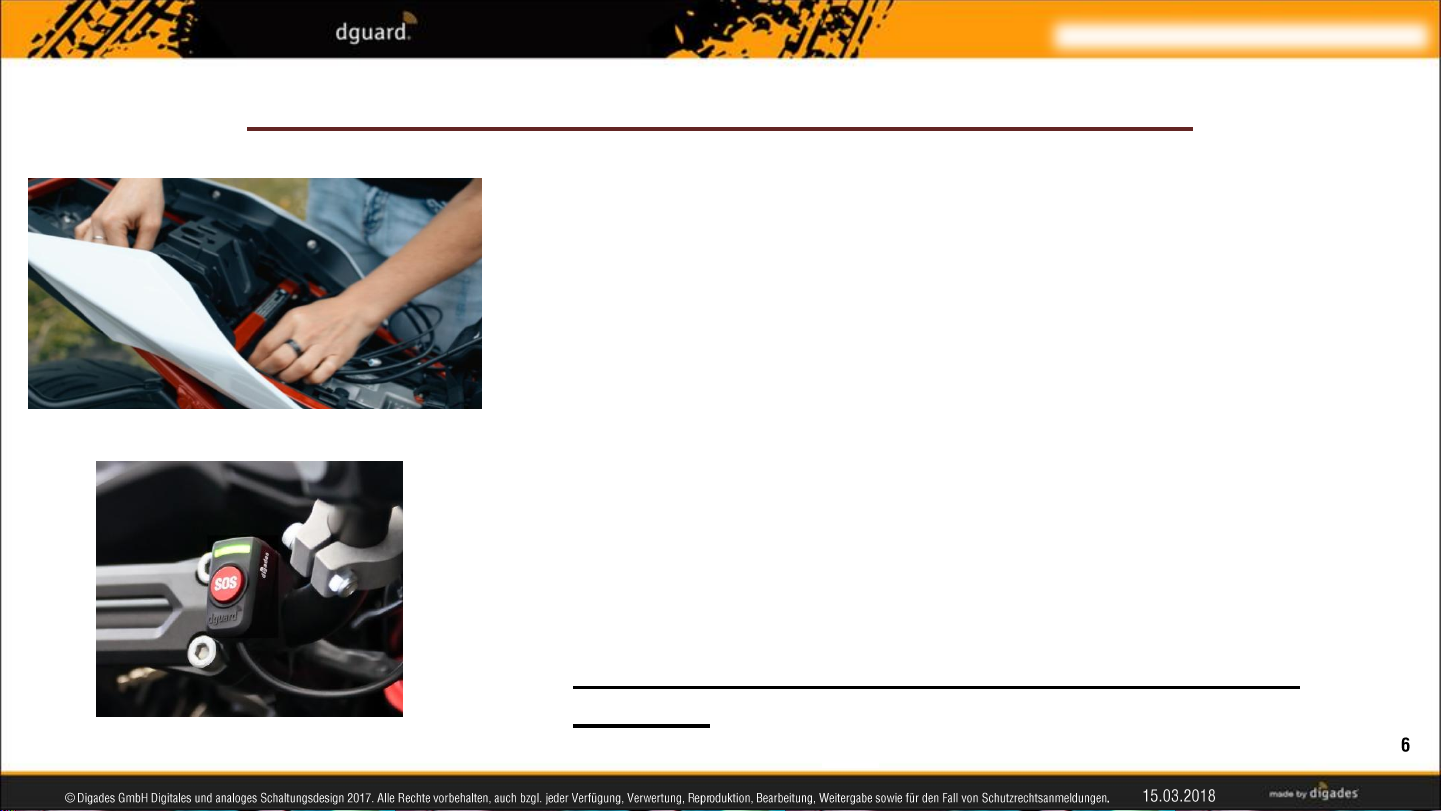
•place the dguard®button on the handlebar, the upper
clamp or dashboard
•place the SOS button within the field of vision of the rider
•place the dguard®harness next to the original
•make sure that the harness is not kinked
•double-check that all connectors are plugged in
properly!
The cable harness must be connected to the dguard®
module, the dguard®sensor, the dguard® button, the
vehicle battery (“terminal 30”) and the live positive terminal
of the power circuit activated by the ignition (“terminal
15”).
installation dguard®
advice - dguard® cable harness & dguard®button:
The dguard®button is the main operating unit on your motorbike. While you ride, a
green LED will inform you about the current system status. You can also use the
dguard®button to make an emergency call manually.
INFO
The dguard®button can be installed with or without a handlebar adapter. Installation with the
handlebar adapter depends on whether your steering rod offers enough space.
If your motorbike does not offer enough space on the steering rod, you can fix the dguard®
button to the cockpit without a handlebar adapter.
INSTRUCTION
The dguard®button can only be placed in one direction on the handlebar adapter. Before
applying the adhesive pad, check the installation direction of the dguard®button on the
handlebar adapter.
installation dguard®
advice - dguard®button:

Installation:
1. Select the hose clip that matches the diameter of your steering rod and pull the shrink sleeve with the
required length over the hose clip.
2. Use a heat gun to shrink the shrink sleeve back.
3. Guide the hose clip through the openings on the handlebar adapter.
4. Ensure that the cable with the 3-pin connection is long enough to reach the installation location on the
steering rod and that your steering movements are not impaired.
5. Ensure that the recess of the handlebar adapter is seated on the steering rod.
6. Fix the hose clip with the handlebar adapter to the steering rod and tighten it with a screwdriver.
7. Thoroughly clean the handlebar adapter and the dguard®button for the adhesive pad and remove all
residue of dust, moisture or grease.
8. Ensure that the adhesive surface of the adhesive pad is free of contamination.
9. Stick the adhesive pad to the handlebar adapter.
10.Press the dguard®button against the adhesive surface on the handlebar adapter.
11.Connect the cable with the 3-pin connection to the dguard®button.
installation dguard®
installation - dguard®button:
Power supply (+ & - )
•connect directly to the motorbike battery. If this is not possible,
use steady current and ground (frame)
Live terminal of ignition
•connect the ignition positive wire „terminal 15“ – by the
connecting board (ignition).
Plug in the connectors
•switch on the ignition –the LED in the dguard®button
starts flashing green FIRST CHECK
installation dguard®
advice - dguard® powersupply & Plug and Play:

•Never disconnect the dguard®system from the vehicle battery’s power supply while
making adjustments to the system or performing a software update. A loss of the power
supply can lead to total failure of the dguard® system, which cannot be remedied by the
user.
•If you are uncertain about the correct connection to the ignition terminal 15, ask the
technical support of the motorbike manufacturer.
•To ensure the degree of protection IP67, make sure that all plugs are connected. The free
2-pole connection has a blind plug and is currently not intended for any use.
installation dguard®
advice - dguard® powersupply & Plug and Play:
Other manuals for dguard
1
Other digades Motorcycle Accessories manuals


