digades dguard 10038341 User manual

User manual English
Bedienungsanleitung German
Istruzioni per l‘uso Italian
Instrucciones de uso Spanish
Instrukcja obsługi Polish
Mode d‘emploi French
Gebruiksaanwzing Dutch
Table of Content

EN
youryour life.life.
dguarddguard
®®detects thedetects the accidentaccident
andand automatically calls for helpautomatically calls for help
youryour bike.bike.
dguarddguard
®®warns you about awarns you about a thefttheft
User manualUser manual

22
Congratulations on buyingCongratulations on buying
the dguardthe dguard®®system!system!
Whether you’re driving on lonely country roads, in the woods or o-road – Whether you’re driving on lonely country roads, in the woods or o-road –
you’ll never be alone again: from now on, dguardyou’ll never be alone again: from now on, dguard®®will accompany you onwill accompany you on
your motorbike trips. This instruction manual will show you how to set upyour motorbike trips. This instruction manual will show you how to set up
your dguardyour dguard®®and how to use it in an emergency. Every dguardand how to use it in an emergency. Every dguard®®systemsystem
complies with the strictest automobile standards and has been put throughcomplies with the strictest automobile standards and has been put through
its paces before leaving the factory. In line with our motto, “your life. yourits paces before leaving the factory. In line with our motto, “your life. your
bike.”, dguardbike.”, dguard®®represents not only your safety, but also that of your mo-represents not only your safety, but also that of your mo-
torbike.torbike.
YOUR LIFE.YOUR LIFE.
dguarddguard®®is equipped with several sensors that, while you are riding, recordis equipped with several sensors that, while you are riding, record
and evaluate data that could be relevant in an accident. This data includesand evaluate data that could be relevant in an accident. This data includes
your angle of inclination, your direction of motion and your motorbike’s ac-your angle of inclination, your direction of motion and your motorbike’s ac-
celeration. If the measurements have detected an accident, an emergencyceleration. If the measurements have detected an accident, an emergency
call is triggered. If you are not injured in the accident, you can cancel thecall is triggered. If you are not injured in the accident, you can cancel the
emergency call. Otherwise, the accident will be reported and your exactemergency call. Otherwise, the accident will be reported and your exact
GPS coordinates will be sent to the emergency coordination centre. Now,GPS coordinates will be sent to the emergency coordination centre. Now,
provided you are able to speak, you can communicate with the emergencyprovided you are able to speak, you can communicate with the emergency
coordination centre via your own Bluetooth headset in the helmet. If youcoordination centre via your own Bluetooth headset in the helmet. If you
cannot speak, the emergency coordination centre will react immediatelycannot speak, the emergency coordination centre will react immediately
and send help straightaway.and send help straightaway.
YOUR BIKE.YOUR BIKE.
Of course your life is important to you, but your motorbike is also close toOf course your life is important to you, but your motorbike is also close to
your heart. So why not protect both? The sensors of the dguardyour heart. So why not protect both? The sensors of the dguard®®systemsystem
are active even when the ignition is switched o. The sensors check if are active even when the ignition is switched o. The sensors check if
somebody is tampering with your motorbike and, if this is the case, let yousomebody is tampering with your motorbike and, if this is the case, let you
know via your smartphone.know via your smartphone.

3
EN
You can use the dguard®roadbook to record your tours in detail. The inter-
active map shows you your route, your speeds and the altitude data for
your tour. You can personalise your tours and share them with your friends
on social media platforms.
Is that all? No, dguard® also oers you a whole host of additional functions.
You can look them up in the pages to come. There’s just one more thing to
say: motorcycling is a beautiful and responsible hobby that requires you to
ride with foresight and make use of the necessary protective equipment.
dguard®supports you in this. Everyone needs a reliable partner in case
something serious happens.
We would like to oer you an enjoyable and accident-free journey.
Your dguard®team
Content
1 Product tips.................................................................................5
1.1 List of regions supported .............................................................5
1.2 Safety-related instructions...........................................................6
1.3 Limits of the system......................................................................7
1.3.1 Undetected accident situations............................................7
1.3.2 Disconnections .....................................................................7
2 Product overview........................................................................8
2.1 Overview of the dguard®system .................................................8
2.2 Scope of delivery...........................................................................9
3 Installing the dguard®system.................................................. 11
3.1 Laying the cable harness ...........................................................11
3.2 Installing the dguard®button .....................................................13
3.2.1 Installing the dguard®button with handlebar adapter ........13
3.2.2 Installing the dguard®button without handlebar adapter...15
3.3 Installing the GPS antenna.........................................................16
3.4 Installing the dguard®module....................................................17
3.5 Installing the dguard®app..........................................................19
3.6 Creating user account ................................................................20

4
EN
3.7 Connecting a Bluetooth headset to the dguard®system........20
4 Operating the dguard®system ................................................22
4.1 Using the dguard®system..........................................................22
4.2 Switching on the dguard®system .............................................22
4.3 System status and troubleshooting ..........................................23
4.3.1 Checking the system status on the dguard®button...........23
4.3.2 Checking the system status in the dguard®app ................24
4.3.3 Troubleshooting ..................................................................24
4.4 Using the emergency call function............................................24
4.4.1 Informing personal contacts of an emergency call.............24
4.4.2 Activating and deactivating the emergency call function ...25
4.4.3 Making an emergency call ..................................................26
4.4.4 What to do after a reported accident with dguard®............28
4.5 Using the anti-theft warning function .......................................29
4.5.1 Conguring the anti-theft warning ......................................29
4.5.2 Activating the anti-theft warning.........................................30
4.5.3 How an anti-theft warning works........................................30
4.5.4 Deactivating the anti-theft warning.....................................32
4.6 dguard®roadbook .......................................................................32
4.6.1 Recording a tour .................................................................32
4.6.2 Setting a break time............................................................33
4.6.3 Finishing the tour ................................................................33
4.6.4 Importing and exporting tours ............................................34
4.7 My dguard®system.....................................................................34
4.7.1 Testing GPS reception ........................................................34
4.7.2 Testing Bluetooth reception ................................................35
4.8 My dguard®account ...................................................................35
5 Software updates......................................................................36
5.1 Updating the software ................................................................36
5.2 Updating the dguard®app..........................................................37
6 Technical data ...........................................................................38
5
PRODUCT TIPS
EN
1 Product tips
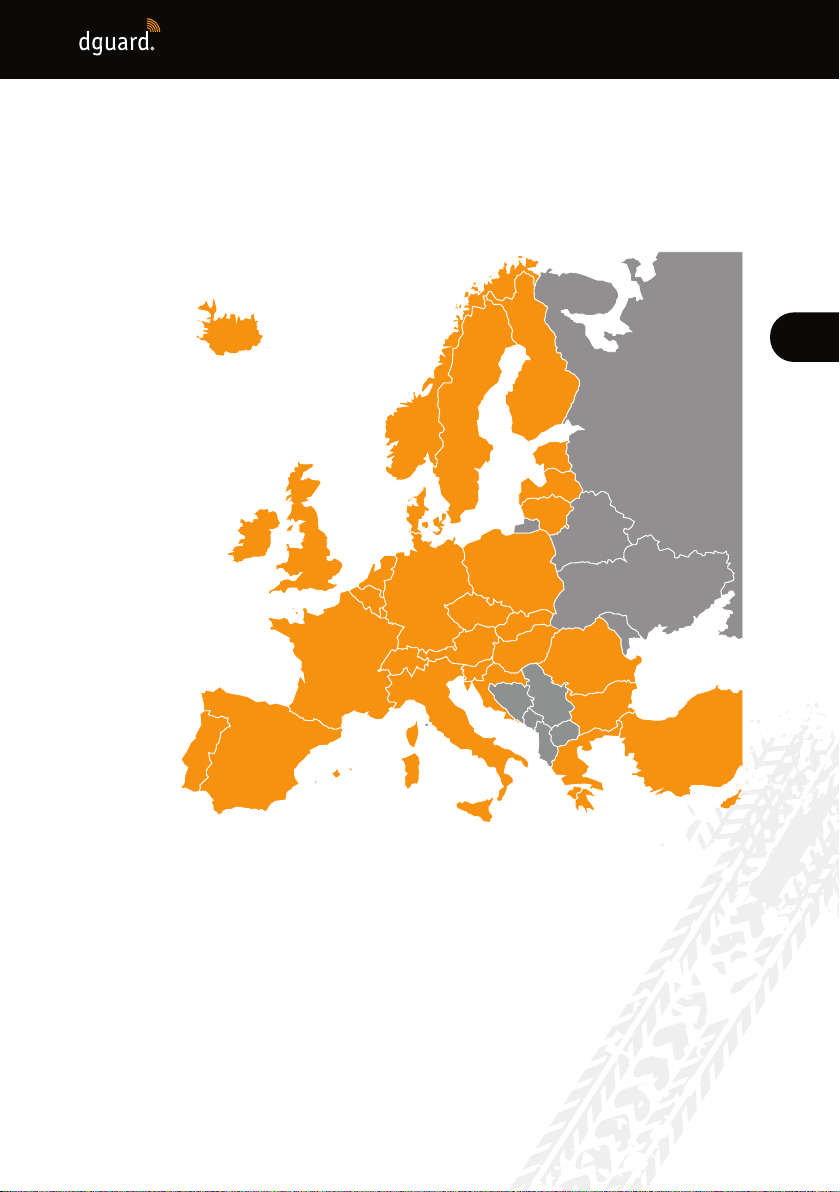
1.1 List of regions supported
The dguard®system can be used in the following European countries:
Fig. 1: In orange: European countries in which the dguard®system is available.
The dguard®system can be used in the following overseas regions:
• French Guiana
• Guadeloupe
• Martinique
• Mayotte
• Saint Barthélemy
• Saint-Martin (French part)

6
PRODUCT TIPS
EN
No emergency call is triggered in the following countries:
• Albania
• Bosnia and Herzegovina
• Macedonia
• Ukraine
• Republic of Moldova
• Russia
• Belarus
The latest version of the list of supported areas as contained in the dguard®
terms and conditions of use is legally applicable. The terms and conditions
of use can be found online at www.dguard.com or are available on request
from our customer service.
1.2 Safety-related instructions
INSTRUCTION
Never disconnect the dguard®system from the vehi-
cle battery’s power supply while making settings to the
system or carrying out a software update. A loss of the
power supply can lead in these cases to total failure of the
dguard®system, which cannot be remedied by the user.
INSTRUCTION
If you are riding slowly o-road and there is no serious
risk to you due to the motorbike falling over, deactivate
the automatic triggering of the emergency call function
(Chapter “4.4.2 Activating and deactivating the emergency
call function”, p.25). The motorbike falling over can
otherwise result in the emergency services being alerted.
Manual triggering via the dguard® button is not aected
by this deactivation.

7
PRODUCT TIPS
EN
INFO
The dguard®system is designed for normal riding. Correct
functioning of the system cannot be guaranteed in unusual
riding situations (e.g. repeated wheelies during stop-and-go
riding or on a motocross course). An emergency call may
be triggered unintentionally.
If you are planning manoeuvres such as these, please
switch o the emergency call function (Chapter “4.4.2
Activating and deactivating the emergency call function”,
p.25).
1.3 Limits of the system
1.3.1 Undetected accident situations
The dguard®system is capable of reliably detecting almost every possible
accident situation. Despite all care and technical precision, however, it is
not possible to detect 100% of accident situations automatically. Espe-
cially when riding slowly at speeds below 20 km/h, falls without outside
involvement are not considered an accident, as medical assistance is not
usually required in these situations. Irrespective of this, the emergency call
can be triggered manually at any time whit the SOS button.
1.3.2 Disconnections
If you are in an area without mobile coverage, successful placing of an
emergency call and successful anti-theft warning by the dguard®system
cannot be guaranteed. All the same, calls to the emergency dispatch are
treated with the highest possible priority and, when roaming, generally
use all available mobile networks.
If your GPS reception is lost briey, e.g. when riding through a tunnel, no
precise positioning can be carried out. In this case, the last known posi-
tion is transmitted in the event of an accident. If you are using the dguard®
system without a Bluetooth headset, you will not be able to speak to
the emergency coordination centre. We guarantee, however, that, if there
is sucient reception at the accident spot, the GPS coordinates and the
automated voice message will be transmitted to the emergency coordina-
tion centre.

8
PRODUCT OVERVIEW
EN
2 Product overview
2.1 Overview of the dguard®system
Fig. 2: Overview of the dguard®system
dguard®cloud dguard®app Emergency call Bluetooth
• The dguard®module (Fig. 2/A) automatically makes an emergency call
in the event of an accident and manages the voice connections
between your Bluetooth headset and the emergency coordination
centre.
• The dguard®button (Fig. 2/C) is installed in the visible area. You can use
it to make an emergency call manually at any time.
• The dguard®module (Fig. 2/A), the GPS antenna (Fig. 2/B) and the
dguard®button (Fig. 2/C) are xed to your motorbike.
• Your data is protected against unauthorised access in the dguard®
cloud .
• The dguard®app gives you access to your dguard®system.
9
PRODUCT OVERVIEW
EN
INFO
The dguard®app functions require the smartphone to
have an Internet connection and the dguard®module
tohave mobile phone reception.
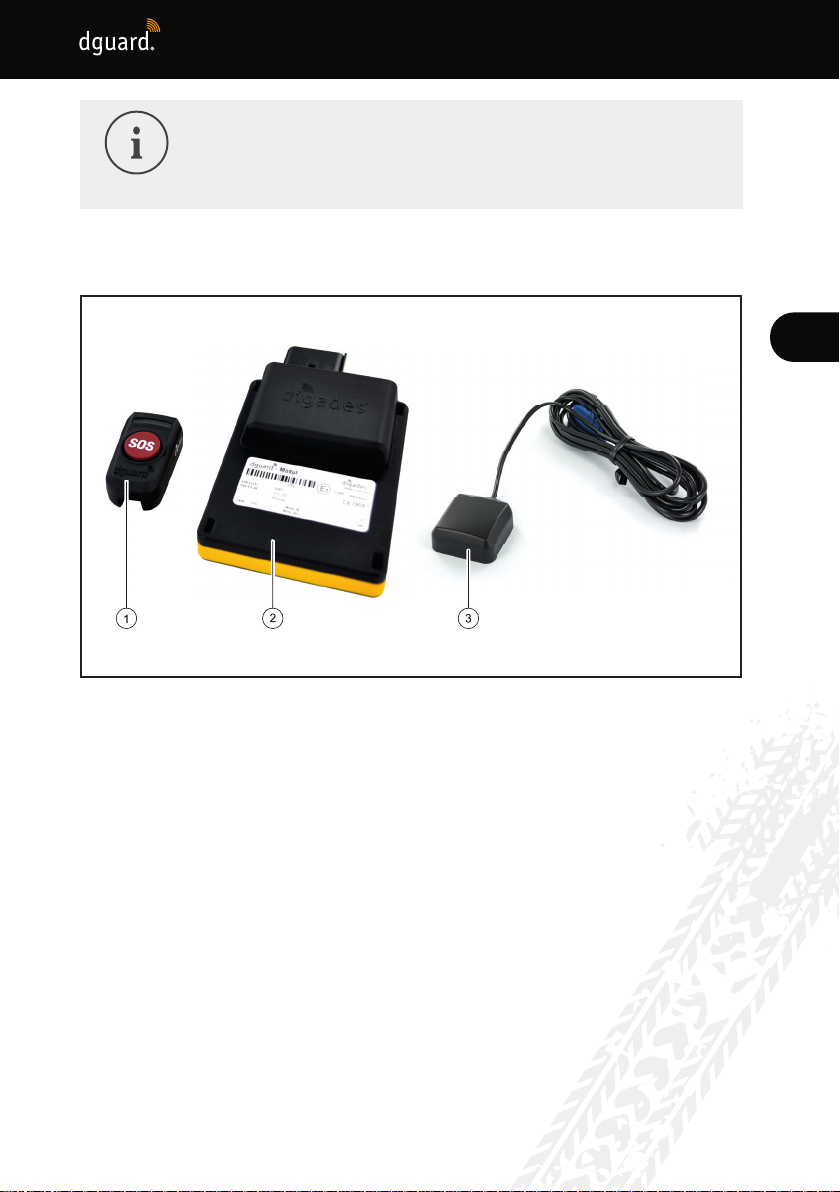
2.2 Scope of delivery
Fig. 3: Scope of delivery
The dguard®system consists of the following vehicle components:
1 dguard®button
2 dguard®module
3 dguard®GPS antenna
10
PRODUCT OVERVIEW
EN
Additional accessories in the scope of delivery
9Cable harness
9Quick Start Guide
9Handlebar adapter for the dguard®button
92 hose clamps and shrink sleeves for the handlebar adapter
9Adhesive pads to attach the dguard®button including a cleaning cloth
9Adhesive pad to attach the dguard®module
9Adhesive pad to attach the GPS antenna
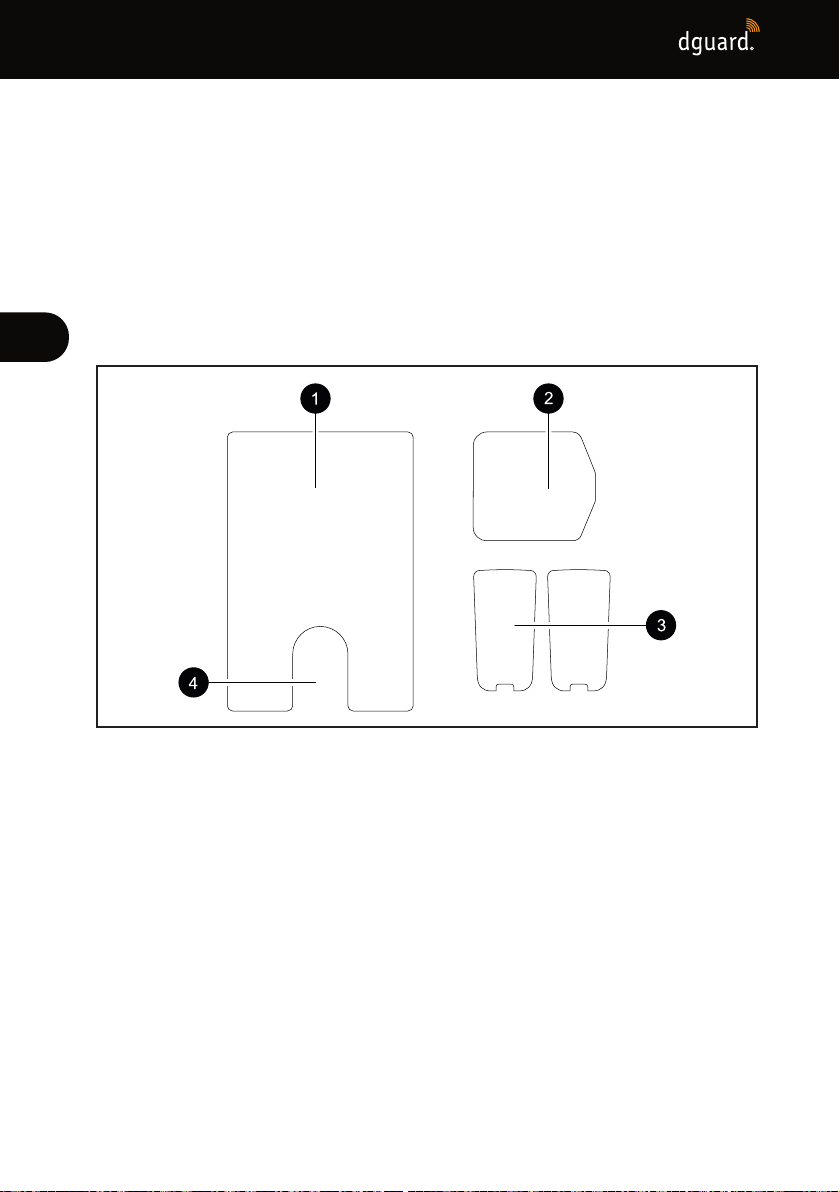
Fig. 4: Overview of the adhesive pads
1 Adhesive pad dguard®Modul
2 Adhesive pad dguard® GPS-Antenne
3 Adhesive pad dguard® Taster (+ reserve)
4 Slot for the pressure compensation membrane
11
INSTALLING THE dguard®SYSTEM
EN
3 Installing the dguard®system
3.1 Laying cable harness
The cable harness must be connected to the module, the button, the
vehicle battery (“terminal 30”) and the switched positive pole of the circuit
switched by the ignition (“terminal 15”). The GPS antenna must be con-
nected separately to the module.
WARNUNG!
If you are unsure about the correct wiring on the circuit
switched by the ignition (“terminal 15”), ask your dealer
or garage for options for your motorcycle. Many models
already oer connection options provided by the manu-
facturer; they cannot all be listed here.
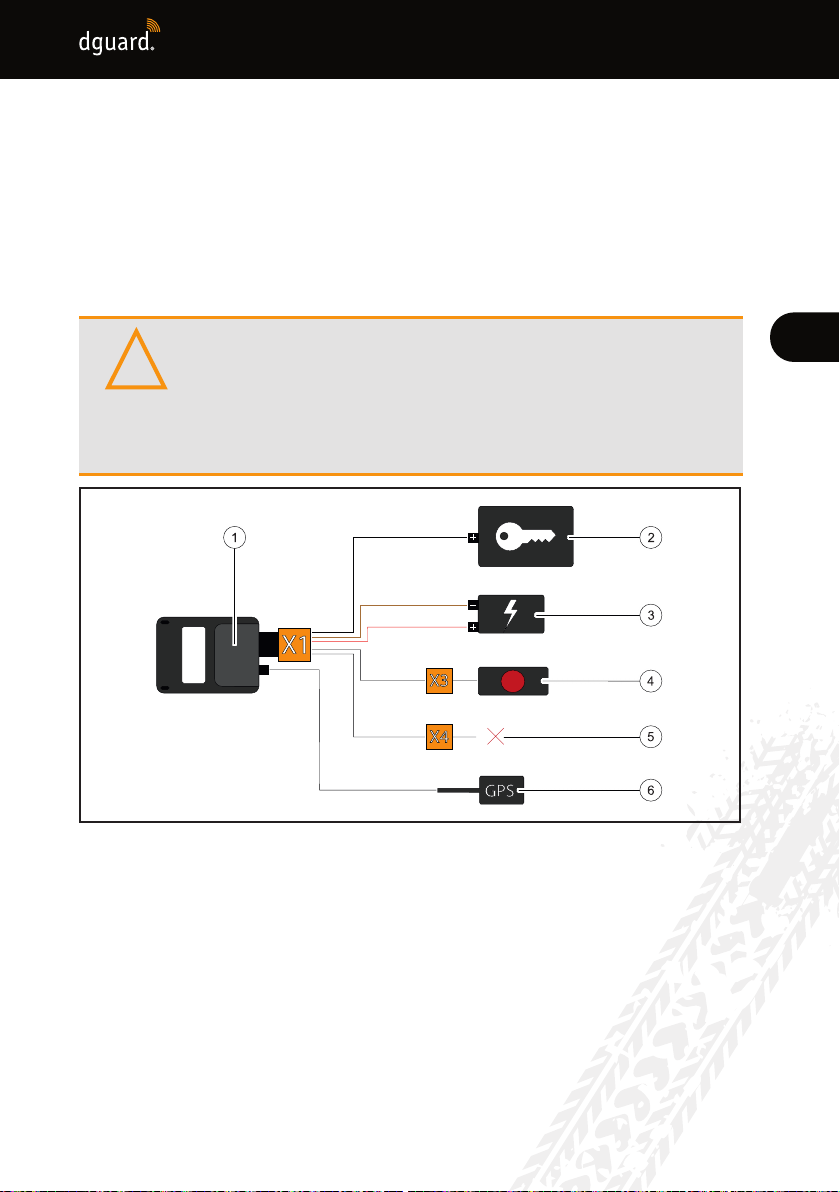
Fig. 5: Connecting the cable harness
1 dguard®module
2 Live positive terminal (“terminal 15“)
3 Vehicle battery (“terminal 30“ and “terminal 31“)
4 dguard®button
5 Reserved for accessories/not in use
6 GPS antenna
!
12
INSTALLING THE dguard®SYSTEM
EN
Observe the following requirements at the installation location:
• Ensure that the cable is long enough to reach the installation locations
of the vehicle components, the GPS antenna, the vehicle battery and
the positive terminal of the power circuit activated by the ignition.
• Choose a hidden installation location (and one that provides maximum
protection in the event of an accident) for the dguard®module within
the motorbike frame (e.g. under the seat or in the rear of the frame).
• The dguard®module requires mobile phone reception and thus should
not be tted directly under the metal parts of the motorbike.
1. Find a suitable place to install the module.
2. Lay the cable with the 16-pin connection X1 at the installation location
of the dguard®module (Fig. 5/1).
3. Lay the cable with the 3-pin connection X3 for the dguard®button
(Fig. 5/4) on the handlebar.
4. Ensure that the cable of the GPS antenna (Fig. 5/6) can reach from the
installation location of the GPS antenna to the installation location of
the dguard®module (Fig. 5/1) (Chapter „3.3 Installing the GPS antenna“,
p. 16).
5. Connect the black wire to the positive terminal of the power circuit
activated by the ignition (Fig. 5/2).
6. Ensure that the cables are not chafed by the frame, are not bent or
crushed and are not laid in the vicinity of hot components (such as the
exhaust or cylinders).
7. Connect the brown wire to the negative terminal of the vehicle battery
(FIg. 5/3).
8. Connect the red wire to the positive terminal of the vehicle battery
(Fig. 5/3).
9. Temporarily x unconnected plugs to the planned installation location
of the vehicle components.
INFO
The 2-pin connection X4 (Fig. 5/5) is reserved for accesso-
ries. To guarantee protection class IP67, all plugs must be
connected and engaged fully. The vacant 2-pin connec-
tion X4 has a dummy plug that only needs to be removed
if you intend to attach accessories
13
INSTALLING THE dguard®SYSTEM
EN
ÖYou have connected the cable harness to the vehicle battery and to
the positive terminal of the power circuit activated by the ignition on
your vehicle.
3.2 Installing the dguard®button
The dguard®button is the main operating unit on your motorbike. While
you ride, a green LED will inform you about the current system status
(Chapter „4.3 System status and troubleshooting“, p. 23). You can also use
the dguard®button to make an emergency call manually.
INFO
The dguard®button can be installed with or without a han-
dlebar adapter. Installation with the handlebar adapter de-
pends on whether your steering rod oers enough space.
3.2.1 Installing the dguard®button with handlebar adapter
Observe the following requirements at the installation location:
• Ensure that there is sucient space on the steering rod of your motor-
bike to t the handlebar adapter.
• You will require a screwdriver and a hot air dryer.
• Select the hose clip that matches the diameter of your steering rod.
9hose clip for diameter 18 mm to 29 mm
9hose clip for diameter 28 mm to 39 mm
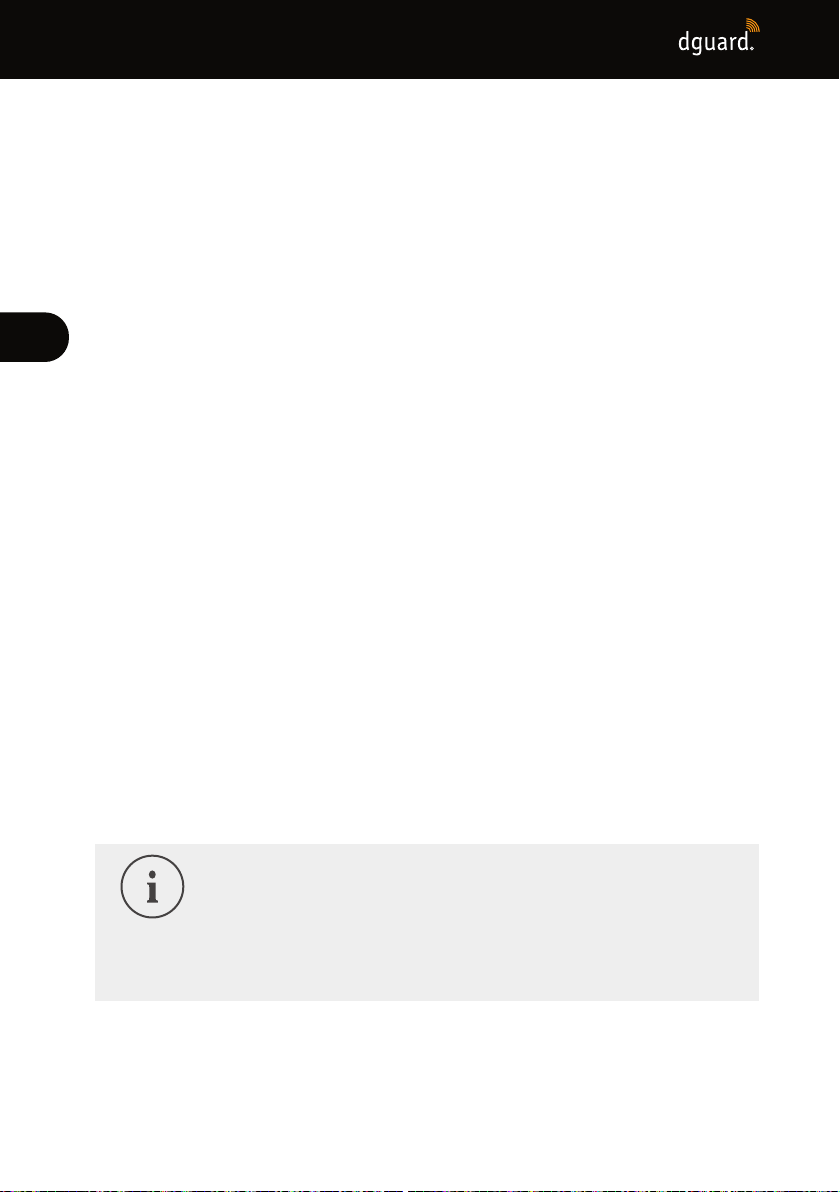
Fig. 6: Installation position of the dguard®button

14
INSTALLING THE dguard®SYSTEM
EN
1 dguard®button
2 Handlebar adapter
3 Hose clip with shrink sleeves
1. Pull the shrink sleeve with the required length over the hose clip.
WARNING!
Ensure that there are no ammable materials in your
vicinity.
2. Use a hot air blow dryer to shrink the shrink sleeve.
3. Guide the hose clip through the openings on the handlebar adapter.
4. Ensure that the cable with the 3-pin connection X3 is long enough to
reach the installation location on the handlebar and that your steering
movements are not impaired.
5. Ensure that the recess on the handlebar adapter is positioned on the
handlebar.
INSTRUCTION
The dguard®button can only be placed in one direction on
the handlebar adapter. Before applying the adhesive pad,
check the installation direction of the dguard®button on
the handlebar adapter.
6. Fix the hose clamp with the handlebar adapter to the handlebar and
tighten it with a screwdriver.
7. Clean the handlebar adapter and the dguard®button thoroughly for
the adhesive pad (Fig. 4/3) and remove all residue of dust, moisture or
grease.
INSTRUCTION
The adhesive surfaces of the adhesive pad (Fig. 4/3) must
be dry and free of dust and grease. Clean the adhesive
surfaces thoroughly before sticking.
!
15
INSTALLING THE dguard®SYSTEM
EN
8. Ensure that the adhesive surface of the adhesive pad (Fig. 4/3) is free
of impurities.
9. Stick the adhesive pad (Fig. 4/3) to the handlebar adapter.
10. Press the dguard®button against the adhesive surface on the handle-
bar adapter.
11. Connect the cable with the 3-pin connection X3 to the dguard®button
(Chapter „3.1 Laying the cable harness“, p. 11)
ÖYou have installed the dguard®Taster button.
3.2.2 Installing the dguard®button without handlebar adapter
If your motorbike does not oer enough space on the handlebar, you can
x the dguard®button to the cockpit without a handlebar adapter.
Observe the following requirements at the installation location:
• Select a location on the cockpit with sucient space for the adhesive
pad (Fig. 4/3).
1. Clean the selected location in the cockpit thoroughly for the adhesive
pad (Fig. 4/3) and the dguard®button and remove all residue of dust,
moisture and grease.
2. Ensure that the cable with the 3-pin connection X3 is long enough to
reach the installation location and that your steering movements are
not impaired.
INSTRUCTION
The adhesive surfaces of the adhesive pad (Fig. 4/3) must
be dry and free of dust and grease. Clean the adhesive
surfaces thoroughly before sticking.
3. Ensure that the adhesive surface of the adhesive pad (Fig. 4/3) is free
of impurities.
4. Stick the adhesive pad (Fig. 4/3) to the selected location.
5. Press the dguard®button against the adhesive surface.
6. Connect the cable with the 3-pin connection X3 to the dguard®button
(Chapter „3.1 Laying the cable harness“, p. 11).
ÖYou have installed the dguard®button.
16
INSTALLING THE dguard®SYSTEM
EN
3.3 Installing the GPS antenna
Observe the following requirements at the installation location:
• Select a location on your motorbike with sucient space for the adhe-
sive pad (Fig. 4/2).
• Ensure that no metal parts of the frame and no top case interfere with
reception. Plastic frame parts do not interfere with reception.
INFO
To test the reception of the GPS antenna, you have now
connected the cable harness to the vehicle battery and to
the positive terminal of the power circuit activated by the
ignition (“terminal 15”).
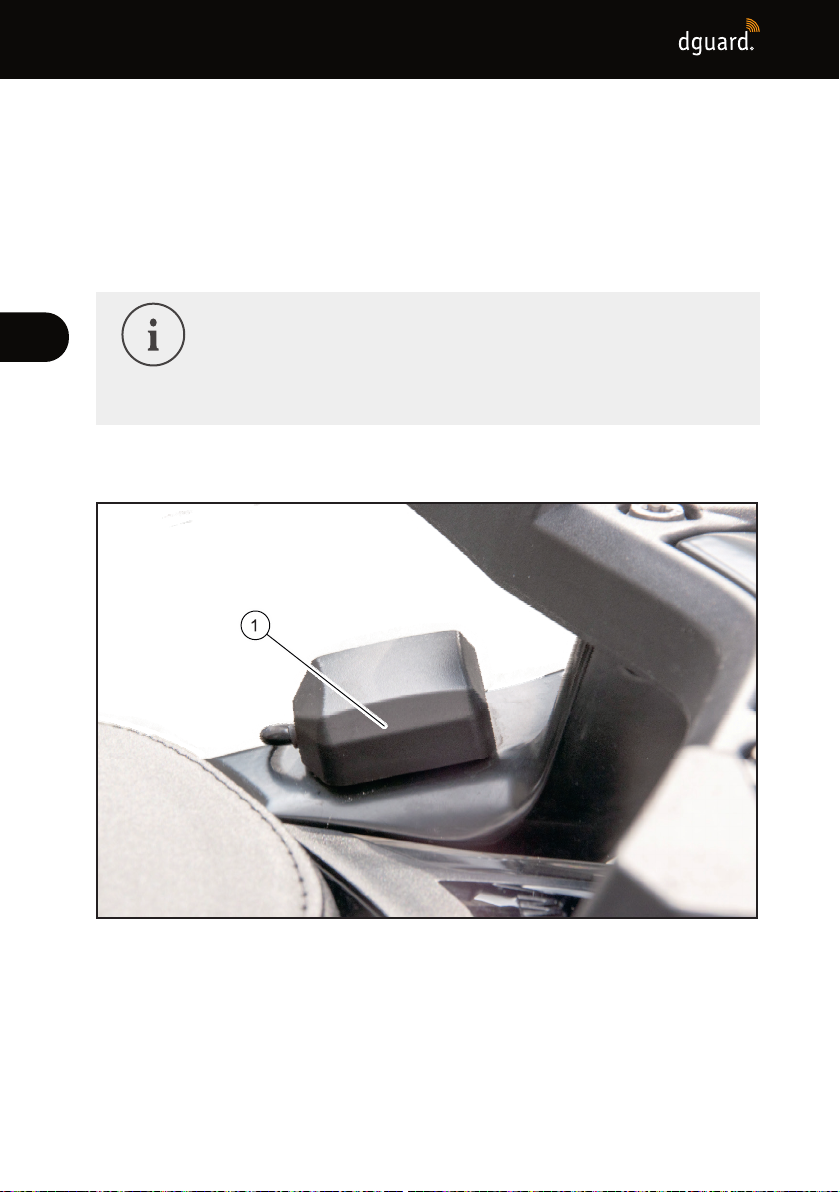
1. Place the GPS antenna (Fig. 7/1) at the planned installation location.
Fig. 7: Example installation location for the GPS antenna
2. Ensura that the antenna cable reaches the antenna connection of the
dguard®module.
3. Connect the GPS antenna to the antenna connection of the dguard®
module.
17
INSTALLING THE dguard®SYSTEM
EN
INFO
When you rst switch on the system, it may take up to 2
minutes until the LED goes out.
4. Clean the selected location for the adhesive pad (Fig. 4/2) and the
GPS antenna thoroughly and remove all residue of dust, moisture or
grease.
INSTRUCTION
The adhesive surfaces of the adhesive pad (Fig. 4/2) must
be dry and free of dust and grease. Clean the adhesive
surfaces thoroughly before sticking.
5. Ensure that the adhesive surface of the adhesive pad (Fig. 4/2) is free
of impurities.
6. Stick the adhesive pad (Fig. 4/2) to the selected location.
7. Press the GPS antenna against the adhesive surface. Try to use the
entire surface of the adhesive pad.
ÖYou have now installed the GPS antenna.
3.4 Installing the dguard®module
The dguard®module is the main interface for accident detection and theft
warning and is thus the heart of your dguard®system. The dguard®mod-
ule contains the SIM chip required to place an emergency call.
Observe the following requirements at the installation location:
• Choose a hidden location (and one that provides maximum protection
in the event of an accident) within the motorbike frame (e.g. under the
seat or in the rear of the frame).
INSTRUCTION
The dguard®module requires mobile phone reception and
thus should not be tted directly under the metal parts of
the motorbike.
1. Clean the selected location thoroughly and remove all residue of dust,
moisture or grease.

18
INSTALLING THE dguard®SYSTEM
EN
INSTRUCTION
The adhesive surfaces of the adhesive pad (Fig. 4/1) must
be dry and free of dust and grease. Clean the adhesive
surfaces thoroughly before sticking.
2. Ensure that the adhesive surface of the adhesive pad (Fig. 4/1) is free
of impurities.
3. Stick the adhesive pad (Fig. 4/1) to the selected location for the
dguard®module.
WARNING!
Note the slot for the pressure compensation membrane
(Fig. 4/4) on the adhesive pad for the dguard®module.
Do not stick anything on the pressure compensation
membrane.
4. Press the dguard®module to the adhesive surface. Try to use the
entire surface of the adhesive pad..
WARNUNG!
To guarantee full functionality in the event of an accident
and to avoid false alarms, ensure that the dguard®mod-
ule is securely positioned after installation.
5. Attach the dguard® module to a xed part of your motorbike using
adhesive tape or cable ties.
ÖYou have now installed the dguard®module.
!
!
19
INSTALLING THE dguard®SYSTEM
EN
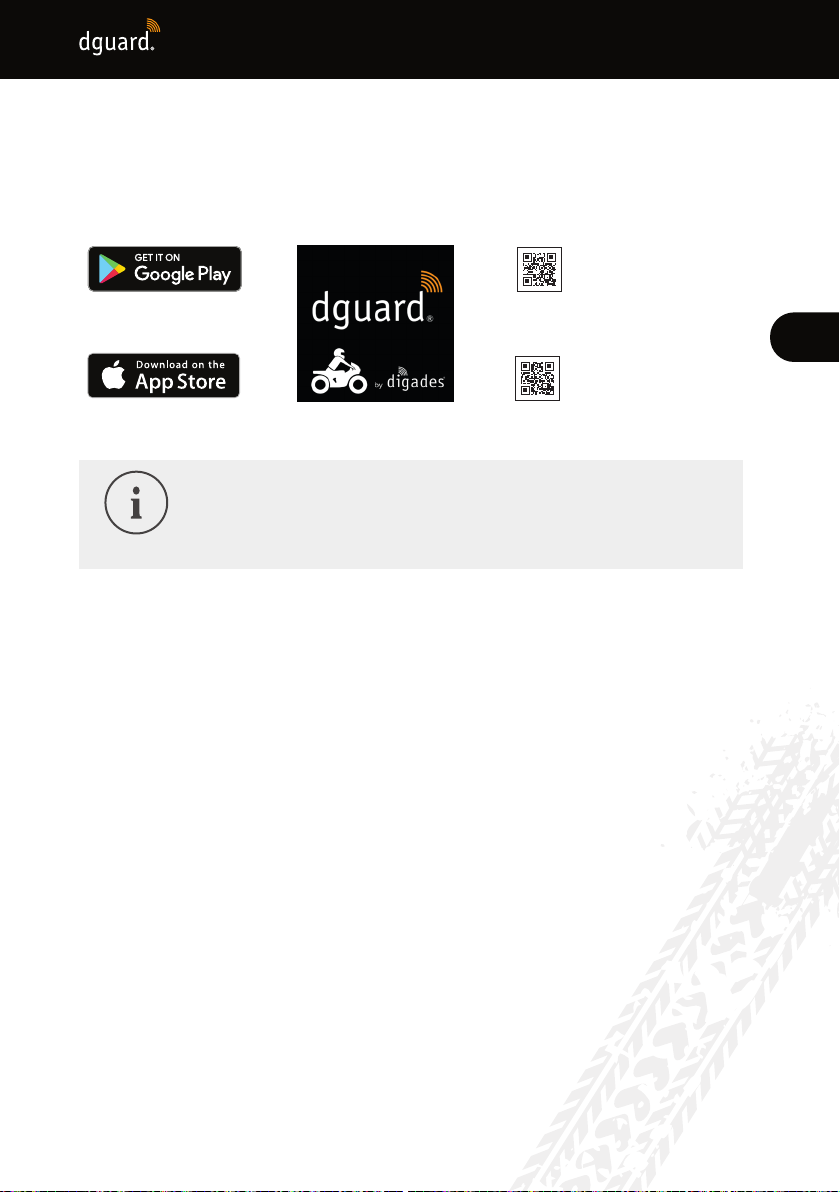
3.5 Installing the dguard®app
Download the dguard®app for Android from the Google Play Store or for
iOS from the App Store on your smartphone and tablet:
Enter dguard in
thePlay Store search
window or scan
theQR code
Enter dguard in
theApp Store search
window or scan
theQR code
INFO
At app.dguard.com, you will nd the web app that you
can open in the browser of your choice using any Inter-
net-capable device.
The web app oers almost the same functions as the dguard®app, but
there are a few restrictions. The anti-theft warning function, for example,
can only use SMS notication, as push notications are not available.
Table of contents
Languages:
Other digades Motorcycle Accessories manuals


