Digital-Ally FirstVu HD User manual

Copyright © 2013 DigitalAlly, Inc.All Rights Reserved. This publication may not be reproduced, stored in a retrieval system,
or transmitted in whole or part in any form or by any means electronic, mechanical, recording, photocopying, or in any other
manner without the prior written approval of Digital Ally, Inc.
Operation Guide
Professional, Wearable Digital Video Recording System
860-00177-00 Rev D

FirstVu™ HD Operation Guide 860-00177-00 REV D
© 2013 Digital Ally, Inc.
T a b l e o f C o n t e n t s
SECTION - 1 INTRODUCTION............................................................................................................................1-1
FIRSTVU™HD FEATURES ...................................................................................................................................1-1
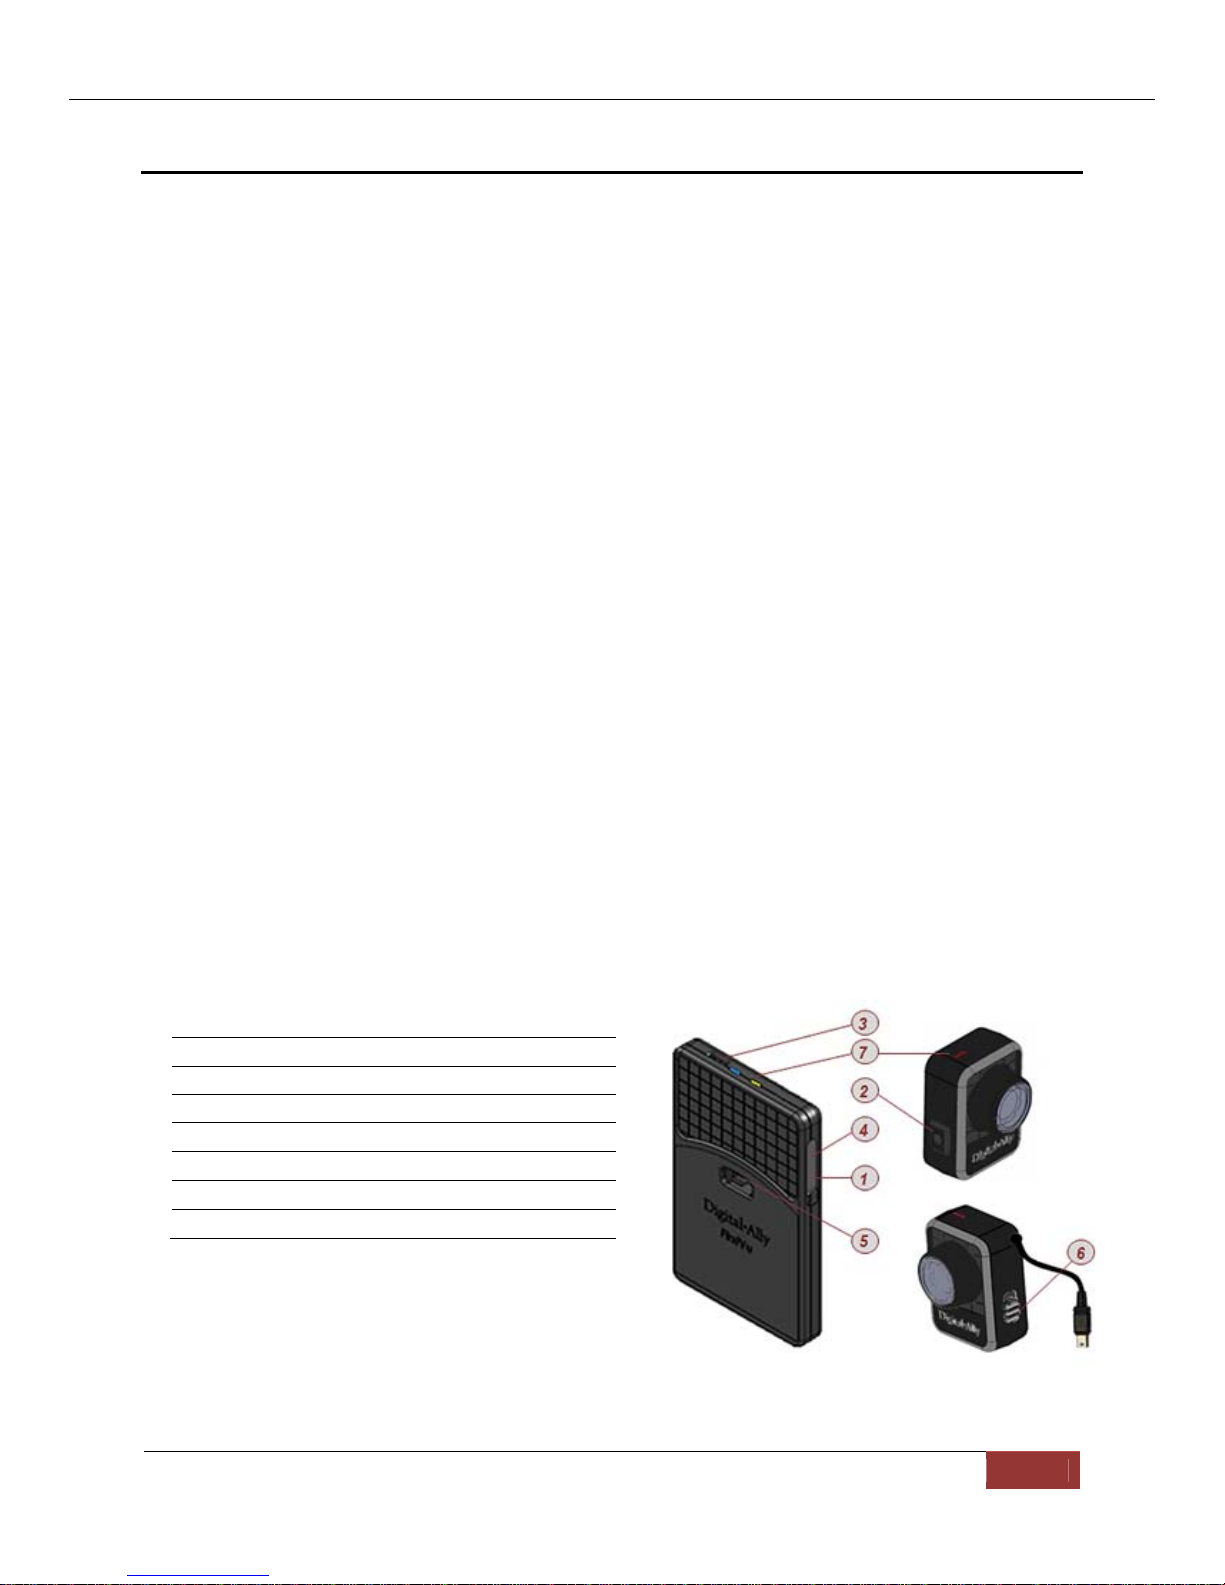
FIRSTVU™HD CONTROLS ..................................................................................................................................1-1
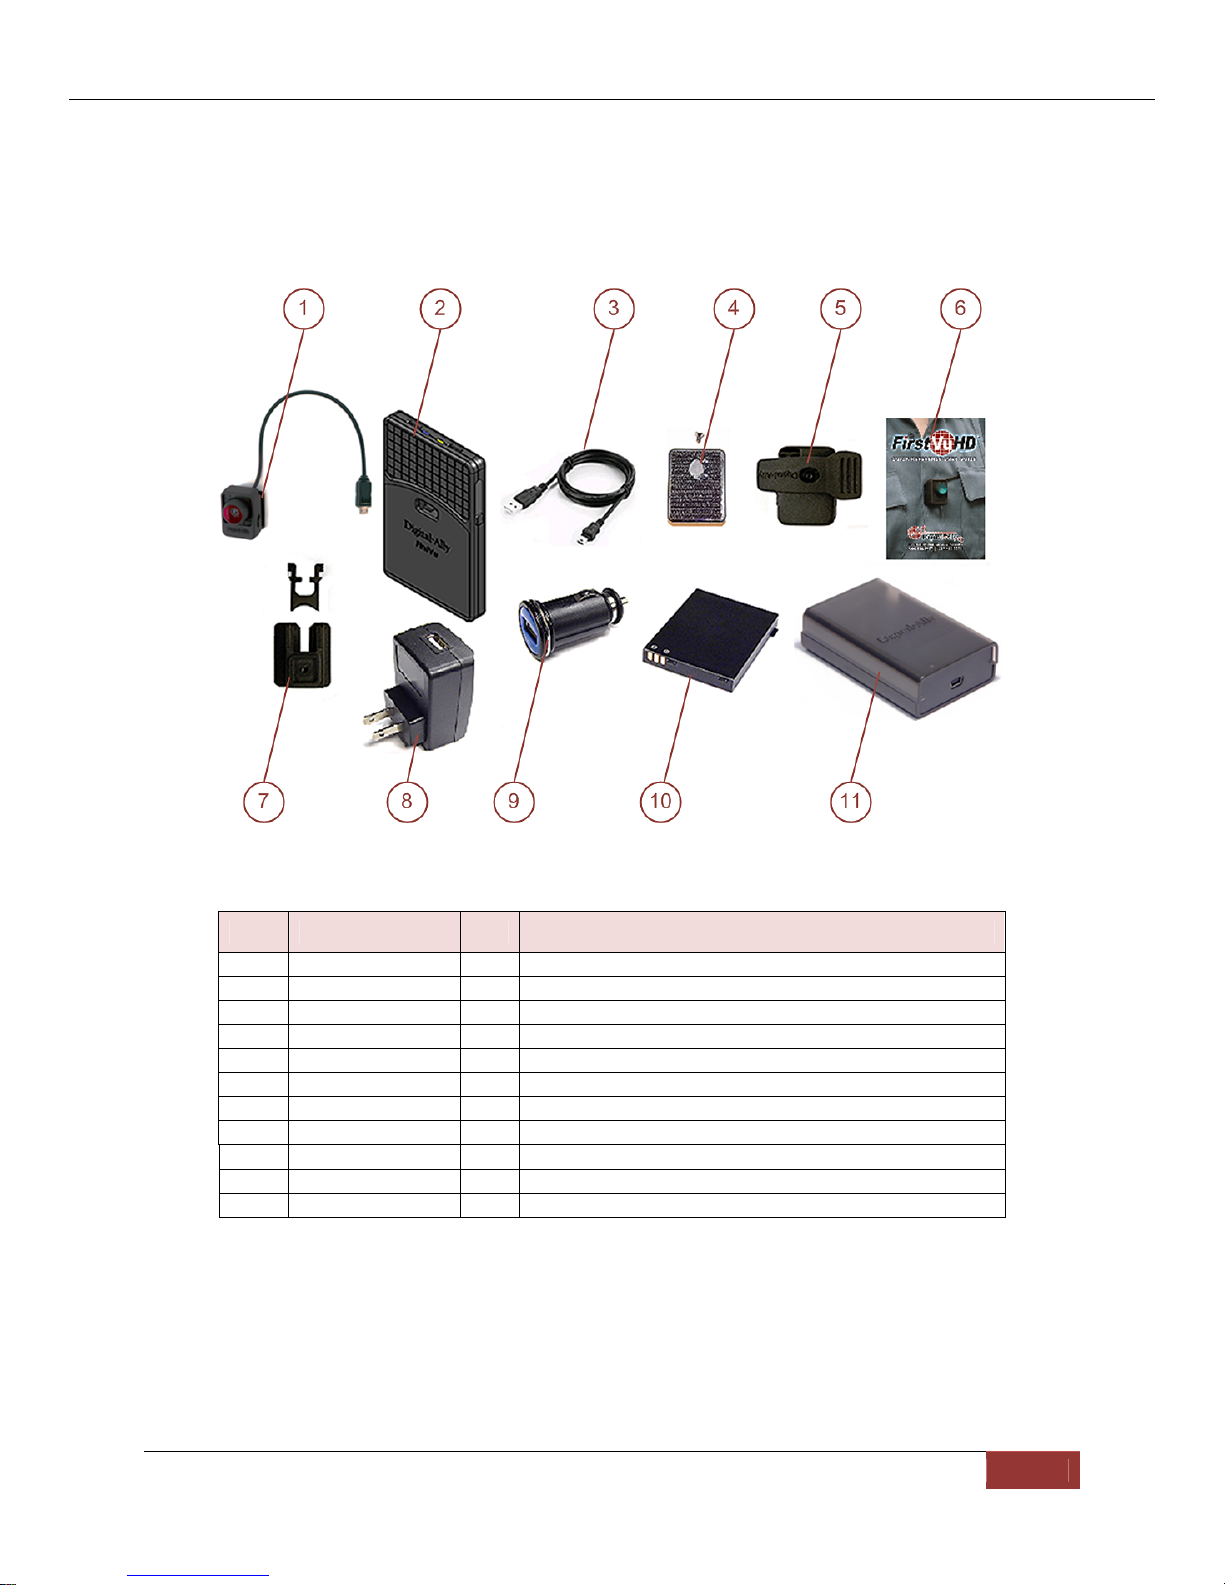
PARTS AND ACCESSORIES LIST.............................................................................................................................1-2
SECTION - 2 GETTING STARTED......................................................................................................................2-1
SOFTWARE UPDATES ............................................................................................................................................2-1
BATTERY CHARGING INFORMATION .....................................................................................................................2-1
Charging From a Computer.........................................................................................................................2-1
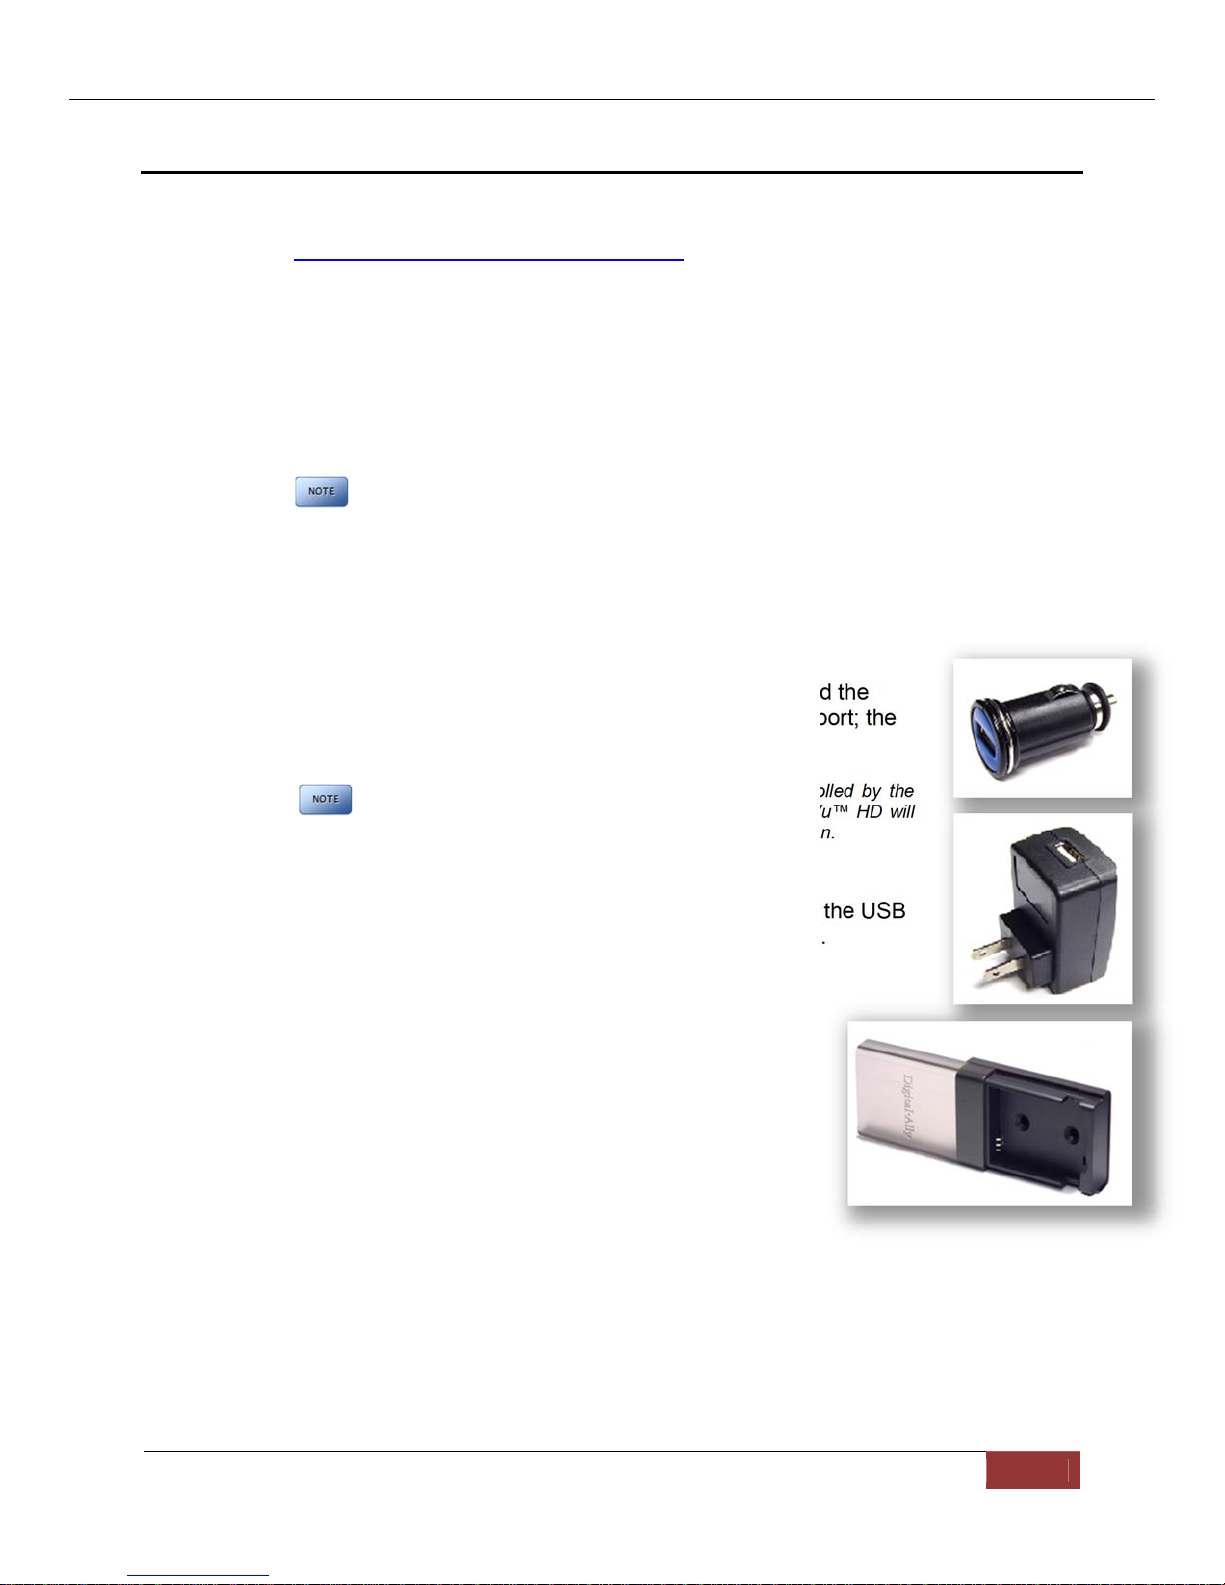
Charging In a Vehicle...................................................................................................................................2-1
Charging Using an AC Power Outlet...........................................................................................................2-1
Charging Using the Battery Charger ...........................................................................................................2-1
FirstVu HD Charging and Battery Indicators..............................................................................................2-1
CONNECTING THE CAMERA..................................................................................................................................2-2
SETTING THE DATE AND TIME ..............................................................................................................................2-2
Automatically setting the date and time .......................................................................................................2-2
Manually setting the date and time ..............................................................................................................2-2
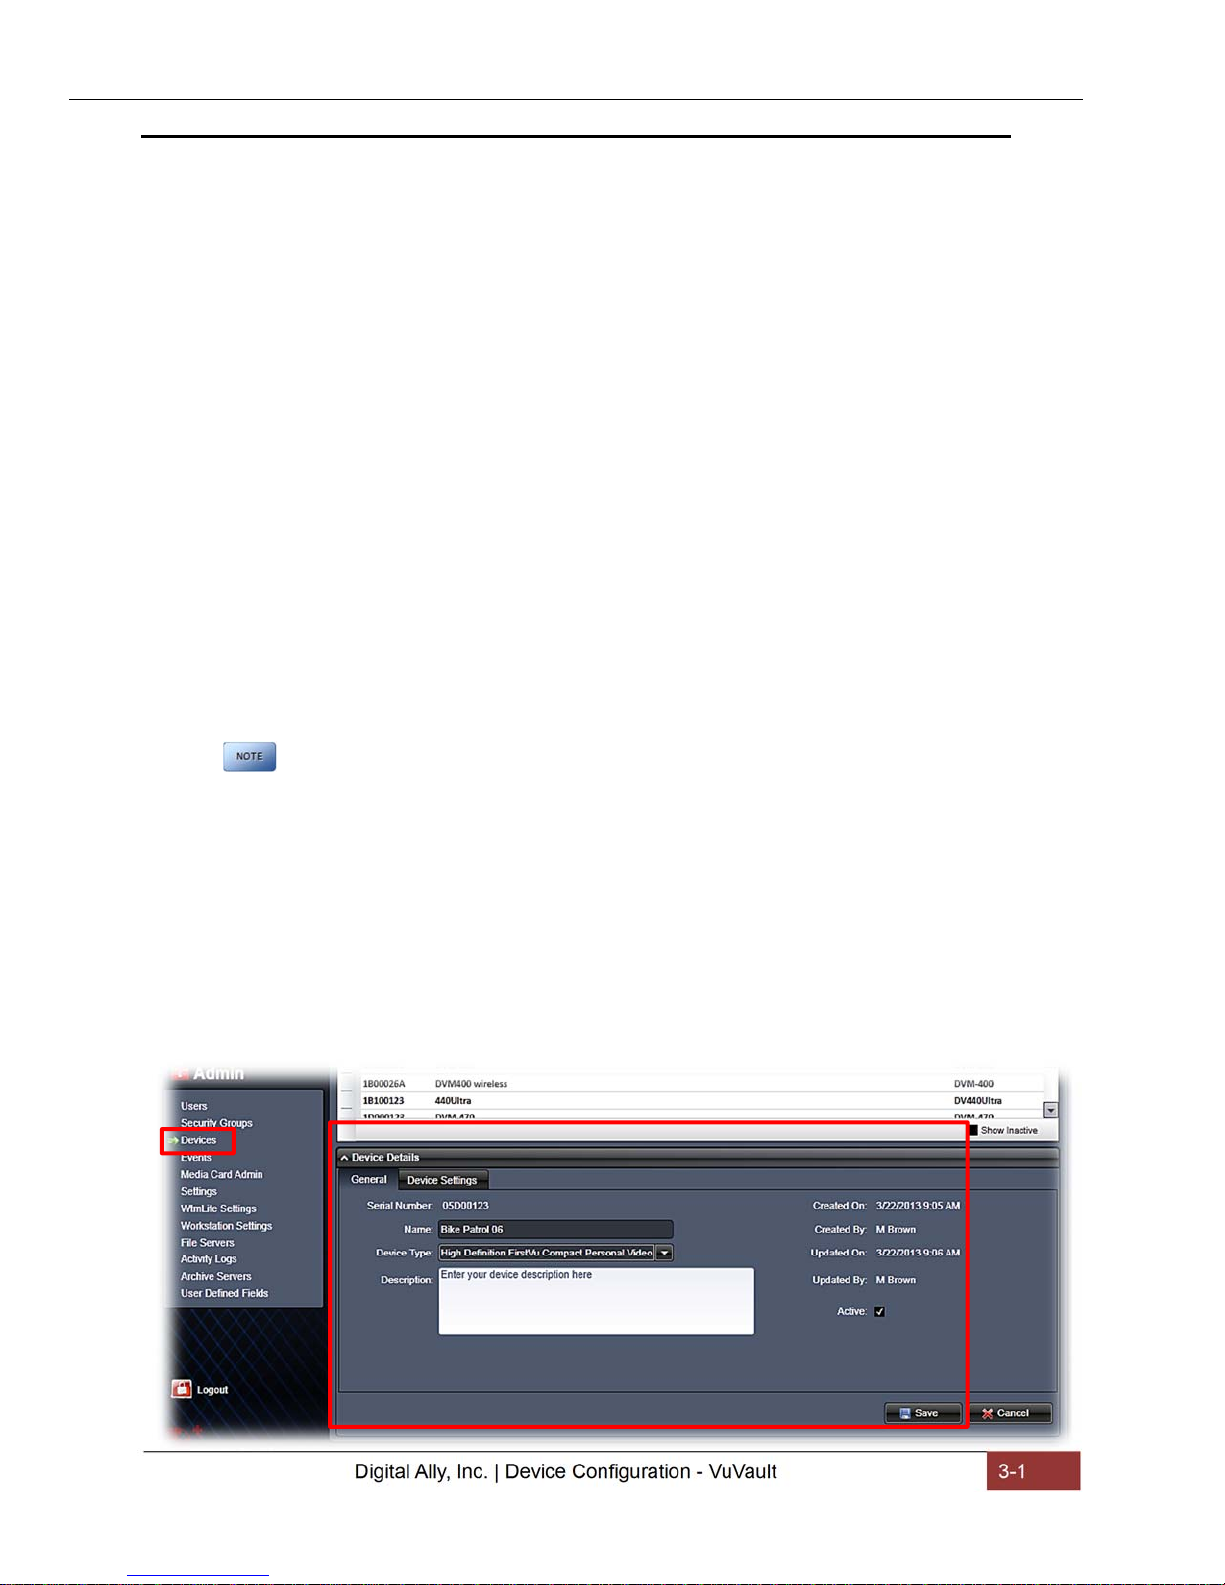
SECTION - 3 DEVICE CONFIGURATION - VUVAULT...................................................................................3-1
DEFAULT CONFIGURATION ...................................................................................................................................3-1
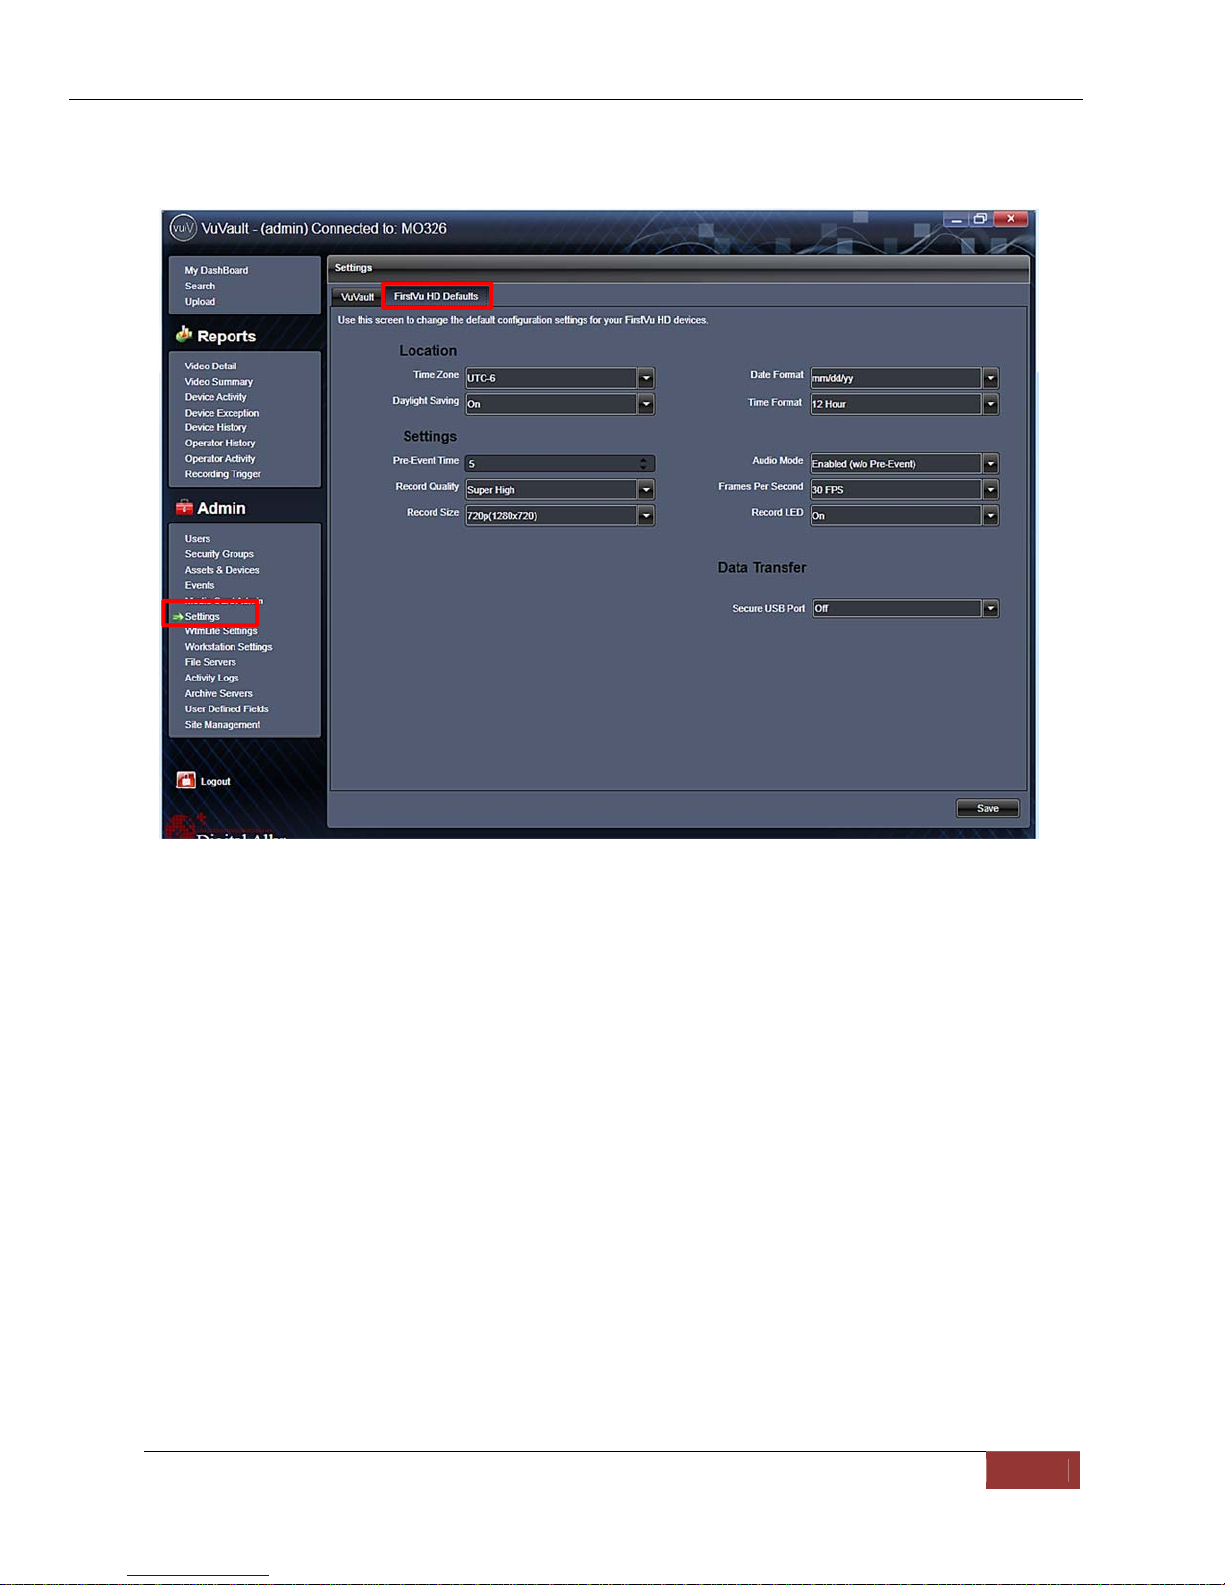
USING VUVAULT TO CONFIGURE YOUR FIRSTVU HD..........................................................................................3-1
Location........................................................................................................................................................3-2
Settings.........................................................................................................................................................3-3
Data Transfer ...............................................................................................................................................3-4
ACTIVATING YOUR FIRSTVU HD WITHIN VUVAULT.............................................................................................3-4
SECTION - 4 DEVICE CONFIGURATION – MINI CONFIGURATION
MANAGER...............................................................................................................................................................4-1
DEFAULT CONFIGURATION ...................................................................................................................................4-1
MINI CONFIGURATION MANAGER PC SOFTWARE.................................................................................................4-1
Load Configuration File...............................................................................................................................4-1
Location........................................................................................................................................................4-2
Settings.........................................................................................................................................................4-3
Save Configuration File ...............................................................................................................................4-4
SECTION - 5 OPERATION....................................................................................................................................5-1
POWERING ON/OFF ..............................................................................................................................................5-1
VIDEO RECORDING...............................................................................................................................................5-1
Start Recording.............................................................................................................................................5-1
Stop Recording .............................................................................................................................................5-1
MARKING EVENTS ...............................................................................................................................................5-1
AUDIO RECORDING ..............................................................................................................................................5-1
UPLOADING FILES TO A COMPUTER......................................................................................................................5-2
UPLOADING FILES USING VUVAULT.....................................................................................................................5-2
Non-Secure USB Port method......................................................................................................................5-2
Secure USB Port Method..............................................................................................................................5-4
VIDEO PLAYBACK AND MANAGEMENT ................................................................................................................5-7
Using VuVault...............................................................................................................................................5-7
Using the Digital Ally Viewer.......................................................................................................................5-7
Toolbar Controls...........................................................................................................................................5-8
Playback Controls........................................................................................................................................5-8
Playback Slider bar......................................................................................................................................5-8
View Selection and Options..........................................................................................................................5-9

FirstVu™ HD Operation Guide 860-00177-00 REV D
© 2013 Digital Ally, Inc.
MEMORY &BATTERY ALERTS..............................................................................................................................5-9
Memory Alerts:.............................................................................................................................................5-9
Battery Alerts:..............................................................................................................................................5-9
Battery Replacement:...................................................................................................................................5-9
SECTION - 6 STATUS INDICATORS...................................................................................................................6-1
SECTION - 7 SPECIFICATIONS ..........................................................................................................................7-1
SECTION - 8 WARRANTY INFORMATION ......................................................................................................8-1
SECTION - 9 CONTACT INFORMATION..........................................................................................................9-1
SECTION - 10 REGULATORY............................................................................................................................10-1

FirstVu™ HD Operation Guide 860-00177-00 REV D
Digital Ally, Inc. | Introduction 1-1
Section - 1 Introduction
The FirstVu™ HD is a Professional, Evidentiary, Wearable, Mountable, and Weather-
Resistant Digital Video System.
Record video and audio, evidence wherever the job requires, day or night while also
collecting useful information such as a date/time stamp, and marks (video bookmarks).
This Operation Guide is designed to get you up and running quickly with its basic features.
For integration within the VuVault™ back office software, please refer to Section 3.
FirstVu™ HD Features
Easy to Operate – One button start/stop record
Small and Lightweight
Easily and securely mounts almost anywhere
High Quality 720p Video – H.264 codec – 1280 x 720 resolution, 30 frames per
second (configurable for lower settings)
Wide Field of View
Encoded AVI videos may easily be viewed on standard PC video player software.
Saves Metadata along with Video
Up to 60 Seconds Pre-Event Record (when configured) – Capture the action
before activating a recorded event
Low light sensitivity for night time operation
Instant Record ON while in Stand-by Mode
User can insert a ‘Mark’ during a recording which records to Metadata
Covert Mode – Vibratory notifications
Secure 32GB of internal event record memory with easy download thru USB port
Software Upgradeable via USB
Up to 4.5 hours of continuous recording on a single charge
FirstVu™ HD Controls
1PowerOn‐Off
2RecordStart/Mark/RecordStop
3CameraPort
4USBPort
5BatteryCover
6MicrophoneON/OFF
7StatusLED’s

FirstVu™ HD Operation Guide 860-00177-00 REV D
Digital Ally, Inc. | Introduction 1-2
Parts and Accessories List
Kit Part Number 001-00203-00
Item Part Number Qty Description
1 050-10110-00 1 Assembly, FirstVu HD Camera
2 050-10091-00 1 Assembly, FirstVu HD DVR
3 008-0100 2 Cable, USB 2.0 TypeA to Mini-B, 3.3 ft.
4 050-10101-00 1 Kit, Velcro Mount
5 050-10090-00 1 Assembly, Fabric Clip
6 860-00182-00 1 FirstVu HD Quick Reference Guide
7 050-10096-00 1 Assembly, Button Mount
8 009-00004-00 1 Charger, 110Vac wall to USB Type A
9 009-00005-00 1 Charger, 12Vdc Auto Plug to USB Type A
10 135-00398-00 2 Battery, 3.7V 2200mAh Li-Po
11 009-00008-00 1 Charger, Battery

FirstVu™ HD Operation Guide 860-00177-00 REV D
Digital Ally, Inc. | Getting Started 2-1
Section - 2 Getting Started
Software Updates
Log on to www.digitalallyinc.com/tech-support.php and register for an account to be an
authorized user. By registering you will be able to download all the latest
firmware/software updates and will be notified of future upgrades.
Battery Charging Information
The FirstVu HD should be fully charged before initial use using the AC power outlet or DC
auto adapter. With the unit powered off, charge the unit initially for 12~16 hours.
Subsequent charges should take approximately 4 hours.
Charge time is minimized when the FirstVu HD is powered off but note
the status indicators will not operate.
Charging From a Computer
Plug the USB cable into the computer’s USB port. Insert the other end of the cable into the
FirstVu USB port and the unit will begin charging.
Charging In a Vehicle
Plug the DC auto adapter into the vehicle’s 12Vdc receptacle and the
other end into the FirstVu HD USB port or charging cradle USB port; the
unit will begin charging.
In some vehicles, the 12Vdc receptacle may be controlled by the
position of the ignition switch. In such cases, the FirstVu™ HD will
only charge when the ignition switch is in the “On” position.
Charging Using an AC Power Outlet
Plug the AC power adapter into an appropriate power outlet and the USB
connector into the FirstVu USB port. The unit will begin charging.
Charging Using the Battery Charger
Remove your battery from the FirstVu HD and insert into the
supplied battery charger shown to the right (009-00008-00).
Then plug your battery charger into an available USB port on
your computer or one of the chargers pictured to the right
using the supplied USB cable. A status LED indicates the
charging mode of the battery. When the LED is green, your
battery is charged and ready for use.
FirstVu HD Charging and Battery Indicators
Charging with unit powered ’ON’
Charging in progress is shown with a solid blue status indicator.
When charging is complete the blue status indicator is not illuminated.
For more information consult Section 6.
Charging with unit powered ’OFF’
The unit may be charged via USB cable with the power switch in the OFF
position. However, no LED indicators will be present while it is charging.

FirstVu™ HD Operation Guide 860-00177-00 REV D
Digital Ally, Inc. | Getting Started 2-2
Connecting the Camera
Connect your camera to the camera port on top of the DVR as
shown to the right. The camera port can only be used with an
approved Digital Ally camera. Never plug any other device or cable
into the camera port. Doing so may cause permanent internal
damage to your FirstVu HD.
Setting the Date and Time
Automatically setting the date and time
The date and time is set by the factory prior to shipment. However, you must also enter the
correct UTC offset when configuring the device so that the time zone can be set properly.
For example, USA Central Standard Time =UTC -6. For more information, consult the
Device Configuration sections of this manual. USA time zones are listed below for
reference.
PST = Pacific Standard Time (UTC - 8 hours)
MST = Mountain Standard Time (UTC - 7 hours)
CST = Central Standard Time (UTC - 6 hours)
EST = Eastern Standard Time (UTC - 5 hours)
AST = Atlantic Standard Time (UTC - 4 hours)
ALST = Alaskan Standard Time (UTC - 9 hours)
HST = Hawaiian Standard Time (UTC - 10 hours)
Manually setting the date and time
The date and time is set by the factory prior to shipment and should not need manual
adjustment. However, date and time can still be set manually if needed. Follow the
procedure below to manually set the date and time.
1. Open Notepad from your computer.
2. Inside Notepad, type in the year, month, day, hour, and seconds you wish to
program into the FirstVu. Use the following format (YYYYMMDDHHMMSS) using 24
hour UTC time. You must also apply your time zone offset.
For example, If you live in the CST zone and the current date & time is 5/23/2013
10:47:50pm, you would enter 20130524044750. Since CST is UTC-6, you have to add
6 hours to the current time to reflect the UTC time.
3. Go to File>Save As and name the file “DATE.txt”
4. Connect your FirstVu HD via the supplied USB cable and transfer the DATE.txt file to
the root drive.
5. Cycle the power on your FirstVu HD. The unit will apply the system date/time during
boot up. When completed, the FirstVuHD will erase the .txt file.
Camera Port

FirstVu™ HD Operation Guide 860-00177-00 REV D
Digital Ally, Inc. | Device Configuration - VuVault 3-1
Section - 3 Device Configuration - VuVault
The FirstVU HD contains a default configuration and can be used immediately. It may
be reconfigured by activating the device either using the Mini Configuration Manager
application supplied on the FirstVu HD product DVD or by using DigitalAlly’s optional
VuVault™ back-office software. If you have purchased VuVault™, follow the
instructions in this section to configure and activate your FirstVu HD. If you have NOT
purchased VuVault, skip to Section 4 to configure your device.
Default Configuration
If the unit has never been activated, the unit will use the following default settings:
Central Standard Time (UTC-6)
Daylight Saving enabled
Date format: Month/Day/Year
Time format: 12-hour
Pre-Event disabled
1280x720p record size/high record quality
Pre-Event Audio disabled
30 frames per second
Record LED enabled
Secure USB port disabled
Using VuVault to Configure your FirstVu HD
You must upgrade VuVault to version 4.2 (minimum) to configure and
activate a FirstVu HD device. VideoManagerII and previous versions
of VuVault will not work with the FirstVu HD.
VuVault is used to manage FirstVu HD settings as well as activate your device for use
within the system.
Before you can configure your device for use within VuVault, the serial number must be
added into the system. Select Admin>Devices>Add Device to add your device into
VuVault. Type in your device serial number and assign it a name within the system.
When done, press Save (for more information consult the VuVault User’s Guide
“Adding Devices” section).

FirstVu™ HD Operation Guide 860-00177-00 REV D
Digital Ally, Inc. | Device Configuration - VuVault 3-2
A configuration field will be available in the Admin>Settings tab within VuVault once a
valid FirstVu HD serial number has been added into the system. These global settings
will define how all users will interface with the FirstVu.
Location
TimeZone
The local time zone is used to adjust the device when synchronizing to the
Greenwich Mean Time. During device configuration, the local time from the
PC real time clock will be used and Central Standard Time is set by default.
Settings: UTC,UTC-6(CST)[default]
DaylightSaving
When set to On, Daylight Saving setting time will be automatically adjusted
for the configured Local Time Zone. If this is disabled, time will not be
adjusted for Daylight Saving.
Settings: Off, On[default]
DateFormat
The date format displayed on the event recordings is selected through this
setting.
Settings:mm/dd/yy[default];yy/mm/dd;dd/mm/yy
TimeFormat
This time format allows the device to be configured in a 12-hour format or a
24-hour format.

FirstVu™ HD Operation Guide 860-00177-00 REV D
Digital Ally, Inc. | Device Configuration - VuVault 3-3
Settings
Pre‐EventTime
The Pre-Event Time option allows you to set the amount of time for the pre-
event buffer. The FirstVu HD will buffer the last 0-60 seconds of audio and
video so it can be recorded during a record event. If set for 0 seconds, pre-
event function will be disabled.
Settings:0-60seconds[default=0seconds]
RecordQuality
The Record Quality parameter allows the video compression bit rate to be
adjusted. Digital video is compressed by taking out data that remains
constant from each frame, and only storing data that actually changes. This
allows videos with still backgrounds to be much smaller than they would be
if the background had to be present in every single frame.
The bit rate is the amount of bits that can be used in one second of video.
The higher the record quality, the higher the bit rate and the size of the
event files. The default setting is “high” for excellent video quality, and can
be lowered or raised to adjust the bit rate and storage space. (VuVault 4.2
Update 2 or newer is required for the super high setting).
Settings: Standard(2Mbps),Medium(4Mbps),High(6Mbps)[default],SuperHigh(12Mbps)
RecordSize
The Record Size parameter allows the video image size to be adjusted from
VGA (standard definition) to 720p (high definition). VGA has a picture size
of 640x480 pixels, whereas 720p has a picture size of 1280x720 pixels.
720p will provide a larger & more defined video picture, but because of its
larger size, will require about 3 times as much storage space as VGA. Also,
the shape of the final video frame will be slightly different, with 720p being a
longer and thinner frame (higher width ratio to height).
Settings: VGA(640x480),and720p(1280x720)[default
AudioMode
The audio mode determines how audio will be recorded to your device. If
enabled, audio information is recorded during the recorded event and
during the configured pre-event time.
If enabled (w/o Pre-event), audio will be recorded during the event but not
recorded during pre-event. If this option is disabled, no audio will be
recorded.
If the Pre-Event Time is set for 0, there cannot be pre-event audio.
Settings: Enabled,Disabled,Enabled(w/oPre-Event)[default]
FramesPerSecond
This parameter sets the number of frames per second the FirstVu HD will
record. The higher the setting, the better the video quality, and the larger
the size of the event files.
Settings:5,10,15,30fps[default=30fps]

FirstVu™ HD Operation Guide 860-00177-00 REV D
Digital Ally, Inc. | Device Configuration - VuVault 3-4
RecordLED(covertmode)
The Red Record LED behavior on the camera can be configured to
accommodate your desired operation. If disabled, the LED will not
illuminate during a recorded event and will operate in covert mode.
Settings:Off,On[default]
Data Transfer
SecureUSBPort
This parameter determines if the USB port for secure data connections to a
PC is enabled or disabled. This feature provides greater security to your
recorded evidentiary data.
When enabled, video and metadata files can only be accessed when using
the upload function within your VuVault stand-alone or networked
environment. The only user-accessible information when the device is
connected to a PC USB port is the dvminfo.log file. The dvminfo.log file
contains basic information about your device such as serial number and
firmware version.
When this option is disabled, video and data files will be accessible to any
user when the device is plugged into a PC USB port. Event data can then
be copied, erased, or uploaded with or without the use of VuVault.
Settings:On,Off[default]
Once the desired settings have been entered, click and proceed
below to activate your device.
Activating your FirstVu HD within VuVault
The Media Card Administration function is used to erase, format, and activate the
FirstVu HD internal memory to be ready for use with VuVault.

FirstVu™ HD Operation Guide 860-00177-00 REV D
Digital Ally, Inc. | Device Configuration - VuVault 3-5
The FirstVu HD must be connected to the VuVault workstation via USB port. Make sure
your device is powered on and in the Standby mode.
1. Select Media Card Admin from the Admin navigation bar.
2. Select the correct Device Type from the available options. You must select
“High Definition FirstVu Compact Personal Video”.
3. Click the button to detect the FirstVu HD from the available removable
drives.
4. Select the drive letter assigned to the FirstVu HD.
5. Note the Card Volume Name field. If there is a current volume name, it will
show up automatically. If not, it will default to DA_DEVICE. This can be
changed according to customer preference to whatever is deemed most
appropriate.
6. Choose from one of two options to activate the device:
Activate Device (Leave Data Intact) – this option simply activates the
FirstVu by writing the “deviceconfig” file to internal memory. No existing
video events located on the internal memory are altered.
Clear Data and Activate Device – this option erases any data on the
internal memory and activates it.
CAUTION: Always ensure that all relevant data has been previously
uploaded to the system before deleting it from the FirstVu HD.
7. Click the Activate button. The Status pane will indicate when the process has
completed.
VuVault will create a file named “deviceconfig” and place into the root folder of
the FirstVu HD. This and all other media files are accessible to the user if
Secure USB Port is disabled in the VuVault Admin>Settings>FirstVu HD
Defaults Menu.
If Secure USB Port is enabled, the only accessible information is the
dvminfo.log file. The dvminfo.log file contains basic information about your
device such as serial number and firmware version. Video uploads and device
configuration MUST be done through VuVault when this option is enabled.
8. Reboot your FirstVu HD by turning the power switch OFF, then ON.
The FirstVu HD is now activated and ready for use. For more information consult the
VuVault User’s Guide Media Card Administration section.

FirstVu™ HD Operation Guide 860-00177-00 REV D
Digital Ally, Inc. | Device Configuration - VuVault 3-6

FirstVu™ HD Operation Guide 860-00177-00 REV D
Digital Ally, Inc. | Device Configuration – Mini Configuration Manager 4-1
Section - 4 Device Configuration – Mini Configuration Manager
The FirstVu™ HD contains a default configuration and can be used immediately.
Advanced configuration for FirstVu HD is determined by the configuration files that are
downloaded to the device from the Mini Configuration Manager supplied on the
FirstVu™ HD DVD, or by using Digital Ally’s optional VuVault™ back-office software. If
you have NOT purchased VuVault™, follow the instructions in this section to configure
and activate your device using the stand-alone Mini Configuration Manager software.
Default Configuration
If the unit has never been activated, the unit will use the following default settings:
Central Standard Time (UTC-6)
Daylight Saving enabled
Date format: Month/Day/Year
Time format: 12-hour
Pre-Event disabled
1280x720p record size/high record quality
Pre-Event Audio disabled
30 frames per second
Record LED enabled
Mini Configuration Manager PC Software
The Mini Configuration Manager software is used to manage FirstVu HD settings as
well as activate a FirstVU HD device or an external memory card for use in a FirstVu
HD (non-VuVault installations). Various configurable items can be adjusted to meet
your specific setting requirements. For VuVault integration, use the configuration
options within the VuVault software program instead to configure your FirstVu HD
(consult Section 3 for more information).
The Mini Configuration Manager Installation software is located on your product DVD.
Once installed, go to Start Menu>Programs>Digital Ally>Mini Configuration Manager to
open the application.
Load Configuration File
To import settings from your FirstVU HD device or data
storage location you can press the Load button inside the
“File” tab near the center of the software screen. This will
bring up the Windows dialog box to navigate to the location
of the file. The file is named “deviceconfig”.

FirstVu™ HD Operation Guide 860-00177-00 REV D
Digital Ally, Inc. | Device Configuration – Mini Configuration Manager 4-2
Device Configuration
Press the button to create or edit a device configuration.
The default device configuration screen will then be available for editing. Use the drop
down arrows to make your selections.
Location
TimeZone
The local time zone is used to adjust the device when synchronizing to the
Greenwich Mean Time. During device configuration, the local time from the
PC real time clock will be used and Central Standard Time is set by default.
Settings: UTC,UTC-6(CST)[default]

FirstVu™ HD Operation Guide 860-00177-00 REV D
Digital Ally, Inc. | Device Configuration – Mini Configuration Manager 4-3
DaylightSaving
When set to On, Daylight Saving setting time will be automatically adjusted
for the configured Local Time Zone. If this is disabled, time will not be
adjusted for Daylight Saving.
Settings: On,Off[default]
DateFormat
The date format displayed on the event recordings is selected through this
setting.
Settings:mm/dd/yy[default];yy/mm/dd;dd/mm/yy
TimeFormat
This time format allows the device to be configured in a 12-hour format or a
24-hour format.
Settings
Pre‐EventTime
The Pre-Event Time option allows you to set the amount of time for the pre-
event buffer. The FirstVu HD will buffer the last 0-60 seconds of audio and
video so it can be recorded during a record event. If set for 0 seconds, pre-
event function will be disabled. Enabling pre-event will reduce battery life to
about 4.5 hours of standby time.
Settings:0-60seconds[default=0seconds]
RecordQuality
The Record Quality parameter allows the video compression bit rate to be
adjusted. Digital video is compressed by taking out data that remains
constant from each frame, and only storing data that actually changes. This
allows videos with still backgrounds to be much smaller than they would be
if the background had to be present in every single frame. The bit rate is the
amount of bits that can be used in one second of video. The higher the
record quality, the higher the bit rate and the size of the event files. The
default setting is “high” for excellent video quality, and can be lowered or
raised to adjust the bit rate and storage space. (Viewer 4.2 Update 2 or
newer is required for the super high setting).
Settings: Standard(2Mbps),Medium(4Mbps),High(6Mbps)[default],SuperHigh(12Mbps)
RecordSize
The Record Size parameter allows the video image size to be adjusted from
VGA (standard definition) to 720p (high definition). VGA has a picture size
of 640x480 pixels, whereas 720p has a picture size of 1280x720 pixels.
720p will provide a larger & more defined video picture, but because of its
larger size, will require about 3 times as much storage space as VGA. Also,
the shape of the final video frame will be slightly different, with 720p being a
longer and thinner frame (higher width ratio to height).
Settings: VGA(640x480),and720p(1280x720)[default]

FirstVu™ HD Operation Guide 860-00177-00 REV D
Digital Ally, Inc. | Device Configuration – Mini Configuration Manager 4-4
AudioMode
The audio mode determines how audio will be recorded to your device. If
enabled, audio information is recorded during the recorded event and
during the configured pre-event time. If enabled (w/o Pre-event), audio will
be recorded during the event but not recorded during pre-event. If this
option is disabled, no audio will be recorded.
If the Pre-Event Time is set for 0, there cannot be pre-event audio.
FramesPerSecond
This parameter sets the number of video frames per second the FirstVu HD
will record. The higher the setting, the better the video quality, and the
larger the size of the event files.
Settings:5,10,15,30fps[default=30fps]
RecordLED
The Red Record LED behavior on the camera can be configured to
accommodate your desired operation. If enabled, the red LED will
illuminate while the FirstVu HD is recording. If disabled, the LED will not
illuminate during a recorded event and will operate in covert mode.
Settings:Disabled,Enabled[default]
When done, go to the tab and save your configuration file to a location on your
computer.
Save Configuration File
To save the configured settings to your FirstVu HD or a data
storage location, you can press the Save button near the center
of the Mini Device Configuration software screen. This will bring
up the Browse for Folder dialog box to select the location to
save the file. After the configuration file has been transferred to
your FirstVu HD, reboot the device by turning the power OFF
then ON.
After the configuration file is copied, reboot your FirstVu HD. It is now configured &
ready for use.

FirstVu HD User’s Guide 860-00177-00 REV D
Digital Ally, Inc. | Operation 5-1
Section - 5 Operation
Powering On/Off
To power on, connect the camera to the camera port on top of the unit.
Then slide the power switch to the ‘ON’ position to power the unit on.
The blue and yellow LED’s will flash alternatively and the device will
vibrate once to indicate that it is powering on.
Once powered on, the unit is ready to start a recording.
To power the unit off, first stop any active recording or playback session
and slide the power switch to the ‘OFF’ position.
WARNING: The camera port can only be used with an approved Digital Ally
camera module. Never plug any other device or cable into the camera port.
Doing so may cause permanent internal damage to your FirstVu HD.
Video Recording
Start Recording
Once the FirstVu HD is powered on, press and release the Record Button at
any time. The DVR unit will emit a vibration pulse, and the red LED status
indicator on top of the camera will be lit continuously (if configured) during the
recording. If pre-event has been enabled through the device configuration,
the unit will automatically include up to 30 seconds of video and audio
prior to the event record trigger.
Stop Recording
Press and hold the Record Button for approximately 3 seconds to stop an active recording.
The DVR will emit a vibration pulse and the unit will be ready to record the next event.
Marking Events
Once a recording has been initiated, markers can be placed in the recording to indicate when
important events take place. This is done by momentarily pressing the Record button.
Additional marks can be placed at any time during the recording.
Audio Recording
The FirstVu™ HD contains a microphone built into the face of the camera
module. The position of the switch indicates whether the audio is enabled
or muted.
Audio can be muted or activated by changing the position of the mute
switch (pictured right).
Audio is active when the switch is in the up (green)
position.
Audio is muted when the switch is in the DOWN position.
Additionally, the audio mode must also be enabled within the device configuration.
Depending yon your purchased camera option, the audio switch may not be
present. In this case, the user will not have the capability to mute the audio.
Camera Port
Power
Switch

FirstVu HD User’s Guide 860-00177-00 REV D
Digital Ally, Inc. | Operation 5-2
Uploading Files to a Computer
Using the supplied USB cable, connect your FirstVu HD to
the computer using the USB port next to the power switch.
Power the unit on and the FirstVu HD will appear on the
computer as a removable storage drive. Double click on the
drive and the video file folders will be listed. You may then
drag and drop the files to your PC or open a selected folder
to playback the .avi file using Windows Media Player.
To playback your videos and metadata using VuVault or the
Digital Ally Viewer, refer to page 5-7.
The FirstVu HD is capable of advanced security features which may restrict a user’s access to
recorded event files. These restrictions can be implemented by a system administrator only if
using the VuVault back office software. If the Secure USB port feature has been enabled in the
VuVault Admin>Settings>FirstVu HD Defaults tab (see page 3-4), video and metadata files will
not be accessible through the USB port and can only be uploaded using VuVault. Additionally,
each user must have Upload New Videos permissions within VuVault to transfer files from the
FirstVu HD.
Uploading Files using VuVault
Non-Secure USB Port method
To upload video files from the FirstVu HD when the Secure USB Port is not enabled, plug
the supplied USB cable into the computer USB port and insert the other end of the cable into
the FirstVu™ HD PC USB port. Make sure your device is powered on.
1. Select Upload from the Main navigation bar. If the secure USB port feature has not been
enabled, select From Disk.
USB Port

FirstVu HD User’s Guide 860-00177-00 REV D
Digital Ally, Inc. | Operation 5-3
2. Click the Source button. ‘A dialogue box will appear allowing you to select the appropriate
location of your FirstVu HD.
The system will verify the files to be uploaded. If event
files are being uploaded from a device that is not recognized by the system, the user will
be prompted to add them with the built-in Add Device Wizard by clicking on Define
Device in the lower right-hand corner of the Device Event Details pane. Please refer to
the VuVault User’s Guide Add Device Wizard section for further details.
3. Once the files have been verified, the system will automatically list and select all of the
files for upload. If you don’t wish to upload all available records, uncheck the Select All
checkbox and then check the box next to each record you want to upload. The default File
Server and Share Location are displayed. If additional file servers have been defined,
select the desired destination using the dropdown menu. Click the Upload Files button to
begin uploading data to the system.
If desired, the selected files can also be backed up to a DVD during the upload
process. VuVault supports disc spanning, so if the total size of the files in the source
location exceeds the space available on a single disc, the user will be prompted to insert
additional discs until all of the files have been copied.
Table of contents
Other Digital-Ally DVR manuals