Digital Barriers EdgeVis HD-IP470 Operation manual

1
Vodafone Business
Surveillance
User Guide
IP470 Installation

Vodafone Business Surveillance –IP470 Installation User Guide
C1 –Public
Page 2
Contents
1. Introduction 4
2. Basic operations of the unit 6
Device connectors 6
Powering the device and switching it on/off 7
Default LAN port IP Addresses 7
Connecting IP cameras 7
Storage medium 7
Updating the software on the unit 7
3. Configuring communications on the HD-IP470 8
Connecting over a 3G/4G cellular network 8
Connecting over a wired LAN connection 9
4. Accessing the local web setup interface 11
Connecting to the encoder’s local web setup interface 11
5. Overview of the key setup steps 13
Step 1 –Configure the communications settings 13
Step 2 - Enter the encoder’s Vodafone Business Surveillance settings 15
Step 3 - Adding video feeds to the encoder 16
Step 4 –Setting recording settings 19
6. User Accounts 21
Managing Server-wide Administrators 26
Managing domain users 26
User details page 27
Introducing Role-based access control 21
7. Additional configuration options 29
Change time zone 29
NTP Service 29
SecureConnect 29

Vodafone Business Surveillance –IP470 Installation User Guide
C1 –Public
Page 3
8. Appendix A - Troubleshooting and frequently asked questions 30
How many channels does the HD-IP470 support? 30
What level of recording and streaming performance is achievable? 30
What recording functions does the HD-IP470 support? 30
What indicative recording times and streaming rates are achievable? 30
What bearers can the HD-IP470 use to transmit video to EdgeVis Server? 31
How does EdgeVis Server licensing work in relation to the HD-IP470? 31
What web browser can I use for the setup? 31
What if I need to restore the encoder to default factory settings? 31
What if the encoder can’t connect to my Vodafone Business Surveillance Server? 31
9. Appendix B - Troubleshooting camera discovery issues 32
What makes and models of IP camera does the encoder support? 32
What if I cannot see my camera listed when I search for cameras? 32
What if I cannot successfully add the IP camera? 32
What if I don’t know the IP address (or login details) of my IP camera? 33
Setting the IP address on a camera to function with an encoder 33
Setting the IP address of a port to function with an existing camera 33
What if my IP camera supports multiple video streams? 33
Camera Compatibility Guide 33
10. Appendix C –Vehicle Installation 35
Dimensions and fixings for in-vehicle installation 35
Connecting the HD-IP470 to a vehicle battery 35
11. Appendix D –Technical Specification and connectors 36
CE COMPLIANCE STATEMENT 37
12. Next steps… 38
Installing a viewing client 38
Configuring the streaming parameters 38

Vodafone Business Surveillance –IP470 Installation User Guide
C1 –Public
Page 4
1. Introduction
This document will help set up and configure HD-IP470, allowing it to record
and be viewable remotely from a Vodafone Business Surveillance Server.
Before proceeding with the installation and setup of your HD-IP470 unit, please ensure that you check the
package contents listed below, refer to the installation notes on the next page and consult the Quick Start
Guide that was supplied with your unit for step-by-step instructions on preparing hardware and software
components.
To operate this device, you will need to set up, or have access to, the following architecture:
To proceed you must have access to the Vodafone Business Surveillance Server, with an account created for
the encoder to use.
1.10 What is in the box?
EdgeVis encoder EdgeVis HD-IP470
Accessories AC/DC 12V power supply, mains power lead, DC power block, two cellular
antennae, two Wi-Fi antennae, mounting plate
Printed materials Quick Start Guide
1.11 Safety Notes
The HD-IP470 can operate in temperatures from -20˚C to +50˚C (+55˚C without POE) whilst powered
from 12V –35V DC.
All deployments of an HD-IP470 encoder unit should ensure that the device is not
mounted:
Within explosive zones
Within 0.5m of a powered transmitter and/or receiver antenna
Within the engine bay/compartment of a vehicle
Within 1m of a vehicle fuel fill point (direct line of sight)
Vodafone Business
Surveillance Encoders
Vodafone Business
Surveillance Clients
Vodafone Business
Surveillance Server
send video to
sends video to
SSD
Vodafone Business Surveillance –IP470 Installation User Guide
C1 –Public
Page 5
WARNING: The HD-IP470 Encoder has been designed to operate from an 12V –35V DC supply. Do
not connect it directly to mains power outlet. Use the AC/DC adapter supplied with the unit.
The following precautions must be taken to avoid damage to the unit:
DO NOT CONNECT DIRECTLY TO THE MAINS SUPPLY
Always ensure the supply is within the specified voltage range and employ suitable
filtering if voltage spikes are likely
Do not reverse the polarity of the DC power supply. It will cause irreparable
damage to the HD-IP470
Always provide a common ground between the HD-IP470 unit and all connected
equipment
WARNING: Do not exceed power supply input voltage.
Do not connect to a power supply over 35V –this will damage the unit.
WARNING: Failure to observe these precautions will invalidate the warranty.
Vodafone Business Surveillance –IP470 Installation User Guide
C1 –Public
Page 6
2. Basic operations of the unit
The EdgeVis HD-IP470 is a small and robust device, ideally suited for use in fixed
installations for the recording and live streaming of video from a multiple IP
cameras.
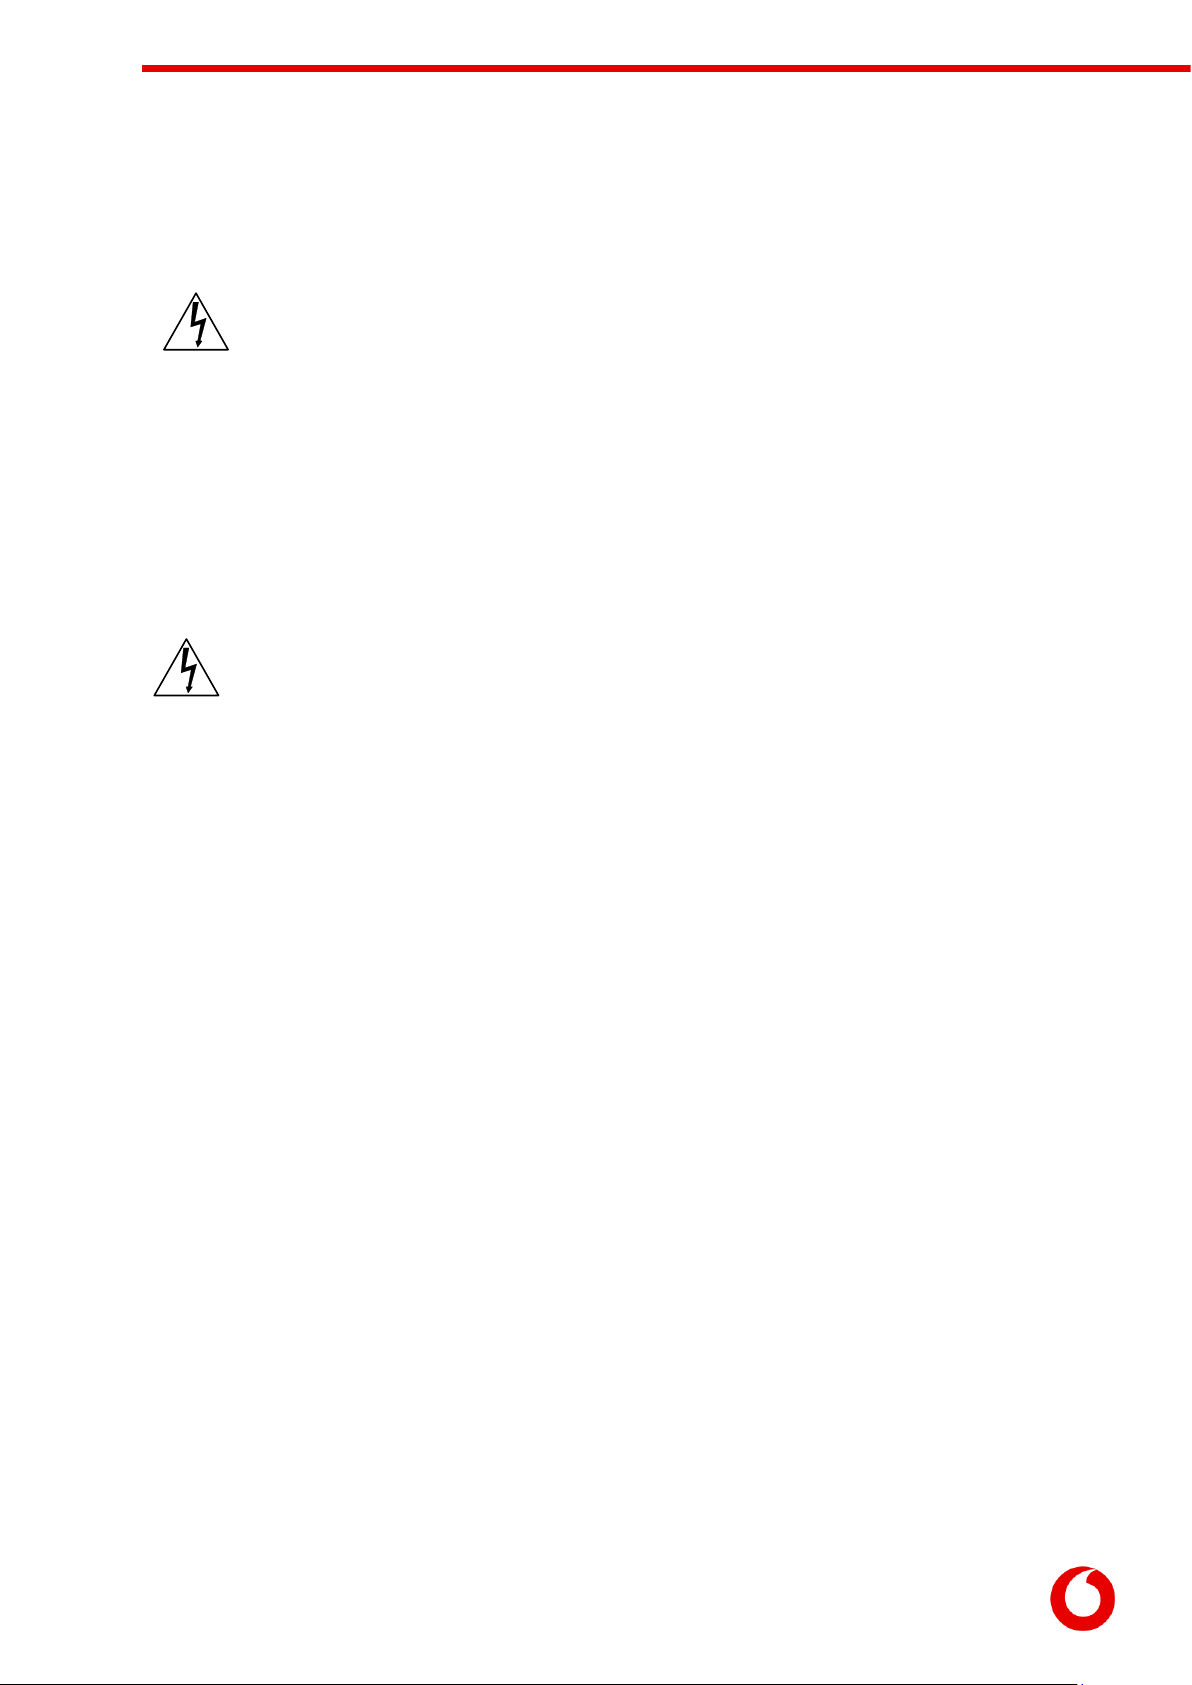
Device connectors
The HD-IP470 features integral TVI streaming using an internal 4G modem, internal Wi-Fi adapter or wired
LAN, and archiving onto internal drive. The device supports the connection of multiple IP cameras.
Connectors for the HD-IP470 are shown below.
s
Panel Layout
1
Power input connector.
6
GPS antenna connector.
2
PoE+ ethernet ports
7
Serial ports.
3
USB 3.0 ports.
8
Cellular antenna connectors.
4
Ethernet port.
9
Wi-Fi antenna connectors.
5
USB 2.0 ports.
10
Digital I/O triggers port.
Note: DVI/VGA, CAN, audio connectors and power button are not used.
1
2
3
4
5
6
7
8
9
10
Vodafone Business Surveillance –IP470 Installation User Guide
C1 –Public
Page 7
Powering the device and switching it on/off
To switch the unit on simply connect the output cable from the AC/DC adapter to the DC input connector
on the front panel of the HD-IP470 and connect the AC/DC adapter to the mains power outlet. Alternatively,
wire up an appropriate DC input cable to the encoder that supplies 9-35V DC.
Default LAN port IP Addresses
For ease of deployment each LAN port on the HD-IP470 device is pre-configured with a static IP address:
Connecting IP cameras
The HD-IP470 allows for connection of multiple IP cameras via the ethernet ports located on the front of
the unit. The cameras should be connected to the device using standard Ethernet cable.
Supported cameras are detailed in the camera compatibility section.
Storage medium
The HD-IP470 can record video to the internal drive or an external USB storage device. Further details on
how to properly prepare a recording disk refer to later in the user guide.
Updating the software on the unit
There are two ways to update the firmware –locally using a USB Pen, or remotely using Vodafone Business
Surveillance Server.
To update remotely, upload the new firmware to the Firmware page within the Vodafone Business
Surveillance Server web interface and then, from the Encoder’s status and diagnostics page, select
Upgrade Firmware from the menu on the right-hand side.
To update locally, copy the update onto a USB flash drive and insert into a USB port on the front of
the unit. The flash drive can be inserted into a running unit or before the unit is powered up. The
update procedure will cause the LEDs under the Ethernet and USB ports to cycle. When the update
is complete, all LEDs will remain on. At this point it is safe to remove the pen and the unit will
automatically reboot.
LAN Port
Default IP Address
Subnet mask
LAN
192.168.10.1
255.255.255.0
PoE+ 1
192.168.11.1
255.255.255.0
PoE+ 2
192.168.12.1
255.255.255.0
USB Ethernet
(not supplied)
192.168.20.1
255.255.255.0

Vodafone Business Surveillance –IP470 Installation User Guide
C1 –Public
Page 8
3. Configuring communications on the HD-
IP470
The HD-IP470 supports communications over wired LAN and Cellular.
Connecting over a 3G/4G cellular network
A valid mobile SIM card is required in order to connect the HD-IP470 over a cellular communications
bearer. The unit has an inbuilt modem for 3G/4G connection with 3G/4G antenna connectors on the side
of the device. Note: despite the ultra-efficient bandwidth usage achieved by TVI, the HD-IP470 is
considered a heavy data use product on cellular networks. It is recommended that an unlimited data plan
(or if unavailable, a heavy consumption data plan) is set up with your Mobile Network Service Provider for
use with the HD-IP470.
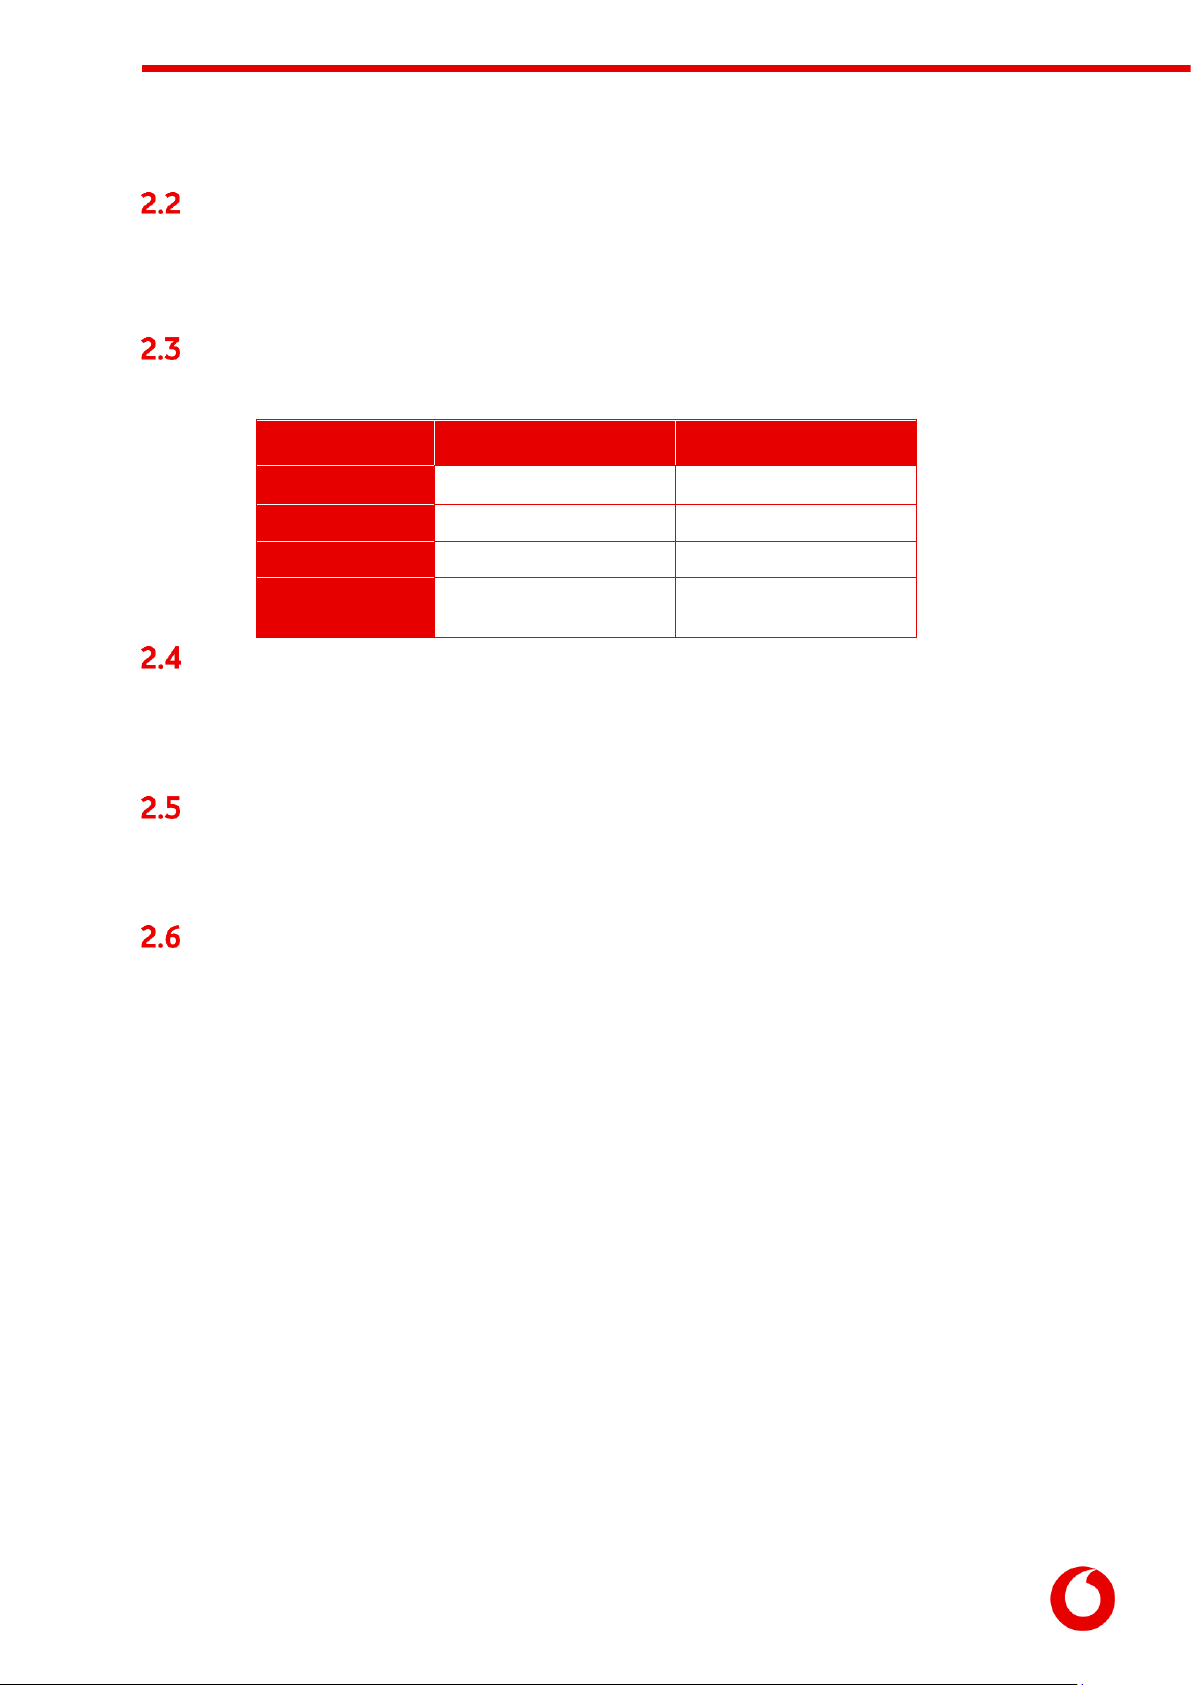
The SIM card holder is located inside the unit under the modem card –this supports a standard size SIM
card. To install micro or nano size cards an adaptor will be required.
Before installing the SIM card:
The unit should be disconnected from the power supply when installing the SIM
card.
Take precautions to prevent static discharge when handling components.
To install the SIM card carefully follow these steps:
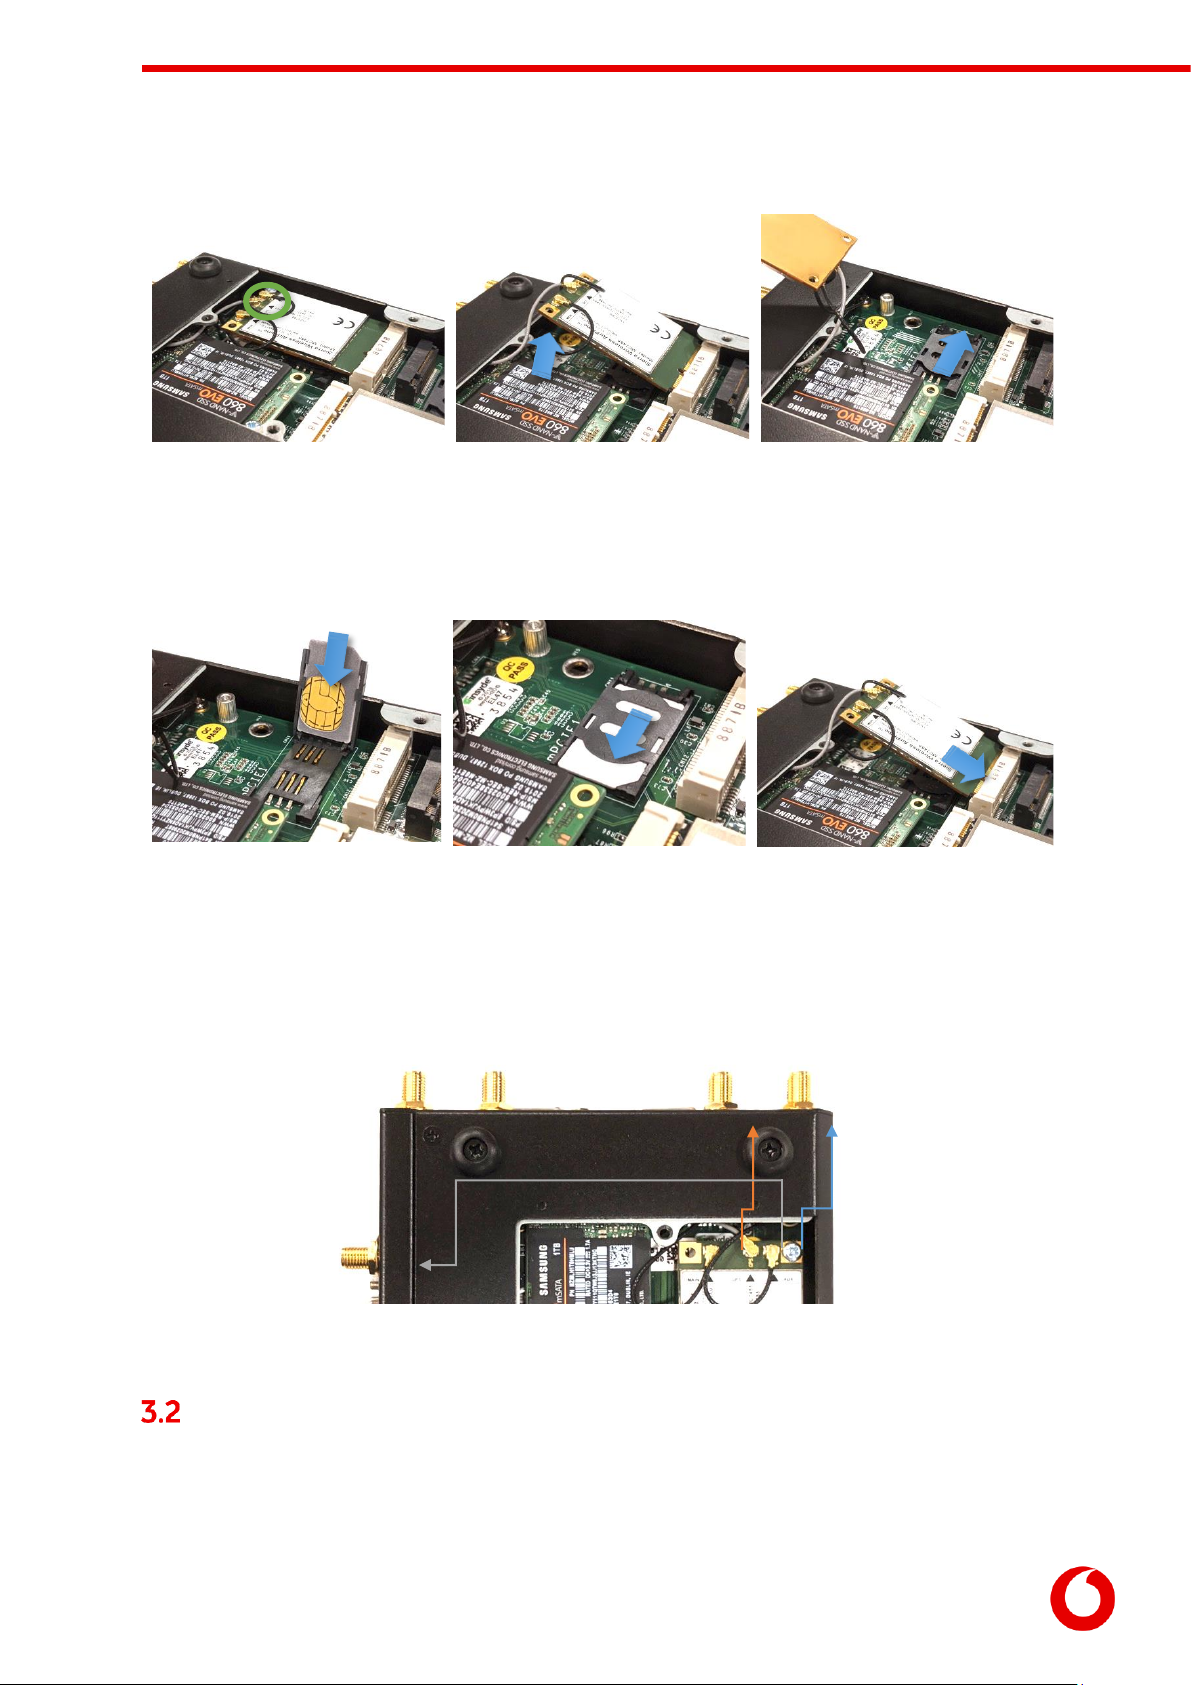
3.1.1 Remove the hatch
Unscrew and safely store the four black bolts holding the base hatch in place. Then remove the hatch.
Vodafone Business Surveillance –IP470 Installation User Guide
C1 –Public
Page 9
3.1.2 Access the SIM card holder
Remove and store the silver bolt
that holds the MODEM in place.
Raise the MODEM without
removing the three antenna
connectors.
Lift the modem to the side to
access the SIM holder. Slide the
top of the SIM holder back to
unlock it.
3.1.3 Insert the SIM card
Lift the top of the SIM holder
and insert the SIM card.
Close the SIM holder then slide
it to lock the SIM in place.
Insert the MODEM into the
header. Ensure the antenna
cables are not snagged or
pinched and secure the MODEM
using the silver bolt.
3.1.4 Check connections and replace the hatch
Check the RF wires are still connected as shown then replace the hatch and secure it using four black
bolts.
Connecting over a wired LAN connection
When using a wired LAN connection as the communications bearer, connect an Ethernet cable into the
LAN connector on the front of the HD-IP470.

Vodafone Business Surveillance –IP470 Installation User Guide
C1 –Public
Page 10
The encoder also includes a driver for the USB to Ethernet adapters using the Asix AX88772 chipset. Any
USB LAN Adapter that uses this chipset should be compatible with the encoder. Devices known to contain
the Asix AX88772 include:
Edimax EU-4028 USB 2.0 Fast Ethernet Adapter
Apple USB to Ethernet adapter
UtechSmart USB 2.0 to 10/100 Fast Ethernet LAN Wired Network Adapter
Vodafone Business Surveillance –IP470 Installation User Guide
C1 –Public
Page 11
4. Accessing the local web setup interface
Connecting to the encoder’s local web
setup interface
There are two different ways to access the local web interface:
1. Using an automatic Wi-Fi hotspot that is created on new encoders that
have no configuration
(useful for setting up and configuring new units quickly)
2. Connecting a PC directly to one of the encoder’s LAN ports
(the normal method for configuring an encoder)
4.1.1 Option 1: Using a laptop via the on-board Wi-Fi hotspot
A new unit with no configuration (or a factory-reset unit) will create a temporary Wi-Fi Access Point when it
is powered up for the first time. The purpose of this Wi-Fi network is to allow Wi-Fi enabled computers to
connect to the encoder and configure the device.
(This hotspot will remain active for 30 minutes.)
1. On a PC, search for a Wi-Fi Access Point Name in the form XXX-YYYYYYYYY
(where X equals the model number, and YYYYYYYYY matches the first part of the encoder’s serial
number)
2. Connect to the network, using password as the Wi-Fi password
3. Open a web browser on the setup laptop/PC and enter the following URL: http://192.168.100.1.
4.1.2 Option 2: Using a laptop via a LAN interface
To access the local web interface, ensure that the setup laptop/PC can connect to the device:
1. Connect your PC to one of the network ports on the encoder (or via a supported USB to Ethernet
adapter). IP Address of the selected port:
IP470: LAN –192.168.10.1 USB Ethernet –192.168.12.1
2. On the PC open the IPv4 network configuration page for the PC’s Ethernet port.
(If necessary refer to these instructions: http://alturl.com/m7zr7)
3. Select the Use the following IP address radio button and enter these settings in the following
two fields:
IP address: 192.168.X.2 (where X is taken from the IP Address of the selected port in Step
1)
Subnet mask: 255.255.255.0 and then click OK to apply.
4. Open a web browser on the setup laptop/PC and
enter the following URL: http://192.168.X.1
(where X is the same as the IP Address of the
selected port in Step 1 –e.g. 192.168.10.1)
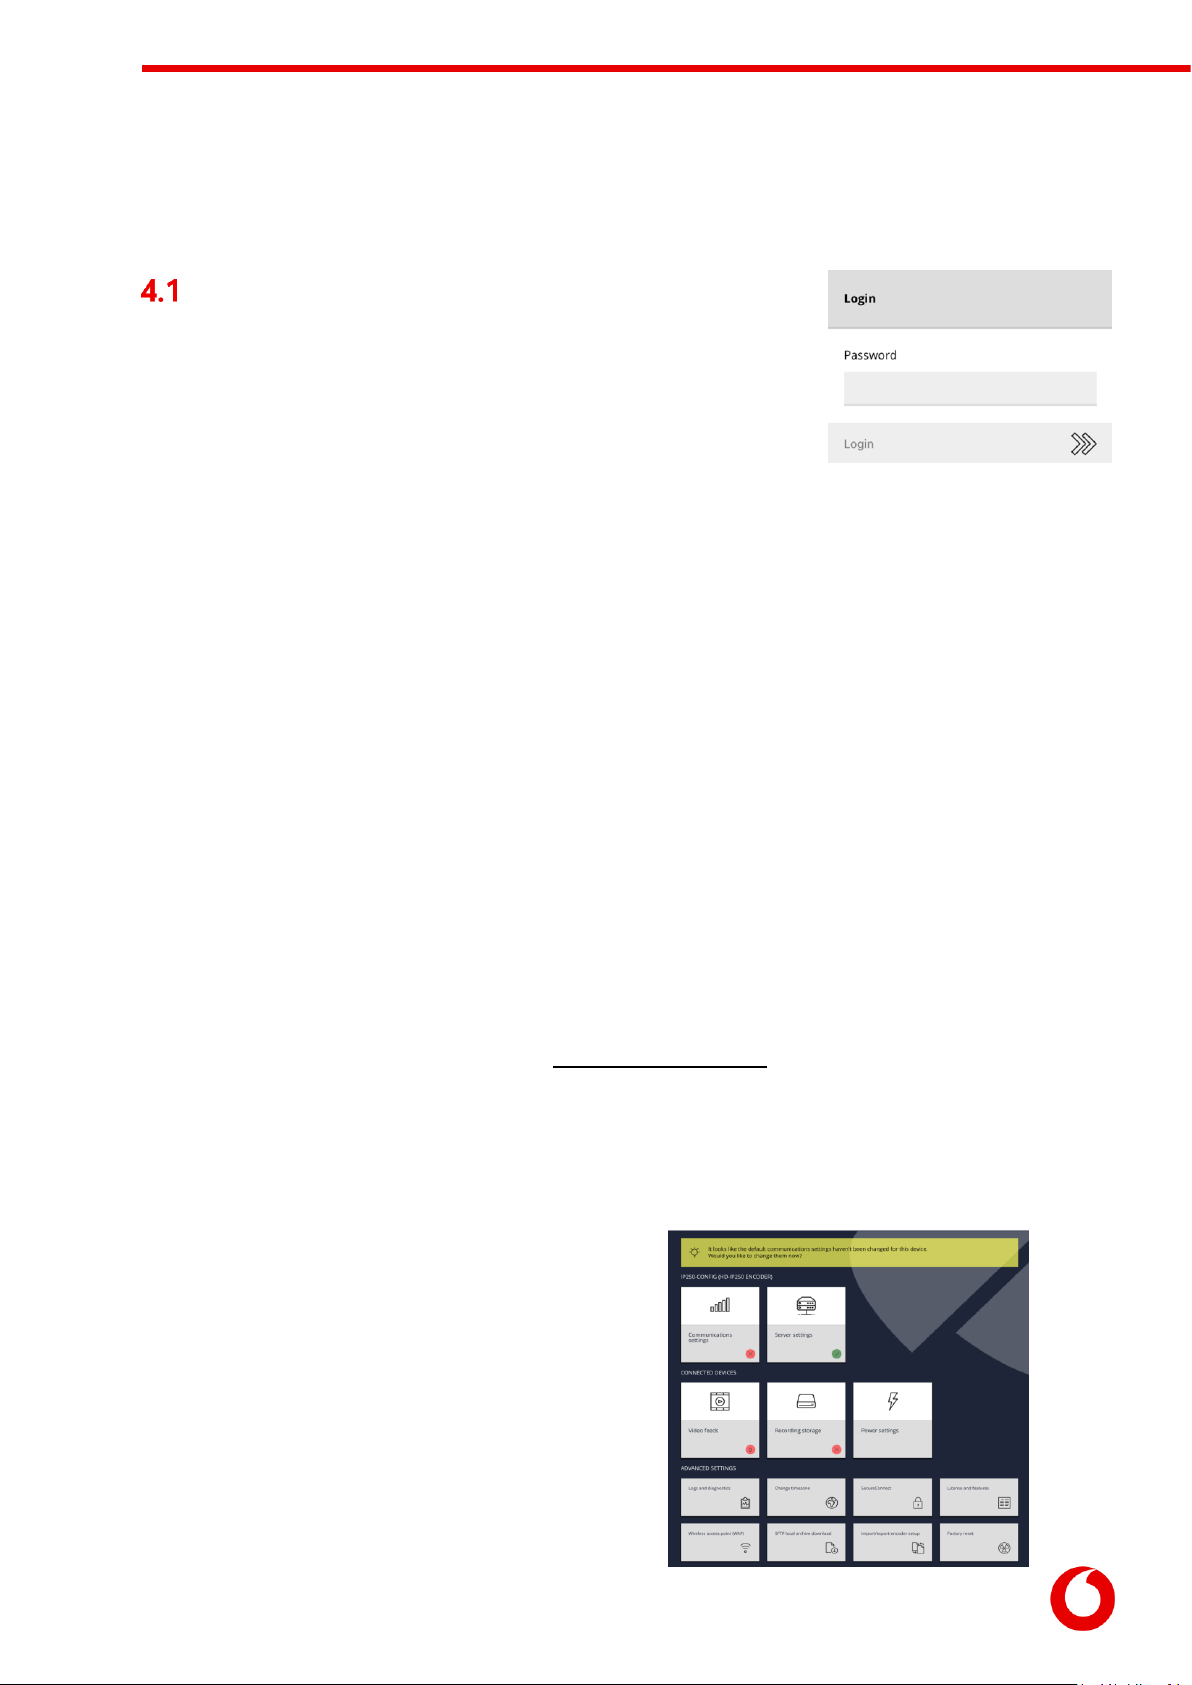
4.1.3 Logging into the setup web interface
Regardless of the method used, the web browser should
now show the login screen for the encoder .

Vodafone Business Surveillance –IP470 Installation User Guide
C1 –Public
Page 12
The default password is encoder name. (as included in the device kit / quick
start guide)
Once logged in the encoder’s dashboard is loaded:
The dashboard presents thestatus of the encoder, showing red-crosses where
an issue requires attention, or a green tick to indicate that section of encoder
configuration is operating correctly. The encoder will also display a help tip if
any crucial encoder settings are still blank and require configuration.

Vodafone Business Surveillance –IP470 Installation User Guide
C1 –Public
Page 13
5. Overview of the key setup steps
Encoder is pre-configured to assistance with installation. There are four key steps in encoder configuration.
1. Configure the communications settings for LAN ports, cellular modem
2. Provide the details of Vodafone Business Surveillance server and encoder account
3. Add each desired video feed to the encoder
4. Select the desired recording location and encryption settings
This section describes each of these four key steps.
Step 1 –Configure the
communications settings
The encoder can utilise both internal and external communications
devices. However we
There are four main tasks to perform in this section:
1. Enable and disable communications methods
2. Configure the settings for each communications bearer
3. Select the communications bearers to use to connect to
Vodafone Business Surveillance Server (both a primary and
secondary)
4. Enable a firewall on the primary/secondary communications bearers
5.1.1 Enable and disable comms methods
For security reasons, it is recommended to disable any comms method that are not required. Click the
desired communications method and use the Enable/Disable this device menu item.

Vodafone Business Surveillance –IP470 Installation User Guide
C1 –Public
Page 14
5.1.2 Configure each comms method’s settings
For each comms method that will be used, click on its entry to view its settings, and from there use the
Edit configuration menu item to enter the settings.
Cellular
connection
Cellular connection will be pre-configured in IP470 with a preloaded Vodafone
SIM.
Cellular connections require an APN, username and password to connect to a
mobile data network –either enter these manually or select from the list of
common mobile operators.
Advanced options include:
Wireless IP address –some private APN networks may require an IP
address
Network Technology –force the modem to use 2G, 3G or 4G (or Auto
select)
Comms Technology –certain modems can work in either GSM or CDMA mode
LAN connection
It is possible, on a per-LAN port basis, to set either DHCP (for connection to a
larger network) or a static configuration (usually for direct-connection to a
camera).
5.1.3 Select the preferred server comms method
It is necessary to select the primary comms method that the encoder will
use to connect to Vodafone Business Surveillance Server and stream
content. A secondary method can be also specified for failover for periods
when the primary bearer is unavailable.
It is possible to set a primary or secondary method directly from the
Communication Settings page, or to use the Use for primary/secondary
communication menu item on each method’s settings page.
5.1.4 Enable the firewall on the primary/secondary comms methods
The only services running on an encoder that are externally accessible are the encoder’s web configuration
page and, if enabled, the SFTP recordings download service. The default setting is to allow access to these
services on any communications method.
For security reasons, it is possible to remove access to these services on communications methods that
have been configured as primary/secondary communications methods. Use the Firewall Settings menu
item to block access to these services.
WARNING: You may immediately lose access to the web setup interface if you are currently configuring the unit
through the primary/secondary comms method and you enable the firewall –this should be the last step you
perform!
Vodafone Business Surveillance –IP470 Installation User Guide
C1 –Public
Page 15
Step 2 - Enter the encoder’s Vodafone Business Surveillance
settings
NOTE: Before the encoder can be connected to a Vodafone Business Surveillance Server, it requires an encoder
account be created on Vodafone Business Surveillance Server. This step is typically undertaken by an administrator
and preconfigured in encoder.
To proceed a user must have the following details for an encoder:
The Domain Name of the user’s Vodafone Business Surveillance Server –
(surveillanceserver.iot.vodafone.com)
The name and password of the encoder account
created on Vodafone Business Surveillance Server
(Optionally) The encryption fingerprint of the
Vodafone Business Surveillance Server
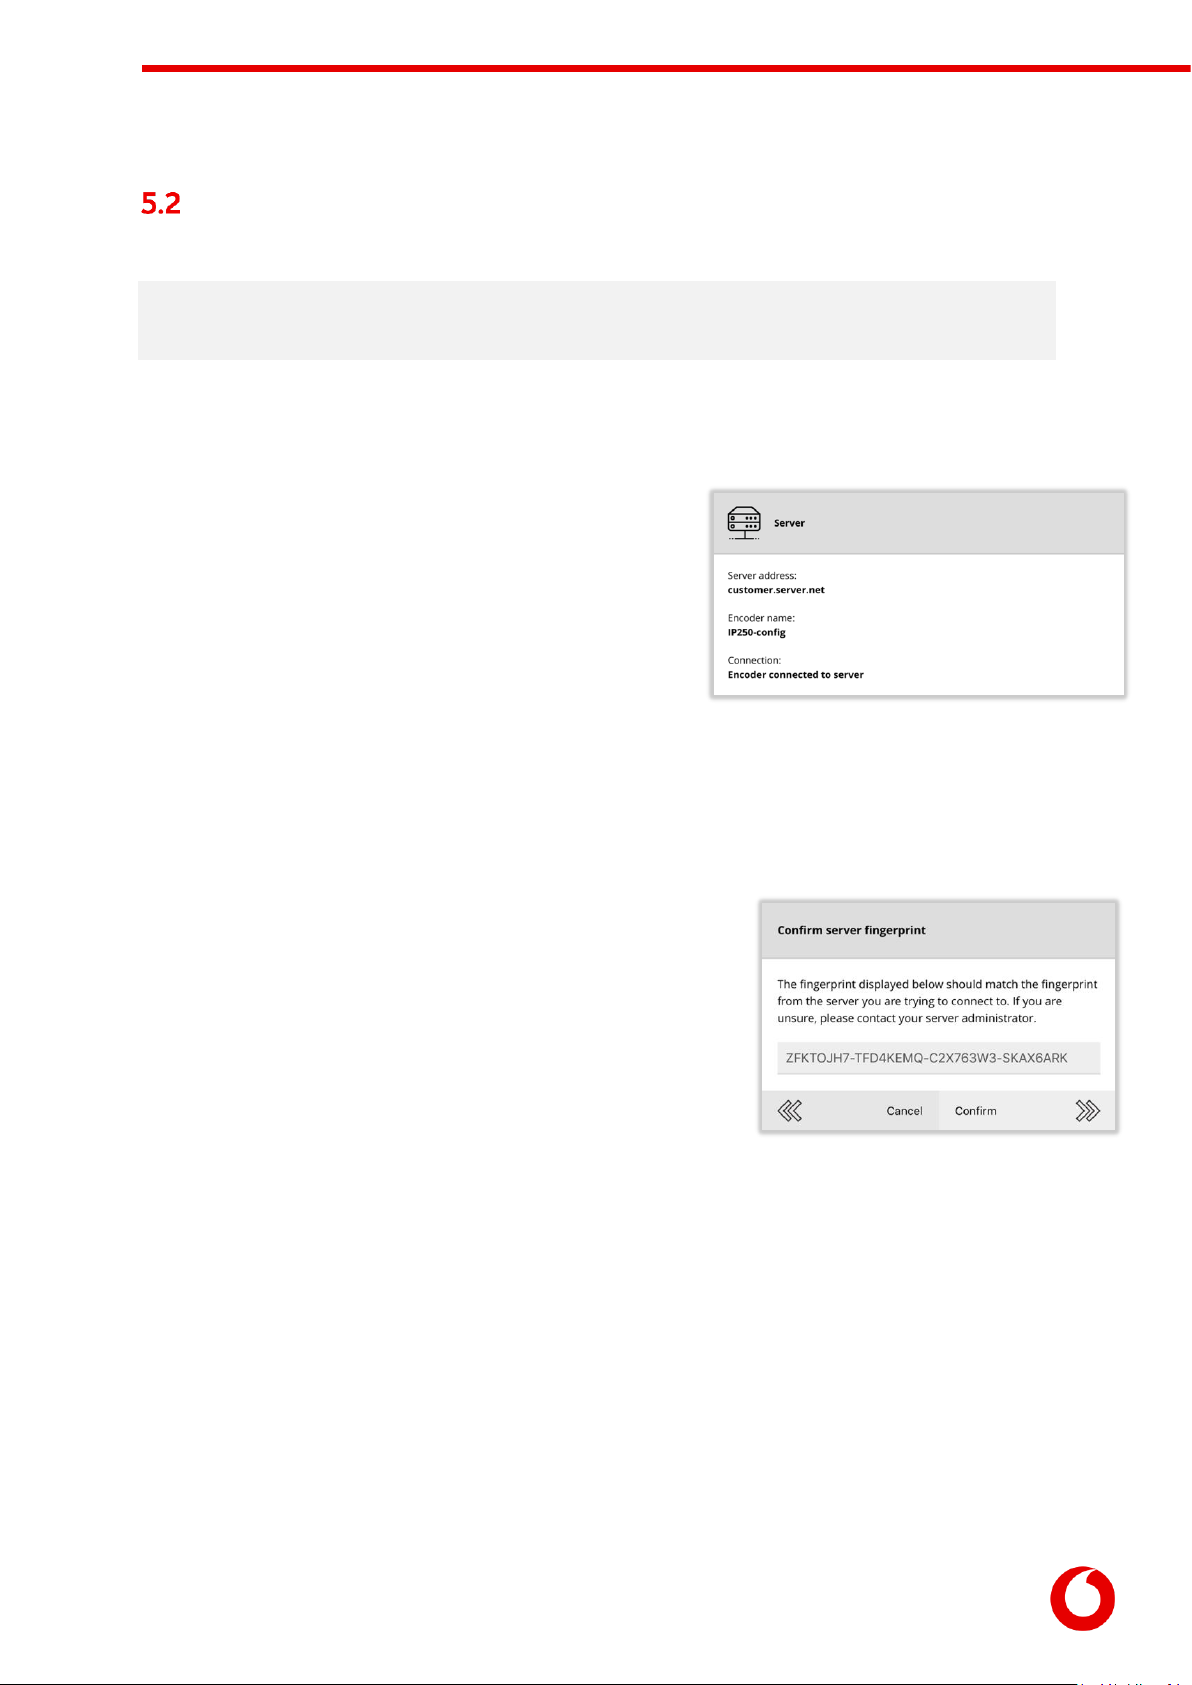
The Server Settings page will display the current settings being
used to connect to the server, and the status of the connection.
To edit the server connection settings, use the Change server settings menu option and enter the details
above.
5.2.1 Encryption modes
When connecting to Vodafone Business Surveillance Server it is possible to select one of three encryption
modes.
Encrypted (online verification)
The user will be asked to verify the encryption fingerprint of
Vodafone Business Surveillance Server before allowing a
connection
Unencrypted
In some circumstances the Vodafone Business Surveillance
Server may not support encryption and so this option should
be used
Encrypted (offline verification)
If connecting to the server is not currently possible to verify the fingerprint this option allows the
user to upload the Vodafone Business Surveillance Server’s encryption pack (available from
Vodafone Business Surveillance Server), which will subsequently be verified when the encoder
reconnects to the server
Encoder will be configured to connect to Vodafone Business Surveillance Server via Encrypted (Online
Verification) mode.
Vodafone Business Surveillance –IP470 Installation User Guide
C1 –Public
Page 16
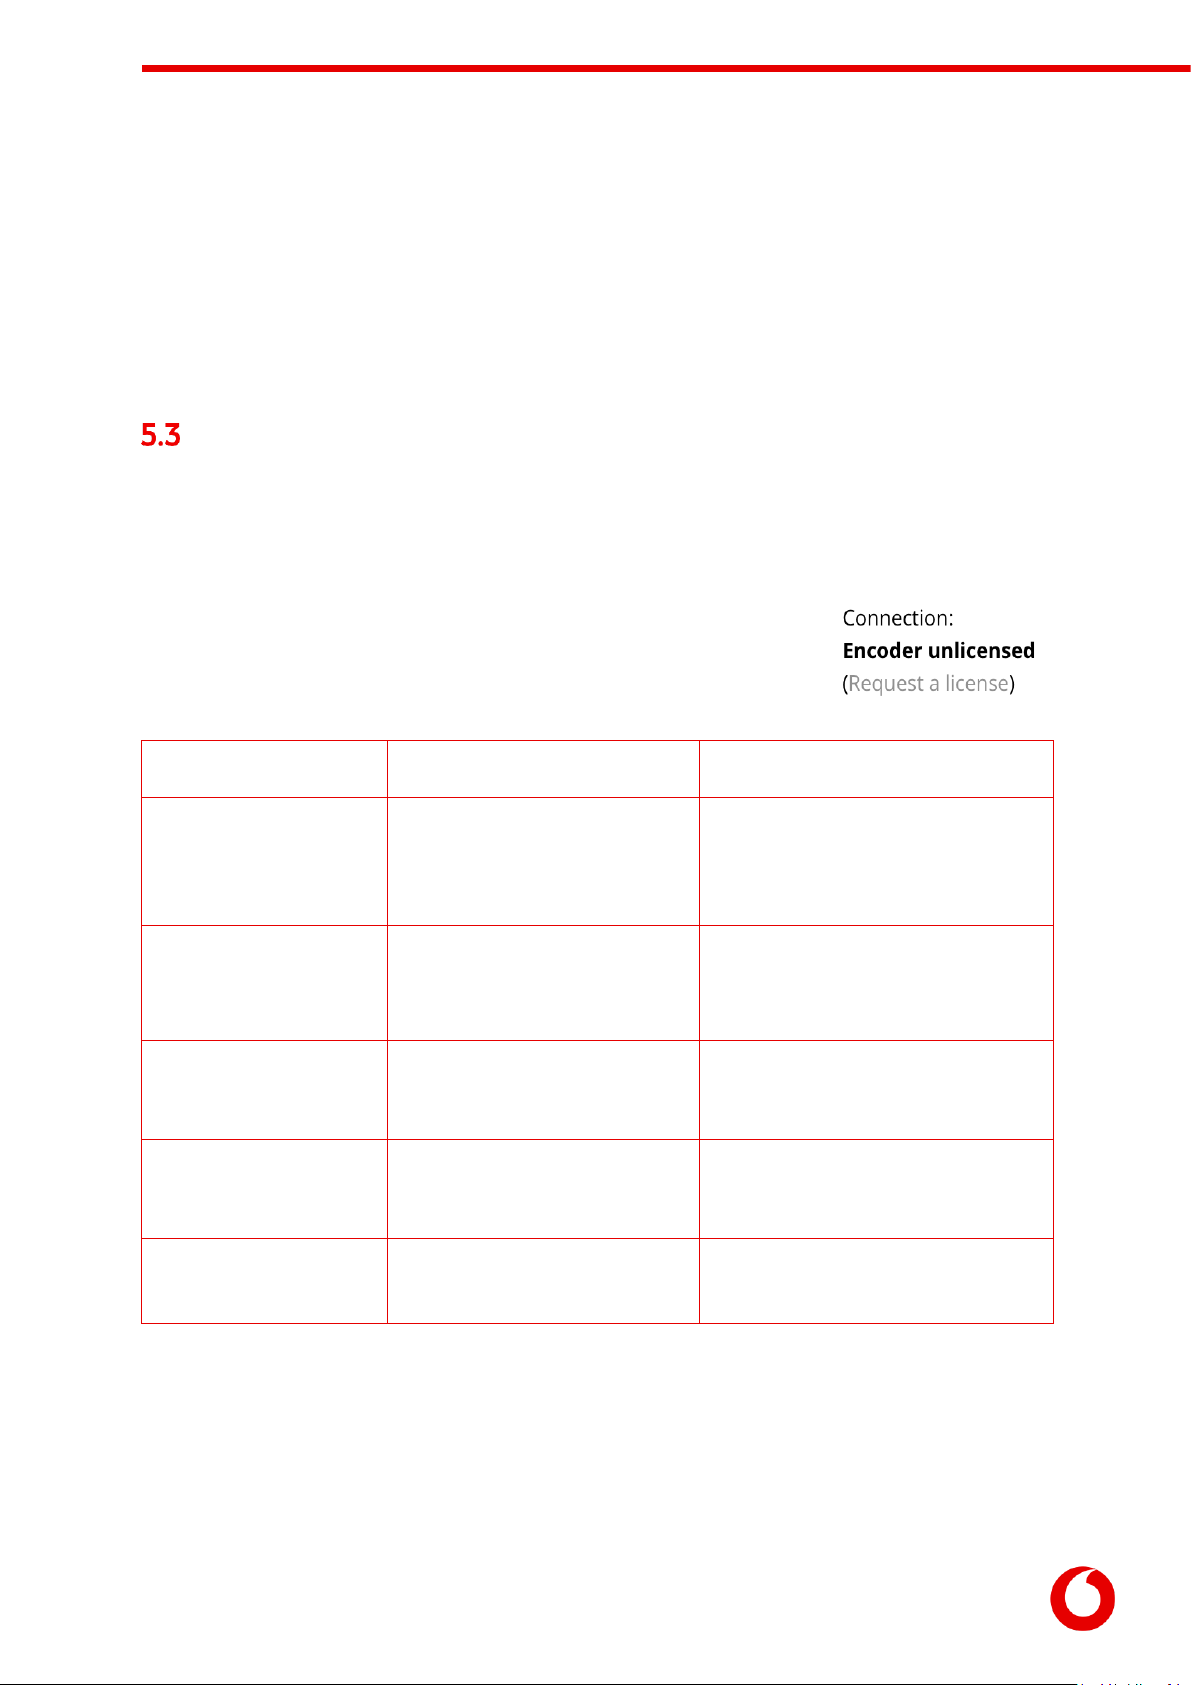
5.2.2 Encoder Licensing
Encoders must also be licensed to connect to a Vodafone Business Surveillance Server. This can be done
during the account creation on Vodafone Business Surveillance Server or, if no licence has been assigned,
be requested by the encoder during configuration
In no licence is currently assigned the Server Settings page will provide a link where the user can request
a licence from the server (if available). The form will also show the features enabled within the selected
licence.
Step 3 - Adding video feeds to the encoder
There are two main ways to add an IP camera:
FastConnect –designed to make it simple to add new cameras ‘out-of-the-box’ directly to an
encoder, without the need for the user to know the camera IP Address or configure the camera in
advance of connection.
Auto-Discover –designed for discovering cameras, either directly
connected to the encoder or through a LAN connection that has
already been configured with the correct network settings.
Consider the following questions when deciding which method to use:
FastConnect
Auto-Discover
Who is it for?
Users with new Axis, Bosch or
Canon cameras who are directly
connecting the camera to the
encoder
Users of a compatible camera who
have configured the camera to be on
the same network subnet as their
encoder
Suitable for one-to-one
connections between
camera and encoder?
YES
YES
Suitable for finding
cameras on a LAN
network?
NO
YES
Supports adding more
than one camera per
port?
NO
YES
Compatibility
Axis, Bosch and Canon cameras
on the compatibility list
Any named camera on the camera
compatibility list
Vodafone Business Surveillance –IP470 Installation User Guide
C1 –Public
Page 17
Prerequisites
- Camera must have default IP
Address and default admin
password set.
- Camera must be connected
directly to the device.
- The LAN port configured for use
on the Series device must be set
for Static IP.
- Encoder LAN port in use can either
be set to static IP for direct
connection or configured to connect
to a LAN network.
- Camera must be pre-configured with
an IP Address that can be accessed by
the encoder (usually on the same
sub-net)
As the IP470s do not have an analog input, an analog to digital converter/encoder is needed, if a customer
requires them to be connected to an analog camera. Axis Single Channel Encoder is the recommended
converter for this solution. They can be powered over Ethernet or with an additional power source.
5.3.1 Adding an IP camera using FastConnect
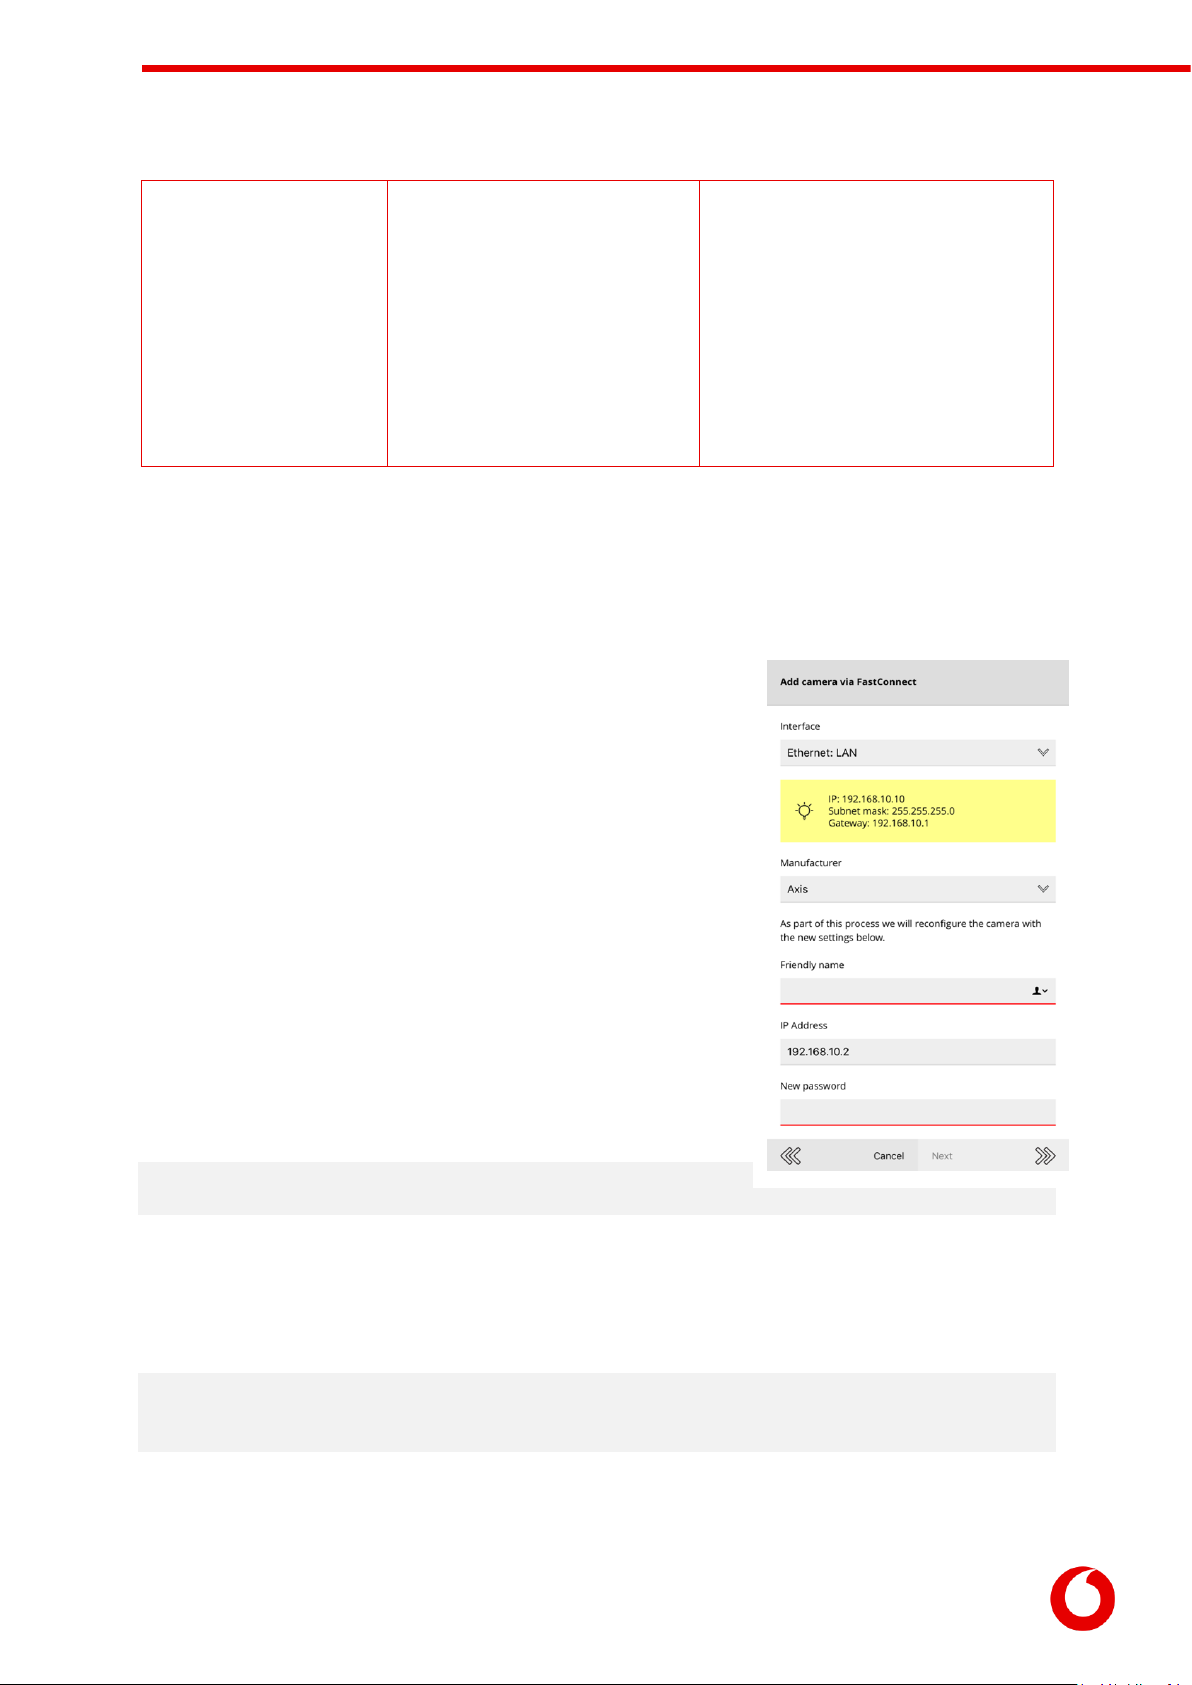
From the Camera Settings page click the Add button to start the Add
Camera wizard.
Select the Add a camera via FastConnect menu option.
Select the network interface the camera is directly attached
to.
Select the brand of camera you are adding to the encoder.
Enter a friendly name that Vodafone Business Surveillance
should use to refer to this camera
Enter a new administrator password for the IP camera
Please take note of both the new IP Address and password, as these
may be required later if configuring the camera through its web
configuration pages.
The next stage is for the encoder to then attempt to find the camera
attached to the device, and if found, will reconfigure the camera and
add it to the list of cameras connected to the encoder.
NOTE: This will only succeed if the camera has factory default settings,
including all network settings.
5.3.2 Auto discover a connected IP Camera
For cameras that are not configured using FastConnect, it is recommended to search for the camera using
the Search local network for cameras menu option.
NOTE: The IP camera and the port (on the encoder) it is connected to must have compatible IP Address settings.
Usually this means that the IP Address of the camera, and address of the encoder port must both be 192.168.X.Y,
where X is the same, but Y is unique on the network.
The encoder will search all enabled network interfaces for IP cameras and display a list of all cameras
available.
To select a camera, click on its entry in the list.
Vodafone Business Surveillance –IP470 Installation User Guide
C1 –Public
Page 18
This will then prompt for:
A friendly name that Vodafone Business Surveillance should use to refer to this camera
The login details of the camera (required for most cameras)
Whether to allow Vodafone Business Surveillance Client to access the camera’s web interface via
SecureConnect
Once entered the camera should now be added to the encoder’s list of video feeds.
If the desired camera is not listed in the discovered cameras, it may still be possible to add the camera, either
by reconfiguring the camera/encoder’s network settings to match or by adding the camera manually.
Appendix offers some advice and trouble-shooting tips if required.
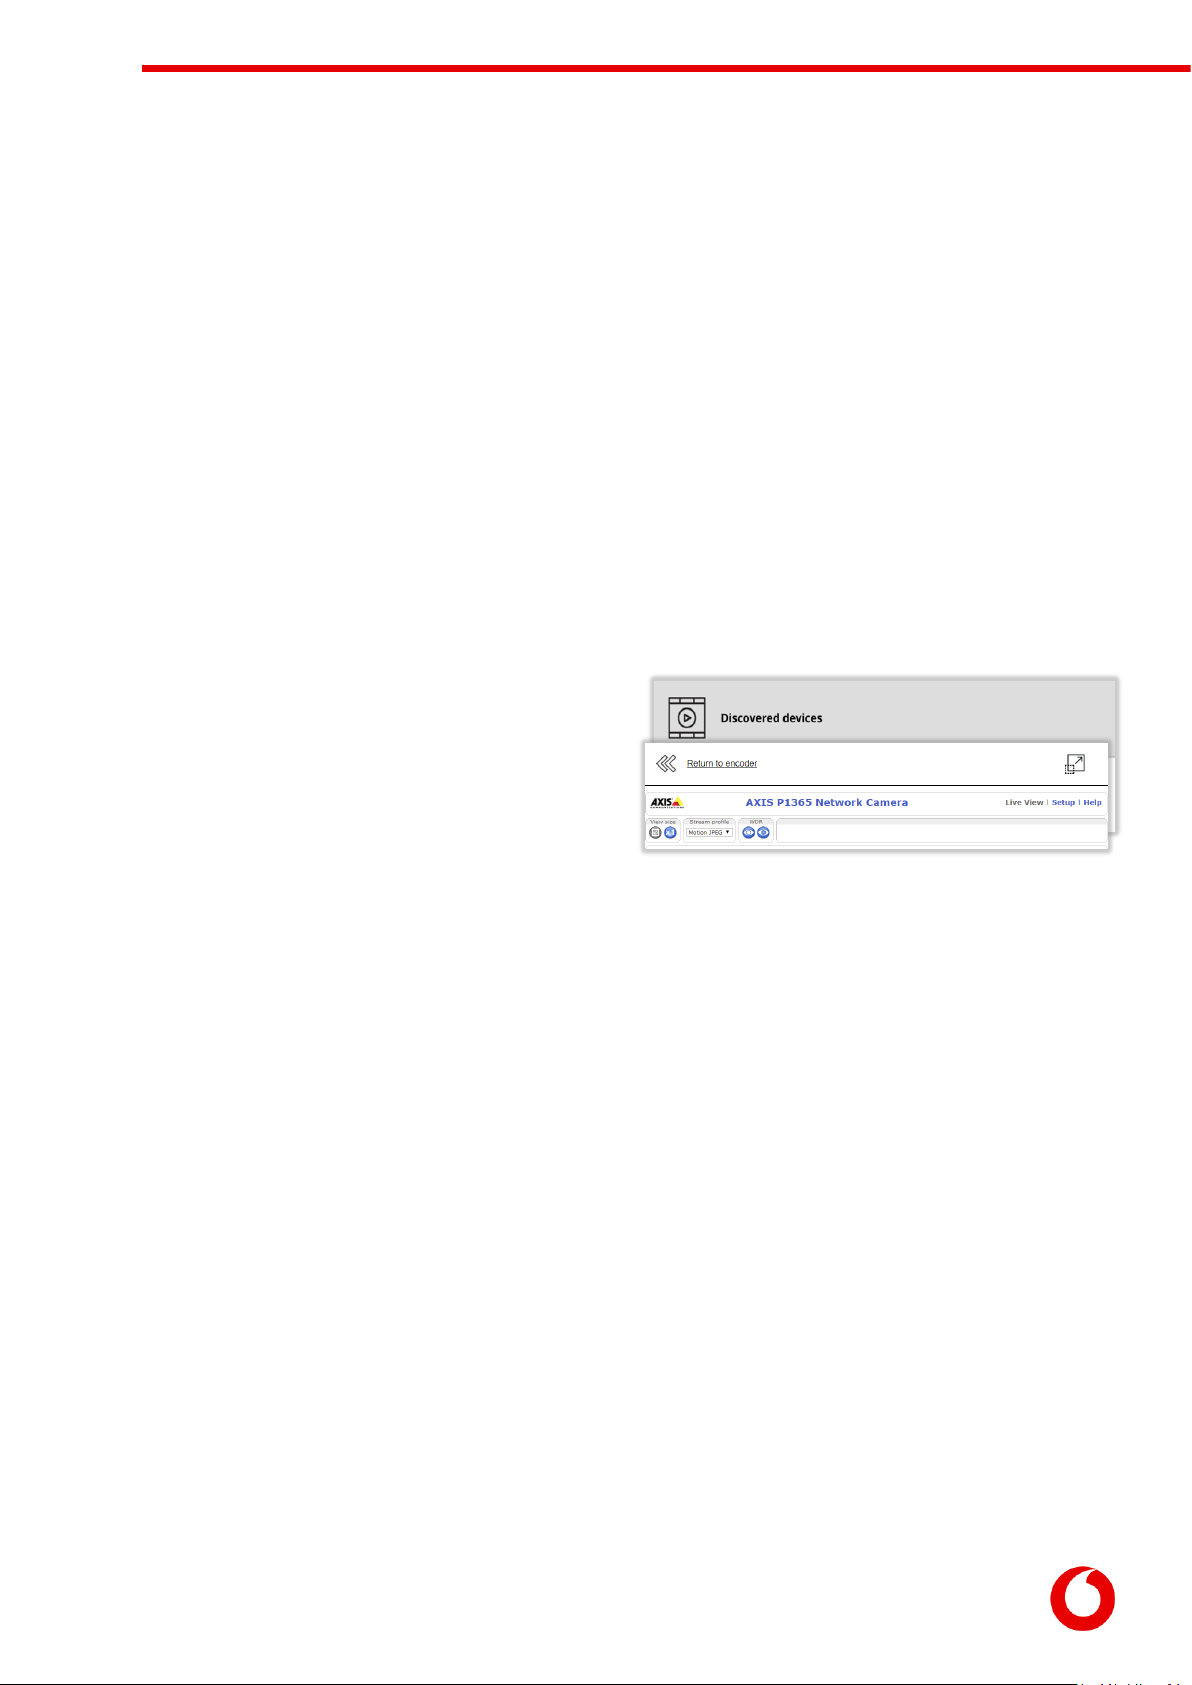
5.3.3 Connecting directly to attached IP cameras
The camera details page allows the user to connect directly to the web interface of any IP camera by
proxying the data via the configuration web page. This functionality can be accessed by selecting the
Connect directly to this camera menu option. This feature allows for easier configuration of any camera
specific settings that require the camera’s web interface.
The Return to encoder button can be used to navigate
back to the encoder configuration pages. The button in
the top right of the page will open the camera’s web
interface in a new browser window, which may be
required if the camera web interface fails to load.
5.3.4 Special instructions for Axis camera users
ONVIF access is enabled by default on any new ONVIF-capable Axis devices, and it should be possible to
add a new camera without issue. However, if the user uses the camera independently of the encoder (and
sets a new root password on the camera using the web interface) ONVIF access is automatically disabled.
To re-enable ONVIF access:
1. Use the Connect Directly feature described above or from a PC, access the camera’s interface
using a web browser (http://<camera IP address>/)
2. Click Setup from the main page
3. Navigate to System Options -> Security -> ONVIF
4. Click Add to create a new user in the Users List
5. Enter a username and password, and ensure the User Group is set to Administrator
This user is only for ONVIF access, and is separate from users created in System Options ->
Security -> Users
6. Navigate to System Options > Advanced > Plain Config
7. From the dropdown menu Select a group of parameters to modify and click WebService.
8. Click Select Group
9. Un-check Enable relay attack protection
10. Click Save
Vodafone Business Surveillance –IP470 Installation User Guide
C1 –Public
Page 19
It should now be possible to add the Axis camera to the encoder.
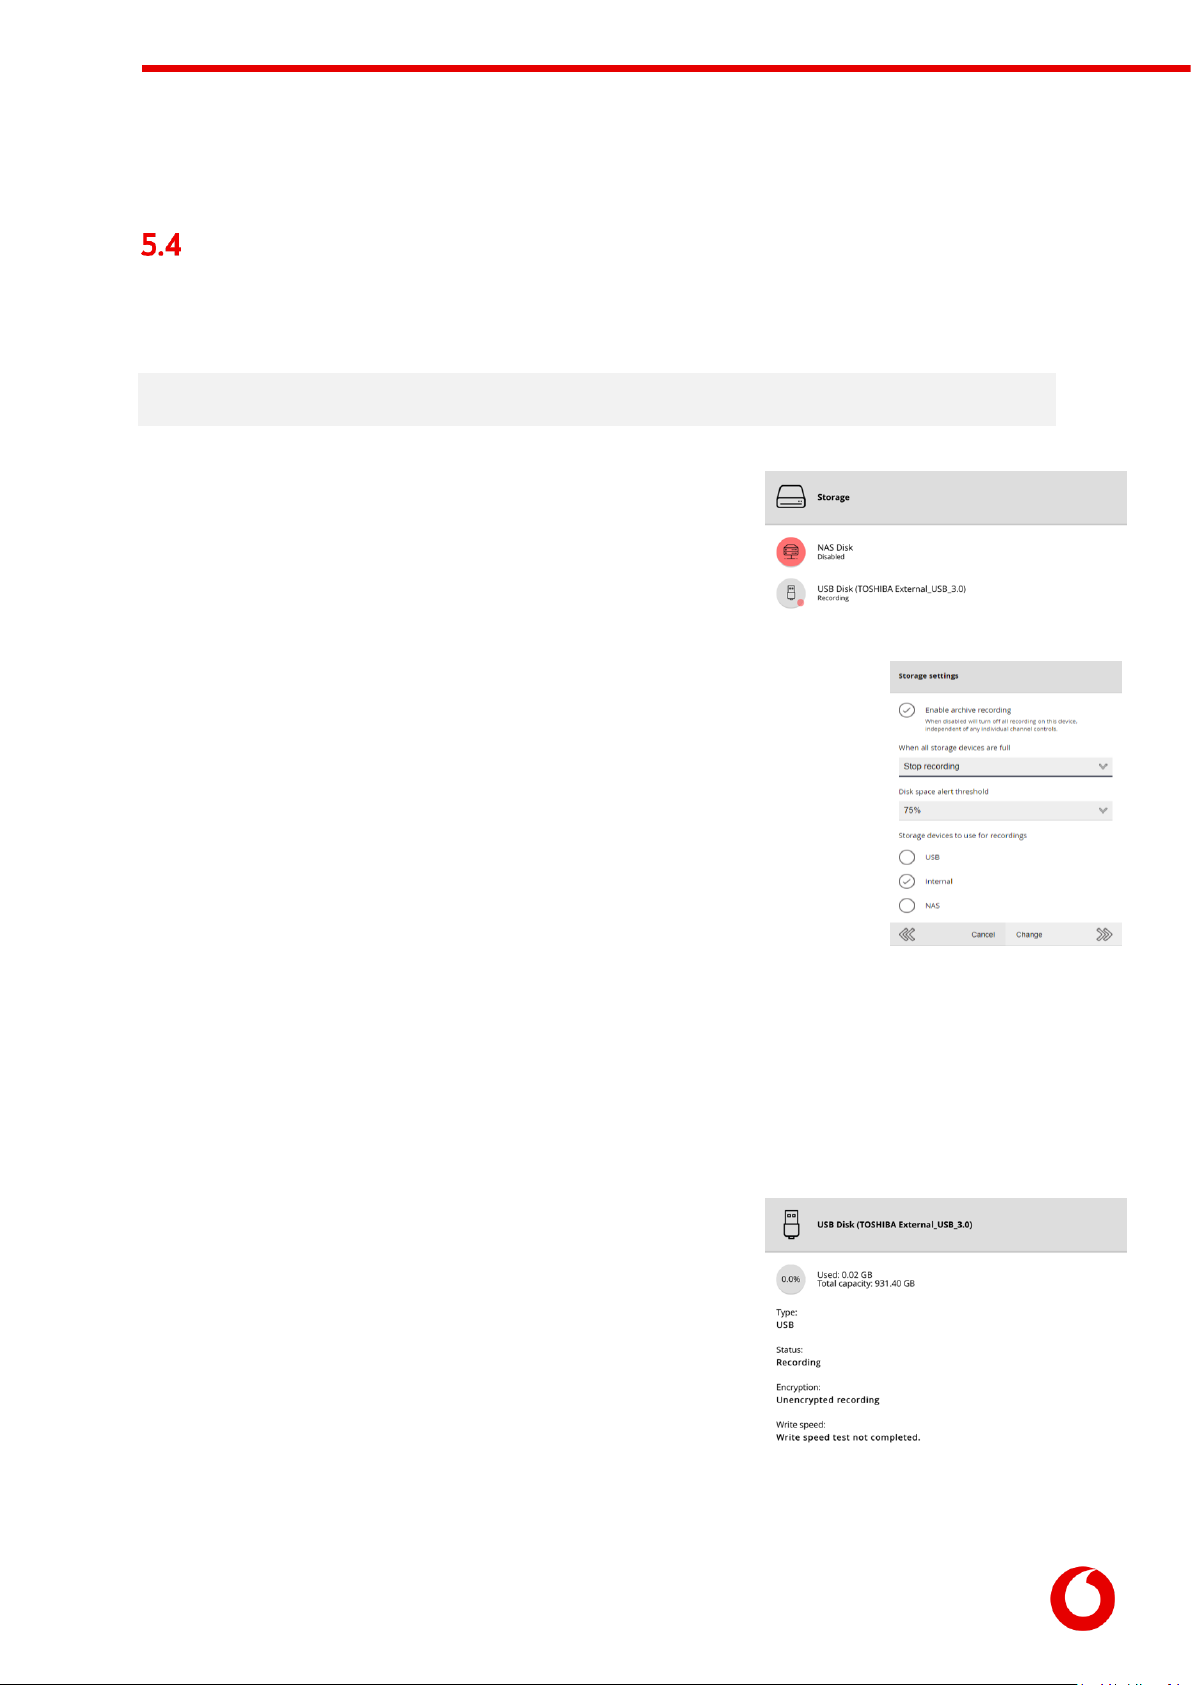
Step 4 –Setting recording settings
An encoder can save recordings to an internal or external USB Disk (Fat32 formatted, at least 20GByte, USB
3.0 preferred). External NAS Disk is supported as a beskope option.
Note: The maximum supported capacity on an internal or external hard drive is 2TB. It is possible to use larger drives,
but they must be formatted by the encoder and the recording space will be reduced to 2TB.
The Recording Storage page will list all available recording locations.
If multiple locations are available, the encoder will pool the locations to
increase the available storage duration.
The Storage Settings menu option can be used to configure various aspects of the
recording. For security reasons, it is possible to enable/disable individual types of
recording devices (or to turn off recording entirely).
When all storage devices become full it is possible to either:
Overwrite oldest recordings (default)
Stop recording
When stop recording is selected the encoder will start to send out notifications when
each disk starts to become full (the threshold is configurable).
To view the settings and status of a recording location select it from the list.
As well as showing the status of the device (including how full it is) it also allows the user to format the
drive, or safely eject the drive from the encoder.
Users wishing to use a NAS drive will require the Windows file share information:
The IP Address of the NAS (e.g. 192.168.10.12)
The name of the share (e.g. share)
The username/password to connect to the NAS
Recording drives can also be speed tested to determine if the storage
device is fast enough for recording purposes.
Vodafone Business Surveillance –IP470 Installation User Guide
C1 –Public
Page 20
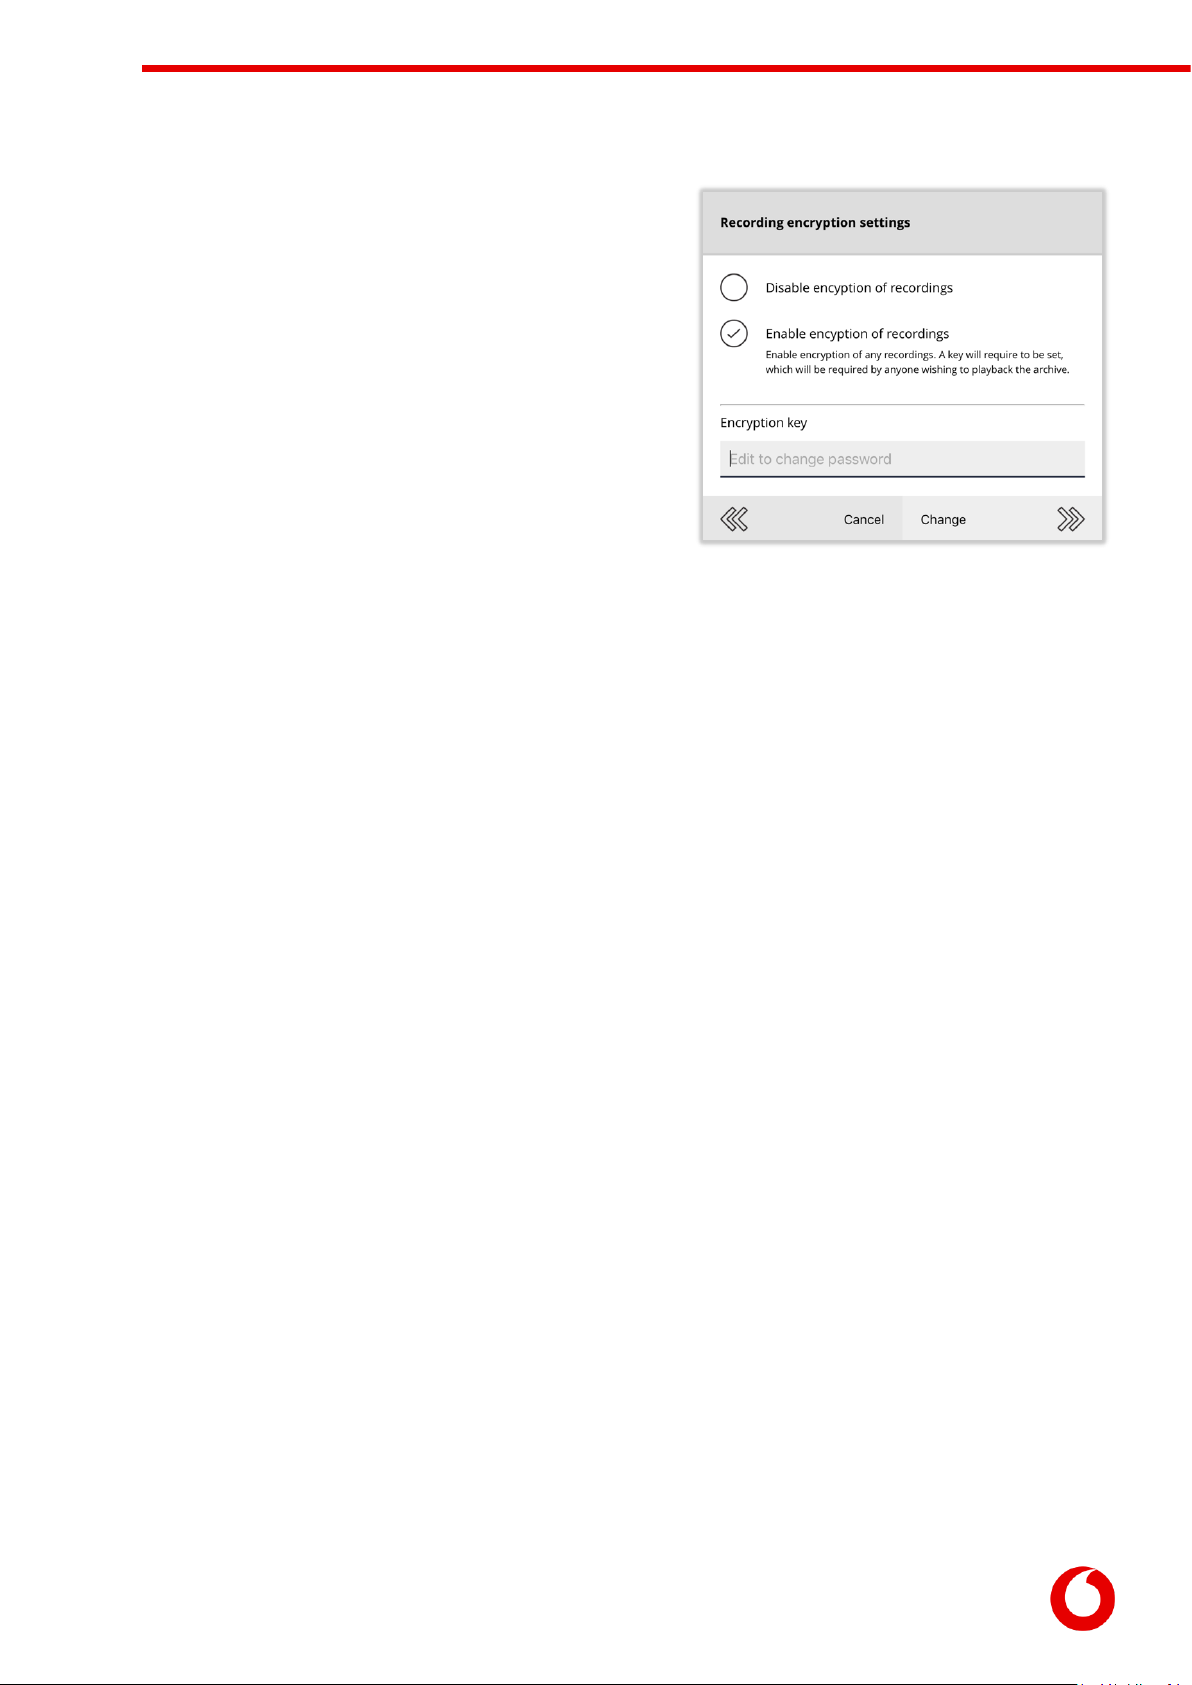
5.4.1 Setting the recording encryption
settings
By default, the encoder will not encrypt or password protect
the recordings. This allows the recordings to be played on any
PC by anyone who has the appropriate playback software.
Using the Recording Encryption Settings menu option, it is
possible to encrypt the recordings so that only those with the
encryption key can review the recordings on the disk.
Changing the recording key will stop recording until all
attached recording disks are reformatted.
Table of contents


