Digital Innovations Automax Motorized Disc Repair System User manual
TM
USER'SGUIDE
©2005 Digital Innovations, L.L.C. All Rights Reserved
Printed in China
Form# LA059A1
Register online at www.digitalinnovations.com
Service and Warranty Information
LIFETIME WARRANTY
The Digital Innovations “Doctor Series” Motorized AutoMax Disc Repair System is warrantied for life. If your device fails
to perform to specifications for any reason, simply return your device directly to Digital Innovations, and we will repair or
replace your unit at no cost. This warranty does not apply to resurfacing wheels, resurfacing fluid, fluid bottles, drying
cloths, or felt buffing squares. Some restrictions apply outside the United States.
THIS WARRANTY IS IN LIEU OF ALL OTHER WARRANTIES, EXPRESSED OR IMPLIED, INCLUDING
WAR RANTIES OF MERCHANTABILITY OF FITNESS FOR A PARTICULAR PURPOSE, AND NO PERSON OR
REPRESENTATIVE IS AUTHORIZED TO ASSUME FOR THE COMPANY ANY OTHER LIABILITY IN
CONNECTION WITH THE SALE OF THIS PRODUCT.
THIS WARRANTY EXCLUDES INCIDENTAL OR CONSEQUENTIAL DAMAGES ARISING FROM THE USE
OF THIS PRODUCT.
Some states in the U.S. do not allow the exclusion of incidental or consequential damages, so the above exclusion may
not apply to you. This warranty gives you specific legal rights and you may also be entitled to other legal rights required
by your state.
For more information on any or all of these tips, as well as troubleshooting suggestions
and Frequently Asked Questions, visit our website,
www.digitalinnovations.com
Patents #5,423,103 and #5,964,650
Other Patents Pending Worldwide
Phone (Customer Support) 1-888-SMART-58 (Hours: 8:30 AM to 4:00 PM, CST Monday-Friday)
Important Safety Instructions
The Digital Innovations
“Doctor Series” Motorized AutoMax Disc Repair System
has been manufactured and
tested with your safety in mind. Please read and observe all safety points outlined in this guide for operating your
new product and save them for future reference. Observing these simple precautions can help you get many
years of enjoyment and safe operation from your new product.
Care Guidelines
•This product should be situated away from heat sources such as radiators, heat registers, stoves, or other
products (including amplifiers) that produce heat.
•Do not use this product near water. This includes, but is not limited to sinks, tubs, basins, pools as well as
wet floors.
•Use only exact replacement parts and accessories as specified by Digital Innovations, as using not
recommended parts may cause irreparable damage to the unit and disc.
•When using the Power Adapter consider the following:
-Always unplug product from electrical outlet before cleaning
-Improper use can result in potential electrical shock or fire
-This product should be operated only from a type of power source indicated on the label.
-Power supply cords should be routed clear of foot traffic and any items that may put pressure on or
cause pinching of the cord.
-Pay close attention to portions of the cord nearest to the plug and product entry point.
-To avoid possible damage by power surges, unplug unit from electrical outlet when not in use
-Do not overload wall outlets and extension cords as this can result in electric shock or fire
-Use only exact replacement parts and accessories as specified by Digital Innovations, as using not
recommended parts may cause irreparable damage to the unit and disc.
Service
• Do not attempt to service this product yourself. Contact Digital Innovations for any service-related
questions.
• Contact Digital Innovations for service information if:
- The product has been dropped or the housing has been damaged
- The product exhibits a distinct change in performance
- The product has been exposed to rain, water, or liquid
- An object has fallen into the unit
- The power supply cord or plug is damaged
Getting StartedIntroduction
Congratulations! You’ve just purchased the world’s leading disc repair solution. Digital Innovation’s
“Doctor
Series” Motorized AutoMax Disc Repair System
uses motorized, patented radial wheel technology to
automatically fix most scratched optical discs including music CDs, DVDs, game discs, photo discs and data
CD-ROMs. Your
“Doctor Series” Motorized Automax Disc Repair System
will help your discs to maintain
their optimal play condition for years to come!
Tips
Your "Doctor Series" Motorized AutoMax Disc Repair System is proven to repair the primary causes of skipping and distortion in
music, movie, photo, data and game discs.
We have put together the following helpful hints and tips to ensure the optimal results to your disc repair. If after following and
reviewing this information, you are not completely satisfied, please visit our website for a demonstration OR call us at 1-
888-SMART-58, between 8:30 am and 4:00 pm CST Monday through Friday. We want to hear from you!
•The final buffing step will help prevent new problems and ensures best repair results. You can buff as hard as you want, as it will
not harm the disc. Store buffing square as recommended to keep it clean and free from debris which could cause scratches.
Replacement felt is available from your local retailer or directly from Digital Innovations.
•Adisc’s play-side is usually the “shiny” side and the label side is the “dull” side.
•To remove and replace a Resurfacing Wheel:
- If a disc is in the Disc Slot, remove it.
- Gently pull the existing Resurfacing Wheel from the Resurfacing Unit. To do this, pull wheel away from wheel hub with
fingers and remove.
- Insert new Resurfacing Wheel, ensuring that protruding center of wheel is facing inward. Rotate wheel to align hub and
wheel and press firmly to seat.
•If the disc is not completely repaired on the first try, repeat until completely fixed or no further improvement is evident. If the disc
still skips, your disc player may need cleaning, repair, or disc scratch may be too deep. Also, examine disc for label-side
damage. Test with a disc that you know is not damaged.
•Discs with label side damage cannot be repaired by any method. To identify label side damage:
- Scratches visible on the label side of a disc are always due to label-side damage, but the reverse is not always true. Label
side-damage can look like play-side damage when viewed straight-on from the play-side. Here’s how to check:
- Method #1- Hold the disc a foot or so from a light source with the play (shiny) side facing you. If you can see through a
scratch, that scratch is definitely on the label side. If you can’t see through the scratch, it is probably on the play-side. Use
Method #2 to be sure.
- Method #2- Tilt disc so you are looking at the scratch from an angle If the scratch has a reflection in the surface of the disc
then the scratch is on the play-side. If not, the scratch is on the label side.
•Circumferential scratches (curved scratches that lie in a direction around the disc) are more likely to cause problems than radial
scratches (that run from inside center to outside rim of disc).
•Store the "Doctor Series" Motorized AutoMax Disc Repair System in a dust-free environment at room temperature. If it is stored
in a warmer or cooler temperature, allow it to return to room temperature before using.
•It is very important to keep discs wet during the resurfacing process, or discs may become damaged.
•To maximize resurfacing life, rinse wheel under cold water after each use. Do not let soak for long periods of time.
•The same disc can be repaired multiple times.
•If the units batteries are drained such that the disc does not complete a full cycle before it is ejected, replace the batteries.
•If attempting to repair 30 or more discs at one time, a DC power adapter (optional) is recommended.
Key Features and
Benefits
• Safe and effective patented design fixes virtually
any type of scratched disc
• Easy to use, motorized operation
• Automatic power-on, disc-resurfacing and disc-
ejection feature
• Convenient desktop design
• Repair-function LED
• Integrated cloth and bottle storage
• Lifetime warranty
• 2 convenient power options: battery-operated
(requires 6 AA batteries, not included) or DC
power adapter (sold separately)
Repair System Includes:
1- Resurfacing Unit
1- Resurfacing Wheel
1- Disc Resurfacing Fluid Bottle
1- Drying Cloth
1- Felt Buffing Square
1- User’s Guide
Please be sure to register your
new device on-line at
www.digitalinnovations.com
Note: To ensure optimal repair
for your damaged discs, please
read all instructions thoroughly!
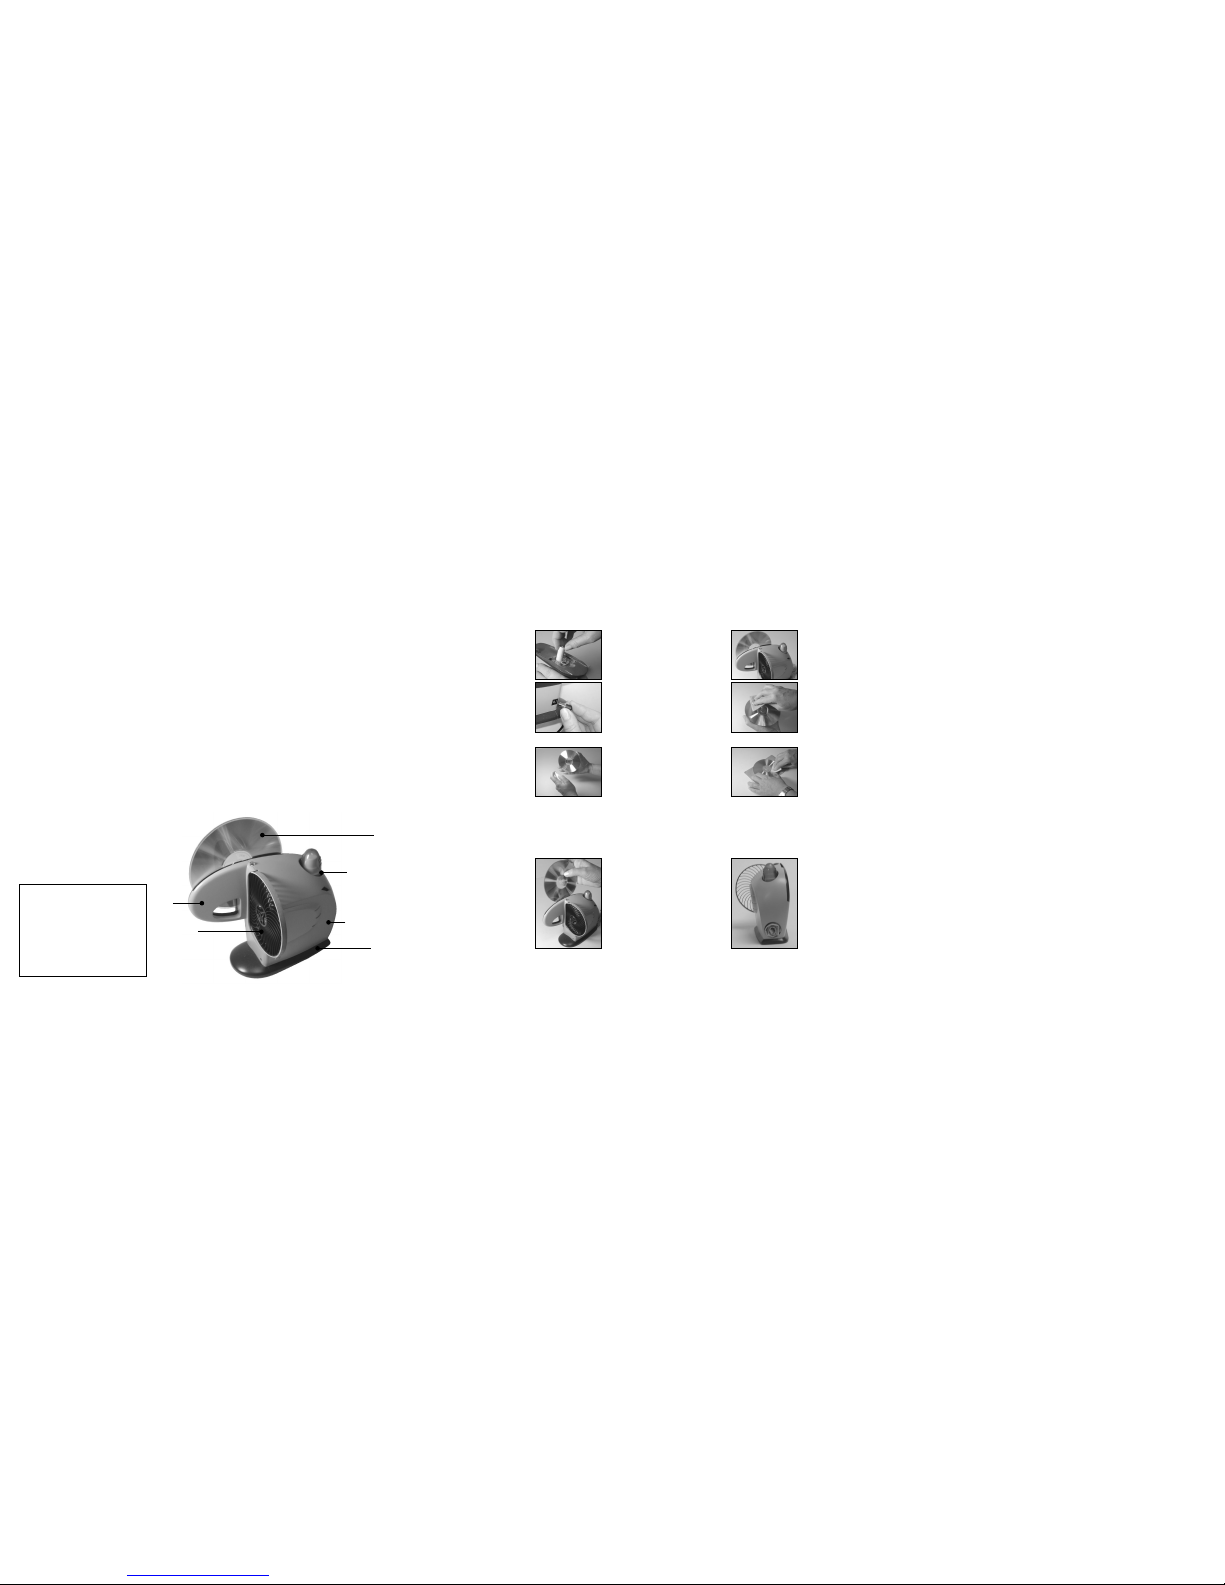
Disc
Disc
Holder
Resurfacing
Wheel
Base
Storage for
Fluid Bottle
Storage for
Drying Cloth,
Felt Buffing
Cloth
1. Open battery door on
bottom of unit and insert
6 AA batteries (alkaline
recommended). If using
optional DC power
adapter (sold separately),
plug transformer into
electrical outlet.
Plug jack into unit base.
4. Disc will rotate inside
device for about 1 minute.
When repair process is
complete, unit will
automatically eject disc.
Remove disc from device
and dry off any excess
moisture using provided
drying cloth.
2. Generously spray entire
play-side of damaged disc
(the side opposite disc
label), using provided
Resurfacing Fluid.
Resurfacing Fluid is
completely safe and
environmentally-friendly.
5. IMPORTANT!!! Place disc
(play-side up) on protected
flat surface. Using Felt
Buffing Square, buff
resurfaced, dry disc
thoroughly. Buffing restores the disc’s shiny
appearance, and ensures optimal disc
performance. Scratches do not have to be
removed completely for the disc to play perfectly.
3. Gently insert disc
completely into Repair
System's disc slot with
play-side of disc facing
Resurfacing Wheel.
Device will power-on
automatically and begin
repair process.
6. When not in use, the
Drying Cloth, Felt Buffing
Square and Resurfacing
Fluid Bottle can be stored
conveniently in unit as
shown.
Note: The "Doctor Series" Motorized
AutoMax Disc Repair System will not repair
severe damage such as gouges and deep
scratches, label side damage and warping.
This manual suits for next models
1
Other Digital Innovations Storage manuals


Popular Storage manuals by other brands

Memtech
Memtech AT3550 Wolverine user guide

QNAP
QNAP TS-h 83XU-RP Series user guide

Sony
Sony SF SERIES operating instructions

Cavalry
Cavalry CAU3G Firmware instructions

Kingston Technology
Kingston Technology DataTraveler Locker+ G3 installation guide

Overland Storage
Overland Storage PowerLoaders AIT-2 User & installation manual


