Digitalis Digitarium Zeta User manual
Digitarium® Zeta Portable
Digital Planetarium System
Version 1.8
May 15, 2019
®®®®®®®®®®®®®®®®®®®®®®®®®®®®®®®®®®®®®®®®®®®®®®®®®®®®®®®®®®®®®®®®®®®®®®®®®®®®®®®

Table of Contents
Introduction......................................................................................................................3
Features of Note.............................................................................................................. 4
Safety............................................................................................................................... 4
Feature Identifier..............................................................................................................5
Set U and Turning on the System..................................................................................6
Set U .........................................................................................................................6
Power On/Begin Projection.........................................................................................7
Focusing the Lens...........................................................................................................7
Centering the Lens..........................................................................................................8
Turning off the System.....................................................................................................8
Packing............................................................................................................................9
Lens Installation and Removal.........................................................................................9
Transit Case Packing Diagram..................................................................................10
Projecting Other Video Sources.....................................................................................11
Maintenance..................................................................................................................11
Lens Care..................................................................................................................11
Lam Life..................................................................................................................11
Assembly....................................................................................................................... 12
First Time Projector Setu .........................................................................................12
Remove Stock Lens..................................................................................................13
Swa Lens Mount.....................................................................................................14
Mount Projector to Frame..........................................................................................14
Disassembly...................................................................................................................16
Recommended Projector Settings.................................................................................17
Basic Troubleshooting...................................................................................................17
How to Get Hel .............................................................................................................19
Product S ecifications...................................................................................................19
Co yright 2006-2019, Digitalis Education Solutions, Inc. All rights reserved.
The Digitalis Education Solutions, Inc. logo is a trademark and Digitarium is a
registered trademark of Digitalis Education Solutions, Inc.
817 Pacific Avenue / Bremerton, WA 98337 USA
DigitalisEducation.com / Phone: +1.360.616.8915
Digitarium® Zeta Portable User Manual 2

Introduction
The Digitarium Zeta ortable digital lanetarium system is a full-featured system ideal
for ortable or fixed domes u to a roximately 12.2m/40 ft in diameter.
Our design goal was a lanetarium system for the small to medium dome market that
was sim le to set u and use, ortable, full-featured, and affordable, with excellent
rojection quality.
You will get the most out of your system if you understand the com onents of which it
consists. The Digitarium Zeta system is com rised of a com uter control unit (the
Digitarium ), a DLP rojector, and two remote controls. The com uter control unit runs
lanetarium and media software which are controlled by a Digitarium infrared remote
control.
The Digitarium com uter control unit roduces video out ut which is rojected onto a
dome by the DLP rojector using our own ro rietary fisheye lens. The DLP rojector
has its own remote control which is used to change settings, such as lam brightness
and video sources, and to view or reset lam usage.
The DLP rojector remote control gives access to many rojection s ecific settings, but
we recommend that you do not modify these unless you are confident in your
knowledge. Im ro er settings can otentially disable your Digitarium system.
Available as an o tional add-on, our Universal Console interface is a cross- latform,
web-based a lication that enables you to easily control your Digitarium lanetarium
system over a wired or wireless network. In a ortable dome, you could run the
Universal Console on an A le iPad®, which would allow you to teach from anywhere in
the dome while also roviding finer control over your resentations. Learn more about
the Universal Console at DigitalisEducation.com.
Please review ALL manuals before attempting to use your system!
●This user manual is designed to rovide a general system overview.
●The Digitarium Software user manual ex lains how to interact with the system
using the remote control.
●The Digitarium CU-1 user manual (or CU-Z user manual for Zeta 'Basic' models)
includes detailed information about the control com uter.
●The DLP rojector user manual rovides s ecific information about the DLP
rojector com onent.
Current versions of all user manuals are available on the Digitalis Community website:
htt ://Community.DigitalisEducation.com.
Digitarium® Zeta Portable User Manual 3

Features of Note
●Easy to use.
●O erated by backlit, handheld remote control or (o tional) Universal Console
interface from anywhere in the dome.
●Software is u dated over the Internet at your command.
●Dis lays images or videos and lays scri ts from a DVD, USB drive, or the internal
hard drive.
●Plays third- arty fulldome video shows.
●5.1 channel surround sound su ort with video.
●Scri ting feature allows you to create rerecorded segments or shows, including
image mani ulation, video, and audio. Read the scri ting documents on the Manuals
age of our Digitalis Community website for more information on writing scri ts.
●Removable lens with user adjustable focus and centering.
●High contrast and reliable DLP rojection technology.
●S ring assisted lift.
Safety
●We recommend removing the lens before shi ing the system long distance with an
outside carrier (i.e., not in your own vehicle). See the acking section for more
information.
●For ro er ventilation, always extend and lock the to frame in lace before
o erating the rojector.
●Be careful lifting the system due to its weight. We recommend using two eo le
when lifting the loaded transit case.
●Always lift the system by its frame, not by any of the individual com onents.
●To avoid overheating, make sure vents are not blocked and the air filter is ke t
clean.
●Always use the Digitarium system with a surge su ressor to avoid damage caused
by ower surges, which is not covered by your warranty.
●Do not stare into the lens while the rojector is rojecting as the light is very bright.
●Refer servicing to qualified service ersonnel.
●Change the lam at the end of its recommended life, or catastro hic failure can
result. The DLP rojector tracks how many hours the lam has been used. See the
DLP rojector manual for instructions on checking lam usage.
Security
The fisheye lens in your system is one of the most ex ensive com onents. Please note
that the lens is removable and could be a target of theft. Plan accordingly.
Digitarium® Zeta Portable User Manual 4
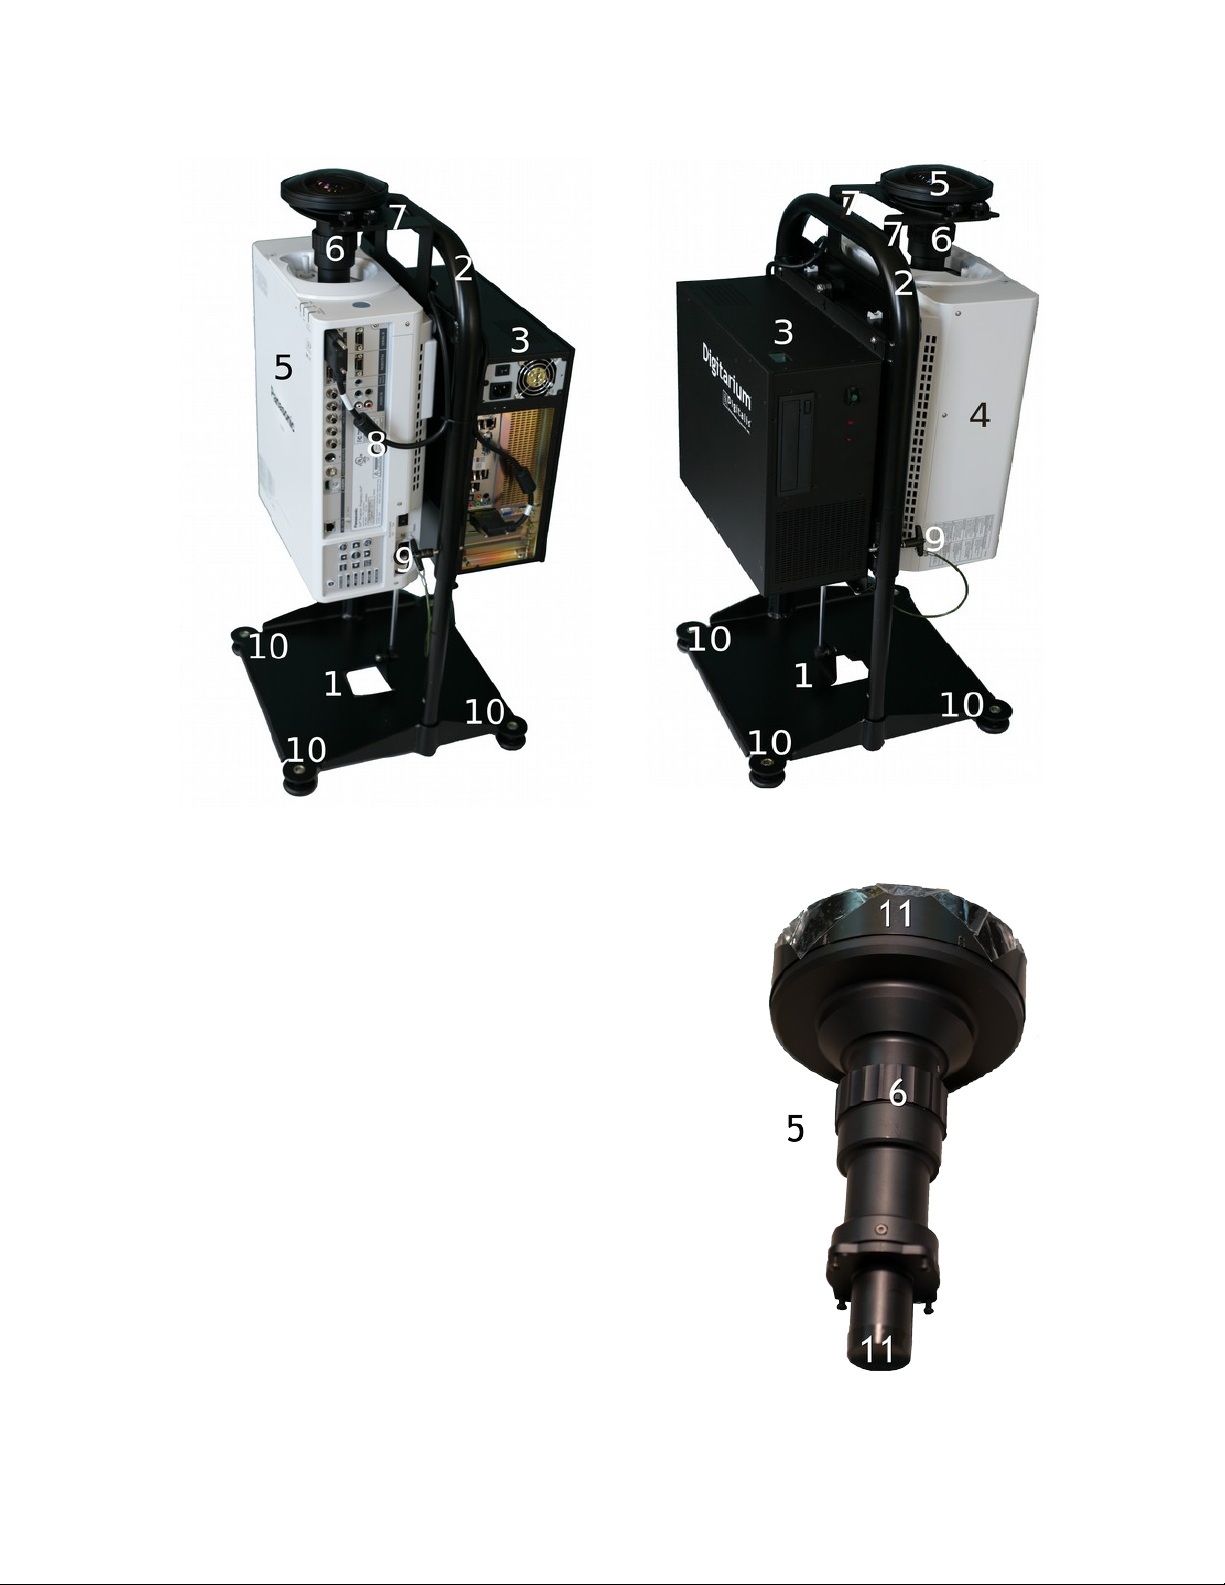
Feature Identifier
Features, as labeled in hotos:
1. Frame base
2. Frame to
3. Digitarium® Control Unit*
4. DLP rojector
5. Digitarium fisheye lens
6. Lens focus lock ring
7. Lens brace
8. Video cable (DVI version shown, HDMI cable is an
alternate)
9. Frame locking ins
10. Adjustable feet
11. Lens ca s (front ca shown with rotective shi ing
film, which can be removed)
* Zeta 'Basic' model may look slightly different than image.
Digitarium® Zeta Portable User Manual 5

Set p and Turning on the System
Before turning on the system, be sure to read the “Turning Off the System”
section on age 9 for instructions on turning it off. Do not sim ly switch it off.
Set p
If you are su lying your own rojector and need to assemble your system from a kit,
see “Assembly” on age 13. Otherwise if you need to install the lens, see “Lens
Removal and Installation” on age 9.
1. With the transit case standing on end (wheels on the floor), undo the two clas s
and o en the case.
2. Remove the cords and remote control(s) from the transit case.
3. Gras the frame by the curved handle. Pull the entire frame out of the case and
lace it on the floor. The transit case can now be stowed.
4. Position the system so that the rojector lens is roughly under the zenith of your
dome. For o timal cooling of rojector com onents in an inflatable dome, make
sure that the DLP rojector is facing the fan intake vent.
5. If necessary, use the leveling feet to correct for an uneven floor.
6. Remove the two ins near the base of the frame by ushing in the button on each
in handle and ulling straight back.
7. Pull u on the to frame to raise the lens to rojection height. (Note: You may want
to stabilize the frame during this rocess by lacing your foot on the frame base.)
8. When the frame reaches its travel limit, insert the ins into the holes from the
rojector side to hold the system in lace. You will need to ush in the button on
each in to insert it, and you may need to lightly ush down on the frame to line u
the holes.
9. Attach the ower cords to the Control Unit and DLP rojector (Note: The longer
cord is for the DLP rojector). Plug the other ends of the cords into a surge
rotector, uninterru tible ower su ly (UPS), or AC ower conditioner lugged into
an acce table AC ower outlet. These devices rotect against damage from
different ty es of electrical ower disturbances not covered under your warranty.
10.Plug in o tional PC s eakers (not included with urchase).
11.Remove the lens ca by lifting straight u ; do not twist the lens cap. If the ca is
tight, gently angle u one side. We recommend setting the ca on to of the frame
base so as not to mis lace it.
Digitarium® Zeta Portable User Manual 6

Power On/Begin Projection
1. Switch on the Control Unit and DLP rojector at their AC ower switches.
2. For Zeta systems with a CU-1, switch on the control unit by ressing the green start
button on the control unit. For troubleshooting, lease refer to your Digitarium CU-1
manual.
3. For Zeta 'Basic' models with a CU-Z, the control unit should ower on automatically
when the ower cable is lugged in. If it doesn't turn on automatically, you can
ress the ower button on the CU-Z remote control to turn the control unit on. For
troubleshooting, lease refer to your Digitarium CU-Z manual.
4. Press the ower button on the DLP rojector remote to turn on the lam .
5. Wait about 75 seconds. If you are using s eakers, you will hear a few musical notes
signifying that the control unit is ready. You will not hear these notes if you have a
start up script on USB or D D.
6. When ready, you will see the sky rojected onto the dome above you. If you see
only black or blue, refer to the troubleshooting section in this manual.
7. When Nightshade, the simulator, starts u , it will automatically run a scri t called
“/scri ts/startu .sts” if one exists in the control unit's USB drive or on the disk in the
DVD drive. For more information about scri ts, see the section entitled “Scri t
Playback Mode” in the Digitarium software user manual. Press if you want to
cancel the scri t.
8. If you want to make sure you are in the center of the dome, ress on the
remote control to bring u an azimuthal grid. Gently move the system as needed to
center the grid on the dome.
9. If the rojection is tilted, recheck the centering (see below for details).
10. If you are using the rojector at an altitude above 4,596 ft (1,400m), you will need
to change the fan setting to high altitude. Follow the directions in the DLP rojector
user manual to do this.
11. Don't forget to change your latitude, longitude, and time zone, if necessary, and
save your settings. Refer to the software manual for more information on this
rocess.
Note: You will robably notice a smell of hot lastic while the rojector is relatively new.
This is normal.
Focusing the Lens
If rojection seems blurry, refocus the lens. NOTE: Never touch the glass of the lens.
●Loosen the four thumb screws on the to of the lens brace.
●Hold the lens steady with one hand and loosen the focus lock ring on the lens
by turning it counter-clockwise.
●Gras the lens near the to , then slowly rotate it until rojection is focused.
●Hold the lens steady and tighten the lock ring by turning it clockwise.
Digitarium® Zeta Portable User Manual 7

●Push the lens brace clam s against the lens, making sure not to tilt the
rojection.
●Tighten the four thumb screws to hold the lens in osition.
Centering the Lens
You may need to center the lens if the rojected horizon is not level:
1. Loosen the four thumb screws on the lens brace clam s.
2. Loosen the white lens adjustment joystick on the rojector by twisting it
counterclockwise.
3. Tilt the joystick to move the lens into the ro er osition.
4. Tighten the white joystick by twisting it clockwise.
5. Push the lens brace clam s against the lens, making sure not to tilt the rojection.
6. Tighten the four thumb screws.
Turning off the System
To shut down your system, you should turn off the control unit first, and then the DLP
rojector.
To turn off the control unit:
1. With the remote control, use text menu item 8.3 (see the software manual for more
information). With the (o tional) Universal Console interface, ta the shut down
button on the Settings screen.
2. If desired, fli the Control Unit ower switch to the off osition (0) when the shut
down rocess is com lete.
To avoid corrupting the system, do not turn off the control unit during a
software update or while the indicator light is bright (indicates disk activity). If
necessary, you can simply turn off the control unit at the AC switch without
following step 1 above. However, this runs the risk of corrupting the system.
To turn off the DLP rojector:
1. Press the ower button of the DLP rojector or DLP rojector remote control twice.
It takes about two minutes to cool down the rojector lam safely. While cooling, the
ower indicator light will be steady orange.
2. Put the lens ca on the fisheye lens to rotect the lens.
3. When the DLP rojector ower indicator light is steady red, the rojector has
com leted its cooling rocess. You can now fli the ower switch to off (0).
Digitarium® Zeta Portable User Manual 8

Packing
1. Un lug the ower cords from the Control Unit and DLP rojector.
2. If necessary, screw the leveling feet as far as ossible into the frame base.
3. Remove the two frame ins by ushing in the central button on each and ulling
straight back.
4. Push down on the to of the frame to com ress it for acking. One strong motion
works best.
5. Insert the frame ins in the holes near the frame base.
6. If you need to remove the lens for trans ort, see the section “Lens Installation and
Removal” below.
7. Bring the transit case over and osition it on end, with the lid o en. The rojector
always goes in the left side of the case, next to the remote controls.
8. Gras the handle of the frame and lift the system slightly off the floor. Angle the to
of the frame slightly toward you, and tilt the bottom of the frame into the transit case.
Straighten out the frame and ush the system all the way into the case. If the system
gets stuck, gently tilt the transit case backward to the floor and let gravity assist with
acking.
9. Pack the ower cords, remote controls, user manual, and accessories in the
rovided s aces. See the hoto below.
NOTE: To avoid damage to the projector, we recommend removing the lens
before shipping the system with an outside carrier (i.e., not in your own vehicle)
or transporting it over rough terrain. Simply reverse the steps in the next section.
Lens Installation and Removal
When you first receive your system, you will need to install the lens as described below.
If you need to remove the lens, reverse the ste s below and trans ort the lens
se arately in a added box.
Follow these steps for Digitarium Zeta Portables sold before 2015:
1. Remove the fisheye lens from the box.
2. Loosen the four thumb screws on the lens brace clam s.
3. Make sure the lens focus lock ring on the lens mount is loose (not tightened all
the way clockwise).
4. Remove the small lens ca from the back end of the lens and the brightly
colored dust ca over the lens mount o ening.
5. Fit the small end of the fisheye lens into the lens mount o ening.
6. Grab the to outer rim of the lens, and rotate the entire lens clockwise
a roximately 20 turns.
7. You will need to adjust the focus after you have turned the rojector on. See the
section “Focusing the Lens” on age 7.
Digitarium® Zeta Portable User Manual 9

Follow these steps for Digitarium Zeta Portables sold in (or after) 2015:
1. Remove the fisheye lens from the box.
2. Loosen the four thumb screws on the lens
brace clam s.
3. Remove the bright red dust ca which
covers the lens mount o ening. Make sure
to remove any ta e which may have been
used to secure the ca .
4. Remove the small lens ca from the back
end of the lens.
5. Fit the small end of the fisheye lens into
the lens mount o ening, lining the silver
lunger on the lens with the small red dot
on the lastic lens mount cover (as shown
to the right).
6. Gently ush the lens downward into the
lens o ening.
7. Grab the to outer rim of the lens and
rotate the entire lens clockwise to lock it
into lace. You will feel a click as the
lunger finds its slot (as shown to the
right).
8. You will need to adjust the focus after you
have turned the rojector on. See the
section “Focusing the Lens” on age 7.
Digitarium® Zeta Portable User Manual 10
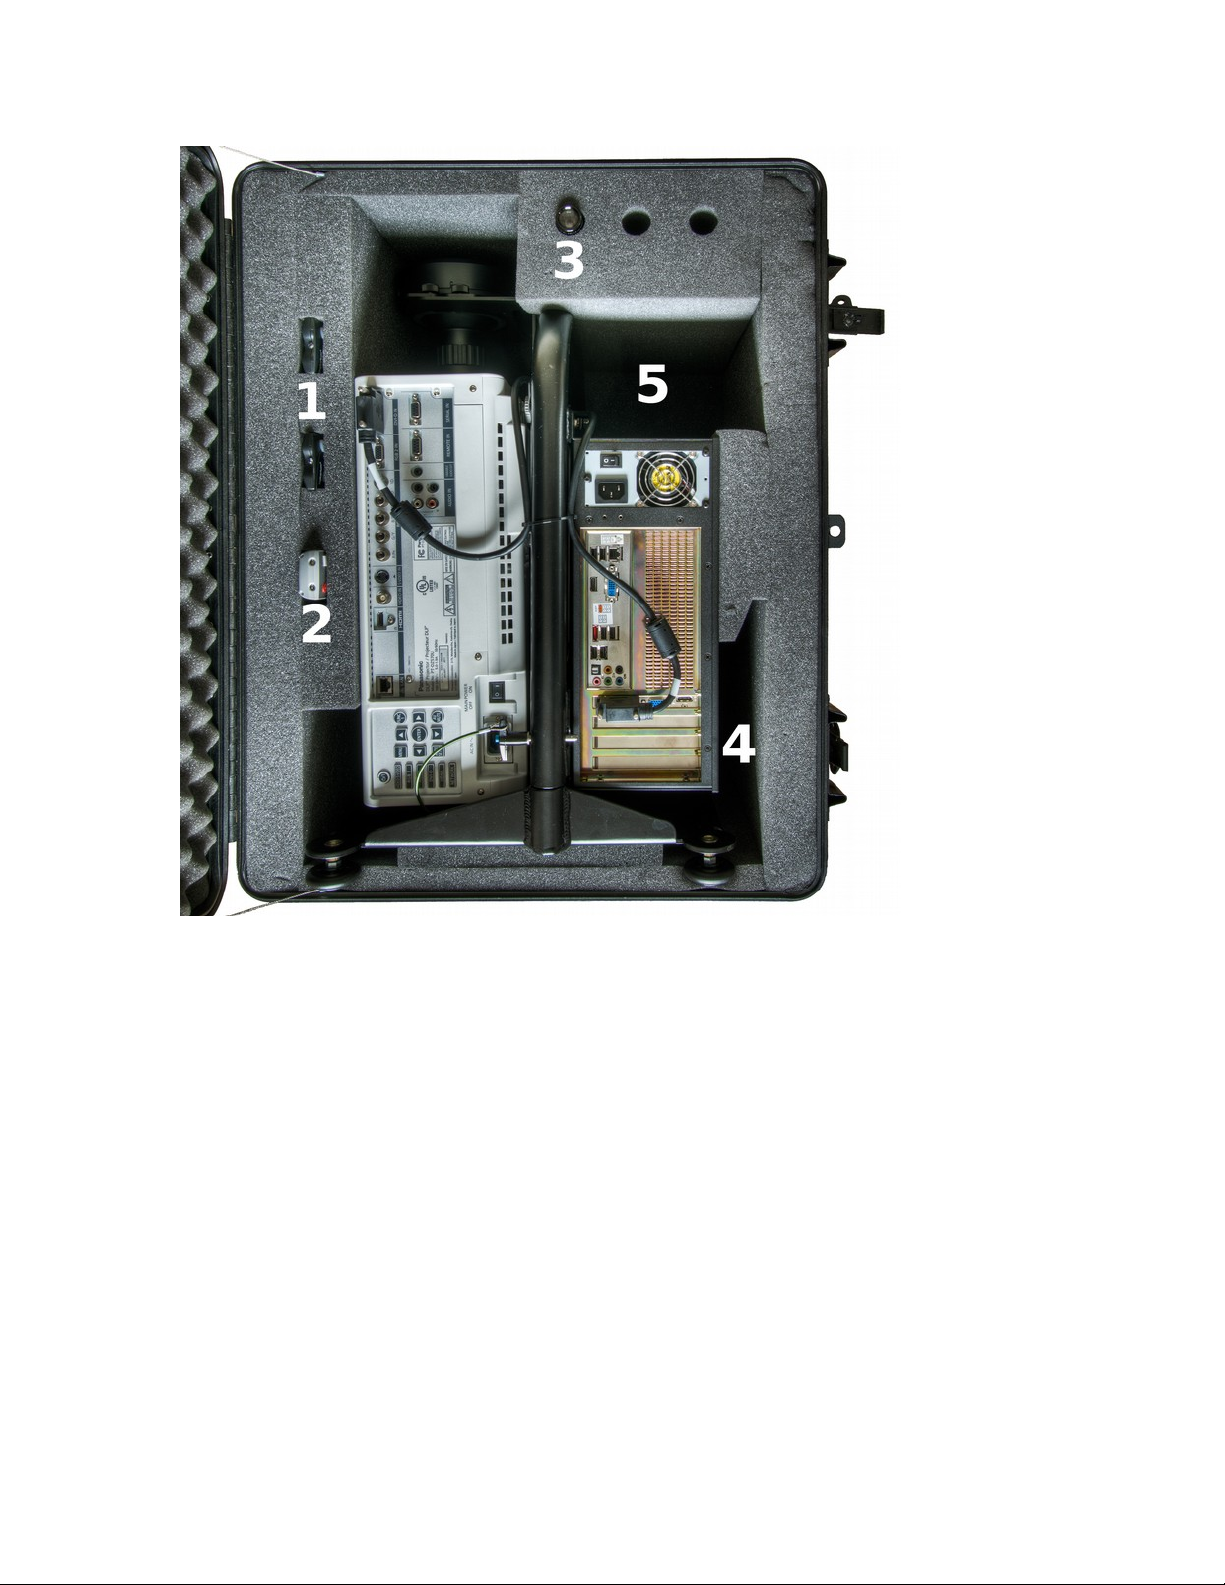
Transit Case Packing Diagram
1. Digitarium remote controls (two)
2. DLP rojector remote control
3. LED ointer (two additional s aces if you wish to urchase more)
4. S ace for user manual
5. S ace for cords
Digitarium® Zeta Portable User Manual 11
Projecting Other Video Sources
The rojector allows you to roject directly from another com uter or video source onto
the dome. See the DLP rojector user manual for details.
Maintenance
Lens Care
To rotect the lens, always attach the lens ca when you are not using your Digitarium
system. If you notice dust or dirt on the lens, clean it with a soft, lint-free tissue or cloth
and methyl alcohol.
If you remove the lens from the system, be sure to use both the front and back
lens ca s.
Lamp Life
The Digitarium system is designed to require minimal maintenance. However, the
rojector lam will eventually grow dimmer and burn out. It is im ortant to check lam
life and to re lace the lam when its design lifetime is reached, even if it is still
a arently working fine, in order to avoid catastro hic failure.
The standard rojector lam must be re laced after 2,000 hours of rojection if used in
high brightness mode or 3,000 hours in eco (low brightness) mode. It may be
necessary to re lace it sooner if the lam becomes noticeably dimmer or rojection will
not start. To assist you, the DLP rojector tracks how many hours the lam has been
used and will rovide reminder messages.
Refer to the DLP rojector user manual for detailed instructions on checking lam hour
usage and re lacement rocedure.
We highly recommend that you always kee a s are lam on hand to be
re ared for any eventuality. Otherwise, if your only lam fails, you may have days or
weeks of downtime waiting for a re lacement.
The rojector lam s contain a small amount of mercury. Please dis ose of them
in an environmentally safe manner, such as at a hazardous waste collection site.
The Control Unit and rojector need to be ke t clean of dust internally for
adequate cooling. See those manuals for service recommendations.
Digitarium® Zeta Portable User Manual 12

Assembly
If you have urchased your own Panasonic rojector or had to disassemble your
system, here are assembly directions.
To mount the DLP rojector to the frame, you will need:
•Philli s screwdriver
•Medium thread locker such as Loctite 242 (o tional, but recommended for better
fastener reliability)
•Zeta mounting hardware kit ( rovided by Digitalis)
•A cushion or iece of foam at least two inches/five cm thick to rest the DLP
rojector on
•A low dust environment, to kee dust out of the rojector o tics.
First Time Projector Setup
This section is only required for a brand new Panasonic rojector. Ski to the next
section if your rojector already has a Digitarium lens mount in it (there will be a brightly
colored mount ca in lace) ski to the next section.
1. Un ack the rojector, set it on its feet on a table, and remove the lens ca .
2. Plug the rojector in, switch on the ower switch next to the ower cord, and turn on
the lam by ressing the ower button on the remote control.
3. While the rojector is running, use the rojector remote control to enter the rojector
menu:
•Select your default language (Dis lay Language).
•Select Orientation as Vertical U .
•Change the menu dis lay so that it dis lays in the center of the rojection area
(Dis lay O tions – On Screen Dis lay – OSD Position = 6).
NOTE: Failing to follow these instructions will make it difficult to see or change your
settings after the fisheye lens is mounted.
4. Turn off the rojector by ressing the ower button twice. Allow it to fully cool down
(indicator light is steady red), then un lug it.
Digitarium® Zeta Portable User Manual 13
Remove Stock Lens
This section is only required if you see the stock lens as shown at right (ca shown).
Otherwise ski to the section Mount Projector to Frame on age 15.
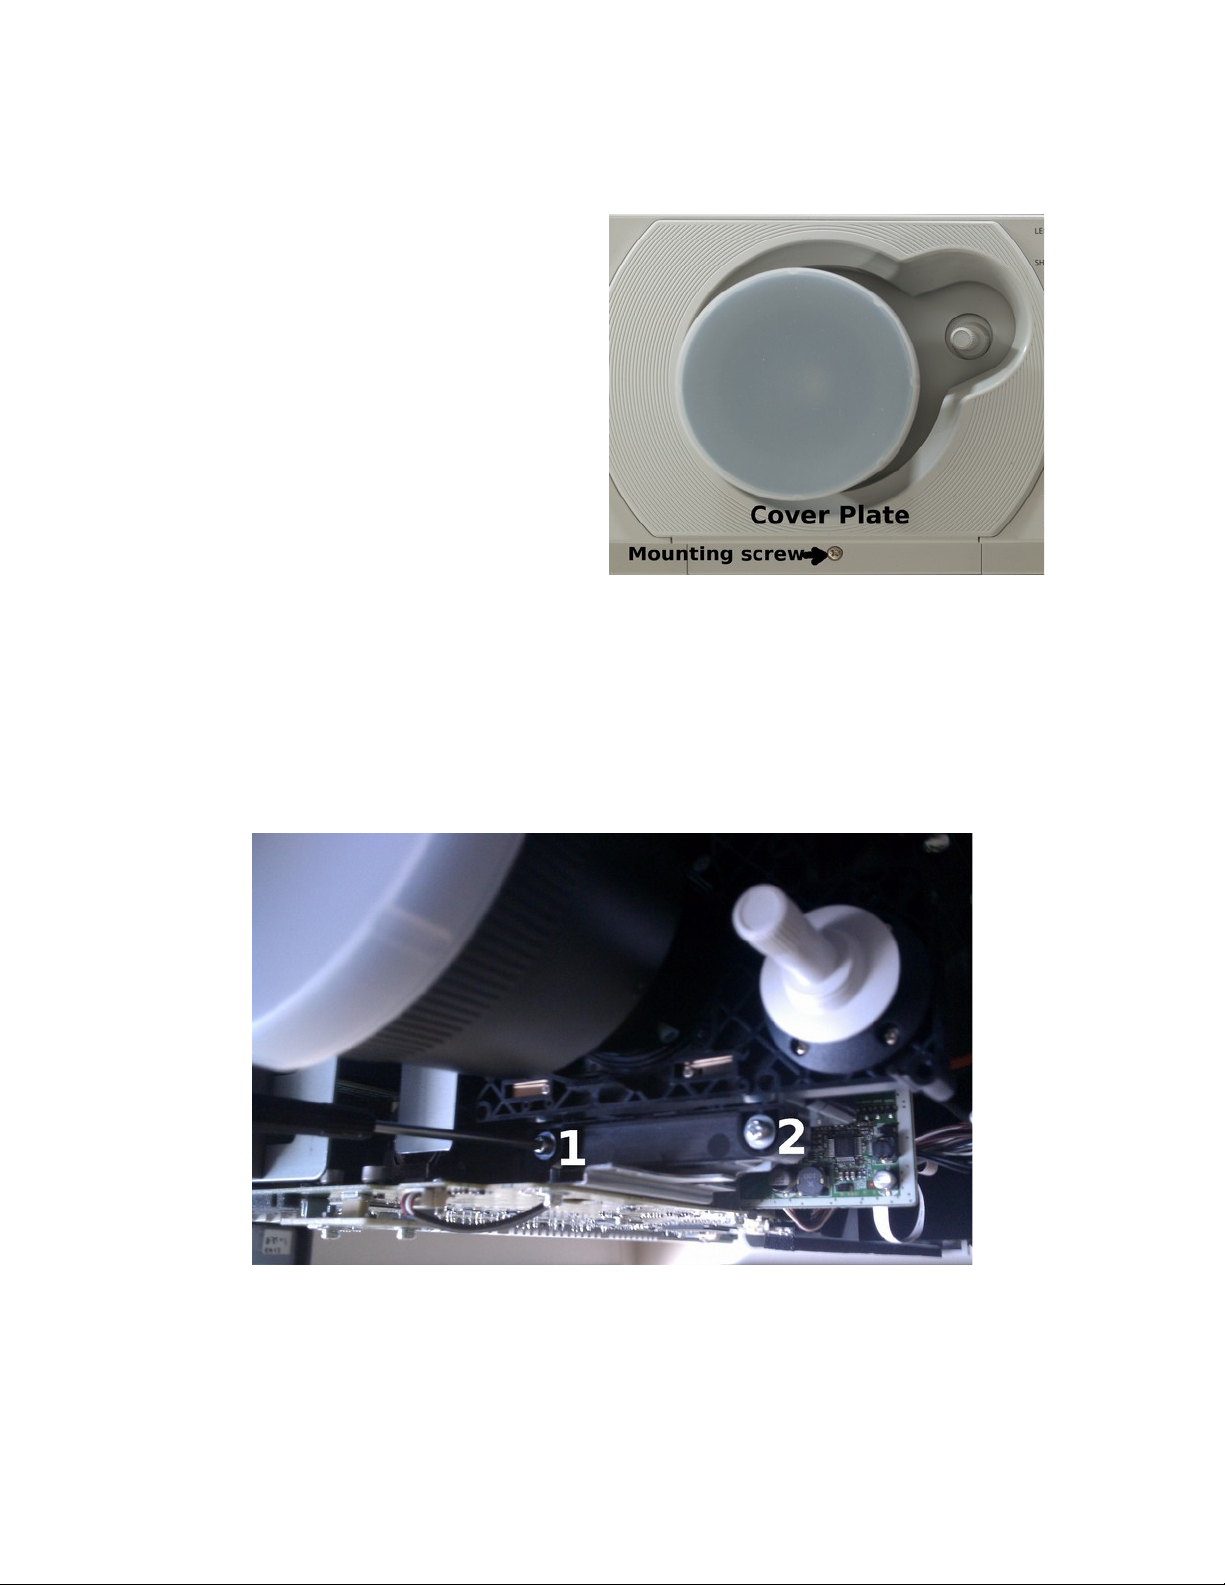
1. Set the rojector on its rear with the
lens ointing u .
2. Locate the cover late on the front of
the rojector. This iece surrounds the
hole where the lens exits the rojector
body, and it is secured with a single
mounting screw.
3. Using a Philli s screwdriver, remove
the mounting screw. Remove the late by
ulling it away from the rojector and over
the lens. Set this iece carefully aside.
4. Remove the flexible white lastic
gasket from around the lens. Save this
iece for later.
5. To remove the lens assembly, locate the three lens assembly mounting screws—two
toward the bottom of the rojector and one toward the to . Only the two bottom screws
are visible in the image below. The to screw is covered by a thin layer of foil. To
remove this screw, you will need to carefully bend the foil out of the way.
6. Using a Philli s-head screwdriver, remove all three screws, and set them aside.
Note: Each screw has a small metal washer behind it. When you remove the screws,
do not dro the washers or screws into the rojector. We highly recommend using a
magnetized screwdriver.
7. Remove the entire lens assembly from the rojector body. You will need to tilt the
lens to remove it.
8. Unmount the factory lens from the lens mounting bracket by removing the four
screws on the back. Store this lens somewhere safe, as you will need it for servicing
the rojector.
Digitarium® Zeta Portable User Manual 14
Swap Lens Mount
If the Digitarium fisheye lens mount is already installed, ski to Mount Projector to
Frame on age 15.
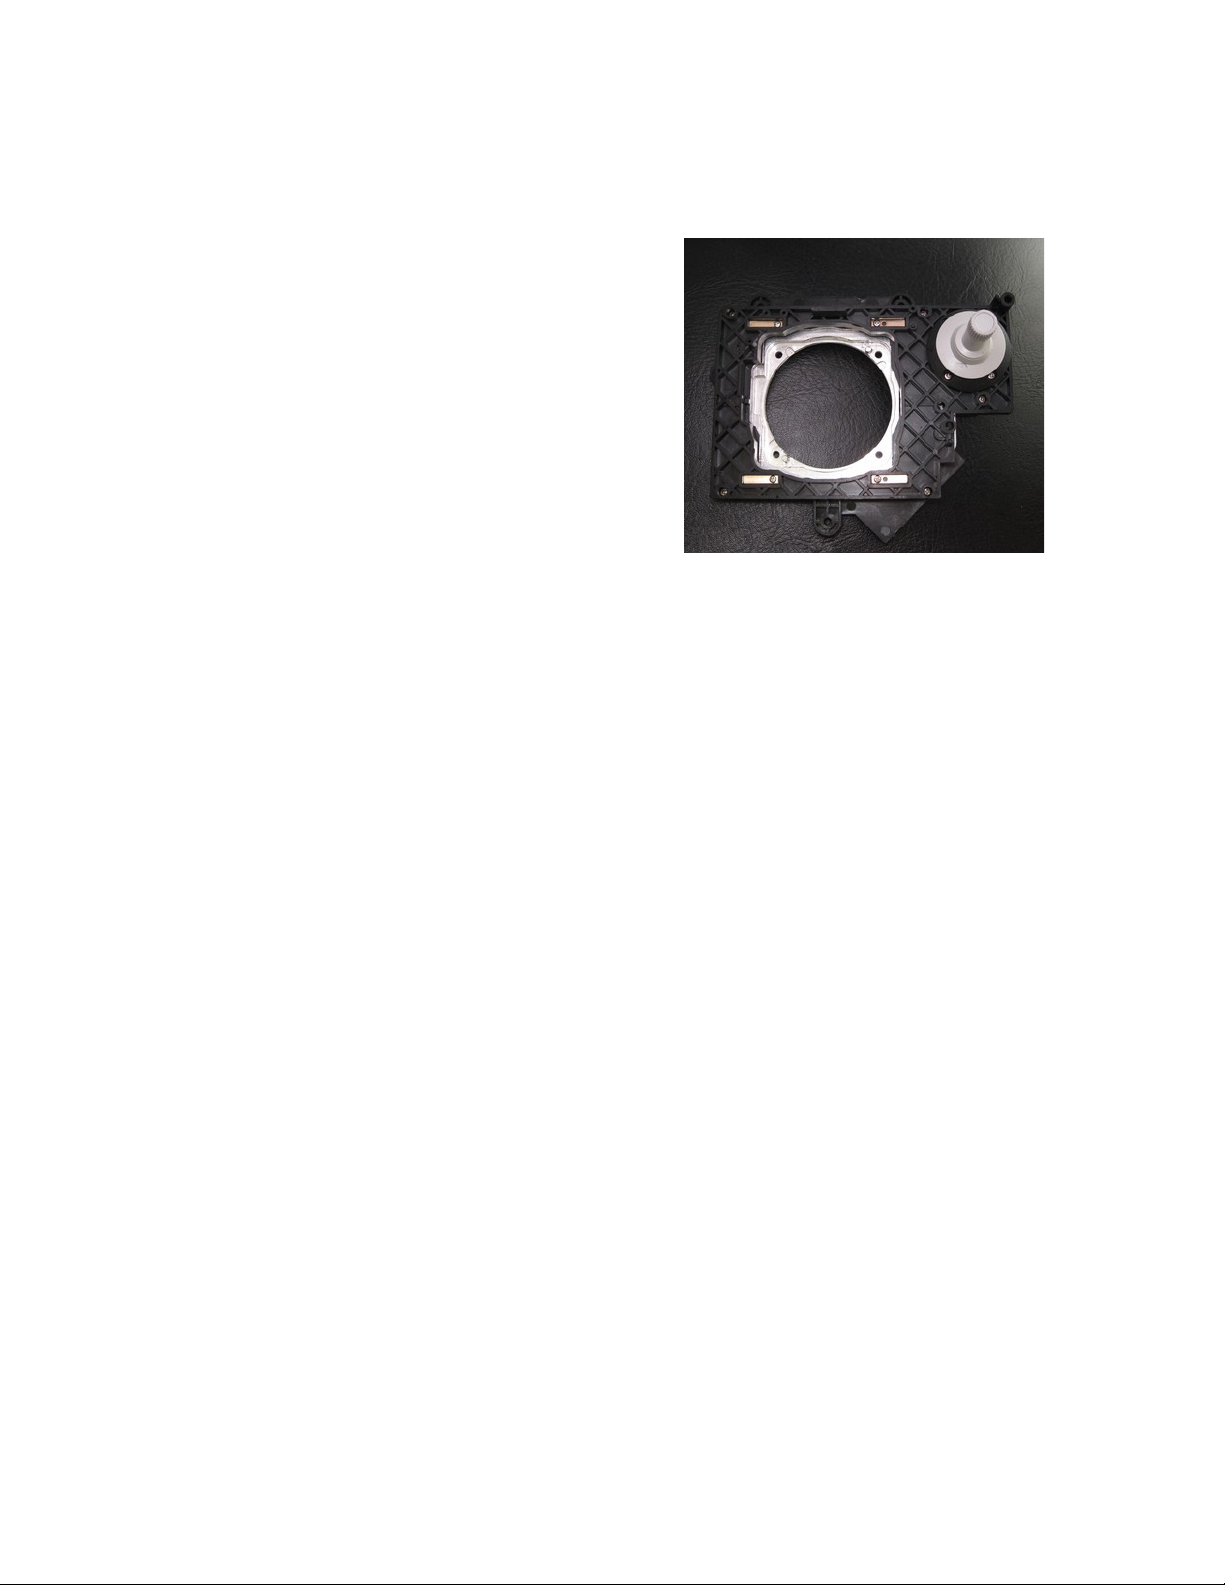
1. If the system will be used in a stationary
configuration like a fixed dome, this ste is not
required:
Disassemble the Panasonic mounting bracket,
and re lace the lastic lens mounting iece
with the machined aluminum iece su lied
with your order. Make sure that the bracket
has the same freedom of movement it had
originally and that the aluminum mounting
iece moves freely in the assembly. Figure to
the right shows a mounting bracket after
re lacement aluminum iece has been
correctly installed.
We created this iece to revent damage to the assembly and rojector due to
shi ing or trans ortation damage, and is not required if the system is well-treated
and not moved frequently.
2. Remove your Digitarium Zeta lens from its box. Loosen the focus lock ring (counter-
clockwise half a turn or so). Remove the back lens ca on the lens and unscrew
the lens from the fisheye mount (about 20 turns). Re lace the lens ca on the back
of the fisheye lens for safety.
3. Use the four 4-40 screws in the Zeta hardware kit to secure the fisheye mount to
the rojector mounting bracket. Use threadlocker if available. Note: Do NOT use
the screws that secured the Panasonic lens to the bracket.
4. Mount the lens mount assembly in the rojector using the three long screws from
earlier.
5. Insert the flexible white lastic gasket (white side u ) around the lens, below the
cover late.
6. Reattach the rojector cover late with the single mounting screw. Note that one
side has two tabs to engage before screwing in the other side.
Mount Projector to Frame
1. Lay the rojector to down (the side with the Panasonic logo) on the iece of foam.
2. Orient the lens brace so that it will fit around the fisheye lens when ut into the
system. Two clam s go on either side of the lens and attach to the brace with
thumb screws. Add these, but do not tighten the thumb screws. The long side of the
brace should rest on the back of the rojector.
Digitarium® Zeta Portable User Manual 15

3. Line u the holes in the lens brace with the
mounting holes in the back of the rojector. See
hoto at right. Place the short screw in the hole
furthest from the lens; use a star washer with this
screw and tighten it fully. Place the shorter s acers
on the three mounting screw holes closest to the
lens, and the longer s acer over the fourth hole.
4. Carefully lower the ortable stand frame on to of the s acers so that the screw
holes are aligned with the s acers. See below.
5. Attach the rojector to the frame with the 30mm M4 screws and star washers. If
ossible, use a dro of threadlocker on each screw.
6. Place the Control Unit on to of the frame. Line u the holes in the Control Unit
flange with the holes in the frame.
7. Use the four 10/32 screws with ca tive star washers to attach the Control Unit to
the frame. If ossible, use a dro of threadlocker on each screw. Push the Control
Unit down toward the frame base so that the screws will go through the smallest
area of the mounting holes. Tighten the screws fully.
Digitarium® Zeta Portable User Manual 16

8. Stand the system u on its
base. Attach the video cable to
both the rojector and the
Control Unit. See the hoto at
right. (DVI cable shown, HDMI
is an alternate with fairly similar
routing.)
9. Place one of the brightly
colored lastic ca s over the
lens mount to kee dust out of
the rojector unless you will
immediately install the lens in
the next ste .
10.You are now almost ready to
turn on and test your system.
See the section Set U on
age 6. Once the system is
booted up, make sure your
projector settings are correct
(see Recommended
Projector Settings below).
Disassembly
Should you need to disassemble your Digitarium Zeta system, first shut it down and
unplug it. Then follow the assembly ste s in reverse order, as required for your
ur oses.
If you need to send your DLP rojector to Panasonic for servicing, we recommend that
you remove it from the Digitarium system frame and re lace our fisheye lens with the
standard rojector lens before doing so.
Digitarium® Zeta Portable User Manual 17

Recommended Projector Settings
For the best erformance and rojection quality, we recommend using the following
settings which you can change in the DLP rojector menu:
•Projector Setu – Cooling Condition – Vertical U
•Picture – Picture Mode = Natural
•Picture – Shar ness = 0
•Picture – Noise Reduction = Off
•Picture – AI = Off
•Dis lay O tions – Back Color = Black
•Dis lay O tions – On Screen Dis lay – OSD Position = 6
Basic Troubleshooting
(See s ecific manuals for detailed information.)
Symptom Possible Solution
Nothing rojected. 1. Do the DLP rojector and the Digitarium® Control Unit have
ower?
2. Are the DLP rojector and Digitarium® Control Unit turned on?
The case fan on the Control Unit on age 25 should be
running and at least one lam indicator light should be green
on the side of the rojector.
3. Is the video cable securely connected at the Control Unit and
rojector? If not, connect it.
4. Press the “DVI” or “HDMI” button on the DLP remote control,
de ending on your system's video cable.
5. If that does not solve the roblem, remove any CD/DVD or
USB drive that contains a start-u scri t. Plug in s eakers and
reset the Control Unit. If the Control Unit is working, you will
hear a few musical notes after Nightshade has started u .
6. If everything seems correct but nothing is rojected, shut down
and then restart the rojector.
7. If the Control Unit is working, try using a different video cable
to connect the DLP rojector and Control Unit.
8. If all of the above fails, contact technical su ort.
Projection is not
level.
See the section entitled “Centering the Lens” on age 8 above.
Digitarium® Zeta Portable User Manual 18

Symptom Possible Solution
Digitarium®
remote control is
not working.
1. Are you ointing it at the zenith of your dome?
2. Is the infrared receiver covered or blocked? If so, remove the
roblem.
3. Test by ointing the remote directly into the IR receiver
window when hitting buttons.
4. Re lace the batteries in the remote with new ones.
5. Reboot the com uter control unit by hitting the red reset
button.
Thick or blurry line
drawings; cursor
segments are
different ixel
thicknesses.
1. Adjust the lens focus. See the section entitled “Focusing the
Lens” on age 9 of this manual for instructions.
2. Make sure that the DLP rojector is using the correct
resolution (1920 x 1200) and that keystone correction is set to
zero. A quick way to check the resolution is to go into media
mode and with the menu visible hit the button. The
current resolution will dis lay below the menu.
3. Are the lines being anti-aliased? Use the text menu (see the
software manual) to turn anti-aliasing on and off for
com arison, then save your reference as default.
Lam shuts off
unex ectedly.
See DLP rojector user manual.
Projection seems
to ulsate/jiggle
(not caused by
star twinkling)
1. This can be caused by vibration in the system or its
environment. Due to the large magnification inherent in the
fisheye lens, a small amount of ixel vibration should be
ex ected.
2. Remove any disk in the DVD drive and see if that hel s. A
USB thumb drive is a better o tion than a CD or DVD (silent
and vibration-free).
3. Is a DLP rojector fan out of balance (this may be audible)?
Try having the DLP rojector serviced if the vibration is
distracting.
Bright fuzzy s ots
on black image.
Dust articles may be inside the o tical ath.
1. Turn off the system and remove the lens (see the
“Disassembly” section on age 18 of this manual).
2. Gently clean the o tical rism inside the rojector with a soft,
clean brush, or carefully vacuum it without touching the o tics.
3. Reattach the lens and test the system.
Digitarium® Zeta Portable User Manual 19

Symptom Possible Solution
Default s eaker
volume too high or
too low. (Zeta
Basic model w/
s eakers)
1. When looking into the system through the o ening on the
back of your control unit you will find the s eaker volume dial
located on the back of the left hand s eaker. Adjust the
volume dial to a desirable level.
2. Additionally, the volume between different media sources can
be adjusted with the Digitarium remote control buttons labeled
-7 and +7. Press the -7 button to decrease the volume, and
+7 to increase the volume.
No sound coming
from s eakers.
(Zeta Basic model
w/ s eakers)
1. Verify that you are laying a video with audio or an audio
track.
2. Verify that the internal s eaker volume is set loud enough to
be heard. When looking into the system through the o en
access door you will find the s eaker volume dial located on
the back of the left hand s eaker.
3. Verify that the s eaker cables are lugged into the control
unit. When looking into the system through the o ening on the
back of your control unit you will find the audio cable lugged
into the outlet with a head hone symbol on the front of your
control unit. The s eakers' USB ower cable is lugged into a
USB hub in the front of the control unit. Make sure they are
both fully seated.
4. If those ste s fail to resolve your roblem, contact technical
su ort for further instructions.
Digitarium® Zeta Portable User Manual 20
Table of contents
Popular Educational Equipment manuals by other brands

Rompa
Rompa Snoezelen Sensory Corner Kit manual

laerdal
laerdal Nursing Baby VitalSim manual

Reality Works
Reality Works RealCare Geriatric Simulator quick start guide

Reality Works
Reality Works 42010450 manual

CAE Healthcare
CAE Healthcare Replay Ultraportable Getting started guide

National Instruments
National Instruments Quanser QNET MI quick start guide


