Dillinger Labs Dani SKAA Pro User manual
SKAA®Pro
wireless audio
Transmitter developed in Canada!
built to survive alien invasion
Dani
Owner’s Manua

Thank you for choosing Dillinger Labs Dani — a
SKAA Pro wireless audio Transmitter designed for
pro audio applications.!
• SKAA / SKAA Pro dual-mode Transmitter with 50
meter range, DC-coupled Burr Brown input
buffers and Burr Brown converters, balanced /
unbalanced line level inputs as well as Thrus for
daisy chaining
• Companion to the Streetheart SKAA / SKAA Pro
Receiver — 1 Dani can feed up to 4 Streethearts
• Pro-grade SKAA wireless audio. 100% Bluetooth
free. 100% WiFi free.
• Works with all SKAA Receivers and all SKAA
Nadja Hubs (in satellite/receive) mode —
including all SKAA-equipped speakers such as
those from Soundboks
• Designed specifically to upgrade virtually any
piece of source-side pro audio gear to SKAA /
SKAA Pro wireless
• Perfect for upgrading your DJ deck, live sound
mixer or recording interface to SKAA wireless
• Ideal for replacing long XLR or TRS cable runs —
for this application we recommend you use
Streetheart Receiver(s) on the audio sink side
• Accepts 2 discrete audio channels on two ¼″
jacks, transmits them wirelessly via SKAA/SKAA
Pro and also outputs them on the Thru jacks
• Accepts hot input signals up to +24dBu
• Perfect for creating a wireless Headphone
solution for DJs or cue mix system for studio
• Need to add an extra pair of monitor speakers to
the “band room” in your studio? Upgrade a pair
of powered monitors with a single Streetheart to
fill that remote room with low-latency audio, and
feed them from your control room with Dani
Introduction
For the curious and intrepid few
who’ve always wondered what this
meant but were too afraid to ask …
The SKAA® standard for wireless audio
guarantees compatibility between all
products bearing the SKAA Compatible
Badge. SKAA Transmitters work with iOS &
Android mobile devices, Mac & Windows
computers, televisions and any product
having a line output, S/PDIF output or a
headphone jack.
SKAA semiconductor components enable
SKAA to be embedded in consumer audio
and pro audio products. Not based on
Bluetooth or WiFI, SKAA is a global standard
built from the ground up specifically for
audio. Learn more at www.SKAA.com
• Love your powered PA speakers? Great —
convert them to lightning-fast SKAA
wireless by adding Streethearts to them —
then feed them wirelessly with your Dani
• Connect Dani to your DJ deck to feed your
Soundboks speakers directly with low
latency SKAA Pro wireless
• Select -10 dBV using the Level Switch on
Dani’s input panel and you can feed Dani
with consumer-grade audio sources such as
your phone or computer
• Dani will run for 14 hours from a full charge
using its internal rechargeable Li-Ion
battery
We like to make our products easy to use and Dani is no exception !!
!
Still, to fully unleash the considerable capabilities of this shiny new work of art, we vehemently advise
you to read the Owner’s Manual. Its pages are brimming with juicy morsels of invaluable insights,
irreverent commentary, and other assorted nuggets of paradigm-altering revelation. We really put our
foot in this one so we hope you love your Dani as much as we do !!
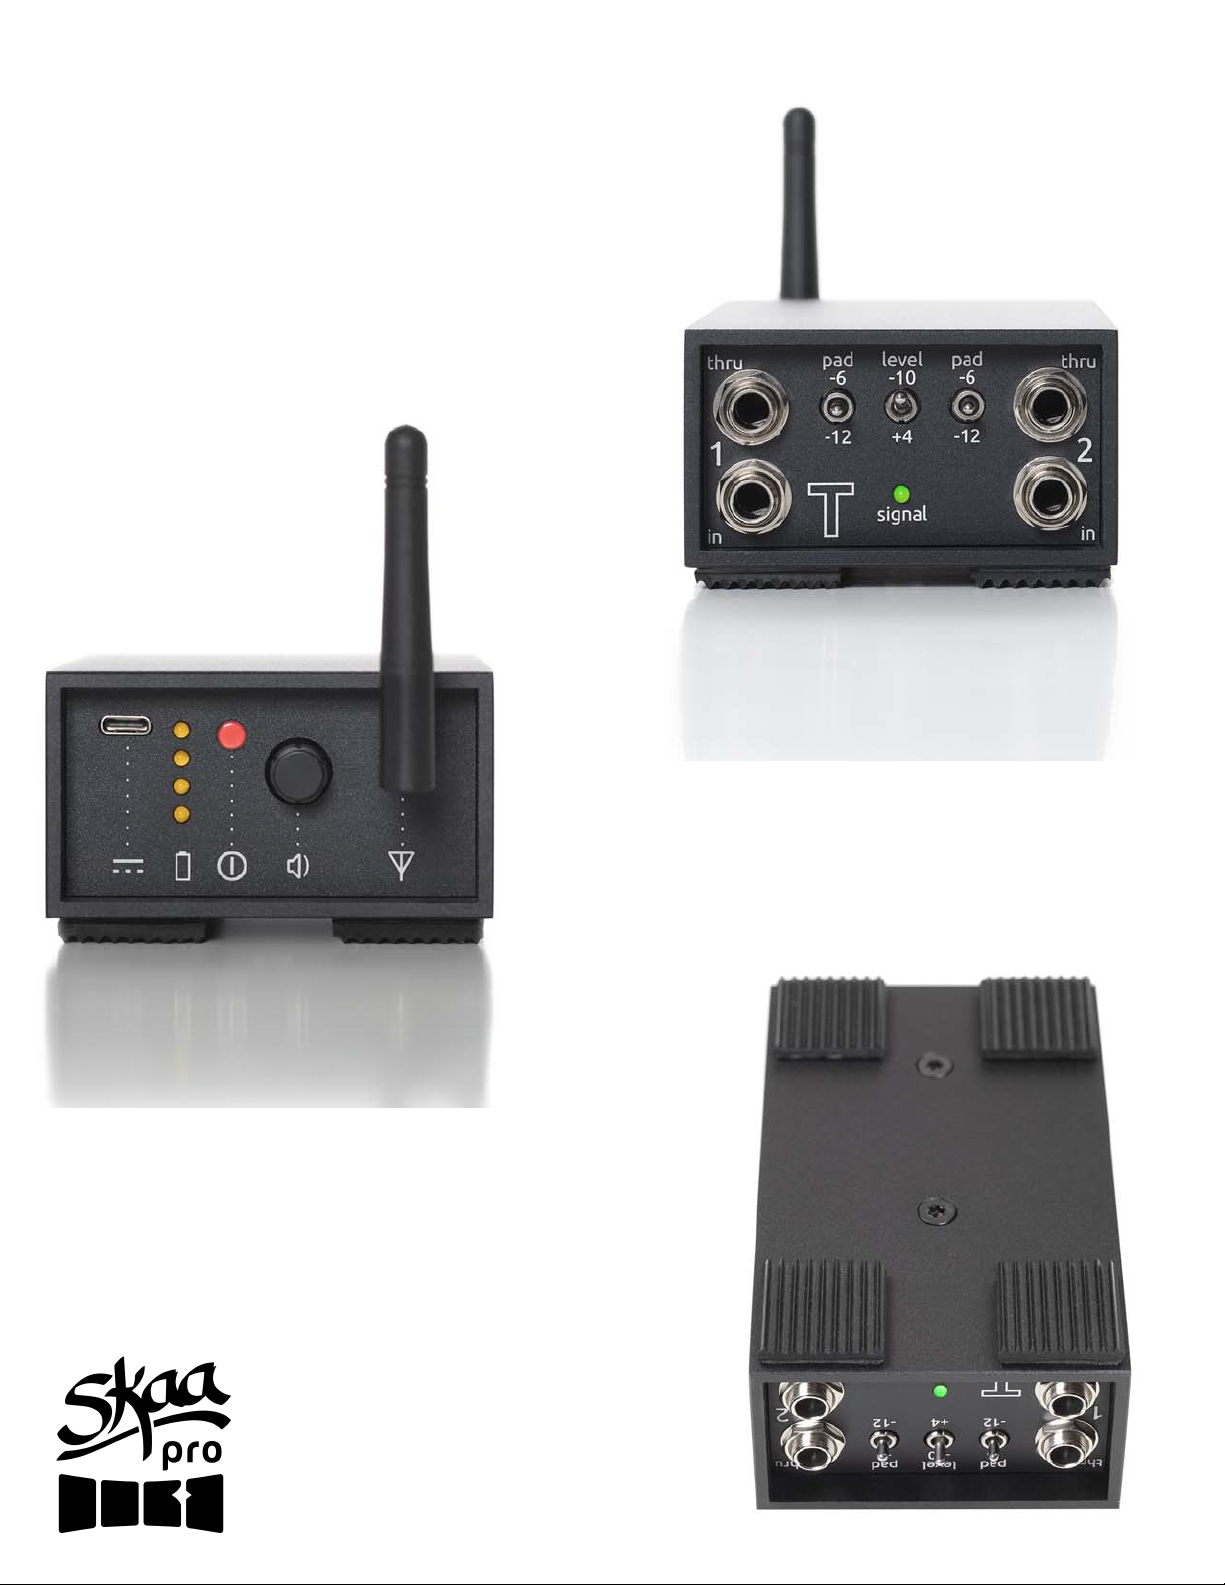
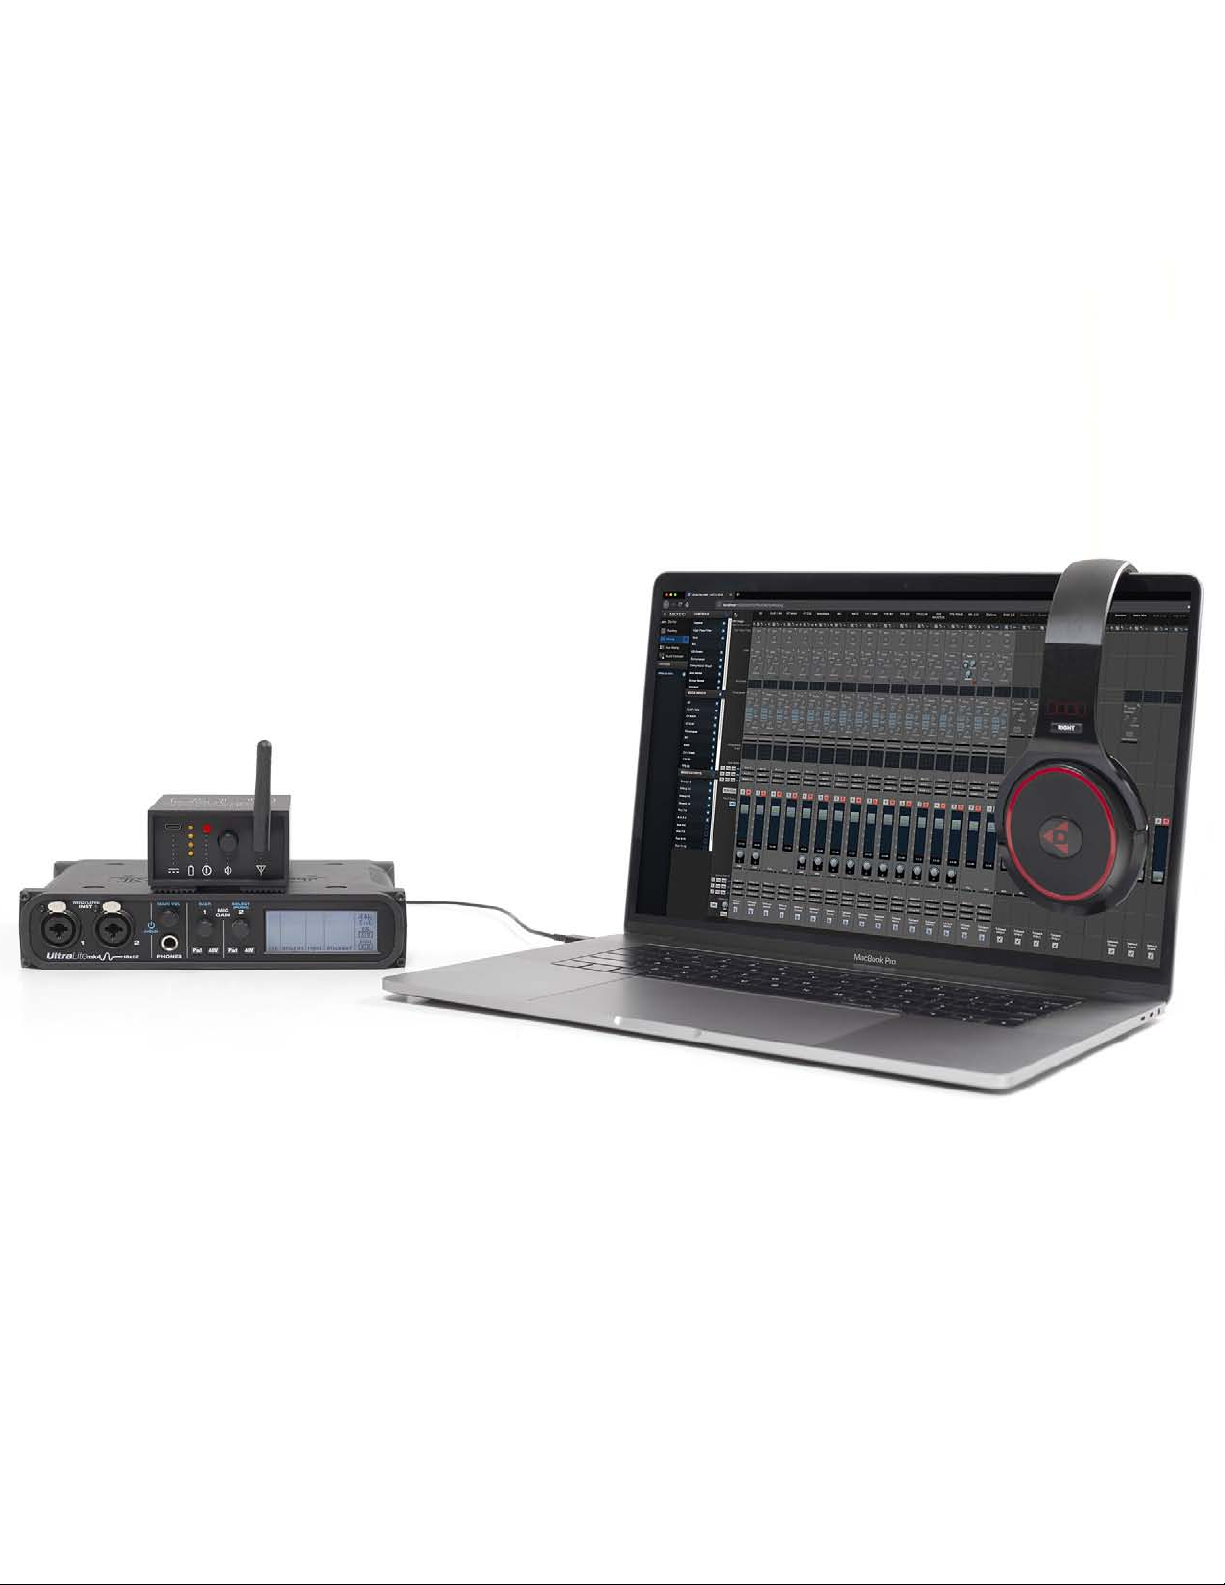
Pretty pics
USER Panel
INPUT Panel
Even its feet are
AWESOME

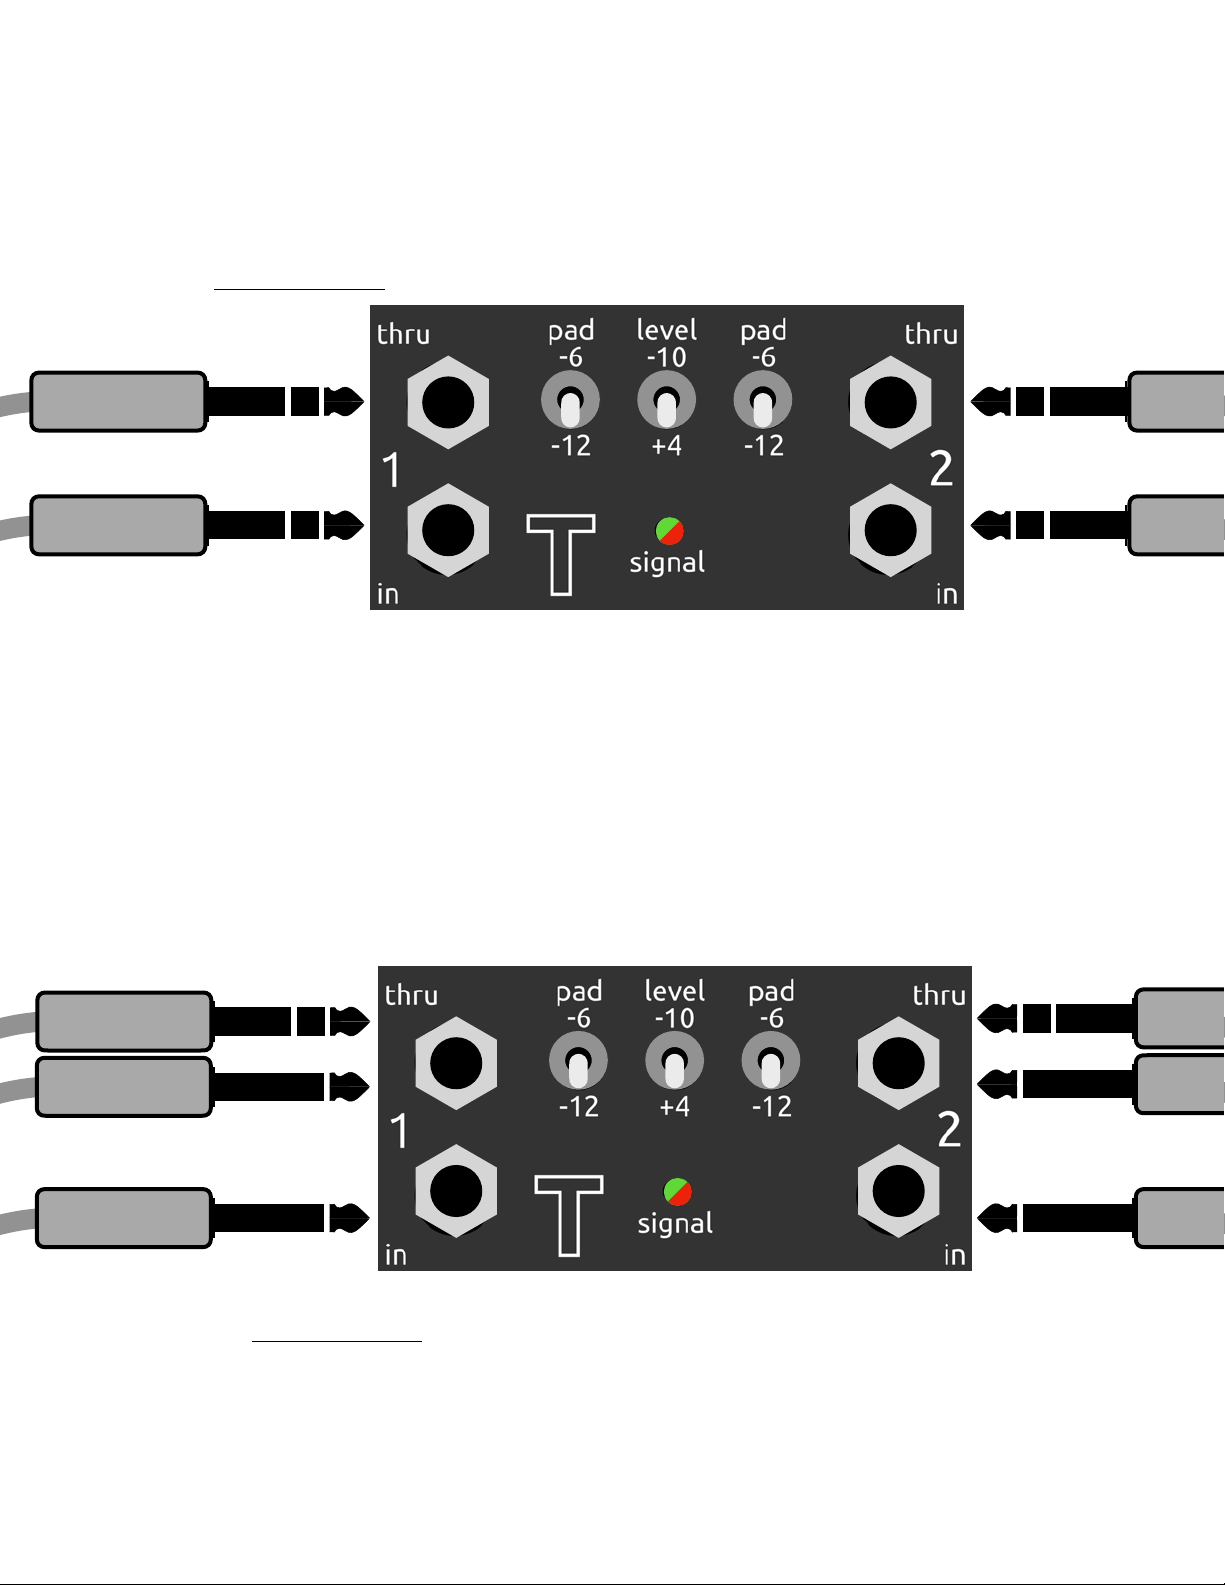
INPUT panel: Jacks
This ridiculously-large “T” is a
handy reminder that Dani is a
Transmitter of wireless audio
The Thrus (2 upper jacks) are outputs
which don’t output anything until you
connect something to the inputs. Each
Thru is hard wired directly to its
respective IN and will output exactly
what’s entering Dani unaltered and
unpadded
On the latest Dani models, In 2 is
automatically normalled to carry the audio
from In 1 — so if you jack into In 1 only,
leaving In 2 unconnected, Dani will send
In 1’s audio on both SKAA channels 1 and
2. And, the In 1 audio will appear also on
both Thrus 1 and 2. If your Dani doesn’t
do this, you can accomplish the same thing
by plugging a patch cable from Thru 1 to
In 2 (TRS patch cable is best if you’re
feeding In 1 from a balanced source)
•These are balanced / unbalanced ¼″TRS line
level inputs with input impedance greater than
20 k ohms
• What’s on the other side of those jacks? DC-
coupled Burr Brown differential input buffers,
followed by Burr Brown analog to digital
converters — yes, for you, only the best !
• Inputs 1 & 2 are most commonly used for Left
and Right audio respectively, but you can use
them for anything you want
• For example, you can send your FOH (front of
house) mix on channel 1 and your headphone
cue mix on channel 2
• Dani’s inputs are capable of handling up to
+24 dBu of signal — just engage the pads as
needed
• Since you don’t have to back off your outputs
to feed Dani, that means when you’ve got
amplifiers connected to Dani’s Thrus, they’ll be
able to achieve their max rated wattage
• Have XLR outputs on your mixer or DJ
controller? Perfect; use two XLR-F to ¼″TRS
cables to feed Dani with balanced signal. This
is the best way to connect because the signal is
strongest and the noise is lowest.
• Got RCA outputs on your mixer? No problem,
Dani’s inputs will happily accept unbalanced
signals, too
• With an RCA source you can use a standard
stereo RCA cable to make your connection —
just pop a pair of ¼″TS to RCA adapters into
Dani’s input jacks and use a stereo RCA cable
to connect your device to Dani
•SKAAstore.com has these handy ¼″TS to RCA
adapters and also has a great stereo ¼″to RCA
cable if you want a one-piece cable for
minimum fuss
•Of course ¼″sources (both balanced TRS and
unbalanced TS) work great with Dani, too
• When using an unbalanced audio source
(keyboard, etc.), always use UNBALANCED (TS)
cables. This will guarantee the ring (cold
conductor) gets properly grounded on the Ins.
• Want to feed Dani from a 3.5 mm headphone
jack from, say, a phone or a computer? No
problem; just use a 3.5mm to 2 ¼″TS cable,
set your Level Switch to -10 and you’re all set.
Dani has 2 balanced/unbalanced
inputs (2 lower jacks) which are
transmitted wirelessly on SKAA
channels 1 and 2
•If your audio source device has balanced outputs, use TRS (balanced ¼″phone) cables to
connect it to Dani for best results
• TRS means “Tip, Ring, Sleeve”; so in other words, 3 conductors. Below you can see that there
are 3 discrete sections of conducting metal on TRS plugs.
• The other end of a TRS cable will typically be either TRS or XLR female
• Check out SKAAstore.com for all the cables you need
Cables for your Dani for BALANCED audio sources
• If you are feeding Dani’s inputs with TRS, avoid using TS cables in the Thrus as this will
unbalance Dani’s inputs and your signal level will be cut in half (made quieter)
• A common use case when you’ll need to use TS connections is when your audio source device has
RCA outputs. SKAAstore.com has cables which are 2 RCA to 2 TS which are perfect for this. You
can also use a common 2 RCA - 2 RCA cable and 2 x RCA to TS adapters on one side.
• If your source device is balanced but you’re short on balanced cables, you may find yourself
feeding Dani with a TS cable to In 1 and a TRS cable to In 2 or vice versa. You’ll notice that
whichever channel has the TRS connection is louder than the other channel. That’s because it has
literally twice the signal pouring into it. You can fix the situation by padding the TRS channel by 6
dB (or more accurately, by 6 dB more than the TS channel is padded) — this will lower the TRS signal
level to match the TS one.
TRS
TRS
TRS
TRS
TS
TS
TRS or TS
TRS or TS
Cables for your Dani for UNBALANCED audio sources
•If your audio source device has unbalanced outputs, use TS (unbalanced ¼″phone)
cables in Dani’s Ins and either TS or TRS cables in Dani’s Thrus
• TS means “Tip, Sleeve”; so in other words, 2 conductors. Below you can see that there
are 2 discrete sections of conducting metal on TS plugs.
• The other end of a TS cable will typically be either TS or RCA

INPUT panel: Switches and LED
• Dani can handle a wide range of line level
signals, from wimpy to paint-peeling
• Start with the 2 pad switches in the middle
position (all pads OFF)
• Next, set the Level Switch — the one in the
center of Dani’s front panel. Set it to -10 dBV
for consumer source devices (for example
phones, computers, iPads, etc.); or set it to +4
dBu for pro source devices (mixing desks,
recording interfaces, DJ decks, keyboards,
synths, electronic drums, etc.)
• Connect your source device to inputs 1&2 and
play a loud song — turn up the volume on your
audio source device nice and high —
somewhere in the range of 80 - 100% volume
level will usually deliver the best results
• Now have a look at the Signal LED — it will flash
Green along with the music when there is signal
flowing into Dani and Red when the signal is
peaking (within 3 dB of clipping)
• If the Signal LED flashes Green all the time or if
it flashes Red only rarely, you’re good to go
• If you see the Signal LED flashing Red quite a
lot, try setting the 2 pad switches to -6 dB. If
the Red flashing goes away or happens very
infrequently, you’re good to go
• If you have a super hot source, you can try
backing off the output level of the source
device — or just set the pads at -12 dB to calm
down the Signal LED
• If you want to use Dani with a microphone
source, you’ll need a preamp between the
microphone and Dani to boost the signal from
“mic level” to “line level”. Most DJ decks and all
mixers have mic preamps built in.
• Dani will work with many acoustic guitars so
long as they have an active pickup. Use a TS
patch cable to connect the guitar directly to In
1. Turn off the pads and try the Level Switch in
both -10 and +4 to see which one works better.
• Tip: Dani’s inputs don’t have the right
impedance for electric guitar / bass, but putting
almost any guitar pedal in between your guitar
and Dani will fix that problem. Take the output
of the pedal and plug it into Dani’s In 1 jack
with a TS patch cable. Try an EQ to get that
Fender feeling or an EQ followed by a JHS
Charlie Brown to get your Marshall Plexi on.
Each channel has a
dedicated Pad
Switch — pads are
off in the center
position
signal /
peak LED
The Signal LED flashes Red when the signal
gets within 3 dB of clipping. If the Signal
LED is flashing Red a lot, engage the pads
until the Signal LED only flashes Red
infrequently. Green flashing most of the
time is what you want to see.
If it’s too distracting, you can turn off the
Green flashing of the Signal LED. Click the
volume knob (single click) on the rear panel
(it’s a button, too). The Signal LED will then
display Red only (peaks only). Click again to
get Green back. Green is always enabled
when you power on your Dani.
Pro Tip: set all 3 switches to the down
position and turn your mixer up — Dani can
handle up to +24 dBu signals, so bring it
Set the Level Switch to +4 dBu when
feeding Dani from pro gear and -10 dBV
when feeding Dani from consumer products
such as phones and computers

• Power Dani ON / OFF by holding down the Power
Button for a few seconds
• A Green glowing Power Button means that Dani is
ON and operating as a SKAA Transmitter
• In Green mode, Dani will feed up to 4 SKAA
Receivers at 36 ms of latency
• A Red glowing Power Button means that Dani is
ON and operating as a SKAA Pro Transmitter
• In Red mode, Dani will feed up to 2 SKAA
Receivers at 19 ms of latency
• When powered on, you can change Dani’s
operational mode by triple clicking the Power
Button (click 3 times, fast). This reboots Dani and
you can watch the Power Button alternate between
Green and Red each time you triple click.
• Dani has a Global Volume control knob which
affects all downstream Receivers Bonded to this
particular Dani. If you want to affect individual
Receivers’ volumes to balance things out, use the
Local Volume controls on the Receivers
themselves.
• Turn Dani’s volume knob clockwise to increase the
volume and counter clockwise to decrease it
• The output level of your Receivers depends on
both the Receiver’s Local Volume (which is set by
the volume buttons or knob on the Receiver) and
the Global Volume (Dani’s volume knob)
• Global and Local Volume example: say Dani is set
to 50% and your Receiver is set to 80% then the
net output level from your Receiver will be 0.5 x
0.8 = 0.4 or 40%.
•Level Setting: Start by setting the Global Volume
on Dani to “full up”. Make sure your Receivers are
Bonded to Dani (see SKAA Receiver User’s Guide
later in this manual if you need help with this).
Watch the Bond Indicator on your Receiver(s) as
you crank the volume on Dani — the Bond Indicator
will flash with each volume step as you crank Dani
up. When it stops flashing, you know Dani’s
volume is at the top. Now back it down about 10
steps (you can feel the clicks as you turn the knob).
Set your Receivers to around 50 - 75% volume
using their Local Volume. Play some music
through Dani and adjust the Local Volume on your
Receivers to balance them relative to each other.
At least one of your Receivers should be at 100%
Local Volume. Now you can use the Global
Volume knob on Dani to control the whole speaker
network as one.
USER Panel: Power & Volume
Hold the Power Button
for a few seconds to
turn Dani ON / OFF
Volume Knob: Rotate to
adjust Global Volume — this
affects the volume on ALL
downstream Receivers
• Triple click Dani’s Volume Knob to mute all
downstream Receivers — you’ll see all their Bond
Indicators slow flash when you do this. Triple click
again to unmute all downstream Receivers.
• If you want to mute/unmute only specific
Receivers, triple click their individual Bond Buttons
(see SKAA Receiver User’s Guide later in this
document)
• All modern SKAA Receivers (those launched in
2019 and later), including the Soundboks Gen 3
speakers, Dillinger Labs Helix headphones and
Dillinger Labs Aquarius speakers, are compatible
with both SKAA and SKAA Pro operation — they will
automatically kick into whichever mode Dani is in
when they Bond to Dani
• When in SKAA mode (Green Power Button), Dani
will power off its radio transmitter (which will drop
Bond to all downstream Receivers) after 2.5
minutes of no audio (silence) on its inputs — and, if
it’s operating from its battery, Dani will
automatically power itself OFF 60 minutes later
• When in SKAA Pro mode (Red Power Button), Dani
will power off its radio Transmitter (which will drop
Bond to all downstream Receivers) after 20
minutes of no audio (silence) on its inputs — and, if
it’s operating from its battery, Dani will
automatically power itself OFF 60 minutes later
• Dani will run for 14 hours from a full charge,
using its internal battery
• Dani will automatically power OFF when the
battery is fully depleted
• Virtually any 5V USB power adapter, such as
an ordinary mobile phone charger, will charge
your Dani
• Charge time depends on the electric current
supply capability of your USB power adapter
— Dani is capable of fast charge if your
adapter can supply at least 2 A
• Dani’s battery will charge In 2 hours (from fully
depleted) — it will take longer if your USB
Power Adapter can’t provide at least 2 A
• Note: If you use your computer’s USB port to
charge Dani, it may take a long time
• You can continue using Dani while it charges
• Pro Tip: If you hear hum or buzz while you’re
charging Dani, make sure you’re charging it
from a standalone wall charger. Sometimes
the mixer or deck you’re feeding Dani audio
from will have a handy USB charging port, but
using it can create a ground loop which can
cause hum or buzz in your audio. If you want
to charge Dani from it go ahead; just
disconnect the charging cable before the gig.
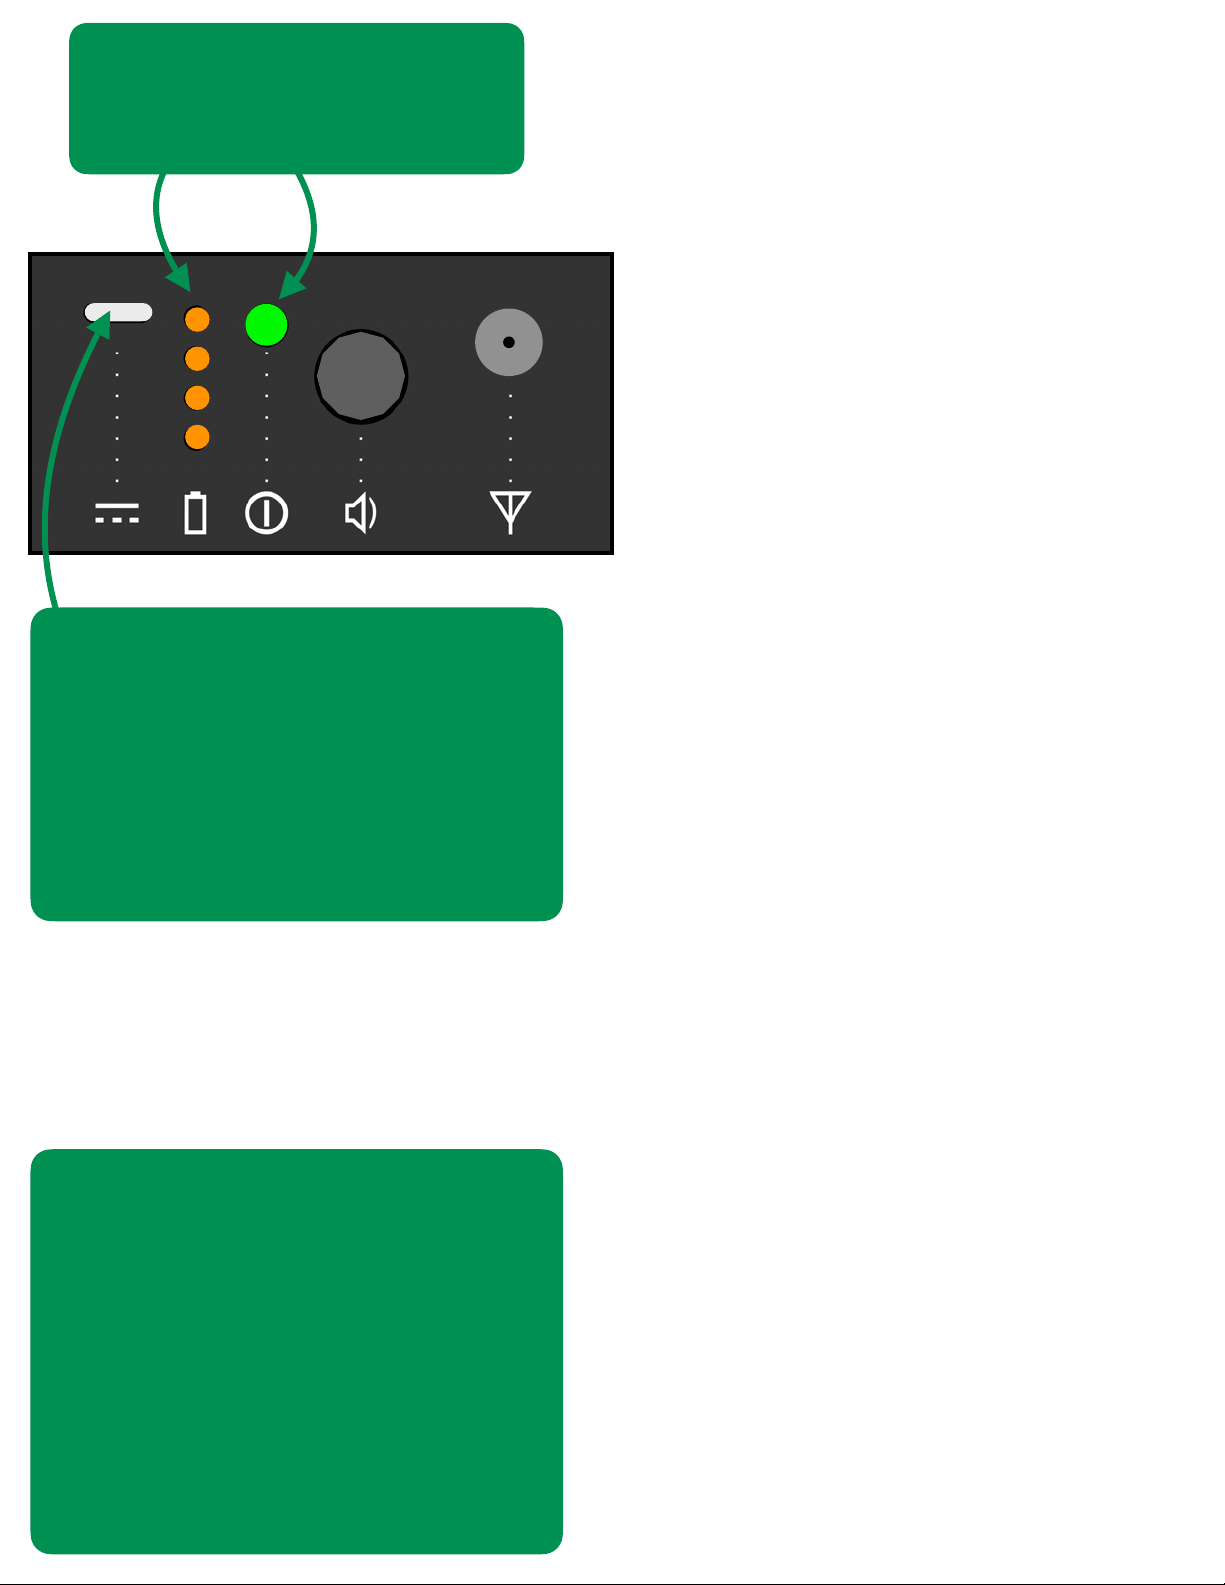
• To find out how much battery life remains:
make sure Dani is powered on (the Power
Button must be glowing either Red or Green)
— then click the Power Button once to activate
the Battery Life Indicator (the stack of 4
orange LEDs)
• The Battery Life Indicator gives you a visual
indication of the amount of energy remaining
in Dani’s internal battery — it stays on for a few
seconds and then automatically shuts off
• When there is about 45 minutes of operating
time remaining, the bottom LED in the stack
will start to flash slowly (the one right beside
the battery icon) — a click on the Power Button
is NOT necessary to see this “low battery”
flashing indication
• When Dani’s internal battery is being charged,
the top LED in the stack (the one right beside
the Type C connector) will glow solid, even if
Dani is powered off. When the charging cycle
finishes, this LED will turn off to let you know
that Dani’s battery is fully charged.
USER Panel: Battery and Charging
While Dani is powered on, click
the Power Button once to display
the battery life remaining
Type C power jack — use the included
Type A to Type C cable with a USB
power adapter to charge your Dani —
keep in mind, this jack is for POWER
ONLY — if you plug Dani into your
computer, nothing magical will happen
except Dani’s battery becoming fuller !
Note: You can replace Dani’s 18650
battery cell say 5-8 years down the
road, when the battery is showing its
age — remove 2 screws and you have
access — do so only if you’re “handy.”
Also make sure to properly dispose of
your old battery by placing a piece of
tape on both ends and dropping it off
at your local recycling depot.

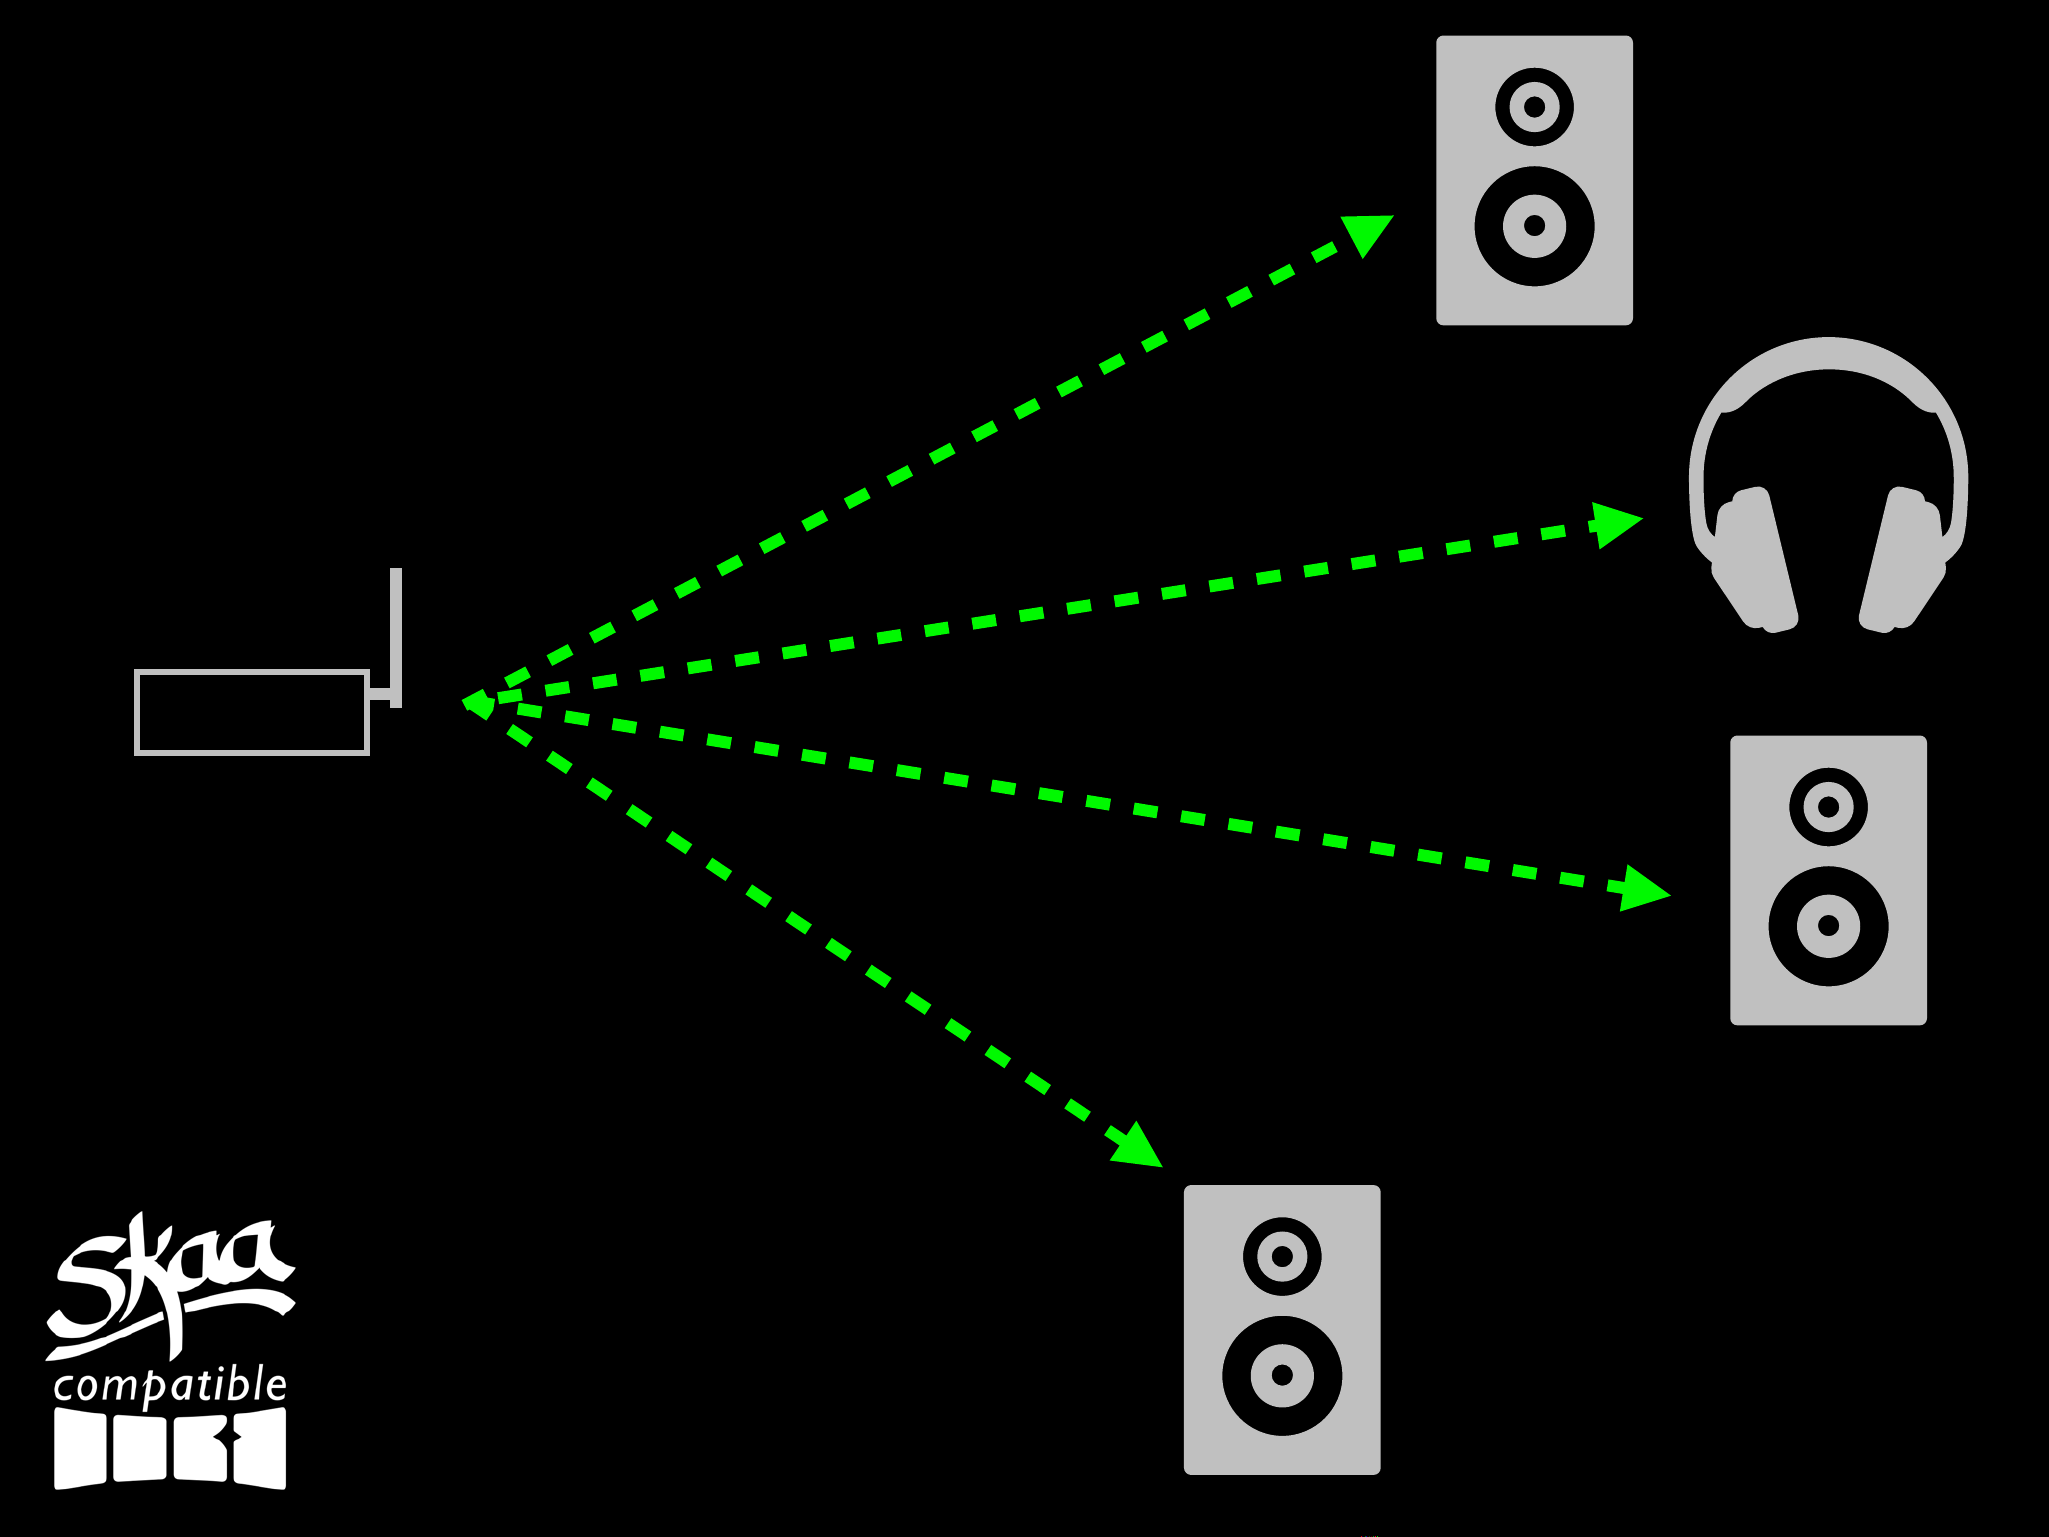
• Dani is capable of up to 50 meter
reliable range with the included +2 dBi
screw-on 2.4GHz SMA-type Antenna
• Your actual reliable range will also
depend on how well the Antenna is
implemented in the receive-side device
• For example, a Streetheart SKAA Pro
Receiver is also rated for 50 meter range
and therefore, you can count on actually
getting 50 meter range in practice when
you use Dani and Streetheart together
• If your Receiver is rated for less than 50
meter range, then the lower of the 2
rated ranges will apply
• Dani’s Antenna can be removed by
unscrewing it — do this to protect Dani
from damage during transport. Just like
you always unplug the audio cables from
Dani, get into the habit of removing the
Antenna before you toss Dani into your
gig bag.
• The SMA stud, as well as all switches,
buttons, indicators and jacks, are
protected by the protruding lip of Dani’s
aluminum enclosure — but for sure you
still need to remove the Antenna for
transport and not doing so may void your
warranty
• Normally, you should orient Dani’s
Antenna vertically (point it straight up) —
see the diagrams on the next page
• For best results, get Dani, and therefore
its Antenna, elevated, as high as possible.
Forget about the dog, let’s get Dani
high !
• If you’re using multiple Danis in your
setup, separate them from each other by
at least 2 meters. If you need to have
them close together and you’re getting
poor range, try orienting their antennas
up to 45º from vertical (and 90º from
each other).
• Higher gain, +5 dBi antennas can also be
used with Dani to extend range, if
necessary, to approximately 80 meters.
This may take your Dani above +20 dBm
radiated RF output power which is the
legal limit in certain countries. Check
local laws first and tread carefully.
USER Panel: Antenna
Standard SMA
Antenna stud
Included +2 dBi
Antenna
Antenna Positioning Tips: !
1. Place your Dani in an
elevated location for
maximum range
2. Keep the Antenna
pointed straight up
Dani on a table top
Dani velcro’d to
a tall speaker
point the Antenna
straight up for
longest range
Antenna is
above the speaker
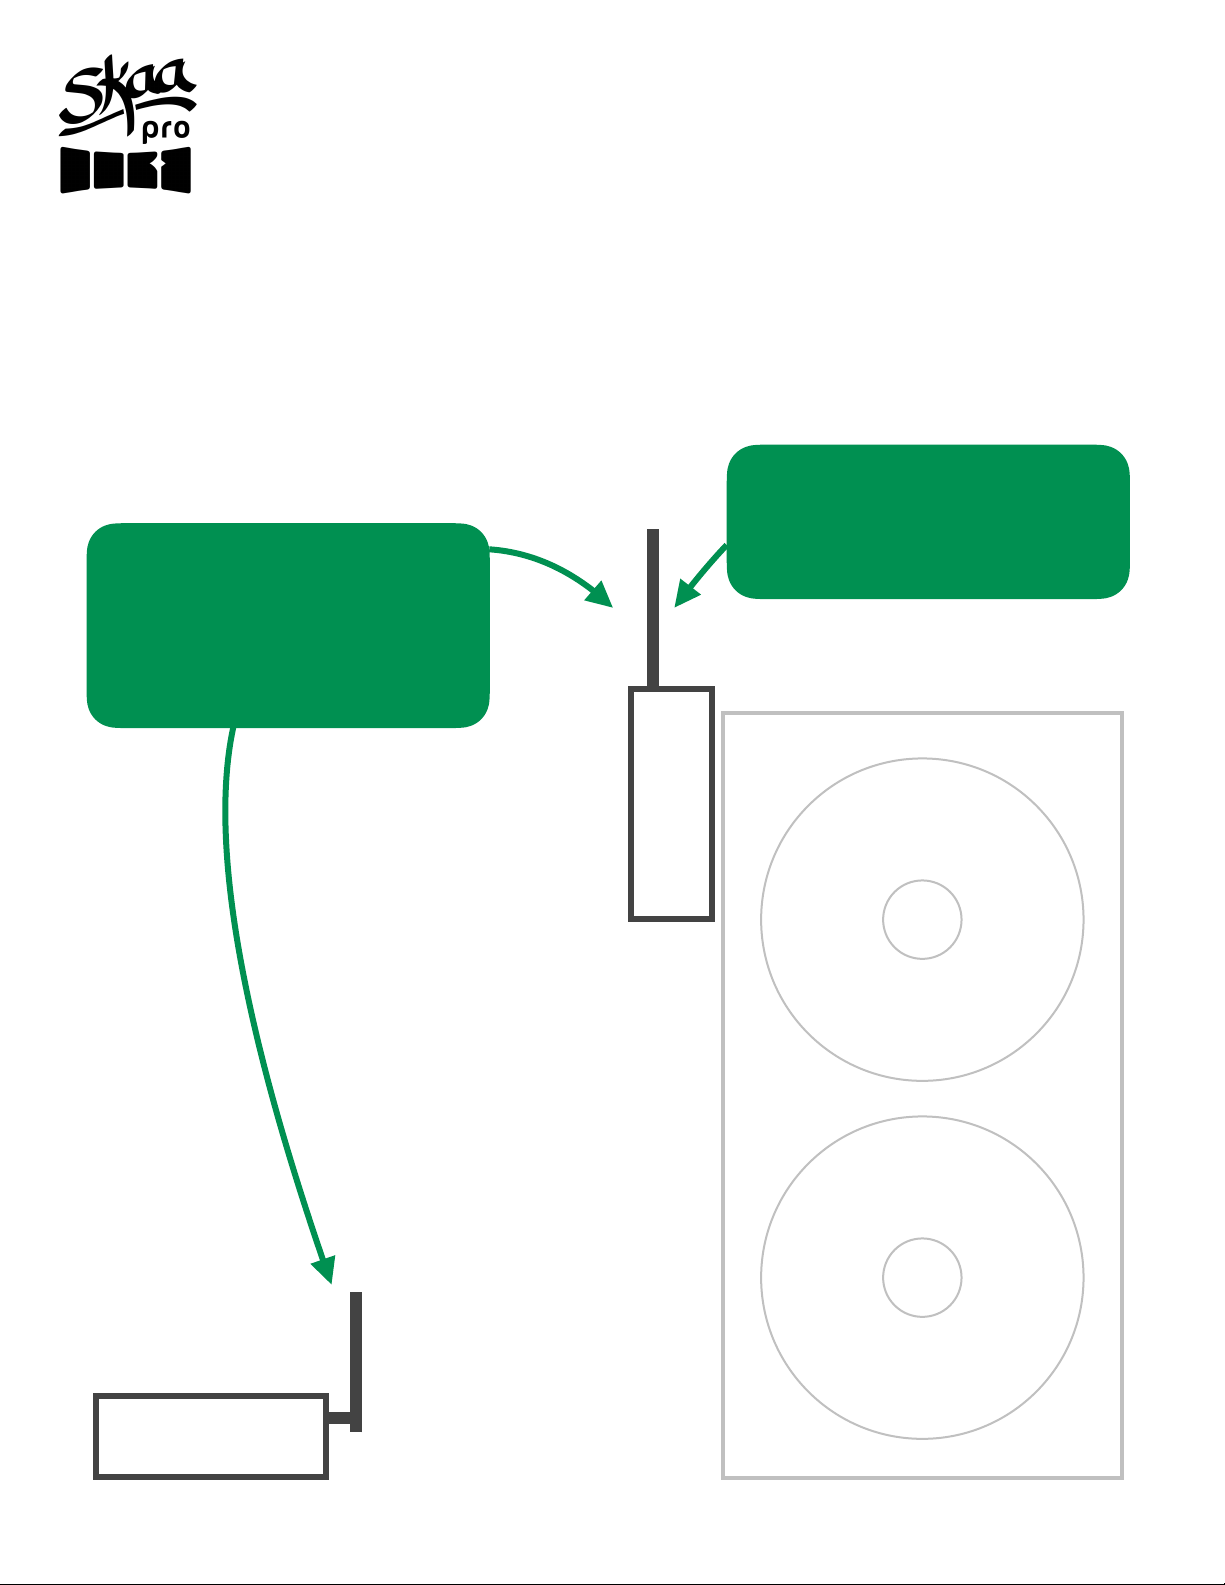
• If you’ve velcro’d Dani to a vertical surface
such as one of your front-of-house
speakers, re-orient the Antenna so it’s
pointed straight up and make sure the
Antenna clears the speaker grill — in other
words, make sure the entire length of the
Antenna is above the top of the metal grill
of the speaker — see the diagram below
USER Panel: Antenna (cont.)
Wondering how to get
Streetheart and other SKAA
Receivers, speakers and
headphones to Bond to
your new Dani Transmitter ?
… discover the power of
the Bond Button, found
on all SKAA Receivers, in
the next 2 pages
SKAA®RECEIVER USER’S GUIDE
Each SKAA receiver uses a Green List to remember your favourite audio sources (SKAA
transmitters). A Green glowing Indicator on your receiver means you are listening to a favourite,
or hunting for one. You can also explore to find new transmitters—an Amber Indicator means you
are exploring for transmitters which are not on your Green List. The Bond Button on your
receiver lets you select which audio source (SKAA transmitter) you’re listening to.
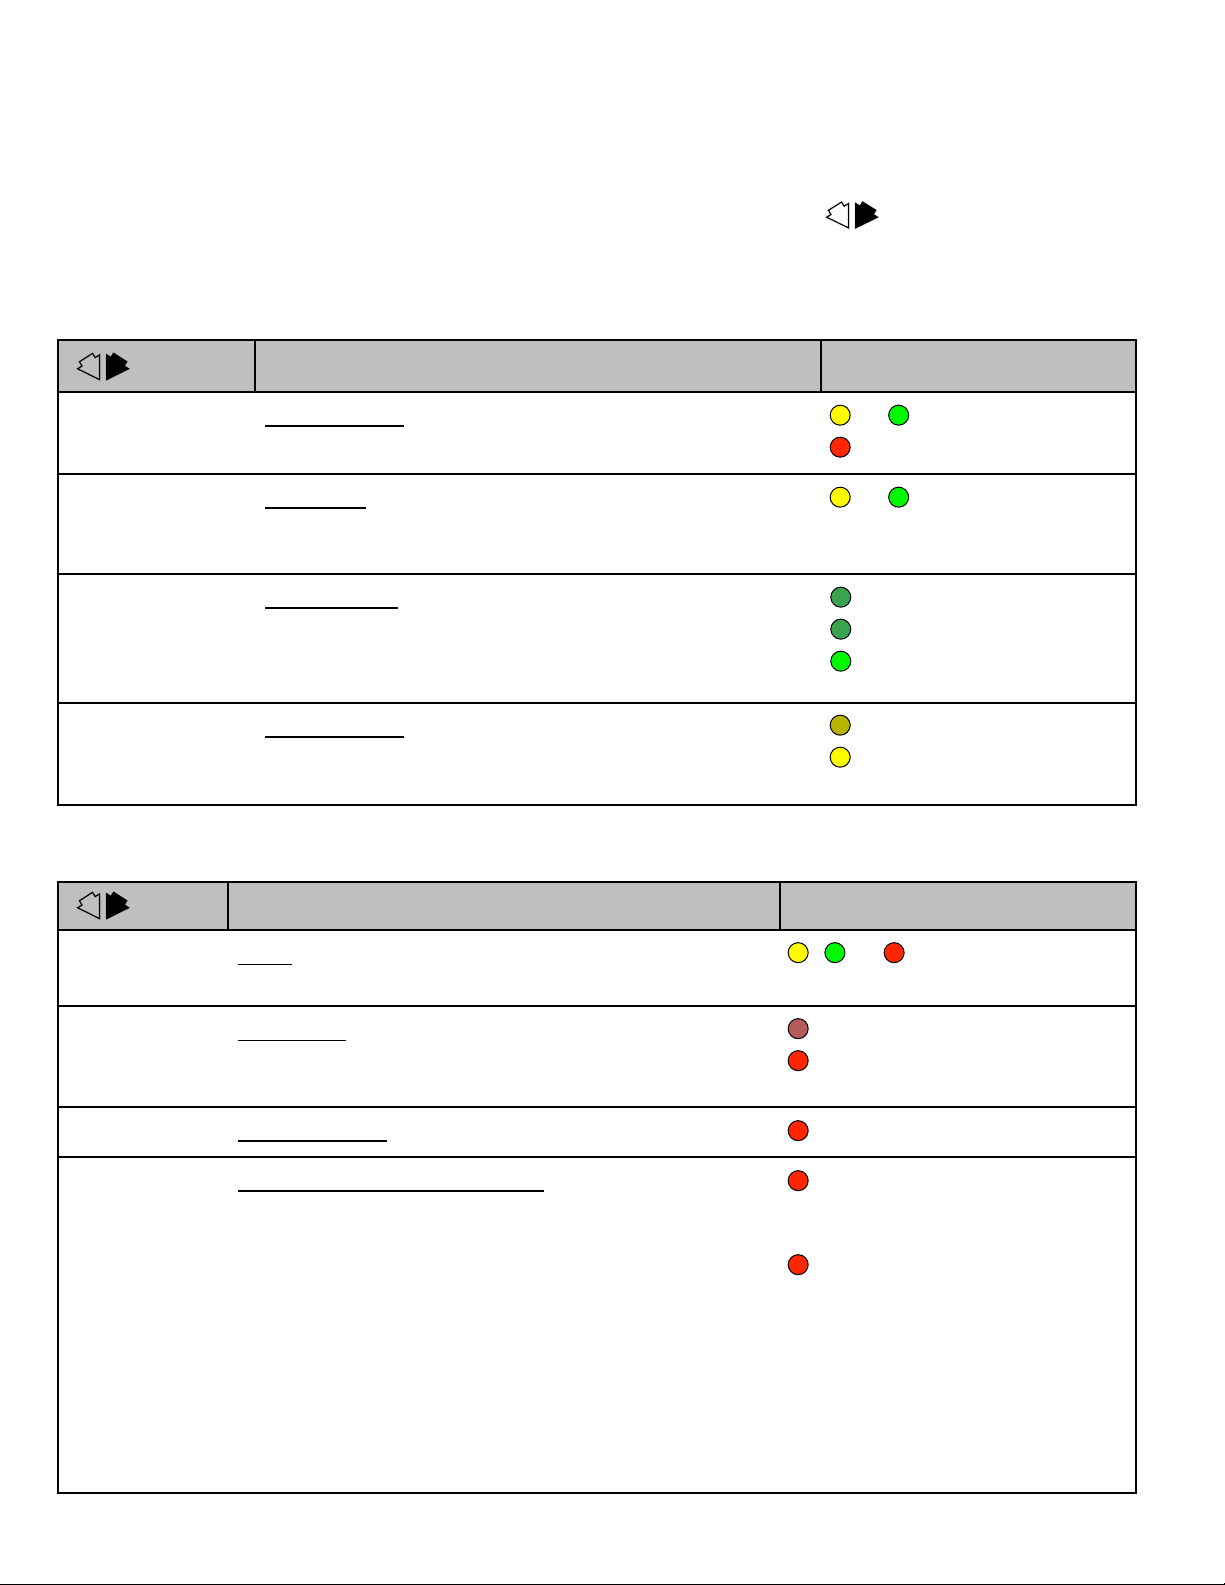
Essentials
More Commands
Button
Command
Indicator
Hold!
a few seconds
Add / Delete Manually add / delete the current
transmitter to / from your Green List
-
Auto Add SKAA will automatically add the
current Amber transmitter to your Green List if
you listen to it for 30 minutes
1 Click
Green Mode Rotate through your list of
favourite transmitters (Green List) — when a
favourite transmitter is found, the search stops
and audio plays from that transmitter
2 Clicks
Amber Mode Explore for new, unknown
transmitters (ones which are not already on your
Green List)
to = Added
(flash) = Deleted
(dim) = Hunting
(bright) = Bonded
(dim) = Hunting
(flash) = Next one
(bright) = Bonded
to = Added!
Button
Command
Indicator
3 Clicks
Mute do again to Unmute; any Click command
will first Unmute and then do its function
4 Clicks
Red Mode If you have 2 or more transmitters
on your Green List, power on just the one you
want to hear and it plays automatically.
6 Clicks
Factory Reset Clear Green List. Start Over!
Hold during
power on!
!
!
!
!
!
!
!
!
Make a Cluster of Receivers:
1. Power off all transmitters and receivers
2. Power on the Master receiver while holding
down its Bond Button—hold the button
down until the Indicator begins to flash Red
3. With the remaining receivers within 3
meters of the Master receiver, power on the
first one, wait for its Indicator to flash Red
and then power on the second one;
continue until all of them are powered on
4. Once all of the Indicators stop flashing (turn
solid Red), power off all of the receivers
, or = Muted!
(slow flash)
(flash) = Receiver has
entered ‘Cluster
Up’ mode
(bright) = The Cluster has
been
successfully
made!
(flash) = Reset Done
(dim) = Hunting
(bright) = Bonded

QUESTIONS AND ANSWERS
Question
Answer
How does the
Green List work?
You can store up to 10 SKAA transmitters on your Green List. These are your “favourite” audio
sources. Every time you add a transmitter, it is assigned the first open spot on the Green List. When
you single click the Bond Button, the receiver hunts through the Green List much like a car radio
hunts for radio stations when you press seek. If the Indicator is dim Green and flashes every few
seconds, this tells you the receiver is hunting through the Green List. Say you have 5 transmitters on
your Green List; your receiver will hunt through the list one by one: 1, 2, 3, 4, 5 and then back to 1
and so on. The dim Green Indicator flashes every time the receiver moves to the next spot on the list.
This hunting goes on for up to 1 minute. If your receiver doesn’t find any of your favourite
transmitters, it stops hunting and just waits for the last bonded favourite. If your receiver does find
one of your favourite transmitters, the hunting stops, the Indicator turns bright green, and your
receiver starts playing audio from that favourite. A dim Green Indicator that is NOT flashing means
the receiver is just sitting on one spot, waiting for a specific favourite transmitter to show up.
How do I bond
with a specific
Green transmitter?
Play audio from your source device and ensure it has a SKAA transmitter connected. Click the
Bond Button on your receiver. The receiver hunts through the Green List, flashing the Indicator as it
goes. Once your receiver finds one of your favourite transmitters, it bonds to it and plays audio from
that transmitter. If that isn’t the transmitter you wanted, click the Bond Button once more. Repeat
until your receiver bonds with the transmitter you want and you’re hearing the correct audio playing.
How do I select
transmitters if I
can’t reach my
Bond Button?
Say you want to put your receiver on a high shelf where you can’t reach the Bond Button easily. First,
set up your Green List: add all of the transmitters you’ll want to use. Then 4-click the Bond
Button to enter Red Mode. Now put the receiver up on the high shelf. Power on just one of your
transmitters and power off all others. The receiver automatically bonds to the transmitter that’s on.
How do I delete a
transmitter from
my Green List?
Factory Reset (6 Clicks of the Bond Button) clears the Green List and lets you start over from scratch.
If however, you’d like to delete just one transmitter from your Green List, first bond your receiver to
the transmitter you wish to delete. See the section above: How do I bond with a specific Green
transmitter?. Once you are bonded to it, hold down the Bond Button for a few seconds until
you see the Indicator flash Red —this Red flash means the transmitter has been deleted.
What is a Cluster?
Clusters are an optional convenience for “power users”. A Cluster is several SKAA receivers
behaving as one product. A left & right speaker pair, for example, or a sound bar and subwoofer.
What is the Master
receiver?
In any Cluster, there is a single Master receiver, and all of the other receivers in the Cluster follow its
behaviour. You can control the entire Cluster by operating the Bond Button of the Master. A
receiver must have a physical Bond Button in order to become the Master.
How do I
“uncluster” several
receivers?
Do the Make a Cluster of Receivers procedure once for each receiver, but omit Step 3. Do them one
at a time. This gives each of the receivers a functioning Bond Button, and each of them will
thereafter operate independently.
What are some
tips for making
Clusters?
Each step in the Make a Cluster of Receivers procedure has a 10-second time limit. When you see
the Master’s Indicator start to flash Red, you have 10 seconds to power on the next receiver. When
that receiver’s Indicator starts to flash Red, you have 10 more seconds to power on the next one, and
so on.
Why does only
one of my Bond
Buttons work?
When you make a Cluster from several receivers, the first one powered on in the Make a Cluster of
Receivers procedure becomes the Master of the Cluster. Only the Master’s Bond Button works
because a Cluster uses just one Green List —the Master’s Green List. The Bond Button of each of the
other receivers will work only for the Mute / Unmute function (3-Click of the Bond Button).
Can any group of
receivers be made
into a Cluster?
No. The receivers must be members of the same product family. If they are not, the Make a Cluster
of Receivers procedure won’t work. This is because only receivers which were designed to work
together (as a single product) can be made into a Cluster.

Parameter
Conditions
Value
Inputs
2 x ¼″TRS Balanced or TS
Unbalanced
Thrus
2 x ¼″TRS wired in parallel
to each respective input
Input Impedance
Line-GND, Balanced or Unbalanced
> 20 kΩ
Qty. Discrete Audio
Channels
2
Standard Compatibility
SKAA OS 2.1 and later
Any SKAA speakers, SKAA
headphones, SKAA Receivers
Input Pads (Each Channel)
0 dB, -6 dB, -12 dB, user
selectable
Max Input Level (0 dB FS)
Level -10, No pad, <0.1% THD+N, 997 Hz
1 V rms
Max Input Level (0 dB FS)
Level -10, -12 dB pad, <0.1% THD+N, 997 Hz
4 V rms
Max Input Level (0 dB FS)
Level +4, No pad, <0.1% THD+N, 997 Hz
+12 dBu
Max Input Level (0 dB FS)
Level +4, -12 dB pad, <0.1% THD+N, 997 Hz
+24 dBu
Signal LED Thresholds
Reference: 0 dB FS at the ADC input
Green: -20 dB, Red: -3 dB, of
the greater of channel 1&2
Frequency Response
Reference: 997 Hz @ 0 dB FS
20 Hz – 20 kHz, + / - 0.3 dB
THD+N
-1 dB FS, 20 Hz –20 kHz, 24 kHz BW
<0.03%
SNR Unweighted
997 Hz @ 0 dB FS, 24 kHz BW
>91 dB
SNR A-weighted
997 Hz @ 0 dB FS, 24 kHz BW
>94 dB
Crosstalk, Unbalanced
Channel to Channel, 0 dB FS, 20 Hz -20 kHz
>58 dB
Crosstalk, Balanced
Channel to Channel, 0 dB FS, 20 Hz -20 kHz
>66 dB
Digital Resolution
48 kSamples / second, 16 bit,
each channel
SKAA Transport Latency
I2S digital to I2S digital
36.72 ms, + / - 1.5 samples
SKAA Max Qty. Receivers
Concurrently Bonded
4
SKAA Pro Transport
Latency
I2S Digital to I2S Digital
19.39 ms, + / - 1.5 samples
SKAA Pro Max Qty.
Receivers
Concurrently Bonded
2
Specifications

One SKAA cell
36 milliseconds
Dani transmitter
in SKAA mode
(connected to audio source)
the 4 receivers can
be any combination
of SKAA speakers,
SKAA headphones,
and SKAA receivers

One SKAA Pro cell
19 milliseconds
All SKAA receivers work in both SKAA and SKAA Pro
modes — mode is determined by the transmitter class
Dani transmitter
in SKAA Pro mode
(connected to audio source)
the 2 receivers can
be any combination
of SKAA speakers,
SKAA headphones,
and SKAA receivers
LEGEND
SKAA
SKAA Pro
WiFi
Wire
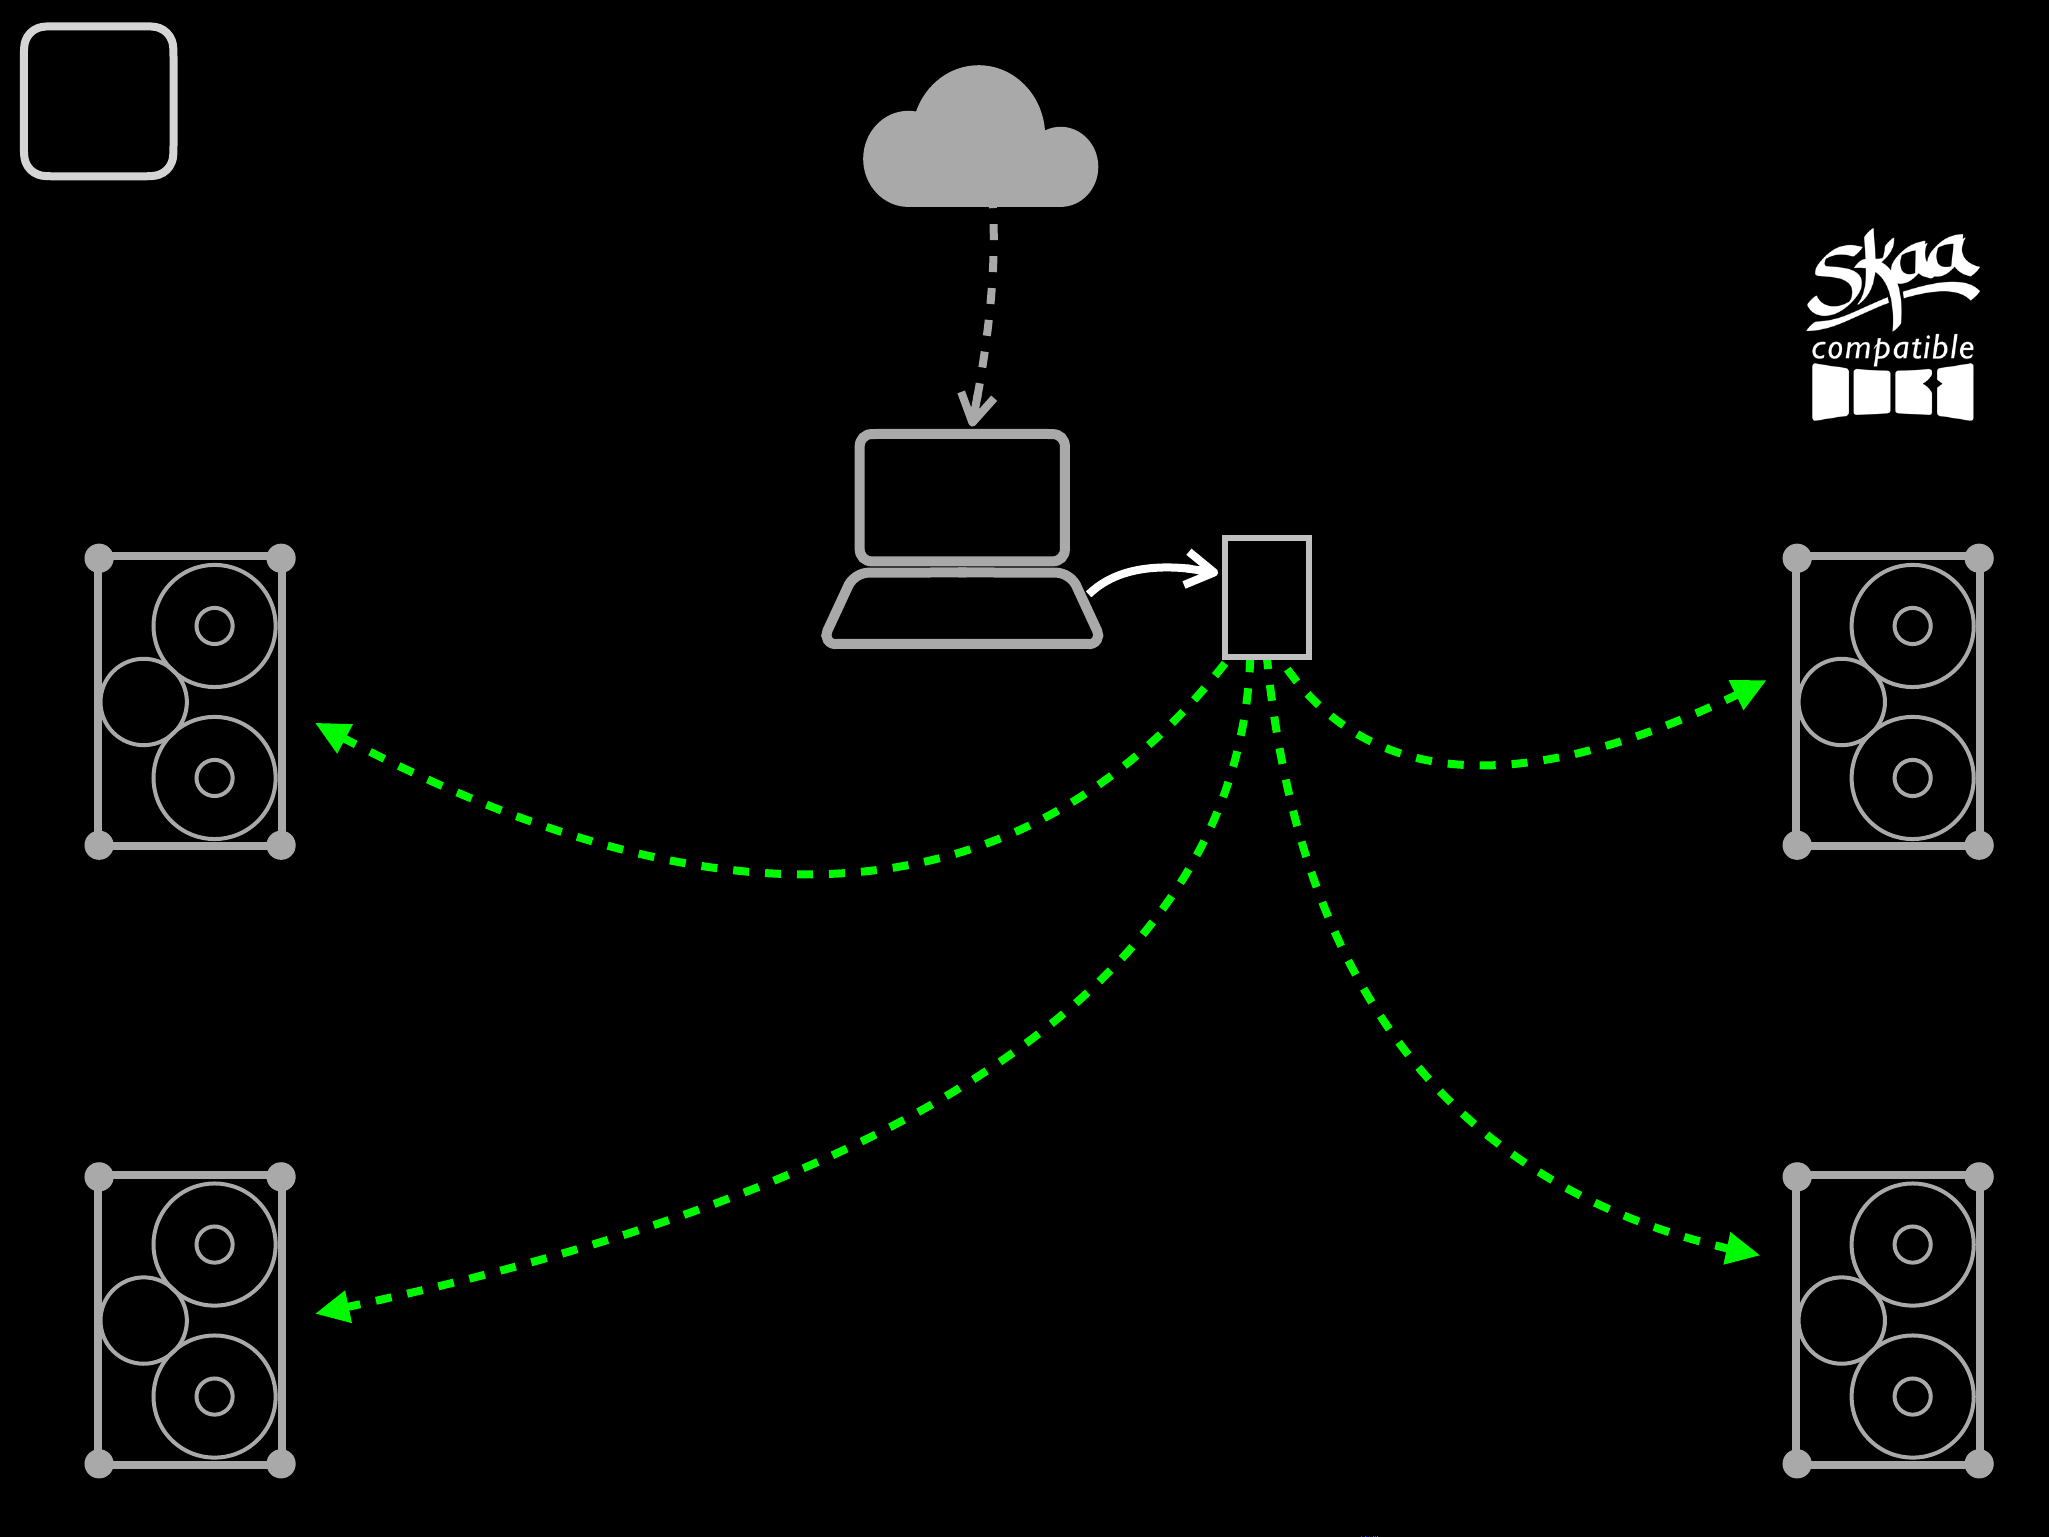
Hi Fidelity Party
streaming music
Pump up the fidelity by keeping Bluetooth
out of the signal chain. Just use computer,
tablet or phone with a Spotify account
Dani
SKAA Speaker SKAA Speaker
SKAA Speaker SKAA Speaker
L
L
R
R
1

Keep it Simple DJ Party
Serato and others have “mixer free” DJ
solutions (software and laptop only) so
this setup is ideal for DJs who want a
light-weight rig which is easy to set up
Dani
SKAA Speaker SKAA Speaker
SKAA Speaker SKAA Speaker
DJ Music Service
BPM Supreme etc.
L
L
R
R
2
Table of contents


