Dillinger Labs SKAA Helix User manual

Helix
owner’s manual
SKAA® wireless
Headphones
Developed in Canada
built to survive a slapshot
4. Quick Start Guide
1. Introduction
Thanks for choosing Dillinger Labs. You're now the proud
owner of Helix, our flagship headphones, powered by SKAA
wireless technology.
SKAA prides itself on ease of use and flexibility. Combine
these values with Dillinger Labs’ commitment to audio
quality and you get Helix. Truly great headphones.
We know you are eager to fire up your new gear and we
don’t want to keep you waiting. Refer to 4. Quick Start
Guide to have your headphones up and running in no time.
Once you’re moving and grooving, come back and learn all
about the ins and outs of Helix.
A few important bytes of information
Have you seen this icon before?
The SKAA Compatible Badge
certifies that this Product has
been tested and is fully
compliant with all of the
requirements of the SKAA
Standard and has been granted
SKAA Certification. This Product will work seamlessly with all
other products sporting the SKAA Compatible Badge.
If your transmitter is capable of SKAA Pro, so is Helix!
SKAA Pro reduces the latency of SKAA from 36ms to 19ms.
Check out the video on SKAA Pro here.
For more information on the SKAA Standard, please visit
SKAA.com. The SKAA® name as well as its associated marks,
logos, and icons are trademarks or registered trademarks of
Eleven Engineering Inc.
2. Live in the moment
Using SKAA technology, Helix has a latency as low as 19ms.
Just switch your transmitter into SKAA Pro and Helix will
switch into SKAA Pro automatically.
But what does this mean and why is it important?
Unlike other wireless headphones which lag behind, Helix
breaks free from the status quo by having no noticeable
delay between you!and the audio source. This allows you to
feel directly plugged in but!with the freedom of wireless
headphones.
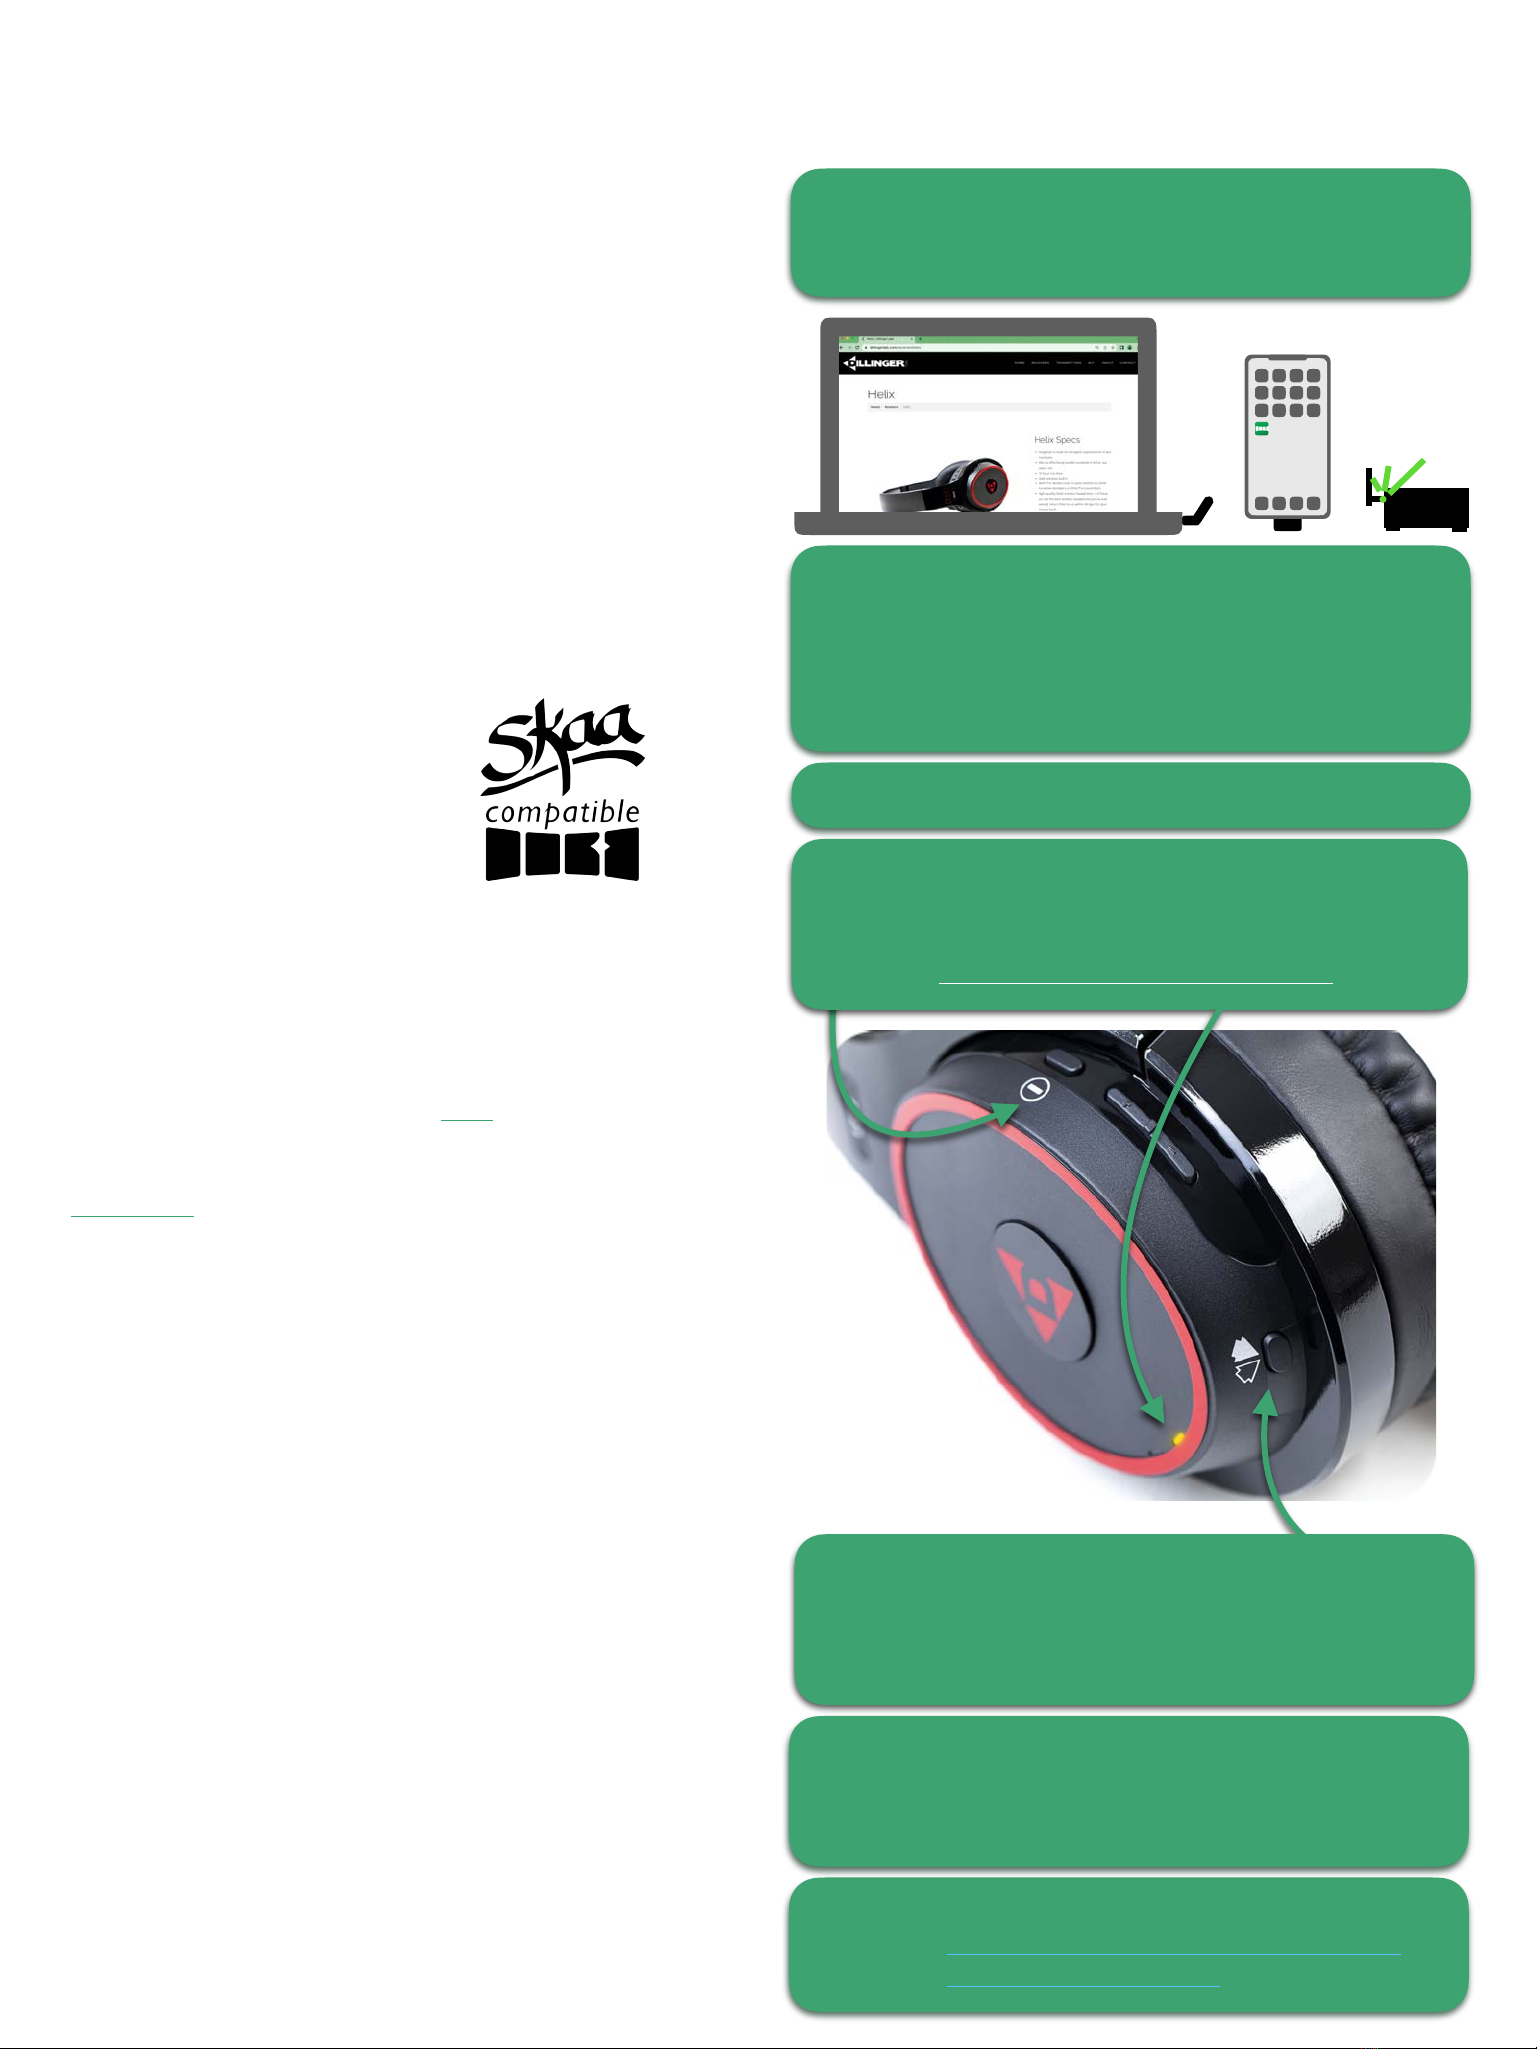
3. Super simple control!
As depicted in the image on the right, Helix headphones
integrate simple-to-use button controls for you to interact
with.
All the controls you need: Bond Button, track control, power,
and volume controls are intuitively laid out on the left cup.
Keep this info in mind as it will come in handy as we traverse
through the manual.
Step 3: Press n’ hold the power switch for 2 seconds.
Helix will instantly Bond to the Transmitter
and the Bond Indicator will shine solid Amber.
You should now hear audio playing.
If the Bond Indicator stays dim Amber and you don’t hear
any audio, carry out a factory reset by quickly clicking the
Bond Button 6 times. Your click speed should be similar to
multi-clicking a computer mouse.
Bonus Links :
SKAA Wireless Audio Beginner's Guide
SKAA YouTube Channel
Step 1: Connect your chosen SKAA Transmitter to
an audio source and, if required, turn the
Transmitter on.
Ursula and Cassandra PC Users:
Mac OS: Navigate to System Preferences > Sound, and
set the output device to SKAA Transmitter.
Microsoft OS: Navigate to Sound Settings and select
SKAA Transmitter as your output device.
Step 2: Play audio on your device.
Step 4: Adjust volume by pressing the volume button
up or down Note: The output volume of your
source device will affect the volume from Helix.

8. Printed F Antenna
Wireless headphones are only as good as their range and
Helix comes out on top. We’ve paired SKAA’s
groundbreaking flexibility and Eleven Engineering’s top-of-
class Printed F Antenna to maximize your wireless freedom.
Ingenious engineering choices allow Helix to reach up to 25
meters of indoor wireless range when Bonded to a SKAA
Transmitter such as a Dani, Ursula, Akiko, Talisa or any
Nadja Hubs.
9. Intuitive track control
Using the power button as shown in the image below, audio
playback can be controlled with just a few simple clicks. A
single click will play/pause. A double click will skip over the
song that should never have made it onto your playlist.
Lastly, a triple click will jump you back to the previous track.
10. Power modes
Helix and SKAA Transmitters work together to optimize
battery life when audio isn’t playing.
2.5 minutes after audio stops - The Transmitter drops
its Bond with Helix, turning Helix’s Bond Indicator dim.
3 minutes after Bond loss - Helix enters Standby,
reducing power consumption but ready if your
transmitter becomes active again.
15 minutes after Bond loss - Helix turns itself off to
save battery life. You’ll have to power it on with a 2-
second press of its power button to get going again.
5. SaffronTM - The Brains
SKAA technology is known for reliable, high-fidelity
audio. To take this one step further we present to you
SaffronTM by Eleven Engineering.
Utilizing the advanced multithreaded architecture that
Eleven’s chips are known for, Saffron is able to run
multiple tasks simultaneously, which is key for reliable
high-fidelity audio. What makes Saffron really special is
that it accomplishes this while consuming the least
amount of power of any SKAA chip on Earth, making it
the perfect choice for Helix.
6. DSP/DAC - The Brawn
Sound quality and battery life can sometimes be at odds
in a product like Helix, but not when designed around
Texas Instruments’ DSP/DAC technology complete with
built-in amplifier.
Your headphones harness the flexibility of PowerTuneTM
to control power consumption while delivering
professional audio quality.
7. Design - The Beauty
Form may follow function, but that doesn’t mean that high-
quality audio can’t flow through beautifully styled
headphones. Helix boasts a minimalist yet bold red and
black colour scheme styled by a team of proud Canucks who
want to give a little more OOMPH to your audio collection.
Helix was crafted for comfort during long-term use. A plush
headband and ear cups will keep your head just as happy as
your ears. Dillinger Labs partnered with Audio Technica,
leveraging their design and manufacturing expertise to
realize the luxurious powerhouse that now sits in front of you.
11. Charging
Helix can continuously play audio while charging, allowing
you to keep the tunes blasting on high when battery levels
are low.
Each pair of Helix headphones ships with a standard micro
USB cable for fast reliable charging.
The micro USB charging port is located on the bottom of the
right cup, under a protective cover, as shown below.
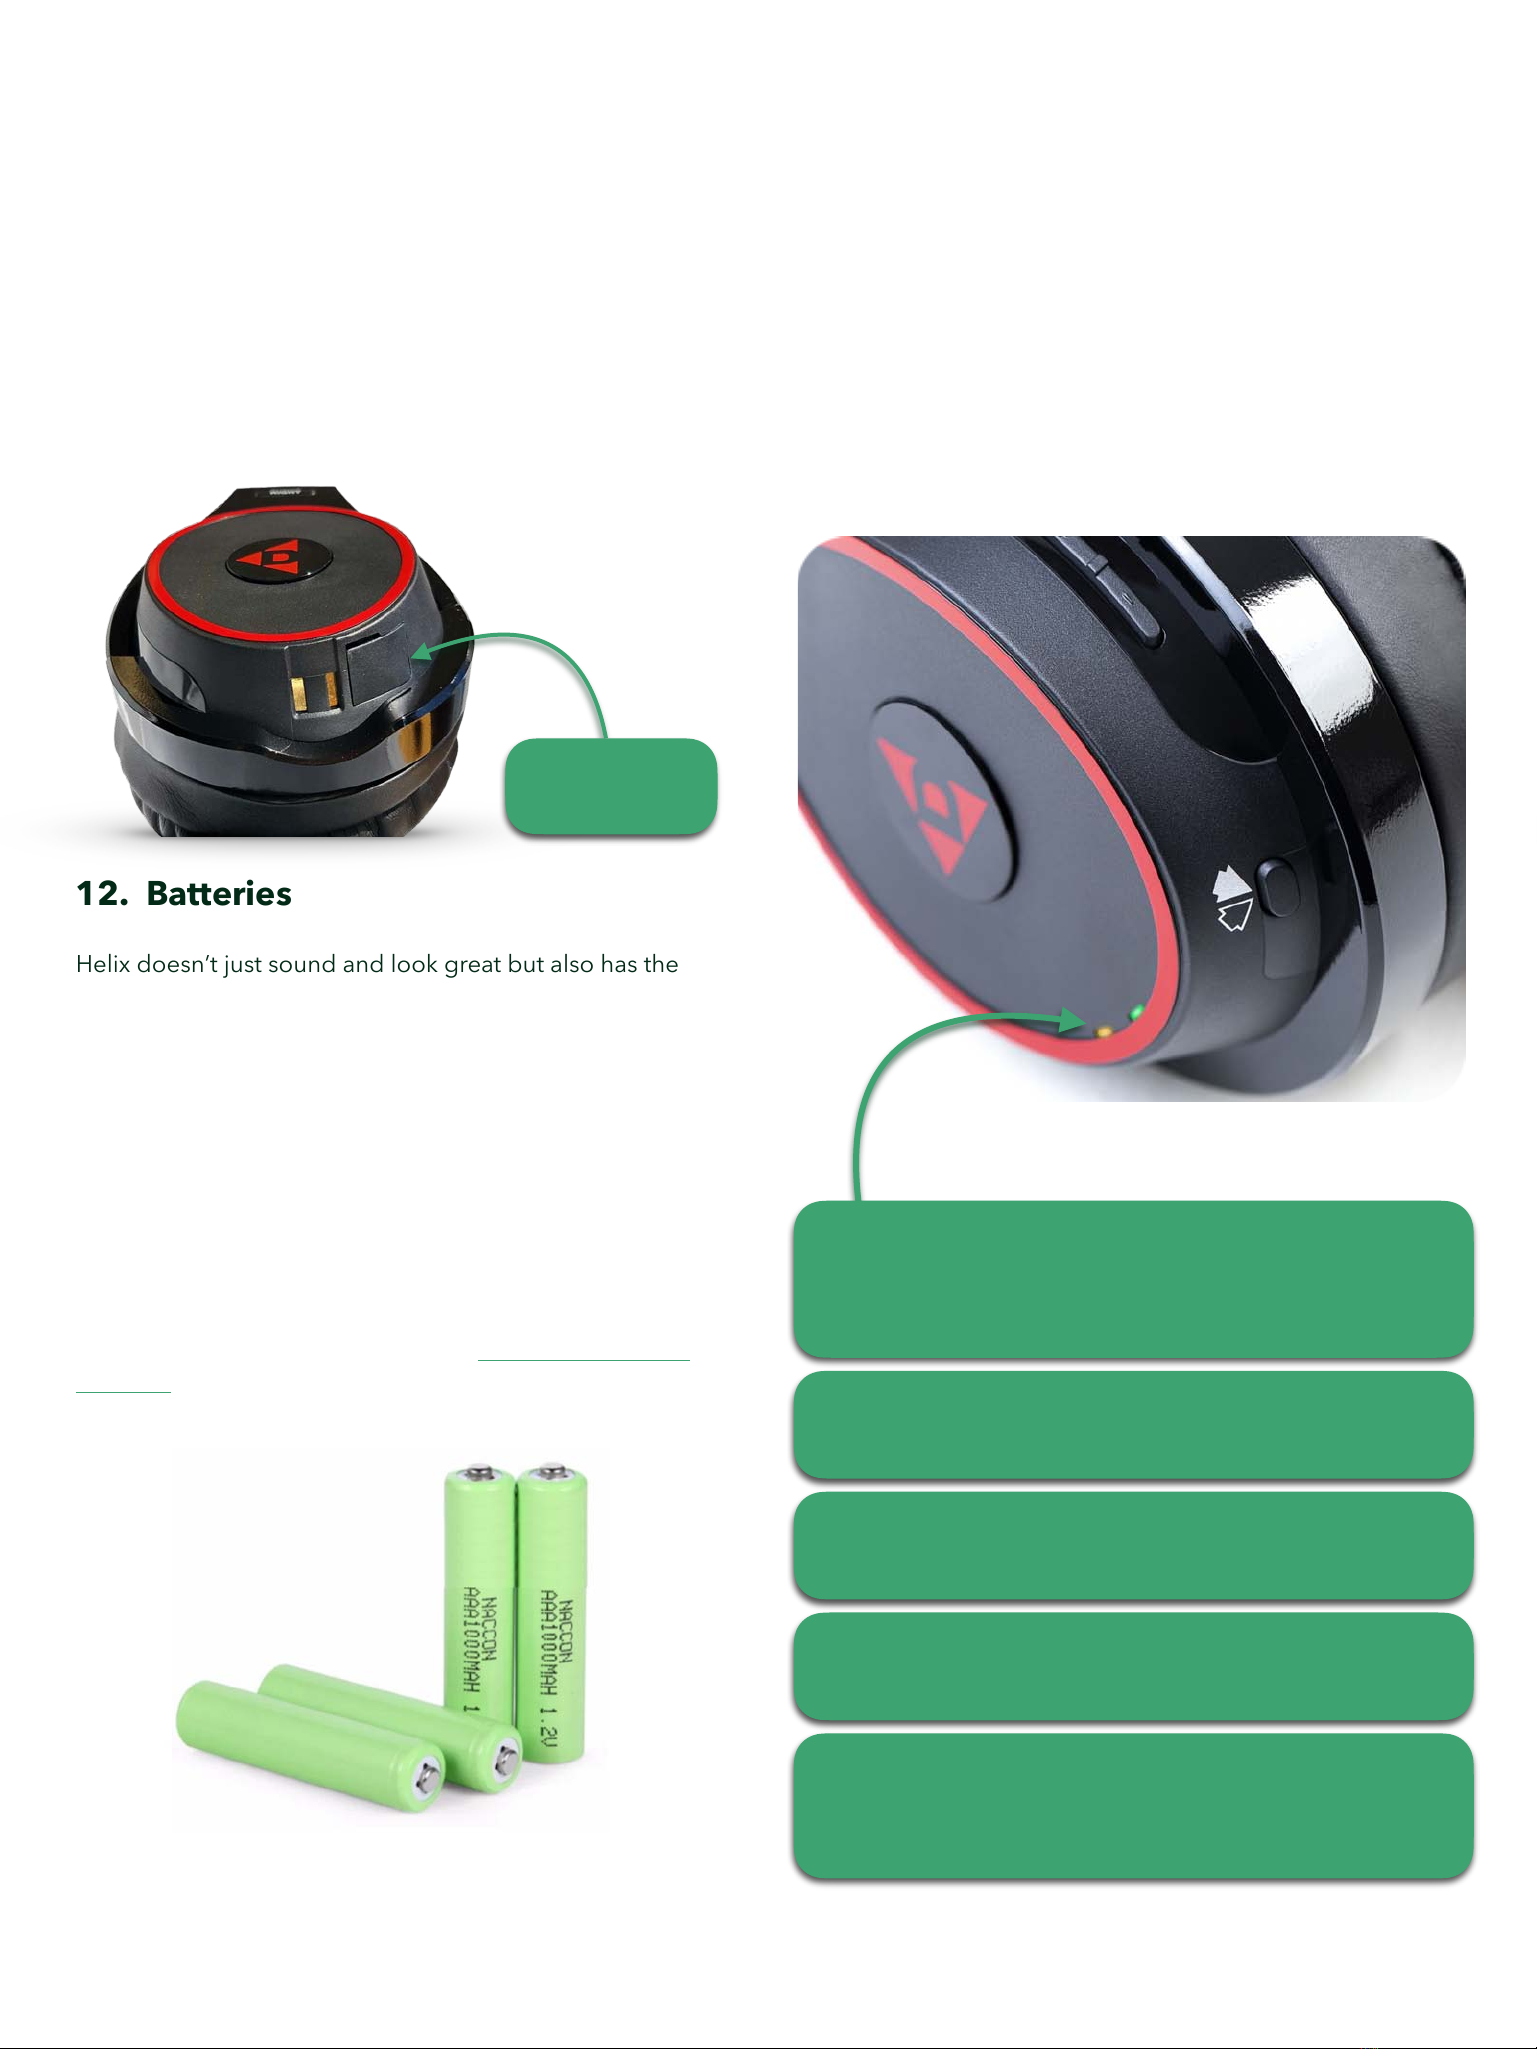
12. Batteries
Helix doesn’t just sound and look great but also has the
battery life to back it up. With two 1100 mAh AAA
rechargeable batteries, Helix will keep you jamming for up to
10 hours of continuous use!
10 hours of battery life is great but how long will they last in 2
years, 5 years, or longer? Battery degradation sucks but
we’ve got you covered. In less than 5 minutes you can swap
out the batteries with easy-to-find replacements, ensuring
that Helix will last as long as the day you bought them.
We’ve even created a quick replacement guide we’d be
happy to send you, just contact us at dillingerlabs.com/
contact/.
13. Battery care
Unlike Lithium Ion batteries that want you to keep their
charge between 20-80%, Helix uses batteries that you can
drain all the way down to 0% and charge to 100% for a
longer run time.
It is recommended to charge Helix after completely draining
the battery to ensure the longevity of the battery cells. But as
mentioned in Section 12, if this isn’t always possible don’t
sweat as the batteries are easily swappable if needed down
the road.
Micro USB
charging port
From a depleted state, the battery requires ~4 hours to be
fully recharged.
During the charging process, the Battery LED will stay
illuminated indicating that headphones are charging.
During charging, if the charging LED begins flashing
slowly, we recommend replacing the batteries. A Video
tutorial can be requested from dillingerlabs.com/contact/
When Helix approaches low battery, the Amber Battery
LED will begin flashing beside the Bond indicator. The
flashing LED lets you know to plug in the charging adapter.
When the Battery LED goes out during charging, Helix is
fully charged and ready to go.

14. SKAA cmd App
The SKAA cmd App provides a useful set of additional
features to your headphones & speakers. For example, you
can add custom names to each pair of headphones or
speakers, easily mute all headphones & speakers or adjust
individual volumes. It also lets you quickly identify which
speakers & headphones are currently bonded to your
phone’s transmitter and much more.
The SKAA cmd App is available for iOS, Android, Mac, and
Windows platforms. It can be download from the Apple
App Store, Google Play Store, and on www.skaa.com/tlc/
skaa-cmd/.
Check out www.skaa.com/tlc/support/ for the dedicated
SKAA cmd App user’s guide.
1
2
3
4
5
6
7
8
9
10
1. The receiver bay shows you when a SKAA receiver or
Cluster is bonded.
2. Move this slider to modify the volume of each
individual speaker.
3. Click “i” to see the App Info Screen.
App Info Screen will show you the app version, app
license, libraries used, transmitter firmware, and screen
size.
4. Master volume control. Use this slider to change
volume on all speakers and headphones simultaneously.
5. Master mute. Click on the triangle and a laser beam
straight out of sci-fi movies will mute all bonded
speakers and headphones.
6. This button allows you to customize the power
mode.
RED: keep transmitter always ON
WHITE: turn OFF transmitter after 2.5min of no audio
GREY: keep transmitter OFF even when audio is being
sent to the transmitter.
7. Customize the name of your Transmitter.
8. IMPORTANT: The green bond block lets you choose
whether a receiver is playing left, right, mono, or both
channels.
9. Press to mute individual speakers or headphones.
Press again to unmute.
10. Customize the name of your headphones &
speakers. Like “Gaming headphones” or “Rocking Right
Speaker”.
Kyle’s Headphones
Antonenko’s Headphones

Parameter
Conditions
Value
Model number
PL5576
Battery
2 x 1100 mAh replaceable AAA batteries
Battery life
Normal Listening
10-hour battery life with typical use
Charge time
From Empty
~2 hours
Digital resolution
48 kSamples/s, 16 bit
Antenna type
Printed F antenna
Indoor range
15 - 25 meter range based on transmitter used
Weight
259 g
Standard Compatibility
SKAA OS 2.1 and later
Any SKAA or SKAA Pro Transmitter, any Nadja Hub
SKAA Transport Latency
I2S Digital to I2S Digital
36.72ms +/- 1.5 samples
SKAA Pro Transport Latency
I2S Digital to I2S Digital
19.39ms +/- 1.5 samples
SKAA Max Qty Receivers
Concurrently Bonded
4
SKAA Pro Max Qty Receivers
Concurrently Bonded
2
Power Supply Rating
5VDC 2.5W
FCC ID
OP5PL5576
IC Number
3534A-PL5576
CE Status
Certified
Specifications

13. Important Information
Please read the following information carefully. Failure to follow the safety guidelines may result in personal injury or user
dissatisfaction.
1. Never operate or store headphones in close proximity to a heat source.
2. Do not operate Headphones in rain. Headphones are not water resistant.
3. Do not charge headphones during electrical storms.
4. Do not leave headphones plugged in and charging for extended periods of time.
5. Drain the battery fully before charging to prolong battery life.
6. Remember with great audio comes great responsibility. Listening to headphones at maximum volume may lead to partial
hearing loss.
7. Do not take headphones apart unless replacing the batteries (contact for detailed instructions). The warranty will be
voided.
Dillinger Labs advises the reader that this owner’s manual is being continuously updated to reflect the most up-to-date and
accurate information regarding Helix Headphones. Please check our website periodically for the most recent version of this
manual.
Should you have any comments or questions about SKAA or Dillinger Labs products, we invite you to write to us here.
Check out SKAA’s YouTube channel to familiarize yourself with an array of fantastic SKAA products.

SKAA®RECEIVER USER’S GUIDE
Each SKAA receiver uses a Green List to remember your favourite audio sources (SKAA
transmitters). A Green glowing Indicator on your receiver means you are listening to a favourite,
or hunting for one. You can also explore to find new transmitters—an Amber Indicator means you
are exploring for transmitters which are not on your Green List. The Bond Button on your
receiver lets you select which audio source (SKAA transmitter) you’re listening to.
Essentials
More Commands
Button
Command
Indicator
Hold!
a few seconds
Add / Delete Manually add / delete the current
transmitter to / from your Green List
-
Auto Add SKAA will automatically add the
current Amber transmitter to your Green List if
you listen to it for 30 minutes
1 Click
Green Mode Rotate through your list of
favourite transmitters (Green List) — when a
favourite transmitter is found, the search stops
and audio plays from that transmitter
2 Clicks
Amber Mode Explore for new, unknown
transmitters (ones which are not already on your
Green List)
to = Added
(flash) = Deleted
(dim) = Hunting
(bright) = Bonded
(dim) = Hunting
(flash) = Next one
(bright) = Bonded
to = Added!
Button
Command
Indicator
3 Clicks
Mute do again to Unmute; any Click command
will first Unmute and then do its function
4 Clicks
Red Mode If you have 2 or more transmitters
on your Green List, power on just the one you
want to hear and it plays automatically.
6 Clicks
Factory Reset Clear Green List. Start Over!
Hold during
power on!
!
!
!
!
!
!
!
!
Make a Cluster of Receivers:
1. Power off all transmitters and receivers
2. Power on the Master receiver while holding
down its Bond Button—hold the button
down until the Indicator begins to flash Red
3. With the remaining receivers within 3
meters of the Master receiver, power on the
first one, wait for its Indicator to flash Red
and then power on the second one;
continue until all of them are powered on
4. Once all of the Indicators stop flashing (turn
solid Red), power off all of the receivers
, or = Muted!
(slow flash)
(flash) = Receiver has
entered ‘Cluster
Up’ mode
(bright) = The Cluster has
been
successfully
made!
(flash) = Reset Done
(dim) = Hunting
(bright) = Bonded

QUESTIONS AND ANSWERS
Question
Answer
How does the
Green List work?
You can store up to 10 SKAA transmitters on your Green List. These are your “favourite” audio
sources. Every time you add a transmitter, it is assigned the first open spot on the Green List. When
you single click the Bond Button, the receiver hunts through the Green List much like a car radio
hunts for radio stations when you press seek. If the Indicator is dim Green and flashes every few
seconds, this tells you the receiver is hunting through the Green List. Say you have 5 transmitters on
your Green List; your receiver will hunt through the list one by one: 1, 2, 3, 4, 5 and then back to 1
and so on. The dim Green Indicator flashes every time the receiver moves to the next spot on the list.
This hunting goes on for up to 1 minute. If your receiver doesn’t find any of your favourite
transmitters, it stops hunting and just waits for the last bonded favourite. If your receiver does find
one of your favourite transmitters, the hunting stops, the Indicator turns bright green, and your
receiver starts playing audio from that favourite. A dim Green Indicator that is NOT flashing means
the receiver is just sitting on one spot, waiting for a specific favourite transmitter to show up.
How do I bond
with a specific
Green transmitter?
Play audio from your source device and ensure it has a SKAA transmitter connected. Click the
Bond Button on your receiver. The receiver hunts through the Green List, flashing the Indicator as it
goes. Once your receiver finds one of your favourite transmitters, it bonds to it and plays audio from
that transmitter. If that isn’t the transmitter you wanted, click the Bond Button once more. Repeat
until your receiver bonds with the transmitter you want and you’re hearing the correct audio playing.
How do I select
transmitters if I
can’t reach my
Bond Button?
Say you want to put your receiver on a high shelf where you can’t reach the Bond Button easily. First,
set up your Green List: add all of the transmitters you’ll want to use. Then 4-click the Bond
Button to enter Red Mode. Now put the receiver up on the high shelf. Power on just one of your
transmitters and power off all others. The receiver automatically bonds to the transmitter that’s on.
How do I delete a
transmitter from
my Green List?
Factory Reset (6 Clicks of the Bond Button) clears the Green List and lets you start over from scratch.
If however, you’d like to delete just one transmitter from your Green List, first bond your receiver to
the transmitter you wish to delete. See the section above: How do I bond with a specific Green
transmitter?. Once you are bonded to it, hold down the Bond Button for a few seconds until
you see the Indicator flash Red —this Red flash means the transmitter has been deleted.
What is a Cluster?
Clusters are an optional convenience for “power users”. A Cluster is several SKAA receivers
behaving as one product. A left & right speaker pair, for example, or a sound bar and subwoofer.
What is the Master
receiver?
In any Cluster, there is a single Master receiver, and all of the other receivers in the Cluster follow its
behaviour. You can control the entire Cluster by operating the Bond Button of the Master. A
receiver must have a physical Bond Button in order to become the Master.
How do I
“uncluster” several
receivers?
Do the Make a Cluster of Receivers procedure once for each receiver, but omit Step 3. Do them one
at a time. This gives each of the receivers a functioning Bond Button, and each of them will
thereafter operate independently.
What are some
tips for making
Clusters?
Each step in the Make a Cluster of Receivers procedure has a 10-second time limit. When you see
the Master’s Indicator start to flash Red, you have 10 seconds to power on the next receiver. When
that receiver’s Indicator starts to flash Red, you have 10 more seconds to power on the next one, and
so on.
Why does only
one of my Bond
Buttons work?
When you make a Cluster from several receivers, the first one powered on in the Make a Cluster of
Receivers procedure becomes the Master of the Cluster. Only the Master’s Bond Button works
because a Cluster uses just one Green List —the Master’s Green List. The Bond Button of each of the
other receivers will work only for the Mute / Unmute function (3-Click of the Bond Button).
Can any group of
receivers be made
into a Cluster?
No. The receivers must be members of the same product family. If they are not, the Make a Cluster
of Receivers procedure won’t work. This is because only receivers which were designed to work
together (as a single product) can be made into a Cluster.
D
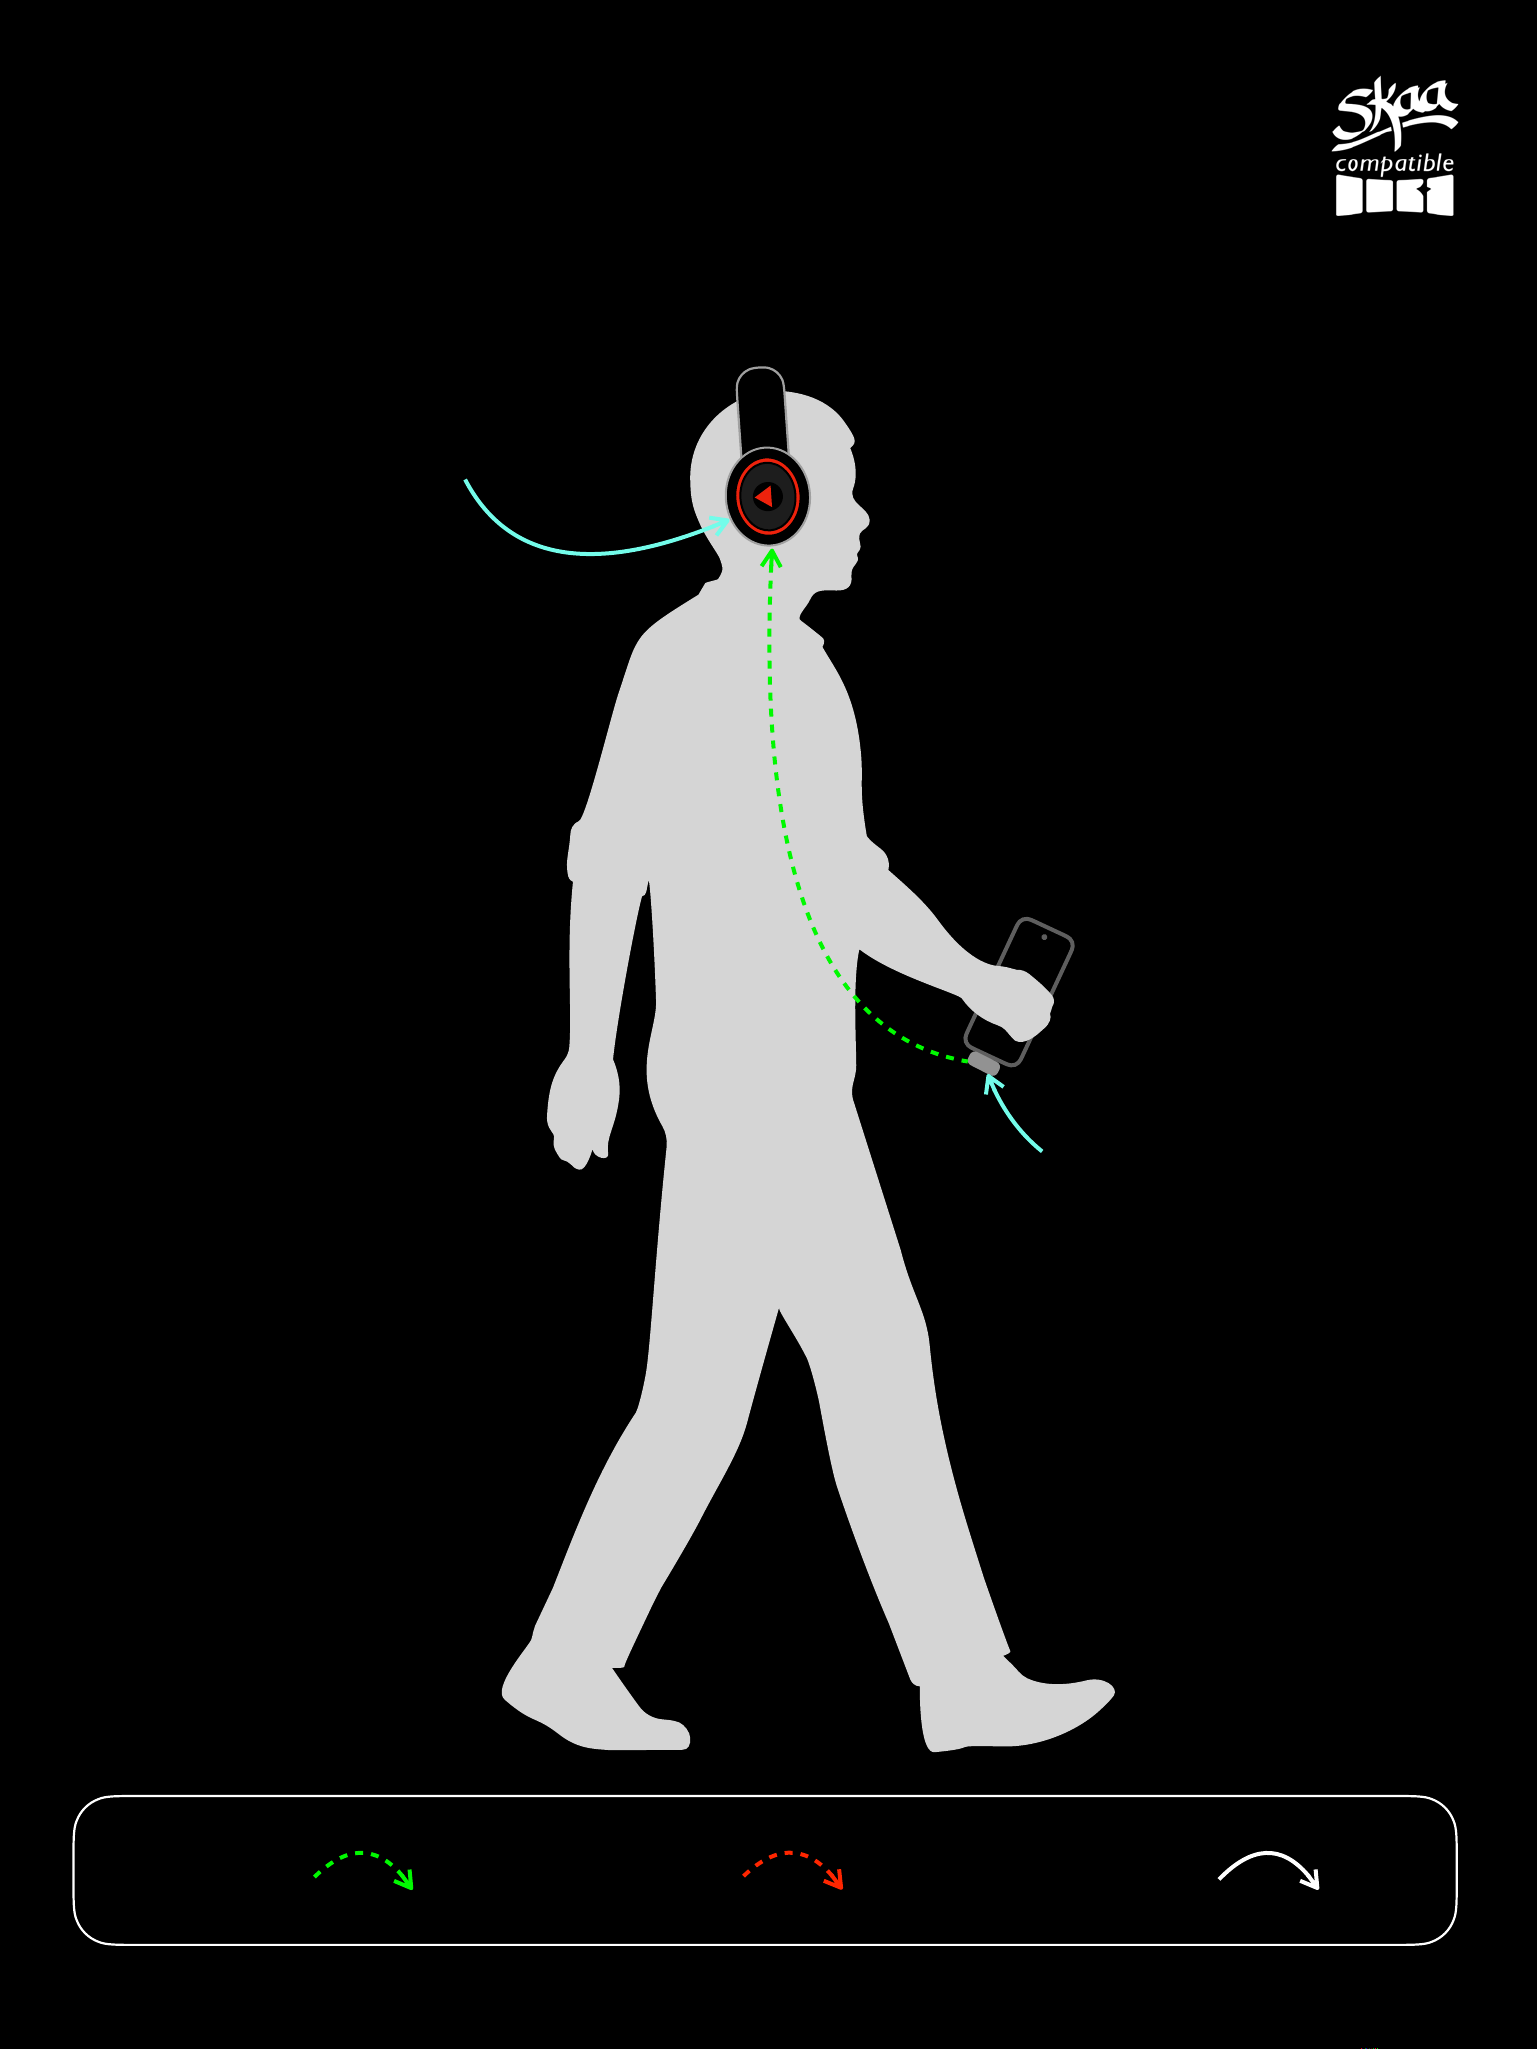
Helix Use Case #1
Music on the go
SKAA - 36 ms latency Wire
Legend:
Cassandra or Diz
Transmitter
Helix Headphones
SKAA Pro - 19 ms latency

Helix Use Case #2
Studio Recording
SKAA - 36 ms latency Wire
Legend:
Dani Transmitter
Helix
Dani Transmitter
Mixer
SKAA Pro - 19 ms latency
Helix Helix
Helix
Thru

Helix Use Case #3
Podcasting
SKAA - 36 ms latency Wire
Legend:
SKAA Enabled CVP Mixer
Helix
Helix
SKAA Pro - 19 ms latency
Helix
Helix

11
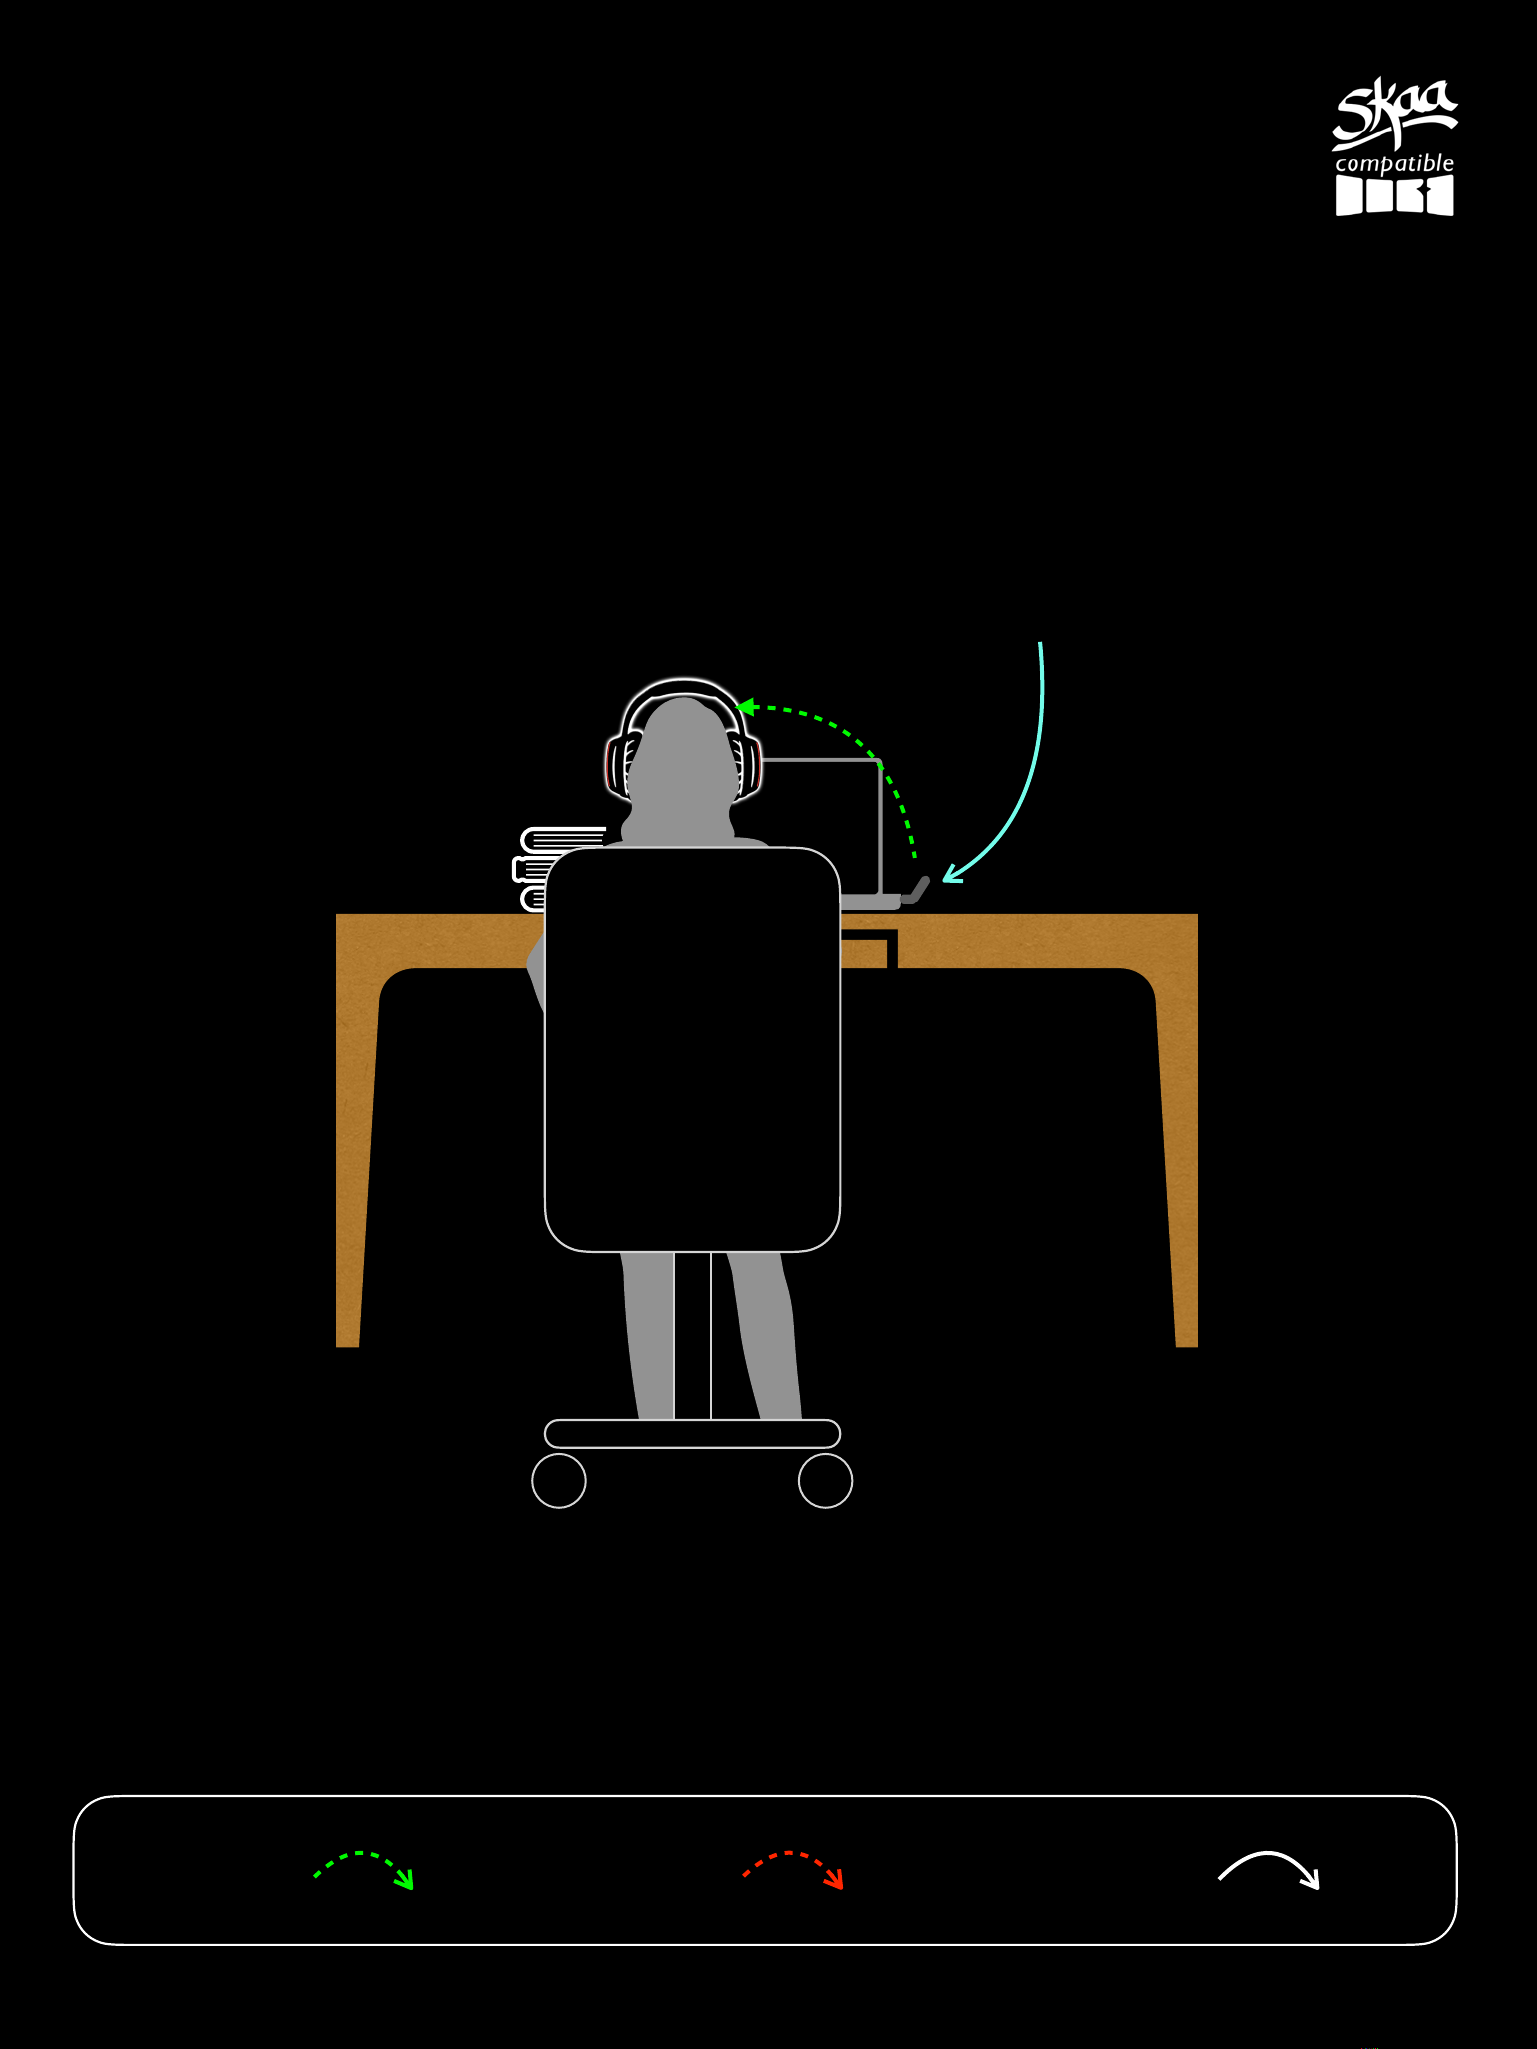
Helix Use Case #5
SKAA - 36 ms latency SKAA Pro - 19 ms latency Wire
Legend:
Computer with Helix
Ursula
Transmitter

Helix Use Case #6
Gaming
SKAA - 36 ms latency SKAA Pro - 19 ms latency Wire
Legend:
Television
Ursula
Transmitter
Helix
Game Console*
*Check your game console manual to see if it supports USB audio
At the time of writing, the following SKAA Transmitters are console compatible
SKAA TX Compatibility
Cassandra (USB-C)
Ursula (USB-A)
Akiko (3.5mm)
Talisa (SPDIF)
Nintendo Switch
No
Dock
Handheld
No
Playstation 4/5
No
Yes
No
Yes
Steam Deck
Yes
No
Yes
No
Xbox One X/S
No
No
No
Yes
Helix

Helix Use Case #7
Watching movies
Talisa Transmitter
SKAA - 36 ms latency SKAA Pro - 19 ms latency Wire
Legend:
Television
Helix HeadphoneHelix Headphone
Table of contents
Other Dillinger Labs Wireless Headphones manuals


