diLUSSO CE528MP User manual

Undermount Rangehood
CE528MP
CE728MP
Installation and Operation Manual
To avoid the risk of accident or damage to the appliance, it is essential to read the
following instructions prior to product installation and / or first time usage.
V1.0

CONTENTS
Important Note ————–-———————————————————Page 3
Product Specification ———–——————————————————Page
Installation Instruction ——————–—-—————————————Page 8
Ducted mode ——————-————–—————————————Page 14
Recirculation mode ——–——————–-————————————-Page 1
Electrical Connection ———————————————–-—————Page 17
Rangehood Operation & Control ————————————————Page 18
Cleaning and Maintenance ———–——–-——————–-—————Page 19
Troubleshooting ———————–——-—————————————Page 21
Schematic Diagram——————————————————————Page 22
2

Important Notes
Dear Customer
Thank you for choosing our product. This appliance is easy to use; however please
read this handbook carefully before installing and operating it. Herein, you will find
the correct method of installation and tips for best use and maintenance of the
product.
This appliance is designed to be handy for any adult to use at home. Do not
allow children to play with it. Children need to be supervised when the product
is in operation so that they do not go near the range hood.
This product must be connected in accordance with current electrical
regulations. A fixed wiring installation is to be done only by an authorised
electrician.
WARNING: THIS APPLIANCE MUST BE EARTHED.
Means for disconnection must be incorporated in the fixed wiring in
accordance with the wiring rules.
Electrical Connection :
reen & yellow = EARTH
Blue = NEUTRAL
Brown = LIVE
Fixed wiring must be protected.
Never use reductions, shunts, adaptors that can cause overheating or
burning.
It is strictly prohibited to modify any part of this appliance. Modification is to be
done at user own risk.
Before maintenance or cleaning of the product, disconnect the appliance from
the mains.
For any repairs, always contact authorized Customer Service Centre and ask for
original spare parts. Repairs by untrained people may lead to damage and void
the warranty.
3

Packaging cling film, polystyrene and plastic wrappings must be kept out of
reach of babies and young children to avoid suffocation.
Do not connect the appliance if there are obvious signs of
transportation damage. If the supply cord is damage, it must be replaced by the
manufacturer, or its service agent as mentioned in Clause 7 ( 0335-2-31)
Ensure the location in which this appliance is installed has good, permanent
ventilation.
The distance between the bench top to the lower part of the hood must not be
at less than 5cm and it is not recommended to be more than 75 cm for optimal
operation.
Do not leave lit gas burners exposed due to risk of fire.
The exhaust from the canopy range hood must not be discharged into any
heating flue.
This product must not be disposed with the domestic waste. It has to be
disposed at an authorised bin for recycling the appliances.
4
50mm

This appliance is not intended for use by person (including children) with
reduced physical, sensory or mental capabilities or lack of experience and
knowledge. Unless, they have been given supervision or instruction
regarding the use of appliance by personnel who is responsible for their safety.
There is risk of catching fire if cleaning is not carried out in accordance with the
frequency suggested and instructions
The filter is made of high density aluminium.
Please do not use corrosive detergent for cleaning. The rangehood should be
cleaned with warm water and non-corrosive detergent every two months.
The air must not be discharged into a flue that is used for exhausting fumes from
appliances burning gas or other fuels.
The rangehood is for home use only, not suitable for barbecue, roast shop and
other commercial purposes.
The rangehood and its filter should be cleaned regularly according to the
instructions..
The manufacturer shall not be liable for any direct or indirect damage caused by faulty
installation. The installer must ensure that the product installation and
connection complies with the local and general regulation in force.
5
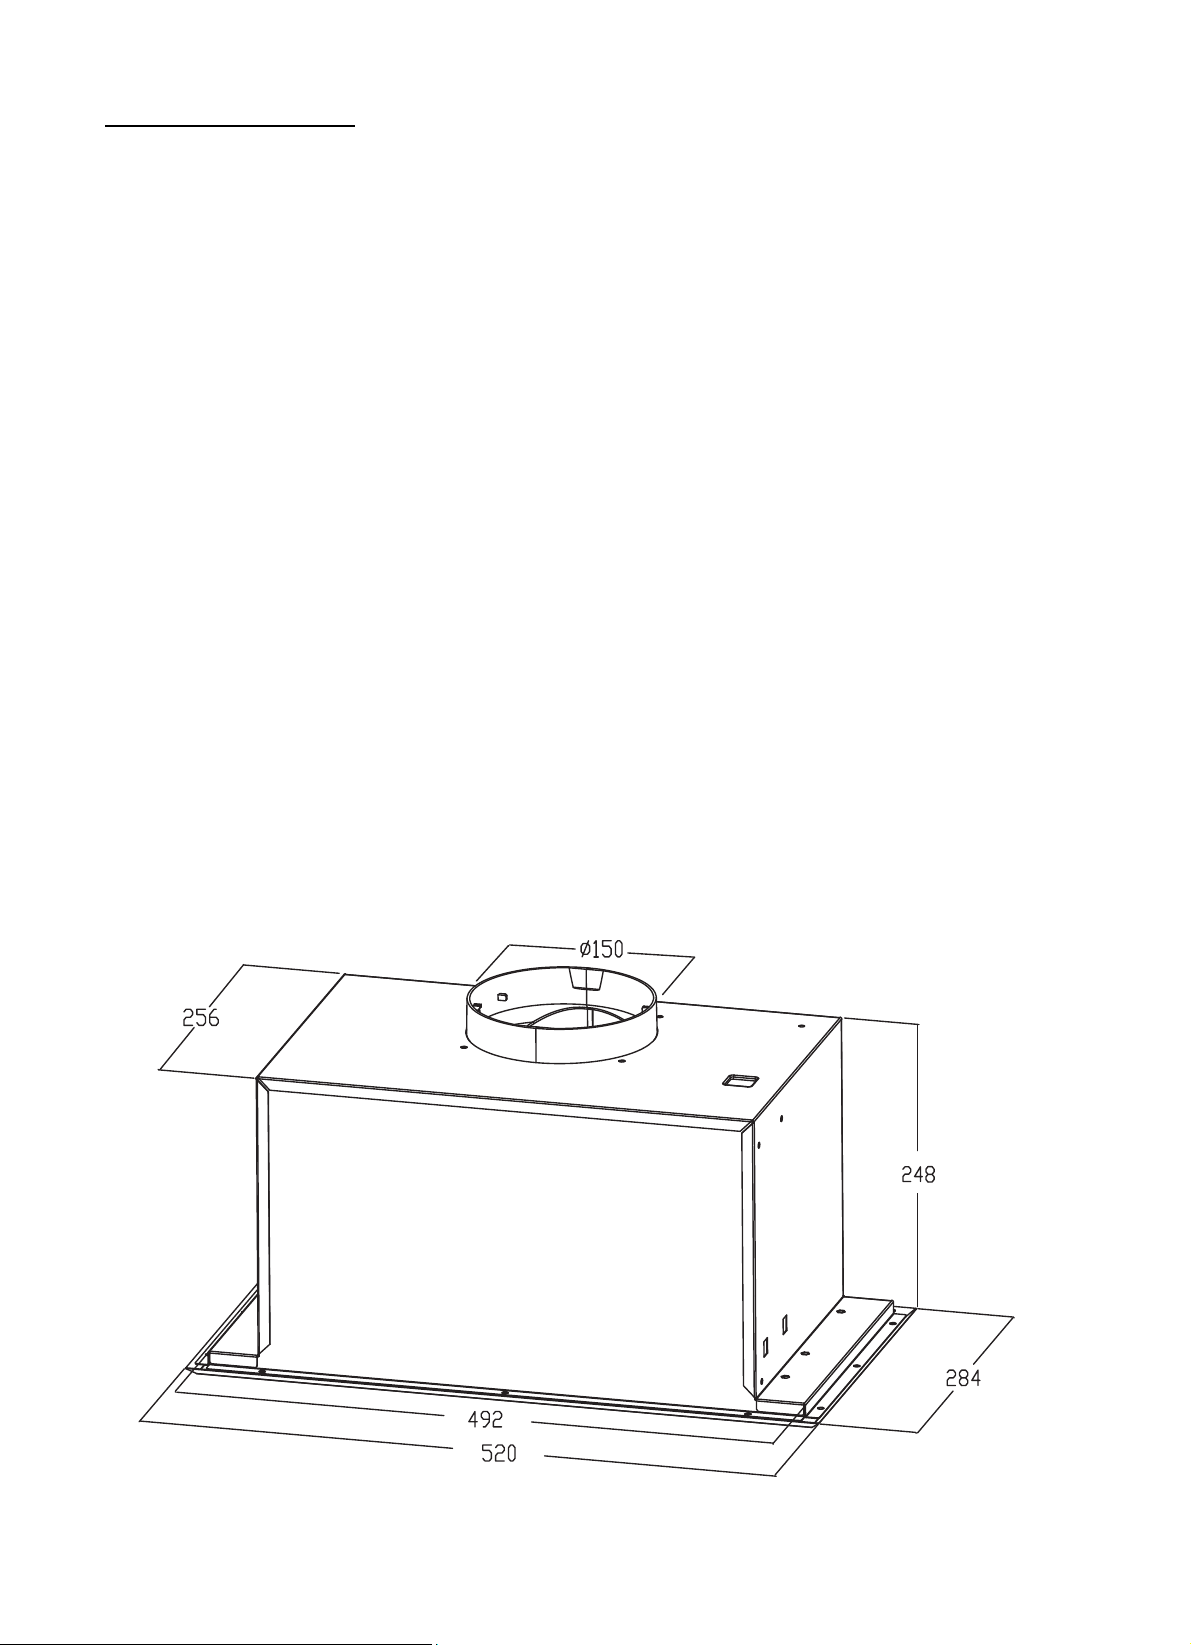
Product Specification
CE528MP CE728MP
Voltage / Frequency : 220-240Vac / 50Hz 220-240Vac / 50Hz
Rated Power : 293 W 293 W
Air Flow : 800m3/hr 800m3/hr
Motor Power : 290W 290W
Filter : Aluminium or Aluminium or
Charcoal (Optional) Charcoal (Optional)
Lighting : LED light 1.5W x 2 LED light 1.5W x 2
Speed Settings : 3 speed 3 speed
Ducting : Ducted or Ducted or
Recirculation (Optional) Recirculation (Optional)
Ducting size : 150mm 150mm
External Dimension :
CE528MP
6
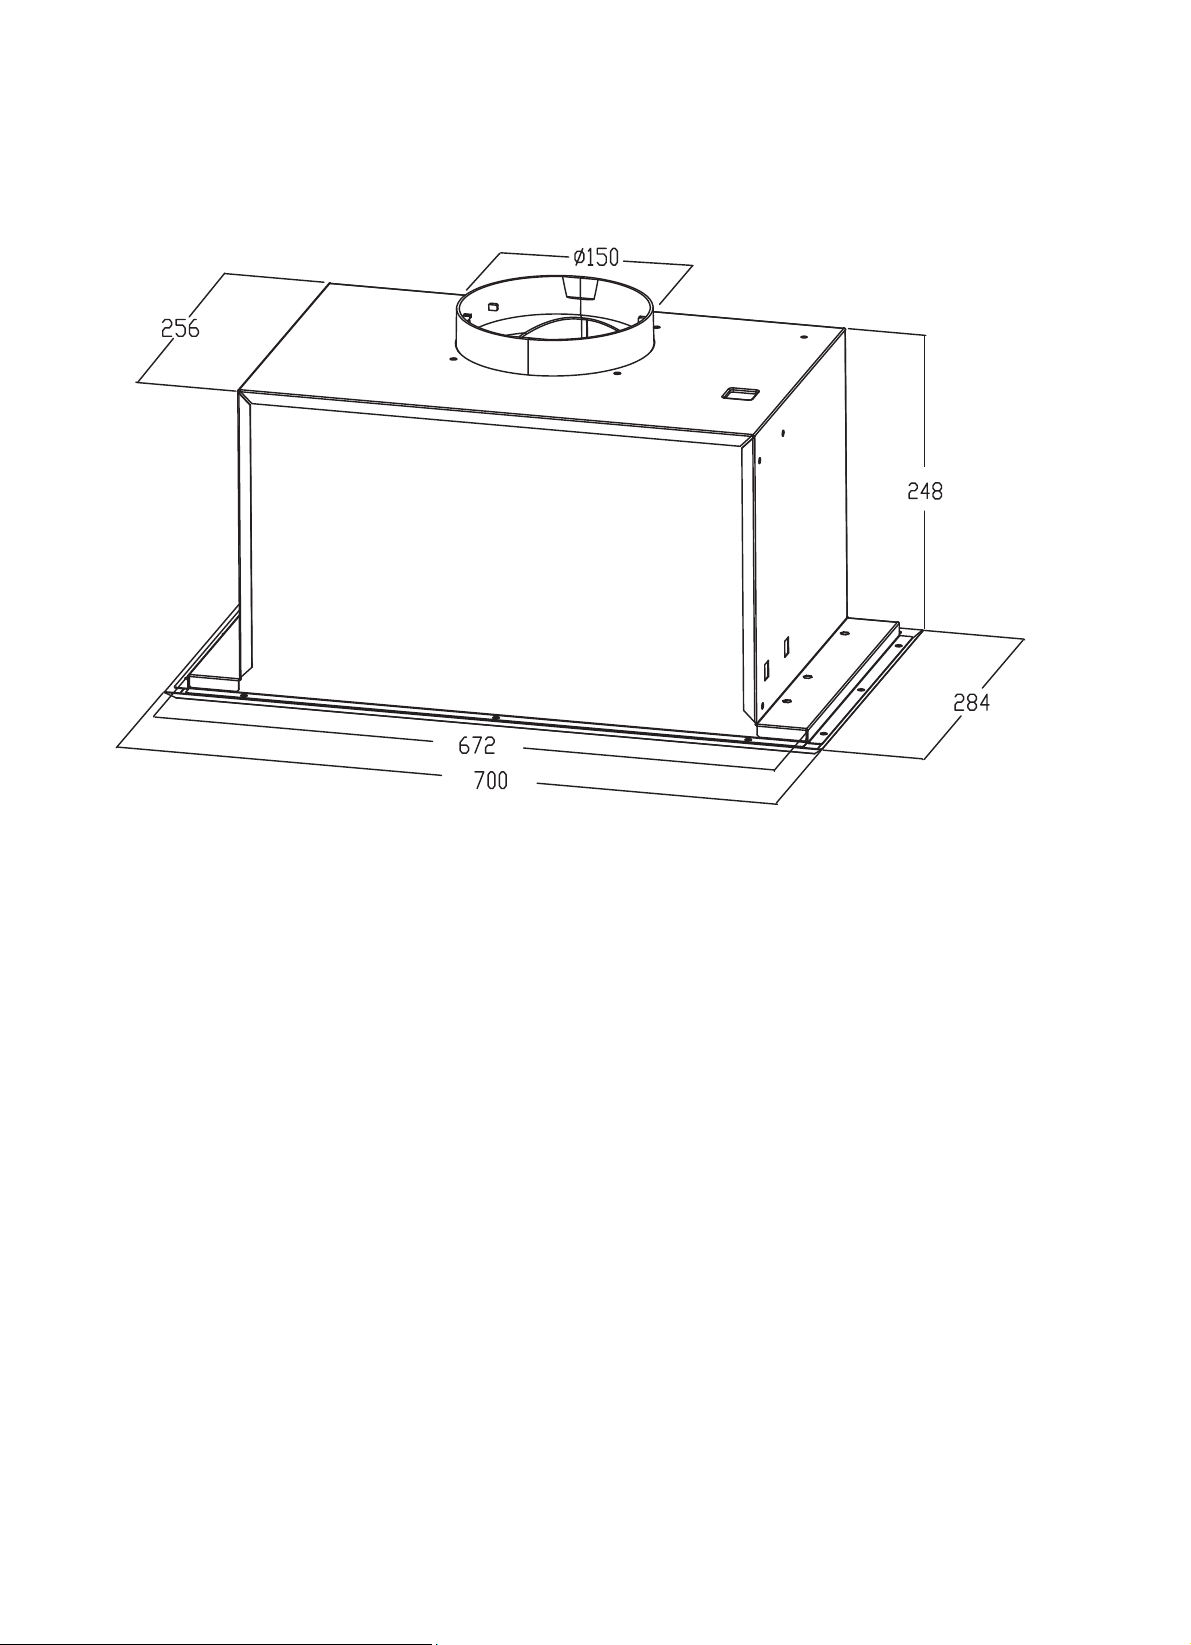
CE728MP
Complete product comes with the following :
1 x rangehood body
1 x user manual & warranty card
Fixing screws
7
8
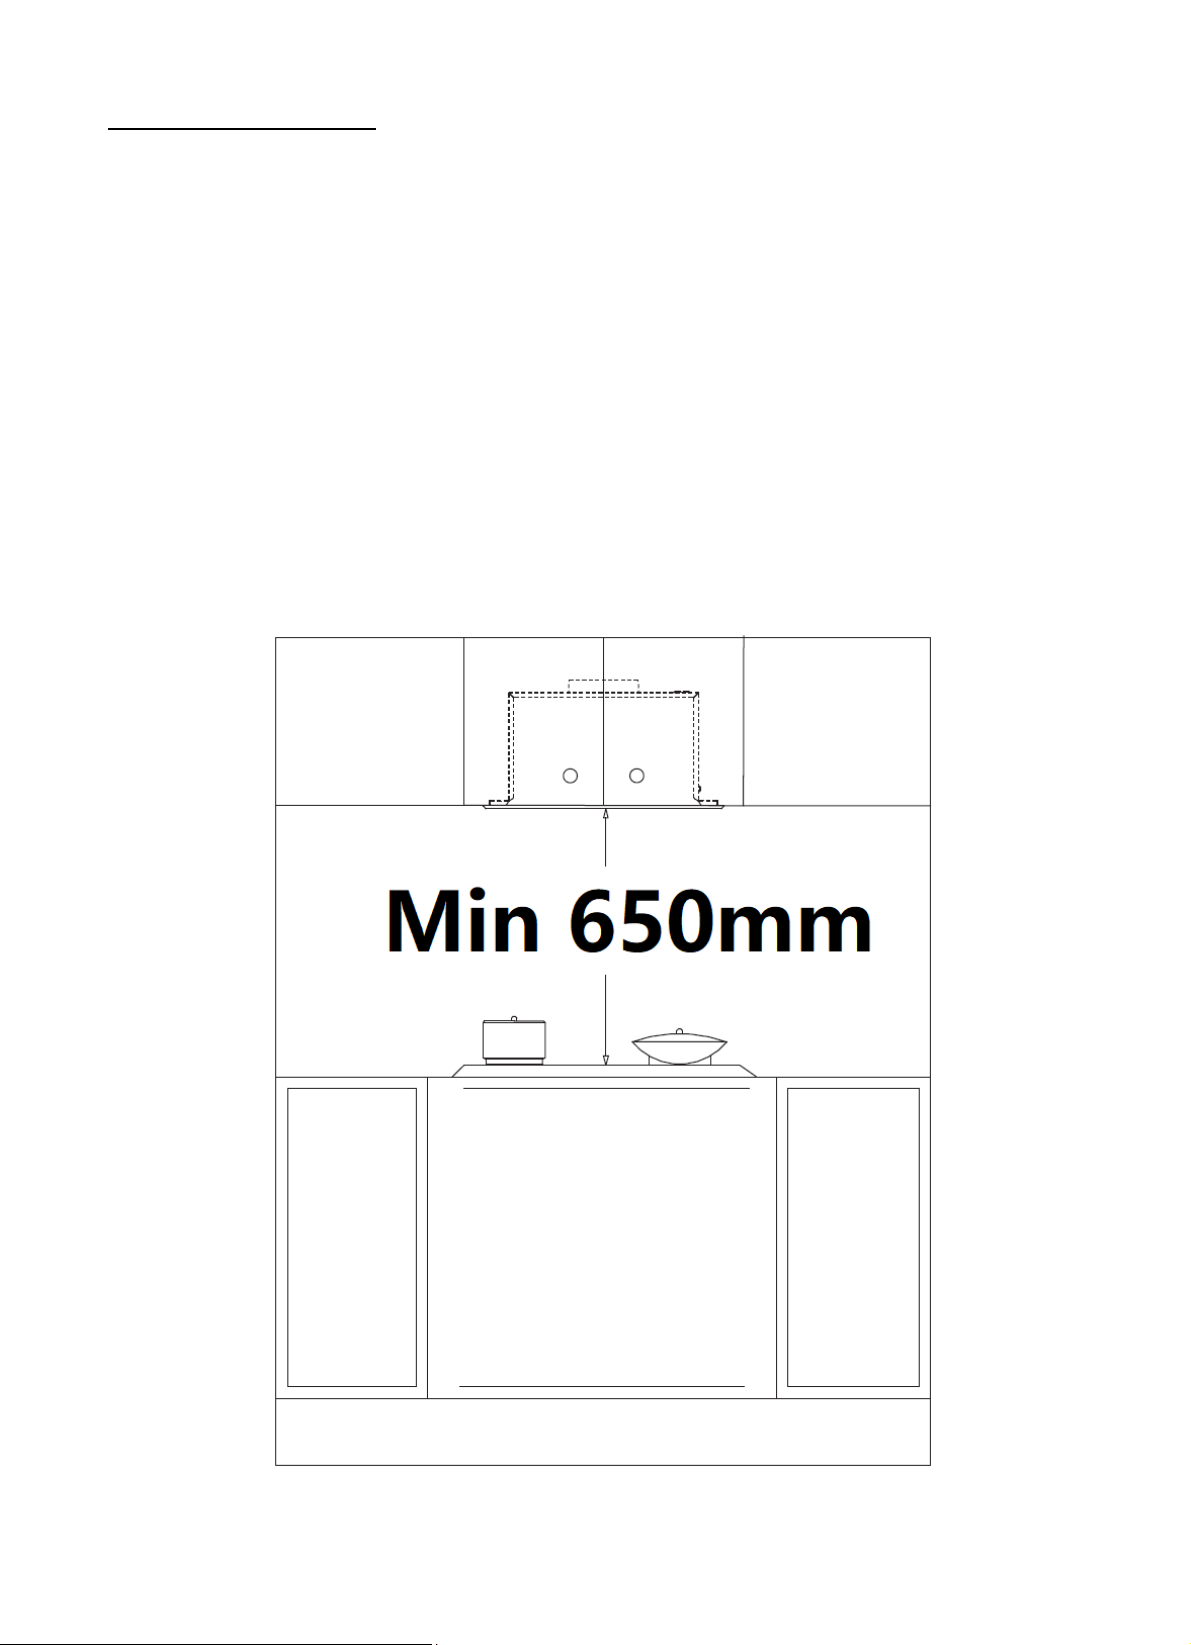
Installation Instruction
Mount the rangehood to the bottom panel of a kitchen cabinet. The lower part of
the hood must be located at a minimum height of 50mm above any cooker hob.
The range hood installation shall comply with 50mm or the distance specified in
the cooker hob instruction manual, whichever is higher. Any installation above
750mm will compromise the range hood performance.
When the hood is working at the same time with other non-electrical cooking
equipment, the negative pressure of the room must not exceed 4Pa.
The rangehood is to be installed horizontally and not tilted at one side.
9
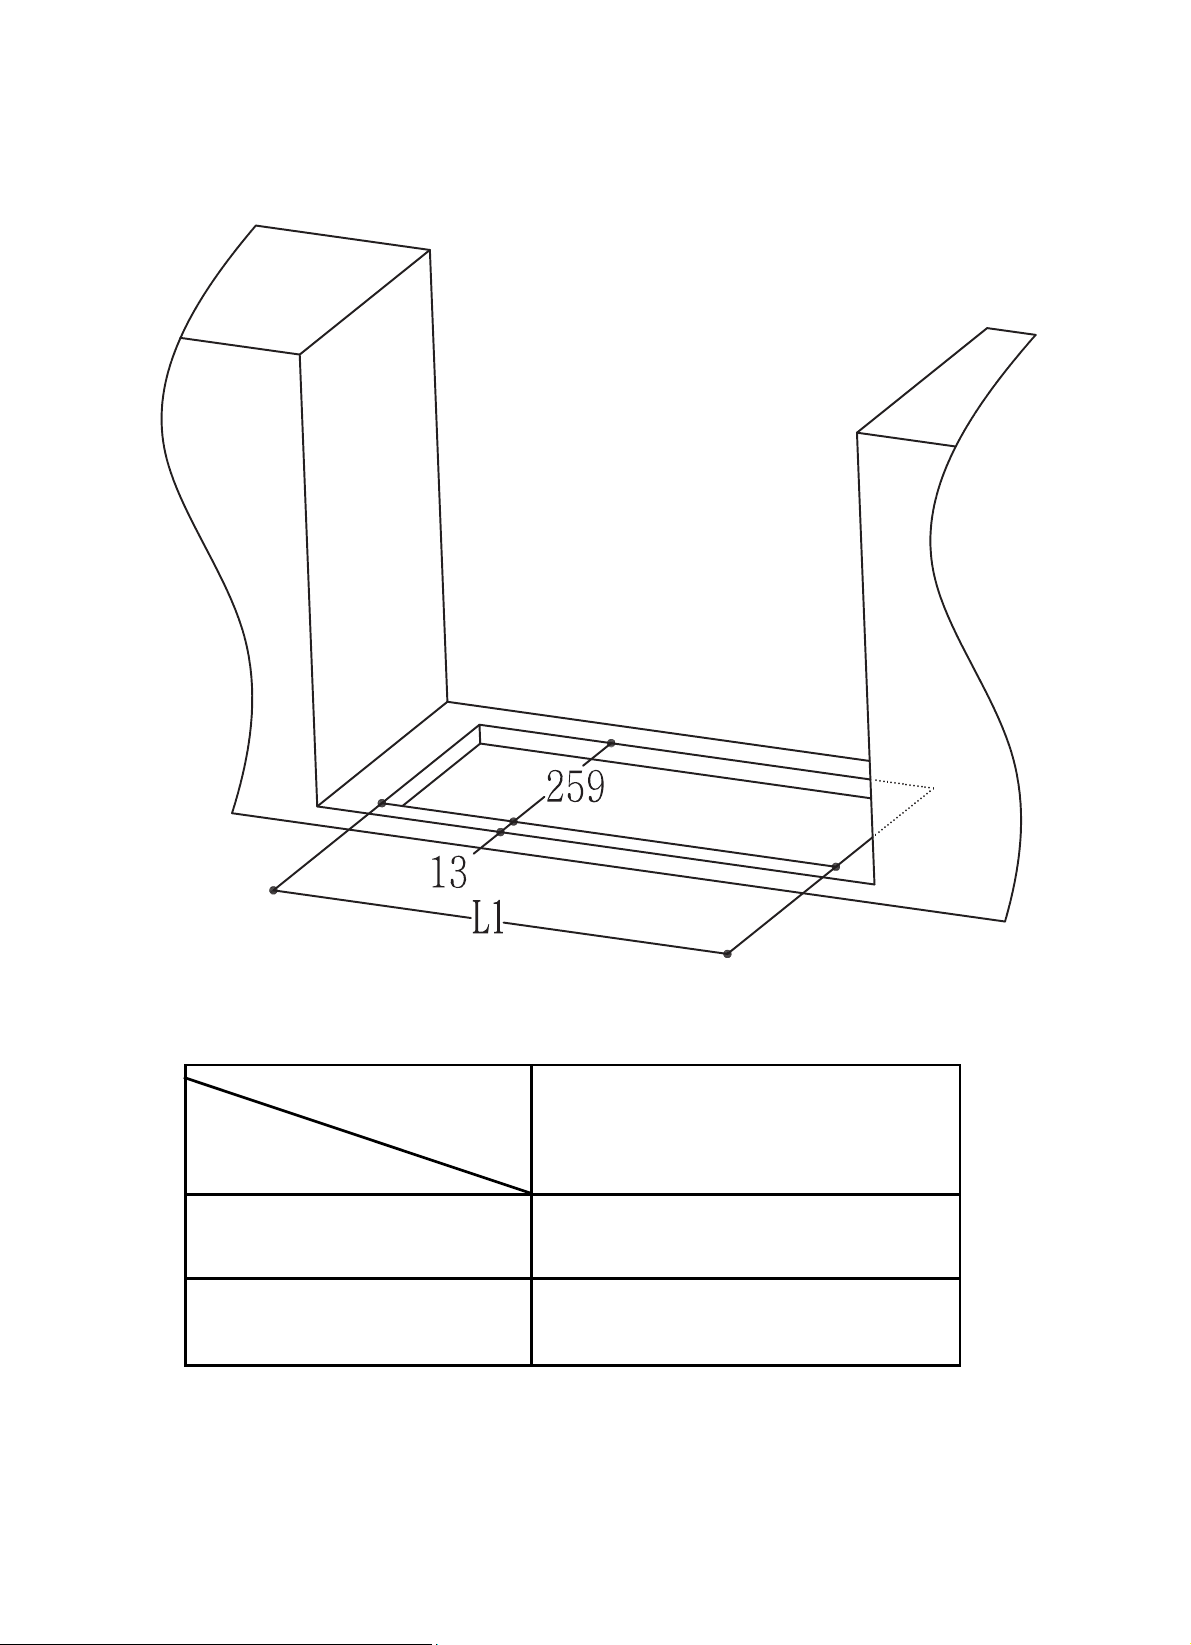
Cabinet cutout dimensions :
Dimension
Model L1
CE528MP 497mm
CE728MP 77mm
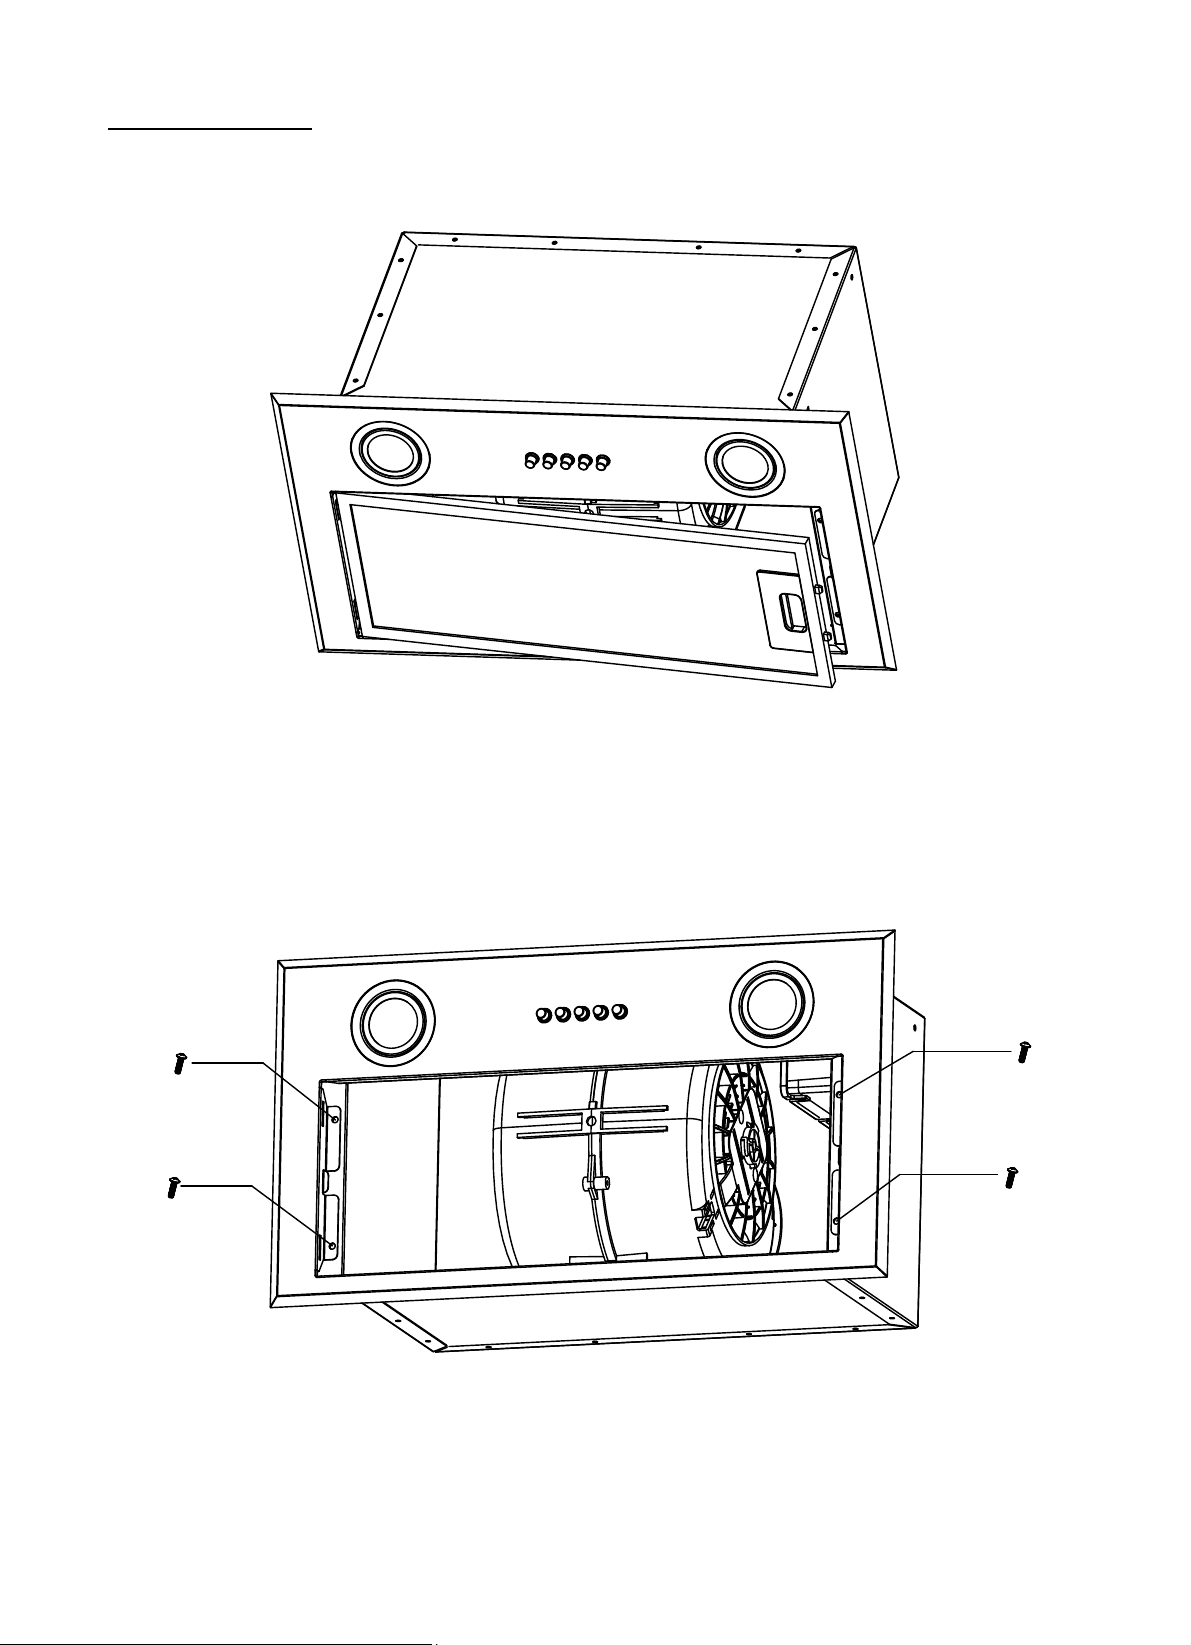
Installation Steps
1. Remove the metal filter.
2. Remove the stainless steel frame by unfastening 4 pcs of M4*10 screws.
10

3. Unfastening ST4*10 of the terminal box, remove the lid of the terminal box,
disconnect the control board wires. Disconnect the LED light wires.
4. Fix the rangehood to the cabinet cutout by using 12 pcs of ST4*18 screws.
11
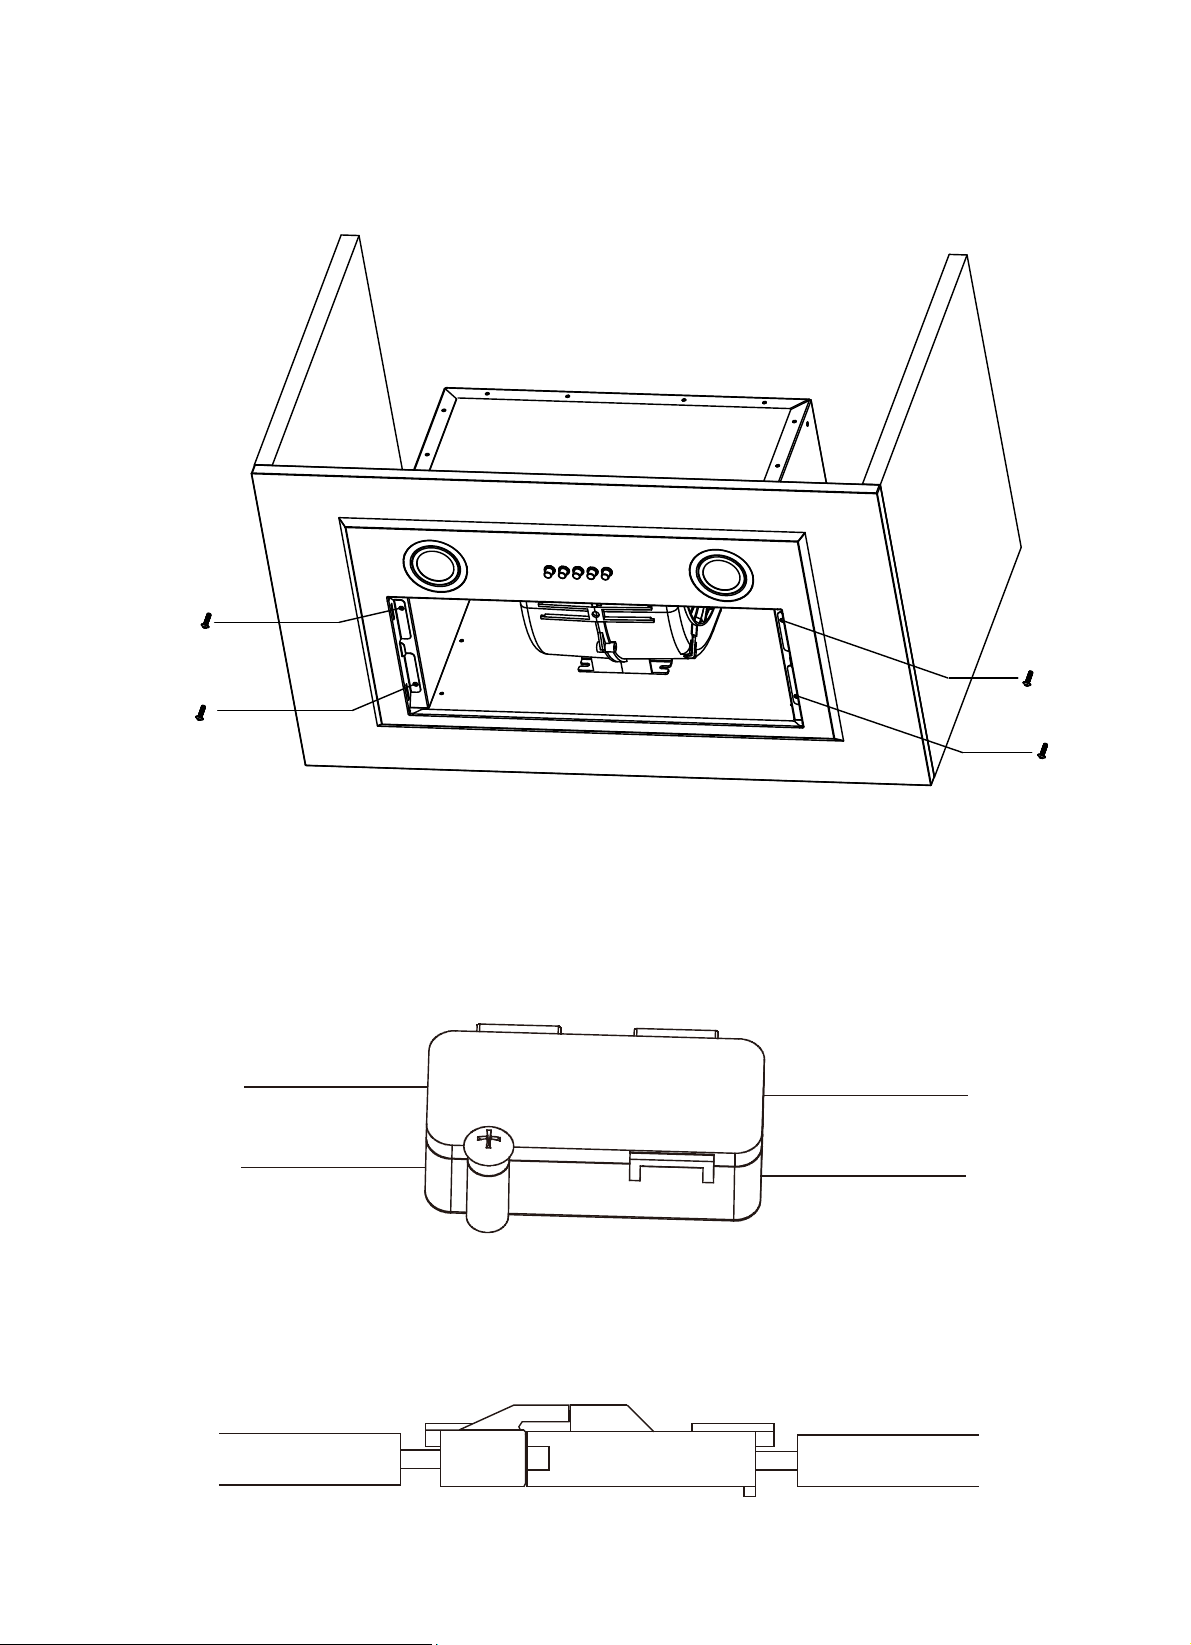
5. Put the stainless steel frame back into place and fasten the 4 pcs of M4*10
screws removed just now.
. Reconnect the control board and LED lights wires in the terminal box. Close the
terminal box lid and secure it with the ST4*10 screw.
12
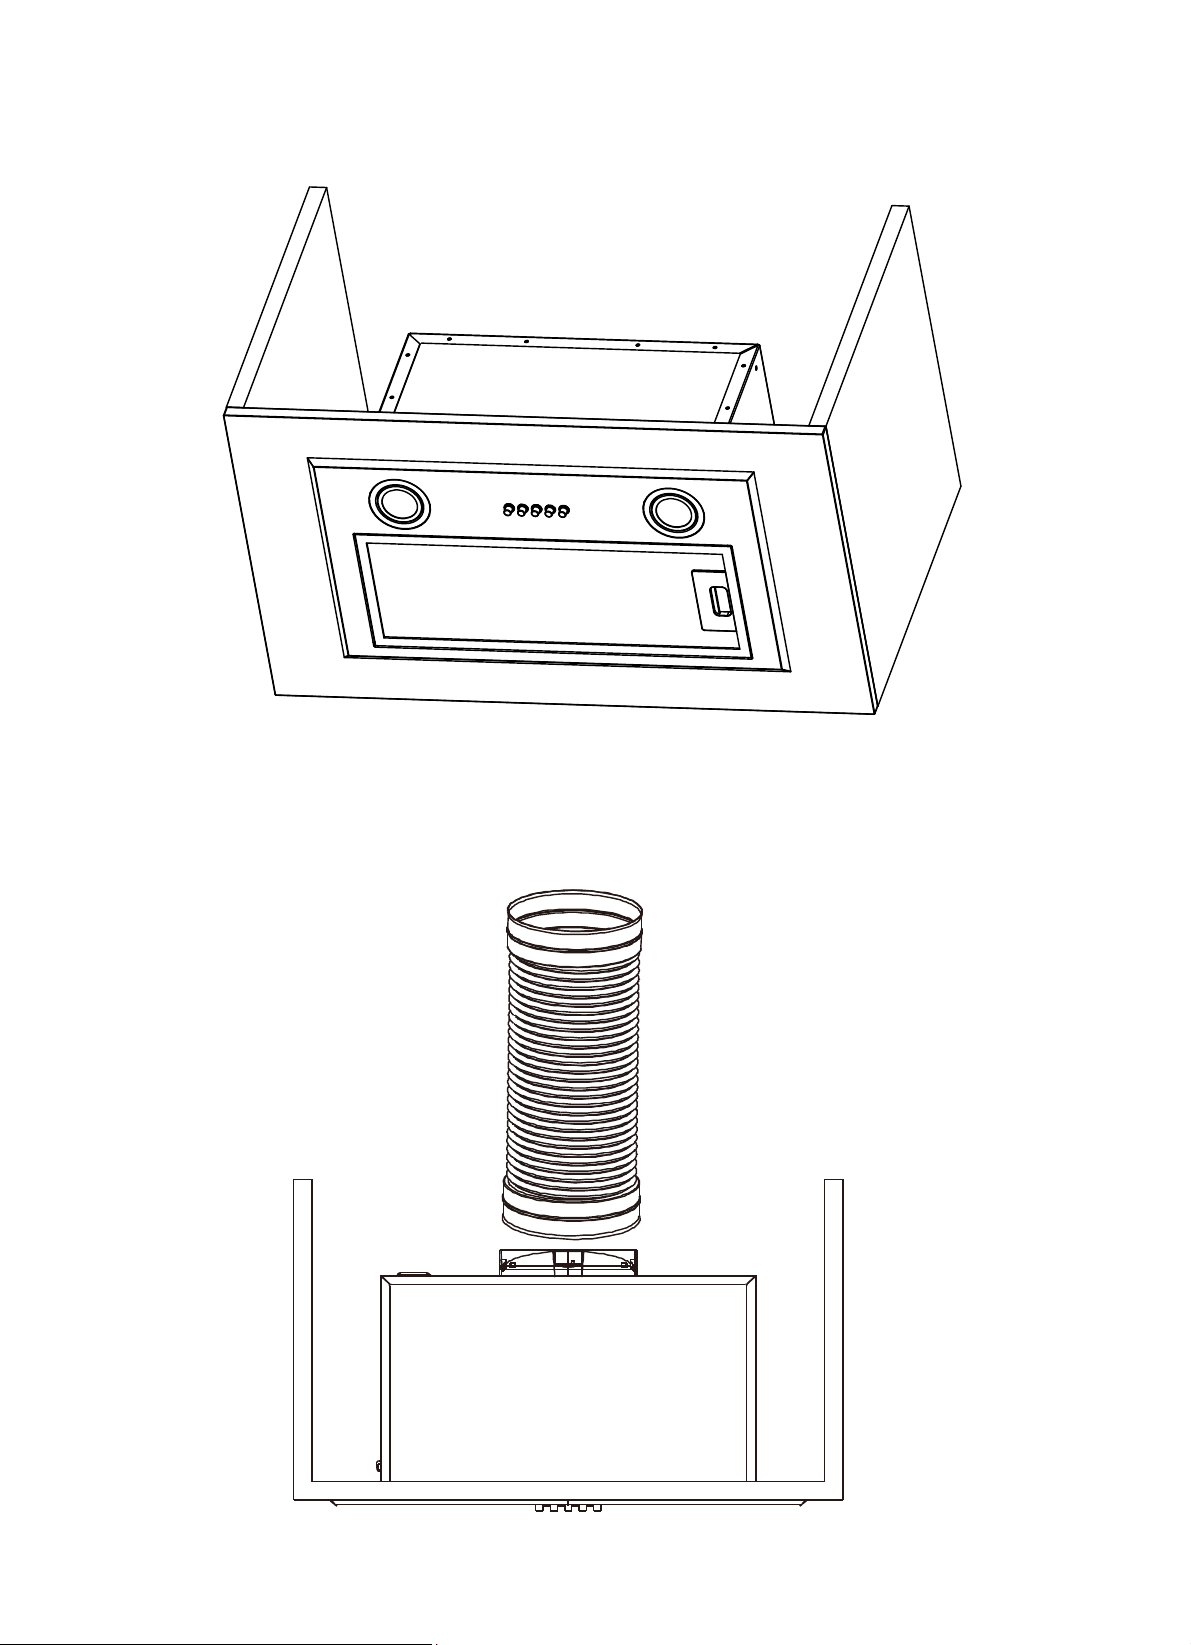
7. Put the metal filter back into place.
8. Install the 150mm duct pipe (optional)
13
14
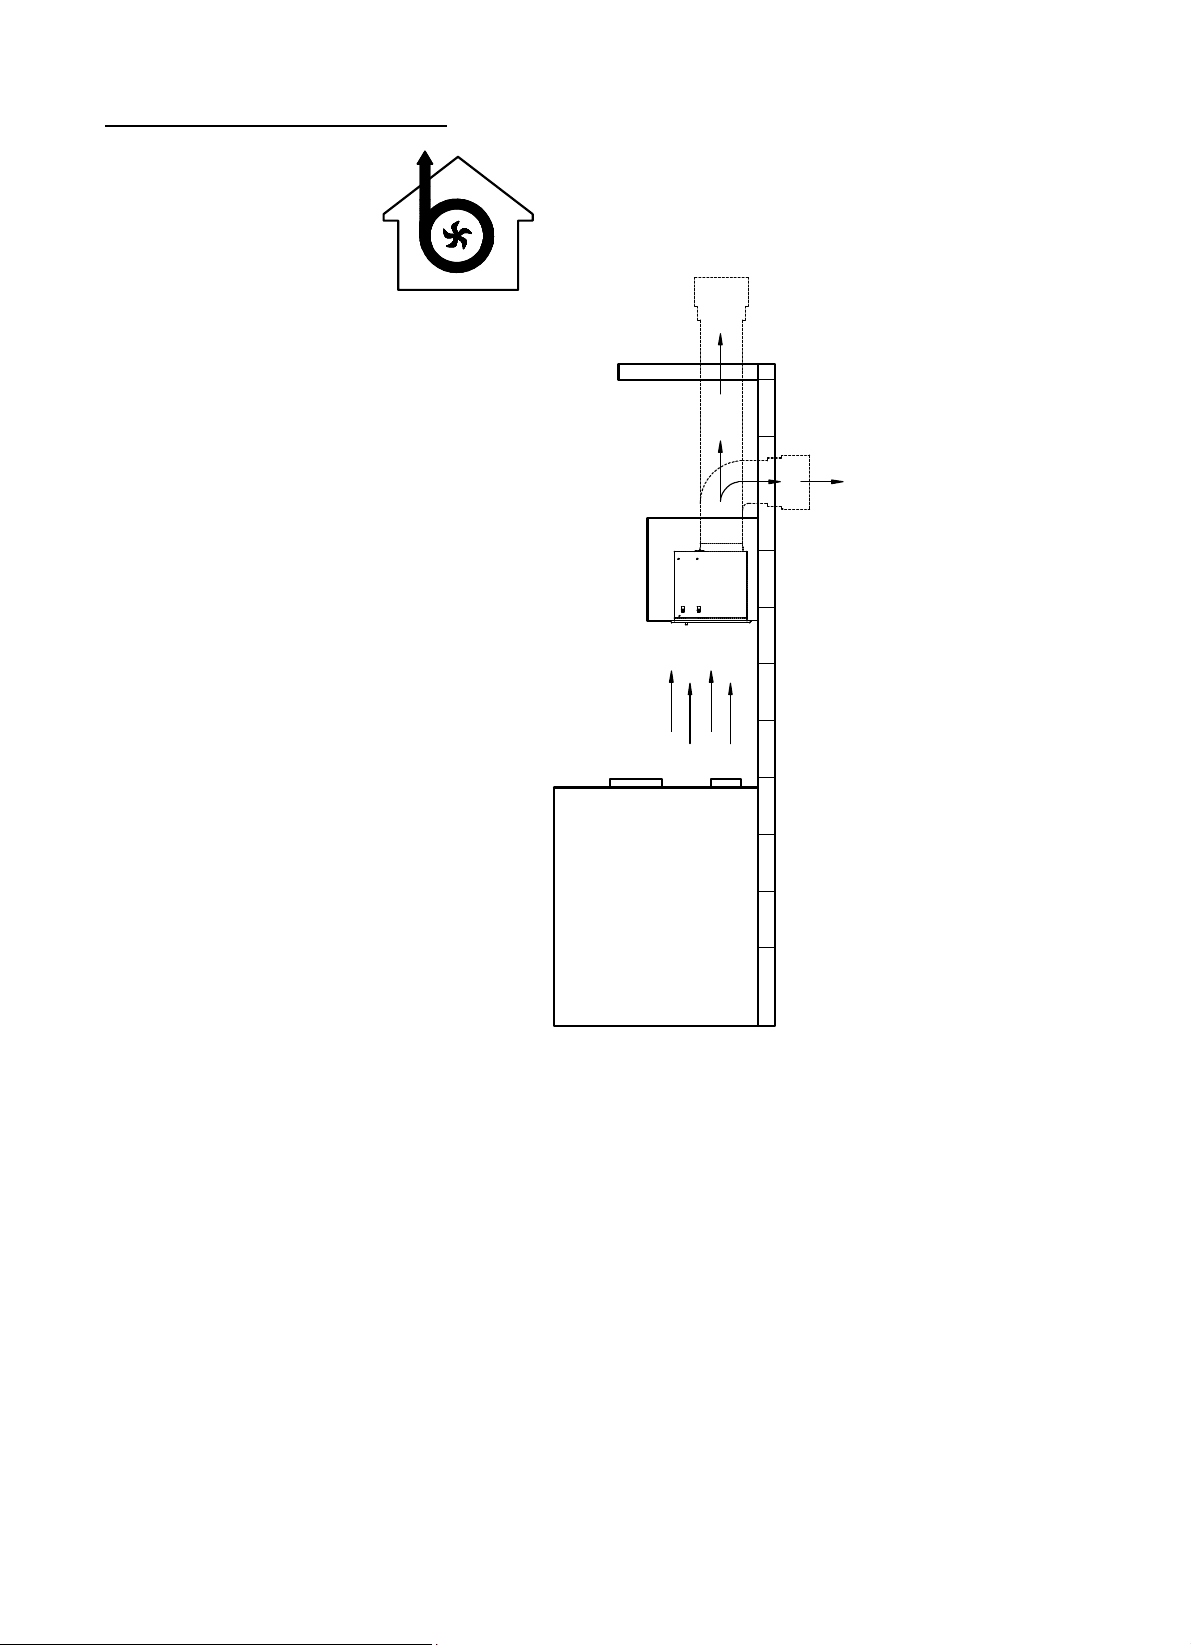
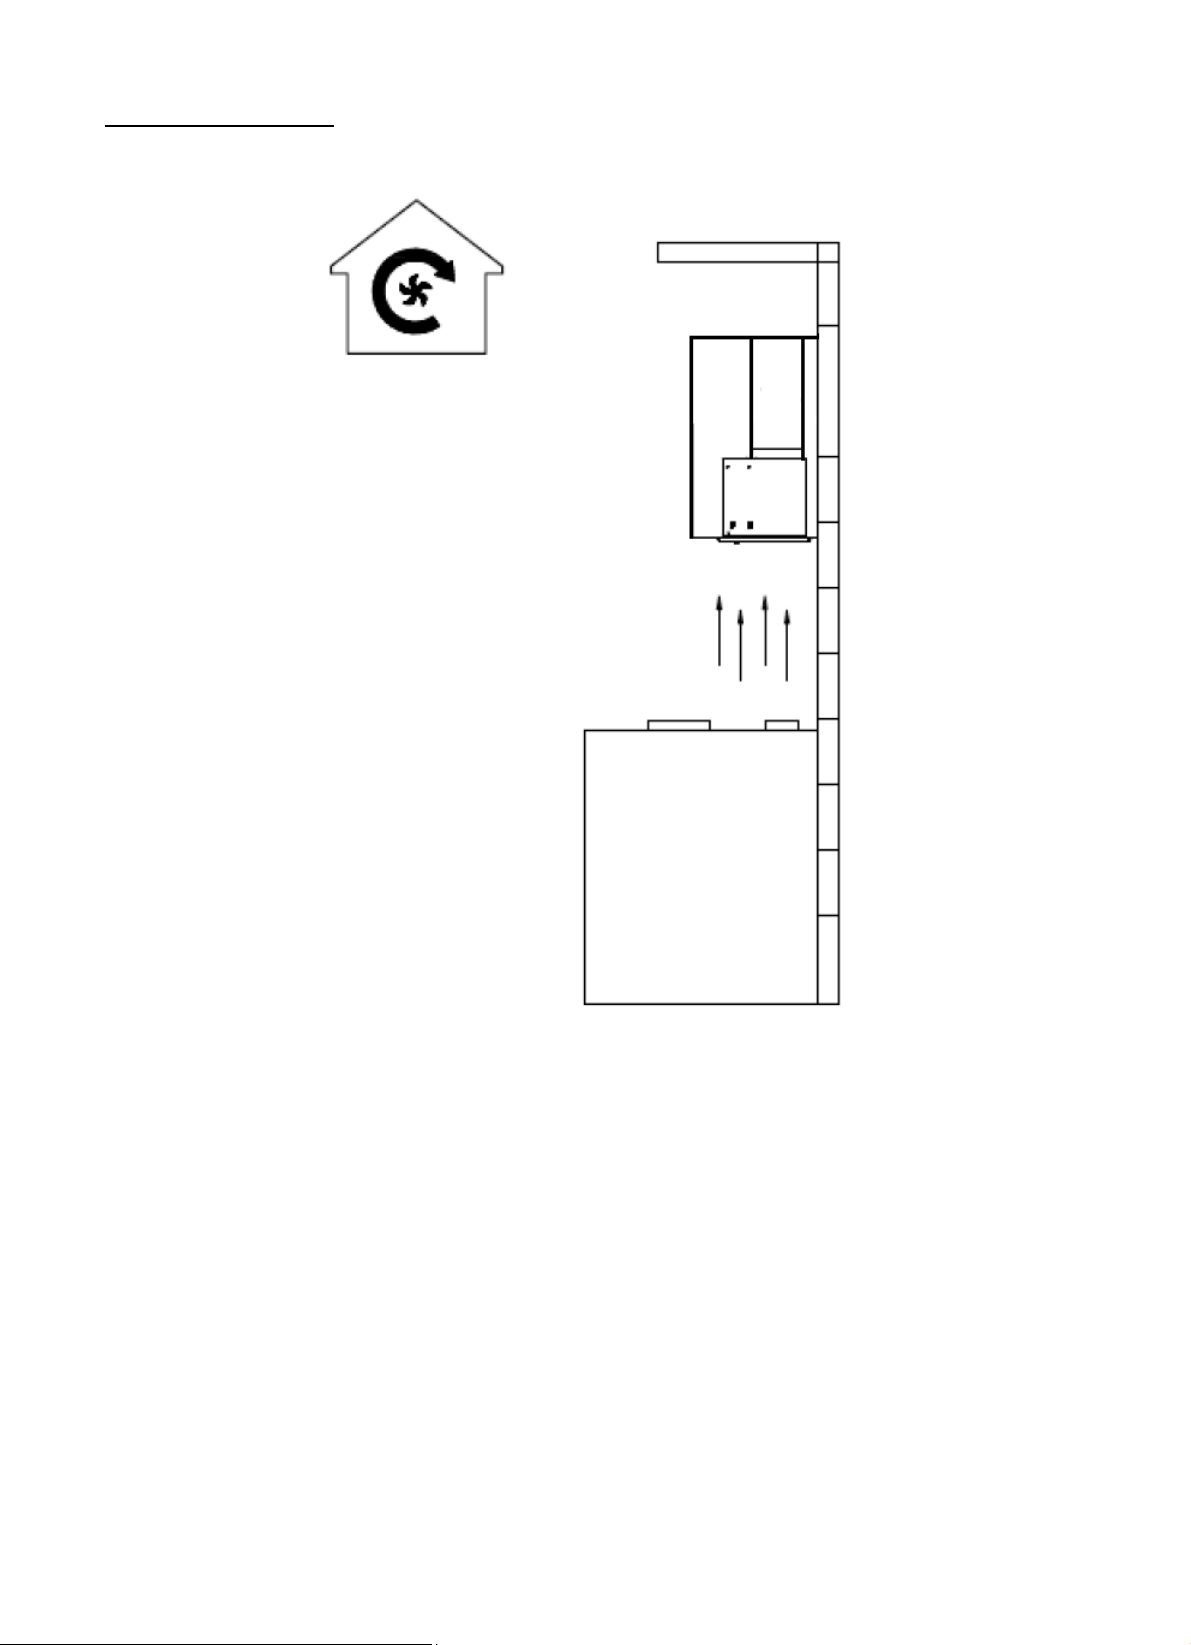
Ducted mode (Vented mode)
In the ducted mode, air is drawn into the hood. Oil is trapped in the aluminium filter
while odours, fumes and condensation are then directed and vented to the outside.
Only the aluminium filters is to be installed in the ducted mode.
Ductwork should be planned carefully before drilling and cutting the duct.
Installer must ensure that the product installation and connection complies with the
local and general ducting regulation in force. Flexible ductwork is recommended.
Extend duct to its full length, and position, cut and discard any excess.

15
Note : Keep duct as straight as possible for maximum air flow and at least
restrictions, while providing for easy maintenance.
Vented system must be terminated to the outside. Ductwork can extend either
through the wall or the roof. Do not terminate the vent system in an attic or other
enclosed area.
The length of the ductwork and the number of elbows should be kept to
minimum to provide efficient performance. The size of the ductwork should be
uniform. Do not install two elbows together. Use duct tape to seal all joints in the
ductwork system. Use caulking to seal exterior wall or floor opening around the cap.
When the hood is working at the same time with other non-electrical cooking
equipment, the negative pressure of the room must not exceed 4Pa.
Make sure there is proper clearance within the wall or floor for exhaust duct before
making cutouts. Do not cut a joist or stud unless absolutely necessary. If a joist or
stud is to be cut, then a supporting frame have to be constructed.
Connect the 150mm duct pipe from the hood body to the rangehood motor. Fix
the duct pipe in position by ring clamps (not provided by manufacturer)
Fix the duct pipe in position by ring clamps (not provided by manufacturer)
Make sure the charcoal filter is removed (if any).
Recirculation mode
In the recirculation mode, air is drawn into the hood. Oil is trapped in the aluminium
filters while cooking odours is removed by the charcoal filter. Purified air then is
directed back to the kitchen.
In this mode, charcoal filter is strongly recommended to be fitted to the
rangehood.
16

Electrical Connection
Before connecting to the mains, make sure that :
The electric meter, fuse, feeding line and socket are adequate to
withstand the maximum load required (refer to product data label for rated
power)
The supply system is regularly earthed, according to the regulations in force.
The isolation switch can easily be reached after the rangehood is installed.
17
18
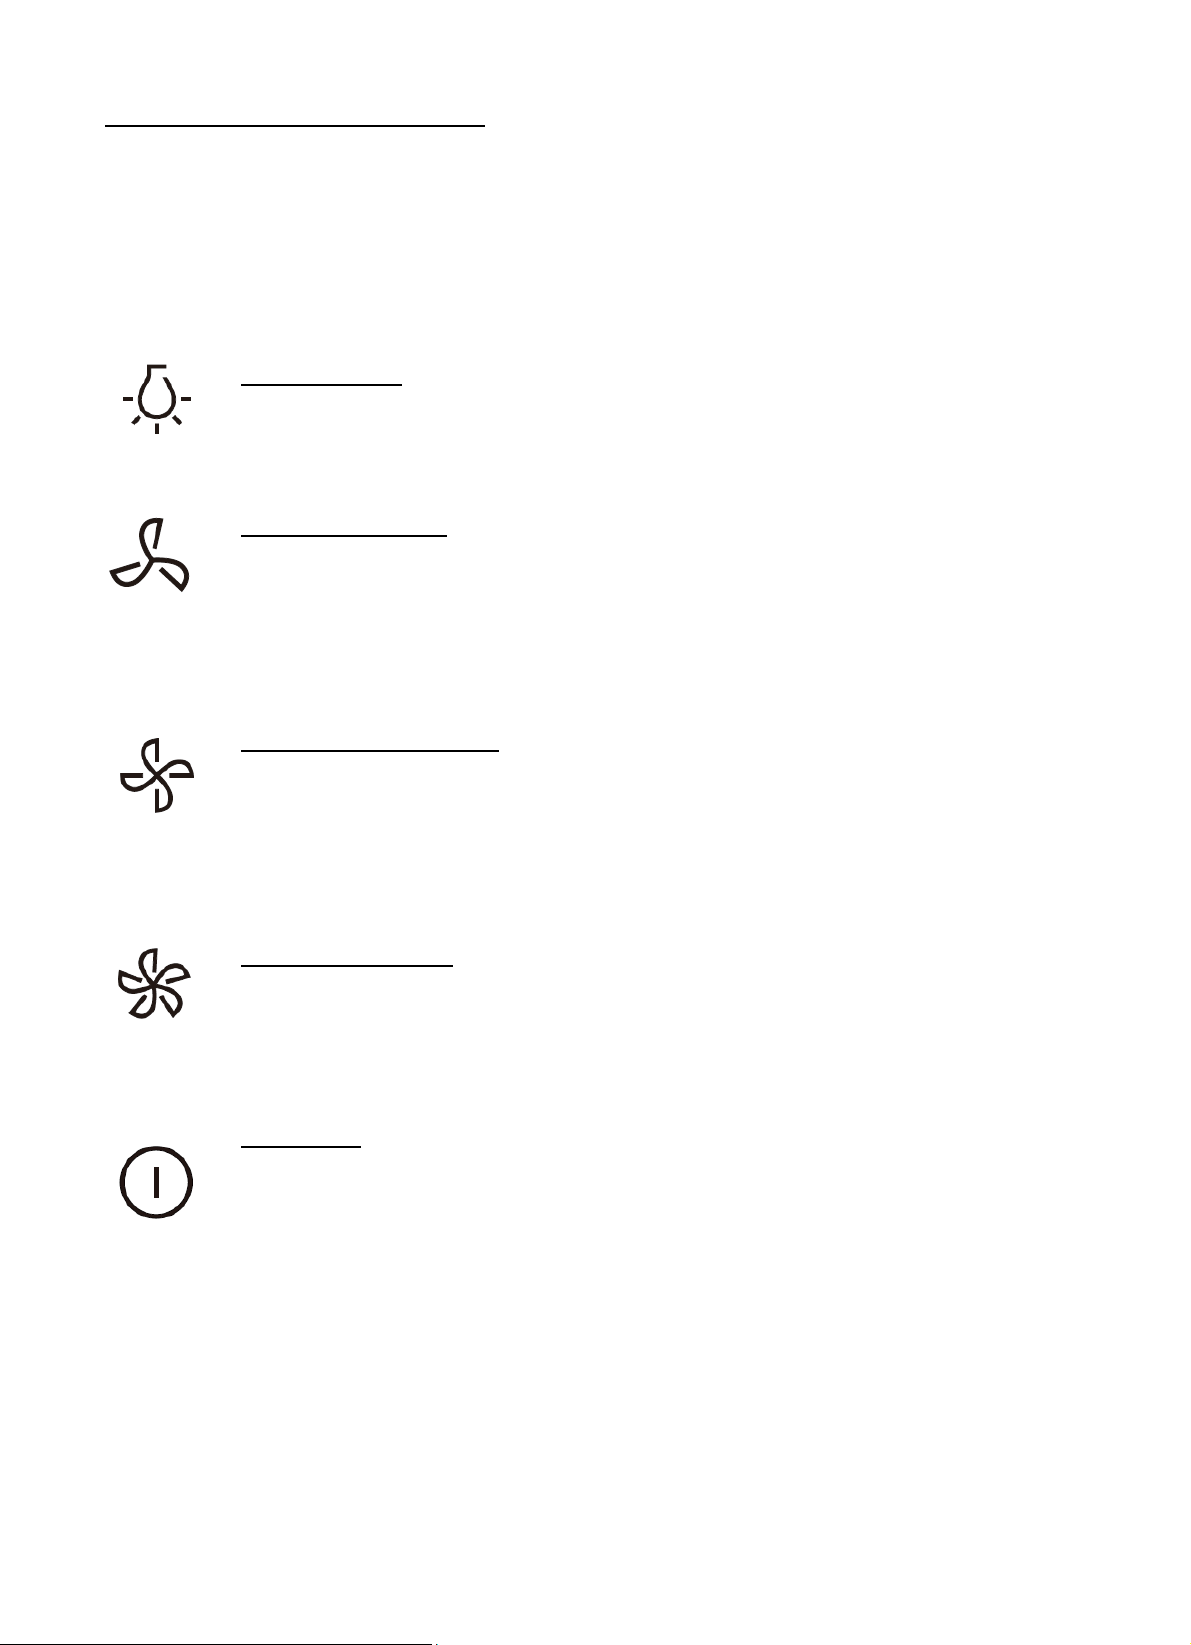
Rangehood Operation & Control
The hood is equipped with a 3-speed control motor. Electronic control buttons are
located at the front edge of the hood canopy.
To achieve better results, it is recommended to switch the hood on 3 to 5 mins
before cooking starts. Likewise, let the hood run for a few minutes after
cooking.
Light On / Off
To turn the lighting system on and off.
Fan at Low Speed
To turn the extractor motor On at low speed. This mode provides a
continuous and low volume extraction in the presence of light cooking
vapours.
Fan at Medium Speed
To turn the extractor motor On at medium speed. Suitable for most
operating conditions. This mode provides the optimum treated air flow
to noise level ratio.
Fan at High Speed
To turn the extractor motor On at high speed. Suitable for eliminating
the high levels of cooking vapours and long cooking period.
Power Off
To turn extractor motor Off.

19
Cleaning & Maintenance
Caution: Prior to cleaning or maintenance, always disconnect the power
supply.
Do not use a steam cleaner.
To ensure the range hood is functioning effectively, regular maintenance is a must.
Surfaces : Clean with warm soapy water and a soft sponge. Never use abrasive
detergent, scouring pads, steel wool or solvents on any part of this appliance as this
will cause irreparable damage. Dry the rangehood by using a cloth that does not pro-
duce fluff.
Metal Filter : This could be washed in a dishwasher with set temperature below
0degreeC. It is advisable to stack them vertically to avoid food residue sticking to
them. Or soak the metal filter in a degreasing agent until all grease is dissolved. Then
clean it under a flowing water tap, and rinse it off.
Note: Frame discolouration may occur if the filter is washed in a dishwasher.
Warning: a build-up of oil may occur if the range hood is not cleaned regularly
20
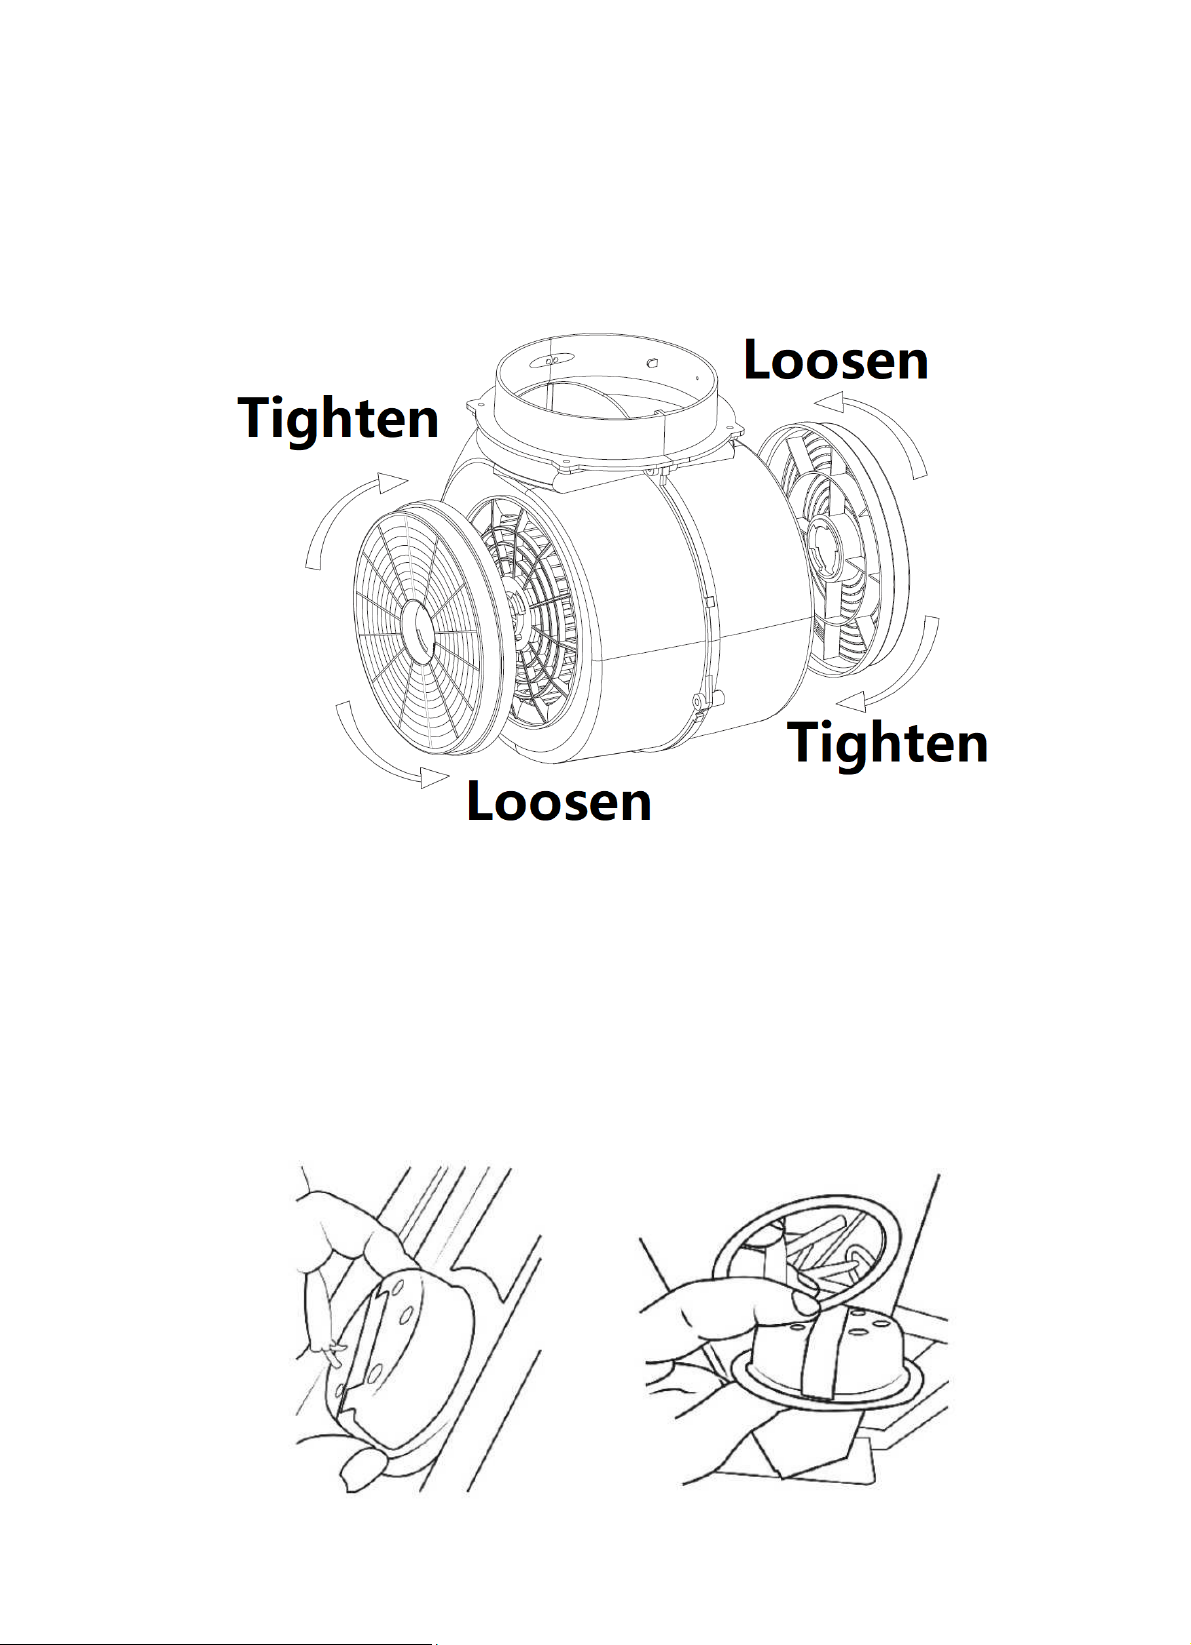
Charcoal Filter : Charcoal filter is not washable. To change the charcoal filter, first
remove the metal filter, then loosen and remove the charcoal filter as indicated in
diagram below. Get a pair of new charcoal filter and tighten them to fit to the side
of extractor motor in the opposite direction.
LED replacement: Contact authorised seller for replacement part. Remove the metal
filter and push the LED from inside the hood body to remove the LED. Disconnect
the LED wires and replace the connection with a new LED. Push the LED from outside
the rangehood body to fix it to the lamp hole.
Other manuals for CE528MP
1
This manual suits for next models
1
Table of contents
Other diLUSSO Ventilation Hood manuals


Popular Ventilation Hood manuals by other brands


Mercury
Mercury SC1000 Installation, operation and maintenance instructions

Miele
Miele DA 6700 D Operating and installation instructions

Faber
Faber CASUAL instruction manual

arietta
arietta Garda Installation instruction guide

Miele
Miele DA 422-4 OPERATING AND INSTALLATION Manual

FALMEC
FALMEC PLANE Instruction booklet


