Ding baby Universal ECRS isofix User manual

Car Seat Ding Narrow
Enhanced Child Restraint System
Universal ECRS isofix

1 2
INSTRUCTION
EN
1.Notice....................................................................
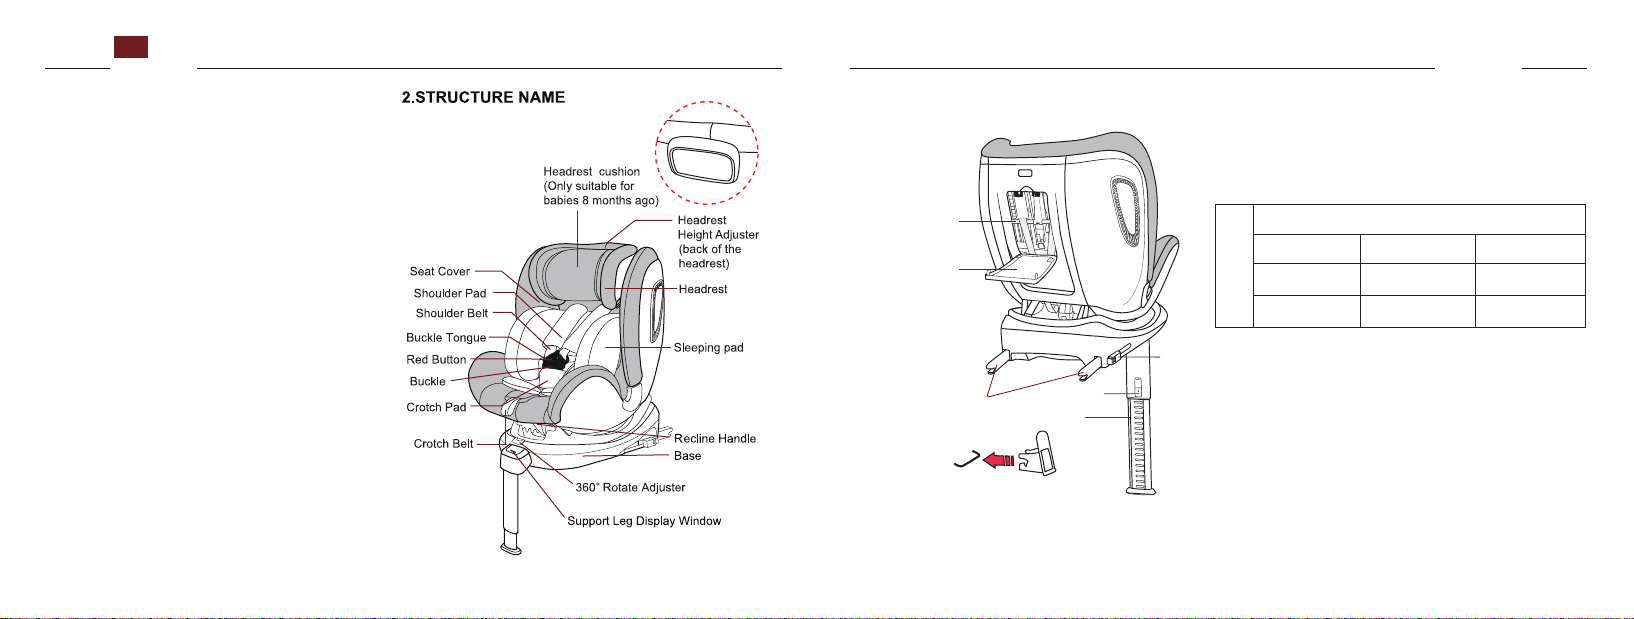
2.Structure Name.....................................................
4.Warning.................................................................
5.Safety Seat Use Method........................................
5.1 Install location...................................................
5.2 How to Use the Harness Buckle......................
5.3 Adjust the Headrest..........................................
5.4 Adjust Safety Belt Lengthen.............................
5.5 Adjust the Rotation of the Seat........................
5.6 Adjust the Angle of the Child Safety Car
Seat.......................................................................
5.7 Removing 5-Point Harness and Storage the
Accessory Part.................................................
5.8
6.Installtion................................................................
3
3
5
4
6
6
7
8
9
11
11
13
15
16
17
safety of a child may be severely endangered.
40-105cm
17
18
6.1 Installed in Rearward Facing Position with
6.2 Installed in Forward Facing Position with
IMPORTANT: READ THESE
INSTRUCTIONS CAREFULLY BEFORE
USE AND KEEP FOR FUTURE
REFERENCE.
If these instructions are not followed, the
3.PRODUCT INFORMATION...................................
Adjust the Length of Support Leg.....................
5.10 Removing and Putting on the Fabric Cover....
16
5.9 Removing Sleeping Pad...................................
ISOFIX and support leg (40-105cm).......................
ISOFIX and support leg (76-105cm)..........................
7.Care and Maintenance .......................................... 19
8.MainTechnical Parameter ................................... 20

3 4
INSTRUCTION
EN
1.NOTICE
Notice regarding i-Size category Enhanced Child
Restraint Systems(40-105cm)
This is an i-Size Enhanced Child Restraint System.
It is approved according to UN Regulation No.
129/03, for use in, i-Size compatible vehicle seating
positions as indicated by vehicle manufacturers in
the vehicle users' manual.
If in doubt, consult either the Enhanced Child
Restraint System manufacturer or the retailer.
IMPORTANT - DO NOT USE FORWARD
FACING BEFORE THE CHILD'S AGE EXCEEDS
15 MONTHS (Refer to instructions).
NOT TO USE REARWARD FACING ECRS
( ECRS= Enhanced Child Restraint System ) IN
SEATING POSITIONS WHERE THERE IS AN
ACTIVE FRONTAL AIRBAG INSTALLED.
40-105cm
Support Leg
Adjust Button
ISOFIX
Attachment
Point
(If you don’t have ISOFIX
Insert Guide, please
ignore this.)
ISOFIX Locking Arms
ISOFIX
Button
Gears Fixed Axle
Instruction Back
Cover(can insert
instruction into it)
ISOFIX Insert Guide
7KLVSURGXFWLVDĈGHJUHHURWDWLQJFKLOGUHstraint system.
The following information can help you better understand
this product
3.PRODUCT INFORMATION
I-size
Body size Installation
method Installation
direction
rearward facing
forward facing
Tested and approved according to ECE R129/03
FPNJ
FPNJ
Isofix+support leg
Isofix+support leg

INSTRUCTION
EN
Please carefully read and make
Because of potential medical
sure you understand all instructions in this
manual and in the vehicle owner’s manual
related to child safety seats. Install and use the
child safety seat as described in the instruction
manual. Failure to do this could result in
serious injury or death of your child. Keep the
reference.
issues inherent to low birth weight and
premature infants, always have a trained
professional doctor or hospital staff member
assess the suitability of the ECRS prior
to leaving the hospital or using the ECRS.
40-105cm
4.WARNING
IMPORTANT!
IMPORTANT!
instructions together with the ECRS for future
56
1. Make sure any straps holding the restraint to the
vehicle should be tight. Support leg should be in full
contact with the ground of the vehicle. Any straps
restraining the child should be adjusted to the child's
body. Make sure straps should not be twisted.
2. Make sure the lap strap is worn low down, so that
the pelvis is firmly engaged to prevent child from
falling out of the safety car seat.
3. Make sure the the ECRS is changed when it has
been subject to violent stresses in an accident.
4. Make sure the rigid items and plastic parts of a
ECRS shall be so located and installed that they are
not liable, during everyday use of the vehicle,to
become trapped by a movable seat or in a door of the
vehicle
5. DO NOT make any alteration or additions to the
ECRS without the approval of the Type Approval
Authority, and a danger of not following closely the
installation instructions provided by the ECRS
manufacturer.
6. HOT! The child seat should be kept away from
sunlight if the seat is not provided with a textile cover,
otherwise it may be too hot for the child’s skin.
ISOFIX Attachments
5.SAFETY SEAT USE METHOD
5.1 Install Location
7. DO NOT leave your child unattended in this
restraint even for a short time.
8. Make sure any luggage or other objects liable to
cause injuries in the event of a collision shall be
properly secured.
9. A) DO NOT use the ECRS system without the
cover.
B) DO NOT replace seat cover with any other than the
one recommended by the manufacturer, because the
cover constitutes an integral part of the restraint
performance.
10. DO NOT use the ECRS system if position of the
adult safety-belt buckle to the main load bearing
contact points on the restraint is unsatisfactory, please
contact the manufacture in doubt about this point.
11. DO NOT use any load bearing contact points other
than those described in the instructions and marked in
the ECRS. please contact the manufacture in doubt
about this point.
12. Please read the car manufacturer's handbook
before installing this i-Size ECRS.

7 8
INSTRUCTION
EN
40-105cm
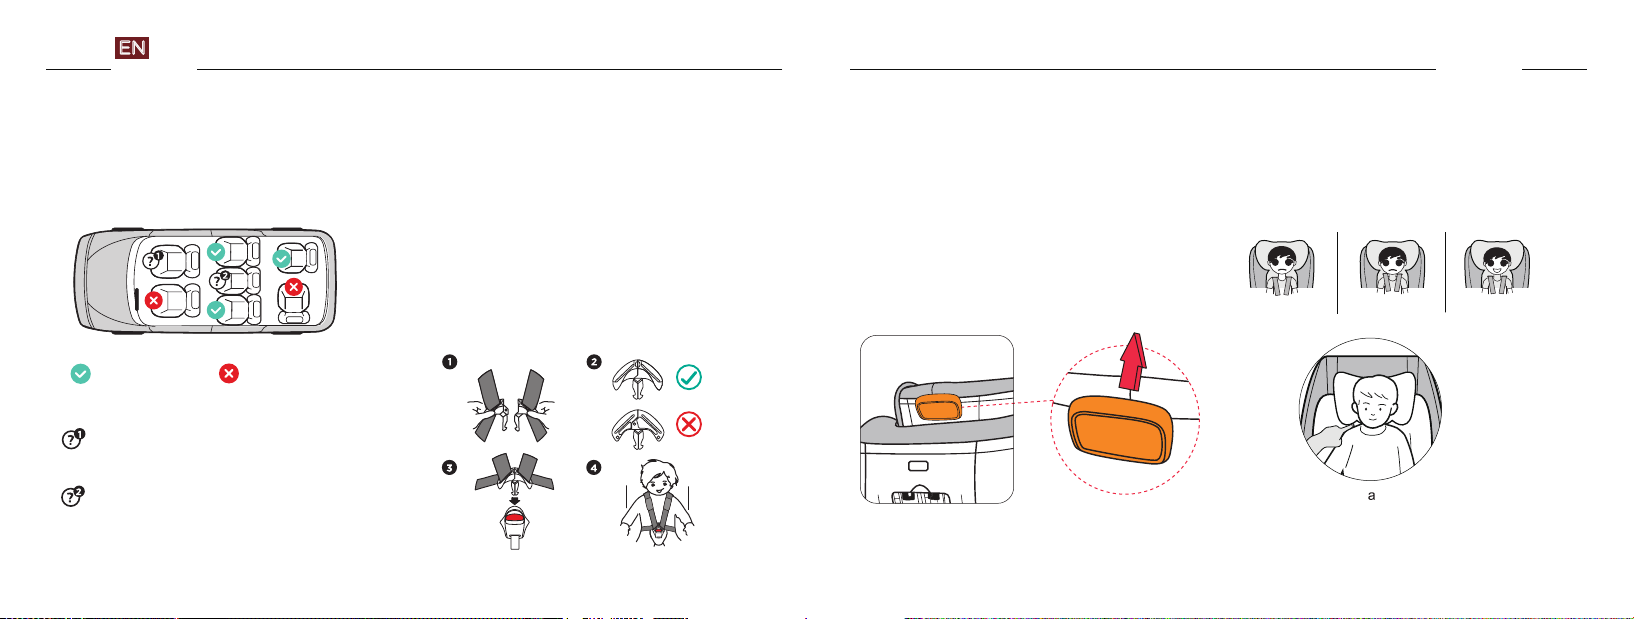
Correct/ Proper Wrong/ Improper
When front the of the seat with opened
airbag, cannot install in this place.
Only with ISOFIX attachments can install
in this place.
When using as i-Size
equipped with the ECE R14 requirements.
And only after installed ISOFIX, then can use on it.
This ECRS system is suitable for vehicles The shoulder straps are adjusted as follows:
Loosen the shoulder straps of the child seat as
much as possible.
Pull the headrest height adjuster, select the
correct height of the shoulder straps and
engage it in position that fits your child by
releasing the adjuster. Pull the headrest to make
sure it is locked after the adjustment.
5.2 How to Use the Harness Buckle
Make sure the right side is up.
Engage them before putting them into the harness
buckle, which should hear an audible CLICK.
Pull shoulder straps to remove all slack from the
lap section ensuring that the hamess is lying flat
and the hamess buckle is locked.
Open the harness buckle by pressing the red
button.
5.3 Adjust the Headrest
A correctly adjusted headrest ensures optimal protection
for your child in the safety seat:
The headrest must be adjusted so that the shoulder
straps are at the same level as your child’s shoulders.
ATTENTION!
too lower too higher correct
Adjust the headrest to the proper position,so that the
distance between the shoulder of the child and the
bottom of the headrest can be lowered by one finger.
Hold the two buckle tongues together.

INSTRUCTION
EN
40-105cm
A:
B:
then rotate the safety seat to 360 degree angle.
( see picture a )
ACTION: Each time rebound the rotation adjuster
back. To make sure the seat is fixed well.
A. Rearward Direction:
must use rearward direction ( see picture 1)
B. Forward Direction: ( 76-105cm ),
must use forward direction ( see picture 2)
(40-105cm),
5.5 Adjust the Rotation of the Seat
Pull the rotation adjuster out with your thumb,
C. When the seat is rotated to 90
degrees, the user can place the child in
this position, but he/she cannot use this angle
during driving( see picture 3)
a
picture 1 picture 2
picture 3
A Tighten Safety Belt
Pull up shoulder belt and the lap belt will
tighten, then pull crotch belt to tighten safety
belt.
Tighten the safety belt as much as possible without
causing discomfort to the child. The lap belt is as
low as possible and should put near child's crotch
not abdomen.
P.S.: Loose safety belt is dangerous. Please
check safety belt adjuster whether work, then
tighten safety belt. After tightening the seat belt,
adjust the shoulder pads to the appropriate position
on the chest.
B Loosen Safety Belt
5.4 Adjust safety belt length
When press the safety belt adjuster, the other hand
must grasp the safety belt which under shoulder
pads and pull it forward to release the safety belt.
9 10

INSTRUCTION
EN
Push the recline handle up and pull the seat outward
( see picture a ), then the seat can be adjusted.
It can be adjusted to 4 positions for forward-facing
ΎΏΐ ).
When the seat is in the position of fourth level, rotate
the seat to the rearward direction, and the seat can be
adjusted to fifth level( see p14 pictureΑ).
40-105cm
5.6 Adjust the Angle of the Child Safety Car Seat
a
13 14
Note: Do not use forward facing before the child’s age exceeds 15 months.
5
5
Fifth Level (Lying Level) First Level Second Level Third Level Fourth Level
Installation of
rearward facing Installation of forward facing
FPNJ
0-3 years
FPNJ
PRQWKV\HDUV
use( see p14 picture
11 12

INSTRUCTION
EN
Step 1: Removing Shoulder Pads and Belts
Loosen the 5-point harness of the child seat as
much as possible, Remove the belt from the
Step2: Storage Buckle
of the backrest. (Picture A and Picture B)
Take the Gears Fixed Axle from the plastic stator
and storage Gears Fixed Axle to Gears Fixed Axle
area on the behind of the backrest( Picture C ).
Finally put redundant belt into cloth
cover. ( Picture D )
Open the buckle, take out buckle tongues from
shoulder belt. Pull down buckle cross cloth cover.
Later pick up the cover in the PE board and
storage the buckle. ( Picture E and F )
40-105cm
5.7 Removing 5-Point Harness and Storage
the Accessory Part
C
D E
A
Metal Link
15 16
F
metal link. Remove the shoulder pad from the
seat belt and keep it in a safe place. Storage
metal link to metal link area on the behind
B
13 14

5.9 Removing Sleeping Pad
When your child’s height exceed 61cm, remove
the sleeping pad.
5.8 Adjust the Length of Support Leg
Never use the child seat without having
it correctly installed
Check that the harness straps are not
twisted and that they have been correctly
inserted in the belt slots of the cover.
5.10 Removing and Putting on the Fabric Cover
1. Remove the 5-point harness.
2. Take off the cover from the backrest and base.
3. Move the headrest of the child seat up to the
highrest position.
4. First take the cover off base of the
headrest, then remove the cover of the
headrest.
17 18
INSTRUCTION
EN
40-105cm
To re-fit the cover, Firstly put on the headrest's cover,
then put on the plastic shell's cover in the order of
①②③ ( see picture1)
picture 1
12
3
Pull out the support leg to the maximum angle.
a)Press the adjust button of support leg, hold the
support leg using the other hand and then
adjust the length of support leg.
b)When support leg is in full contact with the
ground of vehicle so that can release the adjust
button. Pull the support leg to make sure it is locked.
NOTE: c)After finishing the installation of support
leg, display window turns into green color.
15 16

19 20
INSTRUCTION
EN
40-105cm
6.2 Installed in Forward Facing Position with ISOFIX
Put the ISOFIX insert guide into the two ISOFIX
attachment points of your vehicle.
If you don't have ISOFIX insert guide, please
ignore this step.
NOTE: The ISOFIX attachment points are located
between the surface and the backrest of the
vehicle seat.
Press the ISOFIX button to pull out the two locking
arms from the base bottom. Insert the locking arms
into ISOFIX attachment points until you hear an
audible CLICK which indicates they are fully engaged.
And on both sides of the locking arm’s button turn into
Pull out the support leg to adjust it is in full contact
with the ground of vehicle. Make sure the display
window of support leg turns into green color.
(See 5.8)
and support leg (76-105cm)
IMPORTANT: Do not use forward facing before the
child’s age exceeds 15 months.
6.1 Installed in Rearward Facing Position with ISOFIX
Put the ISOFIX insert guide into the two ISOFIX
attachment points of your vehicle
If you don't have ISOFIX insert guide, please
Ignore this step.
and support leg (40-105cm)
NOTE:The ISOFIX attachment points are located
between the surface and the backrest of the vehicle seat.
Press the ISOFIX button to pull out the two locking
arms from the base bottom. Insert the locking arms into
ISOFIX attachment points until you hear an audible CLICK
Pull out the support leg to adjust it is in full contact with
the ground of vehicle. Make sure the display window of
support leg turns into green color. (See 5.8)
6.INSTALLATION
Green
which indicates they are fully engaged. And on both
sides of the locking arms button turn into green safety color.
green satety color.
Green
17 18

22
INSTRUCTION
EN
21
40-105cm
Length: 580mm
Width: 440mm
Height: 620-820mm
440mm 580mm
620-820mm
Sponge clean using warm water and mild soap; do not
use any other cleaning agents.
Store in a safe, dry place and away from heat and direct
sunlight. Avoid placing heavy objects on top of the seat.
CLEANING THE HARNESS AND SHELL
STORAGE
8.MAIN TECHNICAL PARAMETER
MAXIMUM WASH
TEMPERATURE 30
DO NOT BLEACH
DO NOT DRYCLEAN
DO NOT DRYING
DO NOT IRON
DRY FLAT IN SHADE PLACE
CLEANING THE BUCKLE
Periodically inspect your child seat for worn or
damaged parts. If damaged parts are found,
replace the child seat Keep the child seat clean
Do no lubricate any parts of the child seat.
keep it clean and do not leave it in direct
sunlight for extended periods of time.
Removable fabric covers and trims may be
cleaned using warm water with a household
preferably away from direct sunlight.
Food, drink, or other debris may collect inside
the harness buckle which can affect proper
Be sure you can hear an audible click to make
sure the buckle is working properly.
7.CARE AND MAINTENANCE
To prolong the life of your nursery product,
soap or a mild detergent. Allow it to dry fully,
functioning Wash in warm water until clean.
19 20

Autostoel Ding Narrow
Autostoel/universeel verbeterd
veiligheidssysteem voor
kinderen met ISOFIX: 40-105 cm, 0-18 kg
Verbeterd veiligheidssysteem voor kinderen

1 2
INSTRUCTION
EN
1.Mededeling ............................................................
3.Productinformatie...................................................
5.Gebruiksaanwijzing autostoeltje...............................
5.1 Installatieplaats…...............................................
5.2 Hoe de gesp van het harnas gebruiken.............
5.3 De hoofdsteun aanpassen..................................
5.4 De lengte van de veiligheidsgordel aanpassen..
5.5 De draaihoek van het stoeltje aanpassen..........
5.6 De helling van het autostoeltje aanpassen..........
5.7 Het 5-puntsharnas verwijderen en bewaren
van de losse onderdelen....................................
5.8
6. Installatie................................................................
3
5
4
2.Onderdelen............................................................. 3
6
6
7
8
9
11
11
13
15
16
17
17
40-105cm
BELANGRIJK: Lees deze instructies zorgvuldig
voor gebruik en bewaar ze voor toekomstig gebruik.
Indien deze instructies niet opgevolgd worden,
kan dit de veiligheid van het kind ernstig in gevaar brengen.
INHOUDSTABEL
4.Waarschuwing.........................................................
De lengte van de steunpoot aanpassen............
5.10 Verwijderen en aanbrengen van de stoffen
bekleding.................................................................
6.1 Installatie in achterwaarts gerichte positie met
ISOFIX en steunpoot (40-105 cm).............................
18
6.2 Installatie in voorwaarts gerichte positie met ISOFIX
en steunpoot (76-105 cm).............................................
16
5.9 De baby-insert verwijderen................................
7.Onderhoud en schoonmaken......................................19
8. Belangrijkste technische productgegevens................20
DU
BEDIENUNGSANLEITUNG

3 4
INSTRUCTION
EN
Onderdelen
1.Mededeling
40-105cm
Steunpoot
Regelknop
ISOFIX-
verbindingspunt
ISOFIX-knop
ISOFIX
Knopf
As vaste standen
Achterklep instructie
(mogelijkheid
om instructies toe
te voegen)
ISOFIX-inbrenggeleider (negeer dit als u
geen ISOFIX-inbrenggeleider hebt)
Dit product is een kinderstoeltje dat 360 graden draait.
De volgende informatie kan je helpen om dit
product beter te begrijpen.
3.Productinformatie
I-size
Grootte kind Lichaamsgewicht Installatiemethode Installatierichting
Achterwaarts
gericht
Voorwaarts
gericht
Isofix + steunpoot
Isofix + steunpoot
Getest en goedgekeurd overeenkomstig ECE R129/03
40-105 cm
76-105 cm
0-18 kg
9-18 kg
GEBRUIK GEEN ACHTERWAARTS GERICHTE
AUTOSTOEL OP ZITPLAATSEN WAAR EEN
ACTIEVE FRONTALE AIRBAG GEÏNSTALLEERD IS.
BELANGRIJK – NIET VOORWAARTS GERICHT
GEBRUIKEN TOT HET KIND OUDER IS DAN 15
MAANDEN (Zie instructies).
Mededeling met betrekking tot i-Size categorie
Verbeterde Veiligheidssystemen voor Kinderen
(40-105 cm)
Dit is een i-Size autostoel/Verbeterd Veiligheidssys-
teem voor Kinderen.
Het is goedgekeurd overeenkomstig VN-Reglement
Nr. 129/03, voor gebruik op zitposities die compatibel
zijn met i-Size, zoals aangegeven door fabrikanten
van voertuigen in de gebruiksaanwijzing van het
voertuig.
Raadpleeg bij twijfel de fabrikant van de autostoel of
de verkoper.
Kussen hoofdsteun
(enkel geschikt voor baby’s
jonger dan 8 maanden)
Aanpassingssysteem
Hoogte Hoofdsteun
(achterzijde hoofdsteun)
Hoofdsteun
Baby-insert
Hendel
hellingshoek
Basis
Hendel aanpassing draaihoek 360°
Monitor steunpoot
Zitbekleding
Schouderkussentje
Schoudergordel
Gesptongen
Rode knop
Gesp
Kruiskussentje
Kruisgordel
DU
BEDIENUNGSANLEITUNG

INSTRUCTION
EN
40-105cm
4.Waarschuwing
56
ISOFIX-bevestigingspunten
5.Gebruiksaanwijzing autostoeltje
5.1 Installatieplaats
BELANGRIJK! Lees a.u.b. zorgvuldig alle instructies in
deze handleiding en in de gebruikshandleiding van
jouw wagen met betrekking tot autostoeltjes en zorg
ervoor dat je ze begrijpt. Installeer en gebruik het
autostoeltje zoals beschreven in de gebruikshandleid-
ing. Het niet opvolgen van de instructies kan immers
leiden tot ernstige letsels of de dood van jouw kind.
Bewaar de instructies bij het verbeterde veilighe-
idssysteem voor kinderen voor toekomstig gebruik.
BELANGRIJK! Laat een dokter of ziekenhuismedew-
erker de geschiktheid van het autostoeltje evalueren
voordat je het ziekenhuis verlaat of het autostoeltje
gebruikt, omwille van potentiële medische problemen
met betrekking tot een laag geboortegewicht en bij
premature zuigelingen.
1. Zorg ervoor dat alle gordels waarmee het stoeltje
bevestigd is in het voertuig goed vast zitten. Alle
gordels waarmee het kind vast zit dienen goed aan te
sluiten bij zijn lichaam. Zorg ervoor dat ze niet
gedraaid zitten.
2. Zorg ervoor dat het heupbandje laag gedragen
wordt, zodat het bekken goed vast zit, om te
voorkomen dat het kind uit het autostoeltje valt.
3. Zorg ervoor dat het autostoeltje vervangen wordt
wanneer het onderworpen werd aan een hevige
impact in een ongeval.
4. Zorg ervoor dat harde voorwerpen en plastic
onderdelen van een autostoeltje zo geplaatst en
geïnstalleerd zijn dat ze bij alledaags gebruik van het
voertuig niet vast komen te zitten in bijvoorbeeld een
beweegbare zitting of deur van het voertuig.
5. Breng GEEN wijzigingen aan en voeg NIETS aan
het autostoeltje toe zonder de goedkeuring van de
typegoedkeuringsinstantie; het is gevaarlijk om de
installatie-instructies die gegeven worden door de
fabrikant van het autostoeltje niet nauwgezet op te
volgen.
6. HEET! Houd het stoeltje uit zonlicht tenzij het
bedekt is met textiel, aangezien het te heet kan
worden voor de huid van het kind.
7. Laat je kind NIET zonder toezicht achter in het
stoeltje, zelfs niet voor korte tijd.
8. Zorg ervoor dat bagage of andere voorwerpen in de
auto die letsels kunnen veroorzaken bij een aanrijding
stevig bevestigd zijn.
9. A) Gebruik het autostoeltje NIET zonder de
bekleding.
B) Vervang de bekleding van het stoeltje NIET door
een andere dan degene die aanbevolen wordt door de
fabrikant, aangezien de bekleding integraal deel
uitmaakt van de prestaties van het veiligheidssysteem.
10. Gebruik het autostoeltje NIET indien de positie van
de gesp van de veiligheidsgordel voor volwassenen
geen goede stand heeft ten opzichte van de
lastdragende contactpunten op het autostoeltje voor
kinderen. Neem contact op met de fabrikant indien je
twijfels zou hebben over dit punt.
11. Gebruik geen andere lastdragende contactpunten
dan degene die beschreven staan in de instructies en
die aangeduid staan op het kinderstoeltje. Neem
contact op met de fabrikant in geval van twijfel over dit
punt.
12. Lees a.u.b. de gebruikshandleiding van de wagen
voordat je dit i-Size autostoeltje installeert.
DU
BEDIENUNGSANLEITUNG

7 8
INSTRUCTION
EN
40-105cm
correct fout
Enkel op deze stoel als Isofix-bevestingspunten
voorzien zijn
Bij gebruik als i-Size autostoel
Dit systeem is geschikt voor voertuigen uitgerust in
overeenstemming met de vereisten van ECE R14.
Het kan enkel gebruikt worden nadat de ISOFIX
geïnstalleerd is.
Niet gebruiken op autostoelen met actieve airbag
5.2Hoe de gesp van het harnas gebruiken 5.3 De hoofdsteun aanpassen AANDACHT!
te laag te hoog juist
Houd de twee delen van de gesp samen.
Zorg ervoor dat de juiste zijde naar boven gericht is.
Verbind ze voordat je ze in de sluiting van het harnas
stopt, dit zou een KLIKgeluid moeten maken.
Trek aan de schouderbandjes om ervoor te zorgen dat
er geen speling op het heupgedeelte zit, zorg ervoor
dat het harnas plat ligt en dat de sluiting van het
harnas gesloten is.
Ontsluit het harnas door op de rode knop te drukken.
De schouderbandjes worden als volgt aangepast:
maak de bandjes van het autostoeltje zo los
mogelijk.
Trek aan het aanpassingssysteem van de hoofdsteun,
kies de juiste hoogte voor de schouderbandjes en stel
de positie in die geschikt is voor jouw kind door het
aanpassingssysteem los te laten.
Een correct aangepaste hoofdsteun zorgt voor een
optimale bescherming voor jouw kind in het
autostoeltje.
De hoofdsteun dient aangepast te worden zodat de
schouderbandjes op hetzelfde niveau zitten als de
schouders van je kind.
Pas de hoofdsteun aan naar de geschikte positie
zodat er nog een vinger afstand tussen de schouder
van het kind en de onderzijde van de hoofdsteun zit.
DU
BEDIENUNGSANLEITUNG

INSTRUCTION
EN
40-105cm
A:
B:
5.5 De draaihoek van het autostoeltje aanpassen
a
Afbeelding 1 Afbeelding 2
Afbeelding 3
5.4 De lengte van de veiligheidsgordel aanpassen
9 10
A De veiligheidsgordel aanspannen
Trek de schoudergordel naar boven en de heupgordel
zal aangespannen worden, trek dan aan de
kruisgordel om de veiligheidsgordel aan te spannen.
Trek de veiligheidsgordel zoveel mogelijk aan zonder
dat het kind zich oncomfortabel voelt. De heupgordel
moet zo laag mogelijk zitten, bij het kruis van het kind
en niet op zijn buik.
P.S.: Een losse veiligheidsgordel is gevaarlijk.
Controleer of de aanpasriem voor de veiligheidsgordel
werkt en span de veiligheidsgordel aan. Pas de
schouderkussentjes aan nadat je de veiligheidsgordel
aangespannen hebt, zodat ze op de juiste positie op
de borst zitten.
B De veiligheidsgordel losmaken
Druk op de schuifknop met een hand en houd met de
andere hand de schoudergordel vast onder de
schouderkussentjes (houd de schouderkussentjes op
de gordel hierbij niet vast) terwijl het kind rechtop zit,
om de veiligheidsgordel losser te maken.
Trek met je duim aan het aanpassingssysteem voor de
draaihoek, draai dan het autostoeltje in een hoek van
360 graden (zie afbeelding a).
ACTIE: Plaats het aanpassingssysteem voor de
draaihoek elke keer terug. Zorg ervoor dat het stoeltje
goed vast staat.
A.Achterwaartse richting (40-105 cm), gebruik de
achterwaarts gerichte positie (zie afbeelding 1)
B.Voorwaartse richting (76-105 cm), gebruik de
voorwaarts gerichte positie (zie afbeelding 2)
Wanneer het stoeltje in een hoek van 90 graden
gedraaid is, kan het kind in de stoel geplaatst worden,
maar deze hoek mag niet gebruikt worden tijdens het
rijden (zie afbeelding 3).
DU
BEDIENUNGSANLEITUNG

INSTRUCTION
EN
40-105cm
5.6 De helling van het autostoeltje aanpassen
a
13 14
Opmerking: Gebruik dit stoeltje niet voorwaarts gericht tot het kind ouder is dan 15 maanden.
5
5
Niveau 5 (ligstand) Niveau 1 Niveau 2 Niveau 3 Niveau 4
Installatie tegen
de rijrichting in Installatie met de rijrichting mee (baby kijkt naar voren)
40-105 cm, tot
18 kg, 0-3 jaar 76-105 cm, tot 18 kg, 18 maanden tot 3 jaar
11 12
Duw de hellingshendel naar boven en trek het stoeltje
naar buiten (zie afbeelding a), het stoeltje kan dan
aangepast worden.
Het kan aangepast worden in 4 posities bij voorwaarts
gericht gebruik (zie afbeelding 1 2 3 4 op pagina 12).
Je kunt het stoeltje achterwaarts draaien terwijl het in
positie 4 staat. Het kan dan aangepast worden naar
het vijfde niveau (zie afb. 5 op pag. 12)
DU
BEDIENUNGSANLEITUNG

INSTRUCTION
EN
40-105cm
5.7Het 5-puntsharnas verwijderen en bewaren
van de losse onderdelen
C
D E
A
Verbindings-
stuk harnas
15 16
F
B
13 14
Stap 1: Verwijderen van schouderkussentjes en
gordels
Maak het 5-puntsharnas van het autostoeltje zo los
mogelijk. Haal de gordel uit het verbindingsstuk voor
het harnas. Verwijder de schouderkussentjes van de
gordel en bewaar ze op een veilige plaats. Bewaar het
verbindingsstuk voor het harnas op de daarvoor
voorziene opbergplek aan de achterzijde van de
rugleuning (Afbeelding A en Afbeelding B).
Haal de vaste standen-as uit de plastic stator en berg
deze op in het opbergvak aan de achterzijde van de
rugleuning (Afbeelding C).
Plaats ten slotte ook de overbodige gordel in de
stoffen bekleding (Afbeelding D).
Stap 2: Opbergen van gesp
Open de gesp, haal de uiteinden van de gesp uit de
schoudergordel. Trek de gesp naar beneden door de
stoffen bekleding. Open daarna de klep in het PE-bord
en berg de gesp op (afbeeldingen E en F).
DU
BEDIENUNGSANLEITUNG

5.9Verwijderen van de zitkussentjes
Verwijder de zitkussentjes zodra het kind groter
is dan 61 cm.
5.8 De lengte van de steunpoot aanpassen 5.10Verwijderen en aanbrengen van de
stoffen bekleding
17 18
INSTRUCTION
EN
40-105cm
Afbeelding 1
12
3
15 16
Ontgrendel de steunpoot.
a)Druk de regelknop van de steunpoot uit en pas de
lengte ervan aan met je andere hand.
b)Als de steunpoot contact maakt met de vloer van de
auto, laat je de regelknop los. Trek even aan de
steunpoot, hij vergrendelt zichzelf.
c)Wanneer de steunpoot correct is geïnstalleerd, merk
je dat er een groen verklikkertje op de monitor
verschijnt.
1. Verwijder het 5-puntsharnas.
2. Verwijder de bekleding van de rugleuning en basis.
3. Zet de hoofdsteun van het autostoeltje in de
hoogste positie.
4. Verwijder eerst de bekleding van de basis van de
hoofdsteun, verwijder dan de bekleding van de
hoofdsteun.
Om de bekleding opnieuw aan te brengen, breng je
eerst de bekleding van de hoofdsteun aan, daarna
breng je de bekleding van de plastic schelp aan in de
volgorde van 1 2 3
LET OP! Gebruik nooit een autostoeltje dat niet correct
geïnstalleerd is. Gebruik het zitje niet zonder de
bekleding. Zorg ervoor dat de metalen plaat correct
bevestigd is.
LET OP! Controleer of de gordeltjes van het harnas
niet gedraaid zitten en of ze goed in de gordelopenin-
gen van de bekleding zitten.
DU
BEDIENUNGSANLEITUNG
Other manuals for Universal ECRS isofix
1
Table of contents
Languages:
Other Ding baby Car Seat manuals
Popular Car Seat manuals by other brands

Peg-Perego
Peg-Perego PRIMO VIAGGIO 360 Instructions for use

Inglesina
Inglesina Tolomeo 2.3 Ifix instruction manual

BEBE CONFORT
BEBE CONFORT Pearl Pro i-Size Instructions for use & warranty

BABY MONSTERS
BABY MONSTERS BM40001 Instructions for use

Lionelo
Lionelo Lennart User's manual & warranty card

Britax
Britax safe-n-sound maxi lite Instructions for installation & use