DIP'N DRY MAX 41709 User manual
International patents pending. All imitations will be prosecuted.
DIP N DRY MAX® is a registered EU/CTM trade mark.
1
2
3 4

3
8
6
7
9
5
4
Thank you for purchasing DIP N DRY MAX®, the mop
that gets washed and dried in the same bucket, with
two different compartments (one clean and the other
dry) to keep the water separate.
Before using the product for the rst time, please read
all these instructions to ensure you use the product
correctly. Keep this manual on hand for future use.
WARNINGS
Do not use the product if it is
damaged or defective.
Keep out of reach of children.
Do not use near children or animals.
Set up the mop head and then
attach the microbre cleaning pads.
DIP N DRY MAX ® is for household
use.
The set includes:
DIP N DRY MAX®bucket
Pole and pivoting head
Two microbre dust mops
Instruction manual
Microbre mop composition: 100% polyester.
ASSEMBLY INSTRUCTIONS
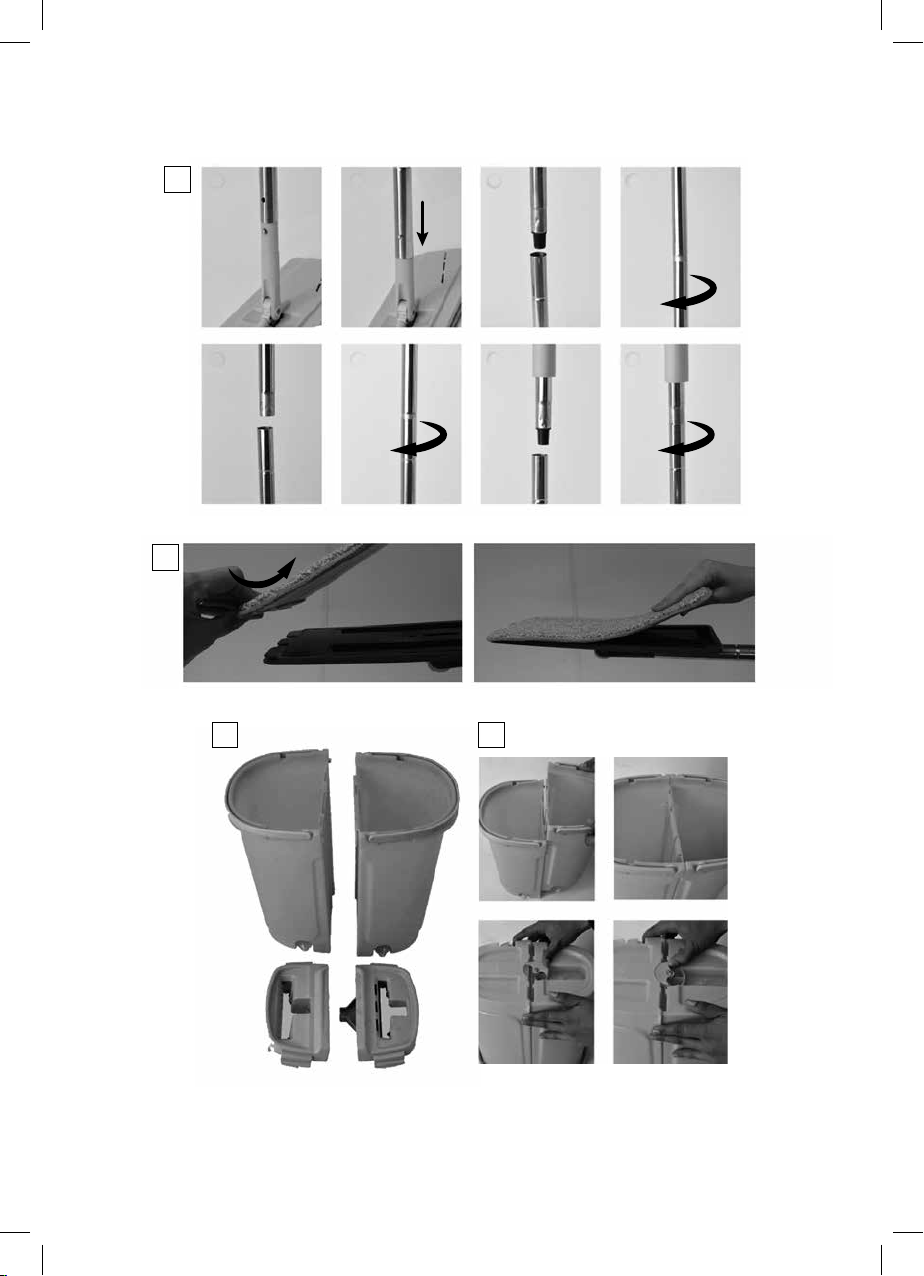
Step 1
Screw the four poles together and t the shortest pole
into the pivoting head (Fig. 1).
Step 2
Attach one end of the microbre mop to the indicated
end of the pivoting head. Use the quick opening and
closing system to attach the entire microbre mop to
the head, as shown in the picture (Fig. 2).
Step 3
Align the middle panels of the separable buckets (Fig.
3) and attach them by turning the tab in the opposite
direction (Fig. 4).
NOTE: Make sure the plastic tabs in the bottom of
each bucket are rmly attached (Fig. 5).
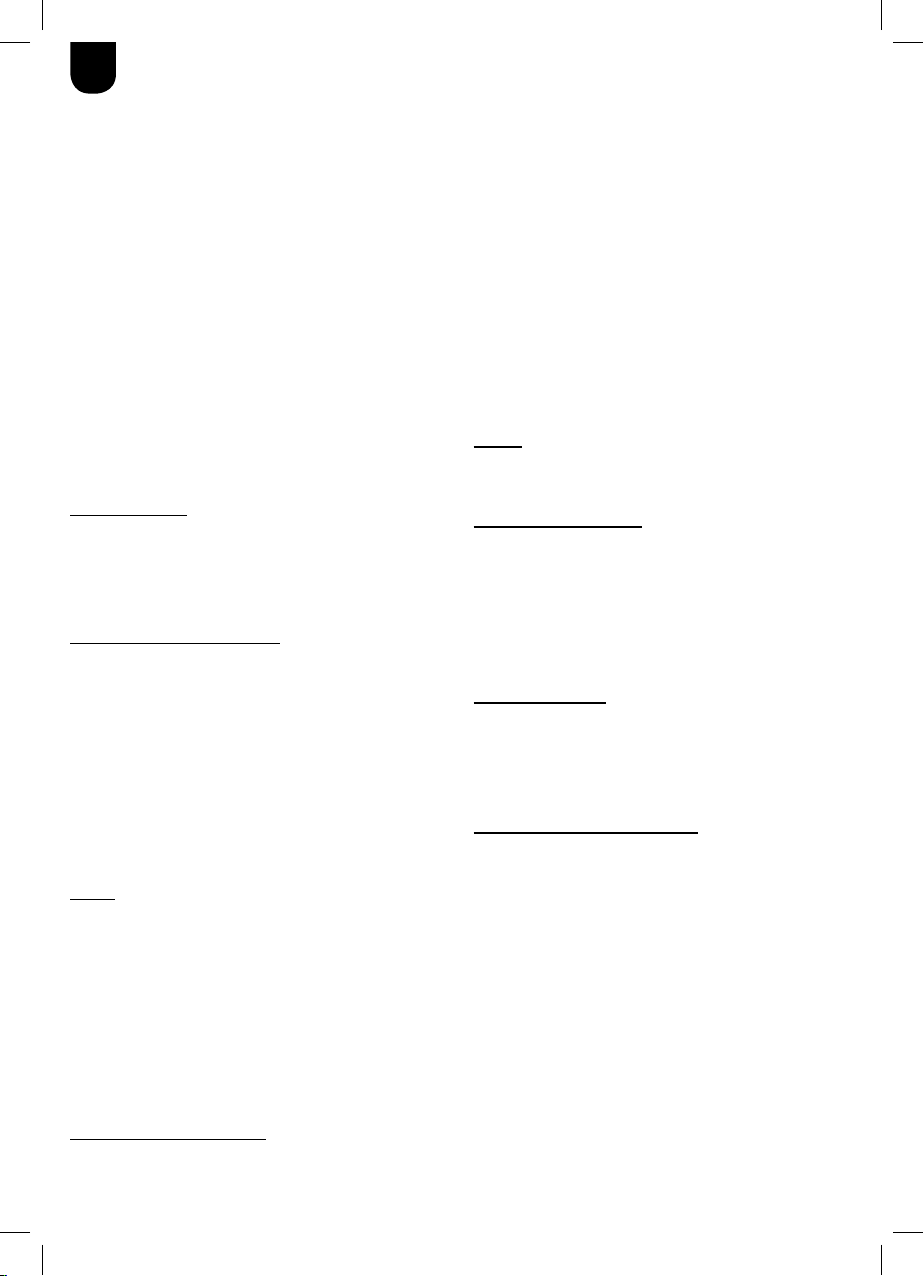
Step 4
Attach the wash lid (labelled WASH) to the bucket
labelled WASH. Perform the same operation with the
dry lid (labelled DRY) (Fig 6).
Step 5
Insert the transparent plugs into the holes near the
bottom of each bucket to prevent water from coming
out (Fig 7).
INSTRUCTIONS FOR USE
1. Fill the WASH bucket with water (with or
without soap solution) to the mark on the
inside of the bucket. Do not bleach.
2. Hold the mop in the vertical position so it
folds and slides into the slot of your choice
(Fig 8).
3. To wash, insert the mop into the WASH slot,
hold the pole rmly and rinse the mop by
moving it up and down against the side until
the mop is clean (Fig 9).
4. Then perform the same action in the DRY
slot as many times as necessary to wring
the water out of the mop. Now you can
clean any surface you want. Repeat these
actions as many times as necessary for op-
timum results.
5. When you’re nished, empty the buckets by
removing the transparent plugs from each
separable bucket or simply pour the water
out of each bucket.
NOTE
DIP N DRY MAX®works perfectly on all kinds of hard
oors such as tiles, linoleum, hardwood, laminate,
marble and granite.
Cleaning Instructions:
DIP N DRY MAX®can be cleaned and dried with a
cloth.
We recommend emptying and rinsing out each bucket.
Disassemble the buckets and nestle them for space-
saving storage.
The microbre cleaning pads are machine washable.
Machine washable at 60 ºC
Do not bleach
Air-dry
Quality Warranty:
This product is covered by a warranty against
manufacturing defects subject to the time periods
stipulated by the legislation in force in each country.
This warranty does not cover damages resulting from
inadequate use, negligent commercial use, abnormal
wear and tear, accidents or improper handling.
Australia & New Zealand only
This product has the benet of certain Consumer
Guarantees. These are prescribed by the Australian
Consumer Law & the New Zealand Consumer
Guarantees Act 1993 both of which provide protection
for consumers. There is no express warranty for
this product in Australia or New Zealand. The above
paragraph refers to other countries.
Made in China
ENGLISH

5
ESPAÑOL
Gracias por haber adquirido DIP N DRY MAX®, la
mopa que se limpia y se seca en un mismo cubo
con dos compartimentos diferentes: uno limpia y otro
seca, sin mezclar el agua.
Antes de utilizarlo, por favor lea todas las instrucciones
para poder usar el producto correctamente. Guarde
este manual en un lugar accesible para futuras
consultas.
ADVERTENCIAS
No utilice el producto si estuviera en
mal estado o defectuoso.
Mantenga el producto fuera del
alcance de los niños.
No utilice cerca de niños o animales.
Coloque las mopas de microbra
una vez esté el cabezal montado.
Utilice Dip n Dry Max®en el entorno
doméstico.
El set incluye:
Cubo DIP N DRY MAX®
Palo y cabezal pivotante
2 mopas de microbra
Manual de instrucciones
Composición mopa de microbra: 100 % poliéster.
INSTRUCCIONES DE MONTAJE
Paso 1
Enrosque los cuatro palos entre sí y ajuste el agujero
del palo más pequeño al cabezal pivotante de la
mopa. (Fig 1)
Paso 2
Enganche el extremo de la mopa de microbra al
extremo indicado a tal efecto del cabezal pivotante.
Adhiera la mopa de microbra al cabezal a través del
cierre rápido tal como se muestra en la imagen (Fig 2)
Paso 3
Encaje los dos cubos divisibles por la parte central
(Fig 3) y asegure el cierre de la supercie, girando la
pletina en sentido contrario. (Fig4)
NOTA: asegúrese de que las pletinas de plástico
que hallará en el fondo de cada cubo, están bien
encajadas. (Fig 5)
Paso 4
Ajuste el cabezal de lavado (marcado con la palabra
“WASH”) al cubo que incluye la palabra WASH.
Realice la misma operación con el cabezal de secado
(marcado con la palabra “DRY”). (Fig 6)
Paso 5
Introduzca los tapones transparentes en los oricios
que encontrará en cada cubo para evitar que salga
el agua. (Fig 7)
INSTRUCCIONES DE USO
1- Llene de agua (con o sin solución jabonosa)
el cubo dedicado a limpiar (WASH) hasta la
marca que encontrará en el interior del mis-
mo. No usar lejía.
2- Doble la mopa en posición vertical para in-
troducirla correctamente en la ranura que
desee. (Fig 8)
3- Para lavar, introduzca la mopa en la ranura
WASH, sujete bien el palo y enjuague verti-
calmente de arriba abajo las veces necesa-
rias hasta que la mopa quede limpia. (Fig 9)
4- A continuación realice tantas veces como
sea necesario, la misma acción en la ranu-
ra DRY para escurrir el agua de la mopa.
Ya puede limpiar la supercie que desee.
Repita estas acciones, las veces que con-
sidere necesarias hasta obtener los resul-
tados óptimos.
5- Cuando haya terminado, vacíe el agua de
los cubos destapando los tapones transpa-
rentes de cada cubo divisible o simplemen-
te vacíe el cubo.
NOTA
DIP N DRY MAX® funciona perfectamente en todo
tipo de suelos duros como azulejos, linóleo, maderas,
laminados, mármol, granito…
Instrucciones de limpieza:
DIP N DRY MAX® se puede limpiar y secar con un
paño.
Se recomienda vaciar y enjuagar cada cubo.
Desmonte los cubos y guárdelos uno dentro del otro:
conseguirá ahorrar espacio al guardarlo.
Las mopas de microbra pueden lavarse en la
lavadora.
Lavable a máquina a 60 ºC
No usar lejía
Secar al aire libre
Garantía de calidad:
Este producto queda cubierto por una garantía contra
defectos de fabricación sujeta a los plazos de tiempo
estipulados por la legislación vigente en cada país.
Esta garantía no cubre los daños resultantes de un
uso inadecuado, uso comercial negligente, desgaste
anormal, accidentes o manipulación indebida.
Fabricado en China
6
Nous vous remercions d’avoir acheté DIP N DRY
MAX®, le balai plat qui se nettoie et se sèche dans un
même seau à deux compartiments : le premier pour
nettoyer et le second pour sécher, sans mélanger l’eau.
Avant de l’utiliser, veuillez lire toutes les instructions
an de garantir une correcte utilisation du produit.
Conservez cette notice dans un endroit accessible
pour pouvoir la consulter ultérieurement.
AVERTISSEMENTS
N’utilisez pas ce produit s’il est en
mauvais état ou défectueux.
Conservez le produit hors de la
portée des enfants.
Ne l’utilisez pas à proximité d’enfants
ou d’animaux.
Placez les chiffonnettes en microbre
une fois la tête montée.
Dip n Dry Max®est conçu pour un
usage domestique.
Contenu du kit :
Seau DIP N DRY MAX®
Manche et tête pivotante
2 serpillères en microbre
Mode d’emploi
Composition de la serpillère en microbre : 100 %
polyester.
ASSEMBLAGE
Étape 1
Vissez les quatre tubes du manche entre eux et ajustez
le trou du tube le plus petit à la tête pivotante du balai.
(Fig. 1)
Étape 2
Attachez l’extrémité du balai en microbre à l’extrémité
de la tête pivotante prévue à cet effet. Fixez la
chiffonnette en microbre à la tête grâce à la fermeture
rapide, comme indiqué sur l’image (Fig. 2).
Étape 3
Emboîtez les deux seaux séparables par la partie
centrale (Fig. 3) et assurez-vous que cette surface
soit bien fermée, en tournant le plaque dans le sens
contraire. (Fig. 4)
REMARQUE : assurez-vous que les plaques en
plastique qui se trouvent au fond de chaque seau
soient bien xées. (Fig. 5)
Étape 4
Ajustez la tête de lavage (indiquant le mot « WASH »)
sur le seau qui comprend le mot WASH. Réalisez la
même opération avec la tête de séchage (indiquant le
mot « DRY ») (Fig. 6)
Étape 5
Introduisez les bouchons transparents dans les orices
se trouvant dans chaque seau pour éviter toute fuite
d’eau. (Fig. 7)
CONSIGNES D’UTILISATION
1. Remplissez d’eau (savonneuse ou non sa-
vonneuse) le seau prévu pour le nettoyage
(WASH) jusqu’à la marque située à l’intérieur
de ce dernier. Javel interdit
2. Placez la tête du balai en position verticale
pour l’introduire correctement dans la rainure
souhaitée. (Fig. 8)
3. Pour laver, introduisez le balai dans la rai-
nure WASH, tenez fermement le manche, et
mouillez la tête du haut vers le bas autant de
fois que nécessaire pour bien imprégner le
balai. (Fig. 9)
4. Puis, réalisez autant de fois que nécessaire
le même geste dans la rainure DRY pour
essorer l’eau du balai. Vous pouvez à pré-
sent laver la surface souhaitée. Répétez ces
opérations toutes les fois nécessaires pour
obtenir des résultats optimaux.
5. Lorsque vous avez terminé, videz l’eau des
seaux en enlevant les bouchons transpa-
rents de chaque cube séparable.
REMARQUE
DIP N DRY MAX® fonctionne parfaitement sur tous les
types de sols durs : carrelage, lino, bois, revêtements
stratiés, marbre, granit, etc.
Instructions de nettoyage
Il est possible de laver et sécher DIP N DRY MAX®
avec un chiffon.
Il est recommandé de vider et de rincer chaque seau.
Démontez les seaux et stockez-les en les emboîtant :
vous gagnerez de l’espace.
Les chiffonnettes en microbre peuvent être lavées en
machine.
Passe en machine à 60 ºC
Javel interdit
Séchage à l’air libre
Garantie :
Ce produit est couvert par une garantie contre les
défauts de fabrication, dont la durée dépend de la
législation en vigueur dans chaque pays.
Cette garantie ne couvre pas les dommages résultant
d’une utilisation inappropriée, d’une négligence
de la part du commerçant, d’une usure anormale,
d’accidents ou d’une mauvaise manipulation.
Fabriqué en Chine
FRANÇAIS

7
DEUTSCH
Vielen Dank für den Kauf von DIP N DRY MAX®,
den Wischmopp, der mit nur einem Eimer mit zwei
getrennten Segmenten reinigt und trocknet: mit einem
wird geputzt, mit dem anderen getrocknet, ohne das
Wasser zu vermischen.
Lesen Sie bitte vor der Verwendung sämtliche
Anweisungen für einen richtigen Produkteinsatz.
Bewahren Sie diese Gebrauchsanleitung an einem gut
zugänglichen Ort für die spätere Wiederbenutzung auf.
HINWEISE
Produkt nicht verwenden, wenn es
sich nicht in einwandfreiem Zustand
bendet.
Von Kindern fernhalten.
Nicht in der Nähe von Kindern oder
Tieren benutzen.
Die Microfaserpads einlegen, sobald
das Kopfteil montiert ist.
Dip n Dry Max®nur im Haushalt
einsetzen.
Im Lieferumfang enthalten:
Eimer DIP N DRY MAX®
Stiel und drehbares Kopfteil
2 Microfaserpads
Gebrauchsanweisung
Zusammensetzung Mikrofasermop: 100 % Polyester.
HINWEISE ZUR MONTAGE
Schritt 1
Die vier Stielelemente zusammenstecken und die
Öffnung des kleinsten Stielelements in das Kopfteil des
Wischmopps einrasten lassen. (Abb. 1)
Schritt 2
DasEnde desMicrofaserpadsamentsprechendenEnde
des drehbaren Kopfteils befestigen. Das Microfaserpad
am Kopfteil mit Hilfe des Schnellverschlusses, wie in
der Abbildung (Abb. 5) gezeigt, befestigen.
Schritt 3
Die zwei Eimersegmente in der Mitte zusammenstecken
(Abb. 3) und deren Verschluss sicherstellen, indem die
Befestigung in Gegenrichtung gedreht wird. (Abb. 4)
ANMERKUNG: Es muss sichergestellt werden, dass
die Kunststoffbefestigungen, die sich im jeweiligen
Eimer benden, korrekt einrasten. (Abb. 5)
Schritt 4
Die Reinigungs-Abdeckung (mit „WASH“
gekennzeichnet) am Eimer befestigen, der ebenfalls
mit WASH gekennzeichnet ist. Mit der Trocknen-
Abdeckung (mit „DRY“ gekennzeichnet) auf gleiche
Weise verfahren. (Abb. 6)
Schritt 5
Die durchsichtigen Stöpsel in die jeweiligen
Eimersegmentöffnungen stecken, um ein Auslaufen
des Wassers zu verhindern. (Abb. 7)
GEBRAUCHSANLEITUNG
1. Den für den Reinigungsvorgang vorgese-
henen Eimer (WASH) mit Wasser (mit oder
ohne Reinigungsmittel) bis zur im Inneren
vorhandenen Füllgrenze füllen. Kein Bleich-
mittel verwenden
2. Den Mopp hochkant stellen, damit er in die
dafür vorgesehene Schlitzöffnung eingeführt
werden kann. (Abb. 8)
3. Zum Ausspülen den Mopp in die WASH-Öff-
nung einführen, den Stiel gut festhalten und
den Mopp sooft wie nötig nach unten und
oben bewegen, bis er sauber ausgespült ist.
(Abb. 9)
4. Anschließend ebenso, sooft wie nötig, in der
DRY-Öffnung verfahren, um das Wasser aus
dem Mopp herauszudrücken. Und schon
können Sie jede gewünschte Oberäche rei-
nigen. Für optimale Ergebnisse diese Vorge-
hensweisen sooft wie nötig wiederholen.
5. Nach Beendigung das Wasser durch Entfer-
nen der durchsichtigen Stöpsel aus den Ei-
mersegmenten ablassen oder diese einfach
entleeren.
ANMERKUNG:
DIP N DRY MAX ® funktioniert perfekt auf harten
Böden aller Art wie Fliesen, Linoleum, Holz, Laminat,
Marmor, Granit…
Reinigungshinweise:
DIP N DRY MAX® kann mit einem Lappen gesäubert
und getrocknet werden.
Es wird empfohlen, jedes Eimersegment zu entleeren
und auszuspülen. Eimersegmente auseinandernehmen
und ineinandergesteckt aufbewahren: das spart Platz.
Die Microfaserpads können in der Waschmaschine
gewaschen werden.
Machinenwaschbar bei 60 ºC
Kein Bleichmittel verwenden
An der Luft trocknen
Hergestellt in China.

8
ITALIANO
Grazie per aver acquistato DIP N DRY MAX®, la
puliscipavimenti che si pulisce e si asciuga in uno
stesso secchio a due scomparti diversi: uno pulisce,
l’altro asciuga senza mescolare l’acqua.
Prima dell’uso, leggere tutte le istruzioni al ne di
utilizzare il prodotto correttamente. Conservare
questo manuale in un luogo facilmente accessibile per
eventuali future consultazioni.
AVVERTENZE
Non utilizzare il prodotto se difettoso
o in cattive condizioni.
Tenere il prodotto fuori dalla portata
dei bambini.
Non utilizzare in prossimità di
bambini o animali domestici.
Agganciare i panni in microbra
dopo aver montato la testa rotante.
Utilizzare Dip n Dry Max®in ambienti
domestici.
Il set comprende:
Secchio DIP N DRY MAX®
Bastone e testa rotante
2 panni in microbra
Manuale di istruzioni
Composizione panno in microbra: 100% poliestere.
ISTRUZIONI DI MONTAGGIO
Passo 1
Assemblare i quattro elementi che costituiscono il
bastone e ssare la testa rotante della puliscipavimenti
in corrispondenza del foro dell’elemento più piccolo
del bastone. (Fig. 1)
Passo 2
Agganciare l’estremità del panno in microbra
all’apposita estremità indicata della testa rotante.
Fare aderire il panno in microbra alla testa
tramite il sistema di chiusura rapida come mostrato
nell’immagine (Fig. 2)
Passo 3
Montare i due secchi indipendenti dalla parte centrale
(Fig. 3) e bloccare la chiusura della supercie ruotando
l’elemento di blocco in plastica nella direzione
opposta. (Fig. 4)
NOTA: assicurarsi che gli elementi di blocco in plastica
che si trovano sul fondo di ciascun secchio rimangano
ben incastrati. (Fig. 5)
Passo 4
Fissare l’apertura per il lavaggio (contrassegnata con
la scritta “WASH”) nel secchio contrassegnato con
la scritta WASH. Eseguire la stessa operazione con
l’apertura per l’asciugatura (contrassegnata con la
scritta “DRY”). (Fig. 6)
Passo 5
Inserire i tappi trasparenti nei fori che si trovano su
ciascun secchio per evitare fuoriuscite di acqua. (Fig.
7)
ISTRUZIONI D’USO
1. Riempire il secchio per il lavaggio (WASH)
con acqua (con o senza soluzione deter-
gente) no a raggiungere l’apposita tacca
ubicata al suo interno. Non usare sbiancanti
2. Posizionare il panno verticalmente inseren-
dolo correttamente nell’apertura che si vuo-
le utilizzare. (Fig. 8)
3. Per lavare, inserire il panno nell’apertura
WASH, tenere ben saldo il bastone e ri-
sciacquare verticalmente con movimenti
dal basso verso l’alto per il numero di volte
necessario no a quando il panno non risulti
pulito. (Fig. 9)
4. Quindi effettuare la stessa operazione in
corrispondenza dell’apertura DRY il nume-
ro di volte necessario per strizzare il panno.
Adesso il panno è pronto per pulire la su-
percie desiderata. Ripetere queste opera-
zioni, il numero di volte necessario no ad
ottenere il risultato ottimale.
5. Una volta nito, vuotare l’acqua dai secchi
rimuovendo i tappi trasparenti da ciascun
secchio indipendente. In alternativa, svuo-
tare direttamente il secchio.
NOTA
DIP N DRY MAX® funziona perfettamente su ogni
tipo di pavimento duro come ad esempio piastrelle,
linoleum, legno, laminati, marmo, granito…
Istruzioni per la pulizia:
È possibile lavare e asciugare DIP N DRY MAX® con
un panno.
Si consiglia di svuotare e risciacquare entrambi i
secchi. Smontare i secchi. Riporli uno dentro l’altro in
modo da risparmiare spazio.
I panni in microbra possono essere lavati in lavatrice.
Lavabili in lavatrice a 60 ºC
Non usare sbiancanti
Asciugare all’aria aperta
Garanzia di qualità:
Questo prodotto è coperto da garanzia contro ogni
difetto di fabbricazione per il tempo previsto dalla
legislazione in vigore in ciascun paese.
Sono esplicitamente esclusi dalla garanzia i danni
derivanti da uso improprio, uso commerciale
negligente, usura anormale, incidenti o manomissioni.
Made in China

9
PORTUGUÊS
Obrigado por ter adquirido DIP N DRY MAX®, a mopa
que consegue limpar e secar no mesmo balde com dois
compartimentos diferentes: um limpa e outro seca, sem
misturar a água.
Leia primeiro todas as instruções para utilizar o produto
corretamente. Guarde este manual num lugar acessível
para consultas futuras.
ADVERTÊNCIAS
Não utilize o produto se estiver em
mau estado ou defeituoso.
Mantenha o produto fora do alcance
das crianças.
Não utilize o produto na proximidade
de crianças ou animais.
Coloque as mopas de microbra
depois de montar a cabeça.
Utilize Dip n Dry Max®no ambiente
doméstico.
O conjunto inclui:
Balde DIP N DRY MAX®
Cabo e cabeça pivotante
2 mopas de microbra
Manual de instruções
Composição da mopa de microbra: 100 % poliéster.
INSTRUÇÕES DE MONTAGEM
Ação 1
Enrosque os quatro cabos e ajuste o orifício do cabo
mais pequeno à cabeça pivotante da mopa. (Fig. 1)
Ação 2
Engate a extremidade da mopa de microbra na
extremidade indicada para esta nalidade da cabeça
pivotante. Adira a mopa de microbra à cabeça através
do fecho rápido conforme mostrado na imagem (Fig. 2).
Ação 3
Encaixe os dois baldes divisíveis na parte central (Fig.
3) e prenda o fecho da superfície, rodando a patilha no
sentido contrário. (Fig. 4)
NOTA: certique-se de que as patilhas de plástico,
que encontrará no fundo de cada balde, estão bem
encaixadas. (Fig. 5)
Ação 4
Ajuste a cabeça de lavagem (marcada com a palavra
“WASH”) no balde que integra a palavra WASH.
Realize a mesma operação com a cabeça de secagem
(marcada com a palavra “DRY”). (Fig. 6)
Ação 5
Introduza as tampas transparentes nos orifícios que
encontrará em cada balde para evitar que a água saia.
(Fig. 7)
INSTRUÇÕES DE UTILIZAÇÃO
1. Encha o balde para limpar (WASH) com água
(com ou sem solução detergente) até à mar-
ca que encontrará no seu interior. Não usar
branqueador
2. Dobre a mopa na posição vertical para a in-
troduzir corretamente na ranhura pretendida.
(Fig. 8)
3. Para lavar, introduza a mopa na ranhura
WASH, segure bem o cabo e enxague ver-
ticalmente de cima para baixo as vezes ne-
cessárias até que a mopa que limpa. (Fig. 9)
4. A seguir realize a mesma ação as vezes ne-
cessárias na ranhura DRY para escorrer a
água da mopa. Já pode limpar a superfície
pretendida. Repita estas ações conforme for
necessário até obter os resultados deseja-
dos.
5. Quando tiver terminado, esvazie a água dos
baldes retirando as tampas transparentes de
cada balde divisível ou esvazie simplesmente
o balde.
NOTA
DIP N DRY MAX® funciona perfeitamente em todo o
tipo de solos duros como azulejos, linóleo, madeiras,
laminados, mármore, granito, etc.
Instruções de limpeza:
DIP N DRY MAX® pode ser limpo e seco com um pano.
É recomendável esvaziar e enxaguar cada balde.
Desmonte os baldes e guarde-os um dentro do outro
para poupar espaço.
As mopas de microbra podem ser limpas na máquina
de lavar roupa.
Lavável à máquina a 60 ºC
Não usar branqueador
Secar ao ar livre
Garantia de qualidade:
Este produto está coberto por uma garantia contra
defeitos de fabrico sujeita aos prazos estipulados pela
legislação em vigor em cada país.
Esta garantia não cobre os danos decorrentes dum
uso inadequado, uso comercial negligente, desgaste
anormal, acidentes ou manipulação indevida.
Fabricado na China

10
NEDERLANDS
Hartelijk dank voor de aanschaf van DIP N DRY
MAX®, de mop die kan worden schoongemaakt en
gedroogd in dezelfde emmer met twee verschillende
compartimenten: in een wordt hij schoongemaakt en
in de ander wordt hij gedroogd, zonder het water te
mengen.
Lees vóór gebruik alle instructies om het product
op de juiste wijze te kunnen gebruiken. Bewaar de
handleiding op een toegankelijke plaats zodat u hem in
de toekomst nogmaals kunt raadplegen.
WAARSCHUWINGEN
Gebruik het product niet als het in
slechte staat verkeert of defect is.
Houd het product buiten het bereik
van kinderen.
Gebruik het product niet in de buurt
van kinderen of dieren.
Bevestig de microvezel moppen
nadat het kopstuk is bevestigd.
Gebruik Dip n Dry Max®in en om het
huis.
De set bestaat uit:
DIP N DRY MAX®emmer
Steel en draaibare kop
2 microvezel moppen
Gebruikershandleiding
Samenstelling van de microvezel mop: 100% polyester.
MONTAGE-INSTRUCTIES
Stap 1
Draai de vier stukken steel aan elkaar en sluit de
opening van het kleinste stuk op de draaibare kop van
de mop aan. (Afb.1)
Stap 2
Haak het uiteinde van de microvezel mop aan het
daartoe bestemde uiteinde van de draaibare kop.
Bevestig de microvezel mop aan de kop door middel
van de snelsluiting, zoals te zien is in de afbeelding
(Afb. 2)
Stap 3
Zet de beide afzonderlijke emmers bij het middendeel
(Afb. 3) in elkaar en vergrendel het oppervlak door het
plaatje naar links te draaien. (Afb. 4)
N.B.: controleer of de plastic plaatjes aan de onderkant
van de emmers goed zitten. (Afb. 5)
Stap 4
Plaats de waskop (gemerkt met het woord “WASH”)
op de emmer met het woord WASH. Verricht dezelfde
handeling met de droogkop (gemerkt met het woord
“DRY”). (Afb. 6)
Stap 5
Steek de doorzichtige stoppen in de openingen in
beide emmers om te voorkomen dat het water eruit
loopt. (Afbeelding 7)
GEBRUIKSAANWIJZINGEN
1. Vul de emmer voor het schoonmaken
(WASH) met water (al dan niet met zeepo-
plossing) tot aan het merkteken aan de bin-
nenzijde. Geen bleekmiddel gebruiken
2. Vouw de mop in verticale richting dubbel zo-
dat hij goed in de gewenste gleuf past. (Afb.
8)
3. Steek de mop, om hem te wassen, in de
gleuf WASH. Houd de steel goed vast en
spoel hem uit door hem zo vaak als nodig
op en neer te bewegen, totdat hij schoon is.
(Afb. 9)
4. Verricht deze handeling vervolgens zo vaak
als nodig is maar nu in de gleuf DRY, om het
water uit de mop te wringen. U kunt nu het
gewenste oppervlak schoonmaken. Herhaal
deze handelingen zo vaak als u nodig acht
om het optimale resultaat te bereiken.
5. Maak de emmers, als u klaar bent, leeg door
de transparante doppen uit de afzonderlijke
emmers te halen, of door simpelweg het wa-
ter uit de emmers te gieten.
OPMERKING
DIP N DRY MAX® werkt perfect voor elk type harde
vloer zoals tegels, linoleum, hout, laminaat, marmer,
graniet…
Reinigingsinstructies:
DIP N DRY MAX® kan met een doek worden
schoongemaakt en gedroogd.
Wij raden aan om beide emmers te legen en om te
spoelen. Demonteer de emmers en bewaar ze in
elkaar: zo bespaart u ruimte bij het opbergen.
De microvezel moppen kunnen in de wasmachine
worden gewassen.
Kan in de wasmachine worden
gewassen bij 60 ºC
Geen bleekmiddel gebruiken
Aan de lucht drogen
Kwaliteitsgarantie:
Voor het product geldt een garantie tegen fabrieksfouten
gedurende de periode die in de wetgeving van elk
betreffend land is vastgelegd.
Onder de garantie valt niet de schade die het gevolg
is van een verkeerd of nalatig gebruik, abnormale
slijtage, ongelukken of onjuiste behandeling.
Made in China

ISL GmbH
Edewechter Landstrasse 55
D 26131 Oldenburg Germany
www.isl-de.com
+49 (0) 441 95 07 08-0
17 rue de la Garenne
CS 90021 St-OUEN LʼAUMONE
95046 CERGY PONTOISE CEDEX
FRANCE
www.venteo.fr
(+33) 1 34258551
Best Direct (International) Benelux B.V.
Sint Janstraat 25a
1251 KZ Laren
www.best-direct.nl
PO Box 202, Spit Junction NSW
2088, Australia
CIF: B08984056
Imported by:
Table of contents
Languages:
Popular Cleaning Equipment manuals by other brands


Kärcher
Kärcher Ringler RI 300 W2G Translation of the original operating manual

Mesto
Mesto 3620 Series Instructions for use

Yamabiko
Yamabiko ECHO ProSweep MTA-PS Operator's manual

Nilfisk-Advance
Nilfisk-Advance Hybrid ECO SE11 Directions for use

P.Lindberg
P.Lindberg 9063195 Original manual

BÖWE
BÖWE P21 installation instructions