dipper KN-201 User manual

Coffee Roast Analyzer
KN-201
User manual
Made in Taiwan Version 1.1.6

2
The Specialty Coffee Association (SCA), a body merged from European
Specialty Coffee Association (SCAE) and American Specialty Coffee Association
(SCAA), promotes using infrared analysis to assess the degree of coffee roast. The
method used is called an Agtron number. A lower Agtron number indicates a
higher caramelization and a deeper roasting degree. On the other hand, a higher
number would indicate a lower caramelization and a lighter roast degree. This
quantitative way can assist roasters in determining the degree of coffee roast
more precisely which is a great aid for them in managing the quality and
consistency of their products.
This product is a professional precision instrument for measuring the degree
of coffee roast. It is suitable for both coffee beans and ground coffee. This product
provides a user friendly interface with an excellent quality exterior. The built in
optical technology complies with the SCA Roast Color Classification System which
enables a coffee roaster accurately measuring the coffee beans Agtron number
and the roasting degree name.
This product uses the same principle of near-infrared sensing as Agtron. When
the infrared wavelength is between 780 to 1500nm, it is called a near-infrared due
to its proximity to visible wavelengths. Many researches point out that the deeper
the coffee roasting degree, the higher the carbonization degree of soluble organic
matter in coffee beans, and the higher the absorption of near-infrared light.
Therefore, when the measurement instrument emits near-infrared to the coffee
to be tested, then measure the reflected energy. The lower the reflection
indicates the deeper the roasting degree; the higher the reflective amount
indicates a shallower roasting degree. SCA converts this reflection into a
numerical value and calls it an Agtron number. 0 means that the soluble organic
matter in coffee beans has been 100% carbonized, and 105 represents only 3-5%
coffee sucrose.
Product description
Analysis principle

3
Agtron numbers are defined as two scale expressions designed to meet the
specific needs of different types of coffee roast.
Agtron Commercial Scale:
This was originally defined as a roast scale, developed primarily for large
commercial plants, corresponding to the carbide ratio of soluble organic matter,
in order to evaluate soluble coffee in the form of dehydration. The measuring
values ranging from 0 to 100, indicates deep to shallow degree. However, as the
market evolved, this type of measuring method is gradually replaced by other
measuring equipment that turned to the primary use of assessing the degree of
roasting.
Agtron Gourmet Scale:
To meet the development of better roast machine performance and more
extreme market roast demands, this higher resolution scale was born. This scale
is typically ranging from 0 to 133, which has a wider measurement ranges than
the Commercial Scale.
Most products on the market now are fixed with Gourmet scale. Our product
supports both scales and can be selected on demand, in order to meet a wider
range of application needs.

4
●Host x 1
●Sample cup / tray x 1
●Flat scraper x 1
●USB cable x 1
●Calibration plate x 1
●User manual x 1
●Carry bag x 1
●Please read this manual carefully before using the product.
●If the product is found to be overheated, producing smoke or unpleasant
smell, unplug the power cord and turn off the power switch immediately.
Continue use may cause fire or electric shock.
●If repair service is required, please contact the dealer from which the product
is purchased.
●Do not operate the product when hands are wet and when connecting the
charger to the equipment to avoid the risk of electric shock.
●This is not a waterproof and dust-proof product, operating in a temperature
between 0~40°C, relative humidity within 80%.
●Do not use a charger exceeding 5 volts, otherwise it will cause damage.
●This product is a precision optical instrument. If the sensor or light source is
contaminated, the accuracy of the measurement will be affected. Keep the use
and storage place clean.
●When using the equipment, stay away from places where static electricity or
magnetic fields might occur, so as not to affect measurement accuracy or
increase the risk of failure.
●Do not use on uneven or vibrated work surface, or the product may be fallen
or shaken, resulting in injury, product failure or inoperability.
●The product has built-in lithium batteries and precision electronic circuitry. If
it encounters fall, heavy hit, collision or other external force injury causing the
deformation of the product, stop using the product immediately and place in
a safe place.
●Do not use damaged power cords, power plug, or loose connectors. This may
result in a short circuit, fire or electric shock to the wires.
Package contents
Precautions

5
●When disposing this product, please follow the local legal rules.
●Super quality aluminum alloy body.
●Intuitive operation interface.
●Clear, easy-to-read OLED display.
●Quick warm-up and measurement process.
●Requires fewer samples and less wastes.
●Separate buttons for bean and ground measurements.
●Self-adaptability design, error automatic compensation.
●Comply with standard SCA Agtron scales (Gourmet and Commercial).
●Display Roast degree name (SCA and Common support).
●200 data logs of history.
●Built-in high-capacity lithium battery for continuous use for more than 8 hours.
●Support plugged in to charge and use at the same time.
●Attached proprietary correction plate that can be corrected on a regular basis.
●Auto screen power save.
●Auto sleep shutdown.
Features

6
Do not look directly at the NIR light source while power on to avoid injury.
[Bean/Power]
Press and hold to switch on/off the power supply.
Short press to start measurement for coffee bean.
[Ground/Setting]
Press and hold to enter the set mode, short press to
start measurement for ground coffee.
[Micro USB]
To connect the USB cha rge r.
[Charging indicator]
Orange light indicates charging is in progress, and
green light indicates charging is complete.
[RESET]
If the operation process crashes, the system can be
restarted by inserting a pin to the switch then pull
out.
[Sensor]
Optical sensor, please keep clean.
[NIR light LED]
Near-infrared light source, please keep clean.
Exterior description

7
●Charging
The new machine is not fully charged after it left the factory. A full charge
is recommended before first use. Connect one end of the USB charging cable
to the charger, and the other end of the micro USB to the USB charging port
of KN-201, then plug the charger into an AC110/220V socket. When orange
light shows up, indicates charging is in progress; and green light indicates
charging is complete. It takes about 3 hours to get fully charged when the
battery is completely discharged. It can be powered on continuously for 8
hours after a fully charge.
When charging in the power-on state, a plug symbol with the word C
appears on the upper right hand corner of the display screen. The C word will
be replaced with a simple plug symbol when fully charged. When the
equipment is turned off, tap on any key to wake up the display. If the screen
displays "Battery Charging", indicates that charging is in progress. When
showing "Full Charged", means the battery is fully charged and the charging
will automatically stop. This product supports charging and operating the
measurement work at the same time.
Whenthe battery is completely discharged, "battery Empty" is
displayed and the equipment will shut down automatically. It is
recommended to plug in the charger to charge the battery before using the
equipment to avoid damaging the battery.
If the product is not frequently used, we recommend charging the
battery at least once a month, to avoid damaging the lithium battery due to
low battery voltage.
●Power switch
Press and hold [Bean/Power] button for 1 second, the screen will first
show the product logo. Then it will enter into the 30 seconds warm-up screen.
To ensure measurement accuracy, it is recommended to wait for the warm-up
process to complete before starting a measurement operation. If skipping the
warm-up process is really necessary, press the two keys on the panel
[Bean/Power], [Ground/Setting] simultaneously, "Quit" will show on the
screen.
Operation method

8
Press and hold [Bean/Power] button for 3 seconds in the power-on state,
"PowerOff" will show on the screen. The equipment will enter into shutdown
state.
●Coffee sample placement
Since coffee samples that have just been roasted or are still temperature-
charged will release infrared light. This may interfere with the sensor resulting
in inaccurate measurement. Make sure the coffee sample has cooled down to
room temperature before using.
When the sample coffee is not properly placed, the measurement result
can become inaccurate. The placement density of the sample and whether or
not it levels with the edge of the cup when filling and flattening the sample
cup are the two most important points that will affect the measurement
accuracy. When placing coffee in the sample cup, fill as much as possible to
reduce any gap in the content. Then use a scraping tool to flatten the top to
the height of the cup edge level without special weighing.
The degree of coffee grinding will also affect the measurement result. The
SCA cupping standards requires 70 to 75% of ground must pass through 20
mesh sieve. The ground is then flattened to fill the sample cup. Make sure
there is no gap in the content and is level with the cup edge. If there is no
correct sieve available, you can fix each grinding scale for comparison. This will
Coffee bean
Coffee ground

9
give you a relevant reference between different measurement values.
The coffee bean’s silver skin might also interfere with the measurement
result. You can reduce the interference by taking the average value after
multiple fill measurements.
●Measurement operation
First, make sure that the sample cup edge is clean and does not have any
foreign objects such as coffee powder. Put KN-201 over the top of the sample
cup, then press the corresponding button. For coffee bean, press
[Bean/Power] button. For ground coffee, press [Ground/Setting] button.
After a few seconds, the screen will display the measured result. At the center,
it is the Agtron number and the corresponding two roasting degree names.
The name of the SCA definition shows above the Agtron number, the common
name shows under.
"Over Range" is shown when the measured value is outside the
range of 0 to 150.
●Read historical data
When each measurement is completed, the result will automatically store
in the 200-historical database. Press both [Bean/Power] and
[Ground/Setting] buttons at the same time to enter into the read mode. The
screen will show the latest test data. Press the [Ground/Setting] button (right)
will show the next data and increase the data sequence number. Press the
[Bean/Power] button (left) will show previous data and decrease the data
sequence number. A larger sequence number represents an older data log.
Data recording adopts a circular method. After the read is complete, press
both buttons again to leave this mode.

10
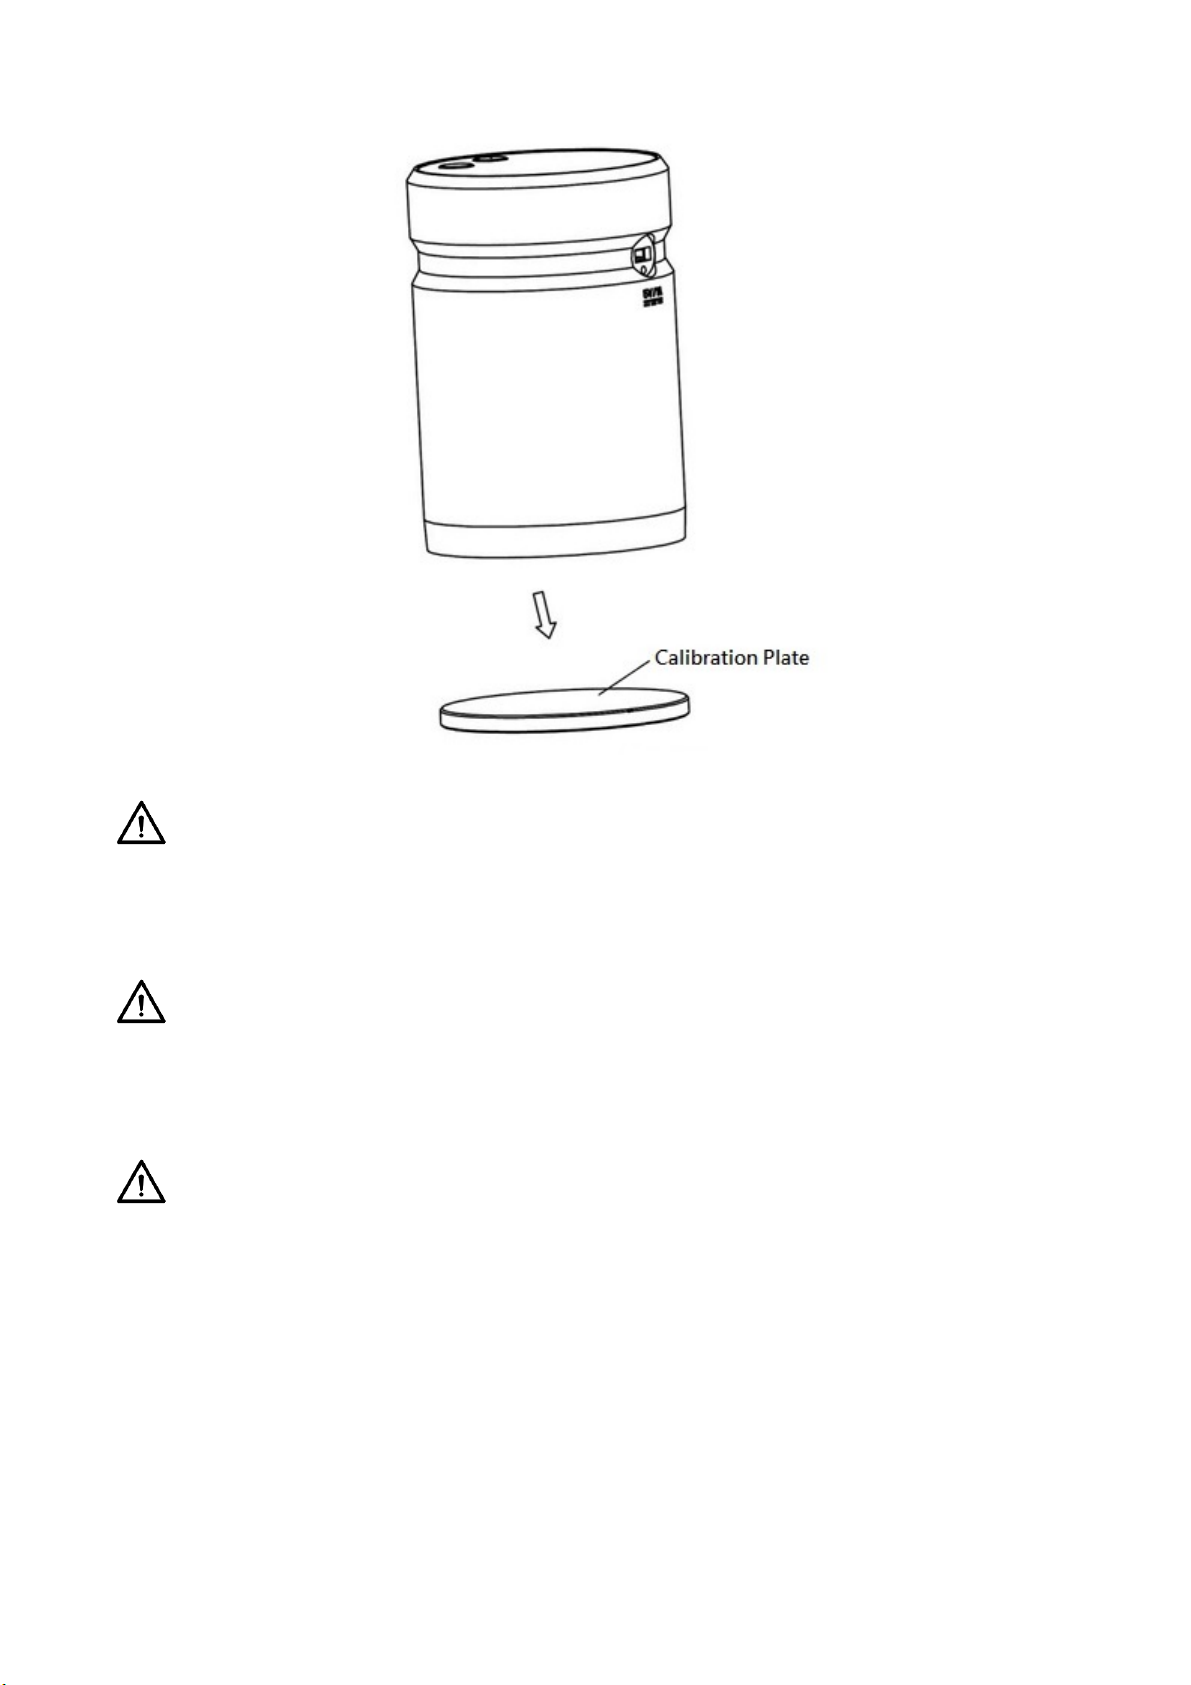
●Calibrate the equipment
Before calibration operation, it is recommended to wear white cotton
gloves when handling the calibration plate. Avoid touching the colored surface
to prevent contamination. Make sure the calibration plate is complete and
clean, and the device is powered on for more than 10 minutes. Check that the
sensor and NIR light LED are clean without any pollutant to ensure accuracy
after calibration.
Place the colored side of the calibration plate on a flat surface, then place
the KN-201 on the calibration plate. Make sure there is a solid fit all around.
Press and hold [Ground/Setting] button for more than 3 seconds to enter into
system setup mode (please refer to the corresponding chapter for details).
Select "Calibration" Entry and select "Yes". The screen will show "Calibrate"
and "Wait...". This means that calibration procedure is being performed. Do
not move until "OK" is shown. Repeat the above action if "Fail" occurs. If "Fail"
continues to occur, it may be because the sensor or light source LED is dirty.
Try cleaning them before performing the calibration again.
11
It is recommended to conduct calibration every six months. This product
has a self-adaptability design. Frequent calibration does not help to increase
accuracy.
When carrying out calibration, the ambient temperature should be kept
in the range of 25±5°C. Temperature outside of this range may affect the
accuracy of the calibration.
After the calibration plate is used, please keep it properly. Do not use
organic solvents such as alcohol to wipe the surface. Avoid direct sunlight to
prevent color loss.

12
In the power-on state, press and hold [Ground/Setting] button for more
than three seconds will enter into System Setup mode. In this mode, the left
and right key functions are displayed in the table below:
Key
Short press
Hold & press
Left button
[Bean/Power]
Last
Return
Right button
[Ground/Setting]
Next
Confirm
Once you have selected the item you want to set, hold the right button
[Ground/Setting] to select the item options. The options are displayed in the
table below:
Item
Option
Description
(1) Auto Power Off
(1) Always ON
(2) 5 mins
(3) 10 mins
(4) 30 mins
(5) 60 mins
The default is 30 minutes.
When the equipment is
idle over the set time, it
will automatically shut
down to save p ower.
(2) Sound
(1) ON
(2) OFF
Default is ON. You can
choose to turn it OFF.
(3) Calibration
(1) Yes
(2) No
Select Yes to carry out a
calibration process.
Please refer to the
"Calibration operation"
section above for details.
(4) Scale Mode
(1) Gourmet
(2) Commercial
Default is Gourmet. It can
be set to Commercial if
needed.
Setup mode

13
(5) Reset Factory
(1) Yes
(2) No
Select Yes the device will
return to the factory set
default parameters. The
historical data will be
emptied, and the
calibration data will also
return to the factory set
value. It is recommended
to carry out a calibration
process after reset.
(6)About
None
Record the firmware
version, serial number
and other relevant
information of this
device.
Change settings could cause unexpected instability. Make sure you
understand the meaning of each setting before making changes.
CAUTION! Shut down the equipment and remove the charging cable before
cleaning.
●Exterior cleaning
The body shell and sample cup/plate can be wiped with a micro-wet fine
fiber cloth, and then with a dry cloth to remove the surface moisture. Please
avoid exposing to direct sunlight to dry. The screen panel is made of acrylic.
Remove the dust on the surface and wipe it lightly with lens cleaning
paper/cloth. Excessive force may cause scratches, please handle it carefully.
●Sense cabin cleaning
After long-term use, the cabin may collect dirt due to coffee powder and
grease residue. The cabin wall can be wiped with micro-wet fine fiber cloth,
and then remove surface moisture with a dry cloth. Please operate gently to
avoid scratching the black paint inside the cabin wall.
Cleaning method

14
●Calibration plate cleaning
Calibration plate surface might be stained with grease or dust due to finger
or other items touched it. Contamination will cause calibration bias. To clean
it, use a small amount of soft dishwashing liquid, and then rinse with water,
dry quickly with soft paper towels or cloth. The process must be gentle to
avoid surface scratches.
Do not clean light sources and sensors with water or other organic
solvents.
It is recommended that the calibration be carried out after the sense
cabin has been cleaned to ensure the accuracy of the measurement.

15
Size
Diameter 65mm, height 100mm
Material
Aerospace aluminum alloy with hard anode treatment
Weight
280g (not include accessories)
Display
128x64 monochrome OLED
Light source
NIR solid-state LED
Sensor
Multi-point phototransistors
Warm-up time
30 seconds
Measure range
0~150 Agtron Gourmet number
Accuracy
>99%
Data records
200 records
Battery
High-capacity rechargeable polymer lithium battery
Battery life
Work continuously up to 8 hours
Charger
USB 5V/1A
Charging time
0~100% about 3 hours
Operating
temperature
0~40°C
Storage
temperature
-10~70°C
Certifications
CE, FCC
Specifications
Table of contents
Popular Measuring Instrument manuals by other brands

REED
REED C-322 instruction manual

Smart Sensor
Smart Sensor AR860 instruction manual

Harbor Freight Tools
Harbor Freight Tools CEN-TECH 41080 Operator's instruction manual

Hanna Instruments
Hanna Instruments HI 96735 instruction manual

Greenheck
Greenheck Sure-Aire 384986 Installation, operation and maintenance manual

FIS
FIS E Series user manual


ScienTECH
ScienTECH Vector S200 Setup and operating procedures

Vaisala
Vaisala Veriteq viewLinc 4.3 quick start guide

BRUEL & KJAER
BRUEL & KJAER 2972 Instructions and applications

Tektronix
Tektronix TLA7AA1 instructions

LINOVISION
LINOVISION IOT-S300AP product manual

Fieldpiece
Fieldpiece ATWB1 Operator's manual