Dirty Hand Tools 101571 User manual
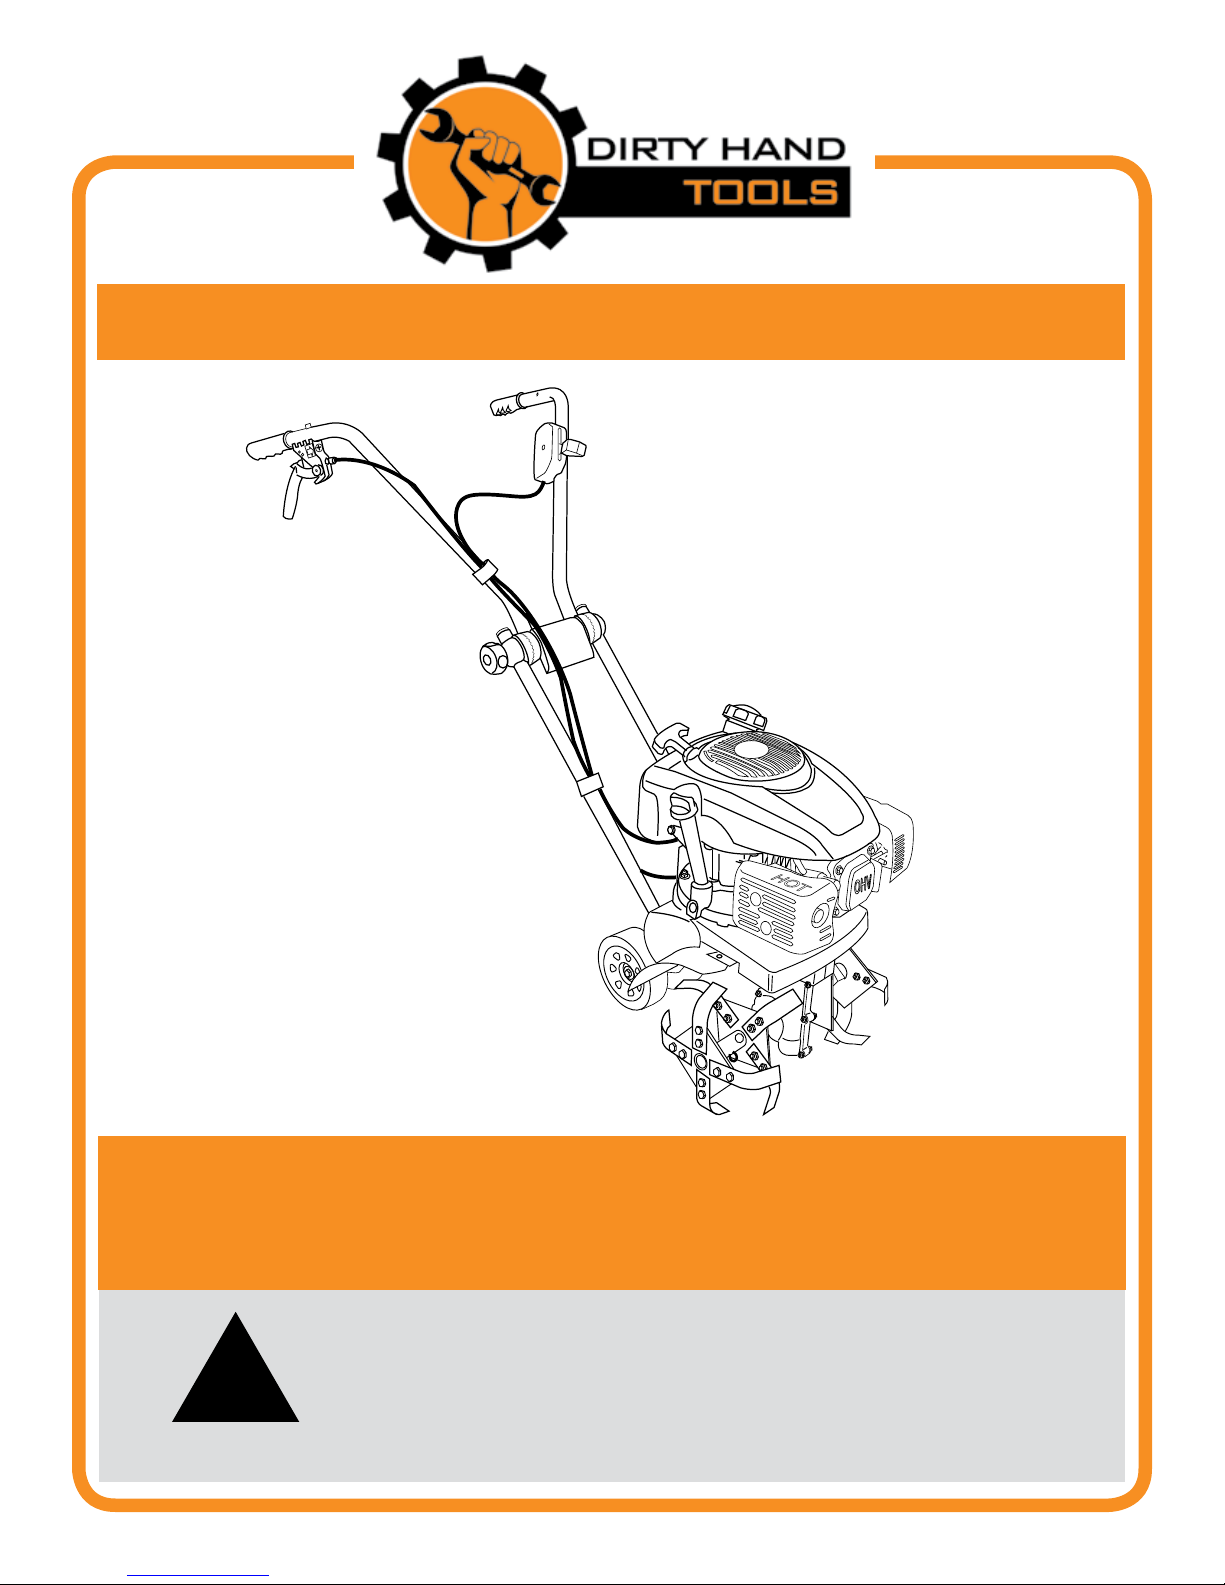
15” Front Tine Tiller
is safety alert symbol identies important safety messages in
this manual. Failure to follow this important safety information
may result in serious injury or death.
MODEL # 101571
Operation Manual
!
Part # 101790 Rev A

510 Pierce Avenue • Suite B
Louisville, CO 80027 • 720-287-5182
For Service or Questions
Call 1-877-487-8275
720-287-5182
www.dirtyhandtools.com
Dirty Hand Tools is a brand of

Table of Contents
Important Safety Information
Intended Use ..............................................................................4
Personal Protective Equipment ..................................................4
General Safety ............................................................................5
Safety Decals ..............................................................................6
Unpacking and Assembly Instructions
Unpacking ...................................................................................7
Overview of Components.............................................................8
Tine Assembly.............................................................................9
Wheel/Depth Regulator Assembly ...........................................10
Handlebar Assembly .................................................................11
Driver Safety Control Lever Mounting ....................................12
rottle Contol Lever Mounting ..............................................12
Safety Shield Assembly .............................................................13
Operating Precautions................................................................14
Operating Instructions
Preparation for Operation .........................................................15
Pre-Start Inspection ..................................................................15
Adjusting the Depth Regulator.................................................15
Starting Up................................................................................16
Shutting Down..........................................................................16
Tilling........................................................................................17
Tilling Tips................................................................................17
Alternative Tine Position ..........................................................18
Maintenance
Lubrication................................................................................19
Cleaning the Tine Axle Shaft....................................................19
Transmission Oil .......................................................................19
Engine Maintenance .................................................................19
Storage.........................................................................................20
Troubleshooting..........................................................................21
Warranty & Specications .........................................Back Cover
3

Important Safety Information
WARNING: Read and thoroughly understand all instructions
and safety information before assembling or operating this tiller.
Failure to do so may cause serious injury or death. Do not allow
anyone to operate this tiller who has not read this manual. As
with all power equipment, a tiller can be dangerous if assembled
or used improperly. Do not operate this tiller if you have doubts or
questions concerning safe operation.
Call our customer service department at 720-287-5182,
1-877-487-8275, or visit www.dirtyhandtools.com if you have any
questions or concerns about the safe operation of this equipment.
Intended Use
Do Not Use the tiller for any purpose other than tilling garden soil
for which it was designed. Any other use is unauthorized and may
result in serious injury or death.
Personal Protective Equipment
When operating this tiller it is essential that you wear safety gear
including goggles or safety glasses, steel toed shoes and tight fitting
gloves (no loose cuffs or draw strings). Always wear ear plugs or
sound deafening headphones to protect against hearing loss when
operating this tiller. Always wear sturdy footwear. Never wear
sandals, sneakers or open shoes, and never operate the tiller with
bare feet. Do not wear loose clothing that might get caught in
moving parts.
YOUR TILLER IS EQUIPPED WITH A SAFETY
CONTROL LEVER THAT ENABLES YOU TO STOP
THE TINES QUICKLY IN AN EMERGENCY.
Learn how the drive safety control lever operates and how to
control the tiller at all times.
Read the entire Operation Manual before using this equipment!
4
!
WARNING
!
DANGER
!
CAUTION

5
Important Safety Information
General Safety
Failure to follow warnings, cautions, assembly and operation
instructions in the Operation Manual may result in serious injury
or death.
READ THE OPERATION MANUAL BEFORE
OPERATION.
• Do not permit children to operate this equipment at any time.
•Do not permit others that have not read and understood the
complete Operation Manual to operate this equipment.
• Keep all people and pets a minimum of 10 feet away from the
work area when operating this tiller.
• Do not operate the tiller when under the influence of alcohol,
drugs or medication.
• Do not allow a person who is tired or otherwise impaired or not
completely alert to operate the tiller.
CAREFULLY INSPECT THE AREA TO BE TILLED AND
REMOVE ALL FOREIGN OBJECTS.
Do not till above underground water lines, gas lines, electric cables,
or pipes. Do not operate the tiller in soil with large rocks and
foreign objects which can damage the equipment.
• Leave control lever in the neutral position before starting the
engine.
• Handle fuel with care; it is highly flammable. Use an approved
fuel container. Never add fuel to a running engine or hot engine.
• Fill fuel tank outdoors with extreme care. Never ll fuel tank
indoors.
• Replace gasoline cap securely and clean up spilled fuel before
restarting.
• Never attempt to make any adjustments while the engine is
running.
!
DANGER
!
DANGER

Important Safety Information
Safety Decals
Safety labels on the tiller are to remind you of important
information while you are operating the unit. Make sure all
safety warning decals are attached and in readable condition.
Replace missing or defaced decals. Contact Dirty Hand Tools
at 1-877-487-8275 for replacement decals.
6
AVOID INJURY
FROM
ROTATING
TINES!
Keep hands,
feet and
clothing away!
• Tines rotate when the
safety latch is flipped up
and the drive control
lever is depressed
towards the handle bar.
• To stop tines from
rotating release the
drive control lever.
The safety latch
automatically snaps
into locked position.
• Stop the engine, wait
for tines to stop
rotating and disconnect
the spark plug before
removing debris or
doing any maintenance.
DANGER
101573
AVOID INJURY
• Know the function and
location of all controls.
• Never allow children to
operate the tiller.
• Check area to be tilled
and remove rocks or
obstacles.
• Check for underground
utilities before using.
WARNING
Read the
Operator’s
Manual
Before
Operating
Wear
Safety
Goggles or
Eyewear
Wear
Boots or
Protective
Footwear
Wear
Protective
Noise
Reduction
Gear
Wear
Gloves and
Protective
Clothing
101846

Unpacking and Assembly
Your tiller will require some assembly. e following instructions will
help you unpack your tiller, assemble and adjust the depth regulator
lever, cable tension and handlebar height. You will need two 9/16”
wrenches.
Unpacking
Open top of carton and remove the tiller components.
Tiller Components
Upper Handlebar left
Upper Handlebar right
Lower Handlebars left and right
Handlebar Face Plate
Handlebar
Wheels/Depth Regulator
Safety Shields
Tine Blades (16)
Engine Assembly
Driver Safety Control Lever (with cable)
rottle Assembly (with cable)
Hardware
DO NOT ADD ENGINE OIL TO THE
TRANSMISSION GEAR CASE
e tiller transmission is lled at the factory.
DO NOT ATTEMPT TO START ENGINE
BEFORE ADDING OIL TO ENGINE
e engine is shipped from the factory without oil. You must add
engine oil before starting the engine. Use only the recommended
weight of oil for a 4-cycle engine (See Engine Operation Manual).
7
!
CAUTION
!
CAUTION

8
Overview of Components
1
2
3
4
5
6
8
7
11 12
Item # Part # Description Qty.
1 101829 Driver Safety Control Lever 1
2 101838 rottle Control Lever Assembly 1
3 101831 Handlebar Adjustment Assembly 1
4 101832 Upper Handlebar Left 1
5 101833 Upper Handlebar Right 1
6 101835 Lower Handlebar Left/Right 2
7 101136 Engine 1
8 101836 Safety Shield Kit 1
9 101837 Depth Regulator 1
10 101838 Wheels 2
11 101839 Tine Blade 16
12 101841 Tiller Axle Sleeve 2
13 101842 Tiller Gearbox 1
14 101843 Engine Belt (not shown) 1
15 101845 Locking Pin 2
16 102893 Plastic Cable Clip 2
17 102894 Flat Lead Clevis with R-Clip 2
13
10
9
15
16
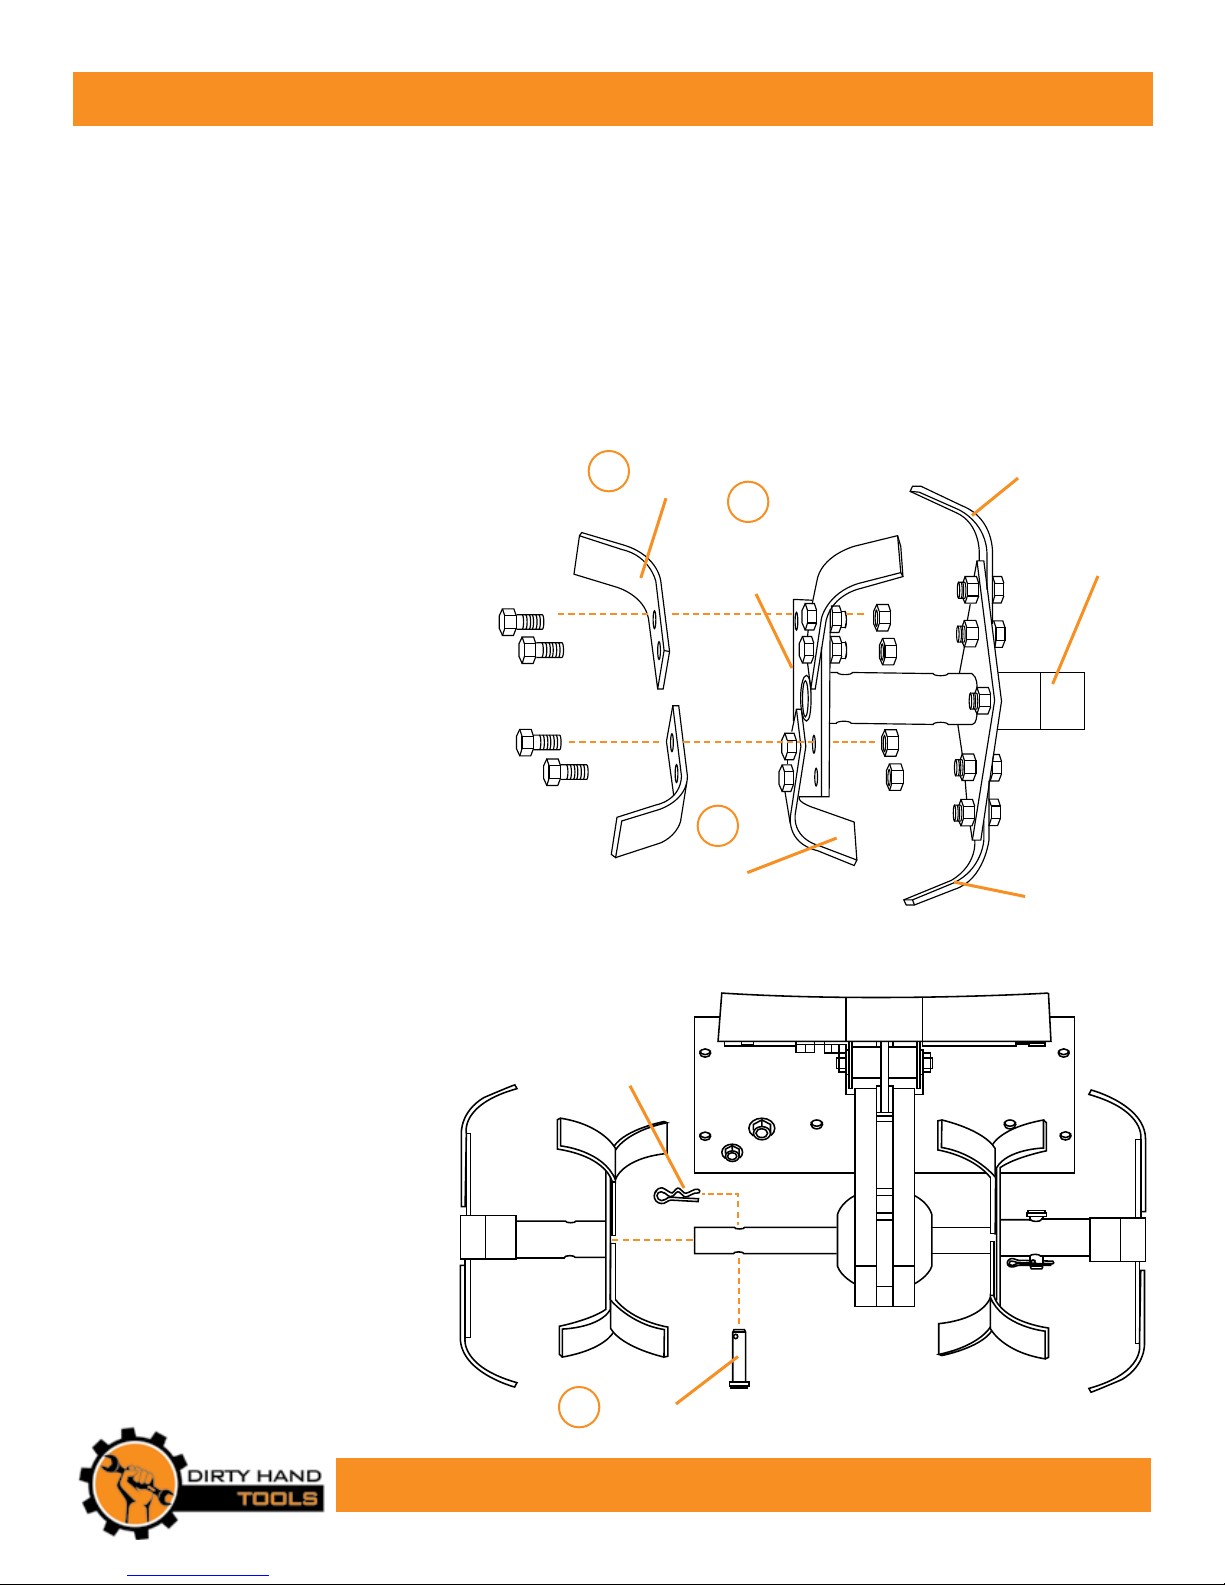
Tine Assembly
Mounting the Tine Blades
1. Attach tine blades to the tine axle sleeve with a hex nut and hex bolt
(see Figure 1). Blades should alternate direction diagonally, one pair
facing in, one pair facing out on each sleeve.
2. Slide the assembled tines onto the tiller’s axle. Align the connection
holes and secure the tines to the tiller axle with a clevis pin and a
R-clip (see Figure 2).
9
TINE
BLADE
Figure 1
TINE
BLADE
TINE
AXLE
SLEEVE
Figure 2
R-CLIP
CLEVIS
PIN
TINE
BLADE
TINE
BLADE
AXLE
11
12
11
17

10
Wheel/Depth Adjuster Assembly
Mounting the Wheels/Depth Adjuster
1. Align two holes on the tiller wheel bracket at the desired height on the
wheels/height adjuster.
2. Push two locking pins through the holes and secure (see Figure 3).
LOCKING
PINS
Figure 3
Handlebar Assembly
Mounting Lower Handlebars
NOTE: e left and right hand handlebars are identical. Each has two
holes drilled in one side and one hole drilled in the opposite side of the
handlebar tube. e two hole side of the handlebars should face inward
toward each other (see Figure 4).
1. Attach the two lower handlebar tubes to the tiller with a tube support
bracket and two hex bolts on each side (see Figure 5).
2. Position the handlebar components as shown in Figure 6.
3. Push the long threaded bolt through all of the components, then secure
at the end with a hex nut.
3. Make height adjustments to the handlebars for operation comfort and
tighten the handlebar adjustment knob securely.
11
Figure 4
UPPER
HANDLEBAR
LEFT
UPPER
HANDLEBAR
RIGHT
HANDLEBAR
FACE PLATE
Figure 6
HANDLEBAR
ADJUSTMENT
KNOB
LOWER
HANDLEBAR
PLASTIC LOCK
HALVES
Figure 5
LOWER
HANDLEBARS
SUPPORT
BRACKET
12
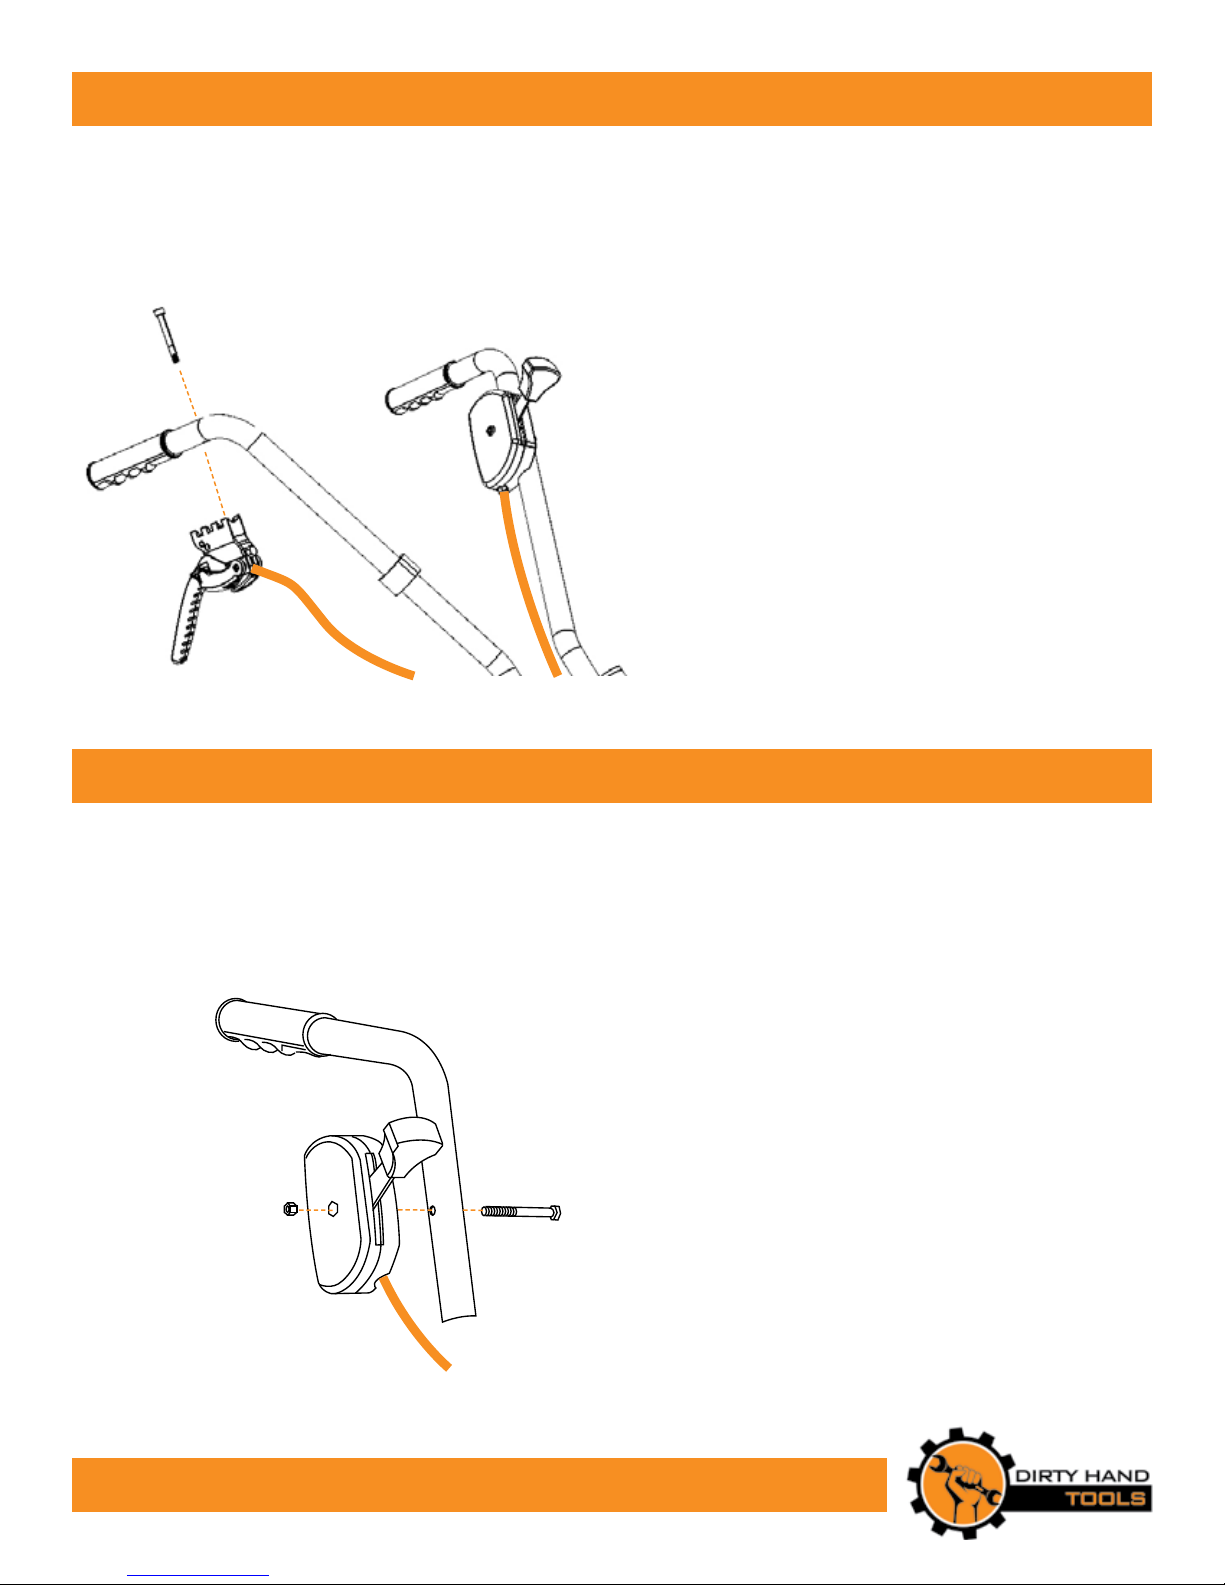
Driver Safety Control Lever Assembly
Mounting the Driver Safety Control Lever
1. Position the Driver Safety Control Lever onto the right handlebar.
2. Push a threaded hex bolt through the top of the handlebar into the
safety control lever and tighten securely (see Figure 7).
Figure 7
rottle Control Lever Assembly
Mounting the rottle Control Lever
1. Position the rottle Control Lever onto the left handlebar.
2. Push a threaded hex bolt through the base of the lever and secure with
a nylock hex nut (see Figure 8).
Figure 8
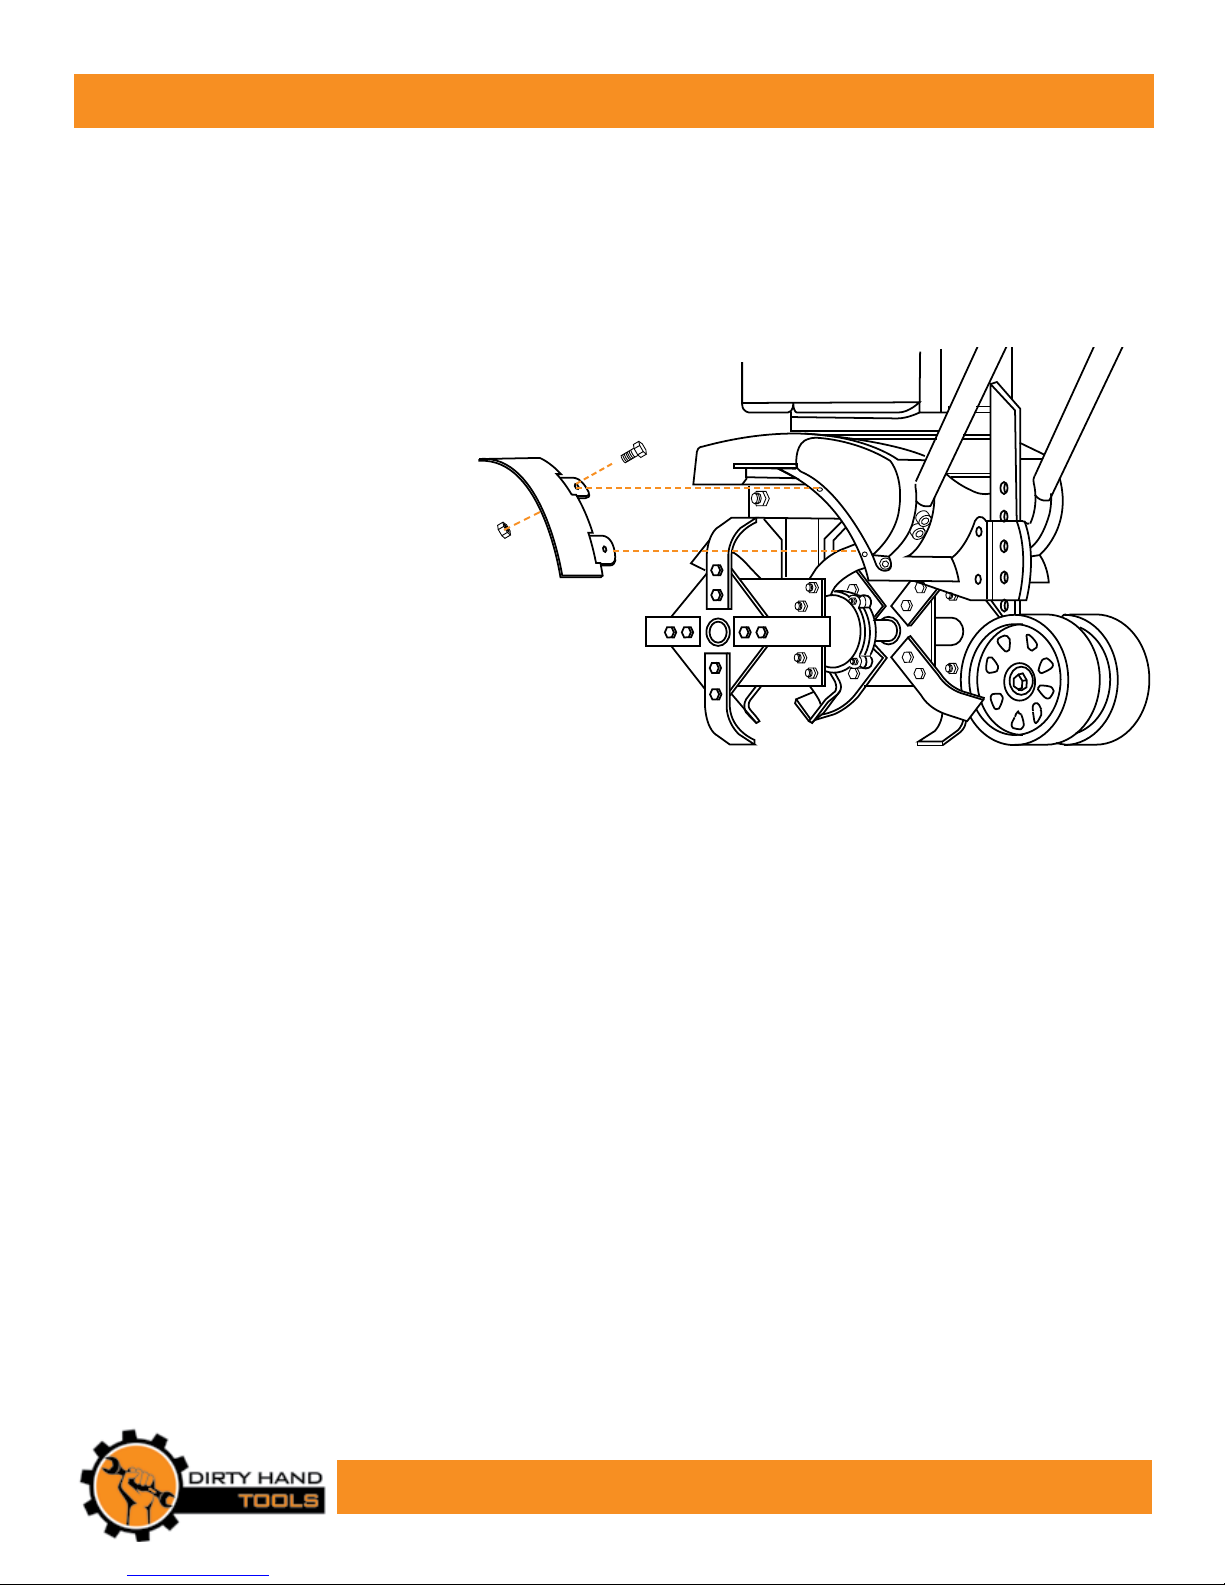
Safety Shield Assembly
Mounting Safety Shields to the Tiller
1. ere are left and right hand Safety Shields. Each has three holes
drilled through a mounting tab. Align the mounting tab with the holes
drilled in the tiller and secure with a hex bolt through the top and a
hex nut underneath the safety shield in three places on each side (see
Figure 9).
13
Figure 9

14
Operating Precautions
READ, UNDERSTAND AND FOLLOW ALL OF THE
PRECAUTIONS BELOW.
Always perform the pre-start checklist before starting the engine.
• Never operate the tiller without safety shields in place.
• Keep hands, feet, and clothing away from rotating parts. Keep clear
of tiller tines at all times.
• Tines rotate when the engine is running and drive lever is depressed
(pulled towards the handlebars). Releasing the drive lever stops the tines.
• Use extreme caution when operating on or crossing gravel drives,
walks, or roads. Stay alert for hidden hazards or trac.
• After striking an obstacle, stop the engine, remove the wire from the
spark plug, inspect the tiller for damage and repair before restarting.
• If tines become clogged, stop the engine and disconnect the spark
plug wire before removing any obstruction.
• Engine muer will be hot from operation. Do not touch it with bare
skin or a severe burn may result.
• If the unit vibrates abnormally, stop the engine and check immediately
for the cause. Vibration is an indication of a potential problem.
• Do not run the engine indoors; exhaust fumes are deadly.
• Do not overload the tiller by trying to till too deep or too fast.
• Never operate the machine at high transport speeds on slippery
surfaces. Look behind and use care when backing.
• Use only attachments and accessories approved by the manufacturer.
• Never operate the tiller without good visibility or adequate light.
• Be careful when tilling in hard ground. e tines may catch in the
ground and propel the tiller backwards. If this occurs, let go of the
handlebars and do not restrain the machine.
• Take precautions when leaving the machine unattended. Disengage
all control levers, stop the engine, wait for all moving parts to stop, and
make certain guards and shields are in place.
• Shut o the engine when leaving the operating position for any
reason. Wait for all moving parts to stop.
OPERATION OF ANY TILLER CAN RESULT IN FOREIGN
OBJECTS BEING THROWN. ALWAYS WEAR
SAFETY GLASSES DURING OPERATION.
!
CAUTION
!
WARNING
15
Operating Instructions
Preparation for Operation
THIS UNIT WAS SHIPPED WITHOUT OIL IN THE
ENGINE. Check the oil level before each operation.
Fill Engine with Oil
1. Add oil according to engine manual. Do not overll. Use SAE30
engine oil. Do not mix oil with gasoline. Oil level must be full.
Check the oil level by removing oil ll plug (see Figure 10). Oil
level should be up to the bottom of the ll plug opening.
Pre-Start Inspection
1. Make sure safety shields are in place and nuts & bolts are secure.
2. Check oil level.
3. Inspect air cleaner (see Figure 11). Clean or replace as needed.
4. Check fuel supply. Fill the fuel tank no closer than 1 inch from
top of tank to provide space for expansion.
5. Be sure spark plug wire is attached and is tightened securely.
6. Examine underneath and around engine for oil or fuel leaks.
7. Inspect fuel hoses for tightness and fuel seepage.
8. Look for signs of engine damage.
9. Remove excessive debris from muer area and recoil starter.
Adjusting the Depth Regulator
Remove the depth regulator, turn in opposition direction and
reinstall with two locking pins pins (see Figure 12). Adjust the
depth regulator up or down as required.
!
WARNING
FUEL FILL
RECOIL
STARTER
Figure 10
Figure 11
OIL FILL
LOCKING
PINS
Figure 12

16
Operating Instructions
NEVER FILL THE FUEL TANK ON A HOT ENGINE
Start-Up
e controls required to start and run the tiller are located on
the engine and are marked “Choke” and “rottle”. A detailed
description of engine operation and precautions is available in the
engine operation manual.
Cold Starts
1. Move choke lever to full choke position.
2. Move throttle lever to “start”.
3. Pull starting rope out slowly one time and allow to return normally.
4. Pull starting rope out rapidly, and allow rope to return normally.
5. When engine starts, gradually move choke lever to “no choke”
position and increase throttle speed.
Restarting A Warm Engine
Restarting an engine that is already warm from previous running does
not normally require use of the choke.
1. Move throttle lever to “start” position.
2. Pull starting rope out rapidly until engine starts. Allow rope to
return normally. Repeat until engine starts.
3. Adjust throttle speed to “high” for best tiller action.
Idle Speed
Use the “low” position on the throttle lever to reduce stress on the
engine when tilling is not being performed. Lowering the engine
speed to “idle” will help extend the life of the motor, as well as
conserve fuel and reduce the noise level of the equipment.
Operating Speed
For normal tilling, set the throttle lever to “fast”.
Shutting Down
To stop the engine at any time, move throttle control to the STOP
position. To stop tines at any time, release the drive control lever.
!
WARNING
START
STOP
START
ENGINE
FULL
THROTTLE
LOW
THROTTLE
STOP
ENGINE

17
Operating Instructions
PRACTICE OPERATING THE CONTROLS AND USING
THE TILLER WITH TINES OUT OF GROUND BEFORE
BEGINNING TO TILL.
It is important that you know how to use the tiller properly,
keep control at all times, stop the tines and wheels from turning,
and stop the engine if necessary.
Read the entire Operation Manual before using the equipment!
Tilling
1. Start the engine.
2. Move the throttle control to fast.
3. Place the tiller in forward by pulling up on the drive lever - this
will engage the tines.
Note: You can slow the tiller’s forward advance at any time by
putting slight downward pressure on the handlebars. Stop the tiller by
releasing the drive lever and then stopping the engine.
Drive Lever
Pulling the drive lever toward the handlebar engages the tines.
Releasing the lever stops the tines (see Figure 12).
Tilling Tips
e key to successful tilling is to begin with a shallow cut on the rst
pass, and then work an inch or two deeper on each successive pass.
• Tilling depth will vary with ground conditions.
• When beginning to till in unbroken ground or in extremely hard
soil perform shallow tilling rst then do a second pass going deeper
into the soil.
• Hold on rmly to the handlebars to control sudden lurches.
Immediately release the drive control lever if the tines jam or you
strike a foreign object. With the drive lever in released, push the
throttle control to stop position to stop the engine. Disengage the
spark plug wire. When tines have stopped, remove foreign objects and
check for damage.
!
WARNING
Pulling the safety
drive lever towards the
handlebar engages the
tines.
Figure 12

18
Alternate Tine Position
Reversing the Tine Blades
e tine blades are mounted in an aligned position for normal tilling of
soft spoils (see Figure 13). e tine blades can be attached in the reverse
direction, offset 180 degrees, for soil that is rocky. (see Figure 14).
1. Release the R-Clip from the clevis pin and slide the tine assembly off
of the tiller axle. Turn the assembled tines in the opposite direction on
each side of the tiller and replace the clevis pins securing with R-Clips.
2. Check the tightness of all connecting bolts and nuts.
Figure 13
Figure 14
19
Maintenance
• Keep tiller, safety shields and covers, attachments, and accessories
in safe working condition.
• Check clevis pins, engine mounting bolts, and other bolts at
frequent intervals for proper tightness to be sure the equipment is
in safe working condition.
• To prevent accidental starting, always disconnect and secure the
spark plug wire from the spark plug before maintenance.
• Never run the engine indoors. Exhaust fumes are toxic.
• Always allow muffler to cool before filling fuel tank.
Lubrication
Proper lubrication of moving mechanical parts is critical for proper
care and maintenance. Oil the cables and other moving parts at 10
hour intervals using a SAE30 engine oil.
Checking Transmission Oil
e transmission oil is filled at the factory. Should it require filling
use SAE30 engine oil and fill to top of the reservoir (see Figure 15).
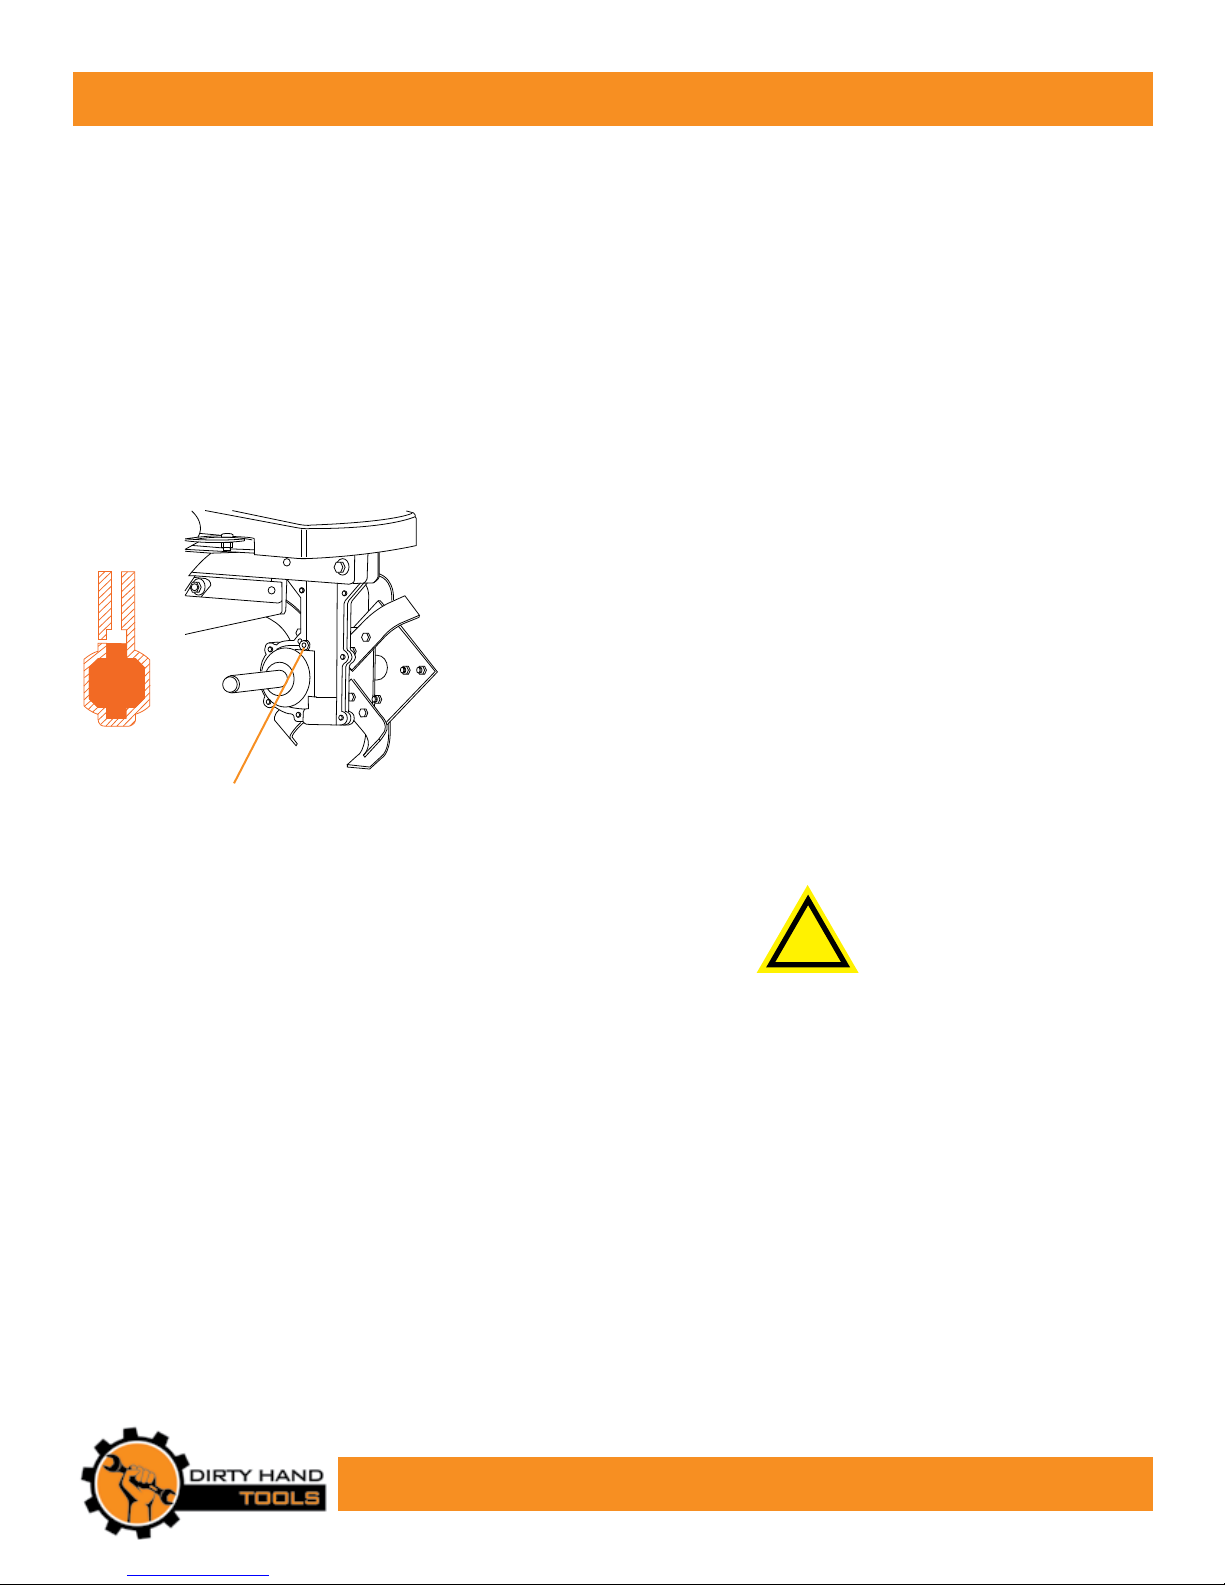
Cleaning the Tine Axle Shaft
1. Turn off engine. Engine must be cool.
2. Remove spark plug wire and secure from spark plug.
3. Tip the tiller backward. Block the tiller in position so that the
tines are exposed.
4. Remove all vegetation, string, wire, and other material that may
have accumulated on the axle between the inside set of tines.
TURN OFF ENGINE AND DETACH SPARK PLUG WIRE.
ENGINE MUST BE COOL.
Engine Maintenance
Refer to the engine manual included in your parts packet for
information on engine maintenance. Your engine manual provides
detailed information and a schedule for performing the following:
1. Check oil level before each use and after 8 hours of operation.
2. Change oil after first 5-8 hours of operation. Change oil while
engine is warm. Refill with new oil of recommended grade.
4. Check spark plug yearly or every 100 hours of operation.
5. Service air cleaner.
6. Keep engine and parts clean.
7. Check engine and equipment often for loose nuts and bolts.
!
WARNING
TRANSMISSION
OIL FILL
Figure 15

20
Storage
DO NOT STORETHE TILLER IN
UNVENTILATED AREA
where fuel fumes may reach ame, sparks, pilot lights
or other ignition source.
Drain fuel outdoors away from any ignition sources.
Use only approved fuel containers.
Never store equipment with gasoline in the tank inside of a
closed building where fumes may reach an open flame or spark.
Allow the engine to cool before storing in any building.
Add a fuel stabilizer to gas tank and run for 10-15 minutes to
prevent fuel from gumming up during an extended storage period.
Prepare for Storage
Follow the steps below to prepare your tiller for storage. Read your
engine manual for detailed instructions on preparing the engine for
storage.
1. Protect wheels and axles from rust: Remove lock pin and slide
wheel off hub. Coat the axles lightly with axle grease. Slide wheel
back on hub and insert lock pin.
2. Drain fuel system completely following engine manufacturer’s
instructions or add fuel stabilizer to prevent fuel from gumming
up during extended storage period.
3. While engine is still warm, drain the oil from the engine. Refill
with fresh oil of the recommended grade.
4. Clean external surfaces, engine and cooling fan.
5. Remove spark plug, pour one ounce of SAE 30 oil into spark
plug hole.
6. Plug hole and pull starter cord slowly to distribute oil evenly in
cylinder head area.
7. Reinstall spark plug.
8. Transport unit to a suitable storage location. If you have chosen
to use a fuel stabilizer and have not drained the fuel system,
follow all safety instructions storage precautions in this manual
to prevent the possibility of fire from the ignition of gasoline
fumes. Remember, gasoline fumes can travel to distant sources of
ignition and ignite, causing risk of explosion and fire.
9. If there is any possibility of unauthorized use or tampering,
remove the spark plug and store it in a safe place before storing
the tiller unit. Be sure to plug the spark plug hole to prevent
foreign material from entering.
!
WARNING
Other manuals for 101571
1
Table of contents
Other Dirty Hand Tools Tiller manuals


