Disc-O-Bed XL Combo Kit 30002BOEP User manual

1
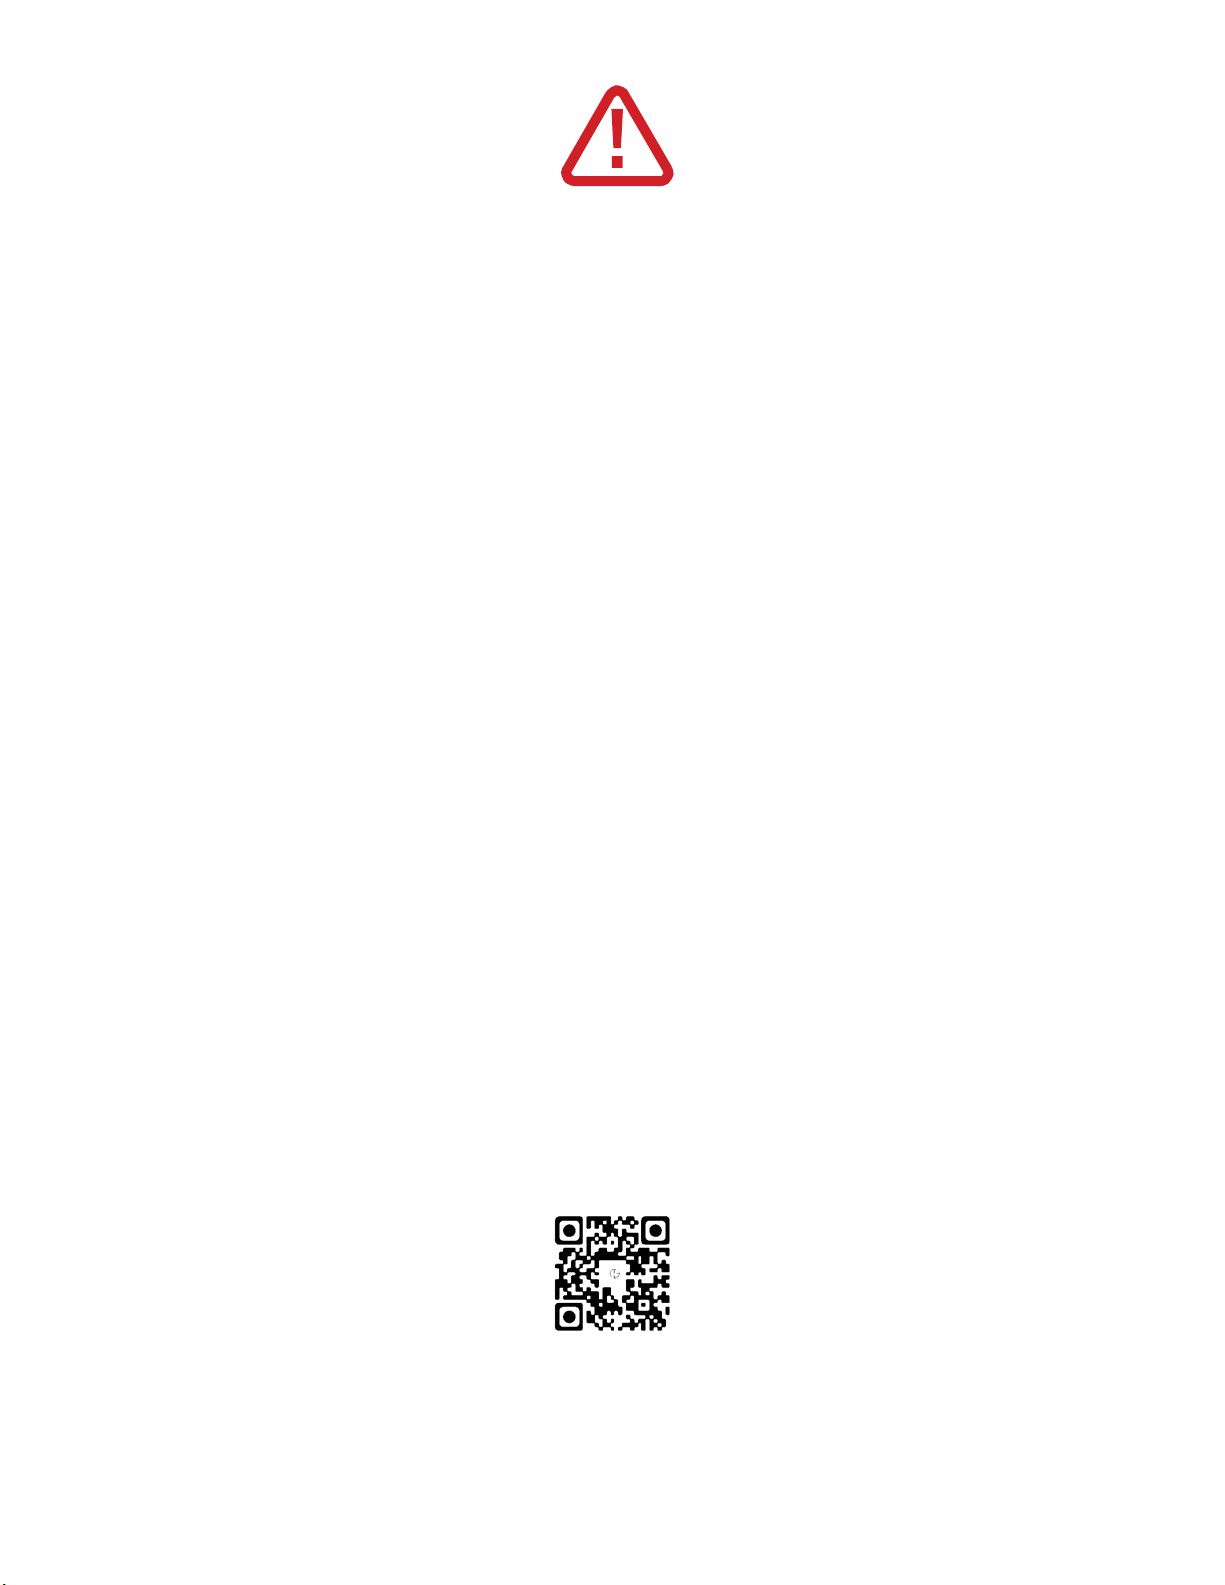
IMPORTANT INFORMATION CONCERNING THIS PRODUCT TO
PREVENT SERIOUS ORFATALINJURIES
Keep these instructions for future reference
1.
Read carefully and fully understand the manufacturer’s assembly.
2.
Care and special attention should be used where a warning is indicated.
3.
Never allow a child under 6 years of age on the top bed. Only one person allowed on each level.
4.
Use the bunk as it is intended
–
DO NOT triple stack.
5.
Ensure that the 5 point check list is followed prior to each use of the bunk.
6.
Openings in and between bunk parts can entrap head and neck of small children.
7.
DO NOT allow horseplay on or under the bunk. NO jumping on the product. This product is not a toy.
8.
DO NOT use substitute parts. Contact the manufacturer or dealer for replacement parts. The use of a guard rail is
not required with this product.
9.
Metal parts could havesharp,pointedorjaggededges. Removethesewithafileoranemeryboard.Childrenmustnot
be allowed to suck any metal part of this product.
10.
Children should use this product under adult supervision.
11.
Maximum weight tolerance is 500lbs per single cot and a total 1000lbs in a bunk configuration
12.
STRANGULATION HAZARD
–Never attach or hang items to any part of the bunk that are not designed for use
with the bunk; example, but not limited to, hooks, belts and jump ropes.
避免於使用本產品時發生嚴重或致命傷害的重要資訊
請妥善保存這些說明以供日後參考
1.
請詳閱並確實了解製造商的組裝說明。
2.
警告標示處應更加謹慎並特別注意。
3.
不得讓 6 歲以下的孩童使用上鋪。各層床位僅限一人使用。
4.
雙鋪僅能依其用途加以使用 - 請勿疊三層。
5.
每次使用雙鋪之前務必遵照5點查核項目進行檢查。
6.
雙鋪零件的開口與零件之間的空隙可能卡住體型嬌小的孩童之頭部與頸部。
7.
請勿在雙鋪上或下方嬉鬧。不得在本產品上跳躍。本產品並非玩具。
8.
請勿使用替代零件。與製造商或經銷商聯絡以取得替換零件。本產品無須使用護欄。
9.
金屬零件可能包含尖銳、尖頂或是鋸齒狀邊緣。使用剉刀或金鋼砂板將其磨平。勿讓孩童誤食本產品的任何金屬
零件。
10.
孩童在使用本產品時應有成人看顧。
11.
各床鋪的最大耐重為225公斤(500磅),而雙層配置的最大耐重之總合為450公斤(1000磅)。
12.
勒頸窒息的危險 - 請勿在雙鋪的任何部位加裝或吊掛並非設計供本產品使用的物件;例如,但並非僅限於吊鉤、皮
帶及跳繩。
Before building scan QR code
在架設之前請掃描行動條碼
or visit http://www.discobed.com/v/c/ and watch assembly video
或連線上網 http://www.discobed.com/v/c 並觀看組裝影片
2
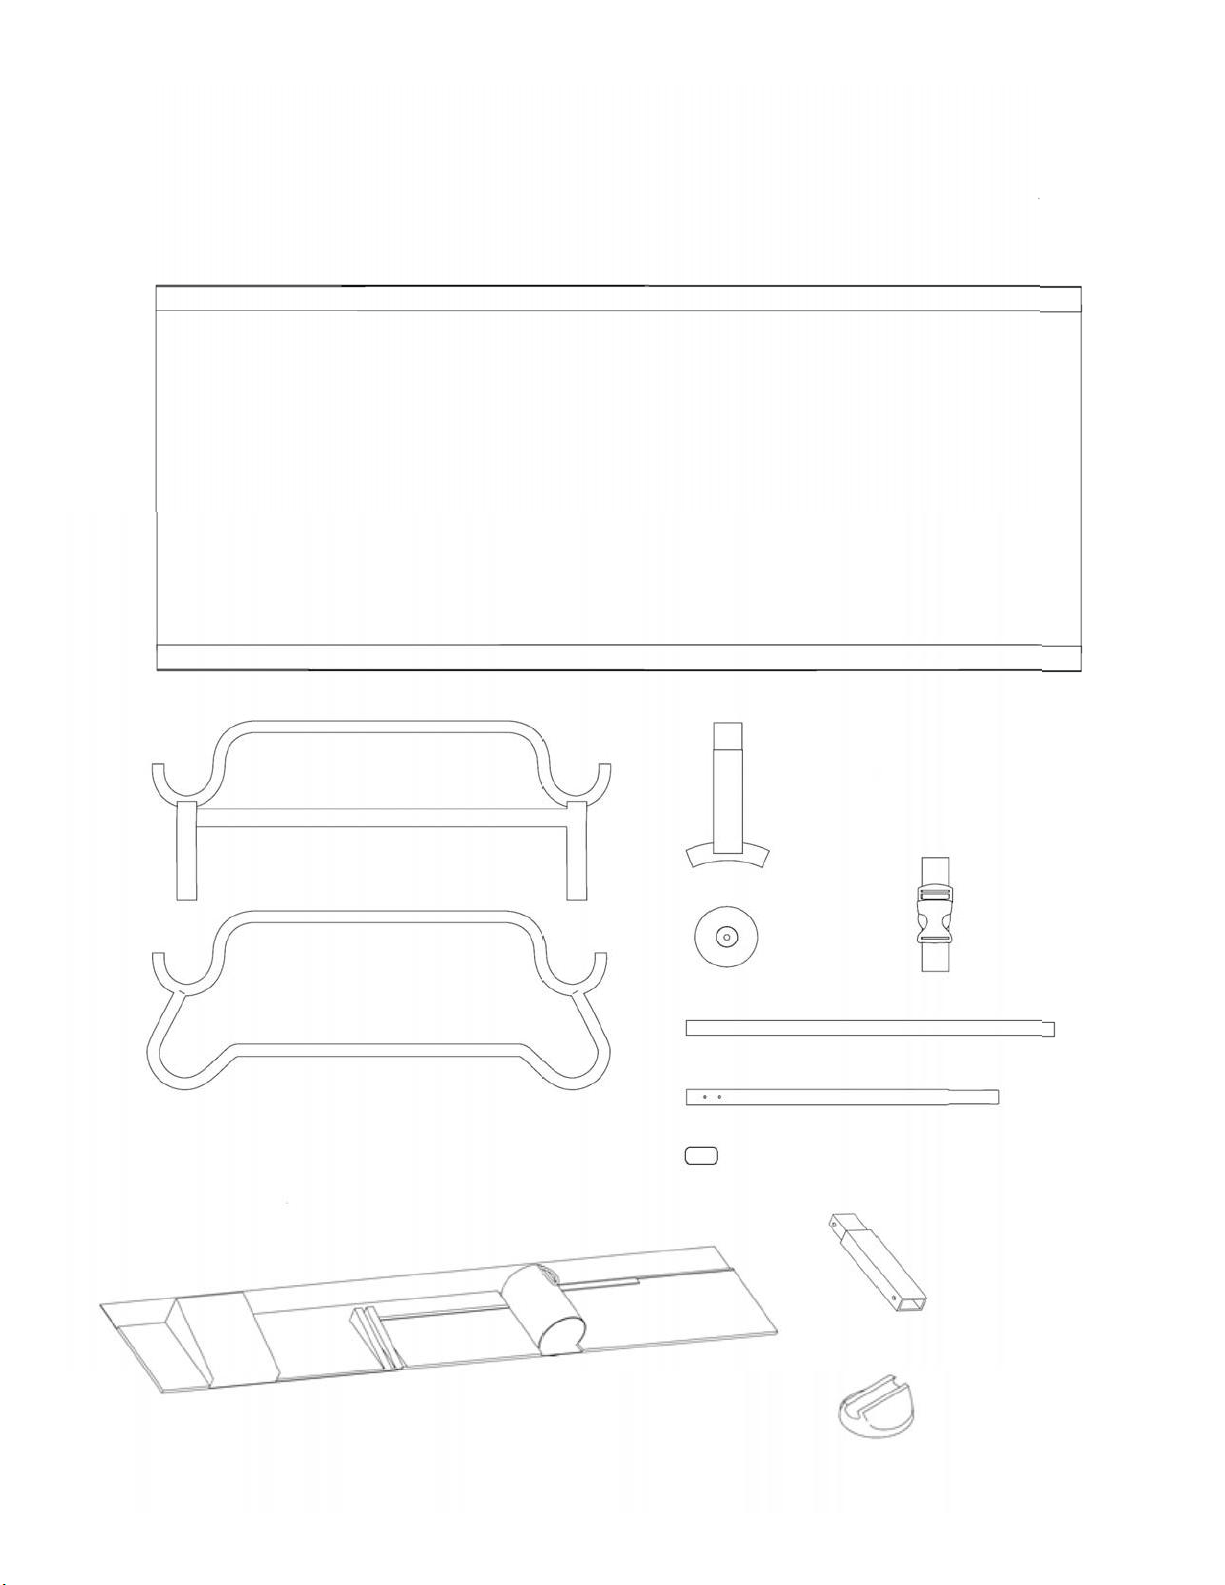
PARTS
零件
2x Sleeping Mats
2x 床墊
4x Stack Adapters
4x連接柱
2x Straight End Frames
2x 平直端框
2x Rounded End Frames
8x Discs
8x圓盤固定座
2x Locking Straps
2x固定束帶
2x
圓形端框
ACCESSORIES
配件
2x Organizers
2x
收納袋
4xStraight Side Rails / 4x
平直側杆
8x Swaged Side Rails / 8x
成型側杆
4x Foot Plugs
4x支架底塞
4x Leg Extenions
4x床腳延伸柱
4x Foot Pads
4x支架墊

3

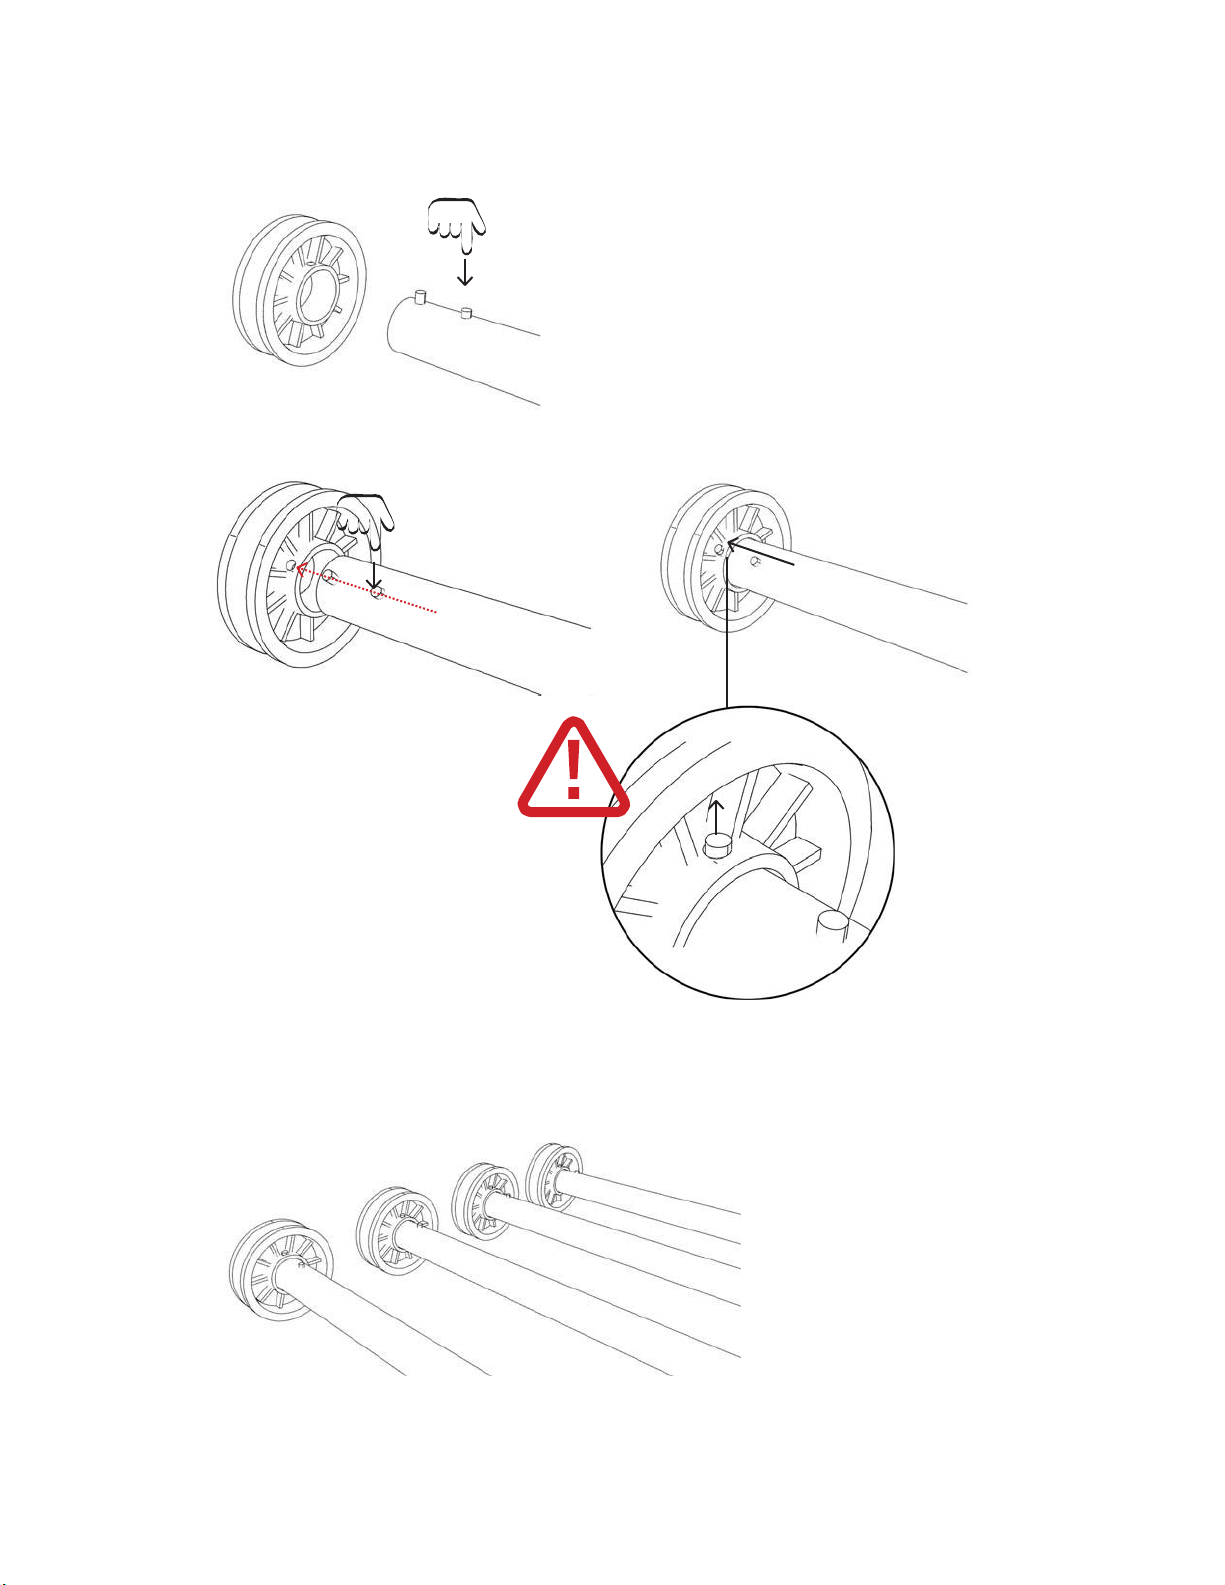
5
B
A
B
B
A
A
Pin(B)isonlysecurelylocked inwhen you
hear a‘click’sound. Makesurepin(B)has
poppedup before moving on.
唯有在聽到「卡嗒」聲才能確定定位銷(B)
已安裝入位。開始下一步驟之前務必確認定位
銷(B)已彈起。
B
A
STEP1. SECURING DISC TO SWAGED SIDE RAIL
步驟 1. 將圓盤固定座與成型側杆相接固定
1.1.
Holding swaged rail, press pin (A) down and hold.
1.1.
手握成型杆,將定位銷(A)壓住不放。
1.2.
Line up pin (B) with hole in disc, insert rail into disc. Let pin (A) go.
1.2.
定位銷(B)對齊圓盤固定座的孔洞,將成型杆插入固定座內。放開定位銷(A)。
1.3.
Repeat steps 1.1 and 1.2 four times with each of the swaged side rails.
1.3. 重複步驟 1.1 與1.2 四次以便將各邊的成型側杆安裝完成。
4x
6
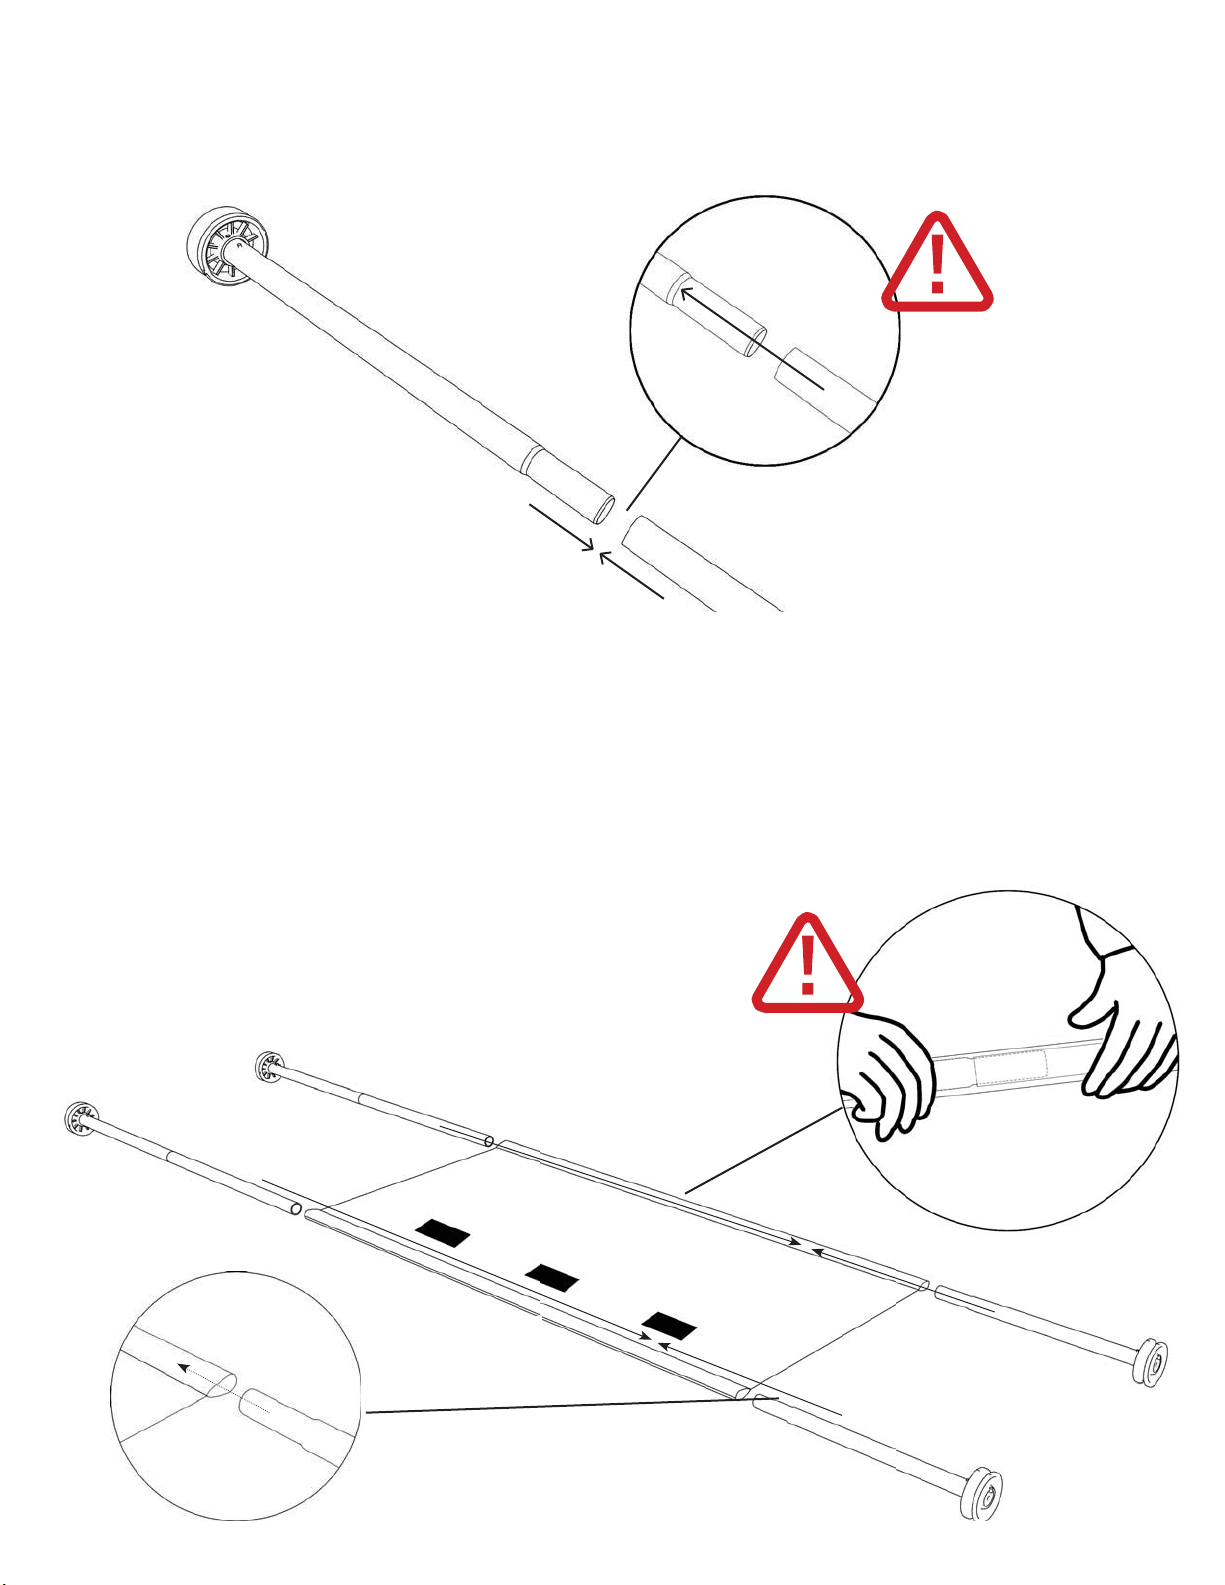
STEP2. CONNECTING SWAGED SIDE RAIL TO STRAIGHT SIDE RAIL
步驟 2. 連接成型側杆與平直側杆
2.1. Attach a swaged side rail (completed in step 1) to a straight rail.
2.1.
將步驟 1 組裝完成的成型側杆與直杆安裝固定。
Makesuretheyslideinto
one another completely.
確認兩端確實地固定相接
2x
2.2.
Repeat step 2.1 two times.
2.2.
重複步驟 2.1. 兩次。
STEP3. ATTACHING SLEEPING MAT TO SIDE RAILS
步驟 3. 安裝床墊與側杆
3.1.
Open out sleeping mat with the correct (logo) side up.
3.2.
At one end, slide the 2 rails (completed in step 2) into the sleeves of the mat.
3.3.
On the other end slide the remaining 2 rails (completed in step 1) into the sleeves of the mat.
3.1.
床墊以正確(有標誌)的那面朝上攤開。
3.2.
由其中一端,將步驟 2 組裝完成的2支杆子穿入床墊套管內。
3.3.
而另一端,將剩下 2 支在步驟 1 完成組裝的杆子穿入床墊套管內。
Make sure that the rails slide into one
another
completely. Do this by running
your fingers
over the side rails where the
connections are.
It should feel smooth to
the touch.
確認杆子確實地固定相接。藉由手指轉動側
杆的接頭處進行確認。連接處應平順接合。
3.2
3.2
3.3
3.3
7
STEP4.
SECURINGEACH DISCINTOTHEENDFRAME
步驟 4. 固定圓盤固定座與端框
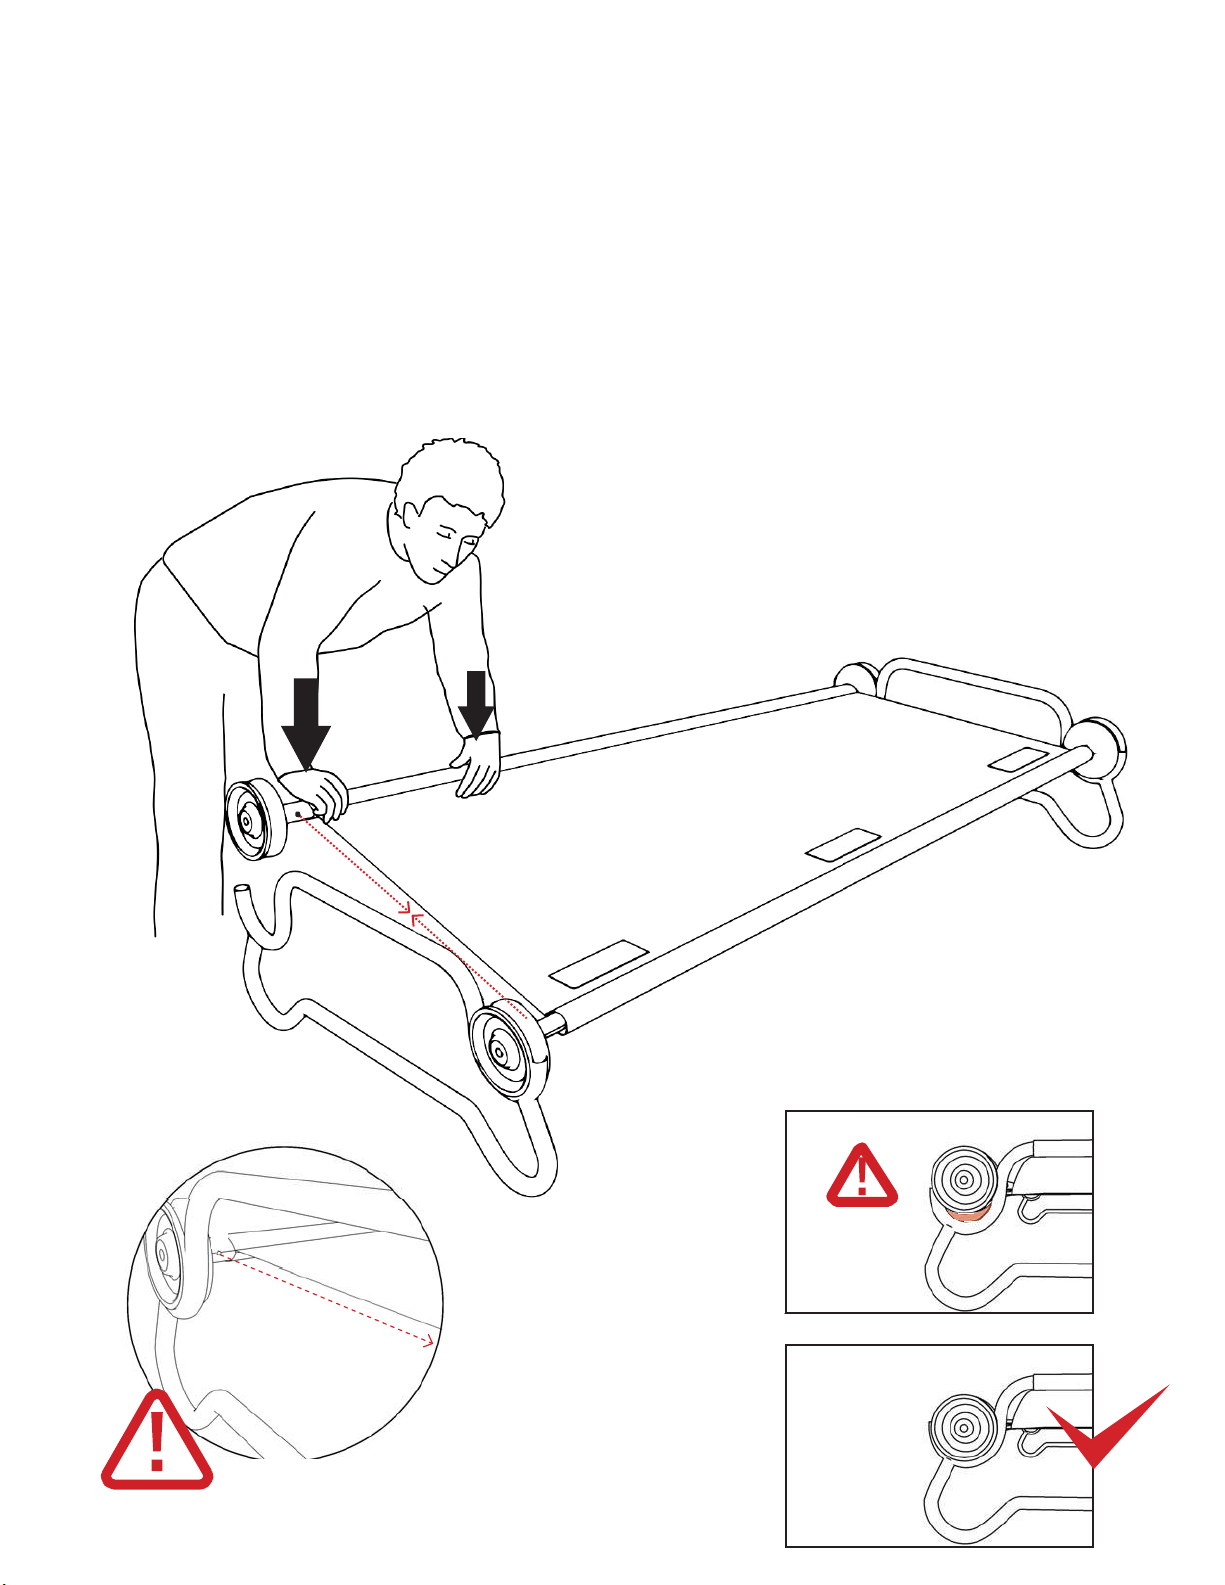
4.1.
Makesurepin(A)isvisible,isnotcoveredbythesleepingmatandisfacinginwards.Checkallfourbed
posts (see diag. 4.1).
4.2.
Looselyplaceeachdiscintotheloopofthebedendframe,ensureyourfingersarenotinthewayand
firmly push down on the side rail (see diag. 4.2).
4.3.
Make sure the disc fits completely into the bed end frame (see diag. 4.3).
4.4.
Repeat steps 4.1, 4.2 and 4.3 on each bed post.
4.1.
確認定位銷(A)沒有被床墊蓋住,可用肉眼看見且朝內放置。四個床柱皆須檢查(見圖 4.1)。
4.2.
將各個圓盤固定座稍微地靠在床鋪端框的環圈上,確保手指不會被壓到並由側杆處向下壓實(見
圖4.2)。
4.3.
確認圓盤固定座完全地壓入床鋪端框內(見圖4.3)。
4.4.
各邊床柱重複4.1、4.2與4.3的步驟進行安裝。
圖4.2
1
2
4
A
圖
4.1
A
3
圖4.3
Pinch hazard
小心夾手
Makesurepin(A)isfacinginwards
andnotcovered bysleeping mat.
確認定位銷(A)朝內放置,
且未被床墊蓋住。
X

8
THEASSEMBLYOFYOURDISC-O-BED® XL
ROUND FRAME SINGLE COT IS NOW COMPLETE.
DISC-O-BED® XL
單鋪圓形框現已完成組裝。
STEP5. STRAIGHT FRAME ASSEMBLY
步驟 5. 組裝平直框
5.1. Follow steps 1 - 4 to complete the assembly of the straight frame single cot.
5.1. 依照步驟 1 - 4 完成單鋪平直框的安裝作業。
THE ASSEMBLY OF YOUR DISC-O-BED® XL
STRAIGHT FRAME SINGLE COT IS NOW COMPLETE.
DISC-O-BED® XL
單鋪平直框現已完成組裝。


STEP1. REMOVE FOOTPLUGS
步驟 1. 拆除支架底塞
1.1. Remove the 4 foot plugs from the straight bed end frame.
1.1. 由床鋪平直端框處將 4 個支架底塞拆下。
STEP2.
ATTACHSTACK ADAPTERSTO STRAIGHT LEG BED END FRAME
步驟 2. 安裝連接柱與平直床腳端框
2.1. Presspin(A)downonstackadapterandhold.
2.1.
將連接柱上的定位銷(A)壓著不放。
2.2.
Linepin(A)withholeinlegofstraightbedendframe.
Insert adapter into leg. Let pin (A) go.
2.2. 定位銷(A)對齊平直床鋪端框的床腳孔洞。
將連接柱插入支架。放開定位銷(A)。
Pinisonlysecurelylocked
inwhenyou hear a‘click’
sound. Make sure pin has
popped up before moving
on.
2.3. Repeat steps 2.1 and 2.2 on remaining legs.
2.3.
重複2.1與2.2 步驟組裝其餘的床腳。
唯有在聽到「卡嗒」聲
才能確定定位銷已安裝入
位。開始下一步驟之前務
必確認定位銷已彈起。
A
4
3
1
2
11
3
2
4
1
12
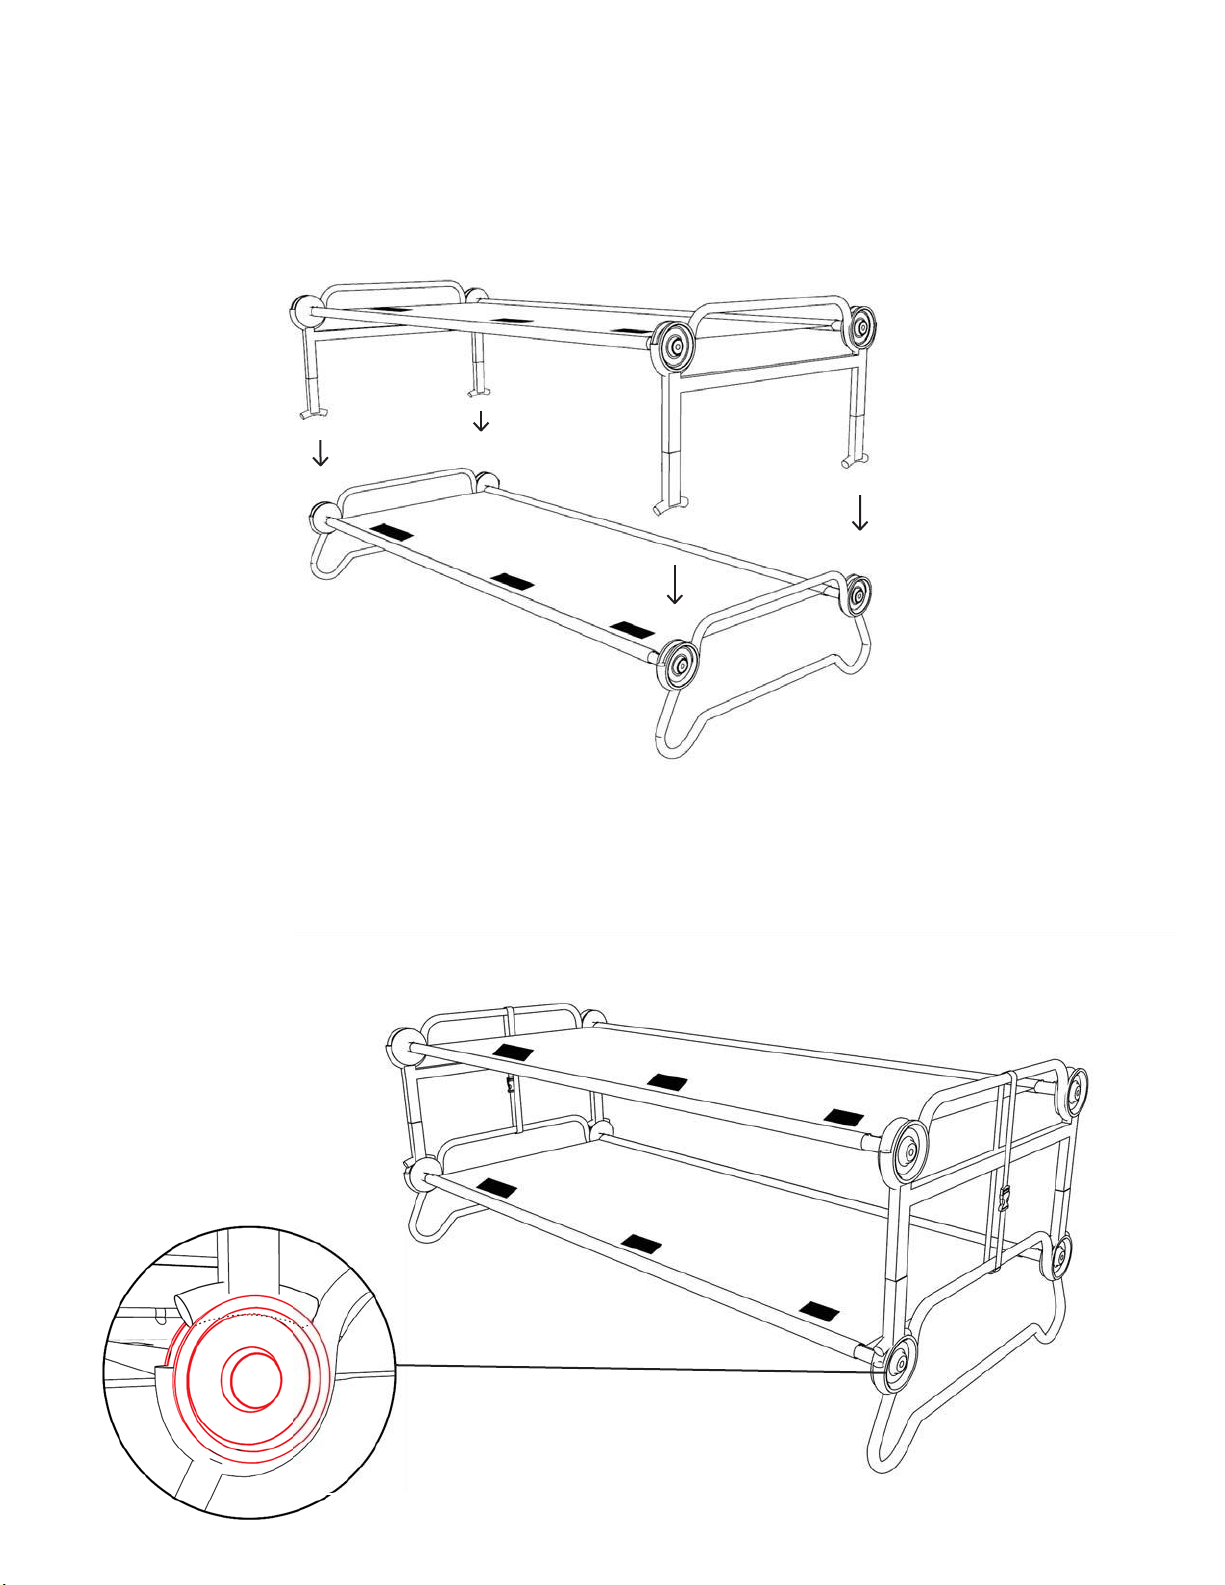
STEP3. STACK STRAIGHT END FRAME ONTO ROUNDED END FRAME
步驟 3. 平直端框與圓形端框相接疊放
3.1. Place straight end frame (fitted with stack adapters completed in step 2) onto rounded end frame.
3.1. 平直端框(已完成步驟 2 連接柱的安裝)放置於圓形端框上。
4
STEP4. CORRECT STACK ADAPTER FITMENT
步驟 4. 正確安裝連接柱
4.1.
Make sure the stack adapter fits directly into the groove of each disc on the bottom cot.
4.2.
Check all four bed posts.
4.1.
確認連接柱直接與下鋪各圓盤固定座的凹槽貼合固定。
4.2.
檢查全數4個床柱。
3
4
2
1
3
2
1
13
1
2x
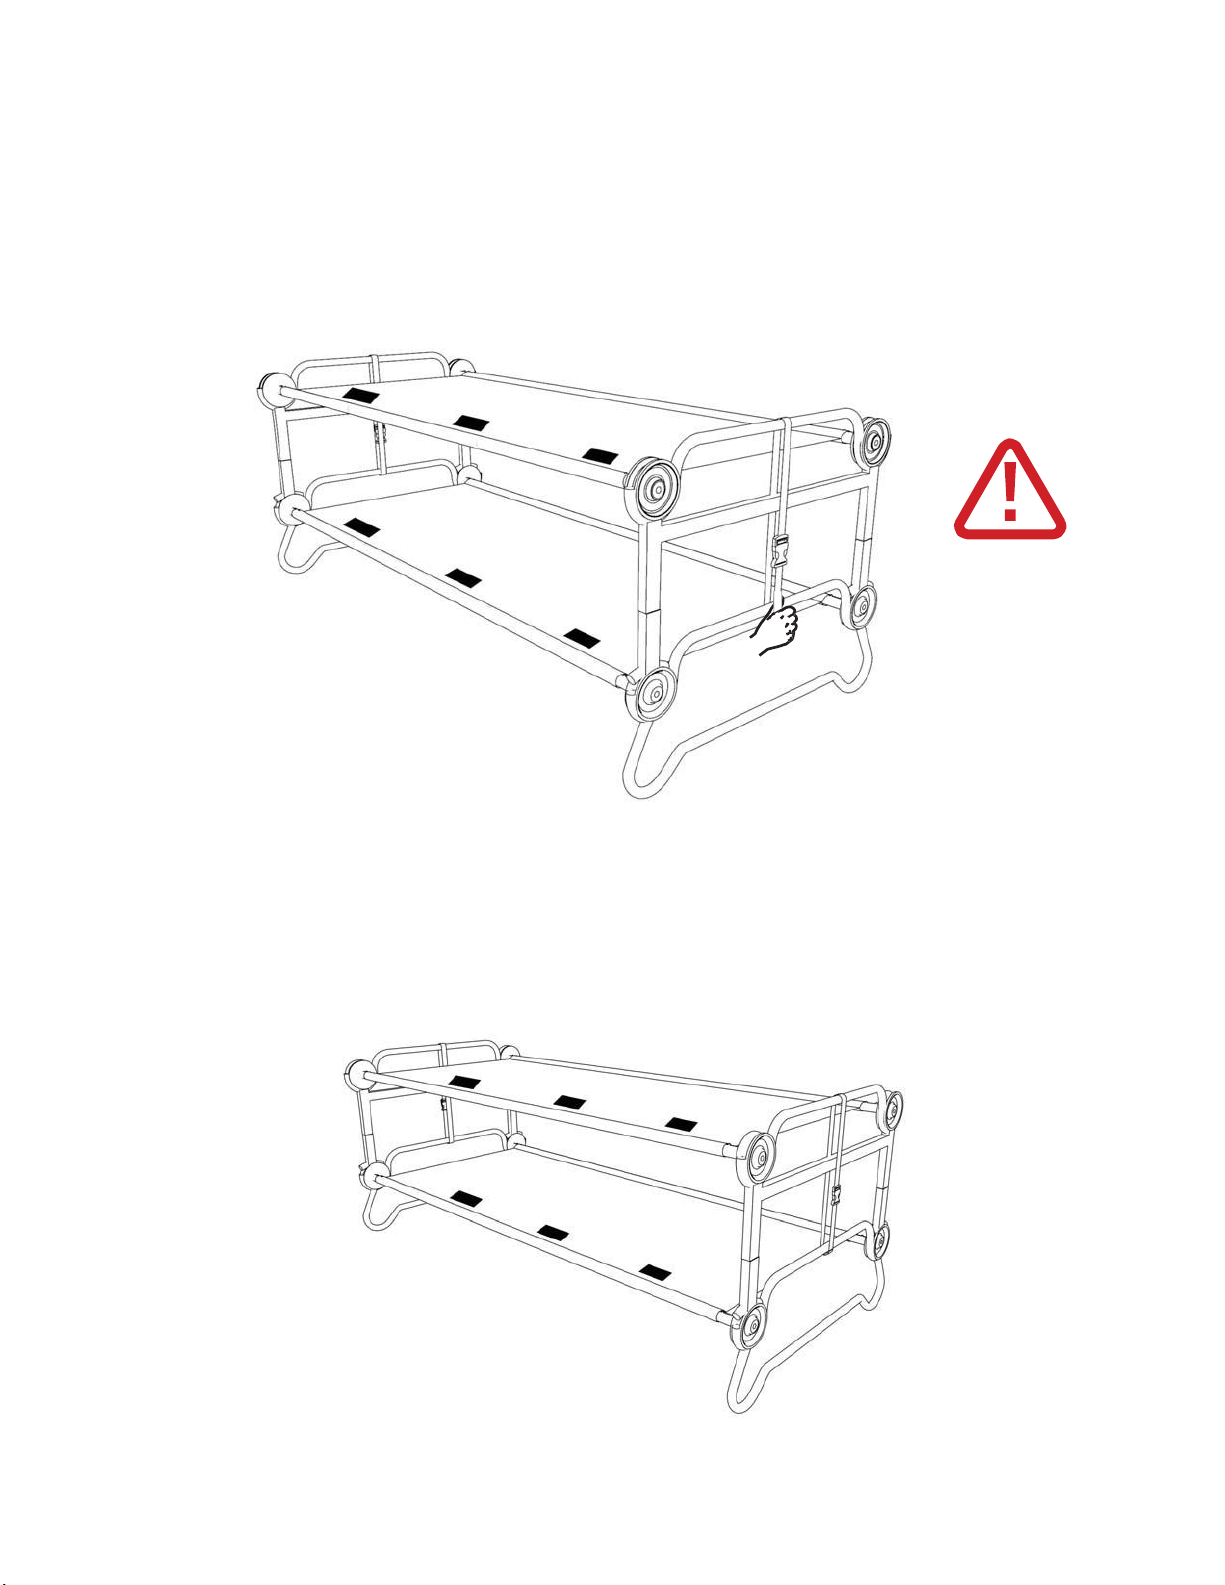
STEP5. ATTACHING LOCKING STRAP
步驟 5. 加裝固定束帶
5.1.
Feed locking strap through bed end frame and lock buckle in place.
5.2.
Pull down on strap in order to secure bunk in position and ensure there is no movement.
5.3.
Repeat step 5.1 at other bed end.
5.1.
由床鋪端框處穿入固定束帶,並鎖上帶扣以使其固定就位。
5.2.
將束帶向下拉緊以便固定雙鋪並確保不會移動。
5.3.
重複 5.1 的步驟,組裝另一端。
2
Make sure strap
is pulled tight
確認有拉緊束帶
YOU HAVE NOW SUCCESSFULLY COMPLETED THE ASSEMBLY
OF YOUR DISC-O-BED® XL BUNK.
DISC-O-BED® XL
雙鋪現已順利完成組裝
We hope that you are completely happy with our product and it is exactly what you expected
希望我們的產品能為您的生活帶來無比樂趣,而它也正如您所期盼的讓您感到滿意


15
STEP1. SETTING UP BACK REST
步驟 1. 安裝靠背
1.1. Lift disc 1 and 2 out of bed end frame of top cot.
1.1.
由上鋪的端框抬起圓盤固定座 1 與2。
1.2.
Placedisc1 and2 on bedendrailofbottomcot.
1.2. 將圓盤固定座 1與2 放置在下鋪的尾杆上。
2
1
1
2

16
1
2
1.3 Let disc rest between bed end rail and stack adapter. The disc should not be able to roll forward.
1.3將圓盤固定座置於床鋪尾杆與連接柱之間。圓盤固定座應該無法向前滾動。
YOU HAVE NOW SUCCESSFULLY COMPLETED THE ASSEMBLY
OF YOUR DISC-O-BED® XL BENCH.
DISC-O-BED® XL
長凳現已順利完成組裝

17
IMPORTANT TO NOTE WHEN CONVERTING YOUR DISC-O-BED® XL
BENCH BACK TO A BUNK CONFIGURATION
DISC-O-BED® XL
長凳恢復成雙鋪設置時
的重要注意事項
1
2
A
Makesurepin(A)isfacinginwardsand
not covered by sleeping mat.
確認定位銷(A)朝內放置,且未被床
墊蓋住。


19
STEP1. SETTING UPSIDE-ORGANIZER
步驟 1. 安裝側邊收納帶
3
2
1
4
Other manuals for XL Combo Kit 30002BOEP
1
Table of contents
Other Disc-O-Bed Indoor Furnishing manuals

Disc-O-Bed
Disc-O-Bed 2XL Outfitter User manual

Disc-O-Bed
Disc-O-Bed XL Combo Kit 30002BOEP User manual

Disc-O-Bed
Disc-O-Bed ONE 30531 User manual

Disc-O-Bed
Disc-O-Bed L User manual

Disc-O-Bed
Disc-O-Bed Disc-O-Bed XL User manual

Disc-O-Bed
Disc-O-Bed 2XL Outfitter User manual

Disc-O-Bed
Disc-O-Bed DOG BED LARGE User manual
Popular Indoor Furnishing manuals by other brands

Regency
Regency LWMS3015 Assembly instructions

Furniture of America
Furniture of America CM7751C Assembly instructions

Safavieh Furniture
Safavieh Furniture Estella CNS5731 manual

PLACES OF STYLE
PLACES OF STYLE Ovalfuss Assembly instruction

Trasman
Trasman 1138 Bo1 Assembly manual

Costway
Costway JV10856 manual


