Discount Car Stereo IL-BKR Instruction Manual
Courtesy of: DiscountCarStereo.com
Serving the internet community since 1995
IL-BKR
QUICK START APPLE LIGHTNING ADAPTER INSTALLATION GUIDE FOR BECKER AUX READY RADIOS
Created: June 9, 2013
Revised: June 3, 2021
PRODUCT SAFETY & DISCLAIMER
READ ALL INSTRUCTIONS CAREFULLY BEFORE INSTALLING, FAILURE TO DO SO MAY CAUSE
PERSONAL INJURY OR DAMAGE TO PRODUCT AND/OR PROPERTY
•This installation guide is provided as a GENERAL installation guide, some vehicles vary and
may require additional steps. We do not accept responsibility for third party labor charges
or modifications. Exercise due-diligence when installing this product.
•We do not accept any responsibility for vehicle damage or personal injury resulting from
the installation of this product.
•Careless installation and operation can result in equipment damage.
Introduction:
In 2012 Apple released a new generation of products and with them a new
Lightning plug, and if your vehicle is equipped with an older iPod adapter it will
also need updating. The iL-BKR will play and charge any Apple Lightning device
including the iPhone XR, iPad Pro etc. without sacrificing the look and feel of the
dashboard components. Installing this adapter requires sacrificing the CD
Changer (if present), but with the storage capacity of Apple lightning devices,
sacrificing the CD Changer should be an easy decision.
An optional remote control is available to operate lightning device while keeping
eyes on the road.
See Frequent ask questions at the end of this guide for details.
Installation:
We recommend disconnecting car battery. But before
anything locate and record the radio safe code. Don’t
disconnect battery if radio code is not available, otherwise
radio will cease to operate.
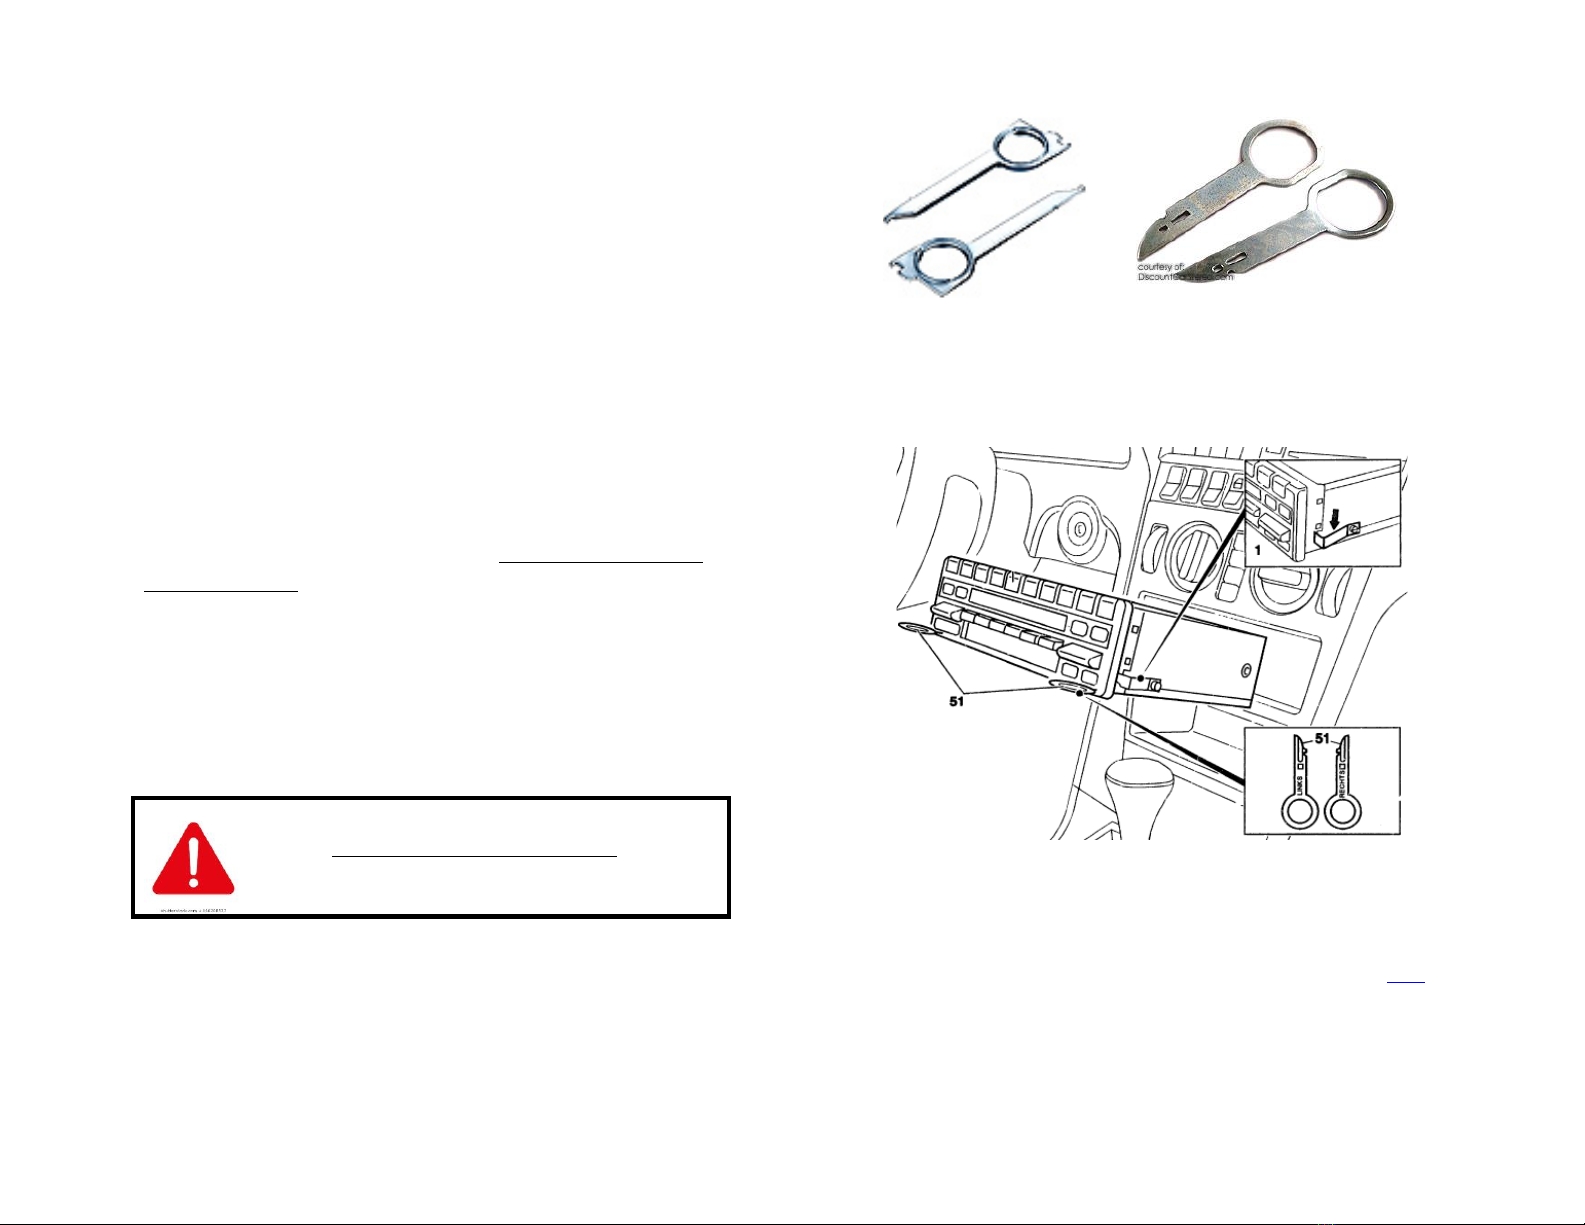
1. Remove radio from dash to gain access to the connectors. A set of
Radio removal tools (See Fig. 1) is required.
Fig. 1
Radio removal Tools
Fig. 2
2. Slide tools into slots (51) on Radio. (Straight edge facing away).
Withdraw radio by pulling outwards. To release keys simply press
retaining springs. See Fig. 2. For detailed radio removal click here.
3. If vehicle has optional CD Changer, it must be disconnected.
Both blue and green plugs must be disconnected (See Fig. 3)
Revision! The IL-BKR no longer has a Green iso plug. Power is now
taken directly from vehicles +12V accessory supply using wire harness in
Fig. 7 which connects to radio on chamber A as seen in Fig.3 below.
Note: The IL-BKR will play & charge only when ignition is “ON” however the
option to charge at all times is available by switching red wire on
installation harness to yellow wire (pin 4)
Fig. 3
Becker radio chamber
4. Connect blue plug from IL-BKR harness (See. Fig. 4) to chamber C-3 on
radio (See Fig. 3)
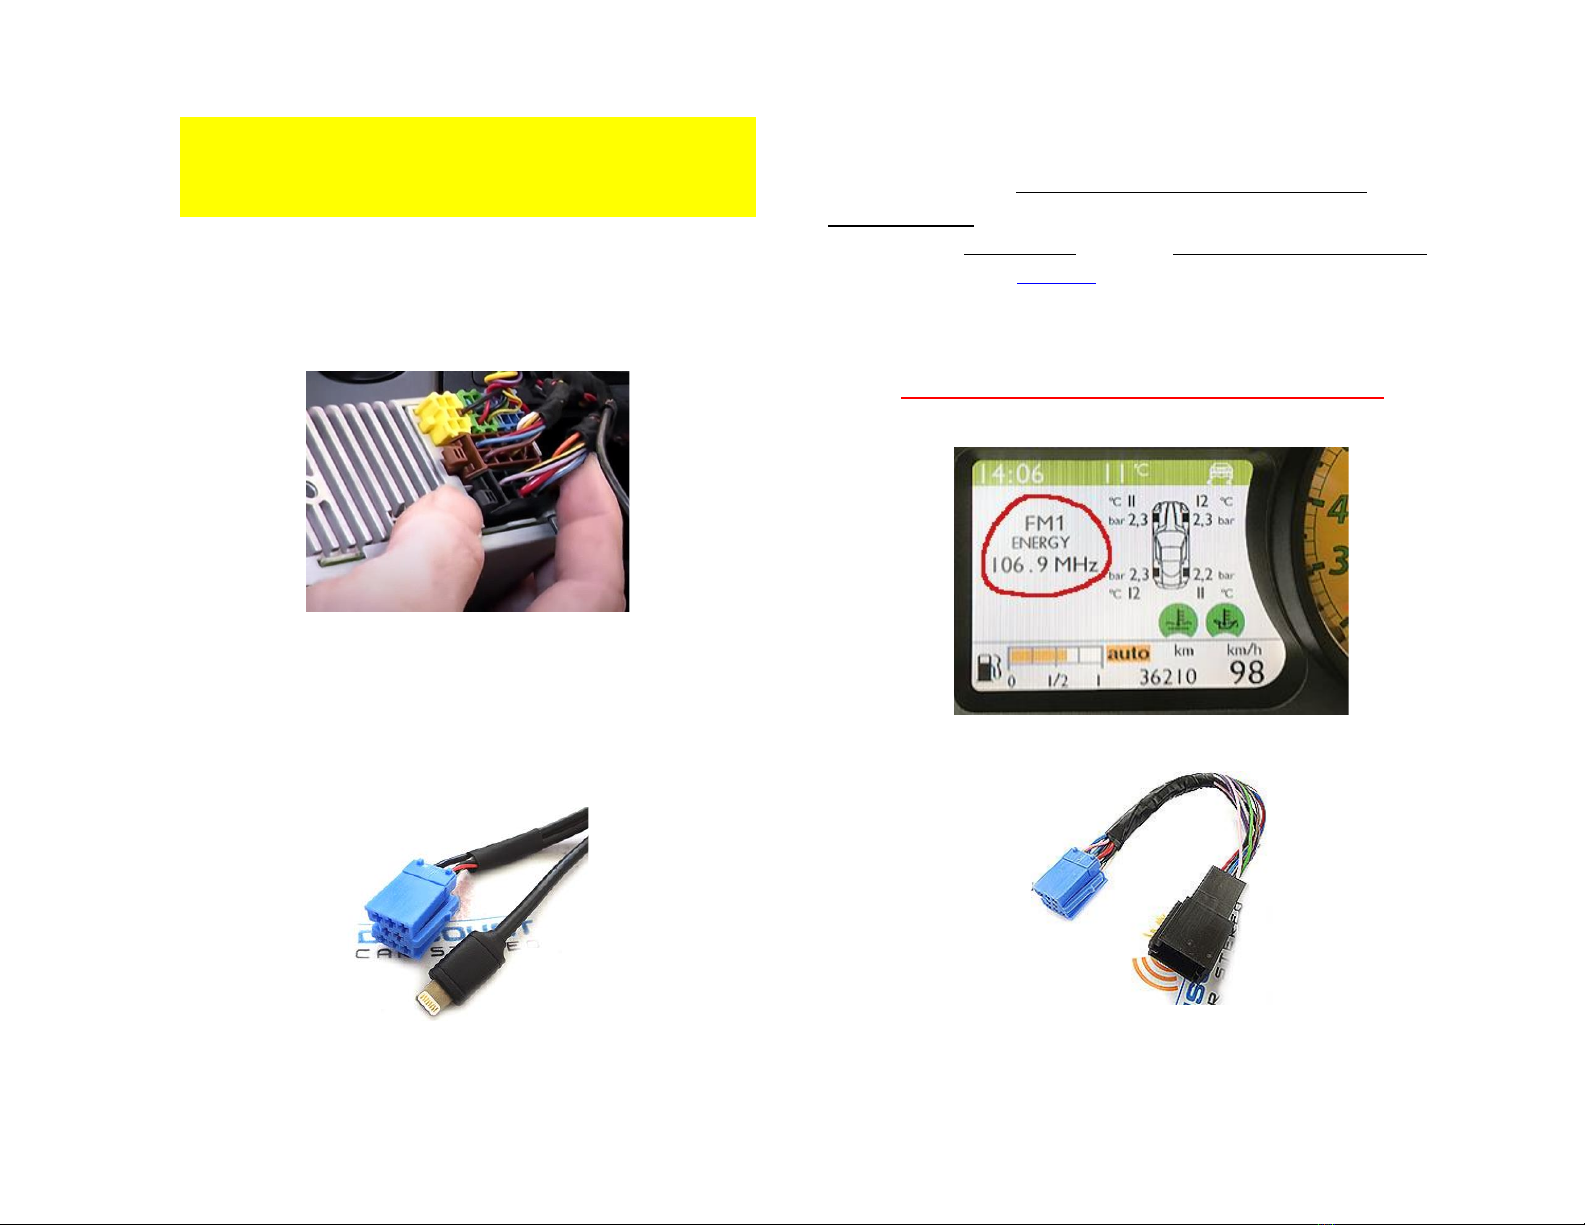
Fig. 4
iso plug & lighting plug
Warning: Ferrari and others with Cascade BE6111, BE6112
radios with factory Bluetooth Hands- Free option and/or
cluster display:
In order to retain cluster display (see Fig. 5) and/or factory hands-free option,
you must purchase our ISO8-HAR T-harness (See Fig. 6).
We highly recommended purchasing the iso8-har harness along with this
adapter (IL-BKR) so that we “mate” prior to shipping, otherwise you will have to
mate yourself.
Vehicles without cluster display and/or Bluetooth hands-free option do
NOT require the ISO8-HAR T-harness.
Fig. 5
Fig. 6
5. Disconnect factory 8-pin plug (black) from chamber A (See Fig. 3)
and connect to matting 8-pin connector on power supply harness (See
Fig. 7)
6. Connect 8-pin plug from power supply harness to Chamber A on radio
(vacated in step 2)
7. Proceed to step 10
Fig. 7
Power harness
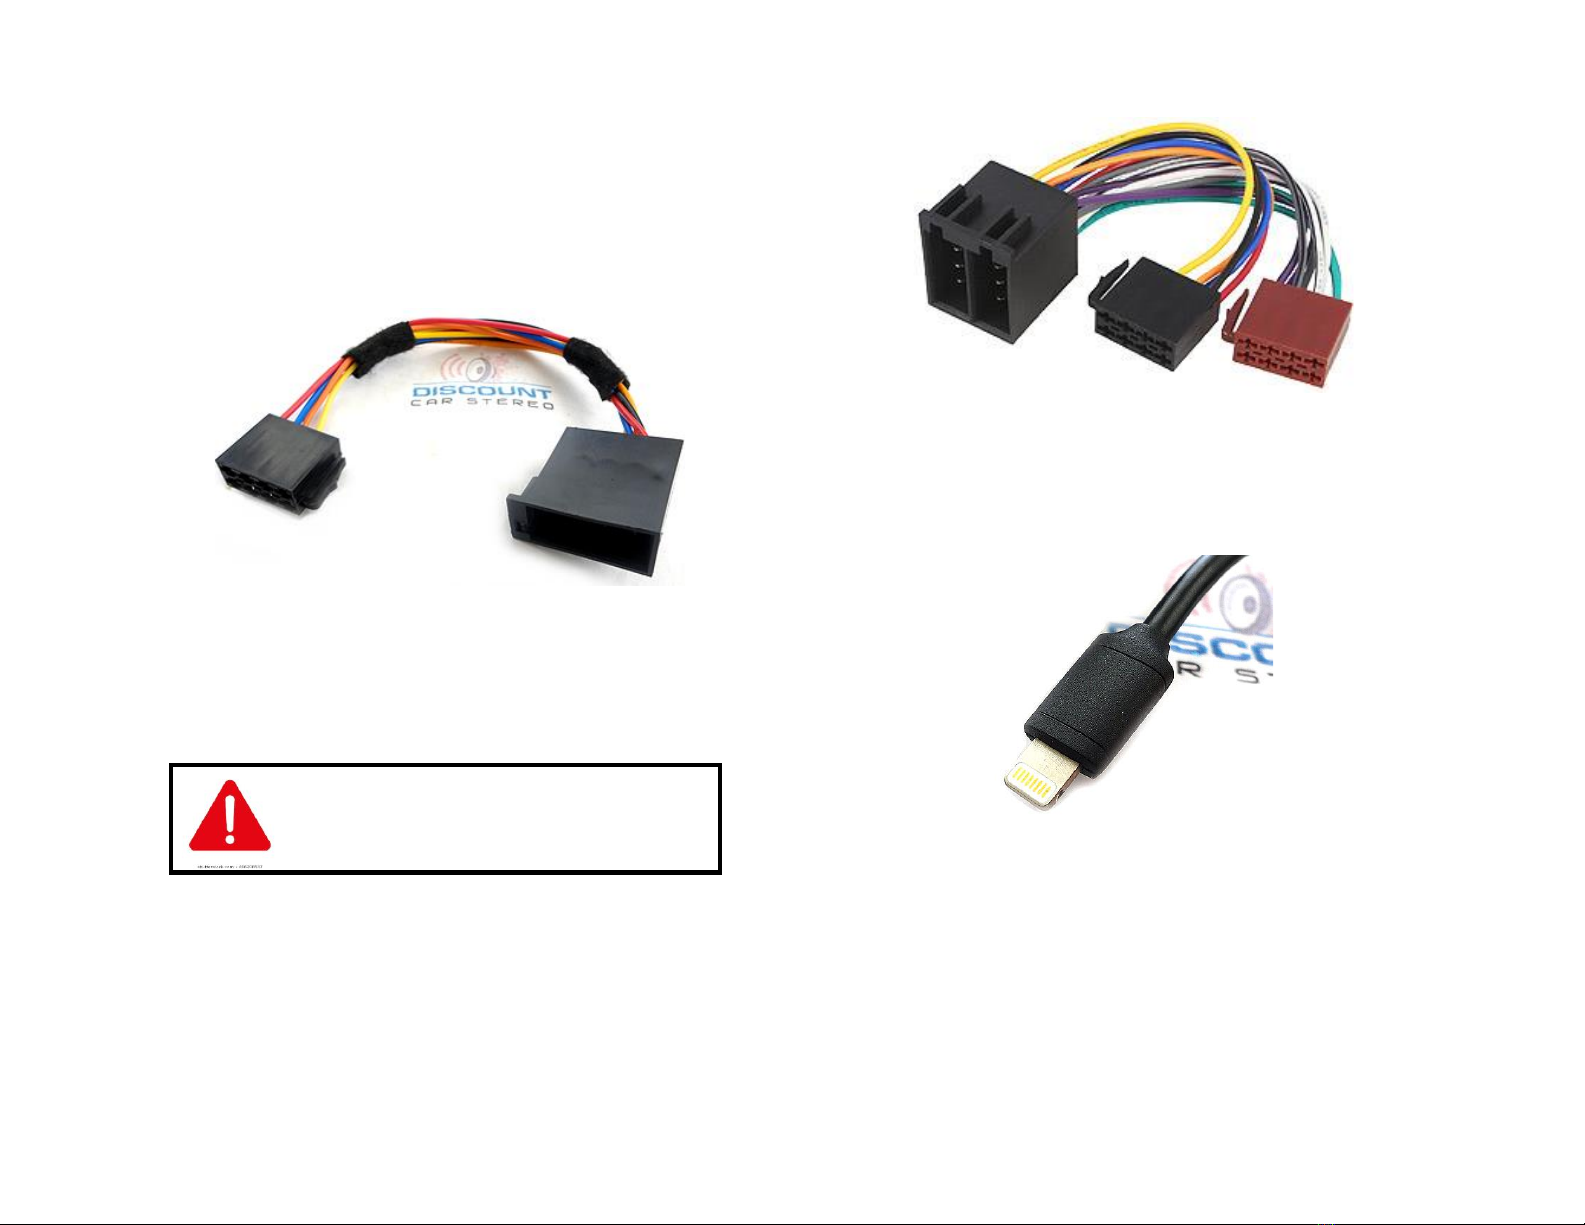
BMW and Mercedes with solid 16-pin plug:
Many BMW and Mercedes include a solid 16-pin
Speaker/Power (A/B) plug. The BHA1784a harness
(See Fig. 8) is included in these applications
8. Disconnect factory solid 16-pin plug from chamber A/B (See Fig. 3)
and connect matting 16-pin connector on harness (See Fig. 8)
9. Connect 8-pin plug black and brown plugs from power supply
harness to Chamber A and B on radio (vacated in step 8)
Fig. 8
10. Run Lightning plug (See Fig. 9) to desired mounting location on
dashboard, glove box, console etc. within 6 ft. of radio. Use caution to
not cut, pinch or crimp the cable during this step.
Fig. 9
11. Securely install the plug and cable in a location away from heat,
humidity, moving parts, or sharp metal objects.
Damage to lightning plug may occur if subject to abuse.

Operation:
One of the most important steps in this process is enabling the AUX function
within Becker radio menu. Most Becker radios are pre-programmed to
recognize a CD Changer connection and because of that you must change the
setting from “CD Changer” to “AUX” otherwise this adapter will not perform as
intended. This process is done upon initial install and will not have to be repeated
unless power is removed from radio for some time.
Enabling the AUX function
Radios with TP button: (i.e. CDR-220)
1. Turn radio "ON"
2. Press and hold the "TP" button for about 8 seconds until Becker 1 is
displayed.
3. Turn the Tuning Knob until AUX OFF is displayed.
4. Press either button located directly under the Arrows on the display to
change the present setting from OFF to ON.
Turn radio OFF.
5. Turn Radio back ON, press “S”(Source) button to enter AUX Mode. This
is the mode to use whenever you want to listen to the device connected
to the adapter.
Radios with ☼button: (i.e. BE6104)
1. Turn Radio “ON”
2. Press and hold the ☼button for about 8 seconds.
3. Select AUX “ON/OFF”option.
4. Press either button located directly under the Arrows on the display to
change the setting to ON.
5. Turn radio OFF.
6. Turn Radio back ON press the “☼”button until “AUX”is displayed.
Other Radios with ☼button (i.e. BE4602)
1. Turn radio ON.
2. Press and hold the ☼button for 8 seconds, until Becker 1 is displayed.
3. Turn the Tuning Knob until AUX OFF is displayed.
4. Press either button located directly under the Arrows on the display to
change the present setting from OFF to ON
5. Turn Radio back “ON” Press “☼” button to enter AUX Mode
Radios with 3 Function buttons (i.e. BE4527)
1. Turn radio ON.
2. Press and hold Function button #2 (center) for more than 4 seconds.
3. The accompanying menu appears on the display.
4. Press the multifunction button located directly under “AUX” on the
display to change the present setting from OFF to ON.
5. The Setting is stored automatically.

Nav Traffic Radios
1. Press the "Radio" button to enter Radio mode.
2. Press the "Navi" and "F10" simultaneously
3. Press "Next" until the AUX input, Changer Res screen
4. Press AUX to enable/disable.
Alternate method:
1. Press the “Sound” button for more than 2 seconds
2. To access user menu second level, press multifunction button →
3. With multifunction button “AUX” select either “AUX mode ON” or “AUX
mode Off”
4. The setting is stored automatically
5. In CD mode, multifunction button “AUX” must be pressed to select “AUX”
mode.
Becker 4775 (Land Rover) & Other Traffic Pro
1. With the Radio "ON" press and hold the Tone button until the sub-menu
comes up.
2. Press the soft-key labeled “Aux” until the screen displays “AUX Mode
on”.
3. Press the Tone button to exit the menu.
4. To enter "AUX" mode, press the "CD" button and select the "AUX" soft-
keys
Sound 5 (BE7077 Sprinter Van etc.)
1. Turn radio ON.
2. Press the
dp
repeatedly until EXT menu appear.
3. Turn Rotary control knob clockwise and select EXT AUX.
4. Press the CD button repeatedly until “AUX” is displayed
Cascade (i.e. BE7941, BE6111, BE6112 etc.)
To activate the External Device mode
1. Turn radio ON.
2. Press the information button (CID)
3. Turn the rotary control/push (OK) button counterclockwise until
System Settings appears at the top right of the display
4. Press the rotary control/push (OK) button
5. Turn the rotary control /push (OK) button to select External Device
6. Confirm selection by pressing the rotary control/push (OK) button
7. Select “AUX” from list and turn it “ON”.
8. Exit menu
9. To listen to the “AUX” device, press the MEDIA button
10. Turn the rotary control /push (OK) button to “AUX” and press the
rotary control/push (OK) button
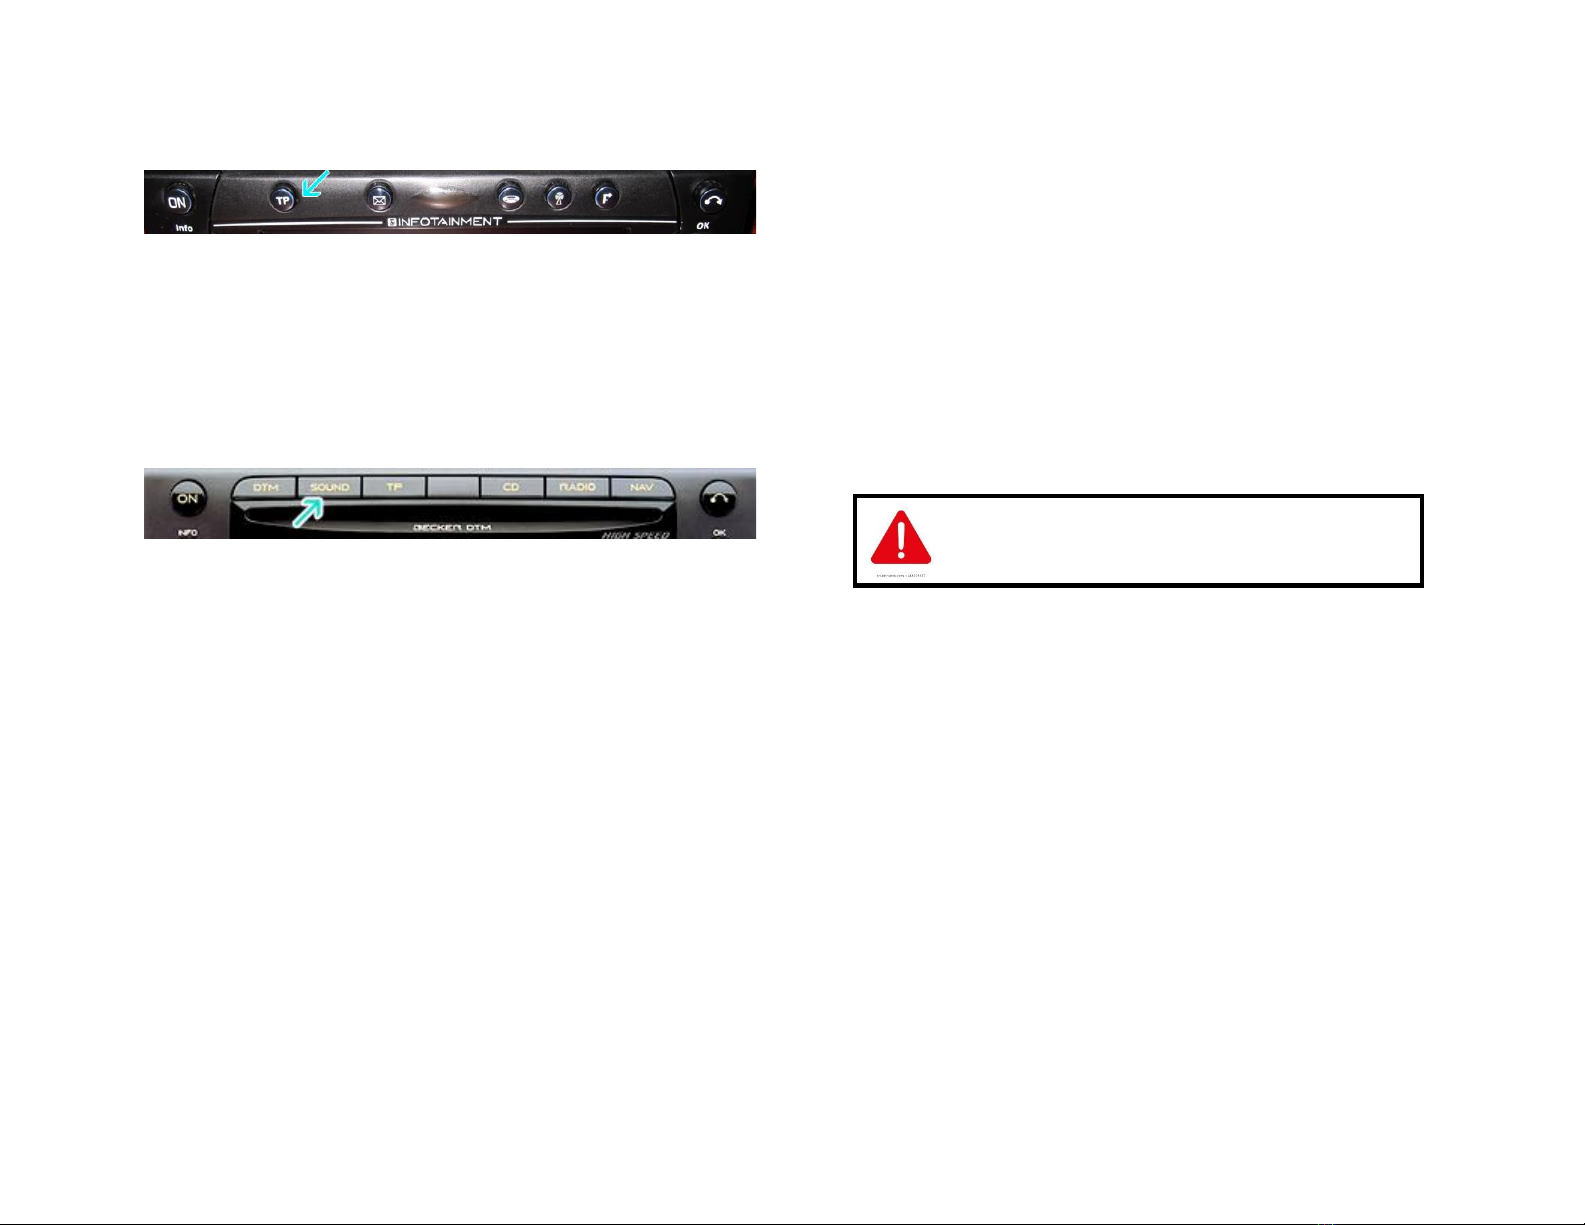
Becker BE7801 Infotainment (Ferrari, Maserati)
1. Press the TP button for more than 2 seconds
2. Press multifunction button “AUX”
3. Select Ext audio source
4. press the right control knob to select “ON”
5. The setting is store automatically
Becker DTM /High speed (i.e. BE-7892, BE7910)
1. Press the Sound button for more than 2 seconds
2. Press multifunction button “AUX”
3. Select Aux Mode on
4. The setting is stored automatically
In CD Operation, the multifunction button AUX must be pressed to select
AUX operation
Test Operation
1. Turn ignition and radio “ON”
Note: Radios in some European vehicles operate without the key;
however, in order for the iL-BKR to work, the key must be turned to
“ACC” or “ON” positions. In these positions the iL-BKR will charge and
play.
2. Connect Apple iPod, iPad or iPhone to Lightning plug
3. Apple device will begin charging, otherwise see note above.
4. Press required button on radio to enter AUX Mode. If radio does not
enter AUX mode go to section “Enabling the AUX function” above.
5. Select a test track on Apple device.
Playlist and Track selection is *NOT* possible from the
radio. You must use the iPod built-in controls to access
music files
6. Test track will play on car speakers
7. Use Volume control on Becker radio to adjust playback level
8. If successful go ahead and reinstall the radio
Note: Removal tool not required to re-install radio. Simply align radio with
opening and push back until it locks in place.
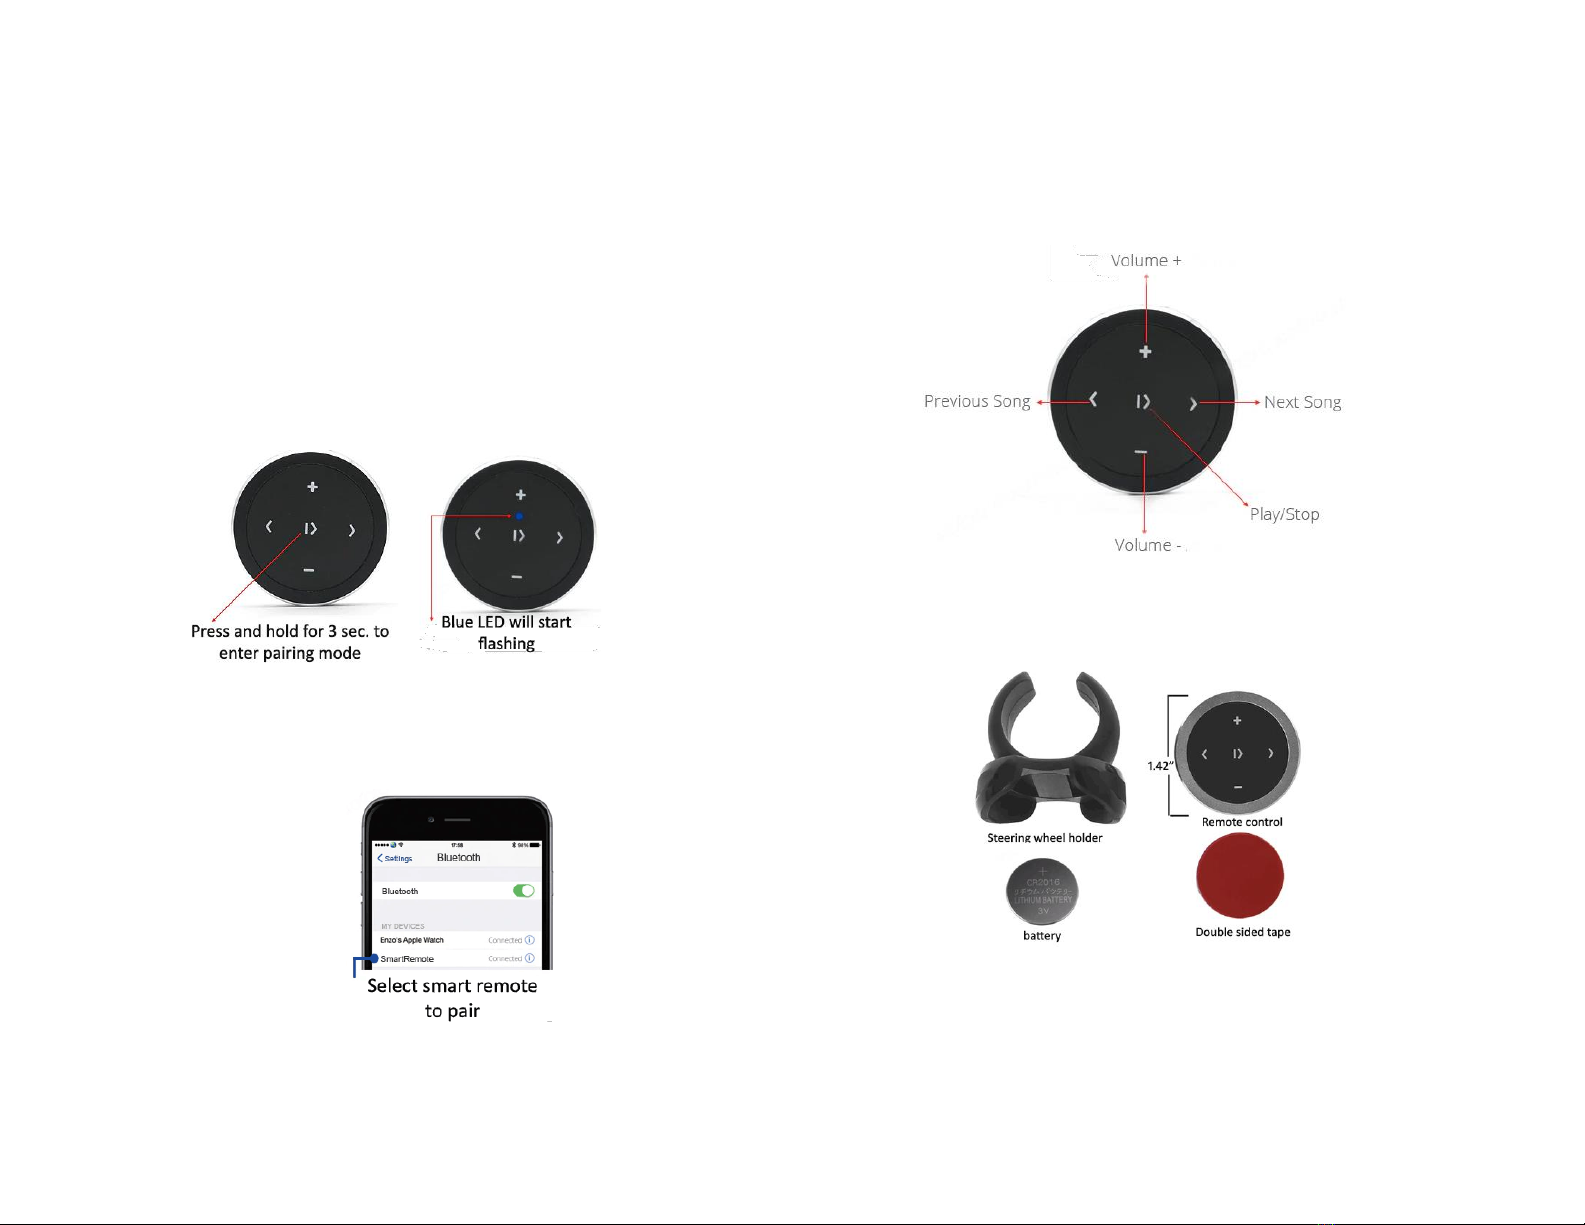
Optional Smart Remote:
This wireless remote would let you pause, play, adjust volume, or otherwise
control your media from farther away than arm’s reach. Use at home to
control Bluetooth device from up to 30 ft.
1. Keep audio device in pocket, glovebox, purse or elsewhere
2. To track up/down within playlist etc.
3. To adjust audio device volume (up/down)
Pairing:
Operation:
Use smart remote to perform the following functions on any iOS7.0 and higher
or Android 4.4 and higher.
Package Contents:

Frequent asked questions
1. Why is your adapter better than what others are offering?
Our cable has a single 8-pin Lightning plug that works as intended (Audio
and charging) and will not damage your device. In addition, we include a
plug-n-play power harness.
2. My vehicle has a CD Changer. Will the IL-BKR work?
YES; but CD Changer must be disconnected.
3. I’ve installed everything but my Phone does not charge and audio
plays on Phone speaker. Is the unit defective?
For Apple lighting devices to play or charge, power must be applied to the
module. Please ensure you did not skip steps 5-6 on page 4. Also ensure
ignition is “ON” and lastly, if your adapter has a fuse holder, check that fuse
is not blown. If ALL checks out, please contact us or proceed to fill out the
return form.
4. Why do I need to purchase the ISO8-HARHarness?
The ISO8-HAR harness is required to retain Bluetooth hands-free and/or
cluster display. Without the ISO8-HAR, Ferrari heads-up display (cluster
display) seen in Fig. 4a or Bluetooth hands-free will cease to work.
Purchase the ISO-HAR along with the IL-BKR and we will mate them prior to
shipping. If for some reason you ignore the warning and need the ISO8-HAR,
then you will have to mate them yourself (special pin removal tool required)
or mail back to us for the free service.
Vehicles without Bluetooth hands-free or cluster display do not
require the ISO8-HAR harness.
5. Does the IL-BKR work on all Becker Radios?
NO; the IL-BKR works on any Becker radio that has “AUX” input setting
within Radio menu. Becker radios without AUX menu option (e.g., CR-210,
CDR-210, PCM and others), are not compatible with the IL-BKR.
6. Do you offer an adapter that works on Becker radios without “AUX”
menu capabilities?
YES; Purchase our IL-BKRCD adapter but only if vehicle also has a CD
Changer. CD Changer remains connected but will no longer function.
7. Can I control Apple device from the radio buttons?
NO; you must continue to use Apple built-in controls and display to operate
the device or purchase optional wireless remote control.
8. I want to be able to charge my phone when the ignition if off. Is this
possible?
YES; Cut red wire on iL-BKR installation harness from its current location
(pin7) and connect to the yellow wire at pin4.
9. Where is the model number located on Becker Radios?
Locate sticker on side of the radio. Radio removal required to see sticker.
Disclaimer
• This product has no affiliation with BMW, Porsche, Ferrari, Mercedes, Land Rover, Becker or
Apple
• We’re not liable for misuse of this product.
•We recommend professional installation.
For help email support@discountcarstereo.com
© 1995-Jun-21 Discount Car Stereo, Inc. All rights reserved. Information in this document is
subject to change without notice. Other products and companies referred to herein are
trademarks or registered trademarks of their respective companies or mark holders.
Table of contents
Other Discount Car Stereo Adapter manuals

Discount Car Stereo
Discount Car Stereo A2D-GM3 Series User manual

Discount Car Stereo
Discount Car Stereo A2DIY-CR12 Instruction Manual

Discount Car Stereo
Discount Car Stereo HON98/PC-POD2 User manual

Discount Car Stereo
Discount Car Stereo AUX-CR12 User manual

Discount Car Stereo
Discount Car Stereo A2D-GM3 Instruction Manual

Discount Car Stereo
Discount Car Stereo A2D-3.5M Instruction Manual

Discount Car Stereo
Discount Car Stereo IL-FM User manual


