Discount Equipment PP220 User manual

PP220
UU
UUSS
SS
CC
CCAA
AA
EE
EESS
SS
Operator’s manual
Manuel d’utilisation
Manual de instrucciones
Please read the operator’s manual carefully and make sure you understand the instructions before using the machine.
Lire attentivement et bien assimiler le manuel d’utilisation avant d’utiliser la machine.
Lea detenidamente el manual de instrucciones y asegúrese de entender su contenido antes de utilizar la máquina.
To order go to Discount-Equipment.com

We sell worldwide for the brands: Genie, Terex, JLG, MultiQuip, Mikasa, Essick, Whiteman,
Mayco, Toro Stone, Diamond Products, Generac Magnum, Airman, Haulotte, Barreto, Power
Blanket, Nifty Lift, Atlas Copco, Chicago Pneumatic, Allmand, Miller Curber, Skyjack, Lull,
Skytrak, Tsurumi, Husquvarna Target, Stow, Wacker, Sakai, Mi-T-M, Sullair, Basic, Dynapac,
MBW, Weber, Bartell, Bennar Newman, Haulotte, Ditch Runner, Menegotti, Morrison, Contec,
Buddy, Crown, Edco, Wyco, Bomag, Laymor, EZ Trench, Bil-Jax, F.S. Curtis, Gehl Pavers, Heli,
Honda, ICS/PowerGrit, IHI, Partner, Imer, Clipper, MMD, Koshin, Rice, CH&E, General Equip-
ment ,Amida, Coleman, NAC, Gradall, Square Shooter, Kent, Stanley, Tamco, Toku, Hatz,
Kohler, Robin, Wisconsin, Northrock, Oztec, Toker TK, Rol-Air, APT, Wylie, Ingersoll Rand /
Doosan, Innovatech, Con X, Ammann, Mecalac, Makinex, Smith Surface Prep,Small Line,
Wanco, Yanmar
Discount-Equipment.com is your online resource for
commercial and industrial quality parts and equipment sales.
561-964-4949
visit us on line @ www.discount-equipment.com
TO PURCHASE THIS PRODUCT PLEASE CONTACT US
Select an option below to find your Equipment
Equipment Financing and
Extended Warranties Available
KEY
T
O SYMBOLS
2
–
English
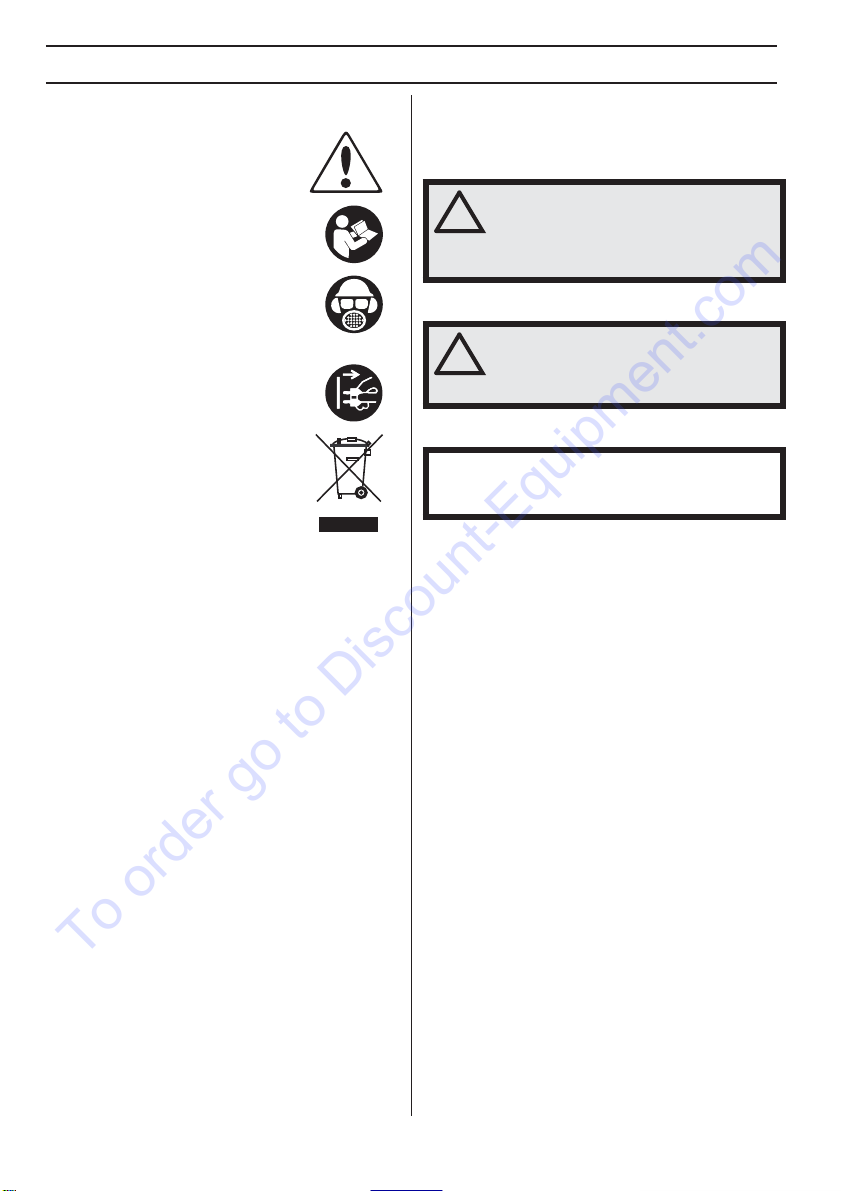
Symbols on the mac
hine
W
ARNING! The machine can be a
dangerous tool if used incorrectly or
carelessly, which can cause serious or
fatal injury to the operator or others.
Please read the operator’s manual
carefully and make sure you understand
the instructions before using the machine.
Always wear:
• Approved protective helmet
• Approved hearing protection
• Protective goggles or a visor
Inspection and/or maintenance should be
carried out with the motor switched off and
the plug disconnected.
En
vironmental marking.
Symbols on
the product or its packaging indicate that
this product cannot be handled as
domestic waste. It must instead be
submitted to an appropriate recycling
station for the recovery of electrical and
electronic equipment.
By ensuring that this product is taken care of correctly,
you can help to counteract the potential negative impact
on the environment and people that can otherwise result
through the incorrect waste management of this product.
For more detailed information about recycling this
product, contact your municipality, your domestic waste
service or the shop from where you purchased the
product.
Other symbols/decals on the mac
hine refer to special
certification requirements for certain markets.
Explanation of warning le
vels
The w
arnings are graded in three levels.
W
ARNING!
CAUTION!
NOTICE!
!
W
ARNING! Used if there is a risk of
serious injury or death for the operator
or damage to the surroundings if the
instructions in the manual are not
followed.
!
CA
UTION! Used if there is a risk of injury
to the operator or damage to the
surroundings if the instructions in the
manual are not followed.
NO
TICE! Used if there is a risk of damage to materials
or the machine if the instructions in the manual are not
followed.
To order go to Discount-Equipment.com
CONTENTS
English
–
3
Contents
Note the f
ollowing before
starting:
KEY
TO SYMBOLS
Symbols on the machine
...................................... 2
Explanation of warning levels ............................... 2
CONTENTS
Contents
............................................................... 3
Note the following before starting: ........................ 3
PRESENT
ATION
Dear customer!
..................................................... 4
Design and features ............................................. 4
PP220 ................................................................... 4
WHA
T IS WHAT?
What is what on the po
wer pack? ......................... 5
MA
CHINE´S SAFETY EQUIPMENT
Gener
al ................................................................. 6
ASSEMBLING AND ADJUSTMENTS
Install the po
wer unit ............................................ 7
Connecting the units ............................................. 7
Connect the cooling water .................................... 7
Connect a power source ...................................... 7
Type of installation ................................................ 8
OPERA
TING
Gener
al safety precautions ................................... 9
Protective equipment ............................................ 10
Power pack safety precautions ............................. 10
Work safety ........................................................... 11
Transport and storage .......................................... 11
MENU SYSTEM
P
ower unit menu system ...................................... 12
Menu overview ..................................................... 13
Menu system explanation ..................................... 14
MENU SYSTEM
Remote control
..................................................... 15
Software settings, remote control ......................... 15
Remote control menu system ............................... 16
Menu overview ..................................................... 16
Menu system explanation ..................................... 17
Battery .................................................................. 18
ST
ARTING AND STOPPING
Bef
ore starting ...................................................... 19
Starting ................................................................. 19
Stopping ............................................................... 19
MAINTENANCE
Gener
al ................................................................. 20
Daily maintenance ................................................ 20
Service ................................................................. 20
Error messages .................................................... 21
TECHNICAL D
ATA
T
echnical data ....................................................... 22
Recommended cable dimensions ......................... 22
US
WARRANTY STATEMENT
W
ARRANTY POLICY ........................................... 23
EQUIPMENT ........................................................ 23
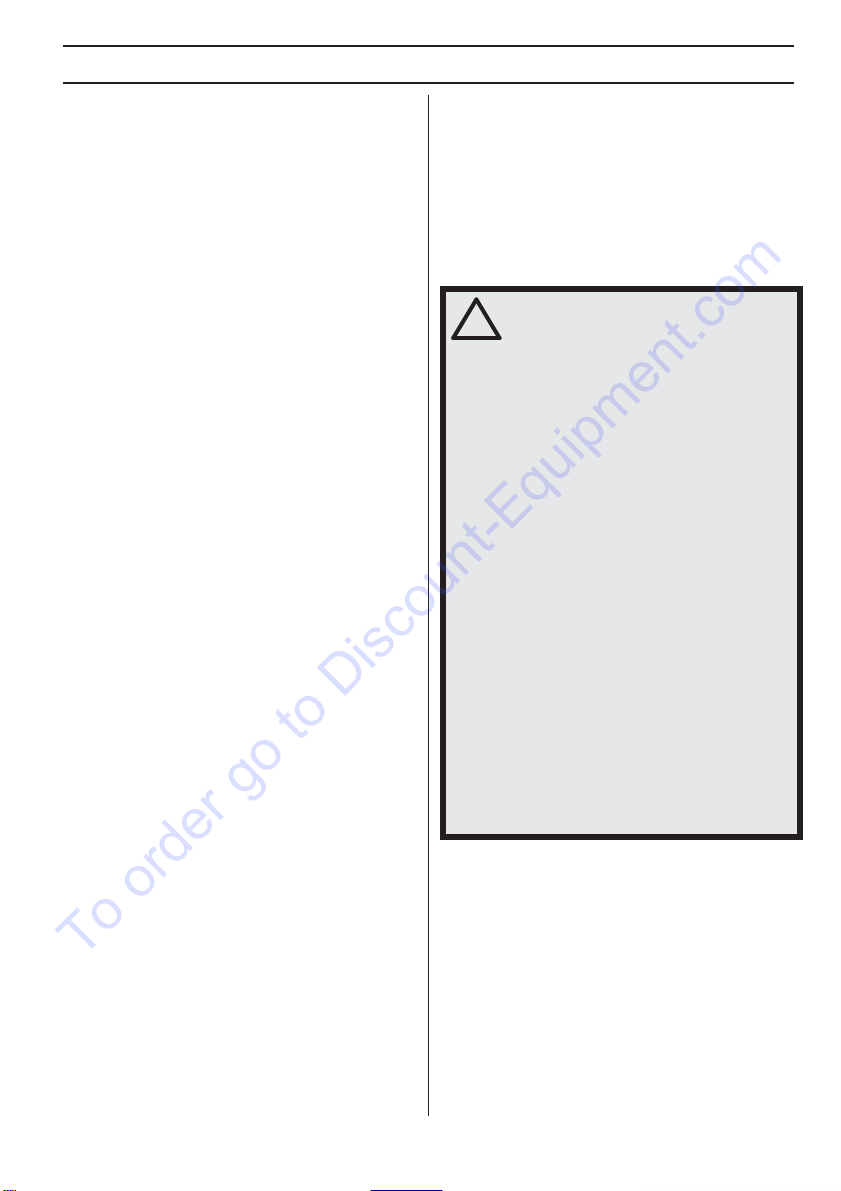
!
W
ARNING! Cutting, especially when DRY
cutting, generates dust that comes from
the material being cut, which frequently
contains silica. Silica is a basic
component of sand, quartz, brick clay,
granite and numerous other minerals
and rocks. Exposure to excessive
amount of such dust can cause:
Respiratory disease (affecting your
ability to breath), including chronic
bronchitis, silicosis and pulmonary
fibrosis from exposure to silica.These
diseases may be fatal;
Skin irritation and rash.
Cancer according to NTP* and IARC* */
National Toxicology Program,
International Agency for Research on
Cancer
Take precautionary steps:
Avoid inhalation of and skin contact with
dust, mist and fumes.
Wear and ensure that all bystanders wear
appropriate respiratory protection such
as dust masks designed to filter out
microscopic particles. (See OSHA 29
CFR Part 1910.1200)
Wet cut when feasible, to minimize dust.
To order go to Discount-Equipment.com

PRESENTATION
Dear customer!
Thank you for choosing a Husqvarna product!
It is our wish that you will be satisfied with your product
and that it will be your companion for a long time. A
purchase of one of our products gives you access to
professional help with repairs and services. If the retailer
who sells your machine is not one of our authorised
dealers, ask him for the address of your nearest service
workshop.
This operator’s manual is a valuable document. Make
sure it is always at hand at the work place. By following its
content (using, service, maintenance etc.) the life span
and the second-hand value of the machine can be
extended.If you ever lend or sell this machine, make sure
that the borrower or buyer gets the operator′s manual, so
they will also know how to properly maintain and use it.
More than 300 years of innovation
Husqvarna AB is a Swedish company based on a tradition
that dates back to 1689, when the Swedish King Charles
XI ordered the construction of a factory for production of
muskets. At that time, the foundation was already laid for
the engineering skills behind the development of some of
the world's leading products in areas such as hunting
weapons, bicycles, motorcycles, domestic appliances,
sewing machines and outdoor products.
Husqvarna is the global leader in outdoor power products
for forestry, park maintenance and lawn and garden care,
as well as cutting equipment and diamond tools for the
construction and stone industries.
Owner responsibility
It is the owner’s/employer’s responsibility that the operator
has sufficient knowledge about how to use the machine
safely. Supervisors and operators must have read and
understood the Operator’s Manual. They must be aware
of:
• The machine’s safety instructions.
• The machine’s range of applications and limitations.
• How the machine is to be used and maintained.
Local regulations could restict the use of this machine.
Find out what regulations are applicable where you work
before you start using the machine.
The manufacturer’s reservation
Subsequent to publishing this manual Husqvarna may
issue additional information for safe operation of this
product. It is the owner’s obligation to keep up with the
safest methods of operation.
Husqvarna AB has a policy of continuous product
development and therefore reserves the right to modify
the design and appearance of products without prior
notice.
4 – English
Design and features
This is a product included in a range of high frequency
powered equipment for cutting, drilling and wall sawing.
They are designed to cut hard materials like masonry and
reinforced concrete and should not be used for any
purpose not described in this manual.
Values such as high performance, reliability, innovative
technology, advanced technical solutions and
environmental considerations distinguish Husqvarna's
products. Safe operation of this product requires the
operator to read this manual carefully. Ask your dealer or
Husqvarna should you need more information.
Some of the unique features of your product are
described below.
PP220
The power unit is especially designed to drive designated
Husqvarna tools with a high frequency motor.
• The unit gives high power output and can use both 1-
and 3-phase input, which makes it flexible and usable.
• The operator can easily make adjustments and
monitor system information via the digital display on
the unit.
• A wireless remote control is used to control the wall
saw; the remote control is only included with
purchases of wall saw equipment WS220.
• The remote control gives the operator freedom of
movement and an uninterrupted view of the work. It is
easy to control, even when wearing gloves. Setting
changes and operation are performed using just a few
buttons.The remote control has a 3.5 inch digital color
display.
• The design is lightweight, compact and ergonomic
which makes the unit easy to transport.
• The unit is water cooled
To order go to Discount-Equipment.com
English
–
5
WHA
T IS
WHA
T?
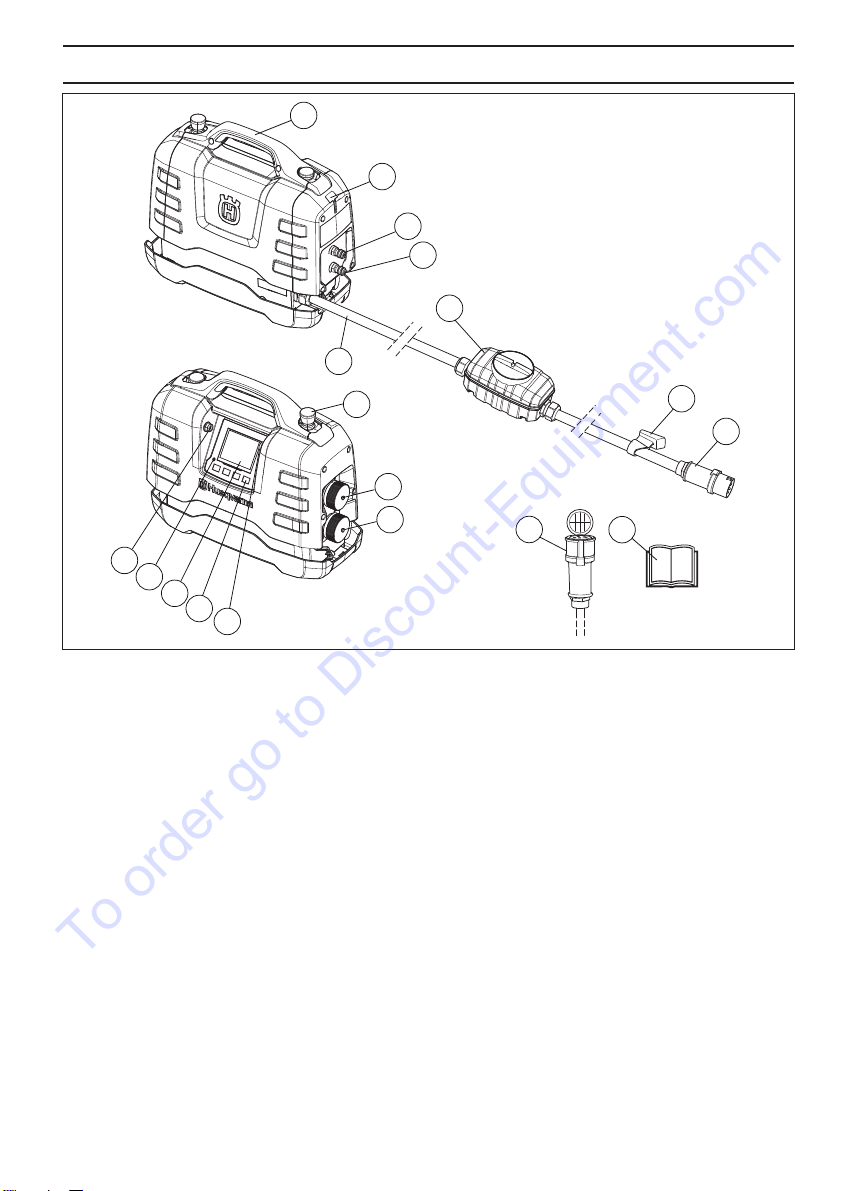
What is what on the po
wer pack?
17 18
13
14
1
5
3
4
9
16
15
12
11
2
6
8
7
10
1
Handle
2 Place for cable holder
3 Water connection in/out
4 Water connection in/out
5 Power cord
6 Ground fault circuit interrupter
7 Cable holder
8 Connector
9 Emergency stop
10 USB connection
11 Overvoltage indicator
12 Display
13 Option keys
14 CAN connection
15 Connector for drill and power cutter
16 Connector for wall saw
17 Adapter cable
18 Operator’s manual
To order go to Discount-Equipment.com
MACHINE´S SAFETY EQUIPMENT
6 – English
General
This section describes the machine′s safety equipment,
its purpose, and how checks and maintenance should be
carried out to ensure that it operates correctly.
This machine is used in combination with other products.
Please read the manual provided with the products
carefully and make sure you understand the instructions
before using the machine.
Check safety equipment daily.
Also check the safety equipment on the power tool that is
to be connected to the power unit, see the operator’s
manual for the respective power tool to check the safety
equipment.
Emergency stop and stop button
The emergency stops on the unit and on the remote
control slow the connected tool and disconnect it from the
power supply.
Testing the emergency stop
•Check that the emergency stop button is not pressed
by turning it clockwise.
• Start the connected tool.
• Press the emergency stop and check that the
connected tool stops.
• When using the wall saw, the stop button should be
controlled in the same way.
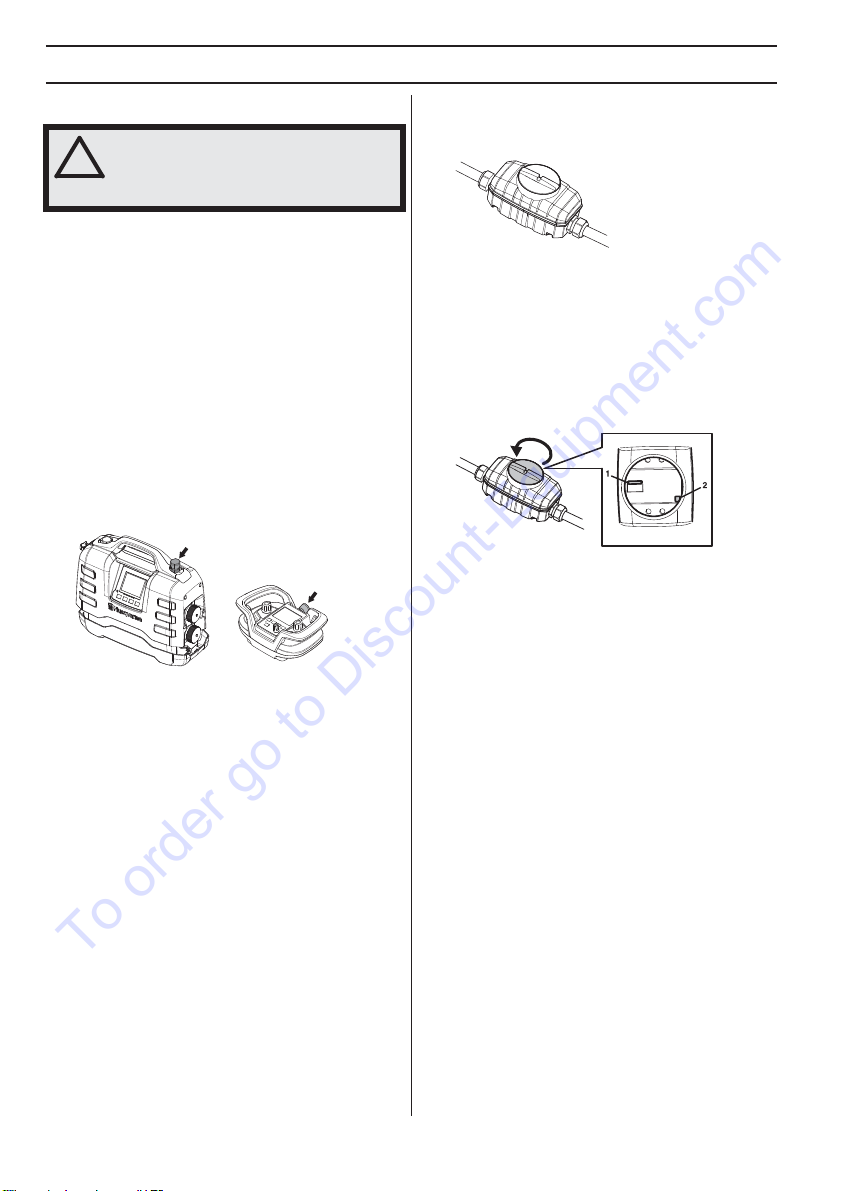
Ground fault circuit interrupter
A residual-current device is fitted to protect operators in
case an electrical fault should occur.
Check the ground fault circuit interrupter
Checking of the residual-current device must be done
with the power unit connected to an earthed or grounded
power outlet.
• Connect the power unit to an earthed or grounded
power outlet.
•Open the cover on the residual-current device to
access the switch (1) and test button (2).
• Set the control in the residual-current device in
position 1.
• Press the test button. The residual-current device
must trigger to disconnect the unit from the power
supply.
• Reset the residual-current device by first setting the
switch to 0 and then to 1.
• Refit and tighten the cover.
The residual-current device must be tested at least every
two weeks with the test button.
!
WARNING! Never use a machine that has
faulty safety equipment! If your machine
fails any checks Discount-equipment.
To order go to Discount-Equipment.com

ASSEMBLING AND ADJUSTMENTS
English – 7
Install the power unit
Place the power unit on the workplace, making sure that
it is standing on a stable surface and that it is protected
from water spray.
If the power unit was purchased together with wall saw
equipment WS220, it can easily be stored in the
designated place in the accompanying transport trolley
during operation.
For maximum performance, the power pack must be
connected to a 3-phase outlet.
Connecting the units
The power unit PP220 shall only be used with designated
Husqvarna products.
• Before connecting a power tool to the power take-off
of the power unit, always check that the pins in the
power tool connector are not bended or damaged.
• Connect the power tool to the designated power take-
off, note that there are two different power take-offs.
The upper power take-off with a silver colored cover is
used for wall saw WS220. The bottom power take-off
with a black cover is used for power cutters and drilling
machines.
For more information, see the ”Technical data” section.
Connect the cooling water
• Connect cooling water to the power unit with a
Gardena water connector to one of the two water
connections.Remember to use clean cooling water to
avoid dirt clogging up the water system.
For more information, see the ”Technical data” section.
The other water connection should be connected to the
power tool, the power tool has various regulating taps for
regulating the flow of cooling water to the tool. See the
operator’s manual for the respective power tools.
Connect a power source
For maximum performance, the power unit should be
connected to an earthed or grounded 3-phase socket
outlet. For more information, see the ”Technical data”
section.
In the lower region of the input voltage range there is a
reduction in available output power.
If a 3-phase electrical connection is not available, the
power unit can also be connected to a 1-phase socket
outlet.
Use the supplied adapter cable for 1-phase connection.
The output at 1-phase operation is substantially lower
than at 3-phase operation.
For more information, see the ”Technical data” section.
• During operation, fit together the covers for the cable
and the power unit to avoid dirt entering the covers
which could damage the connector.
A gasoline or diesel driven generator can be used as a
power source if sufficiently powerful. See typical
generator operation cases in Technical Data. The
generator must be earthed or grounded to safeguard the
function of the power unit.
NOTICE! A generator which on some occasion
generates an input voltage outside the voltage range
specified in the technical data can damage the power
unit.
IMPORTANT!
When the power unit is connected to an electrical
installation protected by a Residual Current
Circuit-Breaker this must be of type B (fig.1), whereas
an installation protected by a type A Residual Current
Circuit-Breaker must support connection to its primary
side, i.e. upstream of the Residual Current
Circuit-Breaker (fig. 2).
Local expertise may be able to recommend safe
alternatives to the above connections. If you encounter
a situation where you are uncertain you should
allways ask an expert. Contact Discount-equipment.
To order go to Discount-Equipment.com
8 – English
ASSEMBLING AND ADJUSTMENTS
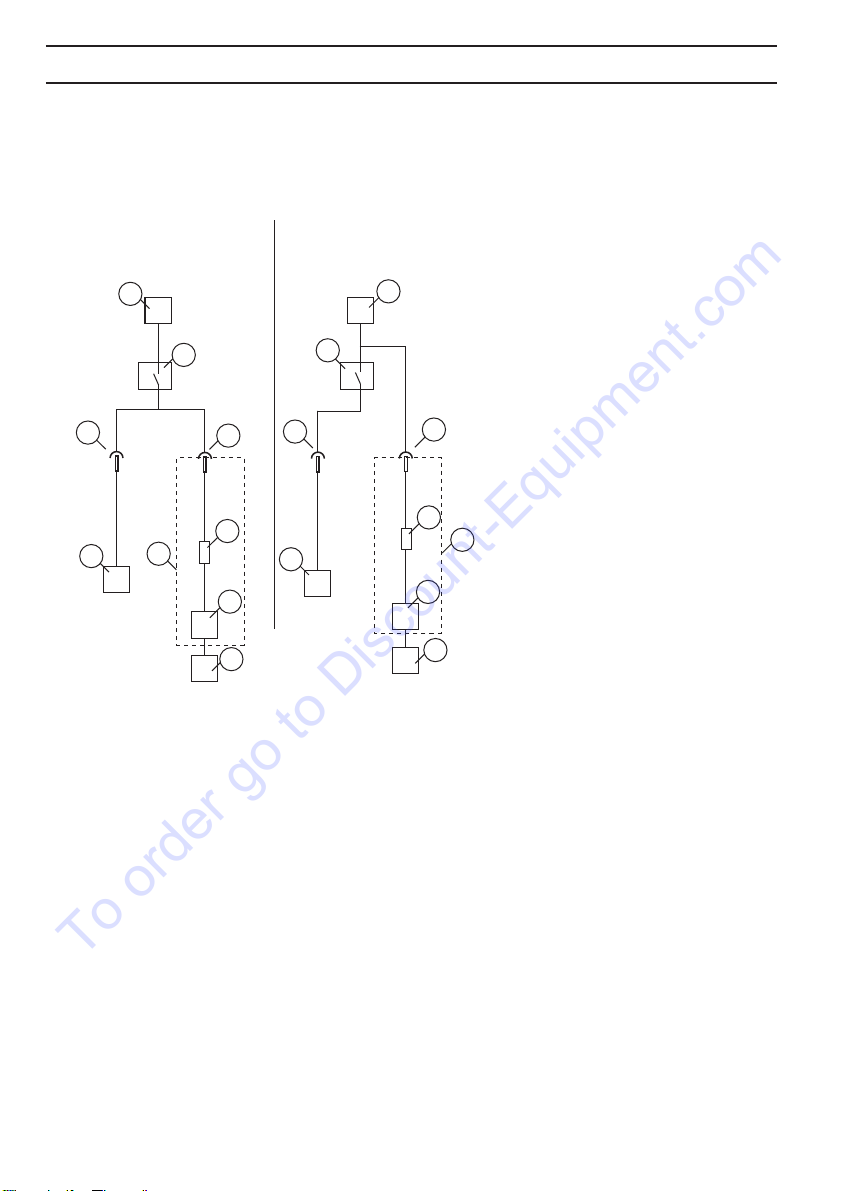
Type of installation
When the power unit is connected to an electrical installation protected by a Residual Current Circuit-Breaker this must
be of type B (fig.1), whereas an installation protected by a type A Residual Current Circuit-Breaker must support
connection to its primary side, i.e. upstream of the Residual Current Circuit-Breaker (fig. 2).
Local expertise may be able to recommend safe alternatives to the above connections. If you encounter a situation
where you are uncertain you should allways ask an expert. Contact Discount-equipment.
A - Power supply
B - Residual-current device type B
C - Residual-current device type A
D - Connector
E - Built in residual-current device type B
F - Other equipment
G - Power pack
H - Power tool
J - PP220
E
FJ
G
H
DD
BC
G
H
J
D
Fig. 1 Fig. 2
F
D
AA
E
To order go to Discount-Equipment.com

OPERATING
English – 9
General safety precautions
Work area safety
•Keep work area clean and well lit. Cluttered or dark
areas invite accidents.
•Do not operate power tools in explosive
atmospheres, such as in the presence of
flammable liquids, gases or dust. Power tools
create sparks which may ignite the dust or fumes.
•Keep children and bystanders away while
operating a power tool. Distractions can cause you
to lose control.
Electrical safety
•Power tool plugs must match the outlet. Never
modify the plug in any way. Unmodified plugs and
matching outlets will reduce the risk of electric shock.
•Avoid body contact with earthed or grounded
surfaces, such as pipes, radiators, ranges and
refrigerators. There is an increased risk of electric
shock if your body is earthed or grounded.
•Do not expose power tools to rain or wet
conditions. Water entering a power tool will increase
the risk of electric shock.
•Do not misuse the cable. Do not use the cable to
carry or pull the power tool, or to disconnect the
power tool from the power take-off. Keep the cable
away from heat, oil, sharp edges and moving
parts. Damaged or tangled cables increase the risk of
electric shock and must therefore be replaced at a
service workshop.
•When operating a power tool outdoors, use an
extension cord suitable for outdoor use. Use of a
cord suitable for outdoor use reduces the risk of
electric shock.
• When operating the power tool in damp environments,
use an extension cord suitable for outdoor use.
Personal safety
•Stay alert, watch what you are doing and use
common sense when operaing a power tool. Do
not use a power tool while you are tired or under
the influence of drugs, alcohol or medication. A
moment of inattention while operating power tools
may result in serious personal injury.
•Use personal protective equipment. Always wear
eye protection. Protetctive equipment such as dust
mask, non-skid safety shoes, hard hat, or hearing
protection used for appropriate conditions will reduce
personal injuries.
•Remove any adjusting key or wrench before
turning the power tool on. A wrench or a key left
attached to a rotating part of the power tool may result
in personal injury.
•Do not overreach. Keep proper footing and
balance at all times. This enables better control of
the power tool in unexpected situations.
•Dress properly. Do not wear loose clothing or
jewellery. Keep your hair, clothing and gloves
away from moving parts. Loose clothes, jewellery or
long hair can be caught in moving parts.
•Wear protective hair covering to contain long hair.
Loose clothes, jewellery or long hair can be caught in
moving parts.
•If devices are provided for the connection of dust
extraction and collection facilities, ensure that
these are connected and properly used. Use of
dust collection can reduce dust-related hazards.
Power tool use and care
•Do not force the power tool. Use the correct power
tool for your application. The correct power tool will
do the job better and safer at the rate for which it was
designed.
•Do not use the power tool if the designated on/off
function for each power tool does not turn it on
and off. Any power tool that cannot be controlled
correctly is dangerous and must be repaired.
•Disconnect the plug from the power source and/or
the battery pack from the power tool before
making any adjustments, changing accessories,
or storing power tools. Such preventive safety
measures reduce the risk of starting the power tool
accidentally.
•Store idle power tools out of the reach of children
and do not allow persons unfamiliar with the
power tool or these instructions to operate the
power tool. Power tools are dangerous in the hands
of untrained users.
•Maintain power tools. Check for misalignment or
binding of moving parts, breakage of parts and
any other condition that may affect the power
tool´s operation. If damaged, have the power tool
repaired before use. Many accidents are caused by
poorly maintained power tools.
•Keep cutting tools sharp and clean. Properly
maintained cutting tools with sharp cutting edges are
less likely to bind and are easier to control.
•Use the power tool, accessories and tool bits etc.
in accordance with these instructions, taking into
account the working conditions and the work to
be performed. Use of the power tool for operations
different from those intended could result in
hazardous situations.
Service
•Have your power tool serviced by a qualified
repair person unsing only identical replacement
parts. This will ensure that the safety of the power tool
is maintained.
!
WARNING! Read all safety warnings and
all instructions. Failure to follow the
warnings and instructions may result in
electric shock, fire and/or serious injury.
IMPORTANT! Save all warnings and instructions for
future reference. The term ”power tool” in the warnings
refers to your mains-operated (corded) power tool or
battery-operated (cordless) power tool.
To order go to Discount-Equipment.com
OPERATING
10 – English
Always use common sense
It is not possible to cover every conceivable situation you
can face. Always exercise care and use your common
sense. If you get into a situation where you feel unsafe,
stop and seek expert advice. Contact Discount-
equipment. Do not attempt any task that you feel unsure
of!
Protective equipment
General
Do not use the machine unless you are able to call for
help in the event of an accident.
Personal protective equipment
You must use approved personal protective equipment
whenever you use the machine. Personal protective
equipment cannot eliminate the risk of injury but it will
reduce the degree of injury if an accident does happen.
Ask your dealer for help in choosing the right equipment.
Always wear:
• Protective helmet
• Hearing protection
• Protective goggles or a visor
• Breathing mask
• Heavy-duty, firm grip gloves.
• Tight-fitting, heavy-duty and comfortable clothing that
permits full freedom of movement.
• Boots with steel toe-caps and non-slip sole
Be careful as clothing, long hair, and jewellery can get
caught in moving parts.
Other protective equipment
• Fire fighting equipment
• Always have a first aid kit nearby.
Power pack safety precautions
This section describes basic safety directions for using
the machine. This information is never a substitute for
professional skills and experience.
• Please read the operator’s manual carefully and make
sure you understand the instructions before using the
machine.
• Keep in mind that the operator is responsible for
accidents or hazards occuring to other people or their
property.
• All operators shall be trained in the use of the
machine. The owner is responsible for ensuring that
the operators receive training.
• The machine must be kept clean. Signs and stickers
must be fully legible.
!
WARNING! The use of products such as
cutters, grinders, drills, that sand or form
material can generate dust and vapors
which may contain hazardous chemicals.
Check the nature of the material you
intend to process and use an appropriate
breathing mask.
!
WARNING! Long-term exposure to noise
can result in permanent hearing
impairment. So always use approved
hearing protection. Listen out for
warning signals or shouts when you are
wearing hearing protection. Always
remove your hearing protection as soon
as the engine stops.
!
WARNING! There is always a risk of
crush injuries when working with
products containing moving parts. Wear
protective gloves to avoid body injuries.
!
WARNING! Sparks may appear and start
a fire when you work with the machine.
Always keep fire fighting equipment
handy.
!
WARNING! Read all safety warnings and
all instructions. Failure to follow the
warnings and instructions may result in
electric shock, fire and/or serious injury.
!
WARNING! The machine can be a
dangerous tool if used incorrectly or
carelessly, which can cause serious or
fatal injury to the operator or others.
Never allow children or other persons
not trained in the use of the machine to
use or service it. Never allow anyone else
to use the machine without first ensuring
that they have read and understood the
contents of the operator’s manual.
Never use the machine if you are
fatigued, while under the influence of
alcohol or drugs, medication or anything
that could affect your vision, alertness,
coordination or judgement.
!
WARNING! Unauthorized modifications
and/or accessories may lead to serious
injury or death to the user or others.
Do not modify this product or use it if it
appears to have been modified by others.
Never use a machine that is faulty. Carry
out the safety checks, maintenance and
service instructions described in this
manual. Some maintenance and service
measures must be carried out by trained
and qualified specialists. See
instructions under the heading
Maintenance.
Always use genuine accessories.
To order go to Discount-Equipment.com
OPERATING
English – 11
Work safety
Work area safety
• Always check and mark out where gas pipes are
routed. Cutting close to gas pipes always entails
danger. Make sure that sparks are not caused when
cutting in view of the risk of explosion. Remain
concentrated and focused on the task. Carelessness
can result in serious personal injury or death.
• Make sure that no pipes or electrical wires are routed
in the work piece or in the working area.
• Make sure that electrical cables within the working
area are not live.
• Never start to work with the machine before the
working area is clear and you have a firm foothold.
• Do not use the machine in bad weather, such as
dense fog, heavy rain, strong wind, intense cold, etc.
Working in bad weather is tiring and can lead to
dangerous conditions, e.g. slippery surfaces.
Electrical safety
•Never use the tool without the residual-current device
delivered with the tool.
• The machine should be connected to an earthed or
grounded outlet socket.
• Check that the mains voltage corresponds with that
stated on the rating plate on the machine.
• Check that the cord and extension cord are intact and
in good condition.
• Keep the connector dry and off the ground.
• Check that the residual-current device is not damaged
and that there are no visible defects, such as cracks.
Make sure the cover is securely tightened.
• Never use the machine if any cable or plug is
damaged, but hand it in to an authorized service
workshop for repair.
• To avoid overheating do not use the extension cord
while it is rolled up.
Personal safety
•Never leave the machine unsupervised with the motor
running.
• Always unplug the power supply to the power pack for
longer work breaks.
• Never work alone, always ensure there is another
person close at hand.Apart from being able to receive
help to assemble the machine, you can also get help
if an accident should occur.
• People and animals can distract you causing you to
lose control of the machine.For this reason, always
remain concentrated and focused on the task.
• People that need to be in close proximity of the
machine must wear hearing protection as the sound
level when cutting exceeds 85 dB(A).
• Always work in a manner that permits easy access to
the emergency stop.If an emergency situation should
arise anyway, push the red emergency stop button on
the power pack or the stop button on the remote
control.
Use and care
This machine is only intended for use together with the
intended Husqvarna products. All other use is forbidden.
• The machine is intended for use in industrial
applications by experienced operators.
• Inspection and/or maintenance should be carried out
with the motor switched off and the plug disconnected.
•Place the power unit on the workplace, making sure
that it is standing on a stable surface and that it is
protected from water spray. Always disconnect the
plug for the power unit before moving it.
• Observe care when lifting.You are handling heavy
parts, which imply the risk of pinch injuries or other
injuries.
• Never pull out the power cable without first switching
off the power pack and waiting for the engine to come
to a complete halt.
• Check that all couplings, connections and cables are
intact and free from dirt.
• Read through the manual supplied with the tool being
connected before starting to use the machine.
Transport and storage
• Always switch of the power pack and pull out the
electric cable before moving the equipment.
• Secure the equipment during transportation in order
to avoid transport damage and accidents. If the power
unit was purchased together with wall saw equipment
WS220, it can easily be stored in the designated place
in the accompanying transport trolley.
• Store the equipment in a lockable area so that it is out
of reach of children and unauthorized persons.
• Store the machine and its equipment in a dry and frost
proof place.
• Do not expose the unit to temperatures below -22 °F
or over 122 °F or to direct sunlight.
!
WARNING! There is always a risk of
shocks from electrically powered
machines. Avoid unfavourable weather
conditions and body contact with
lightning conductors and metal objects.
Always follow the instructions in the
Operator’s manual to avoid damage.
!
WARNING! Do not wash the machine
with water, as water can enter the
electrical system or the engine and
cause damage to the machine or short
circuit.
To order go to Discount-Equipment.com
12 – English
MENU SYSTEM
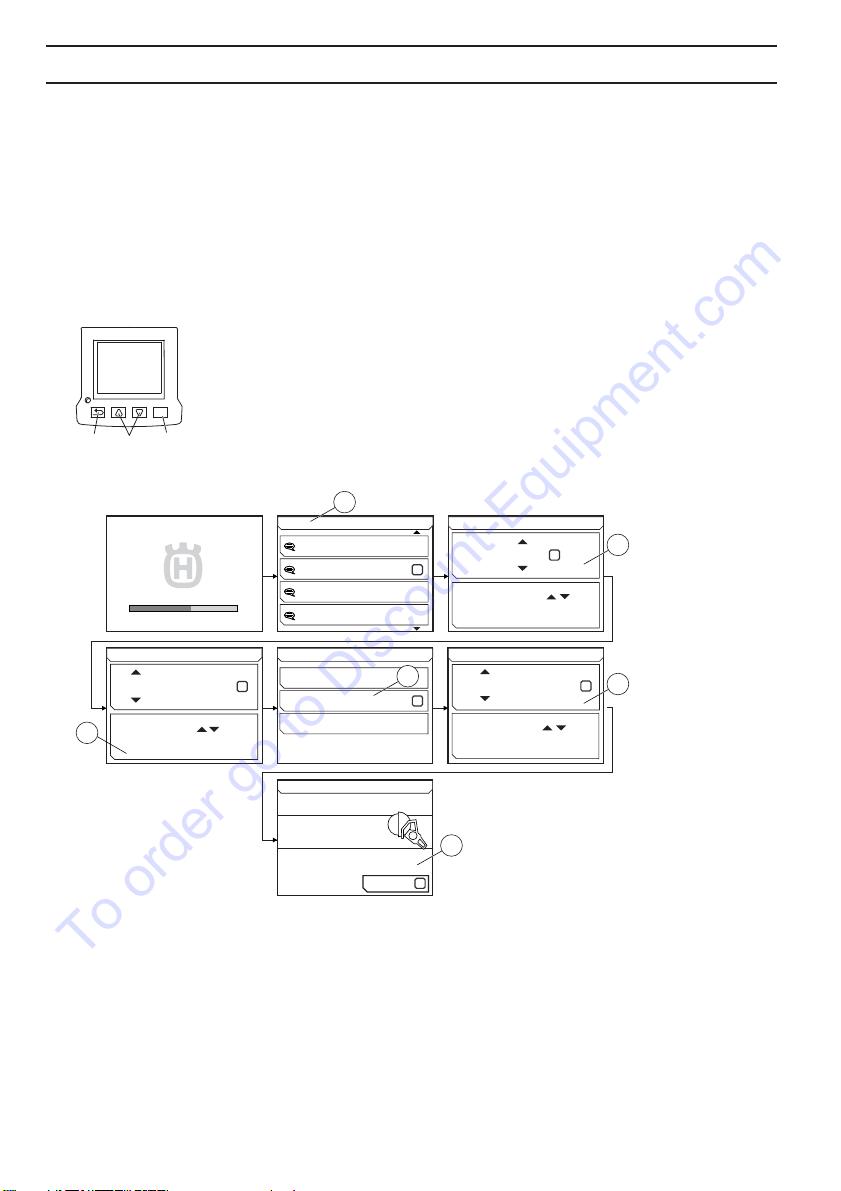
Power unit menu system
General
Display texts are illustrated in English in the manual, but will appear in the chosen language on the product display.
When K6500 or DM650 are connected to the power pack PP220, the display on the power pack unit is used.
When K6500 is running the display will turn off on the power pack.
When WS220 is connected to the power pack PP220, the display on the remote control is used.The display on the
power pack will then be extinguished.
Use the arrow keys (2) to scroll in the menus and the "OK" button (1) to confirm the selection. Use the ”back” button
(3) to go back in the menus.
First start-up
At the first start-up of the power pack the following settings must be made:
• LANGUAGE (1) Select the required display language.
• TIME FORMAT (2) Select the required time format.
• SET TIME (3) State the current time.
• DATE FORMAT (4) Select the required date format.
• SET DATE (5) State the current date.
When these settings have been made the main display is shown with information about the connected tool (6). Please
observe, the illustration shows an example.
OK
2
31
21 JUN 12:45
K6500
MENY
READY
OK
DATE FORMAT
DD.MM.YYYY
YYYY/DD/MM
YYYY-MM-DD
SET TIME
12:59PM
SET TIME WITH
STEP FORWARD WITH OK
OK
SET DATE
2010-04-22
SET DATE WITH
STEP FORWARD WITH OK
OK
OK
TIME FORMAT
12h
SET FORMAT WITH
STEP FORWARD WITH OK
OK
LANGUAGE
SVENSKA
FRANÇAIS
ENGLISH
DEUTSCH
OK
1
2
6
3
5
4
21 JUN 12:45
21 JUN 12:45 21 JUN 12:45
21 JUN 12:45 21 JUN 12:45
To order go to Discount-Equipment.com

English – 13
MENU SYSTEM
Menu overview
See following page for an explanation of each menu.
10
OK
>>> PRODUCT INFO
PP220
21 JUN 12:45
K6500
11
12
13
14
>> SETTINGS
RUN TIME
TIME & DATE
[12:45 - 2010-21-06]
LANGUAGE
[ENGLISH]
21 JUN 12:45
SET UNITS
[METRIC]
FACTORY SETTINGS
15
TIME FORMAT
[24h]
SET DATE
[2010-21-06]
SET TIME
[12:45]
DATE FORMAT
[YYYY-MM-DD]
21 JUN 12:45>>> TIME & DATE
19
20
22
21
>>> RUNTIME
CURRENT RUNTIME
[2:35:42]
21 JUN 12:45
CLEAR RUNTIME
TIME COUNTER
[OFF]
OK
16
17
18
>> SERVICE
ERROR LOG
PRODUCT INFO
TOTAL RUNTIME
[12:24:42]
21 JUN 12:45
5
6
7
VOLTAGE
[ 230V/ 230V/ 230V]
8
>>> ERROR LOG
ERROR 1
ERROR 2
21 JUN 12:45
9
OK
> MENU
SERVICE
SETTINGS
21 JUN 12:45
3
4
2
21 JUN 12:45
K6500
MENY
READY
OK
1
21 JUN 12:45
CONNECT UNIT
NO CONNECTION
MENY
OK
DM 650
GEAR 1 2
RPM
Ø (mm)
21 JUN 12:45
246 532
500 225
23
24
25
To order go to Discount-Equipment.com

MENU SYSTEM
14 – English
Menu system explanation
CONNECT UNIT (1)
This image is shown if the power unit is not connected to
any tool. Connect the intended tool. When the intended
tool is connected, the start screen (2) is displayed. Press
the menu button to start the settings (3) and service (4)
menus.
Image (1) will be displayed if the WS220 is connected to
the unit but the accompanying remote control has not yet
been connected.
Electronic gear
An illustration will be displayed when operating the
DM650 showing the selected electronic gear (23), current
rpm for mechanical gears 1 and 2, and recommended
bore diameter for these gears (24).The current feeder
load (25) of the drill will also be shown.
SETTINGS (4)
The ”Settings” menu consists of sub-menus, which in turn
consist of a number of part menus.
RUN TIME (11)
Run time
TIME COUNTER (16)
On activation, a stop-watch is started to count the time the
tool is active.
CLEAR RUNTIME (17)
Used to reset the stop-watch.
CURRENT RUN TIME (18)
Current running time.
TIME AND DATE (12)
Set time and date.
SET TIME (19)
State the current time.
SET DATE (20)
State the current date.
TIME FORMAT (21)
Select the required time format. Choose from between
the following options:
• 12 h
• 24 h
DATE FORMAT (22)
Select the required date format. Choose from between
the following options:
• YYYY-MM-DD
• YYYY/DD/MM
• DD/MM/YYYY
LANGUAGE 13)
Select the required display language.
FACTORY SETTINGS (15)
Resetting to factory defaults:
SERVICE (4)
SERVICE
ERROR LOG (5)
List of errors (9)
TOTAL RUNTIME (6)
The machine’s total operating time is displayed.
VOLTAGE (7)
Connected input voltage of the machine.
PRODUCT INFO (8)
Information about the unit and the connected tool is
shown (10).
To order go to Discount-Equipment.com
MENU SYSTEM
English – 15
Remote control
General
When the power unit is used together with WS220, a
remote control should be connected to the power unit to
control the wall saw. The remote control is included with
purchases of the wall saw equipment and is kept in a
storage box together with associated accessories.
The wall saw is controlled wirelessly with the remote
control via radio communication between the remote
control and the power unit, or alternatively via the CAN
cable between the remote control and the power unit.
The first time the remote control is to be used together
with the power unit, the remote control has to be paired
with the power unit in order for the radio communication to
work. This may already have been done if the power unit
was purchased together with the wall saw equipment. If
pairing has not been performed, the remote control will
not be able to connect to the power unit via radio
communication and the display will show that it is looking
for units and will try to connect, however without success.
First check, however, that the power unit is active with the
power cable connected and that the emergency stop has
not been pressed down, when carrying out a check to see
if pairing has been performed.
Follow the instructions under Software settings, remote
control below for instructions on how to pair the remote
control with the power unit.
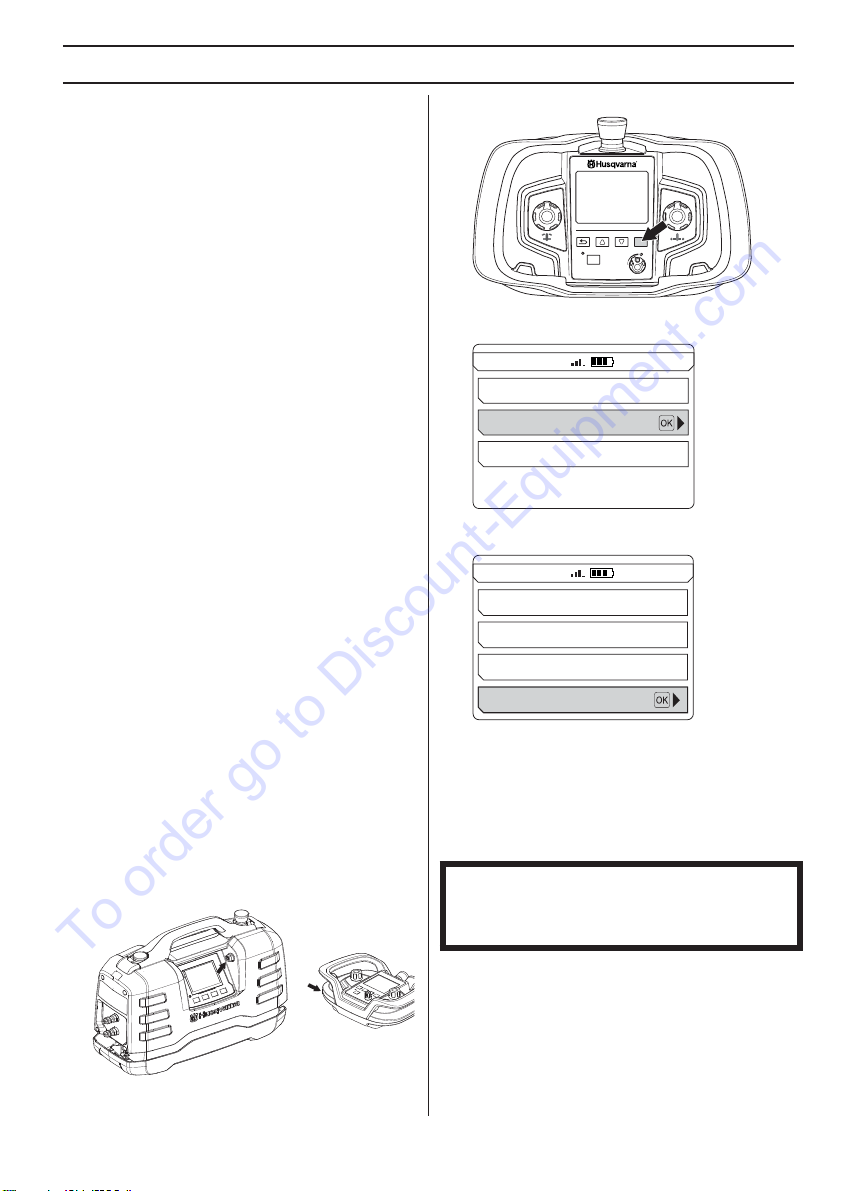
Software settings, remote control
Pair the remote control with the power
unit
For radio communication between the remote control and
the power unit to work, the relevant remote control must
be paired with the relevant power unit.
This is a safety measure to guarantee that the power unit
can only be controlled by one remote control. Radio
communication does not work until this measure has
been carried out.
If the accompanying remote control is exchanged or if it is
necessary to swap remote controls between two units, the
remote control must be rematched with the unit.
• Connect the remote control using the supplied CAN-
cable.Tighten the cable connector screws by hand.
• Allow the remote control to fully charge and await the
home screen.
• Press the ”OK” button to access the menu.
• Go to "SETTINGS”. Browse with the arrow keys and
confirm with "OK".
• Go to ”PAIR RADIO”. Browse with the arrow keys and
confirm with "OK".
A message is displayed on the screen to indicate if the
pairing was successful or not.Try again if the pairing fails.
Read through the operator’s manual for the wall saw for
instructions on how to control the saw with the remote
control.
When the remote control is active the display on the
power unit switches off.
NOTICE! The remote control for the PP220 is also
compatible with the PP480 HF and the PP440 HF units.
The remote control menu system therefore has sub-
menus that are not appropriate for the PP220.
OK
ON/OFF
0
>MENU 20 DEC 20:55
DRIVE CHOICES
SERVICE
SETTINGS
LANGUAGE
[ENGLISH]
SET UNITS
[METRIC]
PAIR RADIO
>>SETTINGS 20 DEC 20:55
TIME & DATE
[20:51 2010-01-12]
To order go to Discount-Equipment.com

16 – English
MENU SYSTEM
Remote control menu system
Use the arrow keys (2) to scroll in the menus and the "OK" button (1) to confirm the selection. Use the ”back” button (3)
to go back in the menus.
The menu system for the remote control can be accessed by pressing the "OK" button.
The menu system comprises the following submenus:
• DRIVE CHOICES
• SETTINGS
• SERVICE
The service menu is password protected. Service personnel only have access to the settings in this menu to perform
servicing.
Menu overview
See following page for an explanation of each menu.
OK
ON/OFF
0
123
>MENU 20 DEC 20:55
DRIVE CHOICES
SETTINGS
SERVICE
RUN TIME
TIME & DATE
[20:51 2010-01-12]
LANGUAGE
[ENGLISH]
SET UNITS
[METRIC]
RADIO CHANNEL
[0]
>>SETTINGS 20 DEC 20:55
SET GEAR
[-]
SET DRIVE MODE
[-]
SET ROT. DIR.
[STANDARD]
SET FUSE
[-]
PAIR RADIO
SET WATER VALVE
[-]
>>DRIVE CHOICES 20 DEC 20:55
20 DEC 20:55
CHANGE NUMBER WITH
STEP FORWARD WITH OK
09317
OK
1
2
3
5
6
7
8
9
10
11
12
13
14
15
PP220
REMOTE CONTROL
WS220
>>PRODUCT INFO 20 DEC 20:55
PRODUCT INFO
4
To order go to Discount-Equipment.com

MENU SYSTEM
English – 17
Menu system explanation
DRIVE CHOICES (1)
DRIVE CHOICES
SET GEAR (5)
SELECT GEAR
Not applicable for PP220.
SET DRIVE MODE (6)
SELECT DRIVE MODE
Not applicable for PP220.
SET ROT. DIR. (7)
Select the required direction of rotation.
The direction of rotation can only be altered when the
blade/wire is not moving. Choose from between the
following options:
• STANDARD
• REVERSE
SET FUSE (8)
SET FUSE
Not applicable for PP220.
SET WATER VALVE (9)
Regulate the water valve.
Not applicable for PP220.
SETTINGS (2)
SETTINGS
RUN TIME (10)
RUN TIME
TIME COUNTER (10)
On activation, a stop-watch is started to count the time the
blade/wire rotates and at least one feed is active.
CLEAR RUN TIME
Used to reset the stop-watch.
TIME AND DATE (11)
Set time and date.
SET TIME
State the current time.
SET DATE
State the current date.
TIME FORMAT
Select the required time format. Choose from between
the following options:
• 12 h
• 24 h
DATE FORMAT
Select the required date format. Choose from between
the following options:
• YYYY-MM-DD
• YYYY/DD/MM
• DD/MM/YYYY
LANGUAGE (12)
Select the required display language.
SET UNITS (13)
Select the required units. Choose from between the
following options:
• AMERICAN
• METRIC
PAIR RADIO (14)
Pair the remote control with machine.
RADIO CHANNEL (15)
RADIO CHANNEL
The radio channel must be changed when the operator
experiences disturbance or loss of communication.
The remote control must be connected to machine with a
CAN cable.
Select the required radio channel. Choose from between
the following options:
• 0 (2.410 GHz)
• 1 (2.415 GHz)
• ...
• 11 (2.465 GHz)
PRODUCT INFO (4)
Information about the unit and the connected tool is
shown.
To order go to Discount-Equipment.com

MENU SYSTEM
18 – English
Battery
The battery is a Li-ion type. Operating time is about 8-10
hours per charge. Extreme cold impairs the battery’s
capacity and operating time. Operating time is also
affected by the extent to which the display has been
active.
Use only original batteries for this product. Contact
Discount-equipment for more information.
An exhausted battery must not be disposed of as
household garbage! Leave it at your nearest service
agent or collection point.
Insert / remove battery
• Insert / remove the battery.
Charge the battery.
Before using the remote control for the first time the
battery has to be charged.
To charge with the battery charger
Charging time for a flat battery is approx. 2-3 hours. The
diode is orange when charging starts and becomes green
when the battery is fully charged.When the battery is fully
charged the charger supplies the battery with
maintenance current until the battery is removed from the
charger.
Keep the battery charger dry and protected against
temperature fluctuations.
To charge with the CAN cable
The charging efficiency with the CAN cable is less than
with the battery charger and it therefore takes a bit longer
to charge the battery.The remote control works as normal
during charging, however.
To order go to Discount-Equipment.com

STARTING AND STOPPING
English – 19
Before starting
• Perform daily maintenance. See instructions in the
section "Maintenance".
• Connect a power source
• Connect the cooling water
See instructions in the section "Assembling and
adjustments".
A gasoline or diesel driven generator can be used as a
power source if sufficiently powerful. See typical
generator operation cases in Technical Data.
Starting
• Start the water supply to the power unit
• Check that the emergency stop button on the power
unit and the stop button on the remote control are not
pushed in by turning them clockwise.
• The connected tool is activated and this is shown by
the information shown in the display.
Follow the instructions in the manual supplied with the
connected tool.
Stopping
Follow the instructions in the manual supplied with the
connected tool.
• Press down the power unit emergency stop.
• Shut off the water supply to the power unit.
!
WARNING! Please read the operator’s
manual carefully and make sure you
understand the instructions before using
the machine.
Wear personal protective equipment. See
instructions under the heading ”Personal
protective equipment”.
Make sure no unauthorised persons are
in the working area, otherwise there is a
risk of serious personal injury.
Check that the machine is assembled
correctly and do not show any signs of
damage. See instructions in the section
"Assembling and adjustments".
NOTICE! The generator must be earthed or grounded
to safeguard the function of the power unit.
NOTICE! A generator which on some occasion
generates an input voltage outside the voltage range
specified in the technical data can damage the power
unit.
To order go to Discount-Equipment.com
Table of contents
Languages:
Other Discount Equipment Power Pack manuals

Popular Power Pack manuals by other brands


therm-ic
therm-ic Supermax Powerpack Instructions for use

Bluetti
Bluetti EP500-JP EP500-USA user manual

Chicago Pneumatic
Chicago Pneumatic PAC P18 Safety and operating instructions

gt coupe
gt coupe IX-SW028 instruction manual

iTechworld
iTechworld PS2000 user guide

Pentax
Pentax TR Power Pack-2 (PW-222 operating manual


