diversey TASKI swingo 760E User manual


2
Translation of the original instructions of use
Legend:
Content
Safety instructions . . . . . . . . . . . . . . . . . . . . . . . . . . . . . . . . . . . 2
Cleaning products . . . . . . . . . . . . . . . . . . . . . . . . . . . . . . . . . . . 4
Further documents . . . . . . . . . . . . . . . . . . . . . . . . . . . . . . . . . . 4
Structural layout . . . . . . . . . . . . . . . . . . . . . . . . . . . . . . . . . . . . 5
Prior to commissioning . . . . . . . . . . . . . . . . . . . . . . . . . . . . . . . 6
Beginning work with the machine . . . . . . . . . . . . . . . . . . . . . . . 7
End of operation . . . . . . . . . . . . . . . . . . . . . . . . . . . . . . . . . . . . 8
Service, maintenance and care. . . . . . . . . . . . . . . . . . . . . . . . . 10
Malfunctions . . . . . . . . . . . . . . . . . . . . . . . . . . . . . . . . . . . . . . . 11
Technical data . . . . . . . . . . . . . . . . . . . . . . . . . . . . . . . . . . . . . . 12
Accessories. . . . . . . . . . . . . . . . . . . . . . . . . . . . . . . . . . . . . . . . 12
Transport. . . . . . . . . . . . . . . . . . . . . . . . . . . . . . . . . . . . . . . . . . 12
Disposal. . . . . . . . . . . . . . . . . . . . . . . . . . . . . . . . . . . . . . . . . . . 12
Machine dimensions . . . . . . . . . . . . . . . . . . . . . . . . . . . . . . . . . 13
Intended use
The machine is intended for commercial use (e.g. in hotels,
schools, hospitals, factories, shopping centers, offices, etc.).
Subject to strict compliance with the instructions of use, these
machines are used for the wet cleaning of hard flooring.
These machines are exclusively designed for use in interior
zones.
Safety instructions
Due to their design and construction, TASKI machines comply
with the relevant essential health and safety requirements of
the EC directives; they therefore have the CE sign.
CAUTION!
Always read the instructions of use and
the safety instructions before using the
machine for the first time.
The instructions of use must be kept in a
safe and well accessible place so that
you can refer to them at any time.
Caution:
This sign designates important informa-
tion. Failure to follow these instructions
may result in danger to persons and/or ex-
tensive damage to property!
Attention:
This sign designates important informa-
tion. Failure to follow these instructions
may result in faults and damage to proper-
ty!
Notice:
This sign designates important information
regarding the efficient use of the product.
Failure to follow these instructions may re-
sult in faults!
It includes instructions for the work steps that
you must carry out in order.
t
Attention:
The machine must not be used for polish-
ing, oiling, the application of wax, carpet
cleaning or dust removal. The wet clean-
ing of parquet and laminate flooring with
this machine is at your own risk.
Caution:
Changes to the machine that have not
been authorized by Diversey will lead to
the expiry of safety marks and CE confor-
mity. Using the machine for purposes oth-
er than the intended purpose can cause
injuries to persons, and damage to the ma-
chine and the working environment. Such
cases will usually result in the termination
of any warranty and possible guarantee
claims.
Caution:
The machine may only be used by per-
sons who are adequately trained for the
use of the machine or who have provided
proof of their skills regarding the use of the
machine and who are explicitly commis-
sioned to use the machine.
Caution:
The machine must not be used by people
with reduced physical, sensory or mental
capacities, including children or people
who lack experience or knowledge.
Children must be supervised to ensure
that they do not play with the machine.
Caution:
Do not use the machine in rooms where
explosive or highly combustible substanc-
es (e.g. gas, solvents, heating fuel, dust,
etc.) are stored or processed.
These substances could be ignited by the
electrical or mechanical components of
the machine.
3
Caution:
Do not use the machine for the vacuum
cleaning of poisonous, harmful, caustic or
irritating substances (e.g. dangerous dust,
etc.). The filter system does not adequate-
ly filter out these kinds of substances.
Possible impacts on the health of the user
or third persons cannot be ruled out.
Caution:
Pay attention to the local situation as well
as to third persons and children! In the vi-
cinity of blind spots such as doors or
curves in particular, it is important to re-
duce speed.
Caution:
Do not transport other persons and objects
with this machine.
Caution:
In case of malfunction or defect or after
collisions or toppling over, the machine
must be inspected by an authorized expert
before restarting. The same applies if the
machine was left outdoors, immersed in
water or subjected to moisture.
Caution:
The machine must be stopped immediate-
ly in case of damage to safety relevant
parts such as brush covers, power supply
cords or covers that enable access to live
parts.
Caution:
The machine must not be stopped, parked
or stored on slopes.
Caution:
The machine must be switched off for any
work carried out on the machine.
Caution:
Do not use the machine in rooms with high
electromagnetic interference (electric
smog).
Caution:
The machine must not be used on slopes
>2%.
Sharp cornering on slopes can affect the
stability of the machine and is therefore
prohibited. Danger of accident.
Attention:
The machine must be protected against
unauthorized use. Therefore, keep the
machine in a locked room before leaving it.
Attention:
Operate and keep the machine in a dry
and low-dust environment at temperatures
between +10°C / + 50 °F and +35°C/ + 95
°F degrees only.
Attention:
Only authorized experts who are familiar
with all safety instructions relevant for this
machine are allowed to repair mechanical
or electrical machine parts.
Attention:
Only tools (brushes, pads or similar) that
are specified in these instructions of use
under accessories, or which have been
recommended by a TASKI consultant,
may be used. Any other brushes might im-
pair the safety and functions of the ma-
chine.
Attention:
National regulations for personal protec-
tion and accident prevention as well as the
manufacturer's instructions for the use of
cleaning solutions must be consistently
observed.
Attention:
It is forbidden to plug in or unplug the main
power supply cord with wet hands!
Attention:
Make sure that the rated voltage stated on
the machine label is the same as the volt-
age rating of the plug socket!
Attention:
Take care not to damage the power supply
cord by rotating tools (brushes, pads or
similar), crimping, tearing or damaging the
power supply cord through heat, oil, or
sharp objects!
Attention:
In case of foam or liquid leakage from the
machine, the suction unit must be
switched off immediately.
Attention:
TASKI machines and devices are de-
signed such that health risks caused by
noise emissions or vibrations can be ruled
out according to the current state of sci-
ence.
See the technical data on page 12.
EN

4
Cleaning products
Further documents
Notice:
TASKI machines are designed in such a
way that optimal cleaning results can be
achieved if TASKI cleaning products are
used.
Other cleaning products may cause mal-
functions and damage to the machine or
the environment.
Therefore, we recommend the exclusive
use of TASKI cleaning products.
Faults caused by inappropriate cleaning
products are not covered by the guaran-
tee.
For further details, please contact your
TASKI service partner.
Notice:
The electric diagram of this machine is
provided in the spare parts list.
Please contact your customer service for
further information.
5
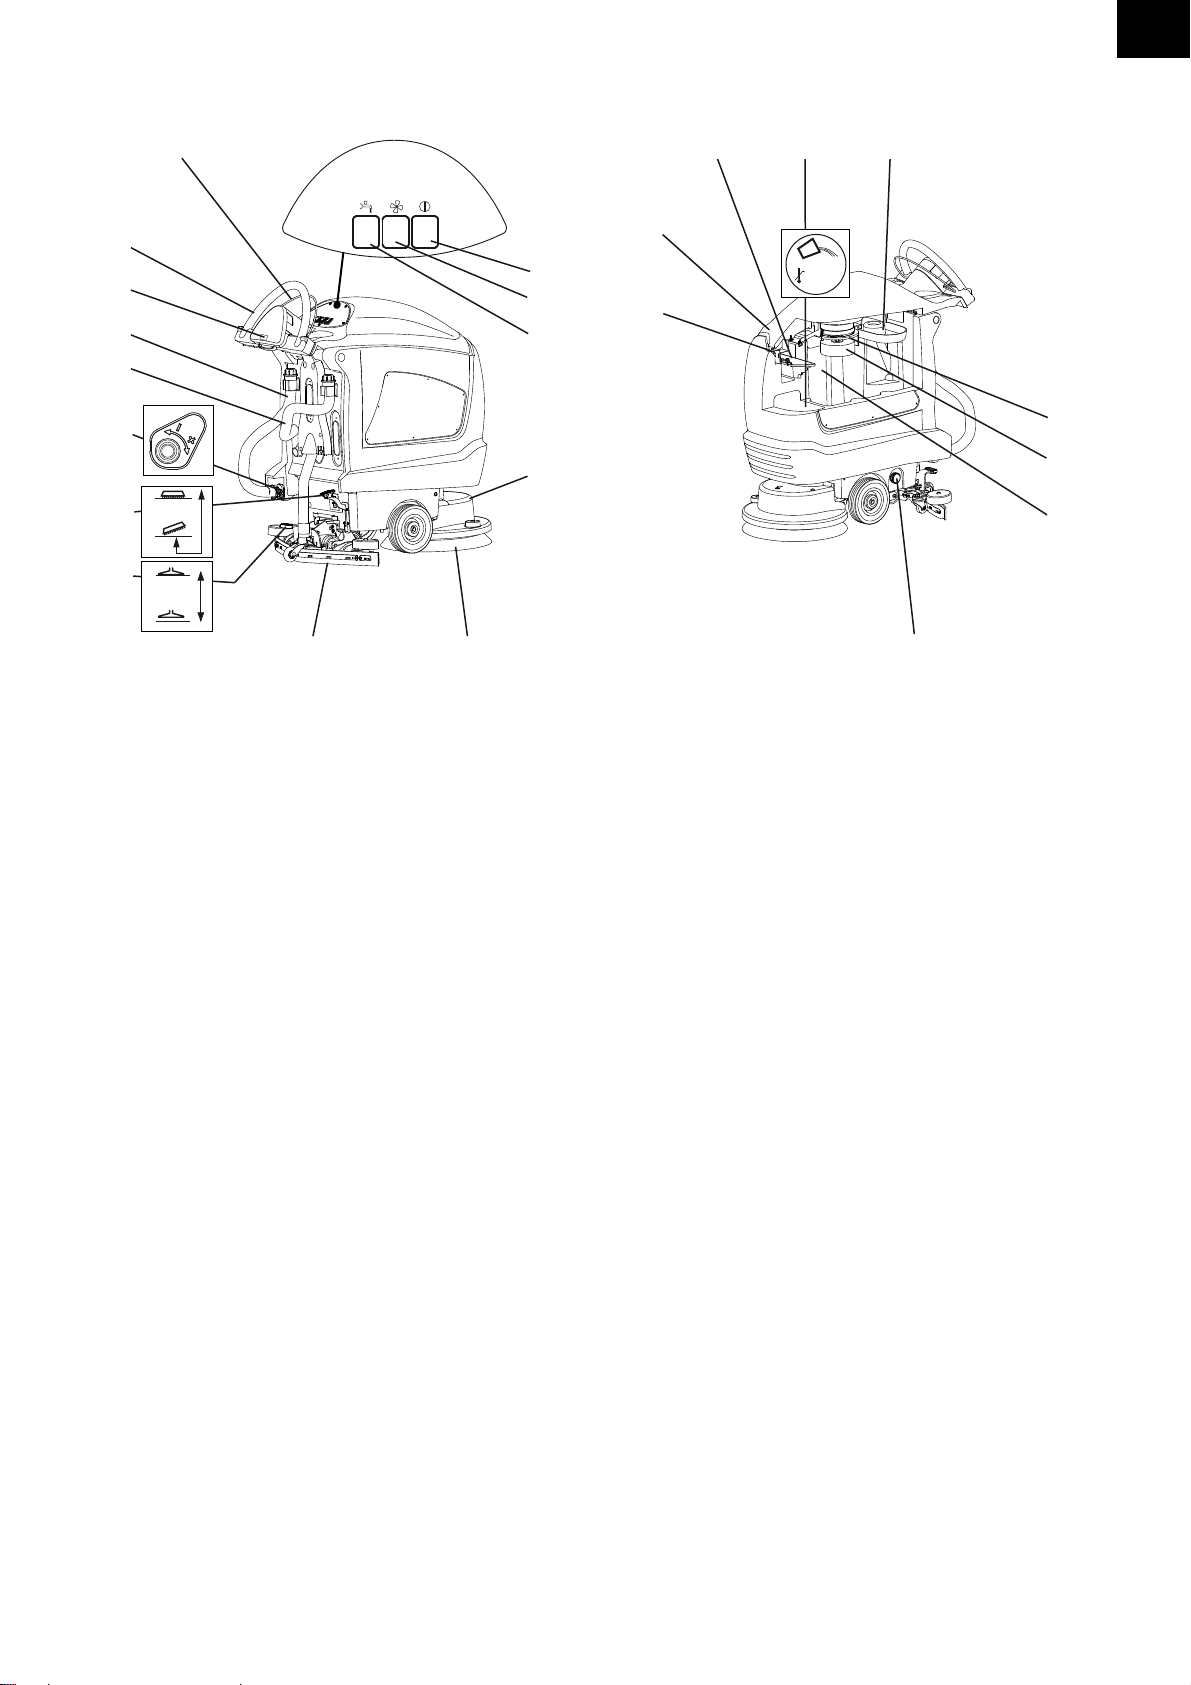
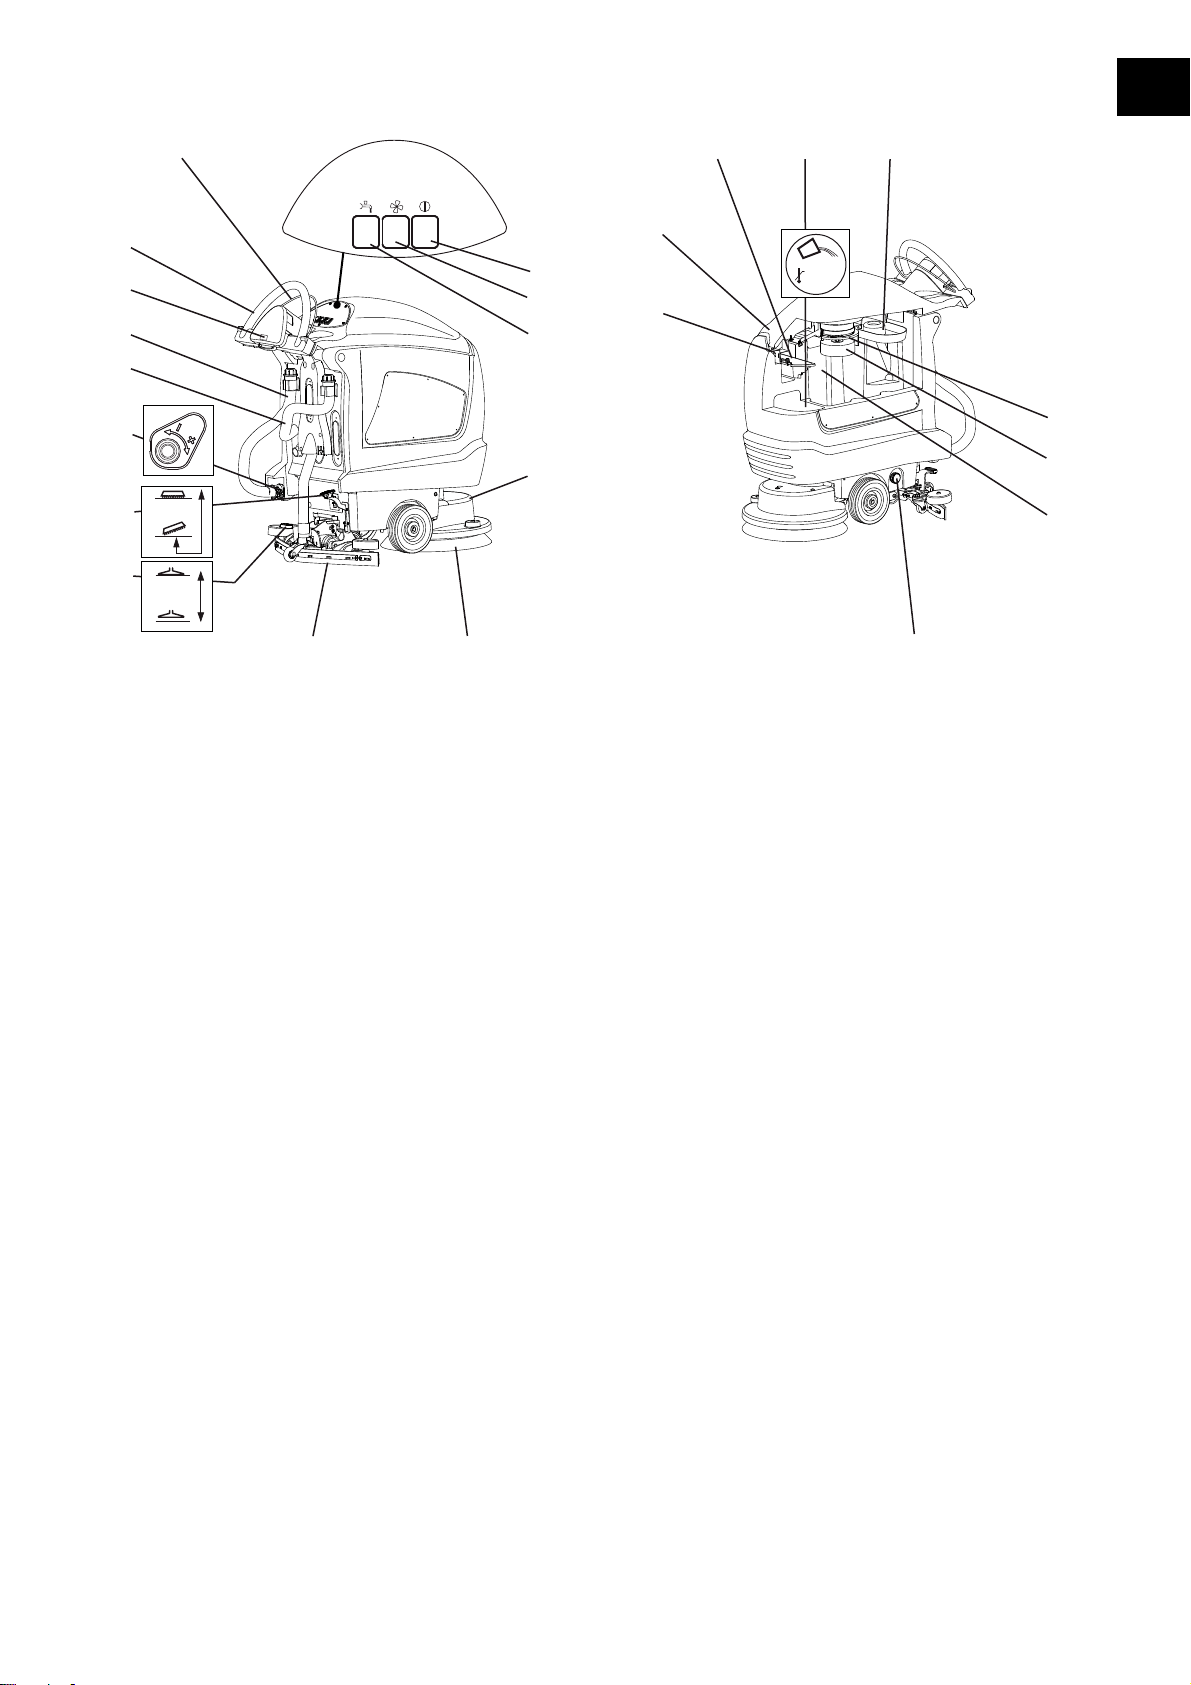
Structural layout
1Switch bracket drive
2Driving handles
3Operating hour counter (option)
4Drain hose cleaning solution (blue cover)
5Drain hose waste water (red cover)
6Water regulating set
7Foot pedal tool
8Foot pedal squeegee
9Squeegee
10 Tools (brushes, pads, etc.)
11 Brush unit
12 Cleaning solution switch
13 Suction unit switch
14 Main switch
15 Fresh water tank filter
16 Recovery tank
17 Float (Overfill protection recovery tank)
18 Suction filter
19 Dirt sieve
20 Solution tank
21 Dosage aid
22 Tank lid
23 Tank lid unlocking
8
910
7
6
2
3
4
5
1
14
13
12
11
20 1921
15
16
17
18
23
22
max.60°C
max.140°F
EN

6
Prior to commissioning
Brush installation
Before inserting, please check:
• that the brush does not fall below the red marking (bristles)
or 1cm of bristle length.
• the pad for wear and cleanliness before use.
Squeegee assembly
Filling the fresh water tank
Attention:
Do not use brushes which have reached
their wear limit. The wear limit is indicated
by the length of the red bristle. Do not use
worn or contaminated pads. Use original
TASKI brushes only. Failure to observe
these instructions may result in inade-
quate cleaning results or even floor dam-
age.
• The machine must be switched off (main switch).
• Position the tools under the tool unit.
• Plug the power supply cord into the mains socket.
• Switch on the machine (key switch).
Switch lights up
• Unlock the foot pedal and lower the
tool slowly.
• Briefly press the operating lever.
In this way the tool is centered and engaged.
Notice:
Lightly moving the machine backwards
and forwards at the driving handle helps it
to engage.
• The machine must be switched off (main switch).
• Position the squeegee (2) below the
squeegee holder (1).
• Press the foot pedal down until the
squeegee holder engages.
• Attach the suction hose to the con-
nector.
Attention:
Max. permissible water temperature
60 °C/140 °F.
Diversey recommends using cold water
since hot water will adjust to the floor tem-
perature as soon as it is in contact with the
floor. Thus there are no advantages to us-
ing hot water.
• The machine must be switched off.
• Put your hand into the opening be-
tween tank cover and tank.
Palms upwards.
• Open the tank cover until the support engages in the tank
wall.
• Remove the dosage aid.
• Fill the fresh water tank with water.
Maximum filling level (page 5).
• Tip the tank cover back into its original position and press
it down until it locks.
1
22
1

7
Dosing
Dosage cup application
Pre-cleaning
Beginning work with the machine
Cleaning start
Attention:
Wear gloves, goggles and appropriate
(protective) working clothes when han-
dling chemical products!
Notice:
Use chemical products recommended by
Diversey only and always observe the
product information.
Caution:
Using unsuitable products (e.g. products
containing chlorine, acids or solvents) may
cause harm to health and severe damage
to the machine.
Notice:
For a precise dosage, use the scale in the
dosage cup.
The filling level mark on the tank corre-
sponds to the mark in the dosage cup. The
type of machine is also noted in the dos-
age cup!
Information on
the package of
the product
Tank capacity Dosage cup
0.5% 1/2 1 x 1/2
MAX 1 x MAX
1% 1/2 1 x MAX (2 x 1/2)
MAX 2 x MAX
• Fill the product you have measured with the dosage cup
into the fresh water tank.
• Slightly lift the tank cover.
• Push the tank cover support slightly inwards.
• Close the tank lid.
• By pushing gently on the front part of the tank cover you
lock the tank.
Attention:
Remove any objects (wooden, metal parts
etc.) from the cleaning surface.
The objects could be catapulted by the ro
-
tating tool, and thereby cause injuries to
people and damage to the environment.
Attention:
Always wear slip-resistant shoes and ap-
propriate working clothes when working
with this machine!
Attention:
Start familiarization with the machine by
making your first driving attempts in a free
area.
• Lower the squeegee.
• Plug the power supply cord into the mains socket.
• Switch on the machine (key switch).
Switch lights up
• Unlock the foot pedal and lower the
tool slowly.
• Switch off the suction unit.
Switch lights up
• Switch off the water pump.
Switch lights up
• Use the quantity control to dose the
cleaning solution.
• Pull the switch bracket drive on the
driving handle.
The tool starts to rotate and the
cleaning solution supply starts.
EN

8
Cleaning method
Direct working method:
Scrubbing and suction in one work step.
Indirect working method:
Applying the cleaning solution, scrubbing and suction in sev-
eral work steps.
Replenishing cleaning solution
Soiled water full
Recovery tank full:
End of operation
Notice:
More precise details regarding the direct
and indirect working method can be found
on the respective method sheet.
Please contact your TASKI customer con-
sultant for further details.
Notice:
The machine guiding might be impaired in
case of special combinations of flooring/
contamination and cleaning product.
Optionally available wheels can improve
the traction of the machine on the floor.
Please contact your TASKI customer con-
sultant.
Attention:
The flooring may be damaged when work-
ing without cleaning solution.
Notice:
A rattling sound of the pump indicates that
the fresh water tank is empty.
Attention:
The pump must never run dry for an ex-
tended period.
• The machine must be switched off.
• Open the tank lid.
• Fill the fresh water tank with water, see page 6.
• Add the cleaning product using the dosing cup.
• Close the tank lid.
• If the recovery tank is full, the floater
will be sucked onto the suction filter.
This will be indicated by a change of
the noise by increasing the suction
speed as well as residual water at the
bottom.
• Drain the recovery tank, see page 9.
• Switch off the water pump.
The cleaning solution supply is
stopped.
• Continue to drive a few meters.
Notice:
Very important for TASKI contact pads!
• To lift the tool, push the foot pedal
downwards until it engages.
• Drive on for a few meters in order to absorb the remaining
drain water.
• Switch off the suction unit.
The switch lights up; the suction en
-
gine stops.
• Switch the machine off (ON/OFF)
and pull the power supply cord out of
the mains socket.
Attention:
The machine must now be emptied and
cleaned. Switch off the machine (main
switch) and remove the plug from the
mains socket.

9
Removing and cleaning the squeegee
Empty and clean the recovery tank and fresh water tank
Proceed as follows:
Cleaning the recovery tank and fresh water tank
Cleaning the fresh water tank filter
Clean the fresh water tank filter after the end of operation.
Clogged filters can inhibit the supply of detergents and thus
lead to surface damage.
Removing and cleaning the brush
• Pull the suction hose from the connector.
• Lift the squeegee with your foot.
• Compress the lock springs. The
squeegee is released and can be re-
moved from the squeegee holder.
• Clean the squeegee under running water using a brush.
Notice:
Only cleaned and intact blades ensure op-
timal suction results!
Notice:
Drain water or cleaning solution must be
disposed of in compliance with the nation-
al regulations.
Notice:
When draining the recovery tank, the reg-
ulations of the detergent supplier regard-
ing personal protective equipment of the
cleaning solution manufacturer must be
observed.
• Take the drain hose out of the holder.
• Open the red or blue cover at the level of the handle, lower
the end of the hose slowly and empty the recovery or fresh
water tank.
• Open the tank cover until the support
engages in the tank wall.
• Rinse the recovery tank and the fresh water tank thorough-
ly with clean water.
• Remove the dirt sieve (yellow), emp-
ty it and thoroughly rinse it under run-
ning water.
• Take out the suction filter (yellow)
and remove the dirt with a cloth or a
soft brush.
• Check the float to make sure it is fully
functional and repair any fault
• After you have finished emptying the tanks, screw the red
and blue cover back on and hang the hose on the holder.
Attention:
Clogged suction filters may impair the suc-
tion performance.
• Reassemble the dirt sieve (yellow) and the suction filter.
• Put the drain hoses back into the holder.
• The machine must be switched off.
• Unscrew the fresh water tank filter
and remove it.
• Rinse the filter thoroughly with clean
water.
Notice:
The filter is lower than the drain hole of the
tank. A rest amount of cleaning solution
will run out only when the filter is removed.
• Put the filter back and twist it closed.
Notice:
Clean the brush whenever cleaning work
is completed.
• To lift the tool, push the foot pedal
downwards until it engages.
• Rotate the tool counterclockwise
away from the tool connection using
your foot.
EN
10
Cleaning the machine
Storing / parking the machine (not in operation)
Service, maintenance and care
The maintenance of the machine is a prerequisite for impec-
cable operation and a long service life.
Service intervals
TASKI machines are high-quality machines that have been
checked for safety in the factory and by authorized inspectors.
Electrical and mechanical parts are subject to wear and aging
after a longer period of use.
Service center
Please always indicate the type and number of the machine
whenever you contact us for order placing or in case of mal-
functions.
The required data are provided on the nameplate of your ma-
chine. The address of your closest TASKI service partner is
provided on the last page of these instructions of use.
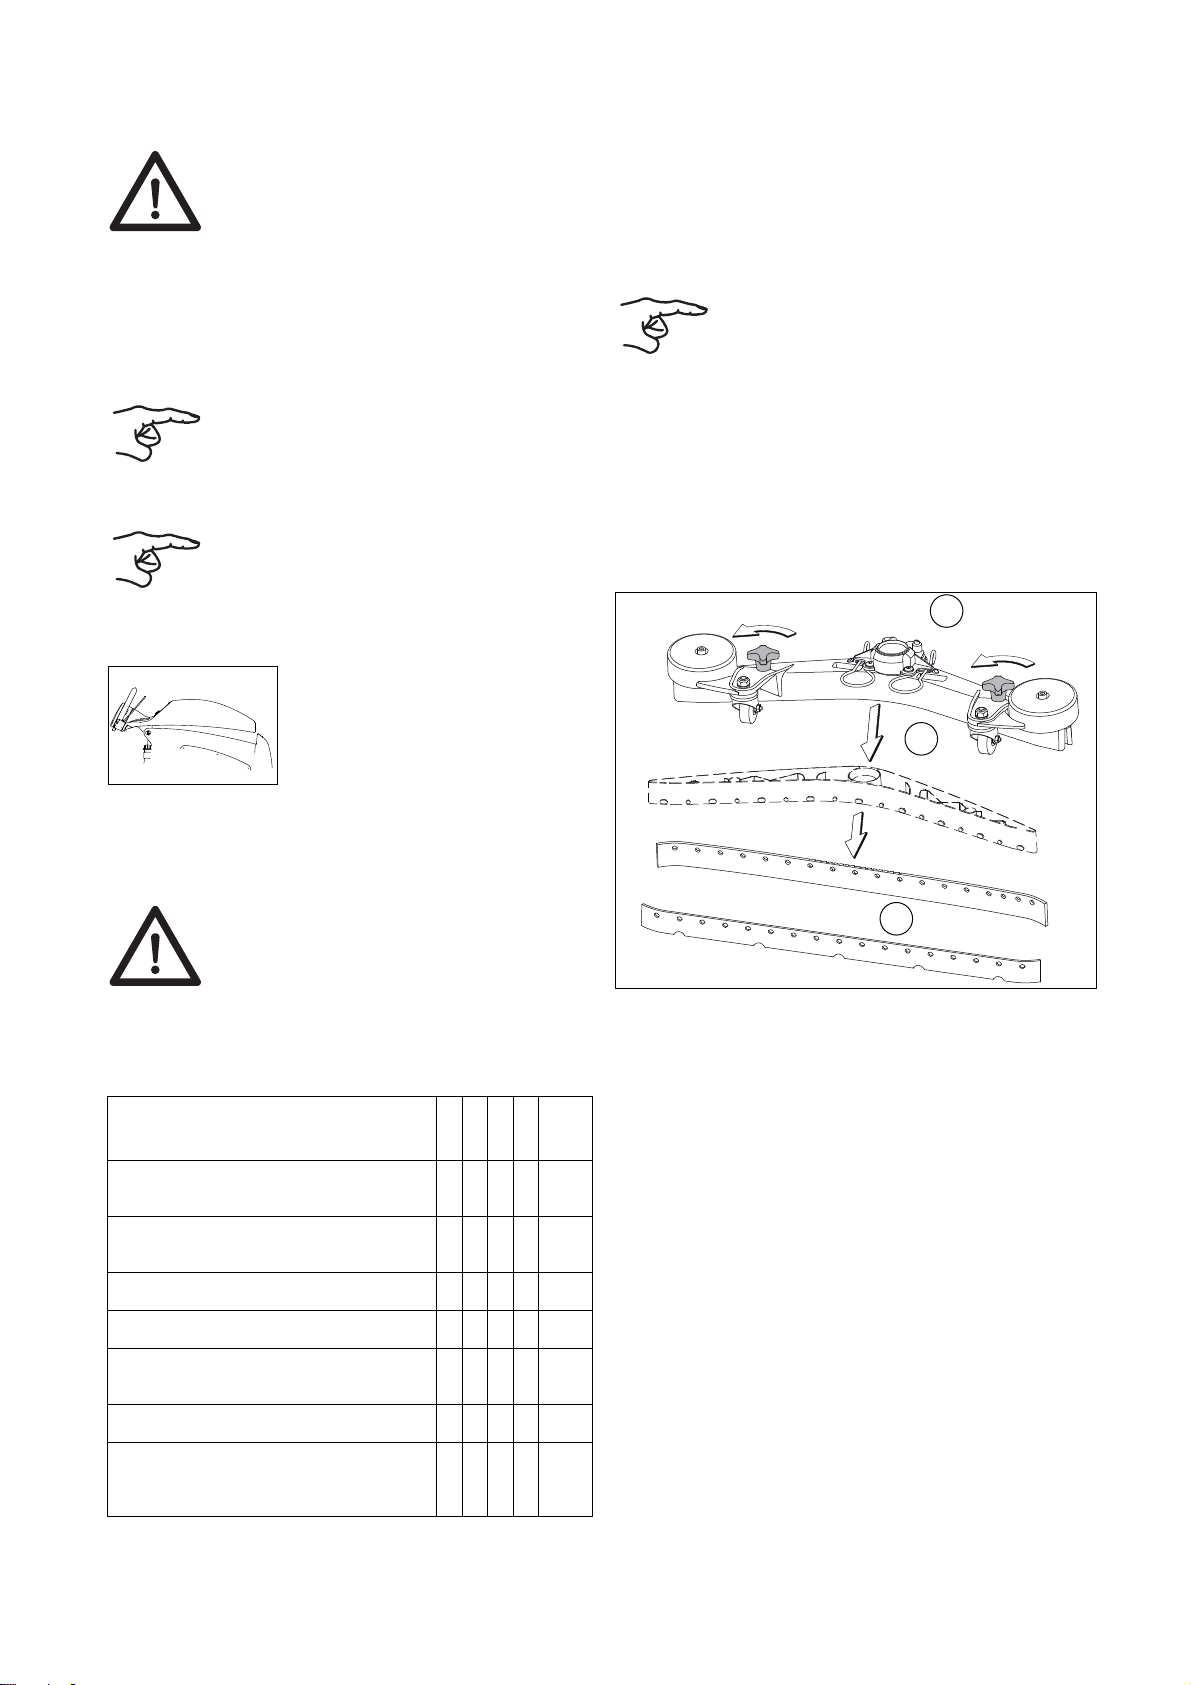
Blade replacement
• Clean the tool under running water.
Attention:
Never clean the machine with a high-pres-
sure cleaner or water jet.
Water ingress in the machine may cause
considerable damage to the mechanical or
electrical parts.
• Wipe the machine with a moist cloth.
Notice:
The machine must be switched off and the
plug must be removed from the mains
socket.
Notice:
Store the machine with a lifted squeegee,
lifted brush and open tank lid. Thus, the
tank can dry,
and the generation of mold and unpleas-
ant odors is prevented.
• Lift the tank and turn the dosing aid.
• Lower the tank cover and place it
carefully on the dosing aid.
Attention:
Use original TASKI parts only; otherwise,
any warranty and liability claims will ex-
pire.
Legend:
◊ = whenever cleaning is completed, ◊◊ = every week,
◊◊◊ = every month, ⊗ = service lamp
Activity
◊
◊◊
◊◊◊
⊗
Page
Draining and cleaning the recovery and
fresh water tank (Flextank) ●9
Check the suction filter for contamina-
tion and clean it ●
Clean all yellow marked parts ●
Clean the brushes ● 9
Clean the squeegee, check the blades
for wear and change them, if necessary ●9
Wipe the machine using a damp cloth ● 10
Clean the seals of the tank lid, check
them for cracks and replace them, if
necessary ●
• In order to maintain operational safety and readiness for
use, the machine must be serviced after 450 working hours
or at least once a year.
Notice:
In case of extraordinary use and/or insuffi-
cient maintenance, shorter intervals are
required.
• Unscrew the star knobs (1), pull the blade body (2) out of
the squeegee body and remove the blades (3).
• Now you can turn the blades or replace them.
• Put the blade body (2) back in the squeegee body and
screw the star knobs (1) back on.
3
1
2

11
Malfunctions
Malfunction Possible causes Troubleshooting Page
Machine without function
No power supply • Insert the plug into the mains sock-
et.
Machine is switched off • Switch on the main switch 5
Power supply cord defect • Contact your service partner
Brush unit or suction unit cannot be
turned off Error in the electronic system or in
the control panel
• Switch off the machine (main
switch) and remove the plug from
the mains socket.
• Contact your service partner
5
Brush does not rotate
Machine overload, overload switch • Release the switch drive and press
again 5
Motor rotates, brush does not • Drive belt broken
• Contact your service partner
Poor suction performance Floor re-
mains wet Soiled water is not vacu-
umed up
Suction not switched on • Press suction unit button 5
Float closes the inlet opening on the
suction unit (overfill protection recov-
ery tank)
• Recovery tank full, check
• Check float for functionality 5
Suction hose not connected • Connect suction hose 6
Squeegee not on the floor
• Check squeegee suspension for
functionality 6
Blades worn out
• Replace blades
10
Hose or squeegee clogged (e.g.
pieces of wood, remnants)
• Remove any foreign matter
Suction filter clogged • Remove any foreign matter 5
Check the tank cover's gasket for
cracks/dirt • Clean the gasket and replace if de-
fective
Dirt sieve full
• Remove the dirt sieve.
• Empty the dirt sieve by tapping it
and rinse it under running water
Insufficient cleaning solvent supply
Cleaning solution tank (fresh water
tank) empty
• Check cleaning solution tank
(fresh water tank) and fill with wa-
ter 8
Fresh water tank filter blocked • Cleaning the fresh water tank filter 9
Cleaning solvent button switched off • Press cleaning solvent button 5
Foam or liquid leaking from the ma-
chine Float malfunction
• Switch the suction unit off
• Check the float to make sure it is
fully functional and repair any fault
EN

12
Technical data
Accessories
Transport Disposal
Machine 760E
Working width 43 cm
Squeegee width 69 cm
Dimensions (LxWxH) 116 x 47.5 x 119.5 cm
Maximum weight of operational machine 130 kg
Rated voltage 220-240V~ 220V AC
Rated power, nominal 1500 W
Frequency 50 60 Hz
Power supply cord length 25 m
Fresh water tank, nominal +/- 5% 50 l
Values according to IEC 60335-2-72
Sound pressure level LpA 70 dB(A)
Uncertainty KpA 2.5 dB(A)
Vibration <2.5 m/s2
Uncertainty K 0.25 m/s2
Splash water guard IPX4
Protection class I
No. Item
7510829 Pad drive harpoon grip 43 cm 1x
8504750 Scrubbing brush, nylon, 43 cm 1x
8504780 Scrubbing brush, nylon, abrasive, 43 cm 1x
8504800 Scrubbing brush, washed concrete, 43 cm 1x
8502830 Filling hose with universal water coupling X
Various pads, (polyester brown, blue, red and contact pad) X
Attention:
This machine may only be lifted using lift-
ing gear (e.g. hoist, loading ramp, etc.).
Notice:
Transport the machine in an upright posi-
tion.
Notice:
Make sure that the machine is lashed and
secured in the transport vehicle.
Notice:
After withdrawal from service, the machine
and accessory parts must be adequately
disposed of in compliance with the nation-
al regulations. Please contact your Di-
versey service partner for help.

13
Machine dimensions
The dimensions are in centimeters!
119.5
116
69
47.5
EN

14
Traducción de las instrucciones originales de uso
Explicación de los símbolos
Índice
Instrucciones de seguridad . . . . . . . . . . . . . . . . . . . . . . . . . . . . 14
Productos de limpieza . . . . . . . . . . . . . . . . . . . . . . . . . . . . . . . . 16
Otros documentos . . . . . . . . . . . . . . . . . . . . . . . . . . . . . . . . . . . 16
Vista general de la estructura . . . . . . . . . . . . . . . . . . . . . . . . . . 17
Antes de la puesta en marcha. . . . . . . . . . . . . . . . . . . . . . . . . . 18
Comienzo del trabajo . . . . . . . . . . . . . . . . . . . . . . . . . . . . . . . . 19
Fin de la operación . . . . . . . . . . . . . . . . . . . . . . . . . . . . . . . . . . 20
Servicio, mantenimiento y cuidado . . . . . . . . . . . . . . . . . . . . . . 22
Averías . . . . . . . . . . . . . . . . . . . . . . . . . . . . . . . . . . . . . . . . . . . 23
Datos técnicos. . . . . . . . . . . . . . . . . . . . . . . . . . . . . . . . . . . . . . 24
Accesorio. . . . . . . . . . . . . . . . . . . . . . . . . . . . . . . . . . . . . . . . . . 24
Transporte . . . . . . . . . . . . . . . . . . . . . . . . . . . . . . . . . . . . . . . . . 24
Eliminación . . . . . . . . . . . . . . . . . . . . . . . . . . . . . . . . . . . . . . . . 24
Dimensiones de la máquina . . . . . . . . . . . . . . . . . . . . . . . . . . . 25
Uso adecuado de la maquinaria
Las máquinas están diseñadas para el uso industrial (por
ejemplo: en hoteles, colegios, hospitales, fábricas, centros
comerciales, oficinas, etc.).
Teniendo en cuenta estas instrucciones de uso sirven para la
limpieza con líquido de los revestimientos de suelos. Estas
máquinas se planearon exclusivamente para la utilización en
el espacio interior.
Instrucciones de seguridad
Las máquinas TASKI cumplen por su diseño y estructura los
requisitos de salud y seguridad básicos de la directiva CE y
llevan por eso el símbolo CE.
CUIDADO
Antes de la primera puesta en funciona-
miento es importante que lea estas ins-
trucciones de uso y las instrucciones de
seguridad.
Conserve las instrucciones de uso cui-
dadosamente y en un sitio accesible
para poder consultarlo en cualquier mo-
mento.
Peligro:
Este símbolo indica información importan-
te. El incumplimiento de estas indicacio-
nes puede producir peligros para las
personas y/o grandes daños.
Atención:
Este símbolo indica información importan-
te. El incumplimiento de estas indicacio-
nes puede ocasionar averías o daños.
Nota:
Este símbolo indica información importan-
te relacionada con el uso eficiente del pro-
ducto. El incumplimiento de estas
indicaciones puede ocasionar averías.
Incluye indicaciones sobre los pasos de trabajo
que deben seguirse secuencialmente.
t
Atención:
La máquina no debe usarse para el pulido,
el engrasado, el encerado, la limpieza de
alfombras y la aspiración de polvo. La lim-
pieza en mojado de suelos de parqué y la-
minado con esta máquina se realiza bajo
su propio riesgo.
Peligro:
Los cambios a la máquina no autorizados
por parte de Diversey llevan a la invalida-
ción de los símbolos de seguridad y la
Conformidad CE. Un uso de la máquina
en contra del uso adecuado de la maqui-
naria puede producir daños a personas, a
la máquina y al entorno laboral. Dichos ca-
sos conllevan siempre la pérdida de cual-
quier derecho de garantía.
Peligro:
La máquina debe usarse solo por perso-
nas que han sido instruidas de forma ade-
cuada sobre su uso o que han demostrado
sus conocimientos con respecto al uso y
se les haya encargado dicho uso explícita-
mente.
Peligro:
La máquina no debe ser utilizada por ni-
ños ni por personas con capacidades físi-
cas, sensoriales o mentales reducidas, o
falta de experiencia y conocimiento.
Los niños deben estar supervisados para
asegurarse de que no juegan con la má
-
quina.
Peligro:
La máquina no debe usarse en espacios
donde se almacenan o trabajan materiales
con peligro de explosión o fácilmente infla-
mables (por ejemplo: gasolina, disolven-
tes, fuelóleo, polvos, etc.).
Los componentes eléctricos o mecánicos
podrían causar la combustión de este ma
-
terial.
15
Peligro:
La máquina no debe ser utilizada para ab-
sorber materiales tóxicos, dañinos para la
salud, corrosivos o irritantes (por ejemplo:
polvos peligrosos, etc.). Este sistema de
filtrado no retiene suficientemente los ma-
teriales de este tipo.
Podría perjudicar la salud del usuario y de
terceros.
Peligro:
Durante el funcionamiento, preste aten-
ción a su alrededor como por ejemplo ter-
ceras personas y niños. Se debe moderar
la velocidad especialmente cerca de luga-
res con poca visibilidad como por ejemplo
puertas o curvas.
Peligro:
Con esta máquina no deben transportarse
otras personas u objetos.
Peligro:
Si apareciera un fallo en el funcionamien-
to, un defecto así como tras una colisión o
una caída, la máquina deberá ser inspec-
cionada por un profesional autorizado an-
tes de volver a utilizarla. Lo anterior se
aplica también cuando la máquina se deja
en el exterior, se sumerge en el agua o se
expone a la humedad.
Peligro:
En caso de daños en piezas relevantes
para la seguridad como la cubierta del ce-
pillo, el cable principal o las cubiertas que
dan acceso a piezas conductoras, se debe
interrumpir inmediatamente el funciona-
miento de la máquina.
Peligro:
La máquina no debe ajustarse, estacio-
narse o almacenarse en lugares inclina-
dos.
Peligro:
La máquina debe estar desconectada du-
rante todos los trabajos en ella.
Peligro:
La máquina no debe usarse en zonas con
cargas electromagnéticas (electrosmog).
Peligro:
La máquina no debe usarse en lugares
con una inclinación >2%.
El cambio agudo en una pendiente puede
perjudicar la estabilidad de la máquina,
por lo que está prohibido. Existe peligro de
accidente.
Atención:
La máquina debe protegerse de usos no
autorizados. Guarde la máquina en una
habitación cerrada antes de alejarse de la
máquina.
Atención:
La máquina sólo debe operarse y almace-
narse en un entorno seco y sin polvo a
temperaturas de +10 °C/+ 50 °F a + 35 °C/
+ 95 °F.
Atención:
Los trabajos de reparación en piezas me-
cánicas o eléctricas de la máquina deben
realizarse solamente por especialistas au-
torizados, que conozcan todas las normas
de seguridad relevantes.
Atención:
Se deben usar exclusivamente herramien-
tas (cepillos, almohadillas o similar), que
hayan sido fijadas dentro de los acceso-
rios de este manual de instrucciones o que
hayan sido recomendadas por un asesor
de TASKI. Otras herramientas pueden
afectar negativamente a la seguridad y las
funciones de la máquina.
Atención:
Las normativas nacionales para la protec-
ción personal y para la prevención de ac-
cidentes como también las indicaciones
del fabricante para el uso de materiales de
limpieza deben ser cumplidas de manera
consecuente.
Atención:
Se prohíbe enchufar y desenchufar la má-
quina con manos mojadas.
Atención:
Compruebe que la tensión nominal de la
placa indicadora coincide con la tensión
de red dominante en la máquina.
Atención:
Tenga en cuenta que el cable de red no se
encuentra aplastado por herramientas ro-
tativas (cepillos, almohadillas o similares),
ni se tira de él, ni está dañado por aceite o
esquinas agudas.
ES
16
Productos de limpieza
Otros documentos
Atención:
¡Desconecte inmediatamente la unidad de
aspiración si salieran espuma o líquidos
de la máquina!
Atención:
Las máquinas y los dispositivos TASKI es-
tán diseñados de manera que, según el
estado de la tecnología hoy en día, se
pueden excluir peligros para la salud por
las emisiones de ruidos o las vibraciones.
Consulte los datos técnicos en la página
24.
Nota:
Las máquinas TASKI están construidas de
tal forma que se consiguen obtener resul-
tados de limpieza óptimos con los produc-
tos de limpieza TASKI.
Otros productos de limpieza pueden pro-
vocar averías y daños a las máquinas o el
entorno laboral.
Por esta razón, le recomendamos que use
exclusivamente productos de limpieza
TASKI.
Las averías que se produzcan por el uso
de productos de limpieza incorrectos, no
estarán cubiertas por la garantía.
Para una información más detallada, con-
tacte con el servicio técnico de TASKI.
Nota:
El esquema eléctrico para esta máquina
se encuentra en la lista de piezas de re-
puesto.
Contacte con el servicio de atención al
cliente para más información.
17
Vista general de la estructura
1Accionamiento del estribo de conmutación
2Timones
3Contador de horas de servicio (opcional)
4Manguera de drenaje de solución de limpieza (cu-
bierta azul)
5Manguera de drenaje de agua sucia (cubierta roja)
6Regulación del agua
7Pedal de herramienta
8Pedal de labios
9Labios
10 Herramienta (cepillos, almohadillas, etc.)
11 Unidad de cepillos
12 Interruptor protegido solución de limpieza
13 Interruptor protegido unidad de aspiración
14 Interruptor principal
15 Filtro del tanque de agua limpia
16 Tanque de recuperación
17 Flotador (protección contra sobrellenado del tan-
que de recuperación)
18 Filtro de aspiración
19 Tamiz de la suciedad
20 Tanque de agua limpia
21 Ayuda para la dosificación
22 Tapa del depósito
23 Desbloqueo de la tapa del tanque
8
910
7
6
2
3
4
5
1
14
13
12
11
20 1921
15
16
17
18
23
22
max.60°C
max.140°F
ES

18
Antes de la puesta en marcha
Colocar la herramienta
Compruebe antes de poner en funcionamiento:
• que el cepillo no esté por debajo de la marca roja (cerdas)
o que la longitud de las cerdas esté por debajo de 1 cm.
• el desgaste y la limpieza del disco.
Monte la boquilla de aspiración
Llenar el tanque de agua limpia
Dosificación
Atención:
No use cepillos donde se haya alcanzado
el límite de desgaste. Esto se indica a tra-
vés de la longitud de las cerdas rojas. No
utilice discos que estén desgastados o su-
cios. Utilice solo herramientas originales
de TASKI. El incumplimiento puede produ-
cir resultados de limpieza insatisfactorios
e incluso daños en el piso.
• La máquina debe estar desconectada (interruptor princi-
pal).
• Coloque la herramienta debajo de la unidad de cepillos.
• Inserte el enchufe en el tomacorriente.
• Encienda la máquina (interruptor
principal).
El interruptor protegido se ilumina.
• Desatranque el control de pie y des-
cienda lentamente la herramienta.
• Presione brevemente la palanca de accionamiento.
Con ello, la herramienta se centra y se embraga.
Nota:
Un ligero movimiento hacia delante y ha-
cia atrás del timón de la máquina facilita el
embrague.
• La máquina debe estar desconectada (interruptor princi-
pal).
• Coloque los labios (2) bajo el soporte
de la tobera (1).
• Presione el control de pie hacia aba-
jo hasta que se encaje la tobera de
aspiración.
• Conecte el orificio de la manguera de
succión al soporte de la tobera.
Atención:
Temperatura de agua máxima permitida
de 60°C/140°F.
Diversey recomienda el uso de agua fría,
porque el agua caliente adquiere la tem-
peratura del suelo en cuanto toma contac-
to con él y ésto no aporta ninguna ventaja.
• La máquina debe estar desconectada (interruptor princi-
pal).
• Agarre la abertura entre la tapa del
depósito y el tanque.
Con la palma de la mano hacia arri
-
ba.
• Abra la tapa del depósito hasta que el soporte cuelgue de
la pared del depósito.
• Separe la ayuda para la dosificación.
• Rellene con agua el tanque de agua limpia.
Nivel máximo de llenado permitido (página 17).
• Vuelva a inclinar la tapa del depósito en su posición origi-
nal y apriétela hacia abajo hasta que se bloquee.
Atención:
Durante la manipulación de productos quí-
micos deben usarse guantes, gafas de
protección y ropa de trabajo (de protec-
ción) adecuada.
Nota:
Utilice solo los productos químicos reco-
mendados por Diversey y tenga siempre
en cuenta la información de los productos.
1
22
1
Table of contents
Languages:
Other diversey Floor Machine manuals

diversey
diversey TASKI swingo 1655 XD User manual

diversey
diversey swingo 4000 User manual

diversey
diversey TASKI swingo 1260B Power User manual

diversey
diversey TASKI swingo 1260B Power User manual

diversey
diversey TrailBlazer User guide

diversey
diversey Taski swingo XP CO75XP.2 User manual

diversey
diversey Taski ergodisc 2000 User manual
Popular Floor Machine manuals by other brands

Superabrasive
Superabrasive LAVINA ELITE Series user manual

KLINDEX
KLINDEX HURRIKANE 26 PROPANO Manual book

Bissell
Bissell BGTS-17 Safety, operation and maintenance manual with parts list

Minuteman
Minuteman R100H user manual

Advance acoustic
Advance acoustic Terra 128B Service manual

Windsor
Windsor CLP owner's manual


