DIY L905 User manual

L905L905L905
L905 Instruction manualL905 Instruction manualL905 Instruction manual
DIY mini house kits–DIY mini house kits–
A Splendid Family A Splendid Family
DIY mini house kits–
A Splendid Family

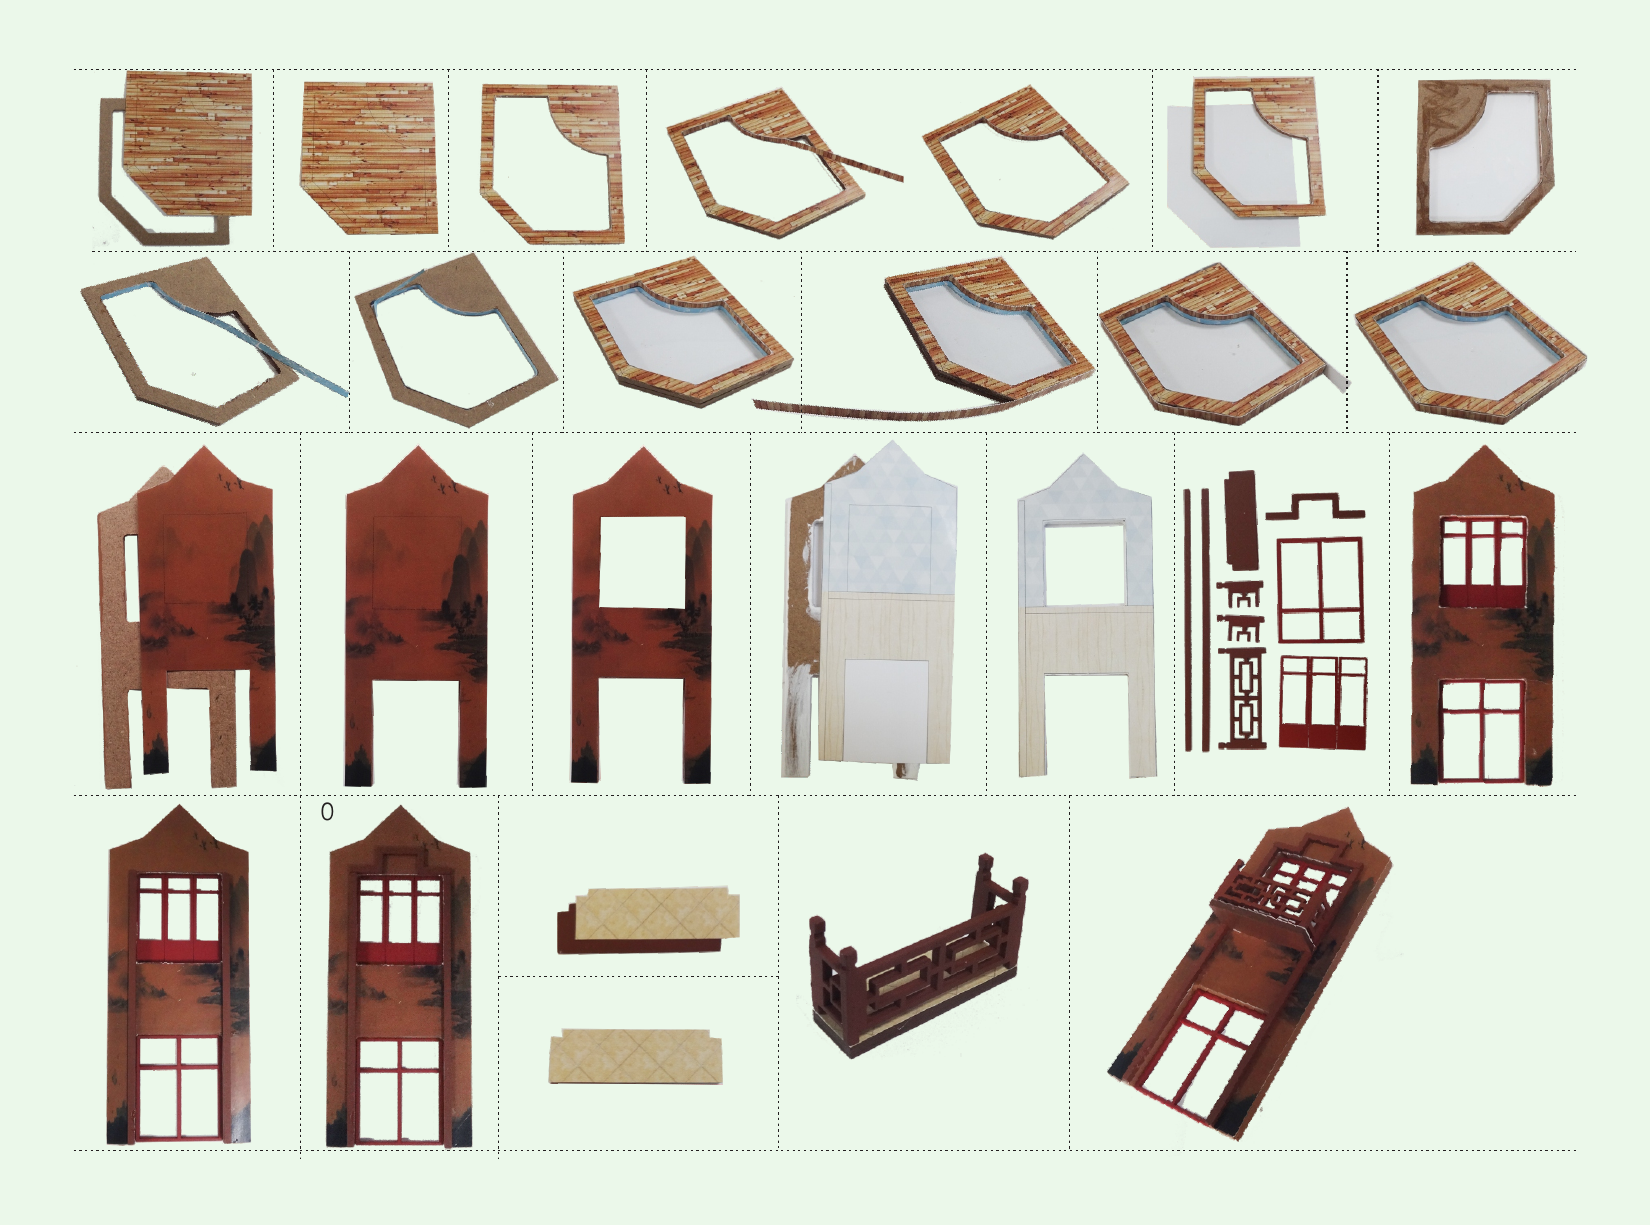
1
P04
P05
P06
photo of product with cover
Installation of dust proof cover
(For updated version, the parts need to be purchased separately)
1. Tear off kraft paper of each
piece of transparent cover.
2.Paste P04,P05 and P06 together to
complete the dust proof cover as shown.
1.Picures shown on the package may be slightly different from the actual product.
2.All the materials are taken in the operation step, put the remaining materials back into
the original pocket until the installation is completed.(Avoid material loss during installation)
3.The dimensions indicated in the step diagram are“cm”.
4.If there have template paper material, please cut the material according to the template
to avoid mistakes..
5.According to the part rule example at the bottom of this page, refer to the part on the part
number drawing, find the material object and compare with the material list, confirm and
install.(Wooden parts only)
6.Glue should not be applied too much, so as not to dry longer, overflow will affect the effect
of the finished product.
7..Part shapes may differ from the photographs depending on he production batch
Be sure to test the LED lights before making the lighting,
note that the LED white wire to the negative, gray wire
to the positive reference to the following figure
operation test.
1 2
Tips for assembling
Testing on LED function
DO NOT contact the
LED wire end direct
to the battery cell.
Use the provide battery
holder. Make sue the
correct polarity.
A01:The parts are directly in the box.;B01:parts in bag B;C01:part in bag C and so on.(Note: display the printing paper A08-01 in the
step: the printing paper is placed directly in the box, part number is A08-01)
Example of parts rule:
How to assemble the battery holder
1.Material and tools needed:
- Battery holder, LED bulb,
tape, screw driver and 2 piece
AAA size battery(not provided)
2. Use screw driver and
take the lid off from the
battery holder.
“-”negative
“+”positive
3. Insert the battery take
notes on the polarity.
4. Connect the red wire
to grey wire. Connect
the black wire to white
wire.
5.Wrap the exposed wire
with the tapes.
6. Place the box lid and
fastness with screw driver.
scale 1:10
P04 Transparent cover
0.18*24*32cm
1piece
scale 1:10
P05 Transparent cover
0.18*18*32cm
2pieces
scale 1:10
P06 Transparent cover
0.18*18*23.64cm
2pieces

2
printing paper
lantern F bag+M bag
wooden dummy F bag
big lantern F bag+M bag+L bag+ template paper
first floor
chandelier F bag+L bag+M bag
round stool
chinese zither G bag+L bag+K bag+template paper
floor lamp G bag+M bag
chessboard
table F bag+printing paper
mahjong table
and chair
F bag+L bag+template paper
+ printing paper
sofa G bag+L bag+M bag+template paper
table G bag+L bag+template paper
bogut rack H bag+M bag
H bag+L bag+template paper
dining table
and chair H bag+L bag+template paper
+printing paper
cupboard
H bag+ printing paper
H bag +printing paper
printing paper
J bag+printing paper
J bag+L bag+template paper
J bag+printing paper
J bag+L bag+template paper
J bag+printing paper
J bag+printing paper
K bag+L bag+template paper
A bag+K bag+M bag+template paper
+printing paper
K bag+L bag+printing paper
call cabinet
kitchen
ventilator
picture scroll
bookcase
chair
desk
bed
zhong ruan
steps
washing table
bathtub
wooden basin
N bag+printing paper
closetool
A bag+D bag+L bag+printing paper
+template paper
little house
A bag+B bag+printing paper
+template paper
lotus pond
gate
spa pool
A bag+B bag+C bag+D bag
+template paper
A bag+B bag+printing paper
+template paper
outer frame
roof
coat hanger K bag+L bag+template paper
G bag+L bag+ template paper
small chandelier F bag+M bag
outdoor light F bag+printing paper
living room
chandelier F bag+N bag+printing paper
K bag
waterwheel
C bag+template paper+printing paper
stairs
M bag
battery holder
details of minature kit
Thumbnail of material list( reference only)
Thumbnail of printing paper &template paper( reference only)
A
B
A
B
A
B
A
B
A
B
A
B
A
B
A
B
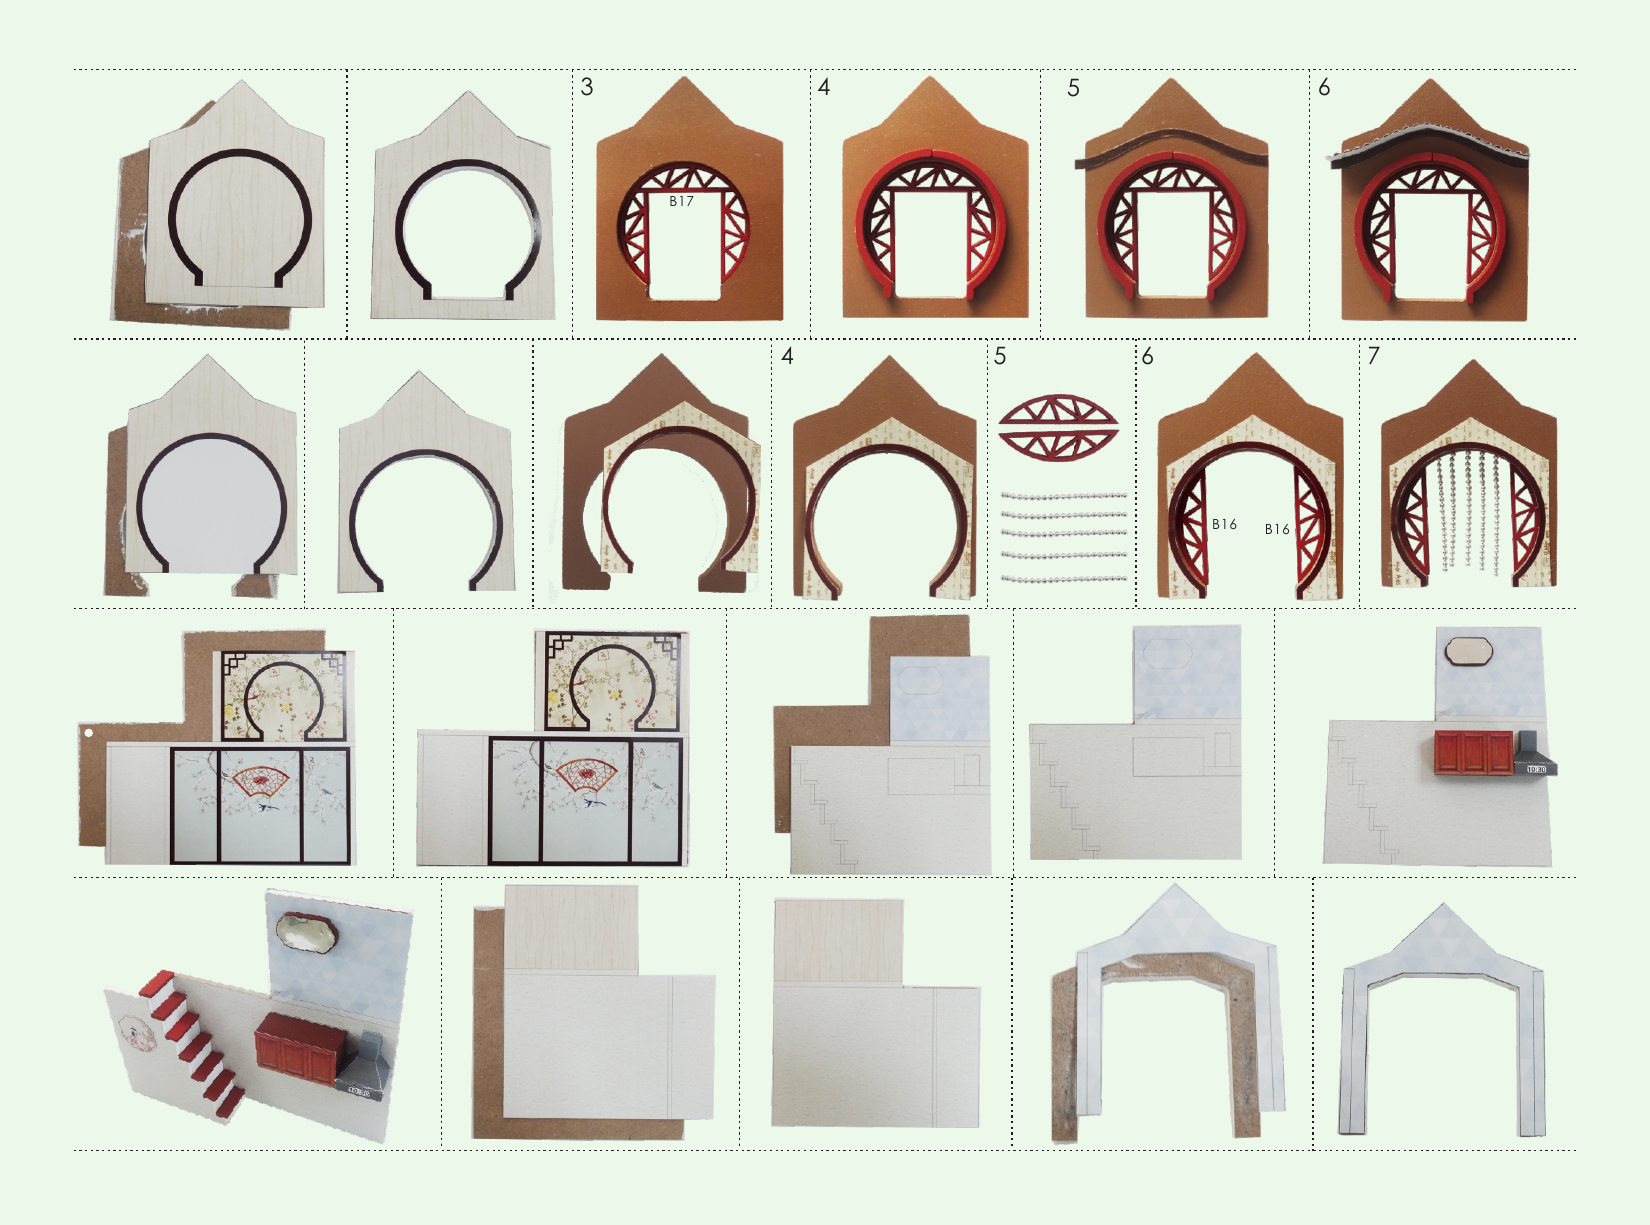
1
Symbol description used
Install parts
in the opposite
direction
Install the same
parts on both
sides
Pay attention to the direction of installation material B stick to
material A
Pay attention to the direction of installation material A stick to
material B
Fold in half
according
to dotted lin
fold double
edge to center
dotted line
Fold four sides
to the middle 123
combination part
according so on.
Name Material package
Bag A-A25(All printing and template papers
are shown on A25 paper ,total 2 pieces A3
and 2pieces A4)
A bag+D bag+L bag+printing paper
+template paper
A bag+B bag+printing paper
+template paper
M01 M01 M01 M01
M02
M02 M02 M02 M02
M02
M02
M02
M03
(8pieces)
F01 F01 F01 F01
F09
F08
F10
F11
(4pieces)
F09
F08
F10
F11
F11
F11
F11
1234
1234567
M24 M24 M24 M24
M23 M23 M23 M23
F02 F02 L10:2cm
L10:2cm
N11 N11
L10:2cm
1cm
M24
M24 A25-1
N11 M23
M23
F02 F02
(need
2 pieces)
(need
3 pieces)
F03 F03
F03
F03
F04
N11 N11
1234567
A25-2-1
Use some tools to make a small
hole in the printing paper.
F03
N11 8 9 10
F03 A25-2-2
12345
N11
F06
F07
A25-3 F07
N11
F06
1234567
F13F12
F15
M27 M27 M27 M27
F12
A25-4-1
F13
F15
M27 M27
M27
M27
A25-4-2 A25-4-2
A25-4-2 A25-4-2
F04
L15:5cm(4pieces)
1
Tie a knot at 1cm
1cm
M03
M02
M02
M03
F01
(need
4 pieces)
3
2 3 456
Lantern
Wooden dummy
Big lantern Small Chandelier
Outdoor Light
Living Room Chandelier
Chessboard Table
4
123
N11
M04
M06
F05
N11 N11
F05 F05
M06 M06 M04 M04
M06
N11
M04
F05
outdoor light 1 outdoor light 2

123456
78 9 10 11
12345678
F17 F17 F17 F17
F19 F19 F19 F19
F19 F19 F19 F19
F18 F18 F18 F18
F16 F16 F16 F16
L08
(mahjong
chairs)
F14
F15
L02
(mahjong
chairs)
F18
F16
F19
F19
F17
(need 4 pieces)
F14
A25-5-1
F15
F14
A25-5-2
A25-5-2
G08
G09
G10
G10
G11
G11
G11
G11
G12
G12
L08(sofa)
L03(sofa)
L02(sofa)
G13
G13
G15
G14
G14
M10 M10
12345
67810
11 12 13 14 15 16 17 18
G11
G11
G11
G11
G10
G09 G10
G08
G12
G12
L08(sofa)
L03(sofa)L02(sofa)
G13
G13
Before making, cut out L02, L03 and L08 according to the template.
M10
M10
G15
G14
G14
4
Mahjong table and chair
L08
(mahjong
chairs)
L08
(mahjong
chairs)
L08
(mahjong
chairs)
L03
(mahjong
chairs)
L03
(mahjong
chairs)
L03
(mahjong
chairs)
L03
(mahjong
chairs)
L02
(mahjong
chairs)
L02
(mahjong
chairs)
L02
(mahjong
chairs)
L03
(mahjong
chairs)
L08
(mahjong
chairs)
L02
(mahjong
chairs)
(need 4 pieces)
Sofa
Before making, cut out L02, L03 and L08 according to the template.

1234
5678 9
12
12
G02
G02
G02
G01
G01
G01 G03(15pieces)
L02(stool)
L02(stool)
L02(stool)
L08(stool) L03(stool)L03(stool) L03(stool)
G03
G01
G02
G03 G03
G03G03
(need 3 pieces)
L08(stool)
L03(stool)
(need 3 pieces)
G04
G05
G05
G04
A25-6 345
678 9
Bend it according to the
shape of the zither.
L10:1.2cm
L10:2.1cm
L10:1.5cm
Cut out the thin wire L13 according
to the dimensions on the drawing.
2.8cm
2.7cm
2.7cm
2.6cm
2.5cm
2.2cm
2.1cm
G05
G05
G06 G06
G07 G07
M04
M04
M05
M05 G07
M05
M04
(need 2 pieces)
L01(table)
G17
G17
G18
G18
G18
G18
G16
A25-7-1
123456
78 9 10
11
15
G16
G17
G18
G18
G17
G18
G18
Before making, cut out L01according
to the template.
L01(table)
A25-7-2
G19
L10:0.6cm L10:0.8cm
L10:0.5cm 12 13
14
M10
M10
M12
M11
(need 3 pieces)
5
Round stool
L08(stool)
L08(stool)
Before making, cut out L02, L03 and L08 according to the template.
Chinese zither
Floor lamp
Table
H01 H01
H02
H03
H04
H04
H05
H05
1234567
M22
M22
M20
M03
H01
H05
H02
H03
H04
H04
H05
H01
M20
M03
M25
M25
M22
M22
H09 H09 H09 H09
H08
H06
H07 H07
H11 H11 H11 H11
H10
H10 H10
H10
H12
(8pieces)
(need
4pieces)
123456
78 9 10 11 12
L02(dining
chair)
L03(dining
chair)
L08(dining
chair)
13 14 15 16
(need 2 pieces)
L08(dining chair)
L03(dining
chair)H11
H09
H12
H12
H10 H08
H06
H07
H07
M08 M08
M08 M08
M28 M29
M14
M13
M19
M20
L10:1cm
L10:1cm M06
H16
H17 H18 H18
H19
H21
H21 H22
H23
H13 H14
H14
H15
H15
H20 H20
L09(wash
basin 1)
L09(wash
basin 1)
L09(wash
basin 2)
L09(wash
basin 2)
L09(wash
basin 3)
L08(gas
cooker)
L09(wash basin 2)
H20
1
2
H20
L09(wash basin 2)L09(wash basin 2)
H20
H19
L09(wash
basin 3)
L09(wash
basin 1)L09(wash
basin 1)
H21 H21
H21
H19
H20
H21 H20
34567
8 9 10 11
H17
A25-9 H18
H17 H18
A25-8-2
17 18 19 20 21 22
0.2cm
0.2cm
0.4cm
L11:0.8cm
cut out he shape
on the drawing.
M07
(need
4pieces)
(need 2pieces)
M16
M19
M06
M14
6
Bogut Rack Dining table and chair
L02(dining
chair)
L02(dining
chair)
L02(dining
chair)
L03(dining
chair)L03(dining
chair)
L03(dining
chair)
L08(dining
chair)
L08(dining
chair)
L08(dining
chair)
Before making, cut out L02, L03 and L08 according to the template.
Cupboard
L09(gas
cooker)
Before making, cut out L08 and L09 according to the template.
M21
M21
12 13 14 15 16 17 18
1cm
L08(gas cooker)
L09(gas cooker)L10:3.2cm 2cm
0.5cm
L12:3cm
M17
M17
A25-10
H13
H14
H13
H15
H15
H14
123
123
5
46
412 3 4 56
A25-8-1
H23
A25-8-2 H22 A25-12-1
A25-12-2
A25-12-3
A25-12-4
A25-12-5
A25-12-3
12345
678 9 10 11
J01 J01
J03
J02
J02
J02
J02
J03
J02
J01
J02
J02
J02 J01
A25-13 A25-14
A25-15
A25-13
M13
M08
M28
M08
19 20 21 22 23
25 26 27
28 29
L10:2cm fold back on
both sides
24
fold it
as shown.
M09
M18
M03
L10:0.5cm
Cut out L08 and L09 according to
the template and glue them together.
7
Wall Cabinet kitchen ventilato
Picture scroll
Book case

1234567
8 9 10 1 234
Before making, cut out L03 and L08
according to the template.
J05
J06
J06
J08
J09
J09
J07
J07
J04
L02(chair)
L08(chair)
L03(chair)
L08(chair)
L03(chair) L02(chair) J06
J05
J07
J07
J06
J09
J09
J08 J04
1cm
Cut out 1cm of J23. Sharpen the toothpick
on the front.
Darken the front
with a black pen.
12345
678 9 10 11
J10
J11
J13 J13
J12
J12
J15 J14
J10
A25-16 J12
J13
J13
J11
J12
A25-17
J15 A25-18
Bed
12345
678 9 10
J16
J17 J18 J18 J19
L02(pillow)
L05(pillow)
L05(pillow)
L03(bed)
L02(quilt)
L01(bed)
L04(bed)
Before making, cut out L01, L02, L03, L04
and L05 according to the template.
J17
J18
J18
J19
J16
L03(bed) L02(quilt)
1cm
L01(bed)
L04
(bed)
J23
1cm
Turn back 1cm.
8
Chair Desk

As shown in the picture, cut out L05
according to the pillow cloth, and
then apply the glue on the dotted
line.
Fold in the right amount
of cotton L07.
Finally, glue the gap
in place.
11 12 13 14 15
L05(pillow)
L07
L02(pillow)
L05(pillow)
L05(pillow)
Make three pillows in the same way.
J20
A25-19
123
J21
J22
A25-20-1
A25-20-2
J21
J22
123 1 2
K01
K02
L06(coat hanger)
K01
K02
L06(coat
hanger)
Before making, cut out L06
according to the template.
12345
678 9 10
A25-11-1
K05 K06
K06
K07
K08
K08
L02(wash basin)
Before making, cut out L02 according to the template.
A25-11-2
K07
K06
K06
K05 K08
2cm
0.5cm
L12:3cm
L02(washing
basin)
123456
78 9 10 11 12
K09
K10
K10
K11 K11
M15 M15
A23(bathtub)
K10
K11
K11
K10
A25-21-1
A23(Bathtub)
K09
Before making, cut out A23 according to the template.
A25-21-2
M15
M15 L07
9
Zhong Ruan
steps
Coat hanger
Washing Table Bathtub
(Note: PVC and printing
paper stick together)
L03(wooden basin)
K03
A25-22-1
L13:5cm
K03
Before making, cut out L03
according to the template.
Tie K03 with 2 lengths
of L13 3cm long.
12341234
N01
A25-22-2
A25-22-2
12345
K12
K12
K13
K13
K13
K13
K13
K13
K13
K13
K17
K16
K14
K15
K15 K12
K17
K13
K13
K13
K13
K13
K13 K13
K13
K12
K15
K16
K14
P03
1234
567
8 9
C01
C02
C03
C03
C03
C03
C03
C03 C04
C04
C04
C04
C04
C04
C04
Before making, cut out L08 according
to the template.
L08(stair
hanging
picture)
C01
A25-23-1 A25-23-2
C03
C03
C03
C01
C03
C03
C03
C02
C04
C04
C04
C04
C04
C04
C04
Before making, cut out A24 according to the template.
1234567
8 9 10 14 15 16
D01
D02
D04
D04
D05 D05
D03
D07
D06
D06
D03
A24
(small house roof)
11 12 13
Make a mark on the red
dotted line with a knife.
A24
(Small house roof)
D06
D06
D07
A25-24-1
D03 (need 2pieces)
D04 D05
A25-24-2
D05
D01
A25-24-3
D02
A25-24-4
1
2
L13:5cm
L13:5cm
L13:5cm
A25-22-1
L03(wooden basin)
L08(stair hanging
picture)
1
10
Wooden Basin
Closetool
Waterwheel Stairs Small house
(back view)
Make a mark on the red
dotted line with a knife.
(front view)
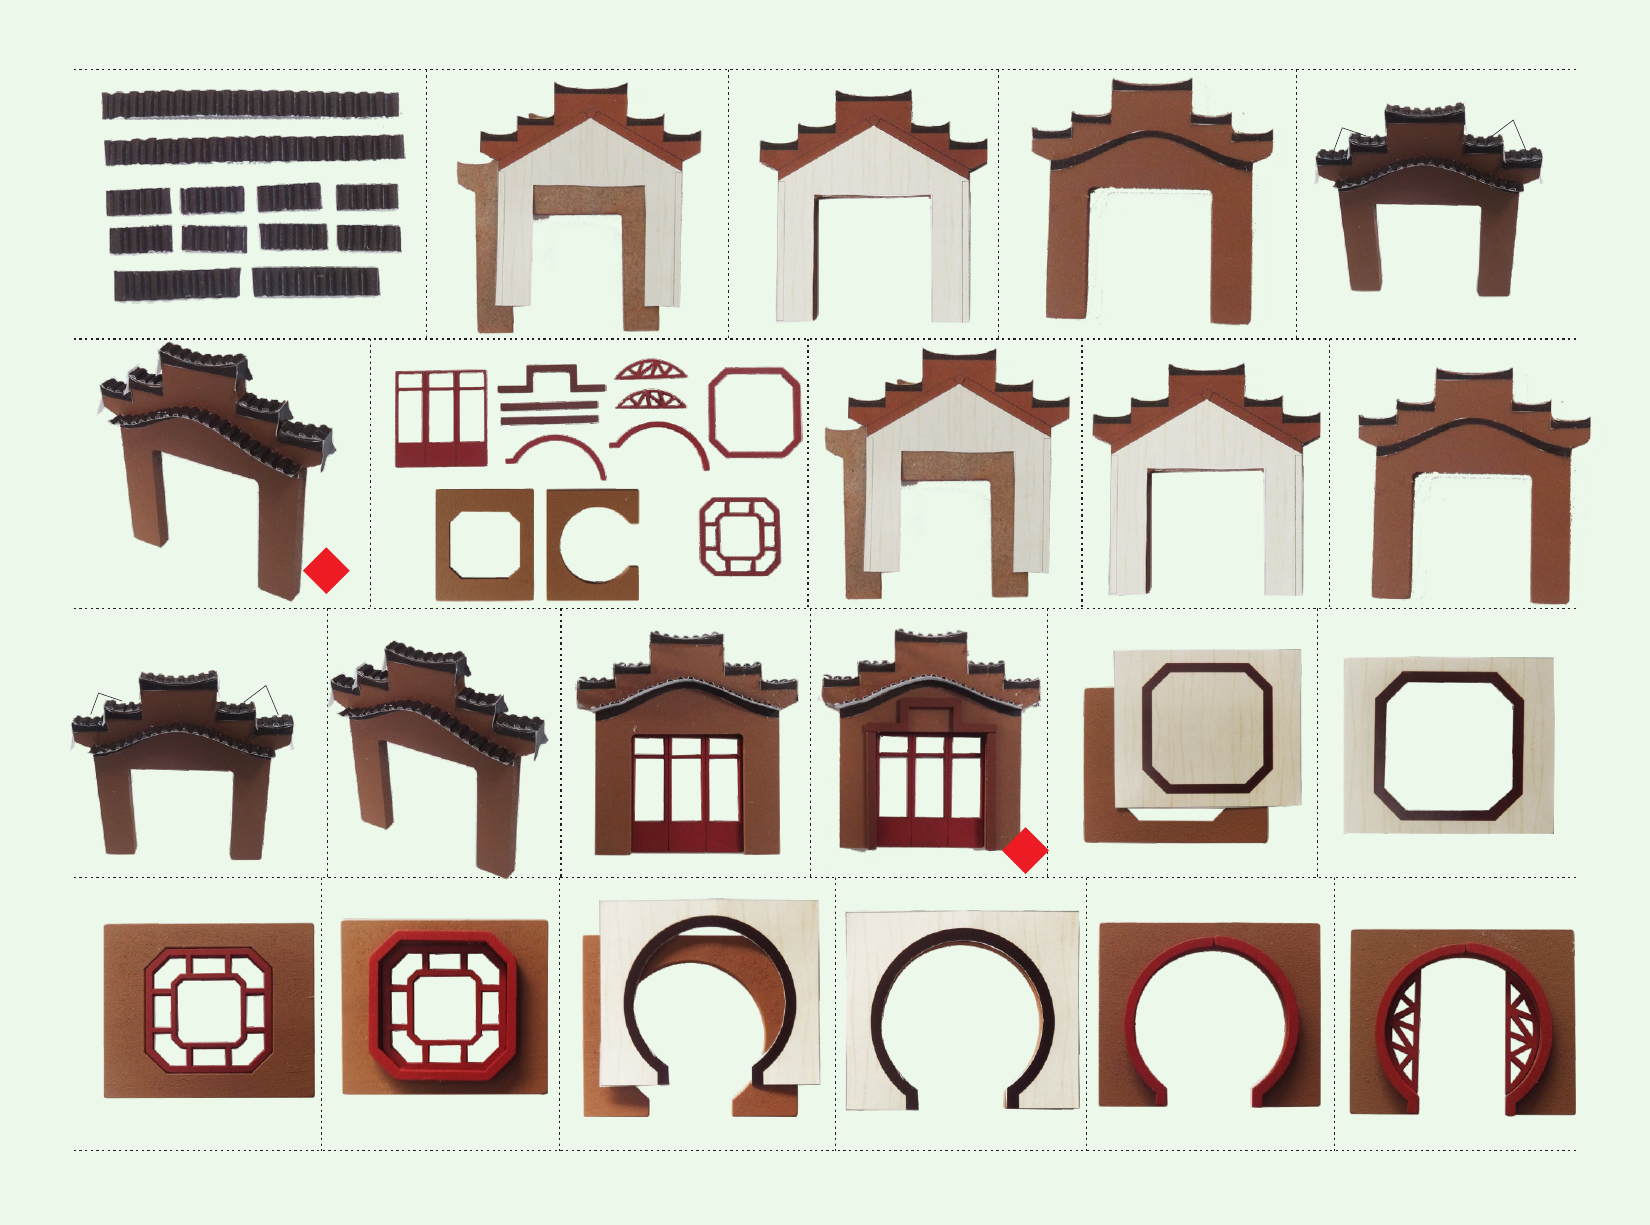
Upgrade Procedure

D08
D09
D11 D11
D10 D12
D12
D12
D12
D14
D14
D19
D13
D15
D15
D16
D16
D17
D17
D18
D18
A24
(gate roof)
L01(gate)
Before making, cut out L01, L08 and A24 according to the template.
A24
(gate roof)
Make a mark on the red
dotted line with a knife. Fold it along the fold.
D17
D19
D18
D17
D10
D09 D08 L01(gate)
L08(door
sticker)
D11 D11
D13 D14
D14
D16 D16
D12
D12
D12
D12
A25-24-5
12345
678 9 10
11 12 13 15
14 16 17 18 19 20
123456
78 9 10 11 12 13
L08(door
sticker)
B19
A25-25-2
A25-25-2
A25-25-1
A23
(lotus pond)
A23
(lotus pond)
Cut out A23 according to the template and stick it on the underside. N02
N10
N10
N03 N03
A25-26
15 16 17 18 19 20 21 22 23
A
B
A
B2
1N11
L01
(small steps)
L01
(big steps)
E15
E16
E17
E18
E19
E20
Before making, cut out L01
according to the template.
E17
E16
E15
L01
(small steps)
L01
(big steps)
E20
E19
E18
M09 M09
0.5cm 0.5cm
L13:1.5cm L13:1.5cm D15D15
Glue a led lamp N11
on the roof as shown.
11
Steps
Gate
L08(door
sticker)
Make a mark on the red
dotted line with a knife.
(back view)
(front view)
Lotus Pond
A22
A25-27-1
A25-27-2
A23
(Spa pool)
A25-27-3
A25-27-4
1234567
8 9 10 11 12 13
C09
C07
C07 C10
C11
C11
C06
B12
B13
A25-28-2
A09
A25-29
C09
1234 5 6 8
9 10 11
12
13 14
A25-28-1
Cut out A23 according to the template
and stick it on the underside.
B13
B12
C07
C07
C06
C11
C11
C10
A09 (turn it over)
12
Spa pool
123456
1234567
12123
12
412
A03
A25-30-1
A11
B17
B16
B16
L14:3.2cm
L14:3.2cm
L14:3.2cm
L14:3.2cm
L14:3.2cm
B16 B16
A25-32
A05
A25-33
cupboard
kitchen ventilator
mirror
stairs
A04
A25-34
A14
A25-35
B18
B18
A24
(roof of
bedroom)
A25-30-2
A25-31-1
A25-31-2
Cut out A24 according to the
template and stick it as the shown.
A12 A12
(turn it over.)
(turn it over)
13

12345
123
A07
A25-36
A25-37
Cut out L08 according to the template and stick it on the bottom.
L08(wall deco)
Use a knife to make a gap in
the upper right corner
gap
1234
Cut out A24 according to the template before making.
A20
A20
A21
A21
A24
(roof of bedroom)
A24
(roof of bedroom)A24
(study room roof)
A24
(study room roof)
A20
B03
B04
A25-38
A25-39
A24
(roof of bedroom )
A20
6 8
5 7
A21
A25-40
A21
A24
(study room roof)
(need 2pieces)
(need 2pieces)
A10
2.8cm
3.4cm
6cm
4cm
10cm
3.8cm
3
3
4
4
N11
small chandelier
living room chandelier
14
Roof
12345
61234
567812
341234
Cut out A24 according to the template before making.
A24(eaves of a small house1)
A25-41
A15
A25-42-1
A25-42-1 A25-42-1
A25-42-1
A25-42-2
A25-42-3
A25-43-1
A25-43-2
A25-43-3
B01 B02
B12 C20 C20
C19 B15
B14
A25-41
A15
A25-42-1
A25-42-1 A25-42-1
A25-42-2
A25-42-3
A25-42-1
A25-43-1
A25-43-2
A25-43-3
B12
C06
C08
C08
C08
C08
C06
B01
A25-44
B14
B15
B02
A25-45
C20
C20
C19
C19 C19
5
6
Cut out A24 according to the template
and stick it on the drawing.
(turn it over)
(turn it over)
(Turn it over.) (Turn it over.)
15
A24(eaves of a small house1)
A24(eaves of a small house2)
A24(eaves of a small house2)
A24(eaves of a small house3)
A24(eaves of
a small house1)
A24(eaves of a
small house2)
A24(eaves of a
small house3)
A24(eaves of a
small house2)
A24(eaves of a
small house2)
A24(eaves of a
small house3)
A24(eaves of
a small house1)
A24(eaves of a
small house2)
Cut out A24 according to the template
and stick it on the drawing.
5678
123456
78 9 10 11
12 13 14 15
B01
B02
5
N11
Glue a led lamp N11 on the roof as shown.
B04
4
4
Cut out A24 according to the
template before making.
A24(Study eaves 1)
A24(Study eaves 2) A24(Study eaves 3)
B15 B14
A25-46-1
A25-46-2
A25-46-2
A25-46-2
A25-46-2
A25-46-3
A13
A24( )Study eaves 1
Cut out A24 according to the
template and stick it on the drawing.
A13
A25-47
B14
B15
A25-43-3
A25-43-2
A25-43-1
A25-43-3
A25-43-2
A25-43-1
3
A13
B03
3
N11
8
7
(Turn over)
16
A24(study eaves 3)
A24(study eaves 2)
A24(study
eaves 1)
A24(study
eaves 2)
A24(study eaves 2)
A24(study
eaves 2)
Glue a led lamp N11 on the roof as shown.
12 4 56
123456
1234
678 9
A24
(bedroom roof)
B05
B05
B06
B06
B07
Before making, cut out A24 according to the template.
A24
(bedroom roof)
3
Make a mark on the red dotted
line with a knife.
Fold it along the fold.
B05
B05
B07
B06
7
small chandelier
B08
B08
B09
B09
B10
A24
(bathroom roof)
Fold the bathroom roof as above.
B08
B08
B10
B09
A02
A25-48
A03
A07
C05
gap
Stick A07 on A02
( ).note the position of the gap
A04 A05
A10
A11
17
Roof of bedroom
(back view)(front view)
Make a mark on the red dotted line with a knife.
small chandelier
The roof of bathroom
Before making, cut out A24 according to the template.

12345
6
7
8 9 10 11
12 13 14 15 16
17 18 19 20
A12 b droom roofe
Glue the wire to the dotted line.
8A14
closetool
bathtub
washing
table
B11
A23(bathroom window)
A09
bathroom
roof
Run the roof wires through the diagram.
N08 N08
M26 M26
plant
mahjong table
and chair
small
house
Thread the electrical wiring of the small house onto the floor.
6
7
L07 spa pool
outdoor
light
C18
C17
C16 C15
18
Plant
N08
M26
21 22 23 123
45678
9 10 11 12 1
23456
C14
C13 C12
E02
E01
E01
E03 E03 E03
E05
E05
E11 E11
E11
E14 E14
E13
A24
(right corridor roof)
Make a mark on the
red dotted line with
a knife. Fold it along the fold.
E14
E14
E12
E13
E01
E01
E11
E11
E02
N11
Glue a led light N11 on the roof.
E03
E03
E03
E05
E05
E01 E01
E03E03
E10
E10 E06
E06
E04
E04
E07
E07
E08
E08
E09
E09
Cut out A24
according to
the template
before making.
Cut out A24
according to
the template
before
making.
A24
(left corridor
roof1)
E07
E07
E07
E07
E07
E07
E06
E06
E01
E08
E09
E10
E10
19
Right corridor
Left corridor
A24
(left corridor
roof2)
E11
Other DIY Toy manuals

Popular Toy manuals by other brands

Simplay3
Simplay3 Carry & Go Track Table 21802 quick start guide

E-FLITE
E-FLITE EDGE 540QQ 280 instruction manual

Jumpking
Jumpking JumpPOD user manual

bruder
bruder 02769 Instructions for use

Fisher-Price
Fisher-Price W9914 owner's manual

Ravensburger
Ravensburger 3D Puzzle Empire State Building Night... manual


Smoby
Smoby 220370 quick start guide

Trix
Trix H0 45 Series instructions

THE WORLD MODELS
THE WORLD MODELS Spot-On 50 instruction manual

M.T.H.
M.T.H. HO 4-6-6-4 Challenger Engineer's guide

KidKraft
KidKraft What's Cookin' Kitchen Assembly instructions

QuiQue's Aircraft
QuiQue's Aircraft Semi Scale Yak-54 Assembly manual