djm direct DJMSS406 User manual

Scroll Saw
Item No.:DJMSS406
SCROLL SAW
Original Operating Manual

1
1.Introduction
MANUFACTURER:
DJM Direct.com
Unit 43 Churchill Way,
Lomeshaye Industrial Estate,
Nelson, Lancashire BB9 6RT UK
DEAR CUSTOMER
We hope your new tool brings you much enjoyment
and success.
NOTE:
According to the applicable product liability laws, the
manufacturer of the device does not assume liability
for damages to the product or damages caused by the
product that occurs due to:
●Improper handling,
●Non-compliance of the operating instructions,
●Repairs by third parties, not by authorized service
technicians,
●Installation and replacement of non-original spare
parts, .
●Application other than specified,
WE RECOMMEND:
Read through the complete text in the operating
instructions before installing and commissioning the
device. The operating instructions are intended to help
the user to become familiar with the machine and take
advantage of its application possibilities in accordance
with the recommendations. The operating instructions
contain important information on how to operate the
machine safely, professionally and economically, how
to avoid danger, costly repairs, reduce downtimes
and how to increase reliability and service life of the
machine.
In addition to the safety regulations in the operating
instructions, you have to meet the applicable
regulations that apply for the operation of the machine
in your country. Keep the operating instructions
package with the machine at all times and store it in a
plastic cover to protect it from dirt and moisture. Read
the instruction manual each time before operating
the machine and carefully follow its information. The
machine can only be operated by persons who are
instructed concerning the operation of the machine
and who are informed about the associated dangers.
The minimum age requirement must be complied
with. In addition to the safety requirements in these
operating instructions and your country’s applicable
regulations, you should observe the generally
recognized technical rules concerning the operation of
woodworking machines.
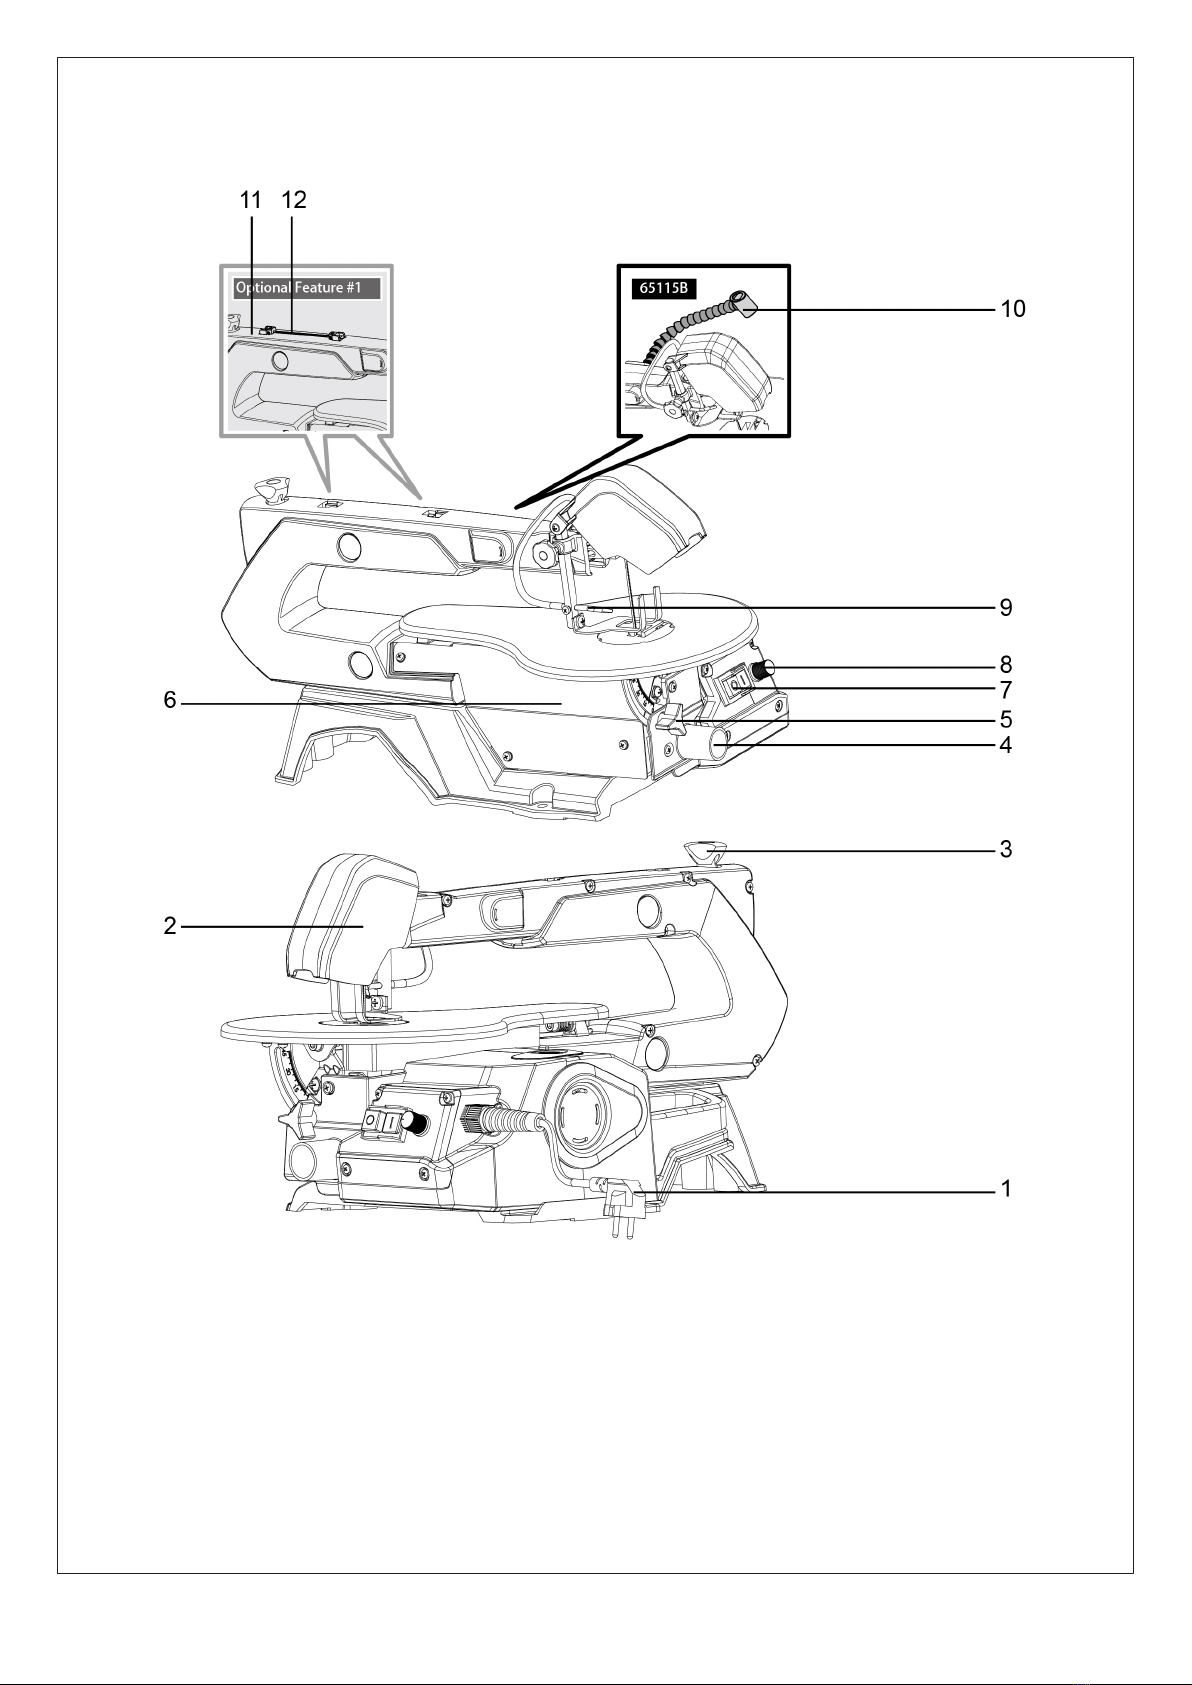
2.Device Description
1. Power Cord & Plug
2. Blade Guard
3. Clamping Screw
4. Suction Adapter
5. Star Button
6. Angle scale
7. ON/OFF switch
8. Speed Switch
9. Air Nozzle
10. Adjustable Hose Lamp
11. Saw-blade Adapter (Optional Feature #1)
12. Flat Saw-blade (Optional Feature #1)
2

3
3. Unpacking
●Open the packaging and remove the device carefully.
●Remove the packaging material as well as the
packaging and transport bracing (if available).
●Check if the delivery is complete.
●Check the device and accessory parts for transport
damage.
●If possible, store the packaging until the warranty
period has expired.
ATTENTION
The device and packaging materials are not toys!
Children must not be allowed to play with plastic
bags, film and small parts! There is a risk of
swallowing and suffocation!
4. Safety
a) General Safety Rules
Understand your Machine
Read this manual and labels affixed to the machine to
understand its limitations and potential hazards.
Be thoroughly familiar with the controls and their
proper operation. Know how to stop the machine and
disengage the controls quickly.
Do not attempt to operate the machine until you fully
understand how to properly operate and maintain
the engine and how to avoid accidental injuries and/or
property damage.
If the unit is to be used by someone other than original
purchaser or loaned, rented, or sold, always provide
this manual and any needed safety training before
operation. The user can prevent and is responsible for
accidents or injuries that may occur to themselves,
other people, and property.
Do not force the machine. Use the correct machine for
your application. The correct machine will do the job
more efficiently and safer at the rate it was designed.
Personal Safety
Do not permit children to operate this machine at any
time.
Keep children, pets, and other people not using the
unit away from the work area. Be alert and shut off
unit if anyone enters work area. Keep children under
the watchful care of a responsible adult.
Do not operate the machine while under the influence
of drugs, alcohol, or any medication that could affect
your ability to use it properly.
Dress properly. Wear heavy long pants, boots, and
gloves. Do not wear loose clothing, short pants, or
jewelry of any kind. Secure long hair so it is above
shoulder level. Keep your hair, clothing, and gloves
away from moving parts. Loose clothes, jewelry, or
long hair can be caught in moving parts.
safety glasses with side shields when operating.
Protect eyes, face, and head from objects that may be
thrown from the unit. Always wear safety goggles or
safety glasses with side shields when operating.
Wear appropriate hearing protection. Wear respiratory
protection to avoid the risk of inhaling harmful dust.
Always keep hands and feet away from all moving
parts during operation. Moving parts can cut or crush
body parts.
Always keep hands and feet away from all pinch
points.
Do not touch parts that might be hot from operation.
Allow parts to cool before attempting to maintain,
adjust, or service.
Stay alert, watch what you are doing, and use common
sense when operating the machine.
Do not overreach. Do not operate the machine
while barefoot or when wearing sandals or similar
lightweight footwear. Wear protective footwear that
will protect your feet and improve your footing on
slippery surfaces. Keep proper footing and balance at
all times. This enables better control of the machine in
unexpected situations.
Inspect your Machine
Check your machine before starting it. Keep guards in
place and in working order. Make sure all nuts, bolts,
etc., are securely tightened.
Never operate the machine when it is in need of
repair or is in poor mechanical condition. Replace
damaged, missing, or failed parts before using it.
Keep the machine in safe working condition. Regularly
check to see that keys and adjusting wrenches are
removed from the machine area before starting it. A
wrench or a key that is left attached to a rotating part
of the machine may result in personal injury. Avoid
accidental starting. Be sure the motor switch is off
before transporting the machine or performing any
maintenance or service on the unit.
Transporting or performing maintenance or service on
a machine with its switch on invites accidents. If the
machine should start to vibrate abnormally, stop the
motor and check immediately for the cause. Vibration
is generally a warning sign of trouble.
Electric Safety
Protect yourself from electric shock. Do not plug or
unplug the motor while standing in or around damp
or wet ground. Do not use the unit in wet or damp
areas or expose it to rain. Prevent body contact with
grounded surfaces: pipes, radiators, ranges, and
refrigerator enclosures. Make sure your fingers do
not touch the plug’s metal prongs when plugging or
unplugging the unit.
Avoid inadvertent starting. Make sure that the switch
is switched off when plugging the plug into an outlet.
Only use approved and appropriately identified
extension cables for use outdoors. Only use cable reels
in the unrolled state.

4
Do not use the cable for purposes for which it is not
intended. Do not use the cable to pull the plug out of
the outlet. Protect the cable from heat, oil and sharp
edges.
Have your electric tool repaired by a qualified
electrician. This electric tool conforms to the
applicable safety regulations. Repairs may only be
performed by an electrician using original spare parts.
Otherwise accidents can occur.
Work Area & Store Area
Keep the work area orderly. Disorder in the work area
can lead to accidents.
Take environmental influences into account. Do not
expose electric tools to rain. Do not use electric tools
in a damp or wet environment. Make sure that the
work area is well-illuminated. Do not use electric tools
where there is a risk of fire or explosion.
Securely store unused electric tools. Unused electric
tools should be stored in a dry, elevated or closed
location out of the reach of children.
b) Specific Safety Rules
Intended Use
The contents of the instructions must cover not only
the intended use of the machinery but also take into
account any reasonably foreseeable misuse thereof.
Safety Precautions
Connect the dust extraction device. If connections for
dust extraction and a collecting device are present,
make sure that they are connected and used properly.
Operation in enclosed areas is only permitted with a
suitable extraction system.
Additional Safety Rules for Scroll Saws
• This scroll saw is intended for use in dry conditions,
and for indoor use only.
• Do not cut pieces of material too small to hold by
hand outside the blade guard.
• Avoid awkward hand positions where a sudden slip
could cause a hand to move into the blade.
• Always use the blade guard to avoid possible injury
due to blade breakage.
• Never leave the scroll saw work area with the
power, or before the machine has come to a complete
stop.
• Do not perform layout, assembly or set up work on
the table while the cutting tool is in operation.
• Never turn your scroll saw on before clearing the
table of all objects: (tools, scraps of wood, etc) except
for the workpiece and related feed or support devices
for the operation planned.
• Take care of your tools. Keep cutting tools sharp
and clean in order to be able to work better and more
safely. Follow the instructions for lubrication and
for tool replacement. Check the connection cable of
the electric tool regularly and have it replaced by a
recognized specialist when damaged. Check extension
cables regularly and replace them when damaged.
Keep the handle dry, clean and free of oil and grease.
Residual Risks
Despite proper use, additional residual risks cannot
be completely ruled out. The following risks may arise
due to the nature of the Scroll Saw:
Mechanical hazards related to:
Machine parts or workpieces:
• Shape
• Relative location
• Mass and velocity (kinetic energy of elements in
controlled or uncontrolled motion)
• Mechanical strength
• Crushing hazard
• Cutting or severing hazard
• Entanglement hazard
• Drawing-in or trapping hazard
Electrical hazards due to:
• Contact of persons with live parts (direct contact)
• Contact of persons with parts which have become
live under faulty conditions (indirect contact)
• Electrostatic phenomena
Hazards generated by noise, resulting in:
• Hearing loss (deafness), other physiological
disorders (loss of balance, loss of awareness)
• Interference with speech communication, acoustic
signals.
Hazards generated by materials and substances (and
their constituent elements)
processed or used by the machinery
• Hazards from contact with or inhalation of harmful
fluids and dusts
• Fire hazard
Hazards generated by neglecting ergonomic principles
in machinery design related to:
• Unhealthy postures or excessive effort
• Hand-arm or foot-leg anatomy
• Local lighting
• Mental overload and underload, stress
• Human error, human behaviour
• Design, location or identifiation of manual controls
Combination of hazards
Unexpected start up, unexpected overrun/ overspeed
(or any similar malfunction) from:
• Failure/disorder of the control system
• External influences on electrical equipment
• Errors made by the operator (due to mismatch of
machinery with human
characteristics and abilities)

5
• Impossibility of stopping the machine in the best
possible conditions
• Variations in the rotational speed of tools
• Failure of the power supply
• Failure of the control circuit
• Errors of fitting
• Break-up during operation
• Falling or ejected objects or fluids
• Loss of stability / overturning of machinery
5. Technical Data
Technical Data
Specifications:
Mains Voltage : 240V/50Hz
Power : 120W
Throat Capacity : 406 mm
Max. Cutting Height : 50 mm @ 90°
20 mm @ 45°
Stroke : 19 mm
Stroke Speed : 400-1650 rpm
Blade Length : 127 mm
Table Size : 255×415mm
Table Tilt : 0° - 45°
6. Contents Supplied
The scroll saw comes partially assembled and is
shipped in carefully packed carton. After all the
parts have been removed from the carton, you
should have:
1. Main Machine
2. Blade guard
3. Saw-blade Adapter (Optional Feature #1)
4. Allen Wrench (Optional Feature #1)
5. Flat Saw-blade (Optional Feature #1)
6. Operator’s Manual
7. Hardware Bag
Blade Guard Assembly
Install the blade guard to the holder. Secure the
screw with a nut and two washers.

6
9. Machine Use and Care
-Do not use low-output electric tools for heavy work.
Do not use the electric tool for purposes for which it
is not intended. For example, do not use hand-held
circular saws for the cutting of branches or logs. Do
not use the electric tool to cut firewood.
-When the saw blade is blocked due to abnormal
feed force during cutting, turn the machine off and
disconnect it from power supply. Remove the work
piece and ensure that the saw blade runs free. Turn
the machine on and start new cutting operation with
reduced feed force.
-Do not remove any cutting residues or other parts of
workpieces from the cutting zone while the machine is
running and the saw unit is not at rest.
Never remove loose splinters, chips or jammed pieces
of wood while the saw blade is running.Switch off the
machine to troubleshoot or remove jammed pieces of
wood.
-Refitting, including adjusting and measuring works,
and cleaning must be carried out only when the motor
is switched off. - Disconnect the main power plug -
Before switching on again, ensure that keys and
adjustment tools have been removed.
-Take care of your tools. Keep cutting tools sharp and
clean in order to be able to work better and more
safely. Follow the instructions for lubrication and for
tool replacement.
-Check the connection cable of the electric tool
regularly and have it replaced by a recognized
specialist when damaged. Check extension cables
regularly and replace them when damaged. Keep the
handle dry, clean and free of oil and grease.
-Check the electric tool for potential damage.
Protective devices and other parts must be carefully
inspected to ensure that they are faultfree and
function as intended prior to continued use of
the electric tool. Check wether the moving parts
function faultlessly and do not jam or whether
parts are damaged. alll parts must be correctly
mounted and all conditions must be fulfilled to
ensure faultfreeoperation of the electric tool. The
moving protective hood may not be fixed in the open
position. Damaged protective devices and parts must
be properly repaired or replaced by a recognised
workshop, insofar as nothing different is specified
in the operating manual. Damaged switches must
be replaced at a customer service workshop. Do not
use any faulty or damaged connection cables. Do not
use any electric tool on which the switch can not be
switched on and off.
7. Introduction
Your new Scroll saw will more than satisfy your
expectations. It has been manufactured under
stringent quality standards to meet superior
performance criteria. You will find it easy and safe to
operate, and with proper care, it will give you many
years of dependable service.
High performance and powerful variable speed
scroll saw. Suitable for precise or intricate cuts in
wood, plastic, metal, plexiglass and plaster.
8. Application Conditions
This scroll saw is designed for operating under
ambient temperatures between +5°C and 40°C
and for installation at altitudes no more than
1000m above M.S.L. The surrounding humidity
should less than 50% at 40°C. It
* S2, Short-time duty. After continuous operation
of 10 minutes the drill stops until the device tem-
perature deviates by less than 2 K (2°C) from the
room temperature.
* The noise was measured according to clause
13.2 of EN 61029-1:2009+A11
Carefully read through this entire
operator’s manual before using your
new Scroll saw. Take special care to
heed the cautions and warnings.
Sound pressure
level (LPA)
Sound power level
(LwA)
78.1 db(A)* k=3 db(A)
88.6 db(A)* k=3 db(A)
7
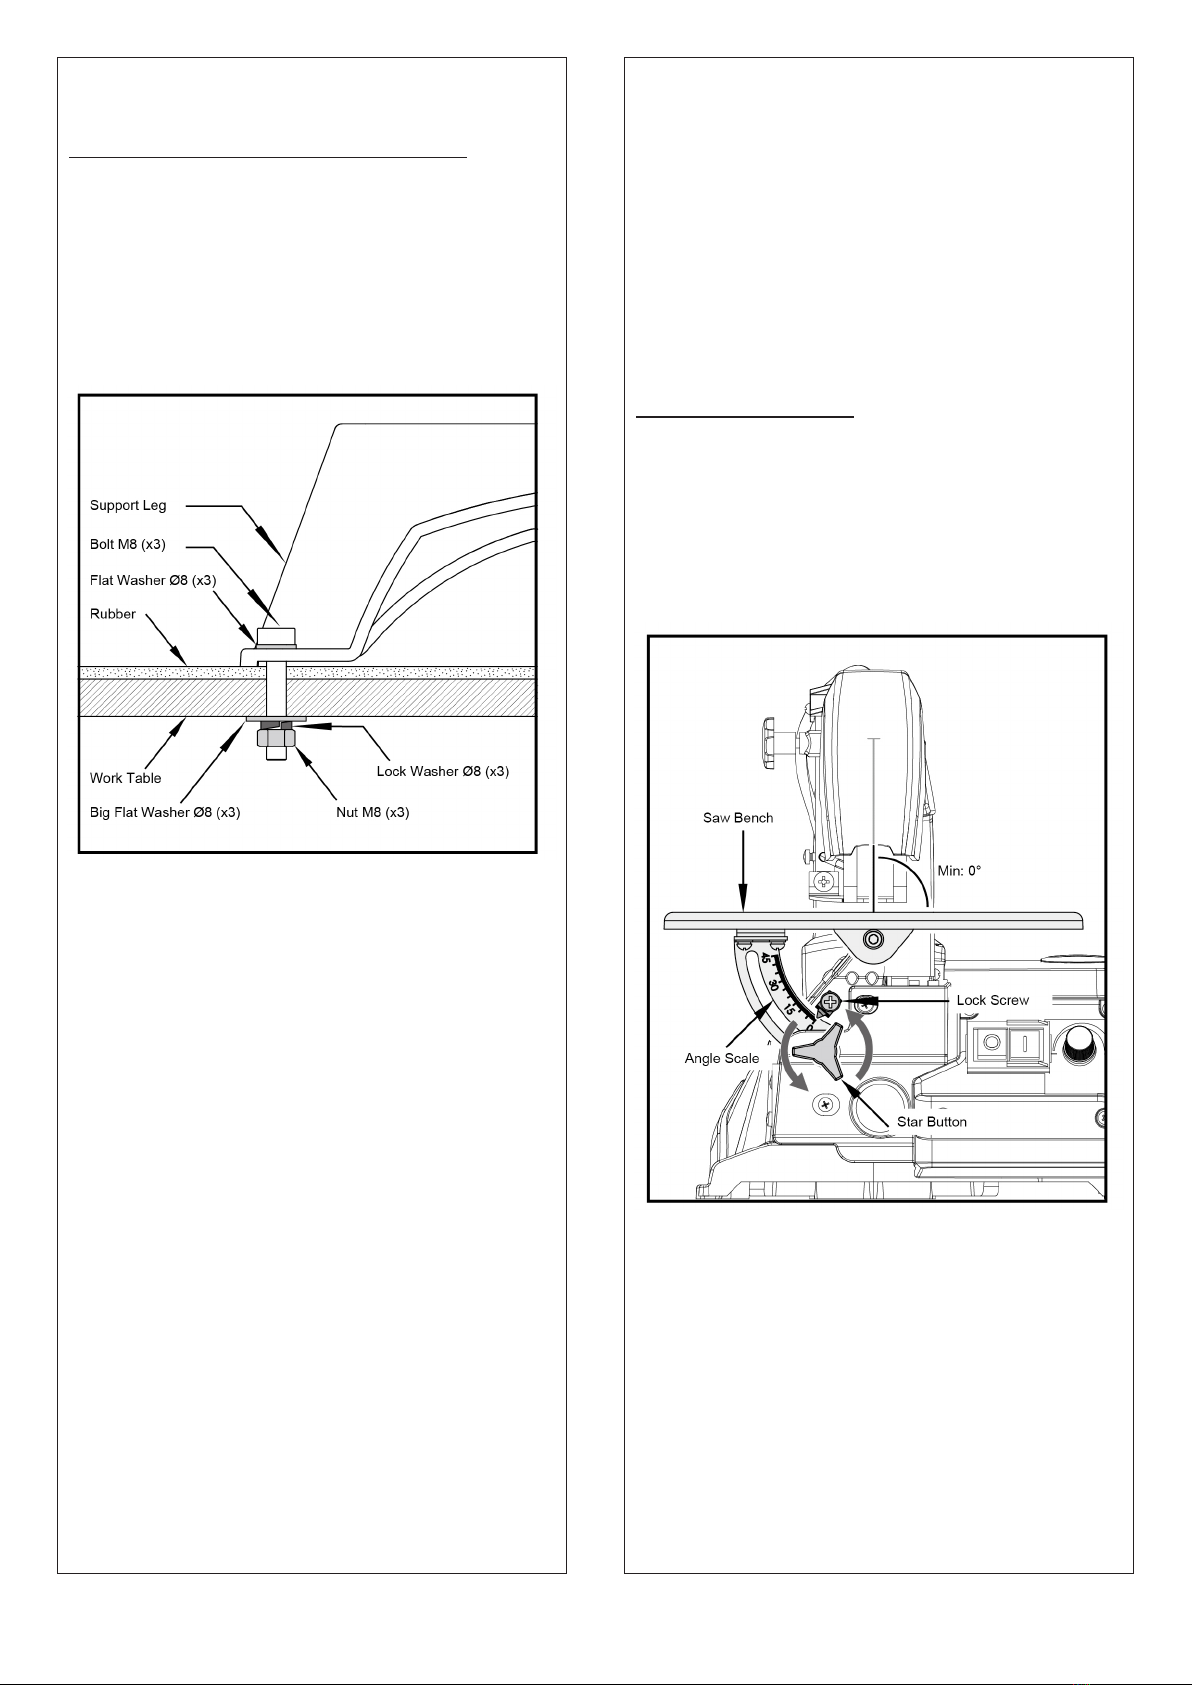
10. Operation
Mounting the machine on a work bench
A workbench made from solid wood is better than
one made of plywood, as interfering vibrations
and noise are more noticeable with plywood.
The necessary tools and small parts for assembling
the saw on a workbench are not supplied with
the saw. However, use equipment of at least the
following:
1. Machine
2. Bolt M8 (×3)
3. Flat Washer Ø8 (×3)
4. Rubber Pad
5. Work Table
6. Big Flat Washer Ø8 (×3)
7. Lock Washer Ø8 (×3)
8. Nut M8 (×3)
First of all, drill holes into the seating surface
and then Insert the screws.
A foam rubber base for reduction of noise is
not supplied with the saw either. However, we
expressly recommend that you use such a base to
keep vibration and noise to a minimum. Ideal size
400 × 240 mm.
11. Setting the Saw Bench
• Release the star button and bring the saw
bench to a right angle in relation to the saw blade.
Use a 90° angle L-square measure the right angle
between the blade and the bench. The saw blade
be at 90° to the angle.
• Close the star button when the distance
between the blade and the 90° angle is at a
minimum. The bench should then be at 90° to the
saw blade.
Setting the angle scale
• Release the lock screw and bring the indicator
to the zero position. Fasten the screw.
Please note: the angle scale is a useful piece of
supplementary equipment, but should not be
used for precision work. Use scrap wood for saw
tests, adjust the bench if necessary.
Horizontal Saw Bench and Diagonal Cuts
The saw bench can be positioned into a 45°
diagonal position or be left in the horizontal
position.
You can read off the approximate slope angle
by using the angle scale located under the work
bench. For more exact adjustment, use scrap
wood for some saw tests; adjust the bench if
necessary.

8
A scroll saw is fundamentally a “curve cutting
tool“ but which can also carry out straight and
angled edge cuts. Familiarise yourself with the
following important points prior to commissioning
the saw.
• The saw does not automatically cut wood.
You must feed the wood against the saw blade
manually.
• The cutting process occurs only while the blade
is moving downwards.
• Feed the wood slowly against the saw blade as
the saw blade teeth are small and cut only while
moving downwards.
• All persons carrying out work with the saw
require training. The saw blade may break easily
during this training time while the operator is still
unfamiliar with the saw.
• The saw is best suited for sheets of wood less
than 2.5 cm thick.
• Feed the wood especially slowly against the
blade and avoid abrupt curves to prevent the
saw blade from breaking, if you wish to cut wood
sheets thicker than 2.5 cm.
• Saw blade teeth becomes blunt over time, saw
blades must be replaced. The saw blades are
sufficient for 1/2 to 2 operating time depending
upon the type of wood.
• Try and make sure that the saw blade follows
the grain of the wood in order to obtain a clean
cut.
• The saw speed must be reduced to minimum
when cutting precious and non-terrous metals.
12. Inside Cuts
This saw is suited also to inside cuts cut not
starting at the edge of the work piece. Proceed
as follows:
• Drill a 6 mm hole in the work piece.
• Loosen the clamping screw (blade tensioner)
and release the tension in the blade.
• Place the bore hole over the saw blade slot in
the work bench.
• Install the saw blade through the hole in the
work piece and through the work blade slot, and
fasten the blade to the holders.
• When you have completed the inside cut,
remove the saw blade and then remove the work
piece from the bench.
Continuous Operation
It is possible to switch the saw on by pressing the
green "I" button for continuous operation.
In order to switch the saw off, it is necessary to
press the red "0" button.
With the continuously variable electronic speed
control, the cutting speed can be increased by
turning to the right or reduced by turning to the
left.
Warning: Switch off the saw andremove
the mains supply plug before doing
inside cuts in order to avoid injuries
caused by unintentional activation of
the saw.
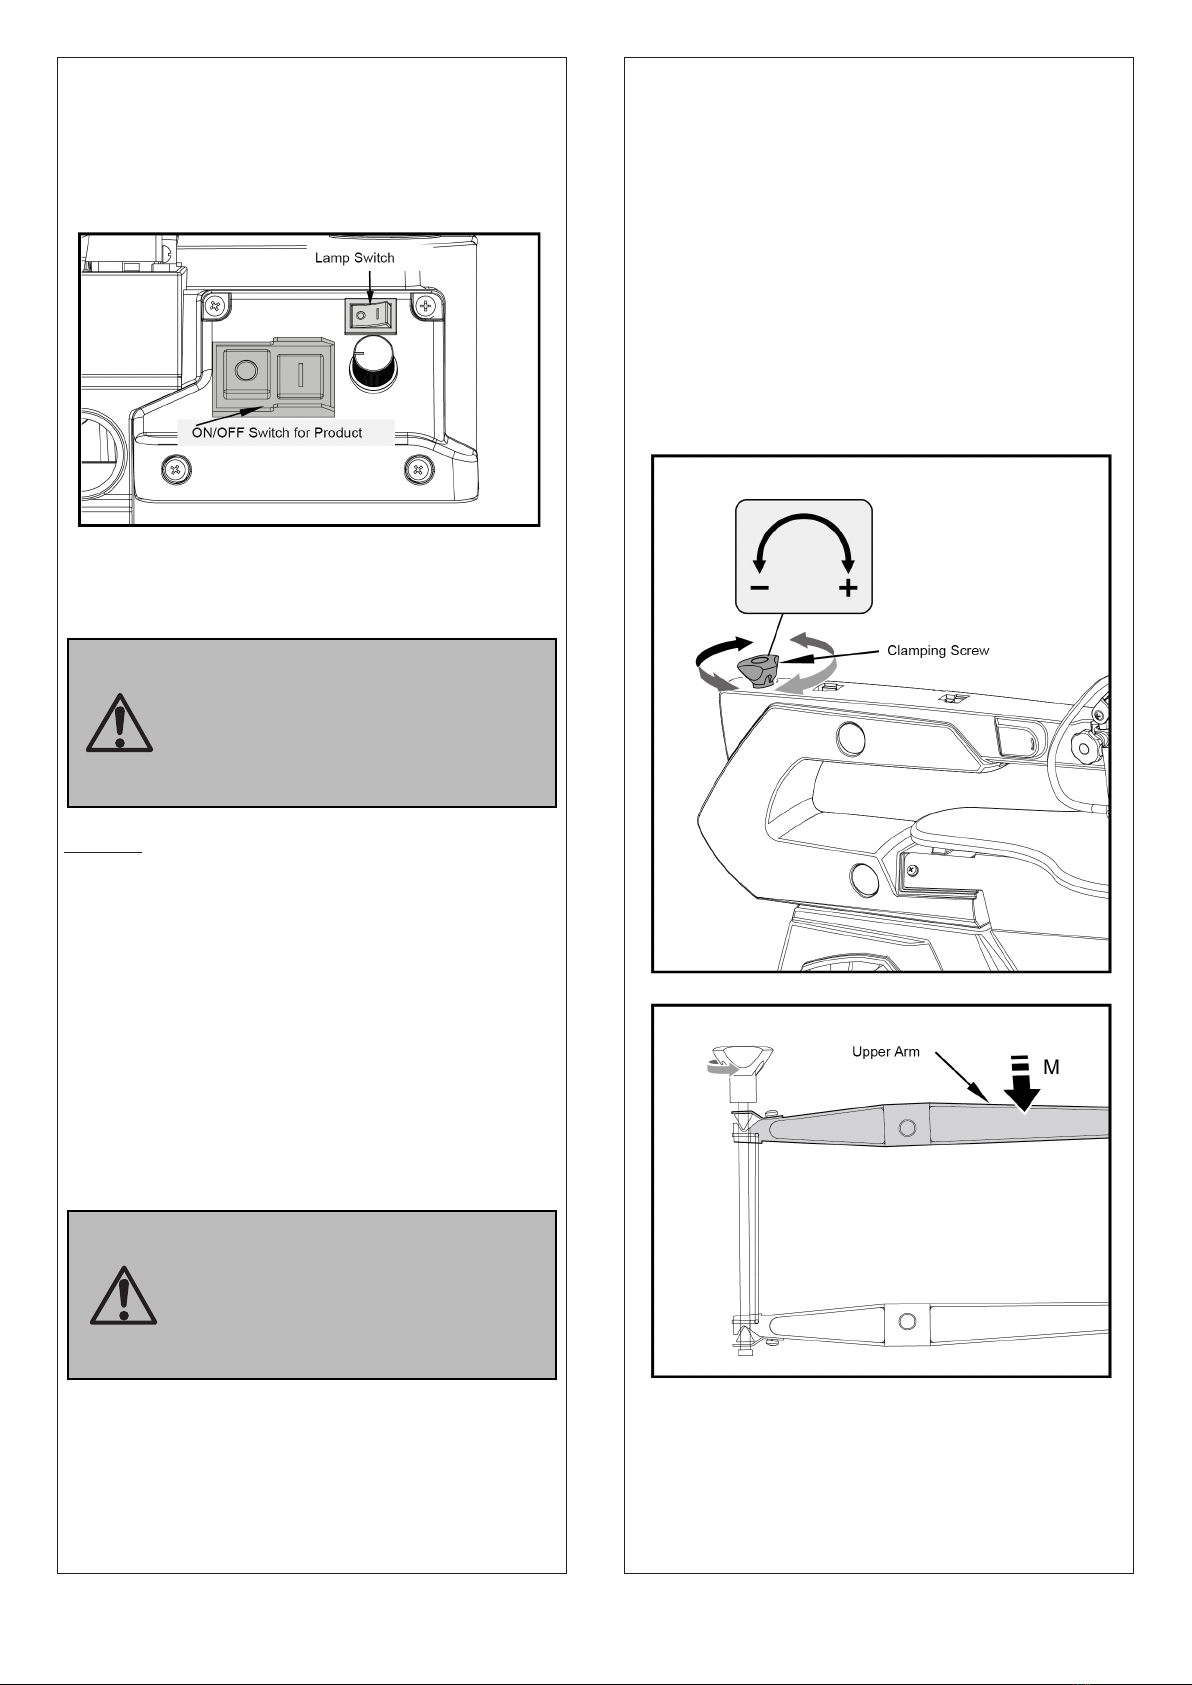
Lighting System (For #65115B)
Press "I" to turn on the lamp.
Press "O" to turn off the lamp
This light switch can only work when the ON/
OFF switch for the product is turned on
13. Maintenance
General
Wipe chips and dust off the machine from time to
time using a cloth.
Re-application of the wax coating on the
workbench makes feeding the workpiece to the
blade easier.
The mains cable should be replaced immediately
if pulled out, cut or damaged in any other way.
Do not lubricate the motor bearings or internal
parts!
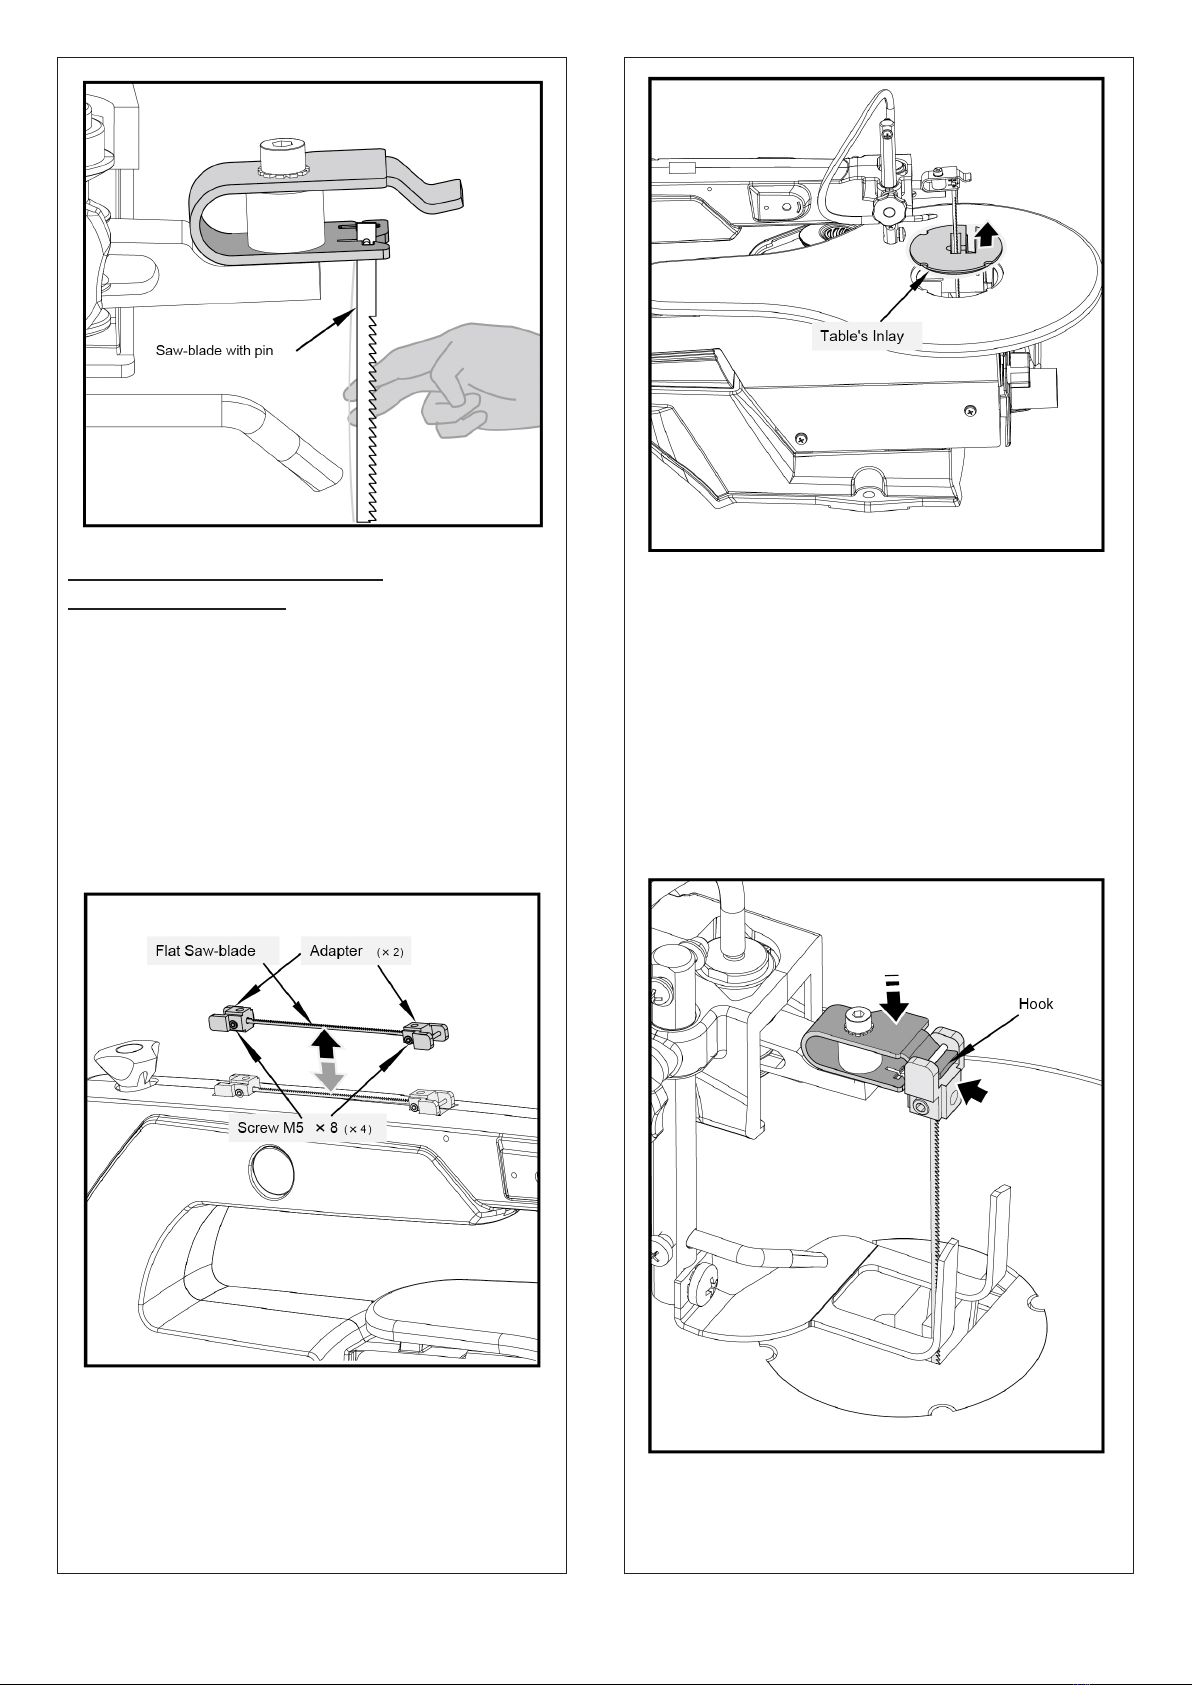
Changing the Saw Blade with pins
1. Saw blade removal. Extract the saw-blade by
unscrewing the Clamping screw. Remove the saw-
blade from the upper and lower support by slightly
pressing the upper arm down.
2. Inserting the new saw-blade. Lead one end of the
saw-blade through the perforation in the table and
insert the saw-blade pins into the notch. Repeat this
procedure at the upper blade support. Before hooking
it in. Slightly press the upper arm down. Check the
position of the blade pins at the supports. Tighten
the blade by means of the Clamping screw. Check the
blade's tightness. Keep on rotating clockwise in order
to tighten the blade even more.
9
Warning! In the interests of
operational safety, always switch off
the saw and remove the mains plug
before carrying out maintenance
work.
Switch off the saw and remove the
mains supply plug before installing
saw blades in order to avoid injuries
caused by unintentional activation of
the saw.
10
Changing the flat saw-blade
(Optional Feature #1)
1. Take out the adapter. Fix the saw-blade with
allen screws using allen wrench.
2. Extract the saw-blade by sliding the table's inlay
up, then unscrew the clamping screw.
3. Slightly press the upper arm down.
4. Then remove the saw-blade by pulling it
forward out of the supports and through the
access perforation in the table
5. Put the saw-blade with the two adapter into
the lower support, the other end into the upper
support.
6. Slight press the upper arm down before
hooking it in.
7. Tighten the blade with the tightening screw
by rotating it clockwise. Check the tightness of
the blade. Keep on rotating clockwise in order to
tighten the blade even more.
11
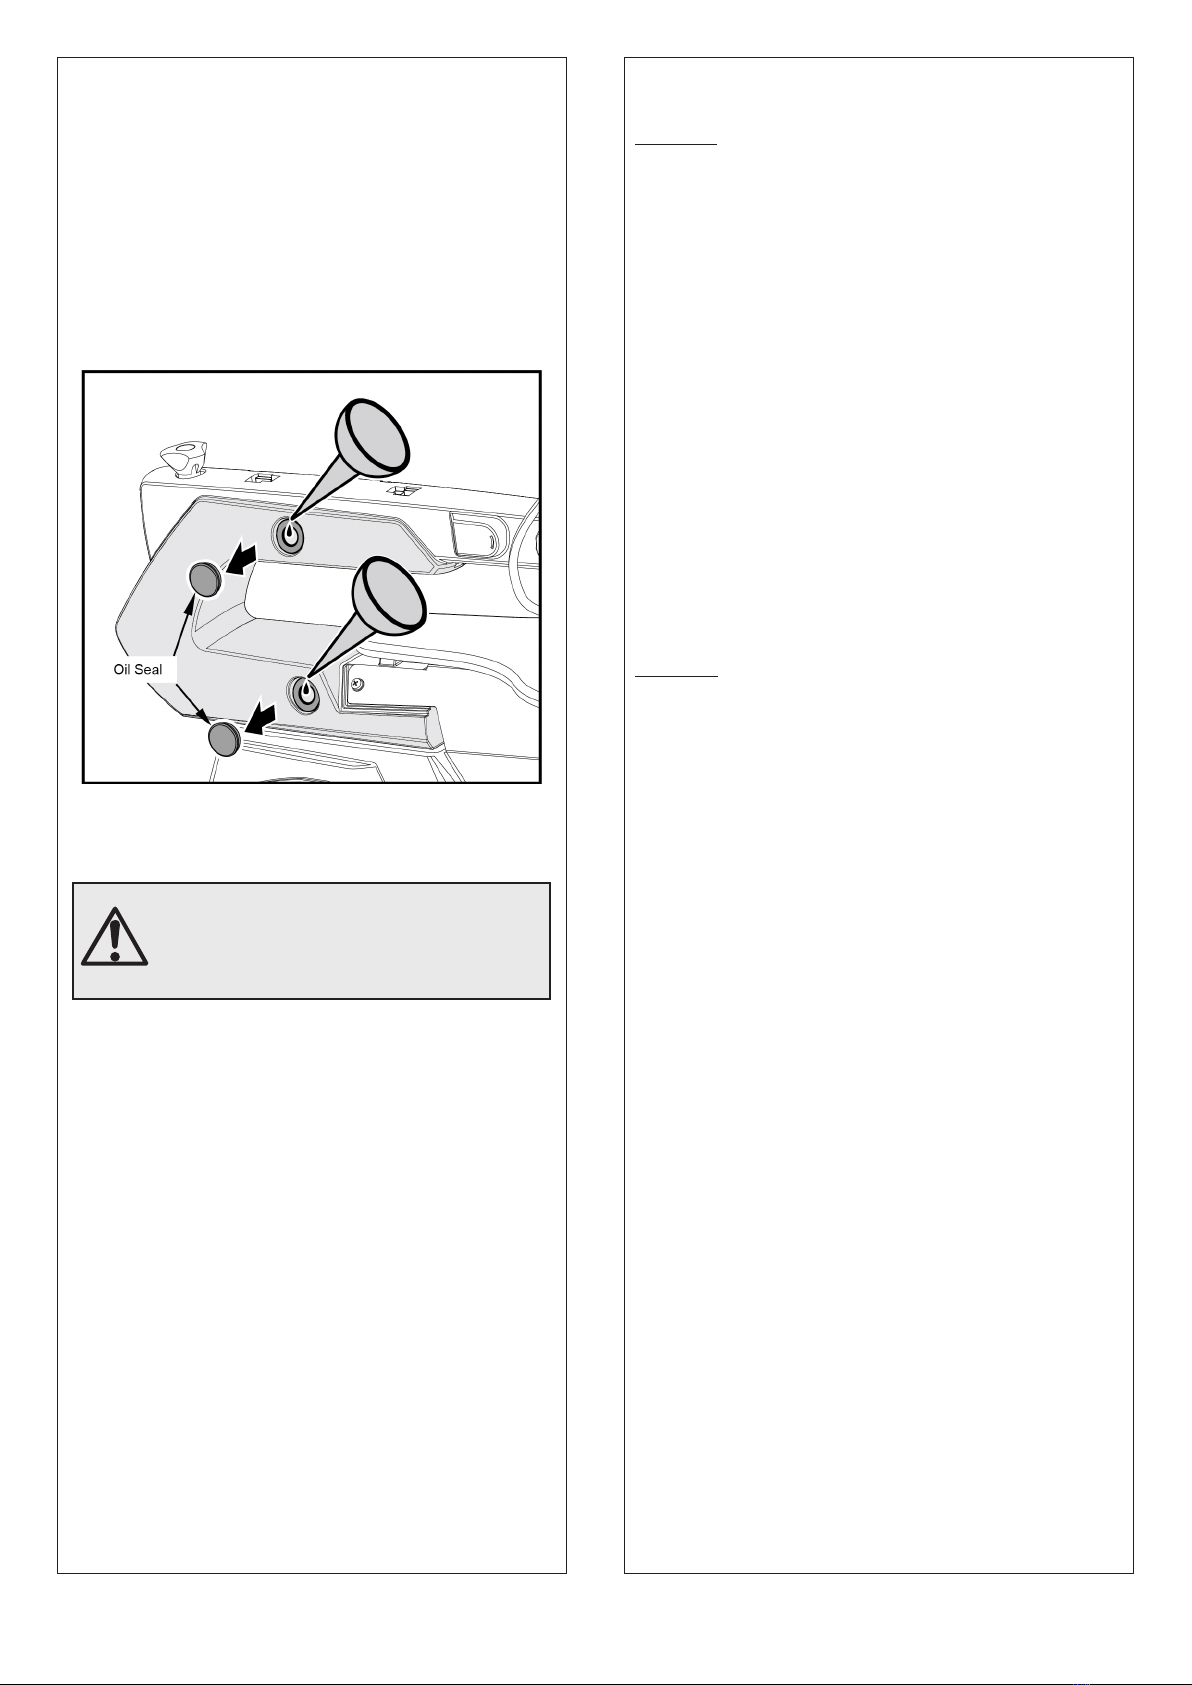
14. Lubrication
Lubricate the saw arm bearings every 50 hours.
Proceed as above figure shown.
Turn the saw to the side.
Apply a generous amount of SAE 20 oil to the
shaft end and bronze bearings.
Let the lubricant oil work in overnight.
Repeat the procedure the next day on the other
side of the saw.
Carbon Brushes Inspection
In case of excessive sparking, have the carbon
brushes checked only by a qualified electrician.
15. Transport
1. Be sure turn off the power and pull out the plug
after use.
2. Pull down the transparent blade guard to
prevent hand cutting during transportation.
3. Disconnect the vacuum cleaner and the other
connecting devices, and remove the connection
bolts between the machine and the work table.
4. Hold the upper end of the U-shaped arm with
one hand while moving; If the saw-blade adapter
& allen wrench (Optional Feature #1) is on the top
of the U-shaped arm, you can move it with both
hands.
5. Raw materials or precision-cut semi-finished
products are recommended to be removed from
the worktable before moving, which may damage
the saw blade and its fixing device.
16. Maintenance
Servicing
Pull the mains plug before any adjustments,
maintenance or repair.
Have any work on the device that is not described in
this instruction guide performed by a professional.
Only use original parts. Allow the device to cool off
before any maintenance or cleaning is undertaken.
There is a risk of burning!
Always check the device before using it for obvious
defects such as loose, worn or damaged parts, correct
the positioning of screws or other parts. Exchange the
damaged parts.
The ball bearings in the spindle and the V-belt pulley
assembly are greased and permanently sealed. Pull the
spindle down and oil the spindle sleeve moderately
every three months.
Lubricate the table bracket and locking knobs if they
become difficult to use.
Cleaning
Do not use any cleaning agents or solvents. Chemical
substances can etch the plastic parts of the device.
Never clean the device under running water.
• Thoroughly clean the device after every use.
• Clean the ventilation openings and the surface of
the device with a soft brush or cloth.
• Remove chips, dust and dirt with a vacuum cleaner
if necessary.
• Lubricate moving parts regularly.
• Vacuum sawdust or metal shavings that accumulate
in and on the motor, pulley housing, table, and work
surface.
• Apply a light coat of paste wax to the column and
table to help keep these surfaces clean and rust-free.
• Do not allow lubricants to come into contact with
switches, V-belts, pulleys and drill lifting arms.
Danger! The carbon brushes should
not be replaced by anyone but a
qualified electrician.

12
17. Storage
Store the device and its accessories in a dark, dry and
frost-proof place that is inaccessible to children. The
optimum storage temperature is between 5 and 30˚C.
Store the electrical tool in its original packaging.
Cover the electrical tool in order to protect it from
dust and moisture.
Store the operating manual with the electrical tool.
Danger! Store the Scroll Saw a way
it cannot be started by unauthorised
persons and that nobody can be injured.
Caution! Do not store the Scroll Saw
unprotected outdoors or in a moist
environment.
Problem Cause Remedy
Saw blades break
Tension incorrectly set Set the correct tension
Load to great Feed the workpiece more slowly
Incorrect saw blade variety Use the correct saw blades
Workpiece not fed straight Avoid exerting pressure from the side
Motor does not
function
Mains Gable faulty Change faulty parts
Motor faulty Call customer service. Do not attempt to
repair the motor yourself as
this should be carried out by trained
personnel.
Vibration
(NOTE: The saw
vibrates slightly
when the motor is
running in normal
opera- tion.)
Saw incorrectely installed Set the correct tension
Unsuitable underlay Feed the workpiece more slowly
The work bench is not screwed
down or is on the motor
Use the correct saw blades
The motor is not secured Avoid exerting pressure from the side
Saw blade swings
out., holders not
aligned straight
Holders not aligned Losen the screws with which the holders
are fastenedto the arm. Align the
holders so that they are perpendicular
to each other and retighten the screws
Trouble Shooting
In the interests of operational safety, always switch off the saw and remove the mains plug
before carrying out maintenance work.
13
16" SCROLL SAWS
22
GB
OPTIONAL FEATURE #1 OPTIONAL FEATURE #2
65115B

14
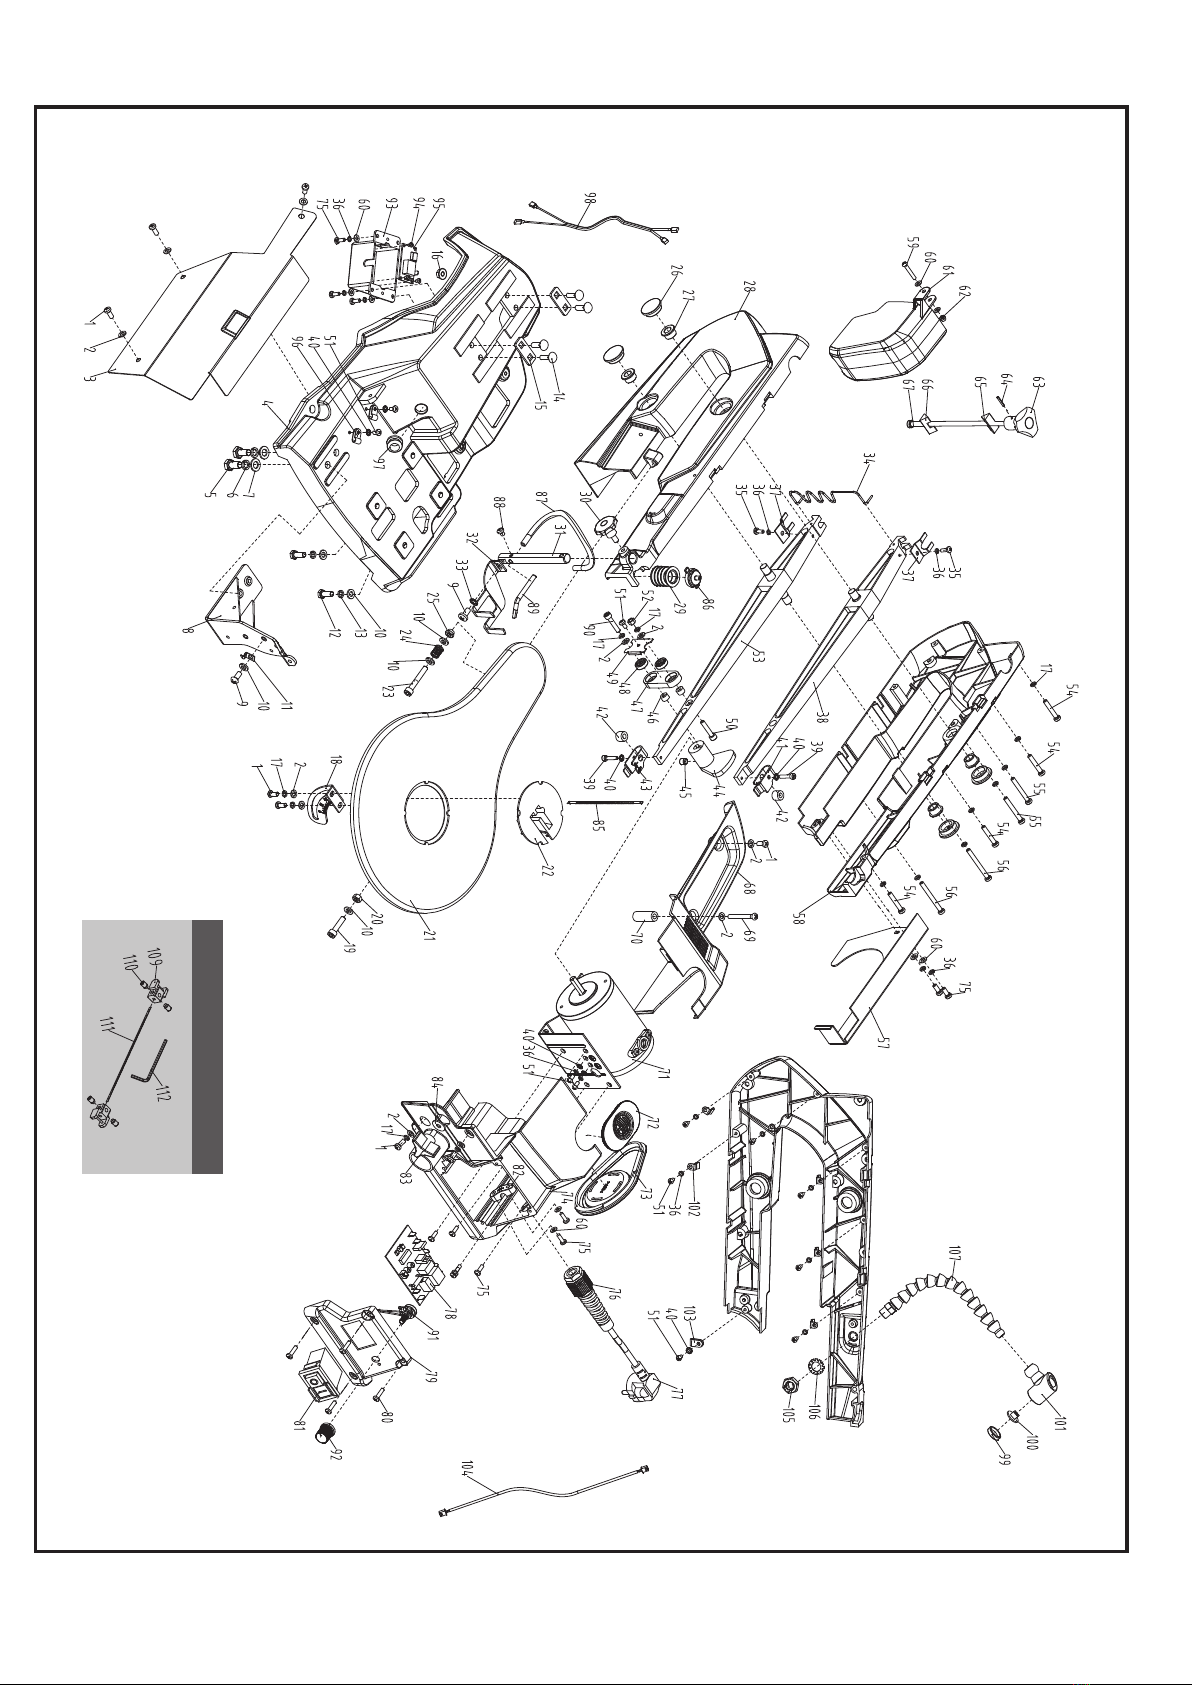
No. Description No. Description
1 Screw M5×12 39 Screw M4×20
2 Flat Washer Ø5 40 Lock Washer Ø4
3 Body Outside Cover 41 Upper Clip
4 Base 42 Bushing
5 Bolt M8×20 43 Lower Clip
6 Spring Washer Ø8 44 Eccentric Bushing
7 Flat Washer Ø8 45 Screw M8×8
8 Support Bracket 46 Small Shaft Sleeve
9 Screw M6×12 47 Plastic Bearing Seat
10 Flat Washer Ø6 48 Bearing 625-2Z
11 Indicator 49 Bearing Cover
12 Bolt M6×16 50 Screw M5×25
13 Spring Washer Ø6 51 Screw M4×8
14 Bolt M6×20 52 Nut M5
15 Press Plate 53 Lower Arm
16 Flange Nut M6 54 Bolt M5×30
17 Spring Washer Ø5 55 Screw M5×40
18 Angle Scale 56 Screw M5×50
19 Screw M6×25 57 Welded Cover
20 Nut M6 58 Main Frame-Left
21 Work Table 59 Screw M4×25
22 Table Inlay 60 Flat Washer Ø4
23 Screw M6×40 61 Blade Guard
24 Spring 62 Locknut M4
25 Locknut M6 63 Clamping Screw
26 Rubber Plug 64 Pin 2.5×16
27 Shaft Sleeve 65 Adjusting Block 1
28 Main Frame-Right 66 Adjusting Block 2
29 Air Bag 67 Adjusting Rod
30 Star Handle Screw 68 Rear Cover
31 Blade Guard Holder 69 Screw M5×45
32 Protective Bracket 70 Rear Cover Busing
33 Lock Washer Ø6 71 Motor
34 Connected Net 72 Rubber Cap
35 Screw M4×10 73 Middle Cover
36 Spring Washer Ø4 74 Front Cover
37 Limit Plate 75 Screw M4×12
38 Upper Arm 76 Cable Gland Strain Relief
Connector

15
No. Description No. Description
77 Power Cord & Plug 96 Cable Clamp R-5.3
78 Circuit Board 97 Rubber Sleeve
79 Switch Board 98 Double Core Cable
80 Screw ST4.2×16 99 Lamp Cover
81 ON/OFF Switch 100 Led Lamp
82 Cable Holder 101 Lamp Holder
83 Star Button M6x13 102 Pipe Clamp 1
84 Big Flat Washer Ø6 103 Cable Clamp U-3.3
85 Blade 104 Lamp Cable 1
86 Air Bag Seat 105 Lock Nut
87 Plastic Air Pipe 106 Lock Washer
88 Screw M5×6 107 Light Tube
89 Air Nozzle 108 Mode Switch
90 Screw M5×20 109 Adapter
91 Potentiometer 110 Screw M5x8
92 Speed control knob 111 Flat Saw-blade
93 Circuit Board Housing 112 Allen Wrench 2.5
94 Screw ST2.9x6.5
95 Led Lamp Circuit Board B

16
Date:05/17/2021
EN ISO 12100:2010
EN 55014-1:2017
EN 55014-2:2015
EN 61000-3-2:2014
EN 61000-3-3:2013
Scroll Saw - Part. No. DJMSS406
2006/42/EC Machinery Directive
2014/30/EU EMC Directive

17
12
Table of contents
Other djm direct Saw manuals


