djm direct DJMSL12 User manual

0

1
1.Instroduction
MANUFACTURER:
DJM Direct.com
Unit 43 Churchill Way, Lomeshaye Industrial Estate, Nelson,
Lancashire BB9 6RT UK
DEAR CUSTOMER
We hope your new tool brings you much enjoyment and success.
NOTE:
According to the applicable product liability laws, the manufacturer
of the device does not assume liability for damages to the product or
damages caused by the product that occurs due to:
- Improper handling,
- Non-compliance of the operating instructions,
- Repairs by third parties, not by authorized service technicians,
- Installation and replacement of non-original spare parts, .
- A breakdown of the electrical system that occurs due to the
non-compliance of the electric regulations and VDE regulations 0100,
DIN 57113 / VDE0113.
WE RECOMMEND:
Read through the complete text in the operating instruc-tions before
installing and commissioning the device. The operating instructions
are intended to help the user to become familiar with the machine
and take advan-tage of its application possibilities in accordance with
the recommendations. The operating instructions contain important
information on how to operate the machine safely, professionally
and economically, how to avoid danger, costly repairs, reduce
downtimes and how to in-crease reliability and service life of the
machine. In addition to the safety regulations in the operating
instructions, you have to meet the applicable regula-tions that apply
for the operation of the machine in your country. Keep the operating
instructions package with the machine at all times and store it in a
plastic cover to protect it from dirt and moisture. Read the
instruction manual each time before operating the machine and
carefully follow its information. The machine can only be operated by
persons who were instructed concerning the operation of the
machine and who are informed about the associated dangers. The
minimum age requirement must be complied with. In addition to the
safety require-ments in these operating instructions and your
country’s applicable regulations, you should observe the generally
recognized technical rules concerning the operation of woodworking
machines.
2.Device Description
1. Handle
2. Laser on/off switch
3. Saw on/off switch
4. Lever to release blade guard
5. Blade guard
6. Blade
7. Fast Clamp
8. Fence
9. Insert Plate
10. Locking knob for mitre angle
11. Mitre gauge
12. Locking Clamp
13. Saw table
14. Mounting holes
15. Extension bars
16. Bevel gauge
17. Dual Laser guide
18. Locking knob for Bevel Angle
19. Trenching facility
20. Sliding carriage
21. Dust bag
22. Sliding carriage lock
23. Blade spindle lock
24. Transport safety lock
25. Extraction port
26. Pan HD Screws
27. Blade bolt
28. Outer clamping flange
29. Extension bar lock
30. Fence extension cap screwz
31. Fence extension lock
32. Trenching stop
33. Depth screw
34. Depth lock
35. Laser screws
36. Laser tip
37. Retaining spring
38. Carbon brush
39. Terminal
40. Positive stop knob
41. Blade wrench

2
3. Unpacking
- Open the packaging and remove the device care-fully.
- Remove the packaging material as well as the packaging and
transport bracing (if available).
- Check that the delivery is complete. s Check the device and
accessory parts for transport damage.
- If possible, store the packaging until the warranty period has
expired.
ATTENTION
The device and packaging materials are not toys! Children must not
be allowed to play with plastic bags, film and small parts! There is a
risk of swallowing and suffocation!
4.Intended use
This mitre saw is intended for cutting wood and analogue materials,
The saw is not designed for cutting firewood.
WARNING ! When using electric tools basic safety precautions should
always be followed to reduce the risk of fire, electric shock and
personal injury including the following.
Read all these instructions before attempting to operate this product
and save these instructions.
All persons who use and service the machine have to be acquainted
with this Manual and must be informed about its potential hazards.
Children and infirm people must not use this tool. Children should be
supervised at all times if they are in the area in which the tool is
being used. It is also imperative that you observe the accident
prevention regulations in force in your area. The same applies for
general rules of occupational health and safety
Even when the tool is used as prescribed it is not possible to
eliminate all residual risk factors. The following hazards may arise in
connection with the tool’s construction and design:
·Contact with the blade.
·Kickback of workpiece and parts of workpiece.
·Blade fracture.
·Catapulting of blade pieces.
·Damage to hearing if effective earmuffs are not worn.
·Harmful emissions of sawdust when the machine is used in closed
rooms. Always use supplementary dust extraction where possible.
·Do not use blades that are deformed or cracked.
·Always remove the plug from the mains socket before making any
adjustments or maintenance, including changing the blade. To ensure
safe operation of the mitre saw you must follow these guidelines:
·Select the correct blade for the material to be cut.
·D o not use the saw to cut materials other than those
recommended by the manufacturer.
The mitre saw can be safely carried by the main handle but only once
it has been removed from the mains power and secured in the locked
down position.
·Do not use the saw without the guards in position, in good working
order and properly maintained.
·Ensure that the arm is properly secure when bevelling.
·Keep the floor area around the machine level, well maintained and
free of loose materials.
·Provide adequate lighting.
·Ensure that you are trained in the use, adjustment and operation of
the machine.
·Use correctly sharpened blades and observe the maximum speed
marked on the blade.
·Do not remove any cut-offs from the cutting area until the guard is
fully locked in place and the blade has come to rest.
·Ensure that the mitre saw is fixed to a work bench wherever
possible.
·When cutting long pieces which extend well over the table width
ensure that the ends are adequately supported at the same height as
the saw table top. Supports should be positioned in such a way to
ensure that the workpiece does not fall to the ground. once the cut
has been made. A number of supports at regular intervals may be
required if the workpiece is extremely long.

3
5. NOT INTENDED USE
If not intended use the risk of fire, electric shock and personal injury
maybe further and
- The provisions contained in this guarantee are not intended to limit,
modify, take away from, disclaim or exclude any statutory guarantee
set forth in any applicable provincial or federal legislation.
6. RESIDUAL RISKS
Even if you use this electric power tool in accordance with
instructions, certain resi dual risks cannot be rules out. The
following hazards may arise in connection with the equipment’s
construction and layout:
1. Lung damage if no suitable protective dust mask is used.
2. Damage to hearing if no suitable ear protection is used.
3. Health damage caused by hand-arm vibrations if the equipment is
used over a prolonged period or is not properly guided and
maintained.
7.GENERAL SAFETY INSTRUCTIONS
WARNING ! When using electric tools basic safety precautions
should always be followed to reduce the risk of fire, electric shock
and personal injury including the following.
Read all these instructions before attempting to operate this product
and save these instructions.
1 - Keep work area clear
- Cluttered areas and benches invite injuries.
2 - Consider work area environment
- Do not expose tools to rain.
- Do not use tools in damp or wet locations.
- Keep work area well lit.
- Do not use tools in the presence of flammable liquids or gases.
3 - Guard against electric shock
- Avoid body contact with earthed or grounded surfaces (e.g. pipes,
radiators, ranges, refrigerators).
4 - Keep other persons away
- Do not let persons, especially children, not involved in the work
touch the tool or the extension cord and keep them away from the
work area.
5 - Store idle tools
- When not in use, tools should be stored in a dry locked-up place,
out of reach of children.
6 - Do not force the tool
- It will do the job better and safer at the rate for which it was
intended.
7 - Use the right tool
- Do not force small tools to do the job of a heavy duty tool.
- Do not use tools for purposes not intended; for example do not
use circular saws to cut tree limbs or logs.
8 - Dress properly
- Do not wear loose clothing or jewellery, they can be caught in
moving parts.
- Non-skid footwear is recommended when working outdoors.
- Wear protective hair covering to contain long hair.
9 - Use protective equipment
- Use safety glasses.
- Use face or dust mask if working operations create dust.
10 - Connect dust extraction equipment
- If the tool is provided for the connection of dust extraction and
collecting equipment, ensure these are connected and properly
used.
11 - Do not abuse the cord
- Never yank the cord to disconnect it from the socket. Keep the
cord away from heat, oil and sharp edges.
12 - Secure work
- Where possible use clamps or a vice to hold the workpieces. It is
safer than using your hand.
13 - Do not overreach
- Keep proper footing and balance at all times.
14 - Maintain tools with care
- Keep cutting tools sharp and clean for better and safer
performance.
- Follow instruction for lubricating and changing accessories.
- Inspect tool cords periodically and if damaged have them repaired
by an authorized service facility.
- Inspect extension cords periodically and replace if damaged.
- Keep handles dry, clean and free from oil and grease.
15 - Disconnect tools
- When not in use, before servicing and when changing
accessories such as blades, bits and cutters, disconnect tools from
the power supply.
16 - Remove adjusting keys and wrenches
- Form the habit of checking to see that keys and adjusting
wrenches are removed from the tool before turning it on.
17 - Avoid unintentional starting
- Ensure switch is in "off" position when plugging in.
18 - Use outdoor extension leads
- When the tool is used outdoors, use only extension cords
intended for outdoor use and so marked.
19 - Stay alert
- Watch what you are doing, use common sense and do not
operate the tool when you are tired.
20 - Check damaged parts

4
- Before further use of tool, it should be carefully checked to
determine that it will operate properly and perform its intended
function.
- Check for alignment of moving parts, binding of moving parts,
breakage of parts, mounting and any other conditions that may
affect its operation.
- A guard or other part that is damaged should be properly
repaired or replaced by an authorized service centre unless
otherwise indicated in this instruction manual.
- Have defective switches replaced by an authorized service centre.
- Do not use the tool if the switch does not turn it on and off.
21 - Warning
- The use of any accessory or attachment other than one
recommended in this instruction manual may present a risk of
personal injury.
22 - Have your tool repaired by a qualified person
- This electric tool complies with the relevant safety rules. Repairs
should only be carried out by qualified persons using original
spare parts, otherwise this may result in considerable danger to
the user.
WARNINGS. Before connecting a tool to a power source (mains
switch power point receptacle, outlet, etc.) be sure that the voltage
supply is the same as that specified on the nameplate of the tool. A
power source with a voltage greater than that specified for the tool
can result in serious injury to the user, as well as damage to the tool.
If in doubt, do not plug in the tool. Using a power source with a
voltage less than the nameplate rating is harmful to the motor. Your
tool is double insulated for additional protection against a possible
electrical insulation failure within the tool.
WEAR GOGGLES
WEAR EARMUFFS
WEAR A BREATHING MASK
WARNING! For your own safety read instruction manual before
operating mitre saw. Wear eye protection. Keep hands out of path of
saw blade. Do not operate saw without guards in place. Do not
perform any operation freehand. Never reach around saw blade.
Turn off tool and wait for saw blade to stop before moving workpiece
or changing settings. When changing the blade, replace and secure all
guarding to its original position and correctly before starting tool.
Disconnect power (or unplug tool as applicable) before changing
blade or servicing. Do not expose to rain or use in damp locations. To
reduce the risk of injury, return carriage to the full rear position after
each crosscut operation.
The tool must be used only for its prescribed purpose. Any use other
than those mentioned in this Manual will be considered a case of
misuse. The user and not the manufacturer shall be liable for any
damage or injury resulting from such cases of misuse.
The manufacturer shall not be liable for any changes made to the
tool nor for any damage resulting from such changes.
Even when the tool is used as prescribed it is not possible to
eliminate all residual risk factors. The following hazards may arise in
connection with the tool’s construction and design:
·Damage to the lungs if an effective dust mask is not worn.
·Damage to hearing if effective earmuffs are not worn.
·When operating the saw, use safety equipment including safety
goggles or shield, ear protection, dust mask and protective clothing
including safety gloves.
·Ensure that there is adequate general or localized lighting.
·Do not use the saw unless the guards are in place.
·Do not use the saw to cut metal or masonry.
·Do not let anyone under 18 years operate this saw.
·Ensure that the operator is adequately trained in the use,
adjustment and operation of the machine.
·Do not use this saw to cut firewood.
·Keep the area free of tripping hazards.
·Report faults in the machine, including guards and saw blades, as
soon as they are discovered.
·Ensure that the machine is always fixed to a work bench,
whenever possible.
·Always stand to one side when operating the saw.
·Never use a damaged or deformed saw blade.
·When cutting round wood, use clamps that prevent the
workpiece from turning on both sides of the blade.
·Never use your hands to remove sawdust, chips or waste close by
the blade.
·Use only blades as recommended by the manufacturer and which
conform to EN 847-1.
·Do not use blades of High Speed Steel (HSS blades).
·If the table insert is damaged or worn, have it replaced by an
authorised service centre.
·Rags, cloths, cord and string and the like should never be left
around the work area.
·Avoid cutting nails. Inspect the workpiece and remove all nails and
other foreign objects before beginning sawing.
·Support the work properly.
·Refrain from removing any cut-offs or other parts of the workpiece
from the cutting area whilst the machine is running and the saw head
is not in the rest position or whilst the machine is running with an
unguarded saw blade.
·Do not attempt to free a jammed blade before first switching off
the machine.

5
·Do not slow or stop a blade with a piece of wood. Let the blade
come to rest naturally.
·If you are interrupted when operating the saw, complete the
process and switch off before looking up.
·Periodically check that all nuts, bolts and other fixings are properly
tightened.
·Do not store materials or equipment above a machine in such a
way that they could fall into it.
·Always hold the saw on parts that are insulated. If you accidentally
cut into hidden wiring or the saw’s own cable, the metal parts of the
saw will become “live”. Switch off at the mains and remove the plug
immediately.
·Never saw near combustible liquids or gases. · Note the direction
of rotation of the motor and the blade.
·Do not lock the movable guard in the open position and always
ensure that it is working properly, freely rotating and returning to
fully cover the teeth of the blade.
·Connect the saw to a dust collection devise and ensure that it is
operated properly. As the operator of the saw, please make sure that
you understand factors that influence exposure to dust, including the
type of material to be machined, the importance of local extraction
and the proper adjustment of hoods/baffles/ shoots of your dust
extraction system. We recommend that you always wear a dust mask
when operating this saw. ·
·Wear gloves when handling saw blades and rough materials. · Saw
blades shall be carried in a holder wherever possible.
·Select saw blades in relation to the material being cut. ·
·Use correctly sharpened saw blades and observe the maximum
speed marked on the blade. Ensure the speed marked on the saw
blade is at least equal to the speed marked on the saw ·
·Take additional care when trenching (slotting).
·The mitre saw can be safely carried by the carrying handle but only
once it has been removed from the mains power and secured in the
locked down position. Warning! Never use the guard as the lifting
and transportation purpose!
·Ensure that the arm is properly secure when bevelling.
·Keep the floor area around the machine level, well maintained and
free of loose materials.
·Ensure that you are trained in the use,adjustment and operation of
the machine.
·Do not remove any cut-offs from the cutting area until the guard is
fully locked in placed and the blade has come to rest.
·Where possible use clamps or a vice to hold the workpieces. It is
safer than using your hand.
·before each cut, make sure that the machine is stable.
·When cutting long pieces which extend well over the table width,
ensure that the ends are adequately supported at the same height as
the saw table top. Supports should be positioned in such a way to
ensure that the workpiece does not fall to the ground once the cut
has been made. A number of supports at regular intervals may be
required if the workpiece is extremely long.
·During slide cutting, always ensure that the saw blade is pushed
away from the operator.
·Always use stands to provide support for long work pieces that
overhang the turntable.
·Feed work into a blade or cutter against the direction of rotation of
the blade or cutter only.
·Before making compound mitre cuts, ensure that the work head is
securely fixed in the desired position.
·Never reach over the blade to remove waste or off cuts.
8. Technical Data
Specifications:
Mains Voltage - 230V/ 50Hz
Power Consumption - 2000W
No load Speed - 4500rpm
Blade Spec - 305x30x40T
Cutting Capacity:
At 0° / 0°- 340x104mm
At -45° / 0° - 240mx104m
At 0° / -45°- 340x55mm
At 0° / +45°- 340x40mm
At -45° / -45° - 240x55mm
At +45° / +45° - 240x40mm
9. Operating
Avoid unintentional starting of the machine. During assembly and for
all work on the machine, the power plug must not be connected to
the mains supply.
Carefully remove all parts included in the delivery from their
packaging.
Remove all packaging material from the machine and the accessories
provided.
Before starting the operation of the machine for the first time, check
if all parts listed in the box content section have been supplied
Note: Check the power tool for possible damage. Before further use
of the machine, check that all protective devices are fully functional.
Any lightly damaged parts must be carefully checked to ensure
flawless operation of the tool. All parts must be properly mounted
and all conditions fulfilled that ensure faultless operation.
Damaged protective devices and parts must be immediately replaced
by an authorised service centre.
6
Always tighten the locking knob (10)&(18) firmly before sawing.
Otherwise the saw blade can become wedged in the workpiece.
Stationary or Flexible Mounting
To ensure safe handling, the machine must be mounted on a level
and stable surface (e. g., workbench) prior to using.
Mounting to a Working Surface
–Fasten the power tool with suitable screw fasteners to the working
surface. The mounting holes (14)serve for this purpose.
or
–Clamp the power tool with commercially available screw clamps by
the feet to the working surface.
Mounting to a Saw Stand
Any universal saw stand which will accept mounting holes 420mm
wide by 350mm in length will suffice
Read all safety warnings and instructions included with the
worktable. Failure of observing safety warnings and instructions can
lead to electrical shock, fire and/or cause serious injuries.
Assemble the worktable properly before mounting the power tool.
Perfect assembly is important in order to prevent the risk of
collapsing.
–Mount the power tool in transport position on the saw stand.
Dust/Chip Extraction
Dusts from materials such as lead-containing coatings, some wood
types, minerals and metal can be harmful to one’s health. Touching
or breathing-in the dusts can cause allergic reactions and/or lead to
respiratory infections of the user or bystanders.
Certain dusts, such as oak or beech dust, are considered as
carcinogenic, especially in connection with wood-treatment additives
(chromate, wood preservative). Materials containing asbestos may
only be worked by specialists.
–Always use dust extraction or the Dust bag (21) provided
–Provide for good ventilation of the working place.
–It is recommended to wear a P2 filter-class respirator.
Observe the relevant regulations in your country for the materials to
be worked.
The dust/chip extraction can be blocked by dust, chips or workpiece
fragments.
–Switch the machine off and pull the mains plug from the socket
outlet.
–Wait until the saw blade has come to a complete stop.
–Determine the cause of the blockage and correct it.
Integrated DustExtraction.
–Insert the dust bag firmly onto the machine
During sawing, the dust bag must never come in contact with moving
tool components.
Always empty the dust bag in good time.
External Dust Extraction
For dust extraction, you can also connect the extraction port (25) to a
vacuum hose (internal Ø 40 mm).
The dust extractor must be suitable for the material being worked.
When vacuuming dry dust that is especially detrimental to health or
carcinogenic, use a special dust extractor.
Changing the Blade
Before any work on the machine itself, pull the mains plug.
When mounting the saw blade, wear protective gloves. Danger of
injury when touching the saw blade.
Use only saw blades whose maximum permitted speed is higher than
the no-load speed of the power tool.
Use only saw blades that correspond with the characteristic data
given in these operation instructions.
Use only saw blades recommended by the tool manufacturer, and
suitable for sawing the materials to be cut.
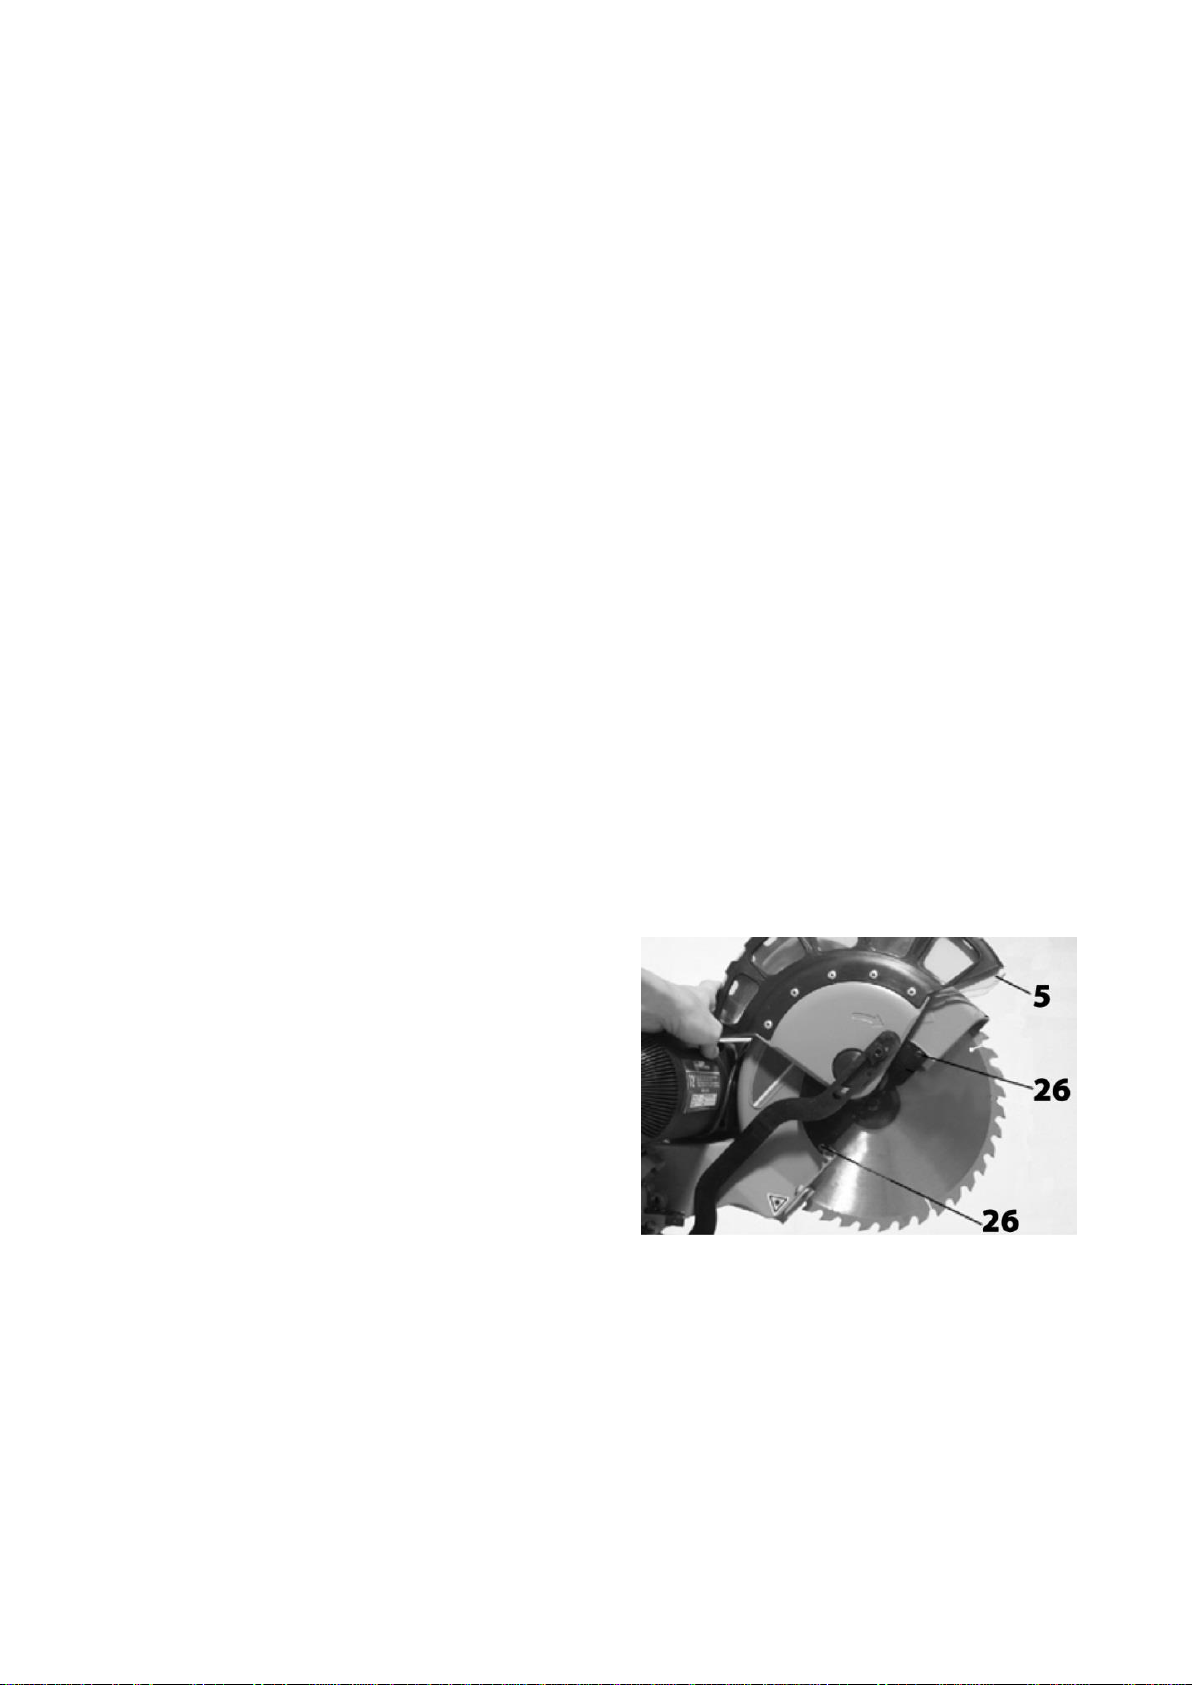
Removing the Saw Blade
–Bring the power tool into the working position.
–Press lever (4) and swing back the retracting blade guard (5) to the
stop.
Hold the retracting blade guard in this position.
–Loosen both screws (26). This then releases blade guard (5).
–Lower blade guard (5) down to rest on saw table (13).
–Turn blade bolt (27)with the provided blade wrench(41) and at the
same time press the blade spindle lock (23)until it engages.
–Keep the blade spindle lock (23) pressed and unscrew blade bolt
(27)in clockwise direction (left-hand thread!).
–Mount the clamping flange (28) and blade bolt (27). Press spindle
lock (38 ) until it engages, and then tighten the blade bolt with a
tightening torque of approx. 15–23 Nm turning in anticlockwise
direction.

7
–Reposition the blade guard (5) and secure this with the two screws
(26).
–Guide the retracting blade guard downward into its original
position.
Before any work on the machine itself, remove the mains plug from
outlet.
Transport Safety
The transport safety lock (24) enables easier handling of the machine
when transporting to various working locations.
Releasing the Machine (Working Position)
–Push the tool arm by the handle (1) down a little in order to relieve
the transport safetylock (24).
–Pull the transport safety lock (24) completely outward and turn 90°,
and loose.
–Guide the tool arm slowly upward.
Securing the Machine (Transport Position)
–Pull out the transport safety lock (24) then press lever (4) and at
the same time, swing the tool arm by handle (1) toward the saw
table (13)until it reaches the saw table. Pull out transport safety lock
(24) and turn 90° and push in to secure.
The tool arm is now securely locked for transport.
Mounting the Extension Bars
To extend the saw table additionally, extension bars are mounted
both to the left and right of the power tool.
–Loosen the extension bar lock (29) then pull out the extension bar
(15) to the desired length.
–Tighten the extension be lock (29) to secure the extension bar (15)
Extending the Fence
For bevel angles, the fence (8) must be extended.
–Loosen fence extension cap screw (30) using a hex key, and loosen
fence extension lock (31).
–Slide out the fence (8) to the desired position
–Tighten the both (30) & (31) again.
Setting the Trenching Facility
In its normally set position the trenching facility (19) permits the
blade to cut completely through the workpiece, but when set the
trenching facility (19) allows the blade to cut only part way through
the workpiece.
–With the tool in the working position, pull the trenching stop (32)
towards the front of the tool.
–Adjust the depth screw (33) to the desired length. Check height by
pulling down blade as if to cut workpiece.
–Tighten the depth lock (34) to lock the depth screw into position.
Clamping the Workpiece
To ensure optimum working safety, the workpiece must always be
firmly clamped.
Do not saw workpieces that are too small to clamp.
While clamping the workpiece, do not reach under the clamping
lever of either of the clamps with your fingers.
–Press the workpiece firmly against the fence (8).
–Insert the fast clamp (7) into one of the holes intended for this
purpose.
–Adapt the fast clamp to the workpiece by turning the threaded rod.
–Tighten the main screwin order to clamp the workpiece.
Adjusting the Cutting Angle
To ensure precise cuts, the basic adjustment of the machine must be
checked and adjusted as necessary after intensive use.
Always tighten the locking knob (10) & (18) firmly before sawing.
Otherwise the saw blade can become wedged in the work piece.
Adjusting Standard Mitre Angles or Any Angle
8
For quick and precise adjustment of commonly used mitre angles,
indentshave been provided for on the saw table:
–Loosen the locking knob (10) in case it is tightened.
–Rotate the saw table (13) left or right to the requested indent.
–Tighten locking knob (10). As the table is turned the indents will
click as they are passed.
Use mitre gauge (11) to achieve desired angle.
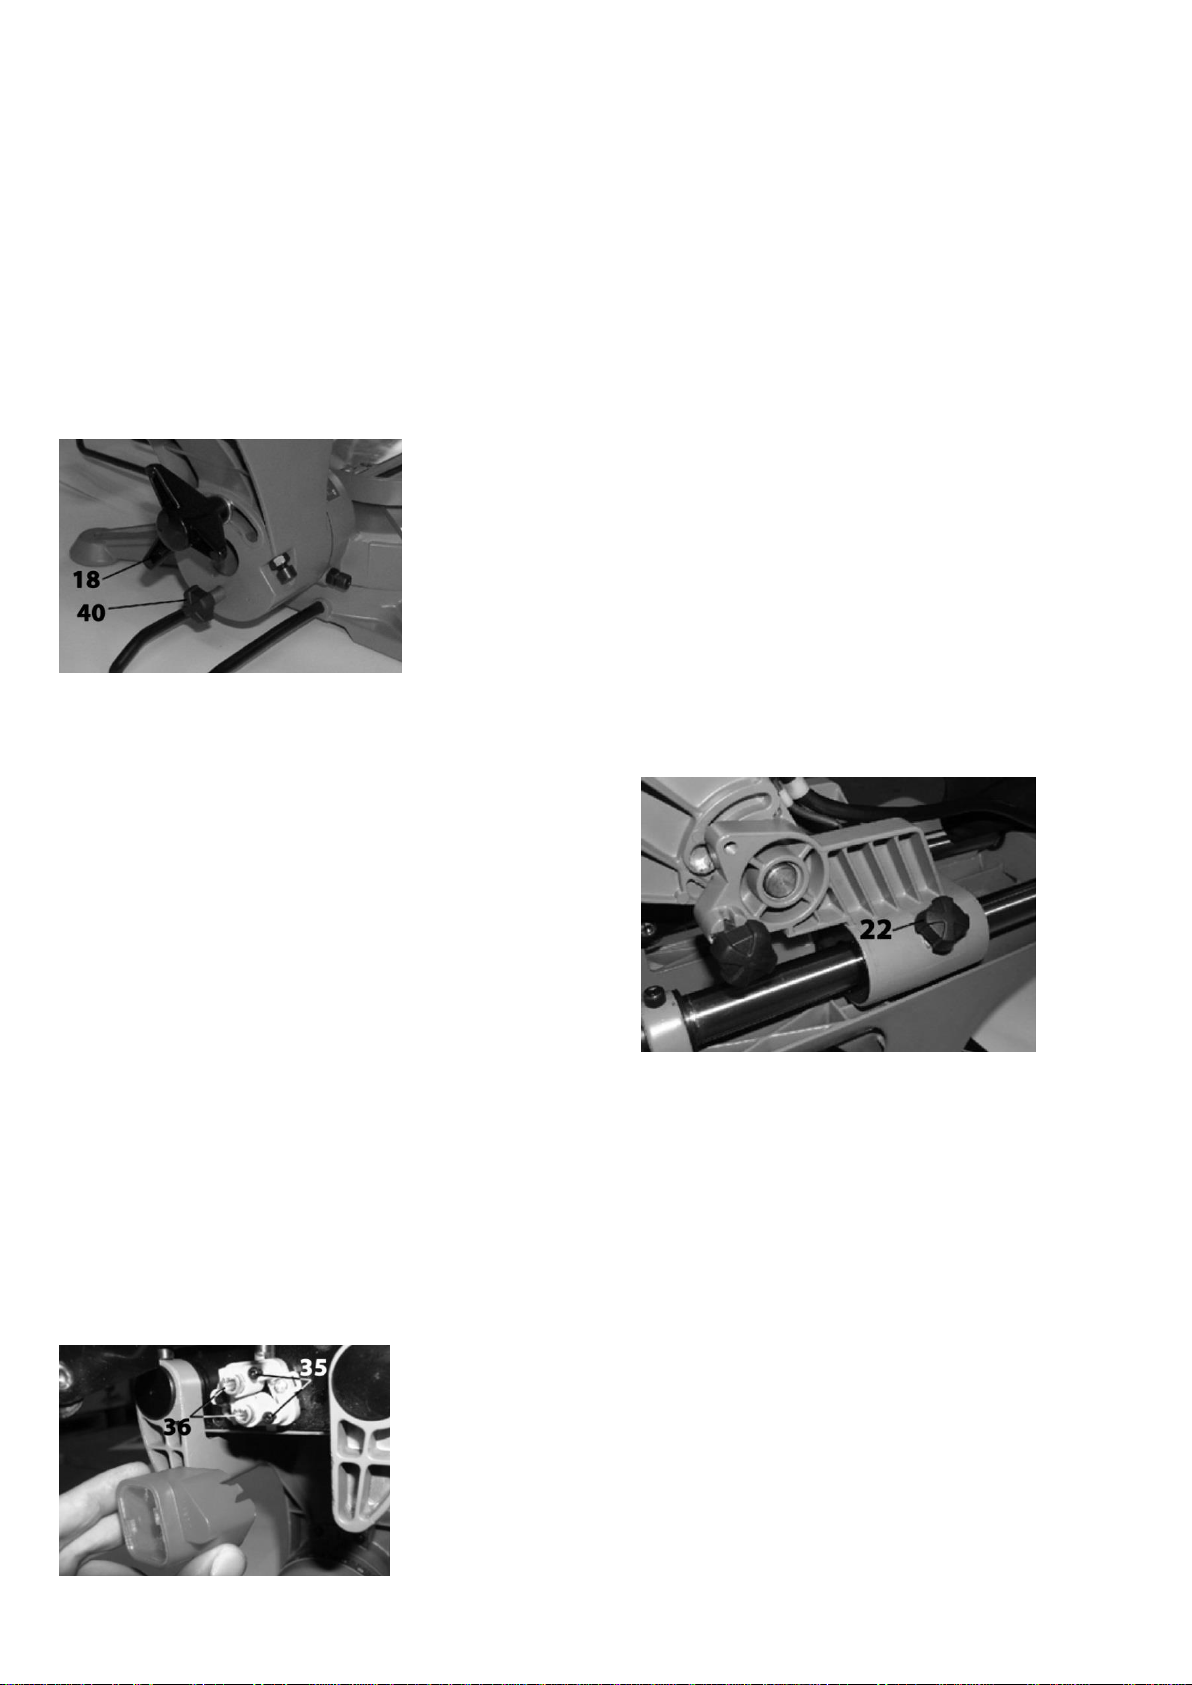
Adjusting the Bevel Angle
The bevel angle can be set in the range from -45° to 45°.
–Loosen the bevel lock (18) and pull out positive stop knob (40).
–Tilt the tool arm by the handle (1) until the bevel gauge
(16)indicates the desired bevel angle.
–Hold the tool arm in this position and retighten the bevel lock (18).
Using the Laser Guide System (17)
This feature allows your cuts to be accurate every time
Do not stare directly into the laser beams
–Mark the line of the cut of your work piece.
–Adjust the mitre and/or bevel angles as required
–Press the laser on/off switch (2) and align the work piece cut line
with either laser beam. The beams describe where the edges of the
blade (6) will cut.
–Clamp the piece in place then cut as normal.
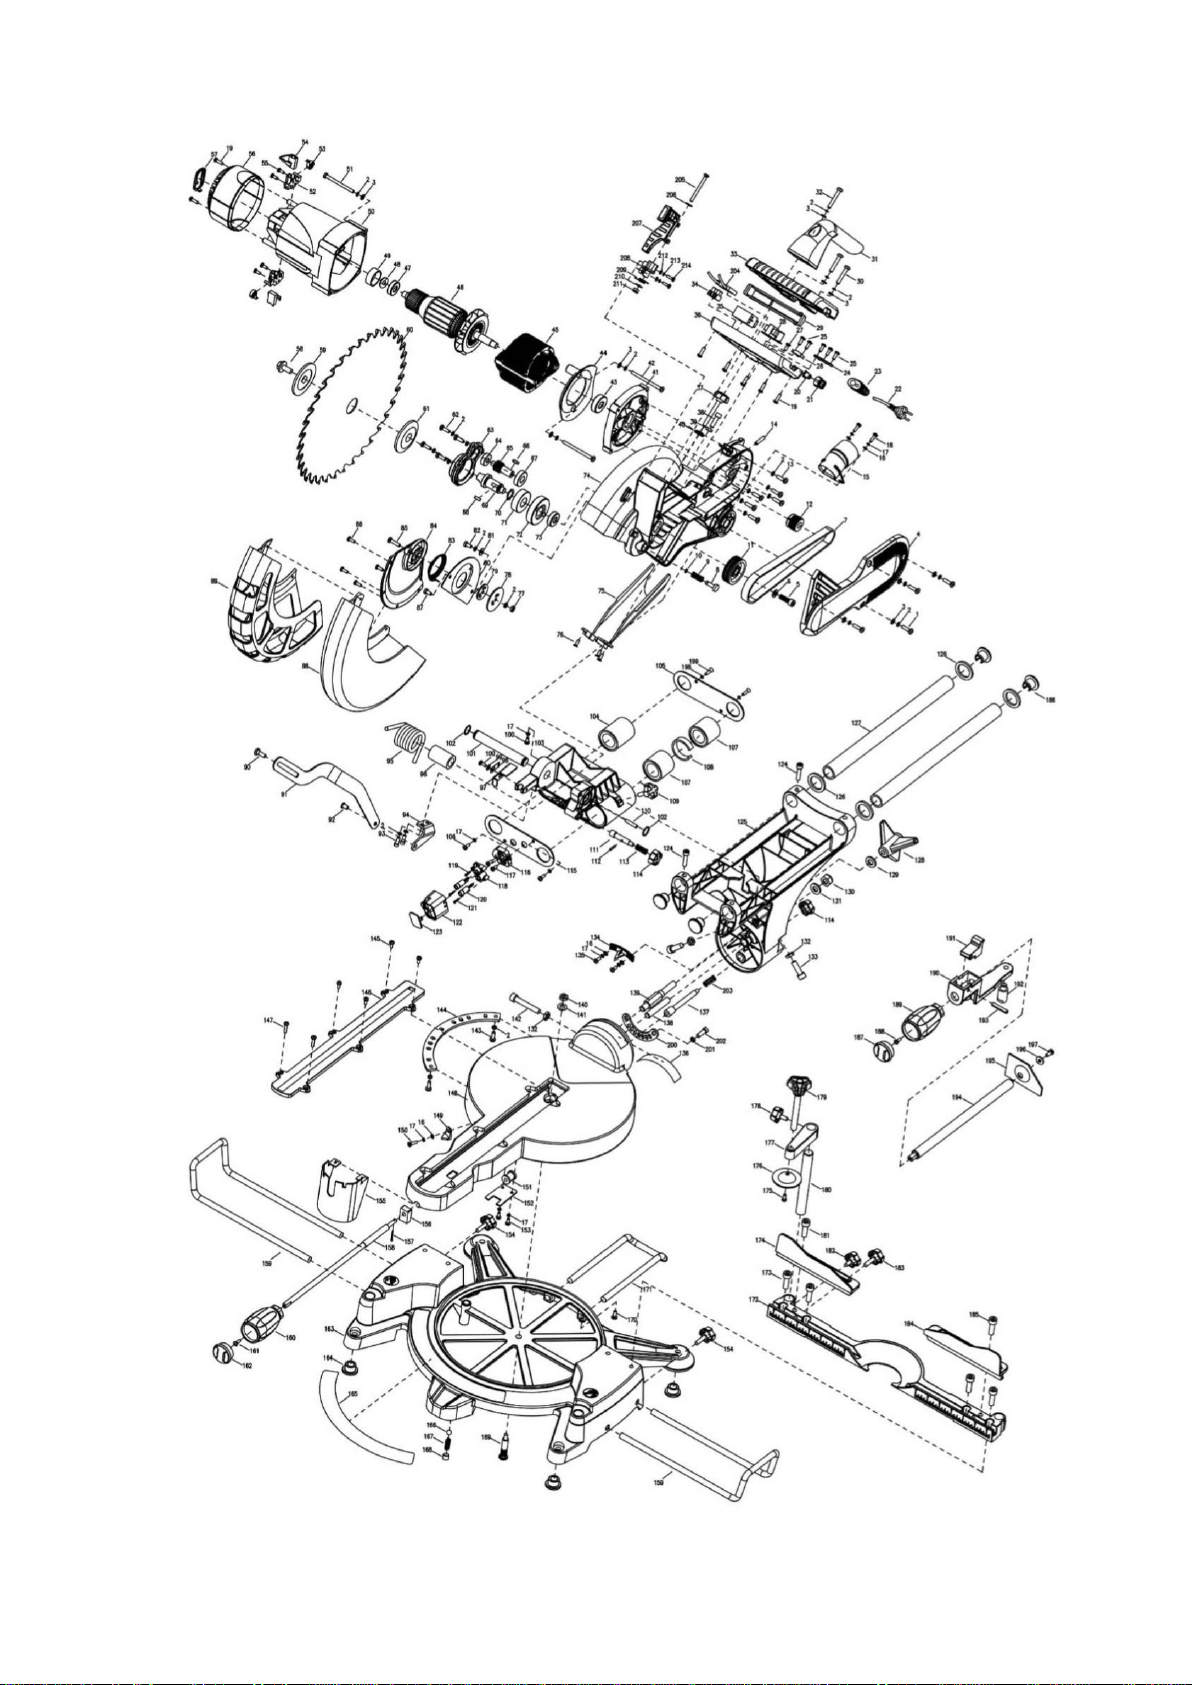
Adjusting the Laser guide System (17)
If your laser guide does not seem to be aligned with both side of the
blade kerf, a small adjustment can be made.
–Place and clamp a scrap workpiece to the machine, and make a
partial cut.
–Remove the laser guide protective cover.
–Loosen screws (35) next to the laser (36)
–Turn laser tips (36) until the beams are aligned with either side of
the cut.
–Once aligned hold and retighten screws (35)
Starting Operation
Observe correct mains voltage! The voltage of the power source
must agree with the voltage specified on the nameplate of the
machine. Power tools marked with 230V can also be operated with
220V.
Switching On
–To start the machine, press the On/Off switch (3) and keep it
pressed.
Note: For safety reasons, the On/Off switch (3) cannot be locked; it
must remain pressed during the entire operation.
The tool arm can only be guided downward when pressing lever (4).
–For sawing, you must additionally press lever (4) in addition to
actuating the On/Off switch (3).
Switching Off
–To switch off the machine, release the On/Off switch (3).
Cross Cutting
When cutting, it is not always necessary to use the sliding carriage. In
this case make sure that the sliding carriage lock (22) is tightened to
prevent the saw arm from sliding.
–With the machine in working position, and the bevel and mitre
angle set to desired angles and the workpiece clamped, loosen the
sliding carriage lock (22), pull handle (1) towards you.
–Press the On/off switch (3), also press lever (4). Pull down on
handle (1) and push the blade down through the workpiece then
away from your body.
–Once the cut is complete raise the head and release the on/off
switch (3) and lever (4).
–Wait until the blade has stopped spinning before removing the
workpiece.
General Sawing Instructions
For all cuts, it must first be ensured that the saw blade at no time
can come in contact with the fence, screw clamps or other machine
parts. Remove possibly mounted auxiliary stops or adjust them
accordingly.

9
Protect the saw blade against impact and shock. Do not subject the
saw blade to lateral pressure.
Do not saw warped/bent workpieces. The workpiece must always
have a straight edge to face against the fence.
Long workpieces must be under laid or supported at their free end.
Position of the Operator
Do not stand in a line with the saw blade in front of the machine.
Always stand aside of the saw blade. This protects your body against
possible kickback.
–Keep hands, fingers and arms away from the rotating saw blade.
–Do not cross your arms when operating the tool arm.
10. Transport
1. Turn off the power tool before any transport and disconnect it
from the power supply.
2. Apply the power tool at least with two people, do not touch the
table extensions.
3. Protect the power tool from knocks, bumps and strong vibrations,
such as during transport in vehi-cles.
4. Secure the power tool against overturning and slid-ing.
5. Never use the safety devices for handling or trans-porting
purposes.
11. Maintenance
Warning! Prior to any adjustment, maintenance or service work
disconnect the mains power plug!
11.1 General maintenance measures
- Keep all safety devices, air vents and the motor hous-ing free of dirt
and dust as far as possible. Wipe the equipment with a clean cloth or
blow it down with com-pressed air at low pressure.
- We recommend that you clean the equipment imme-diately after
you use it.
- Clean the equipment regularly with a damp cloth and some soft
soap. Do not use cleaning agents or sol-vents; these may be
aggressive to the plastic parts in the equipment. Ensure that no
water can get into the interior of the equipment.
- In order to extend the service life of the tool, oil the rotary parts
once monthly. Do not oil the motor.
11.2 Brush inspection
In case of excessive sparking, have the carbon brushes
carbon brushes should not be replaced by anyone but a qualified
electrician.
12. Storage
Store the device and its accessories in a dark, dry and frost-proof
place that is inaccessible to children. The optimum storage
temperature is between 5 and 30.C. Store the electrical tool in its
original packaging. Cover the electrical tool in order to protect it from
dust and moisture.
When the sawblade and key are not in use.
Store the operating manual with the electrical tool.
13. Electrical connection
The electrical motor installed is connected and ready for operation.
The connection complies with the applicable VDE and DIN
provisions. The customer‘s mains connection as well as the
extension cable used must also comply with these regulations.
- The product meets the requirements of EN 61000-3-11 and is
subject to special connec-tion conditions. This means that use of the
product at any freely selectable connection point is not al-lowed.
-Given unfavorable conditions in the power supply the product can
cause the voltage to fluctuate temporarily.
-The product is exclusively intended for use at con-nection points
that have a continuous current-carry-ing capacity of at least 100
Amper phase.
-As the user, you are required to ensure, in consulta-tion with your
electric power company if necessary, that the connection point at
which you wish to operate the product meets the specified
requirements.
Important information
In the event of an overloading the motor will switch itself off. After a
cool-down period (time varies) the mo-tor can be switched back on
again.
Damaged electrical connection cable
The insulation on electrical connection cables is often
damaged.
This may have the following causes:
- Passage points, where connection cables are passed through
windows or doors.
- Kinks where the connection cable has been improp-erly fastened or
routed.
- Places where the connection cables have been cut due to being
driven over.
- Insulation damage due to being ripped out of the
wall outlet.
- Cracks due to the insulation ageing. Such damaged electrical
connection cables must not be used and are life-threatening due to
the insulation damage. Check the electrical connection cables for
damage regu-larly. Make sure that the connection cable does not
hang on the power network during the inspection. Electrical
connection cables must comply with the ap-plicable VDE and DIN
provisions. Only use connection cables with the marking .H05VV-F“.

10
The printing of the type designation on the connection cable is
mandatory.
AC motor
- The mains voltage must be 230 V~
- Extension cables up to 25 m long must have a cross-section of 1.5
mm2.
Connections and repairs of electrical equipment may only be carried
out by an electrician. Please provide the following information in the
event of any enquiries:
Type of current for the motor
- Machine data - type plate
- Machine data - type plate
11

12
12”Mitre Saw –Part. No. DJMSL12
Data: 02/13/2019

13

14
Table of contents
Other djm direct Saw manuals


