DNA Professional HLC Series User manual

HLC SERIES MIXERS
User manual
Instrukcja obsługi

ENGLISH
A. Input channel section
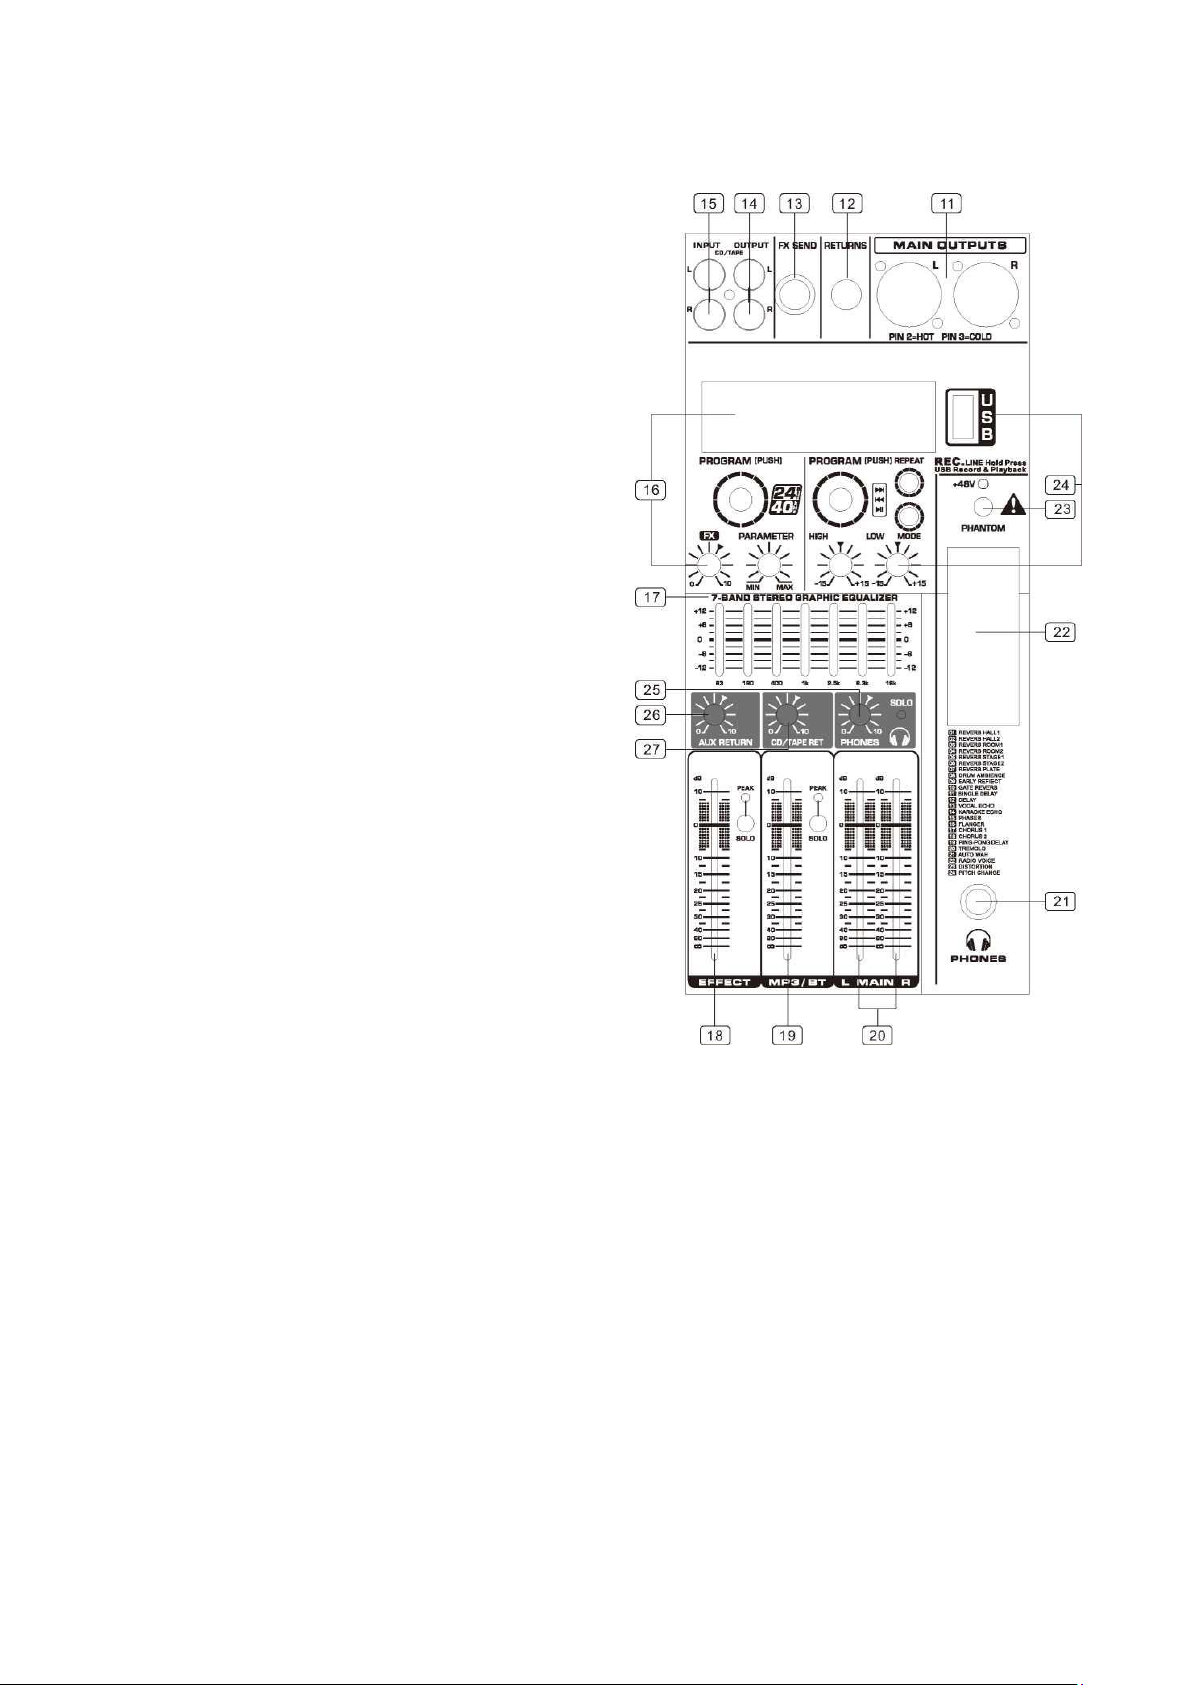
1. LINE/MIC
The unbalanced Mic input is provided for the use of a unblalnce mic and is designed to accept
a unbalanced high impedance input signal. (This use for connection Deck, Turntable,
Keyboard ate,.)
2. GAIN CONTROL
Adjusts input sensitivity from -60dB to -20dB with the -20dB pad switch in the out position,
and -40dB to 0dB when the -20dB pad switch is pushed.
3. HIGH
Control the high frequency tone of each channel, Always set this control to the 12 O'clock
position, but you can control the high frequency tone according to the speaker, the
conditions of listening position and listener's taste, Clockwise rotation of the control increases
level.
4. MID
This has a function which controls the middle frequency tone of each channel. Always set this
control to the 12 o'clock position, but you can control the middle frequency tone according to
the speaker, the conditions of listening position and listener's taste. Clockwise rotation of the
control increases the level, and vice versa.
5. LOW
Control the low frequency tone of each channel. Always set this control to the 12 o'clock
position, but you can control the middle frequency tone according to the speaker, the
conditions of listening position and listener’s state. Clock wise rotation of the control increase
the level.
6. EFF
Use this control when you want to get effect sound by adjustment of input signal, when you
don't use external source, digital delay will be working which installed inside.
7. PAN
The pan control sends continuously variable amounts of the post fader signal to either the left
or right main busses, in the center position equal amounts of signal are sent to the left and
right busses.
8. PEAK(PEAK LEVEL INDICATOR)
A red LED indicates a signal level at the insert return point, premaster fader. It illuminates at
approximately 5dB below clipping.
9. SOLO
You can monitor the signal of the only channel which PFL switch is turned "ON" using by
headphone in useful. When PFL switch turned on, other channels or cut off automatically.
10. CHANNEL FADER
This is function to adjust the volume of signal connection into each channel and adjust the volume of output, together
with master fader. Normally operation is at the "0"mark,providing 4dB of gain above that point, if required.

B. Master section
11. STEREO OUTPUT JACK (LEFT ] RIGHT)
In this section, the final confirmed sound can be send to main
amplifier through XLR & 1/4 jack.
12. STEREO FX RETURNS & SENDS
This can be used to connect all kinds of effects form outside.
13. STEREO FX RETURNS & SENDS
This can be used to connect all kinds of effects form outside.
14. RECORD PIN JACK
This jack is to be connected with cassette deck when recording
the mixed output.
15. TAPE INPUT JACK
This jack is to be connected with cassette deck when playing
back.
16. EFFECTS CONTROL
This is 24BIT digital effects processor control.
17. STEREO GRAPHIC EQUALIZER
7-band equalizer is provided for tone control over each
frequency, and for precise high quality sound by final tone
control.
18. EFFECT LEVEL
Using by this control, you can adjust signal level of repeat &
external effect.
19. Mp3 VOLUME
Using by this control, you can adjust signal level of.
20. OUTPUT MAIN FADER(LEFT/RIGHT)
This is a master fader for adjustment for volume of left/right
output. Unit gains signal adjusted by this .
21. PHONES JACK
This is used for monitoring them master signal and individually monitoring each channel with PEL,L/R.
22. OUTPUTS LEVEL INDICATOR
Condition of the operation, therefore, you can see output condition thru this master level indication.
23. JAMTP.+48V
+48V Phantom Power available on each input Mic socket. And this switch is on Rear Phantom Power.
24. MP3.HI.LOW/PLAYER
25. PHONES JACK
This is used for monitoring the master signal and individually monitoring each channel with.
26. AUX RETURN VOLUME
27. CD/TAPE RET VOLUME

C. Rear Panel
28. POWER SWITCH
Push marked (1), when you want to operate. The LED (SEE NO.33) will be turned on when working
29. POWER JACK
This is out of connect the power supply (2 x AC 120V or 230V) jack.
D. Fault finding guide
Repairing a sound mixing console requires specialist, but basic fault finding is within the scope of any user if a few basic
rules followed.
•Get to know the block Diagram of your console.
•get to know what each component in the system is supposed to do.
•Learn where to look for common trouble spots.
The Block diagram is a representative sketch of all the components of the console; showing how they connect together
and how the signal flows through the system. Once you have become familiar with the various component have gained
a valuable understand of the internal structure of the console and tracking down the problem by elimination.
•Swap input connections to check that the source is really present. Check both Mic and Line inputs.
•Eliminate sections of the channel by using the insert point to re-route the signal to other inputs that are known to be
working
•Route channels to different outputs or to auxiliary sends to identify problems on the master section.
•Compare a suspect channel with an adjacent channel which had been set up identically .Use PFL to monitor the signal
in each section.
E. Cautions of installation
Please take care of the following points for installations.
1. Install this product at place of good ventilation and keep an interval over 30cm form the other objects.
2. Install this product at rear side for non-touching of somebody, if possible and avoid an installation of a aisle & the
front side of the stage.
3. Cause an obstacle and an drop of product from the vibration of speaker ,if you put this product one speaker for a
long time.
4. Avoid strong or using product in condition of excessive heat or cold, or in position where it is likely to be subject to
vibration, dust or moisture.
5. Connect the plug into an outlet by the check of power source "AC220V" of the installation place.
6. Install the speaker more front side than the used mic and far away from mic ,if possible.
7. Insert a plug of cord closely into the speaker jack at the speaker connection.
8. Clean this product by using soft dry cloth & poly-wax.

F. How to Operate
1. Above all, it is necessary to confirm power voltage.
2. Make sure this appliance power switch is off when connecting the plug of power cord with outlet
3. Set every controls to the positions stated below to avoid loud blasts. Loud blasts may cause damage for your speaker
system or your ears when you are wearing headphone.
Master faders L-R, Sub faders 1-2,Effect fader & Each channel faders.
Gain control Turn to the left completely
Hi, freq, Mid, Low Turn to the center position
Aux1-2 & Effect control Turn to the left completely
Pan control Turn to the left completely
Set other Turn to the left completely
4. Push power switch marked(l),then the LED will be turned on when start working.
5. Set Master faders L-R to the position between min & mid, after working.
6. Set a certain Channel faders which you want to use to the position between min & mid .After that, Connect input
section with external source.
7. To make sound through external sources, turn the Gain control to the right.
8. Adjust tone controls in accordance with your taste.
9. Adjust between Effect fader control towards max from min& effect control to the right ,when you want to get echo
effect a certain channel. After set a certain channel, adjust delay control & repeat control. Then you can get various
echo effect sound.
G. Installations

H. Block diagram

POLSKI
A. Sekcja kanałów wejściowych
1. LINE/MIC
Niezbalanowane wejścia mikrofonowe przeznaczone są do wprowadzenia sygnału
wejściowego o wysokiej impedancji (do użycia z gramofonami, konsolami DJ, instrumentami
klawiszowymi, itd.)
2. GAIN
Reguluje poziom wejściowy w zakresie -60dB do -20dB z przełącznikiem pad -20dB w pozycji
wyjściowej oraz -40dB do 0dB kiedy pad jest wciśnięty.
3. HIGH
Kontroluje poziom wysokich częstotliwości każdego kanału. Nominalna pozycja jest na
godzinie 12-tej, przekręcając w lewo zmniejszasz ilość tonów wysokich, a w prawo zwiększasz.
4. MID
Kontroluje poziom średnich częstotliwości każdego kanału. Nominalna pozycja jest na
godzinie 12-tej, przekręcając w lewo zmniejszasz ilość tonów średnich, a w prawo zwiększasz.
5. LOW
Kontroluje poziom niskich częstotliwości każdego kanału. Nominalna pozycja jest na godzinie
12-tej, przekręcając w lewo zmniejszasz ilość niskich tonów, a w prawo zwiększasz.
6. EFF
Użyj tego potencjometru w momencie kiedy chcesz uzyskać efekt na sygnale przesyłany z
zewnętrznego procesora efeków. W momencie gdy go nie używasz sygnał będzie
przeprocesowany przez wewnętrzną kamerę pogłosową.
7. PAN
Kontroler ten reguluje objętość sygnału wysyłanego na lewy i prawy kanał szyny głównej.
Ustawienie go w pozycji centralnej daje równy podział sygnału na lewą i prawą stronę.
8. PEAK (WSKAŹNIK LED)
Czerwona dioda LED wskazuje, że poziom sygnału jest zbyt wysoki. Zmniejsz poziom gain, lub
zmień regulację częstotliwości aby uniknąć zniekształceń.
9. SOLO
Możesz monitorować sygnał tylko z jednego kanału kiedy jego przełącznik PFL jest włączony –
za pomocą słuchawek. Kiedy przełącznik jest włączony inne kanały się wyciszają.
10. FADER KANAŁU
Za pomocą tego suwaka regulujesz poziom sygnału wyjściowego z danego kanału. Zaleca się
ustawienie faderu na pozycję 0 z możliwością podbicia o dodatkowe 4dB –jeśli to wymagane.

B. Sekcja główna
11. MAIN OUTPUTS (LEFT / RIGHT)
Te wyjścia odpowiadają za wyprowadzenie końcowego sygnału
do wzmacniacza lub kolumn za pomocą kabli XLR lub Jack.
12. STEREO FX RETURNS
Służy do wprowadzenia sygnału powrotnego z zewnętrznego
urządzenia.
13. STEREO FX SENDS
Służy do wyprowadzenia sygnału do zewnętrznego urządzenia.
14. OUTPUT CD/TAPE
Złącza te służą do podłączenia urządzenia nagrywającego
podczas zgrywania sygnału głównego.
15. INPUT CD/TAPE
Służą do podłączenia sygnału z rekordera, lub odtwarzacza.
16. KONTROLA EFEKTÓW
Sterowanie wbudowanym, cyfrowym procesorem efektów.
17. STEREO GRAPHIC EQUALIZER
7-pasmowy korektor graficzny do sterowania poziomem
poszczególnych częstotliwości, w celu uzyskania jak najlepszego
efektu dźwiękowego.
18. POZIOM EFFECT
Używając tego suwaka możesz kontrolować całkowity poziom
efektu.
19. Poziom MP3/BT
Fader służący do regulacji poziomu głośności odtwarzacza MP3.
20. OUTPUT MAIN FADER (LEFT/RIGHT)
Główny suwak regulujący poziom sygnału wysyłanego do wyjść
MAIN.
21. PHONES
Złącze do podłączenia słuchawek w celu monitorowania poziomu sygnału.
22. OUTPUTS LEVEL INDICATOR
Wskaźniki ukazujące poziom sygnału sekcji master.
23. PHANTOM +48V
Przełącznik +48V Phantom do podania dodatkowego zasilania Phantom na złącza mikrofonowe.
24. ODTWARZACZ MP3 I REGULACJA TONÓW
25. PHONES
Potencjometr regulujący poziom sygnału na słuchawkach
26. POTENCJOMETR AUX RETURN
27. POTENCJOMETR CD/TAPE RET

C. Panel tylny
28. PRZEŁĄCZNIK ZASILANIA
Służy do włączania i wyłączania konsoli. Dioda LED wewnątrz przełącznika będzie się świeciła w momencie podawania
zasilania.
29. ZŁĄCZE ZASILANIA.
D. Rozwiązywanie problemów
Naprawy wszelkiego rodzaju wymagają interwencji specjalisty, jednak podstawowe problemy możesz wykryć
samodzielnie jeśli postępował będziesz zgodnie z kilkoma zaleceniami:
•Poznaj diagram swojej konsoli
•Zapoznaj się z funkcjami poszczególnych komponentów
•Sprawdź gdzie szukać potencjalnych źródeł problemów
Diagram Block to rysunek techniczny ukazujący poszczególne element konsoli, jak są połączone oraz jak sygnał
przepływa przez cały system. Kiedy zapoznasz się z tymi elementami pozwoli Ci to na zrozumienie, wykrycie i
wyeliminowanie niektórych problemów.
•Zamień złącza wejściowe aby sprawdzić czy sygnał jest obecny. Sprawdź zarówno wejście mikrofonowe i liniowe.
•Wyeliminuj sekcje kanałów używając punktów insertowych by przekierować sygnał do innego wejścia, które wiesz, że
działa.
•Skieruj wysyłkę z kanałów na inne wyjścia, lub do wyjść pomocniczych aby zidentyfikować problem z sekcją główną.
•Porównaj podejrzany kanał z sąsiednim, który został identycznie skonfigurowany. Użyj monitoringu PFL aby sprawdzić
sygnał każdej sekcji.
E. Ostrzeżenia instalacji
Przestrzegaj poniższych zasad podczas instalacji.
1. Instaluj zawsze produkt w miejscu z dobrą wentylacją i pozostaw przestrzeń minimum 30cm od innych objektów.
2. Instaluj produkt tak, aby nikt nieporządany nie miał dostępu do tylnego panelu.
3. Nie kładź miksera na kolumnach, subwooferach i inych urządzeniach mogących spowodować duże wibracje. Może to
spowodować upadek konsoli i jej uszkodzenie.
4. Unikaj użytkowania przy ekstremalnych temperaturach oraz miejscach o znacznym zakurzeniu i dużej wilgoci.
5. Zawsze podłączaj mikser do odpowiedniego źródła zasilania z uziemieniem.
6. Nie podłączaj przewodów na siłę, sprawdź czy wtyczki nie są uszkodzone jeśli stawiają opór przy podłączaniu.
7. Czyść urządzenie za pomocą miękkiej ściereczki, bez użycia mocnych detergentów.

F. Użytkowanie
1. Przede wszystkim należy sprawdzić zasilanie.
2. Upewnij się, że przełącznik zasilania jest w pozycji OFF przed podłączeniem przewodu.
3. Ustaw wszystkie potencjometry na minimum aby uniknąć głośnych sygnałów. Nagły, głośny gwizd może spowodować
uszkodzenie systemu nagłośnieniowego oraz słuchu.
Suwaki Main L-R, Sub 1-2, Effect oraz kanałów
Kontrola gain Obróc maksymalnie w lewo
Częstotliwości Hi, freq, Mid, Low Ustaw w pozycji centralnej
Aux 1-2 oraz Effect Obróc maksymalnie w lewo
Pan Obróc maksymalnie w lewo
Pozostałe Obróc maksymalnie w lewo
4. Wciśnij przełącznik zasilania, dioda sięzaświeci i urządzenie zacznie działać.
5. Ustaw główne fadery L-R do pozycji pomiędzy min i mid.
6. Ustaw suwaki kanałów, których będziesz używać na pozycję min & mid. Następnie podłącz źródło zewnętrzne.
7. Aby uzyskać dźwięk ze źródła zewnętrznego, przekręć potencjometr Gain w prawo.
8. Ustaw regulatory częstotliwości zgodnie z upodobaniem.
9. Jeśli chcesz uzyskać efekt na danym kanale wyreguluj jego poziom za pomocą suwaka Effect w sekcji głównej, oraz
potencjometrem FX na kanale. Za pomocą wbudowanego procesora efektów możesz dopasować efekt do swoich
potrzeb.
G. Instalacja

H. Diagram block
Table of contents
Languages:
Popular Mixer manuals by other brands

Imer Group
Imer Group IMR750 Operating, maintenance, spare parts manual

Shure
Shure SCM810AZ user guide

URSUS TROTTER
URSUS TROTTER UT-KLEIN700 instruction manual

Doyon
Doyon SM-200 Installation and maintenance manual

F.F. Group
F.F. Group MX 850 PLUS Original instructions

KitchenAid
KitchenAid 5K45SSN owner's manual