DNA M-PAD User manual

1
M-PAD
USER’S MANUAL
INSTRUKCJA OBSŁUGI

2
ENGLISH
Contents
FEATURES .......................................................................................................................3
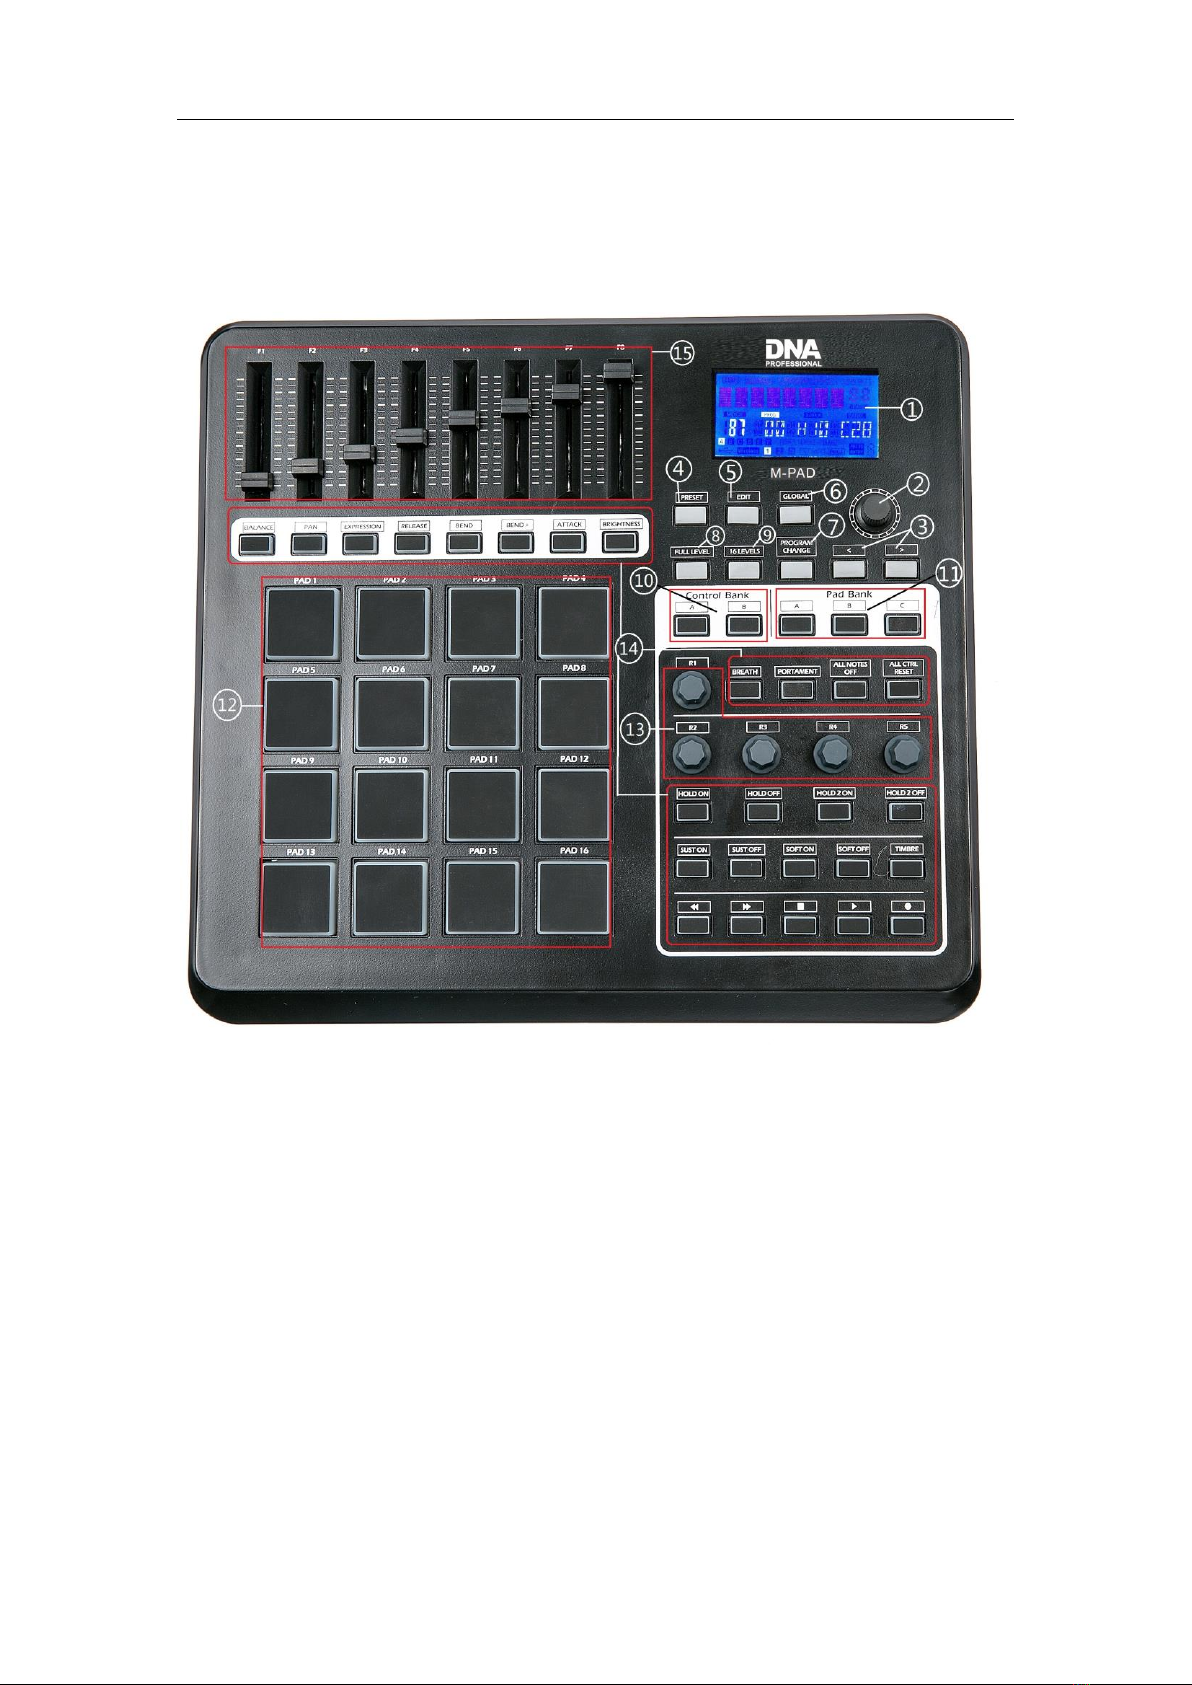
FRONT PANEL OVERVIEW.......................................................................................4
REAR PANEL OVERVIEW..........................................................................................7
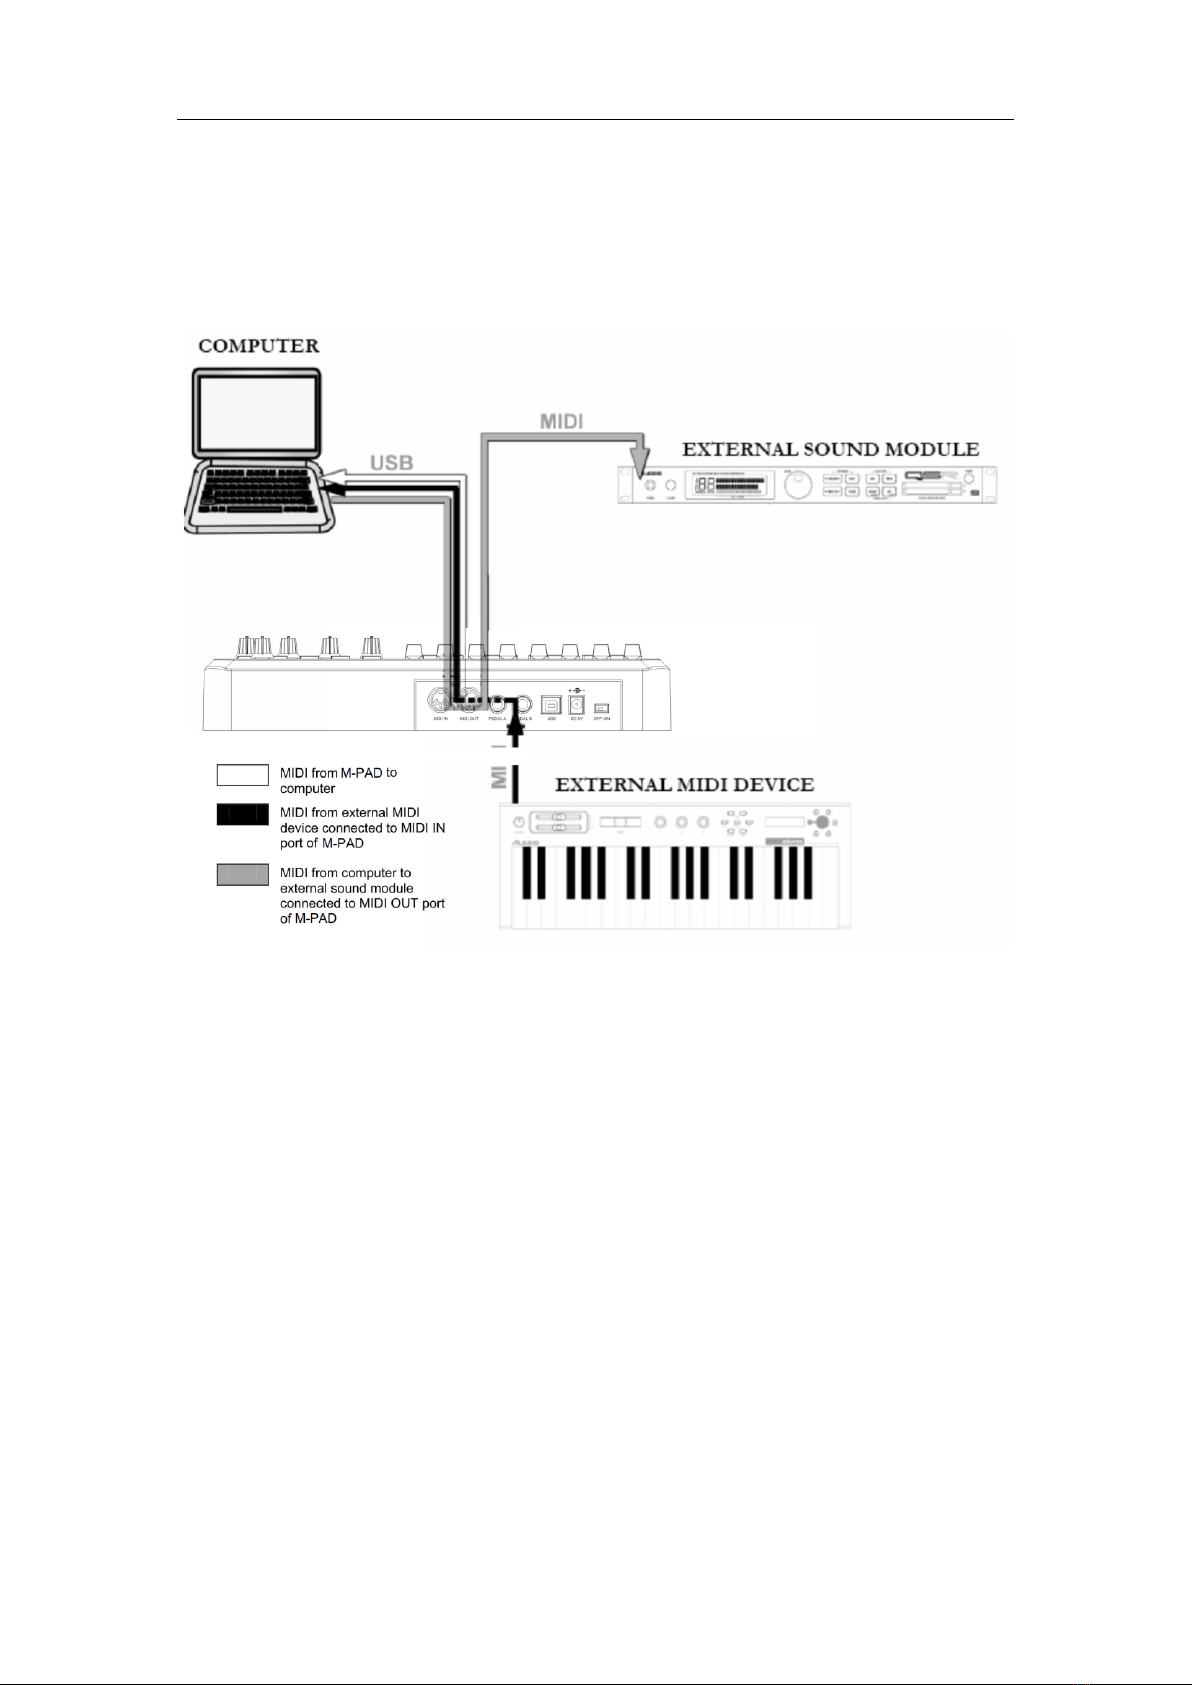
HOOKUP DIAGRAM.................................................................................................7
OPERATION ....................................................................................................................9
1. FULL LEVEL ..........................................................................................................9
2. 16 LEVELS ............................................................................................................9
3. PAD BANK..........................................................................................................10
4. PRESET...............................................................................................................10
5. PROGRAM CHANGE ..........................................................................................11
6. EDIT ...................................................................................................................12
6.1 PAD EDIT...................................................................................................13
6.2 CONTROL EDIT..........................................................................................13
7. GLOBAL..............................................................................................................13
7.1 Page1-MIDI COMMON CHANNEL ............................................................14
7.2 Page2-PAD VELOCITY CURVE....................................................................14
7.3 Select the Backlit RGB Color of 8 Pads.....................................................15
7.4 Page3-MUTE.............................................................................................15
7.5 Page-4 Reset.............................................................................................16
7.6 Page4-SAVE GLOBAL.................................................................................16
7.7 Page5-Pad note output type ....................................................................16
8. MMC(MIDI MACHINE CONTROL)......................................................................16
TROUBLESHOOTING.....................................................................................................19
TECHNICAL SPECIFICATIONS ........................................................................................22

3
FEATURES
⚫16xHigh quality velocity & pressure sensitive performance trigger pads with RGB
backlit.
⚫5xAssignable Dials.
⚫8xAssignable Slider, each slider can be edit by user.
⚫26xLED backlit Assignable Buttons.
⚫Function buttons, providing functions like, EDIT, GLOBAL, LEVELS, PRESET, PAD
GROUP, and etc.
⚫1xMIDI OUT, 1XMIDI IN; Power supplied by USB and DC 9V.
⚫Compatible with Win XP/Vista/Win7/8/10 and Mac OSX. Drive free and
hot-plug supported.

4
INTRODUCTION
FRONT PANEL OVERVIEW
1. LCD –The display is used for navigating menus, displaying data, and affecting
change on M-PAD’s options and parameters.
2. [VALUE] (Push to Enter) –This dial is used for incrementing and decrementing
Presets, parameter values and settings. This dial also functions as an [ENTER]
button when it is pressed down.
3. [<] AND [>] BUTTONS –These buttons are used for navigating through fields of
menus and options.

5
4. [PRESET] –This button calls up Preset Mode. You can select and recall different
Preset programs in this mode.
5. [EDIT] –This button calls up Edit Mode, which allows you to edit the behavior of
the pads, knobs, buttons, faders.
6. [GLOBAL] –This button calls up Global Mode, where MIDI reset commands and
global system preferences are set.
7. [PROGRAM CHANGE] –Pressing this button will enter Program Change mode.
In this mode, you can send a Program Change or Program with Bank Change
message to a hardware or software module.
8. [FULL LEVEL]. When [FULL LEVEL] is activated, the pads always play back at a
maximum velocity (127), no matter how hard or soft you hit them.
9.[16 LEVEL]. When [16 LEVEL] is activated, you can use the 16 pads to change a
selected sound’s velocity in 16 steps.
10. [CONTROL BANK]. The M-PAD features 2 independent banks of continuous
controllers. Effectively, this allows you to control up to 78 independent parameters
with the knob, faders and buttons on the M-PAD. The [CONTROL BANK] button is
used to switch among the 2 banks.
11. PAD BANK buttons. These 3 buttons switch among pad banks A, B, C. Each
bank can address a unique set of 16 sounds giving you access of up to 48 different
sounds you can trigger with the pads. The currently selected pad bank will be
indicated on the LCD display.
12 . 16 PRESSURE AND VELOCITY SENSITIVE PADS. The pads can be used to
trigger drum hits to our software or hardware module. The pads are pressure and

6
velocity sensitive, which makes them very responsive and intuitive to play.
13. 5 ASSIGNABLE KNOBS–Each 360-degree knob can be used to send continuous
control data to a desktop audio workstation. These knobs should be endless and
can send MIDI note messages.
14. 26 ASSIGNABLE BUTTONS. These buttons can be used as MIDI CC switches.
15.8 ASSIGNABLE SLIDERS-Each slider can be used to send continuous control
data to a desktop audio workstation or external MIDI device.
REAR PANEL OVERVIEW
1. DC POWER ADAPTER INPUT –Plug in a 9V–1A DC power adapter if you do not wish
to power the M-PAD through the USB connection.
2. USB CONNECTION –Plug a standard USB cable into this outlet and into the USB
port of your computer. The computer’s USB port will provide power to the M-PAD.
This connection is used to send and receive MIDI data to and from your computer
and may also be used to send MIDI data from your computer to a device attached to
the MIDI OUT port of the M-PAD.
3. MIDI OUT –Use a five-pin MIDI cable to connect the MIDI OUT of the M-PAD to
the MIDI IN of an external device.
4. MIDI IN –Use a five-pin MIDI cable to connect the MIDI OUT of an external MIDI
device to the MIDI IN of the M-PAD.
5. Pedal A –can be used as MIDI CC switches.
6. Pedal B –can be used as MIDI CC continues.

7
HOOKUP DIAGRAM
Please refer to the following scenario for connecting the M-PAD.
1. Connect a USB cable from your computer to the M-PAD. The unit will be
powered through the USB connection. Alternatively, if you do not wish to use a
computer in your setup or if you wish to power the M-PAD externally, please plug
in the included 9V-1A DC power adapter.
2. If you would like to use an external sound module, connect a 5-pin MIDI cable
from the MIDI OUT of the M-PAD to the MIDI IN of the external device.
3. If you would like to use Footswitches or an Expression Pedal with the M-PAD,
connect the 1/4" jack from the selected pedal in to the appropriate plug on the
M-PAD.

8
A NOTE ABOUT USING THE M-PAD WITH SOFTWAR
1. Make sure that the M-PAD and all external devices are connected and that the
USB cable is connected to your computer before opening any software
applications with which you intend to use the M-PAD. If the unit is not
plugged in before, your software application might not recognize the M-PAD
as an available device.
2. In your software application, you will need to set the M-PAD as a default MIDI
input device. This is usually done in the MIDI section of the Preferences menu.

9
OPERATION
1. FULL LEVEL
When the [FULL LEVEL] button is activated, the M-PAD pads always play back at
maximum velocity (127). This way, no matter how hard or soft you hit a pad, the v
will always trigger the sound at its maximum velocity (volume).
2. 16 LEVELS
When you press [16 LEVELS], you can use the 16 pads to change a selected pad’s
velocity in 16 steps. This allows you to have more control over the velocity of the
desired sound. When this button is pressed the last pad that was hit gets mapped
to all 16 pads. The pads output the same note number and pressure controller as
the initial pad, but the velocity is fixed at the values in the diagram below,

10
regardless of how hard you hit each pad.
3. PAD BANK
These 3 buttons switch between pad banks A, B, C. You can store different sounds in
each one of the 3 different banks, giving you access of up to 48 different sounds
you can trigger.
When you Press [A], [B], or [C]. The LCD will display the current Pad bank, and the
note of each pad is changed. When you edit the Pad data, Enter the global setting
and choose save global. All the settings will be saved to the current Pad.
4. PRESET
When the [PRESET] button is valid,the PRESET MODE be activated. Different preset
programs can be selected and recalled. A preset is a collection of information about
how different sliders, knobs, and pads will behave.
You can change presets with the [ < ] or [ > ] button, the number of the current

11
preset will be displayed on the screen, pressing [ENTER] loads the selected Preset.
5. PROGRAM CHANGE
You can use this button to change the program.
*SET PROGRAM CHANGE: You can set which Program Change Number the pad will
transmit when it is pressed. Use [ < ] or [ > ] button to select Program Change field.
While in ProgramChange field, use [VALUE] dial to select desired Program Change
Number. Pressing [ENTER] to confirm the value.
*SET BANK M: Use [ < ] or [ > ] button to select Bank M field. While in Bank M field,
use [VALUE] dial to select desired value, Pressing [ENTER] to confirm the value.
*SET BANK L: Use [ < ] or [ > ] button to select ‘Bank L’field. While in Bank L field,
use [VALUE] dial to select desired value, Pressing [ENTER] to confirm the value.

12
6. EDIT
When you press[EDIT] button,The LCD displays‘CTLdata1’and the EDIT MODE is
activated. In this mode, you can change the parameters of the pads, knobs and
sliders. The EDIT MODE allows you to fully customize and optimize your controller
for the best desired performance.
The different parameters that you can edit are organized under two different pages
on the display and are described below. Depending on which event type you select
on Page 1, you will be given different parameters which you can edit on Page 2.
To select the controller you wish to edit, just move any slider, knob or hit a pad –
This will prompt the screen to display the properties of that particular controller.
You can select the desired controller with the [VALUE] dial. Pressing [ENTER] will
confirm the value.(In edit mode, there is no message can be sent).

13
6.1 PAD EDIT
The pads can either be set to transmit Note information.
Press the pad that you would like to edit, and use [ < ] or [ > ] button to select Note
field. The LCD displays ‘Pad_note’, turn the [VALUE] dial to select ‘NOTE’.
Press [ENTER] to confirm the ‘Note’.
6.2 CONTROL EDIT
The knobs and sliders can be set to transmit special value of the Control .
*SET CONTROL VALUE: Use [ < ] or [ > ] button to select Control VALUE field, and
the LCD displays ‘CTLdata2. While in Control VALUE field, use [VALUE] dial to
select desired Controller VALUE.
7. GLOBAL
When you press[GLOBAL] button,the GLOBAL MODE be activated, it has 4 pages
in this mode. Table 1 shows corresponding function for each page.
Page 1
MIDI COMMON CHANNEL
Page2
PAD VELOCITY CURVE
Page 3
MUTE
Page 4
Reset
Page5
SAVE GLOBAL
Page6
Pad Note output type

14
7.1 Page1-MIDI COMMON CHANNEL
Use [ > ] or [< ]button to select MIDI Common Channel page in GLOBAL MODE.
Turn [VALUE] dial to select desire MIDI Channel. The array of the MIDI Channel is
0~15. Press [ENTER] set MIDI Channel.
7.2 Page2-PAD VELOCITY CURVE
Use [ > ] or [< ]button to select PAD VELOCITY CURVE page in GLOBAL MODE. Turn
[VALUE] dial to change Pad curve type. It has four curves, the array of the four
curves is 0~3. Press [ENTER] to select desired curve.
PCD1
0
20
40
60
80
100
120
140
1 2 3 4 5 6 7 8 9 10
PCD2
0
20
40
60
80
100
120
140
1 2 3 4 5 6 7 8 9
PCD3
0
20
40
60
80
100
120
140
1 2 3 4 5 6 7 8 9
PCD4
0
20
40
60
80
100
120
140
1 2 3 4 5 6 7 8 9

15
7.3 Select the Backlit RGB Color of 8 Pads
Press “GLOBAL”and “>”button and the LCD displays “RGB OFF”, then press
“VALUE”button to adjust RGB color for the pads when the LCD displays “RGB
ON”. The Faders F1, F2 and F3 are used for RGB color. F1 is for red color. F2 is for
blue color and F3 is for green color. Press the pad you want to change the RGB
color and then operate the fader F1,F2,F3 to change the RGB color of this pad. Press
“VALUE”button to exit the RGB color setting mode. The operate steps are
following:
(1) Press the “GLOBAL”button and then “>”button for one or two times until
the LCD displays “RGB OFF”. Then press “VALUE”button for one or two
times until the LCD displays “RGB ON”.
(2) Press one of the 16 PADs and the LCD displays “PAD”.
(3) Operate F1,F2,F3 to change the RGB color of the pad. During operation, the LCD
displays the current RGB color No. on the bottom-left corner. Maximum is 127,
0 means LED lights off.
(4) Press the “VALUE”button to exit the RGB color setting mode.
(5) Reference RGB No. for some colors:
COLOR
R. G. B
WHITE
127 127 127
BLACK
0 0 0
RED
127 0 0
GREEN
0 127 0
BLUE
0 0 127
CYAN
0 127 127
MAGENTA
127 0 127
YELLOW
127 127 0
ORANGE
127 82 0
7.4 Page3-MUTE
In MUTE ON mode, any message cannot be send. Press [ENTER] to switch the MUTE
mode.

16
7.5 Page-4 Reset
Reset the all the controller, include the pads, knobs, buttons and sliders.
7.6 Page4-SAVE GLOBAL
Use [ > ] or [< ]button to select SAVE GLOBAL page in GLOBAL MODE. You will see
‘SAVE_ALL’ displayed on the screen. Press [ENTER] to save all the global settings.
7.7 Page5-Pad note output type
In Note_TP1 mode, when striking the pad, the NOTE OFF message is send
immediately after the NOTE ON message is sent. In Note_TP2 mode, the NOTE ON
message is sent when the user strikes the pad, the Note off message is sent when
the finger comes off the pad. Press [ENTER] to switch the mode.
8. MMC(MIDI MACHINE CONTROL)
There are 6 buttons used for MMC-[|<<],[<<],[>>],[O],[stop],[play].It is common to
set the 6
buttons as Sequencer remote control buttons, it needs to be working with
sequencer software.

17
Question: Does the M-PAD have internal sounds?
Answer: No. The M-PAD is a MIDI-controller, which means that it does not
contain any sounds inside but is instead used to control external sound
devices, such as hardware and software synthesizers, sequencers and drum
machines.
Question: Do I need to use a power adapter if I am using the M-PAD with a
computer?
Answer: No. The M-PAD will draw power directly from the USB port. However, if
your USB port does not supply enough power or if you are using a USB hub, it may
be necessary to use a power adapter.
Question: What software applications is the M-PAD compatible with?
Answer: The M-PAD is compatible with any software or hardware device which
supports the MIDI protocol. Please consult your specific hardware or software
device’s documentation for instructions on enabling the M-PAD as a MIDI input
device.
Question: Can I use the M-PAD as a MIDI interface for other MIDI devices?
Answer: Yes. The M-PAD functions as a MIDI interface which can send and receive
from other MIDI devices connected to it.
Question: Can I control multiple devices with the M-PAD?
Answer: Yes. The M-PAD can transmit information on 16 MIDI channels
Question: Can I send Program Change messages to my software or hardware
devices?
Answer: Yes. You can send program change messages in Program Change mode.
In addition, pads and buttons may also be assigned to transmit program change
messages.
Question: Are the pads on the M-PAD velocity and pressure sensitive?
Answer: Yes. The M-PAD sports real MPC velocity and pressure sensitive pads. This

18
allows you to be extremely expressive with your programming and performance.
Question: What type of pads is used on the M-PAD?
Answer: The M-PAD features the same pads as the MPC2500.
Question: Are the knobs on the M-PAD endless?
Answer: The knobs on the M-PAD are endless pots. This allows you to limit the
range of the knobs, as well as use them as increment/decrement controls. Please
note that your software application must be able to receive and recognize NRPNs
for Increment/decrement functions to work.
Question: I see 5 knobs, 8 faders, 26 buttons, and 16 pads. Is that all I get?
Answer: No. The M-PAD features multiple banks of controllers and pads, which can
be accessed with the [PAD BANK] and [CONTROL BANK] buttons. This allows you to
access significantly more parameters than the amount of physical controllers. There
are 3 control banks, which effectively give you 117 (3x39) controllers. There are also
4 different pad banks which give you a total of 64 (4x16) pads.

19
TROUBLESHOOTING
PROBLEM
CAUSE
SOLUTION
The display dose not
light up.
No power.
Please make sure that the
M-PAD is connected to your
computer and that the
computer is powered on.
If using a power adapter,
please make sure that the
adapter is plugged into a live
power outlet.
M-PAD not properly
connected.
Check your computer’s USB
connection to confirm that the
M-PAD is recognized. If
necessary, replug the
connection and restart your
computer.
If controlling an external
hardware module, make sure
that the M-PAD’s MIDI OUT is
connected to the device’s
MIDI IN port.

20
No sound from target
device.
M-PAD connected after
software application has
started.
Restart the software
application with the controller
plugged in.
Problem is caused by
use of a USB hub.
Unplug the M-PAD from the
USB hub and connect directly
to your computer.
Software application not
set to receive MIDI data
from the M-PAD.
Ensure that the M-PAD or
“USB” MIDI device is listed as
an active MIDI source in your
application. Usually, the MIDI
settings can be accessed
through the application’s
Preferences menu.
M-PAD’S MIDI channel
not the same as
application’s incoming
MIDI channel.
Make sure that the M-PAD is
sending MIDI information on
the channel that the target
device expects.
Notes sustain
continuously.
Footswitch was plugged
in after the M-PAD was
powered on.
Turn the unit’s power off, wait
a moment and then turn it on
again.
Stuck notes due to
incomplete MIDI data.
Turn the unit’s power off, wait
a moment and then turn it on
again.
Table of contents
Languages: