DNP DS-SL10 User manual

Digital Photo Printer
DS-SL10
DS-SL20
Printer Driver
Setup Guide
This guide describes how to set up the Printer Driver for Windows 8,
Windows 7, Windows Vista and Windows XP.
Before using the printer driver, be sure to read the “Readme” file.
Before Using this Software
3-00D-055-12 (1)
© 2012 Dai Nippon Printing Co., Ltd.
Digital Photo Printer
DS-ID400

Configuring the Printer 2
The screens used in this guide to describe setup assume
that a DS-SL10 printer is connected to a computer
running Windows 7. If you are using a printer of a
different model, replace any occurrence of “DS-SL10”
with the model name of your printer. If you are using
Windows 8, Windows Vista or Windows XP, replace all
instances of “Windows 7” with the version you are
using.
Microsoft, Windows, and Windows Vista are registered
trademarks of Microsoft Corporation.
Configuring the Printer
Before you begin printing from applications, open the
printer settings screen and configure the settings.
You can open the printer settings screen using one of the
following methods.
• To open from the Windows Control Panel
For Windows 8
Place the mouse cursor at the bottom right of the
desktop screen to display the Charm bar, select
[Control Panel] in [Settings], and then select [View
devices and printers]. Right-click the DNP DS-SL10
printer icon, and select [Printing preferences].
For Windows 7
On the [Start] menu, select [Control Panel] and then
[View devices and printers]. Right-click the DNP DS-
SL10 printer icon, and select [Printing preferences].
For Windows Vista
On the [Start] menu, select [Control Panel] and then
[Printers]. Select the DNP DS-SL10 printer icon, and
then select [Select printing preferences] from the
command bar.
For Windows XP
On the [Start] menu, select [Control Panel] and then
[Printers and Faxes]. Select the DNP DS-SL10 printer
icon, and then select [Printing Preferences] from the
[File] menu.
The settings that you make here are used as default
settings when printing from applications.
Note
The settings may not be used as defaults depending on
the application.
• To open from the application menu
On the [File] menu of your application, click the
command used to make printer settings.
The settings made this way only remain valid until you
close the application.
This guide describes the tabs that appear in the
DS-SL10 settings screen.
[Paper] tab
Basic print related settings.
[Graphics] tab
Used for setting gray, lightness, and other settings
related to image quality.

Configuring the Printer 3
[Paper] tab settings
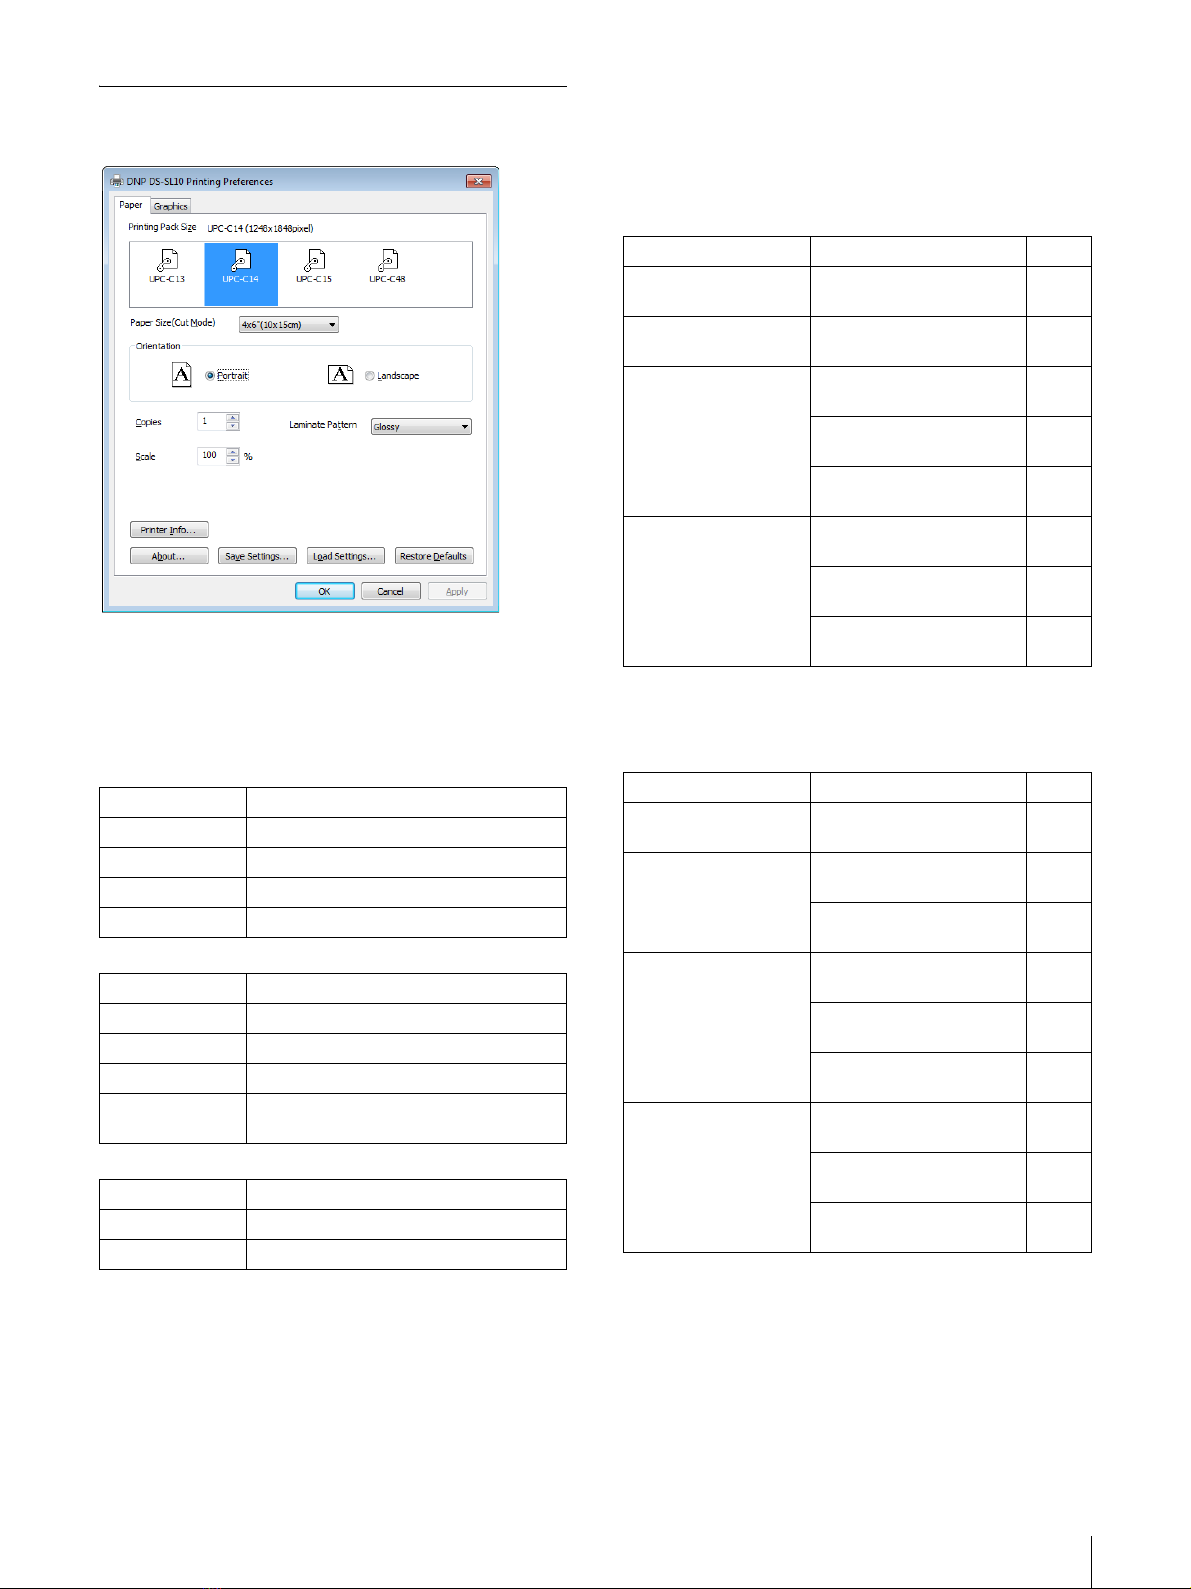
Configure basic print-related settings.
Printing Pack Size
Select the print pack to be used. The print packs and
paper sizes that are compatible with this printer are as
follows.
For the DS-SL10
For the DS-SL20
For the DS-ID400
Paper Size (Cut Mode) (DS-SL10, DS-
SL20 only)
Specifies the paper size.
In addition to standard-size prints, depending on the
print pack you are using, you can print more than one
page of a print document on a single sheet and cut the
sheet after printing (Cut Mode).
The paper sizes that you can specify and the numbers of
pages that you can assign to each sheet with each print
pack are as follows.
For the DS-SL10
1) Standard-size sheet is cut into the respective size.
2) Standard-size sheet is cut in half.
For the DS-SL20
1) Standard-size sheet is cut into the respective size.
2) Standard-size sheet is cut in half.
Orientation
Select either [Portrait] or [Landscape] as the print
direction.
Print pack Maximum print size (resolution)
2UPC-C13 series 9 × 13 cm (3.5 × 5") (1,100 × 1,536 pixels)
2UPC-C14 series 10 × 15 cm (4 × 6") (1,248 × 1,848 pixels)
2UPC-C15 series 13 × 18 cm (5 × 7") (1,536 × 2,148 pixels)
2UPC-C48 series 10 × 20 cm (4 × 8") (1,248 × 2,448 pixels)
Print pack Maximum print size (resolution)
2UPC-R203 series 9 × 13 cm (3.5 × 5") (1,210 × 1,728 pixels)
2UPC-R204 series 10 × 15 cm (4 × 6") (1,382 × 2,048 pixels)
2UPC-R205 series 13 × 18 cm (5 × 7") (1,728 × 2,380 pixels)
2UPC-R206/C26
series
15 × 20 cm (4 × 8") (2,048 × 2,724 pixels)
Print pack Maximum print size (resolution)
UPC-X34 series 7 × 9 cm (3 × 3.5") (1112 × 1512 pixels)
UPC-X46 series 10 × 15 cm (4 × 6") (1664 × 2440 pixels)
Print pack Paper size (pixels) Pages
2UPC-C13 series 9 × 13 cm (3.5 × 5")
(1,100 × 1,536 pixels)
1
2UPC-C14 series 10 × 15 cm (4 × 6")
(1,248 × 1,848 pixels)
1
2UPC-C15 series 13 × 18 cm (5 × 7")
(1,536 × 2,148 pixels)
1
13×13cm(5×5")
(1,536 × 1,548 pixels)
1 1)
9×13cm(3.5×5")
(1,100 × 1,536 pixels)
2 2)
2UPC-C48 series 10 × 20 cm (4 × 8")
(1,248 × 2,448 pixels)
1
10×18cm(4×7")
(1,248 × 2,148 pixels)
1 1)
10×10cm(4×4")
(1,248 × 1,248 pixels)
2 2)
Print pack Paper size (pixels) Pages
2UPC-R203 series 9 × 13 cm (3.5 × 5")
(1,210 × 1,728 pixels)
1
2UPC-R204 series 10 × 15 cm (4 × 6")
(1,382 × 2,048 pixels)
1
5×15cm(2×6")
(691 × 2,048 pixels)
2 2)
2UPC-R205 series 13 × 18 cm (5 × 7")
(1,728 × 2,380 pixels)
1
13×13cm(5×5")
(1,728 × 1,728 pixels)
1 1)
9×13cm(3.5×5")
(1,210 × 1,728 pixels)
2 2)
2UPC-R206/C26 series 15 × 20 cm (6 × 8")
(2,048 × 2,724 pixels)
1
15×18cm(6×7")
(2,048 × 2,380 pixels)
1 1)
10×15cm(4×6")
(1,382 × 2,048 pixels)
2 2)

Configuring the Printer 4
Copies
You can set this between 1 and 255.
Scale
Specifies the scale of prints. You can set the scale
between 20 and 400%.
Laminate Pattern (DS-SL10, DS-SL20
only)
Select from among the following two types of print
surface lamination.
Glossy Produces prints with a glossy finish.
Matte Produces prints with a misty appearance.
Printer Info
Displays information related to the printer currently
connected, such as print pack and printer status.
About
Displays the version information of this printer driver.
Save Settings
Saves all print setting configurations to a file.
Load Settings
Loads stored setting configurations from a file.
Restore Defaults
Restores all settings in the [Paper] tab to their default
condition.
[Graphics] tab settings
Select [Color Balance], [Lightness], [Color Correction],
or [Gray Balance] in the [Color Adjust] list to change
these settings.
Color Balance
Adjusts the color balance. Adjust the setting by moving
the slider left or right. You can also make adjustments by
typing values in the box on the right.
Color Balance (Red, Green, Blue)
Sliders for [Cyan - Red], [Magenta - Green], and
[Yellow - Blue] are available. Regarding red, green, and
blue, each color becomes stronger when you move the
slider to the right (+), and weaker when you move the
slider to the left (–). For example, if you move the [Cyan
- Red] slider to the left (–), red becomes weaker while
cyan becomes stronger.
Strong
Output
Weak StrongInput

Configuring the Printer 5
Lightness
Adjusts lightness. Adjust the setting by moving the
slider left or right. You can also make adjustments by
typing values in the box on the right.
Sharpness
Adjusts the sharpness of image outlines. Sharpness is
enhanced when you move the slider to the right (+), and
reduced and smoothened when you move the slider to
the left (–).
Dark
Adjusts the scale of the dark tones. Dark tones become
darker when you move the slider to the right (+), and
lighter when you move the slider to the left (–).
Gamma
Adjusts the scale of medium tones. Medium tones
become darker when you move the slider to the right (+),
and lighter when you move the slider to the left (–).
Light
Adjusts the scale of light tones. Light tones become
lighter when you move the slider to the right (+), and
darker when you move the slider to the left (–).
Memo
To adjust the contrast, move the [Dark] and [Light]
sliders. Contrast becomes higher when you move both
sliders to the right (+), and lower when you move both
sliders to the left (–).
Light
Output
Dark LightInput
Light
Output
Dark LightInput
Light
Output
Dark LightInput

Configuring the Printer 6
Color Correction
Select the color correction method.
Printer Hardware Color Correction
The printer corrects color.
Color Table (DS-SL20 only)
Select one of the printer’s internal color tables.
Standard: Reproduces the standard colors of the
printer.
Enhanced: Reproduces sharp, high-contrast colors.
ICM Color Correction (not available in Windows 8)
Uses the ICC profile assigned to the printer to perform
ICM color correction in the printer driver. The
perceptual rendering method is used.
None
Printer and printer driver color correction is not
performed.
Gray Balance (DS-SL10, DS-SL20 only)
Adjust the gray balance setting.
When you click the [Print Chart] button, two charts (A
and B) will be printed, each with gray patterns ranging
from No. 0 to No. 88. Select your preferred gray balance
from among patterns No. 0 to No. 88 for charts A and B,
and enter the numbers for your selections in [Gray
Balance A] and [Gray Balance B].
Gray Balance A, Gray Balance B
Select a gray pattern number between 0 and 88.
Print Chart
Prints gray balance patterns.
Note
Chart printing is disabled when more than one page is
assigned to be printed on a single sheet with the [Cut
Mode] setting. Print with [Cut Mode] set to the standard
paper size.
Charts are printed with the values for [Color Balance]
and [Lightness] (excluding [Sharpness]) set to 0.

Configuring the Printer 7
Printing with Image Color
Management
Note
Color management using ICM is not available in
Windows 8.
To print from applications that support Windows Image
Color Management (ICM), you must install an ICC
profile.
The following ICC profile can be found in the ICC
Profile folder on the supplied CD-ROM.
For the DS-SL10:
DS-SL10_UPC-C1X_D50.icm
For the DS-SL20:
DS-SL20_UPC-R20X_D50.icm
For the DS-ID400:
DS-ID400_UPC-X_D50.icm
Perform the following to use the ICC profile.
Installing the ICC profile
1
Select the icon for the ICC profile you want to use.
2
Right-click the icon, and select [Install Profile].
Adding the ICC profile
The procedure for adding the ICC profile differs
depending on the operating system you are using.
When using Windows 8
Color management using ICM is not available in
Windows 8.
When using Windows 7
1
Click [Start], select [Control Panel], and then select
[View devices and printers].
2
Right-click the DNP DS-SL10 printer icon, and
select [Printer properties].
3
Click the [Color Management] tab.
4
Click [Color Management].

Configuring the Printer 8
5
Open the [Device] pull-down menu, and select
[Printer: DNP DS-SL10].
6
Select [Use my settings for this device].
7
Click [Add] to add the profile to be used.
8
Select the profile you want to use from the list that
appears, and click [OK].
9
Confirm that the profile has been added, and click
[Close] to close the dialog box.
10
Click [OK] to close the properties screen.
Note
Specifying the ICC profile on the application side may
also be necessary, depending on the application software
used. For details, refer to the operating instructions for
your application software.
When using Windows Vista
1
Click [Start], select [Control Panel], and then select
[Printers].
2
Right-click the DNP DS-SL10 printer icon, and
select [Properties].

Configuring the Printer 9
3
Click the [Color Management] tab.
4
Click [Color Management].
5
Open the [Device] pull-down menu, and select
[Printer: DNP DS-SL10].
6
Select [Use my settings for this device].
7
Click [Add] to add the profile to be used.
8
Select the profile you want to use from the list that
appears, and click [OK].
9
Confirm that the profile has been added, and click
[Close] to close the dialog box.
10
Click [OK] to close the properties screen.
Note
Specifying the ICC profile on the application side may
also be necessary, depending on the application software
used. For details, refer to the operating instructions for
your application software.
When using Windows XP
1
Click [Start], select [Control Panel], and then select
[Printers and Faxes].

Configuring the Printer 10
2
Right-click the DNP DS-SL10 printer icon, and
select [Properties].
3
Click the [Color Management] tab.
4
Click [Add] to add the profile to be used.
5
Select the profile you want to use from the list that
appears, and click [Add].
6
Click [OK] to close the properties screen.
Note
Specifying the ICC profile on the application side may
also be necessary, depending on the application software
used. For details, refer to the operating instructions for
your application software.
Disabling color correction on the printer
When using Image Color Management (ICM) from an
application, you must disable color correction on the
printer hardware. To disable color correction, follow the
directions on page 6 and select [None].
Other manuals for DS-SL10
1
This manual suits for next models
2
Table of contents
Other DNP Printer manuals