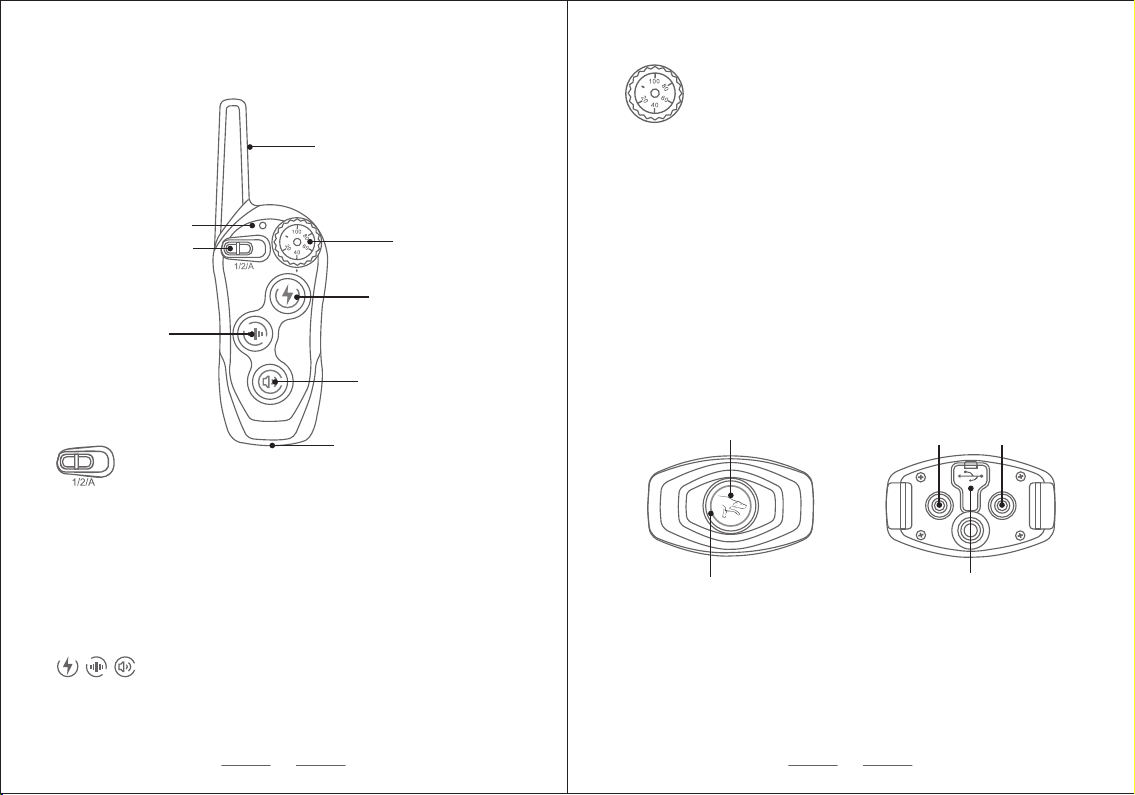
DOBE DB400 User manual

2FCC REQUIREMENT1BEFORE YOU GET STARTEDIf the collar is not in use for an extended period of time, make sure the collar is fully charged before it's left idle. This, and a monthly charge, will help extend the battery life.Avoid leaving the collar on the dog for more than 12 hours per day.Before using your dog training bark collar, please fully charge the collar and remote with approximately 2 hours.If you are unsure whether this product is appropriate for your dog, please consult your veterinarian or certified trainer.Do not use this product if your dog is aggressive, or if your dog is prone to aggressive behavior. Thank You for choosing our Dog Training Bark Collar. Please read the user guide carefully before using.WARRANTYWe provide a 1-YEAR warranty from the date of purchase. This product has undergone a thorough quality inspection at the factory to ensure that the product is in good condition. We will remedy all defects in workmanship or materials within the warranty period.If you have questions regarding installations, using the product, or any other related issues, contact us through one of those methods.Do you love this collar? Please share your positive story about how our collar has helped your dog improve training on Amazon to help other customers choose the right dog training collar for their dogs!In order for the warranty to be granted, all warranty claims must be accompanied by proof of purchase from an authorized distribution partner. We DO NOT offer a warranty for products that have been bought secondhand or as a resold product. Any water damage on the remote and the Water Resistant Receiver of our product series will not be covered. Damages due to improper installation or use, unauthorized removal / modification / repair are not covered by the warranty. CONTACT THE CUSTOMERS SERVICE1. Please go to “My orders > Find Order > Contact Seller”2. Go to the product page, you will see a line said “Sold by ‘store name’ and Fulfilled by Amazon”. Click“store name” > Have a question for ‘store name’ - “Ask a question”DB500A1@outlook.com3. Service Mail: (AM: 9:00 to PM: 21:00) Chinese TimeWhy the item looks like old or appears to be second-hand?We thought that the item was returned back by other Amazon buyers, So if you meet this problem, Please contact our customer service representatives to determine whether your device needs to be replacement.Changes or modifications not expressly approved by the party responsible for compliance could void the user’s authority to operate the equipment. This device complies with Part 15 of the FCC Rules. Operation is subject to the following two conditions: (1) this device may not cause harmful interference, and(2) this device must accept any interference received, including interference that may cause undesired operation.

REMOTE CONTROLBuilt-in AntennaShock ButtonBeep ButtonToggle Switch LED Indicator LightCharging PortANTI BARK COLLARContact PointVibration Button3ON/OFF/Pairing/Sensitivity ButtonLED Indicator LightCharging Port4(Dog Channel: 1/2Anti Bark Mode: A)The remote has 3 channels: 1and 2 is for the Remote Training Mode. A is for the Anti Bark Mode. You will use the toggle switch on the remote to switch between channels.If you have one dog, you will need to pair to Channel 1 or Channel 2.If you have two dogs and bought a second collar, you will need to pair one collar to Channel 1 for one dog and you will need to pair the second collar to Channel 2 for the second dog.The three buttons on the remote for beep, vibrate, and shock can be used for Channel 1, Channel 2, and Channel A.How to turn the collar off and onClick the button on the collar once to turn it ON. You will feel a short vibrate to confirm it has been turned on. It will stay on when the remote is charging.It will turn off when the battery is fully charged.It will flash if you press buttons on the remote.It will blink every 3 seconds during standby mode until no operations have been completed for 20 minutes.Remote LED Indicator LightBlink twice per second when the remote need to charging.To turn the collar OFF, quickly double click the button on the collar. You will feel a long vibrate to confirm it has been turned off.Intensity DialShock/VibrationThe intensity dial on the remote is used to adjust the level of vibrate or shock from 0 to 100 for Channel 1, Channel 2. Turn the dial clockwise to turn the intensity up. 40 levels is currently intensity in used.

56Anti Bark Collar LED Indicator LightBlink every 3 seconds during standby until no operations have been completed for 20 min. On when the collar is working or mode buttons on the remote are pressed.It will turn on during charging and when the battery fully charged.Flash quick during the 10 seconds pairing process.Blink twice per second when the collar need to charging.HOW TO FIT COLLAR ON YOUR DOGThe collar size is adjustable to fit your dog's neck between 9" and 26". If your dog's neck circumference is smaller than 9” or larger than 26”, this collar is not suitable. A well-fitted collar is essential for ensuring that the two metal probe contact points press firmly against the dog's skin, which will foster training efficiency and quality. When the collar is fitted and connected properly, there should be enough space to fit one or two fingers snugly in between the contact points on the receiver on the collar and the dog's skin. The collar should not be worn by dogs under 10 pounds. NOTE: Please make sure that both of Metal Probes Contact Points are touch your dog’s neck skin. this is very important, it will effect whether the Anti Bark Mode can work or not. and also effect on safe when you use SHOCK MODE.Under Dog’s Neck Touch The Dog’s SkinWhen you adjust the collar to fit your dog’s neck there was an excessive amount hanging over if you want to cut the excessive amount off. Please burn the end of the collar to prevent the whole thing frayed.These steps will help your dog safe and comfortable.A collar worn for too long or made too tight on the dog's neck may cause skin damage, ranging from redness to pressure ulcers (commonly known as bed sores). Examine the contact area daily for signs of a rash or a sore. If a rash or sore is found, discontinue use until the skin has healed. If the condition persists beyond 48 hours, see your veterinarian.These collars can cause pressure necrosis if used incorrectly and is often misidentified as burns.If possible, reposition the collar on the pet's neck every 1 to 2 hours.Never connect a lead to the electronic collar, because it may cause excessive pressure on the contact points.Wash the dog's neck area and the contacts of the collar weekly with a damp cloth.So please check your dog’s neck every day, may cause skin damage. Ranging from redness to pressure ulcers; this condition is commonly known, as bed sores.

78PAIRING THE COLLAR WITH REMOTEChannel 1 and/or 2 are used when you want to MANUALLY trigger a response when your dog barks or does a bad behavior that you want to correct. 1. Make sure the toggle switch on Channel 1 Position.3. Within 10 seconds, press and hold button on the remote to pair the collar with the remote. you will hear 2nd beep from the collar, this confirms the pairing is complete.4. Press the button to verify that the Remote Training Mode is working.Use the Intensity Dial on the remote to set the intensity level from 1-100 for Channel 1 or 2. Currently Intensity is 40 in use. the BEEP mode is non-adjustable level.If you want to pair another collar to the same remote, change the toggle switch to Channel 2 and follow the same instructions.Hold the button for 3 secondsPress and hold one of mode buttonsHOW TO USE THE ANTI BARK MODEChannel A is used when you want the collar to AUTOMATICALLY trigger a response when your dog barks. Change the toggle switch on the remote to Channel A position. It is Anti Bark Mode now and will default to one of Anti Bark Mode, but you can change the modes any time. NOTE: We was paired the collar to Channel 1 before, we have back to the Channel 1. it is back to MANUALLY remote training mode. NOTE: We has been paired the collar with remote. So you can easy right out of the box. Usually, one collar was paired to the Channel 1, another one paired to the Channel 2.2. Hold the button on the collar down for 3 seconds. You will hear 1st beep from the collar and the LED light will flash green to confirm it is in pairing status. HOW TO PAIRING THE COLLAR WITH REMOTERun to the Anti Bark ModeBack to the Remote Training ModeNOTE: Put the test light over the Contact Points of the collar and thenpress the SHOCK button to verify SHOCK mode is working.

109Mode:11.5S21.5S2S+42S1.5S+Mode:41.5S1.5S+51.5S2S+11.5S21.5S1S+However, if the dog stops barking for 30 seconds, the duration will be automatically reset to the initial.When you press button, you will hear one beep from the collar, which means the beep mode is selected and ready to use. 11.5SMode:22S32S1.5S+31.5S2S+31.5S1S+HOW TO CHOOSE ONE OF ANTI BARK MODEThe collar just beep on the 1st time and 2nd time as a initial warning on your dog barks. When your dog barks the 3rd time, it will add in Shock, the shock intensity is the level 100.However, if the dog stops barking for 30 seconds, the beeping duration will be automatically reset to the initial.When you press button, you will hear two beeps from the collar, which means the vibrate mode is selected and ready to use. The collar just beep on the 1st time as a warning on your dog barks. When your dog barks the 2nd time and 3rd time, it will add in Vibrate. in the 4th time, it will add in Shock, the shock intensity is level 100.However, if the dog stops barking for 30 seconds, the beeping duration will be automatically reset to the initial.When you press button, you will hear 3rd beeps from the collar, which means the shock mode is selected and ready to use.The collar just beep on the 1st time as a warning on your dog barks. When your dog barks the 2nd time to 5th time, it will add in Shock, based on your settings.NOTE: if the continued stimulus reaches the 5 times, then the collar will stop working for 30 seconds to protect the dog even he still barks. the LED light will flashing 30 seconds at the same time. HOW TO SET THE SENSITIVITY LEVEL FOR ANTI BARK MODEPressing and hold the button for 0.5 seconds every time to set the sensitivity level. do not hold it over 3 seconds, the collar will into the pairing status and you can’t pairing the collar in Channel A position.When you hear 1 beep from the collar, you set to the level 1. When you hear 2 beeps from the collar, you set to the level 2. When you hear 3 beeps from the collar, you set to the level 3.When you hear 4 beeps from the collar, you set to the level 4. When you hear a long beep from the collar, you set to the level 5. HOW TO TESTING THE ANTI BARK MODEWe would recommend faux sounds to provoke the behavior before actually using the product to correct it automatically. Please make sure the Metal Probes Contact Points is touch your dog’s neck skin both. We have used a new technology to identify the barks from your dog by vibration and trigger the collar work to avoid false trigger caused by other dog barks around your dog. So if your dog's bark isn't causing a vibration against the sensor it doesn't work.NOTE: Level 5 is highest sensitive and easy to work when the dog barks, sometimes you need to adjust to the lower level to fit your dog.

1112FAQ1. Are there any minimum age requirements for the dogs using the device?There is no limit of ages for dogs using the device for training purposes. However, to develop quality training, you should make sure that the dog can comply with basic obedience commands such as "Sit" or "Stay". Regardless of age, the collar might be too large for dogs under 10 pounds.2. How long should I process each training session for my dog?Each training session should be processed as short as about 15 min.3. If the bark collar goes into sleep mode, does it turn back on?In Anti Bark Mode, the collar will turn back on when the dog starts barking. In Remote Training Mode, turn the collar back on when press one of button.4. Why doesn't the remote work in the responding range or why the connection become weakened when my dog is farther away? Check to see if the remote antenna is blocked by fingers or other items, which could decrease the responding range significantly.The dog training bark collar has a responding range of approximately 1,300 feet, which may slightly vary depending on the way the remote is held. Hold the remote out and away from your body to maintain an ideal range. When holding the remote, please do not touch or block the antenna to avoid a potential sharp decrease in the responding range. To ensure strong signals and connections, make sure the device is sufficiently charged before each use. Range will not be limited through glass windows, but it will be limited through a door or wall.RESPONDING RANGETo ensure the collar is 100% waterproof, make sure the rubber cover on the USB charging port on the back of the collar is fully sealed. 100% WaterproofWATERPROOF COLLARNOTE: If the collar started going off randomly beeping and vibrating for no reason. which means the water gets into the collar. Please remove the collar from your dog, unscrew the screws, wipe out the water stains on the circuit board and the shell. Wait for it to dry, then re-install it and try again. Fully SealingSometimes we forgot to put the rubber cover fully sealed on the charging portafter the collar charged fully. so it will not be waterproof.Any electrical conductors such as cars, chain-link dog runs, metal buildings, and radio towers will also affect the range. For the best effect, please approach such devices as few as possible during the training.The 1,300 foot range was designed and tested for flat terrain. Trying to use the remote through bushes, trees, hills, buildings, and or moisture can make a difference to the range. To keep possession of an ideal range, please hold and lift the remote above your head when the dog is far away or tries moving to higher ground.

13145. Can I attach a leash to this collar?We strongly suggest that you do NOT attach a leash to this collar. It can result in severe injury by pushing the contact points too tightly against a dog's neck. If you need to use a leash, attach it to a separate and non-metallic collar or a harness while making sure that the extra collar does not put any pressure on the contact points on the training collar.The metal probes are too short to reach the dog's skin. You can replace them with the longer ones. If the dog is still not responding after that, please try pairing the remote and collar again or trim the dog's hair.The battery might be low. Please check the LED indicator light on the remote and on the collar to know about the battery life span.9. Why isn't my dog reacting in Remote Training Mode?Please make sure the device is turned on and properly paired while the intensity levels of vibration and electrostatic pulse are not set to zero.Make sure the collar is fitted tightly enough on the dog's neck for both contacting points touching the dog's skin. This is very important for the Shock Mode. If not, the Shock Stimulation will burn into your dog’s neck.7. Why can’t I feel any stimulation when the LED indicator light is on?Humans normally react less than dogs do. You may need to use your fingertip to touch both contact points and increase the stimulation level by adjusting the intensity dial located at the top right corner of the remote. Make sure that both contacting points are being touched at the same time by two fingertips.Make sure the toggle switch on Channel 1 or Channel 2 position Channel A is for Anti Bark Mode. when you press one of buttons, it is select the Anti Bark Mode. 6. Why doesn't the device work when I test it with my hand?When testing the collar with your hands, touch both electrodes located at the back of the collar at the same time.Pairing the anti bark collar with remote again to see is it work.If the device is fully charged and you have done all of the above, please contact our customer service representatives to determine whether your device needs to be serviced or repaired.10. Why it doesn’t work when my dog barks in Anti Bark Mode?Make sure the Contact Points touch your dog's neck skin both. This is very important. the anti bark collar will be identify the barks from your dog or not by vibration. So if the barks isn’t causing a vibration against the sensor it doesn’t work. 11. Why the training collar started going off randomly beep and vibrate for no reason. The collar is not waterproof now. Please remove the collar from your dog , unscrew the screws, wipe out the water stains on the circuit board and the shell. Wait for it to dry, then re-install it. most we will fix this issue. If still can’t fix the issue, please contact our customer service representatives to determine whether your device needs to be serviced or repaired.We would recommend that you have to check the rubber cover is fully seal or not after your dog swimming.8. Is the Vibrate/Shock safe for my pet?While the Vibrate/Shock is unpleasant, it is harmless to your pet. Electronic training device require interaction and training from the owner to achieve desired results.

FCCCaution
Thisdevicecomplieswithpart15oftheFCCRules.Operationissubjecttothe
followingtwoconditions:(1)Thisdevicemaynotcauseharmfulinterference,and(2)
thisdevicemustacceptanyinterferencereceived,includinginterferencethatmay
causeundesiredoperation.
AnyChangesormodificationsnotexpresslyapprovedbythepartyresponsiblefor
compliancecouldvoidtheuser'sauthoritytooperatetheequipment.
Note: ThisequipmenthasbeentestedandfoundtocomplywiththelimitsforaClass
Bdigitaldevice,pursuanttopart15oftheFCCRules.Theselimitsaredesignedto
providereasonableprotectionagainstharmfulinterferenceinaresidentialinstallation.
Thisequipmentgeneratesusesandcanradiateradiofrequencyenergyand,ifnot
installedandusedinaccordancewiththeinstructions,maycauseharmfulinterference
toradiocommunications.However,thereisnoguaranteethatinterferencewillnot
occurinaparticularinstallation.Ifthisequipmentdoescauseharmfulinterferenceto
radioortelevisionreception,whichcanbedeterminedbyturningtheequipmentoff
andon,theuserisencouragedtotrytocorrecttheinterferencebyoneormoreofthe
followingmeasures:
-Reorientorrelocatethereceivingantenna.
-Increasetheseparationbetweentheequipmentandreceiver.
-Connecttheequipmentintoanoutletonacircuitdifferentfromthattowhichthe
receiverisconnected.
-Consultthedealeroranexperiencedradio/TVtechnicianforhelp.
This equipmentcomplieswithFCC radiation exposure limits setforthforan
uncontrolledenvironment.
Table of contents
Popular Pet Care Product manuals by other brands

Gallagher
Gallagher 083091 installation instructions

Petsafe
Petsafe PTY00-14665 Operating and training guide

Petsafe
Petsafe PAWZ AWAY PDT00-11312 Operating and training guide

Petsafe
Petsafe PDT00-11875 Operating and training guide

HAFENBANDE
HAFENBANDE Flory HBB2101 instruction manual

Dogtra
Dogtra 2500T&B Series owner's manual