manuals.online logo
Brands
  1. Home
  2. •
  3. Brands
  4. •
  5. Doctorseyes
  6. •
  7. Controllers
  8. •
  9. Doctorseyes PLC-4 User manual

Doctorseyes PLC-4 User manual

doctorseyes™
INSTRUCTIONS MANUAL
for the
Power and Light
Controller
Professional System
PLC-4
used in conjunction with
doctorseyes
Hotline: +49 73 52 94 16 49 7
from 09:00 a.m. tol 05:00 p.m. (GMT)
Doctoreseyes GmbH
Abteistr. 18/1
88416 Ochsenhausen
Germany
Phone: +49 7352 9416497
Fax: +49 7352 9416499
[email protected]
www doctors.eyes.com
Version 2.0/US
doctors
Outer diameter mm
Inner diameter . . . . . . . . . . 44 mm
LED distance to opening . . 1.5 mm
Filter thread . . . . . . . . . . . . 72 mm
Weight . . . . . . . . . . . . . . . . 1.2 ounces
Light color temperature . . . > 5800 K
LED life cycle. . . . . . . . . . . 50,000 hours
eyes 72 Ringlight
. . . . . . . . . 74
doctors
13.4 ounces
eyes Light and Power Controller
Professional System
Dimensions (mm) 72 x 125 x 45
Weight
Battery capacity 2000 mAh
Battery Illumination time approx. 3 hours
Voltage 3.6 V
Charging indicator yes
Charging voltage 8.6V - 9V
Technical Specifications:
Included in PLC-4:doctorseyes
!
!
!
!
!
!
!
!
Power and Light Controller PLC-4
Tripod screw
doctors Ringlight 72 incl.
macro lens +4
Occlusal mirror
Mounting element 72
Charging Unit for Controller
doctors Ringlight 86 incl.
macro lens +4 (optional)
Mounting element 86 (optional)
eyes
eyes
1
4
doctors
Dear Dental Photographers,
Congratulations and thank you for choosing the doctors
Professional System.
Our lighting system is very user-friendly and intuitive.
Nevertheless, the following pages provide you with brief
instructions on using the doctors Ringlight. Tips and tricks
relating to the camera settings can be found in the camera's
separate user manual.
We would like to thank all the dentists and dental technicians for
their stimulating ideas which have influenced the development
and hence the quality of our products.
Your comments and suggestions are always welcome.
We hope you enjoy the world of digital dental photography.
The doctors Team
eyes
eyes
eyes
eyes
Power and Light Controller Professional PLC-4
Version 1.0
Warning
Warning
Never look directly into the LED light beam. The intense
bright light can burn the retina. If necessary, provide the
patient with protective eyewear or a mask.
Note: It is normal for the doctors Ringlight to
become warm when in use.
When working with patients never leave the power and
light controller connected to the power supply and never
leave the camera connected to its power supply.
eyes
doctors the world of digital dental imagingeyes.com
Brightness and Battery Life
Charging the Controller
The brightness of the doctors
Ringlight and Winglights remain
constant even when the battery
weakens. The controller will
automatically turn off the lights when
the battery is too low. To recharge the
battery in the controller connect it to
the power supply.
When charging the controller, only use
the power supply unit provided by
doctors . Connect the power
supply unit to the socket on the back
of the controller.
The blinking loading symbol shows the
loading status even when the
controller is turned off. When the
controller is fully charged, the loading
symbol stops blinking and remains lit.
In addition, the battery symbol is
completely filled.
It takes an average of three hours to
fully load the controller but this time
can be reduced. It is also possible to
load the controller even when the
charge status shows it is half full.
eyes
eyes
position
temp brightness
ultrabright
f1 f2
prog. 2
12
doctorseyes.com
®
position
brightness
ultrabright
f1 f2
position
brightness
ultrabright
f1 f2
made in Germany
PLC-4
6 V DC
doctorseyes.com
®
position
brightness
ultrabright
f1 f2
23
Turning the Controller On and Off
Regulating Brightness
Changing Light Segment
Combinations
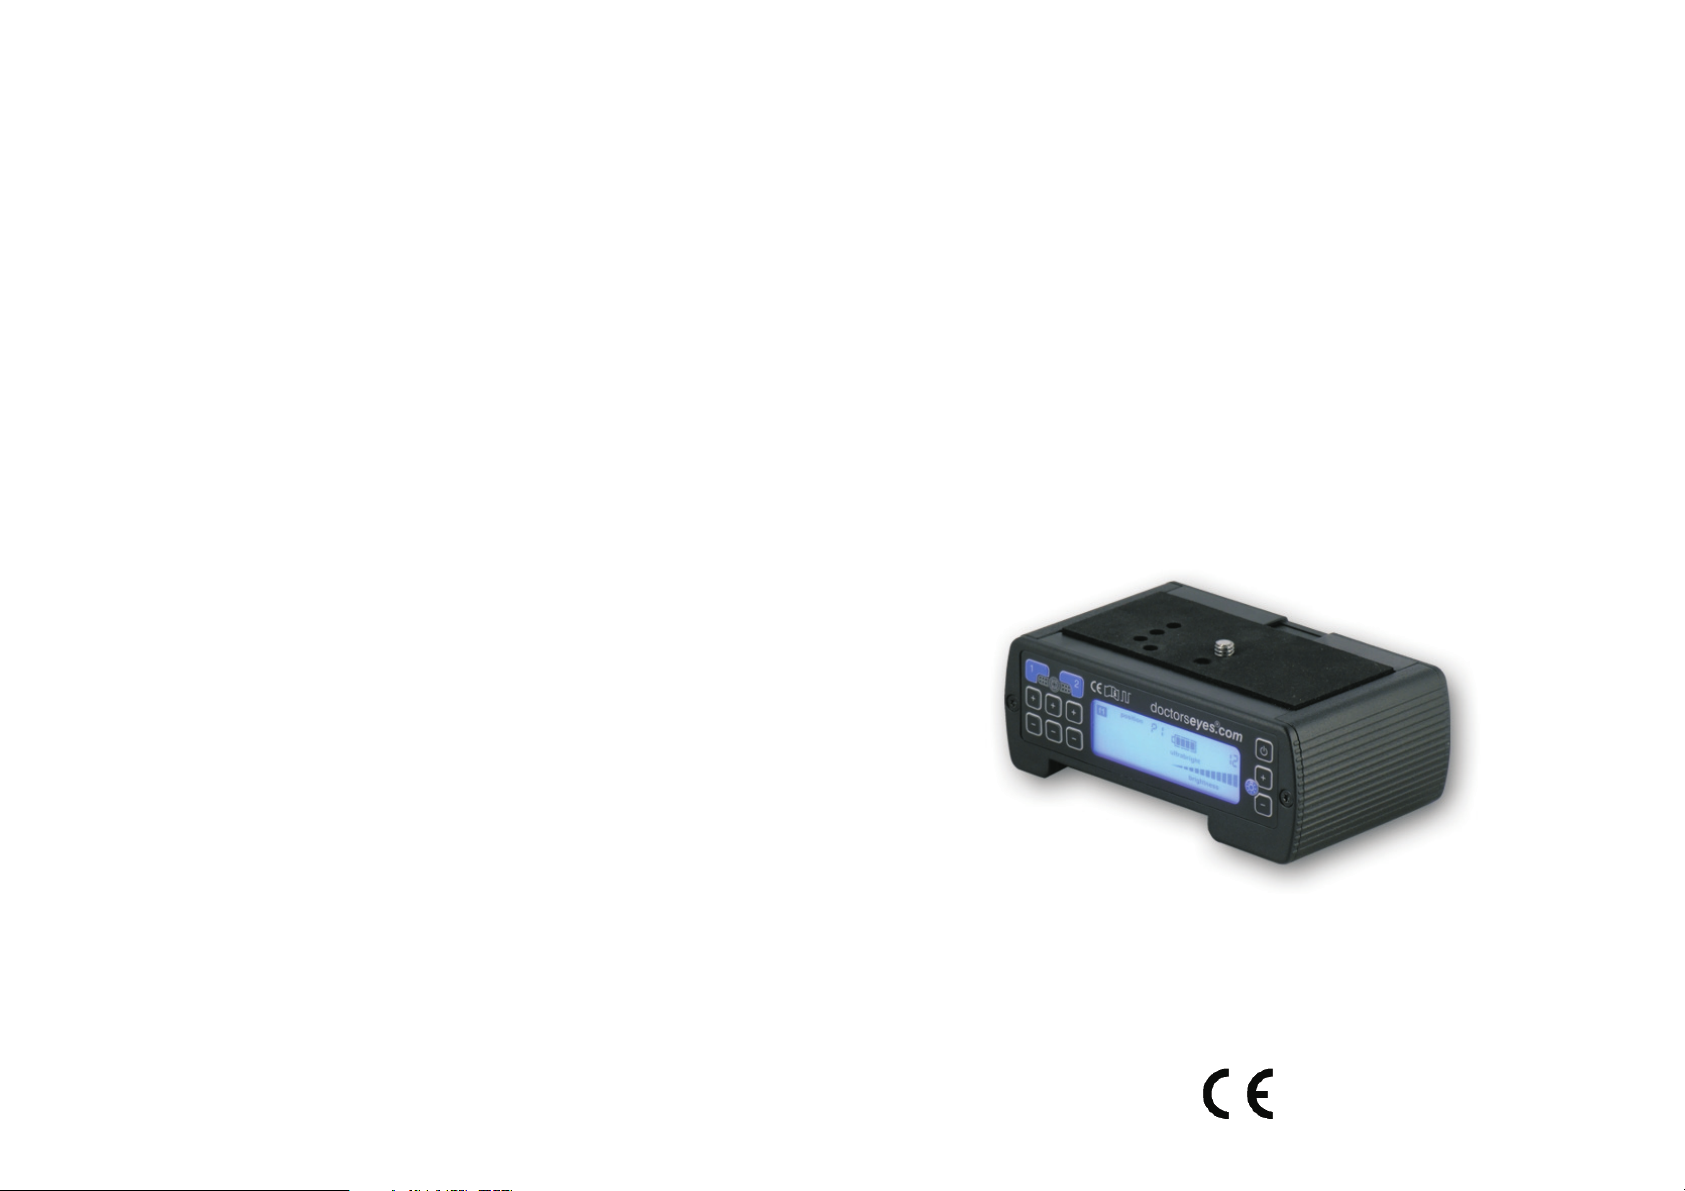
The PLC-4 can be turned on and off by
pushing the button in the top right
corner of the controller. The blue
colored display is visible when the
controller is on.
The light can be adjusted up to a level
13 by using the plus and minus
buttons.
The current level of brightness is
indicated by a number in the top right
corner of the controller display and the
triangle bar graphic below. When
maximum level of brightness has been
reached, the word “ultrabright” appears.
The doctors Professional System
offers a maximum of flexibility through
its many light combinations as well as
by the Winglights and center Ringlight.
The six plus and minus buttons control
sections of LED light segments on each
wing and the center ring. This makes it
possible to activate a specific segment
of the light system, for example the
bottom half of the right wing.
The lit segments are visible on the
controller display. Every light segment
has a corresponding number which is
indicated on the display. These
numbers repeat themselves if one was
to scroll through. Each Winglight offers
13 settings (from 0 to 12), the Ringlight
7 settings (from 0 to 6).
eyes
doctors the world of digital dental imagingeyes.com doctors the world of digital dental imagingeyes.com
position
temp brightness
ultrabright
f1 f2
prog. 2
12
doctorseyes.com
®
position
temp brightness
ultrabright
f1 f2
prog. 2
12
doctorseyes.com
®
brightness
ultrabright
position
temp brightness
ultrabright
f1 f2
prog. 2
12
doctorseyes.com
®
brightness
ultrabright
The various combinations can be
controlled by pushing the plus and
minus buttons. If the button is pushed
down briefly the number increases if
the button is pressed longer than one
second, the numbers will go back to
previous light combinations, 'counting
down'. This allows for fast and
comfortable control of the various
lighting combinations in the controller
display.
When looking through the camera
viewer while adjusting the light
combination one can quickly identify
the best lighting conditions for the
picture. When taking front close-up
shots, we recommend shutting off the
center Ringlight and only using the
Winglights on the side.
PLC-4 allows for two preferred
lighting combinations to be saved and
each retrieved by the push of a
button. This is especially helpful when
a specific lighting combination is used
repeatedly.
To save a light segment combination,
have the camera lit the way it should
be saved. Press either the '1' or '2'
button longer than one second. The
light combination is stored when you
see 'f1' and 'P1' in the controller
display. To retrieve the lighting
combination, press the same number
again (either 1 or 2).
Saving Light Segment
Combinations
The
position
temp brightness
ultrabright
f1 f2
prog. 2
12
doctorseyes.com
®
position
temp brightness
ultrabright
f1 f2
prog. 2
12
doctorseyes.com
®
position
temp brightness
ultrabright
f1 f2
position
temp
f1 f2
position
temp
f1 f2

Popular Controllers manuals by other brands

ICP DAS USA WISE-224 Series quick start

ICP DAS USA

ICP DAS USA WISE-224 Series quick start

Pulsar ZERO 4001 instructions

Pulsar

Pulsar ZERO 4001 instructions

RCF AT20T user manual

RCF

RCF AT20T user manual

Chatsworth Products 36720-701 installation instructions

Chatsworth Products

Chatsworth Products 36720-701 installation instructions

ICT Distribution 3 Series instruction manual

ICT

ICT Distribution 3 Series instruction manual

MR tapcon 230 pro operating instructions

MR

MR tapcon 230 pro operating instructions

Onkyo PDR-155 Service manual

Onkyo

Onkyo PDR-155 Service manual

Enwork Solano HA user manual

Enwork

Enwork Solano HA user manual

Leaksafe Solutions WaterSwitch Installation & user guide

Leaksafe Solutions

Leaksafe Solutions WaterSwitch Installation & user guide

Festo Pneumatic SDK-4-PK-3 operating instructions

Festo Pneumatic

Festo Pneumatic SDK-4-PK-3 operating instructions

Eaton ESWA4500C installation manual

Eaton

Eaton ESWA4500C installation manual

Mitsubishi Electric MELSEC iQ-F FX5 user manual

Mitsubishi Electric

Mitsubishi Electric MELSEC iQ-F FX5 user manual

Emerson Fisher HSRL Series instruction manual

Emerson

Emerson Fisher HSRL Series instruction manual

NSI NCM 6128 Operation manual

NSI

NSI NCM 6128 Operation manual

AUMA GSTI Series operating instructions

AUMA

AUMA GSTI Series operating instructions

Danfoss AK-PC 351 instructions

Danfoss

Danfoss AK-PC 351 instructions

Bosch CC 100 M user manual

Bosch

Bosch CC 100 M user manual

Mitsubishi Electric Melsec WS Series user manual

Mitsubishi Electric

Mitsubishi Electric Melsec WS Series user manual

manuals.online logo
manuals.online logoBrands
  • About & Mission
  • Contact us
  • Privacy Policy
  • Terms and Conditions

Copyright 2025 Manuals.Online. All Rights Reserved.