Doheny's ProJet Free Plus-650 User manual

ProJet
Free
Plus-650
Battery- Operated Robotic Pool
Cleaner for Aboveground Pools
INSTRUCTION MANUAL
Battery: 7.4V /5200mAh
Charging power: 8.4V DC, 1.5A
Motor voltage: 7.4V DC
Waterproof grade: IPX8

1
SAFETY WARNING
When installing and using this electrical equipment, you should always
follow
the
basic
safety
precautions.
Please
read
the
following
carefully
This cleaner is not a toy and should be operated by people older than 8 years
of age. Anyone who operates this cleaner, has to read the manual carefully
before using it.
(1)
The
cleaner
is
designed
to
clean
a
swimming
pool
or
a
swim
spa.
(2)
Only
use
the
original
battery
and
charger
provided.
(3)
Only
charge
the
cleaner
when
the
power
is
OFF.
(4)
Store the cleaner in a clean, dry location. Do not expose the cleaner
to direct sunlight, or close to explosives.
(5)
Please make sure there are no sharp objects in the pool to avoid damage
to the cleaner.
(6)
The
cleaner
automatically
shuts
off
when
it
is
out
of
water.
(7)
Avoid blocking or impeding the flow of the cleaner’s suction port
while operating.
(8)
Do not disassemble the cleaner without professional guidance from an
authorized repair center.
(9)
Should an oil leak occur, remove the cleaner from the water and place it in
a plastic bag.
(10)
Please contact the company where the cleaner was purchased should
the cleaner stop working.
Only original parts may be used for repairs.
(11)
Maximum
water
depth:
1.5
m
(5
ft)
(12)
Water
temperature
operating
range:
4°C(
39.2°F
)-35°C(
95°F
)
•Charger:
1.
Only
use
the
original
charger
provided.
2.
For indoor use only. The charger should not be used outdoors and
must not be exposed to rain, humidity, liquids, sunlight, or heat.
3.
Keep the
charger
out
of
the reach
of
children.
4.
Never
use
the
charger
if
it
is
damaged.
Warning!

2
5.
Do not handle the cleaner or charger with wet hands and or bare feet
while charging the cleaner.
6.
Disconnect
the
charger
from
its power
source when
not
in
use.
7.
If
the
wire
is
damaged,
replace
the
entire
charger
to
avoid
danger.
8.
Make
sure
the
cleaner
and
charger
are
totally
dry
before
charging.
9.
Charge the cleaner 4-5 hours prior to the first use.
Normally the
cleaner will operate for approximately 60 minutes when fully charged.
•Battery disposal:
(1)
The battery is a lithium battery and must be disposed of properly.
Contact your local authority for more information.
(2)
Never
attempt
to
disassemble
the
lithium
battery.
(3)
Remove all personal items that are metal should a lithium battery need
to be removed from the cleaner by authorized personnel only.
(4)
In rare situations,
the battery may overheat and cause severe burning
when high current occurs because of a short circuit.
(5)
Wear complete eye protection, gloves and protective clothing when
authorized personnel only needs to remove the battery pack.
(6)
Avoid smoking near or exposing the cleaner to flames to avoid
exposure to unhealthy gases.
(7)
If acid comes in contact with skin and clothing, wash immediately with
plenty of soap and water.
(8)
If acid comes in contact with eyes, immediately flood eye with running
cool water for at least 15 minutes.
Seek medical attention immediately.
The above warnings and cautions are not intended to incorporate all
possible instances for risks and/or severe injury. Pool/spa owners
should always exercise caution and common sense when operating the
cleaner.

Pin cover
Charger
3
Assembly
A: Floater
B: Upper cover
B-1: Jet head
C: Cartridge filter
D: Filter
E: Bottom base
F: Charger
G: Hook
A
G F B
C
D
E
Assembly and operation
Charging the cleaner
Use only the original external adapter and charging cable provided.
Bottom cover body assembly bottom
Make sure the robot and charger ports are clean and dry before installation.
Charge the robot before using it for the first time (about 5 hours).
1.Remove the pin cover from the charging port located under
the cleaner. To avoid losing the cover, attach the pin cover to
the charging cable.
Switch
2.Place the charger plug into the charging port at the
bottom of the cleaner, then plug the charger into
the power supply to begin charging the cleaner.
Note: Once the robot starts charging, the
indicator light on the external adapter will turn red.
When the robot is fully charged, the indicator light will
turn green.
3.When fully charged, pull the charger plug
out of the charging port at the bottom of the
cleaner. Securely place the pin cover over
the charging port making sure the port is
sealed before placing the cleaner in the
water.
Charging
port
B-1
The jet head (B1) rotates 180 degrees as the water flows through the
bottom base (E), the filters (C & D) and the upper cover (B). The
water flow passing through the jet head propels the robot across the
pool floor. Should an obstacle prevent the robot from moving
forward, the jet head turns 180 degrees and sends the robot in the
opposite direction. The debris is collected and stored in the bottom
base (E) of the cleaner as clean water passes through the filter (C)

4
Pipe air out
Power on
1. Turn on the switch, the indicator lights up,
loosen the rope on the float, put the robot
horizontally into the pool, and wait for the
robot to sink freely down to the pool bottom,
it takes around 20-30 seconds to pipe air out
first.
2. Adjust the length of the rope to ensure that
the length of the rope is at the same height as
the water level. Cut or tie the excess rope.
Open the latch on the
top of the cleaner to
easily carry it by
hand or remove it
from the pool.
3. When the robot runs out of battery, it will automatically stop at the edge of the pool unless unforeseen
obstacles prevent the robot from moving to the pool’s edge.
Note:
1. It is recommended to turn off the filtration system as the water circulation in the pool may affect the robot's
movement. .
2. Any obstacle in the swimming pool will affect the robot's crawling and cleaning track, such as ladder.
3. If you are using salt to sanitize you water, make sure it is dissolved before putting the robot into the water.
Debris Access & Disposal
1. 3.
TOP
2.
4.
TOP
TOP

5
Maintenance and storage
1. The battery continues to discharge during storage. Make sure the robot is fully charged before storing it.
2. When not in use, you must recharge the battery at least once every three months.
3. Keep the charging adapter and cable separate from the robot while storing.
4. Clean the robot and filters with clean water prior to string it. Do not use detergent.
5. Remove all water from the robot before storing it, making sure the robot is completely dry.
6. Use a wet cloth to clean and dry the robot and its accessories.
7. Store in a well-ventilated place away from sunlight, heat, fire sources, pool chemicals and children.
The storage temperature should be 10 ℃– 25 ℃or (50 °F – 77°F).
Note: higher storage temperatures may shorten battery life.
Maintenance and replacement of impeller
Recommended tool (not included): screw driver
1. 2. 3.
Impeller
Maintenance and replacement of wheels
Main wheel
Note: the main wheel on this side has
magnets. Please contact the dealer for
replacement or maintenance.
Steering wheel

6
Battery assembly and replacement
Warning!
Do not treat electrical appliances as unclassified municipal waste, use separate collection facilities. For
information on available collection systems, contact your local government.
Do not remove the lithium battery without authorization.
When removing the lithium battery from the vacuum device, please remove all metals such as rings, bracelets,
necklaces, and watches.
The short-circuit current generated by a battery is enough to adsorb the ring (or similar items), causing severe
burns.
Before removing the battery pack, please wear eye protection, gloves, and protective clothing.
Be careful not to touch the wire or any metal parts, or it will cause spark or short circuit.
Do not smoke, spark, or flame near the cleaner, or it will ignite the battery and produce gas.
Avoid exposing the battery to fire or high temperature, otherwise it may cause explosion.
In case of battery leakage, avoid contact with the damaged battery and put it in a plastic bag.
If skin or clothing is in contact with acid, wash immediately with plenty of soap and water.
If the eyes are in contact with acid, rinse the eyes with water for at least 15 minutes and send them to a doctor
for treatment.
Battery replacement (authorized repair centers only):
NOTE: User must consult dealer before any battery replacement.
1. Pull out the four clips of the core part of the upper cover outward and separate it from the body assembly of the bottom cover,
take out the Micro patricles filer. .
2. Use a screwdriver to remove all screws on the power cover of the bottom cover.
3. Open the battery cover, find the
battery connection line, press the
clip on the connector, pull it out, and
take out the battery.
Note: wrap the connector with
insulating tape immediately to avoid
short circuit caused by contact
between two wire terminals.
4. According to the disassembly steps, re install the battery and assemble the charging parts.
Note: (1) if there are impurities in the seal ring, clean it and install it back into the seal ring groove.
(2) Pay attention to the assembly direction. The six screw holes must be aligned to lock the screws.

7
Trouble shooting
If you have problems with your cleaner, follow the troubleshooting steps below to restore performance.
Note: turn off the power before making any repairs.
Problem Possible causes Solution
Robot not capturing debris.
The battery is low. Charge the robot.
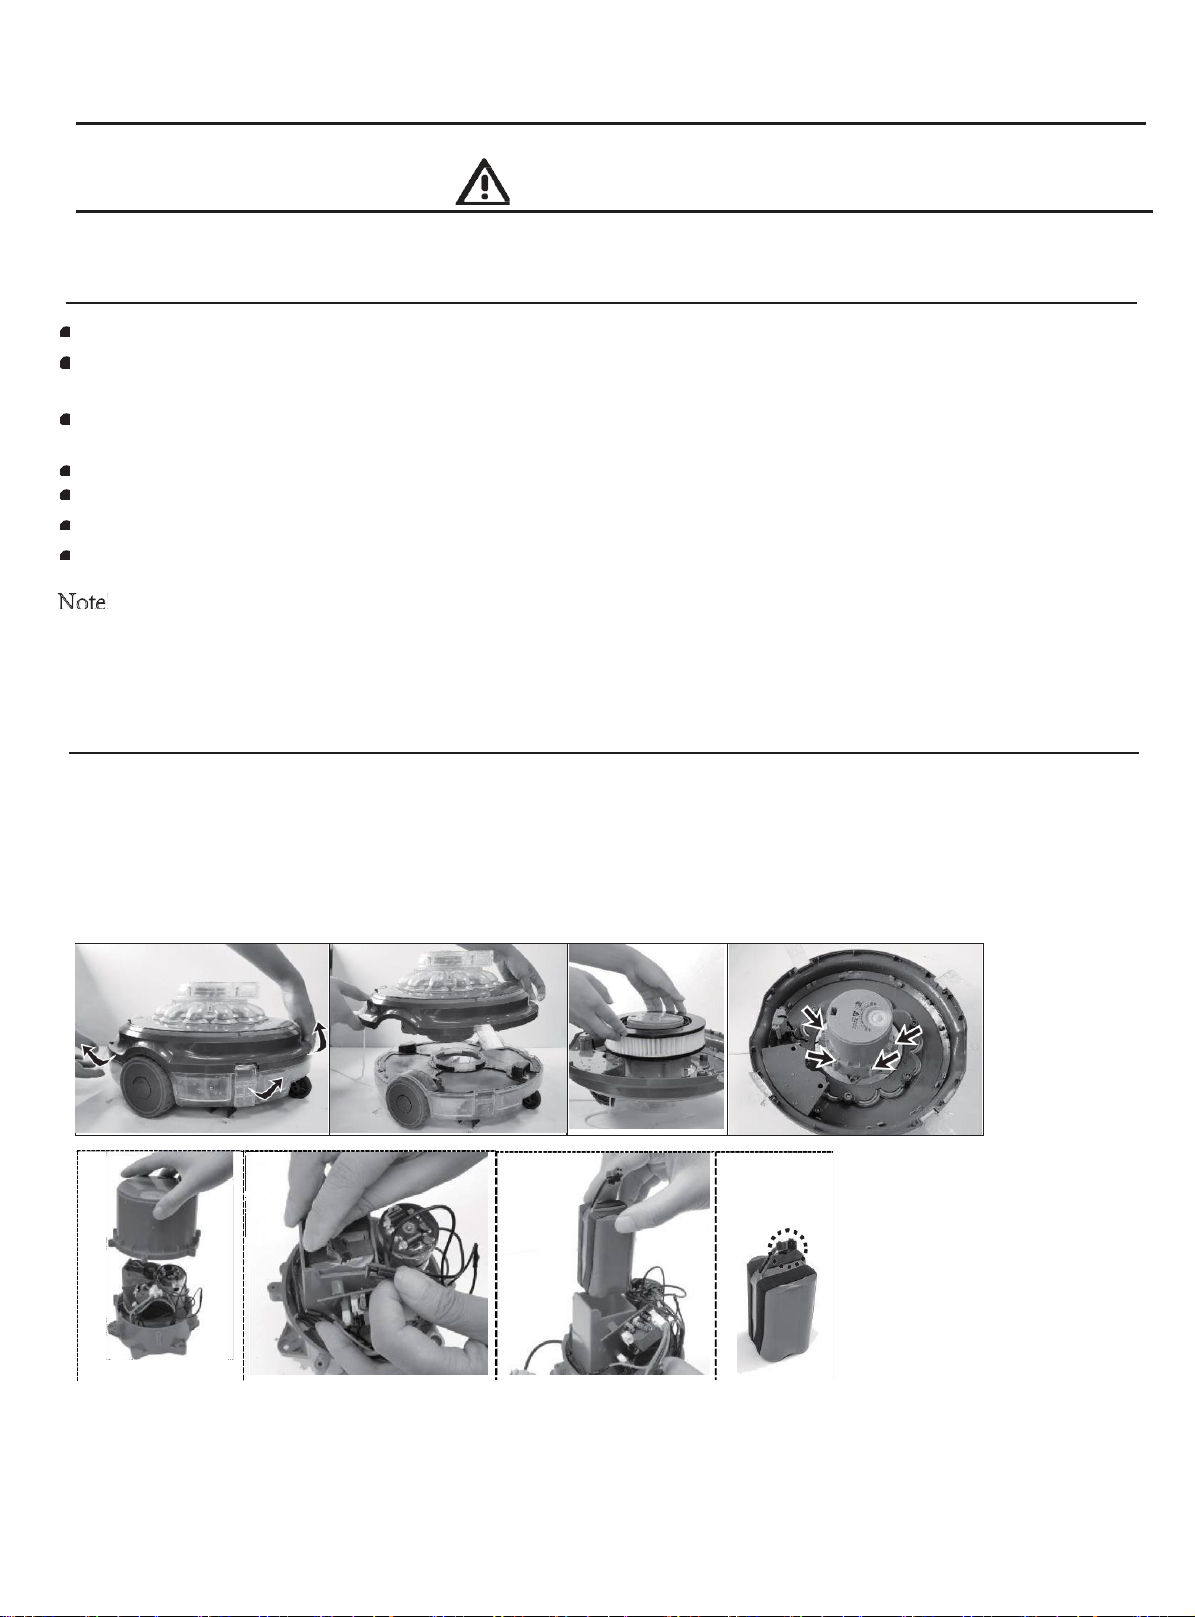
Impeller is stuck.
Turn off the power supply of the robot and
visually check whether the impeller rotates. If
necessary, contact your dealer for further
instructions. Warning! Before servicing the
equipment, make sure that the robot is turned
off.
Impeller damaged. Please contact your dealer for replacement.
The storage area is full. Clean the storage area and filter screen.
The robot stops moving in
the middle of the pool (the
rotating head is still
turning).
The robot was stopped by an
obstacle.
Check the cleaner for obstructions.
Remove obstacles.
The robot is stuck on the main pool
floor drain.
Turn off the filtration system (see
instructions in the manual).
The liner has excessive wrinkles
or divots.
The robot will try to maneuver around or
over the wrinkles or divots. This may
cause the robot to take additional time.
Contact your dealer for help.
The
robot cannot cover the
entire pool / move along
the wall of the pool.
The storage area is full.
Clean the storage area and filter screen.
The operation time was shorter
than expected.
Clean the filter chamber and recharge the
robot for 4-5 hours
The water circulation generated
by the filtration system interrupts
the direction of movement.
Turn off the filtration system (see
instructions in the manual).
The wheel is stuck. Check and remove debris from the wheels.
The
robot moves slowly. The storage area is full. Clean the storage area and filter screen.
The turning head does not
rotate or rotates too
slowly.
The bottom of the swivel is
stuck.
The storage area is full, check and remove
any debris that may be stuck under the
rotating head. It can be rotated by hand and
rinsed with water until smooth.
The storage area is full. Clean the storage area and filter screen.

8
The debris escaped from the
robot.
The valve of the suction
nozzle (bottom of the
cleaner) is broken.
The baffle at the suction cup is like a door
to prevent debris from escaping from the
debris chamber. Contact your dealer for
further instructions.
Debris enters the outside of
the filter cover.
The filter cover is
damaged.
Replace the filter cover with a new one.
Please contact your dealer for
replacement parts.
The robot can still work
without water.
The water of the robot is not
dry, and the contact is short
circuited, so the robot can still
work without water.
Leave it outside the water for a few
seconds and wait for the water to dry
There is garbage at the contact
point, such as wet hair, which
causes short circuit of the
contact.
Remove hair and other debris with tools
Circuit board damaged Please contact the dealer for replacement.
If the charger shows red
light all the time, it does not
change to a green light after
8 hours of charging.
Battery damage.
Please contact the dealer to replace the
battery. Warning! Don't turn on the robot and
replace the battery yourself. This can cause
serious or fatal injury, so the warranty will
not be valid.
If the charger changes to a
green light in a very short
time, and the device also
only works for a short time
(within half an hour).
1. When the product starts
to charge after the work
is over
2. If the charger shows a
green light all the time.
(Make sure the charger cable
is properly and completely
connected to the external
adapter and the robot.
)
Charger is damaged.
Contact the dealer for replacement.
Warning! Using the wrong external adapter
will result in damage to the robot / battery
and void the warranty.
If the charger light does not
light any more.

ProJet Free Plus-650
PARTS LIST
9
Reference
INO Item No.
Description
A
300051
Tether Cord Assembly
B
INO 600-2
Rotating Head Cover
C
INO 600-3
Interior Head Assembly
D
INO 650-4
Upper Body
E
INO 650-5
Body Clip
F
3000566
Standard Filter 150 µm
G
INO 600-8
Impeller
H
INO 650-8
Motor Assembly
I
INO 650-9
Lower Body
J
30005510
Small Guide Wheel
K
30005511
Brush Guides
L
INO 600-13
Large Wheel
M
INO 600-14
Inner Wheel Pin
N
3000515
US Charger
O
INO 650-15
5,200 mAh Lithium Battery
P
INO 650-16
Pin Cover- Charging Port
Q
30005517
Fine Cartridge Filter 10 µm
R
3000519
Retrieval Hook
Table of contents
Other Doheny's Swimming Pool Vacuum manuals