Ausströmleiste inklusive fernbedienbarer
LED-Beleuchtung
Vielen Dank, dass Sie sich für den Kauf der Bubble Air LED entschieden haben.
Diese Bedienungsanleitung ist Bestandteil des Produktes. Sie enthält wichtige Hinweise zur Inbetriebnahme und
Bedienung! Bewahren Sie diese Bedienungsanleitung zum Nachlesen auf!
Lieferumfang:
Das Bubble Air LED Set besteht aus einer LED Leiste mit 9 LED´s bei 21cm, 18 LEDs bei 33 cm Länge und
24 LEDs bei 44 cm Länge. Einem Steuergerät mit Empfänger und Fernbedienung inkl. Batterie sowie einem
12V Schaltnetzteil und einem ca. 90 cm langen Schlauch. Alles darf nur in dieser Kombination miteinander
verwendet werden.
Verwendung / Inbetriebnahme:
Das Gerät dient zur dekorativen Beleuchtung und Belüftung des Aquariums.
Achtung: Das Set darf nur in geschlossenen Räumen verwendet werden!
1. Schließen Sie das Netzteil an das Steuergerät (weißes Kästchen) an.
2. Verbinden Sie die Bubble Air LED Leiste mit dem im Lieferumfang enthaltenen Schlauch mit einer beliebigen
Membranpumpe.
3. Platzieren Sie die Bubble Air LED Leiste mit Hilfe der Saugnäpfe an einer von Ihnen gewünschten Stelle im
Aquarium.
4. Nehmen Sie jetzt Ihre Membranpumpe in Betrieb und stecken Sie dann den Stecker der Bubble Air LED ein.
5. Entfernen Sie die Schutzfolie an der Fernbedienung zur Aktivierung der Batterie.
6. Mit der Fernbedienung können Sie das Gerät nun steuern.
Achtung: Der Infrarot-Empfänger am weißen Kästchen muss in der Reichweite der Fernbedienung sein!
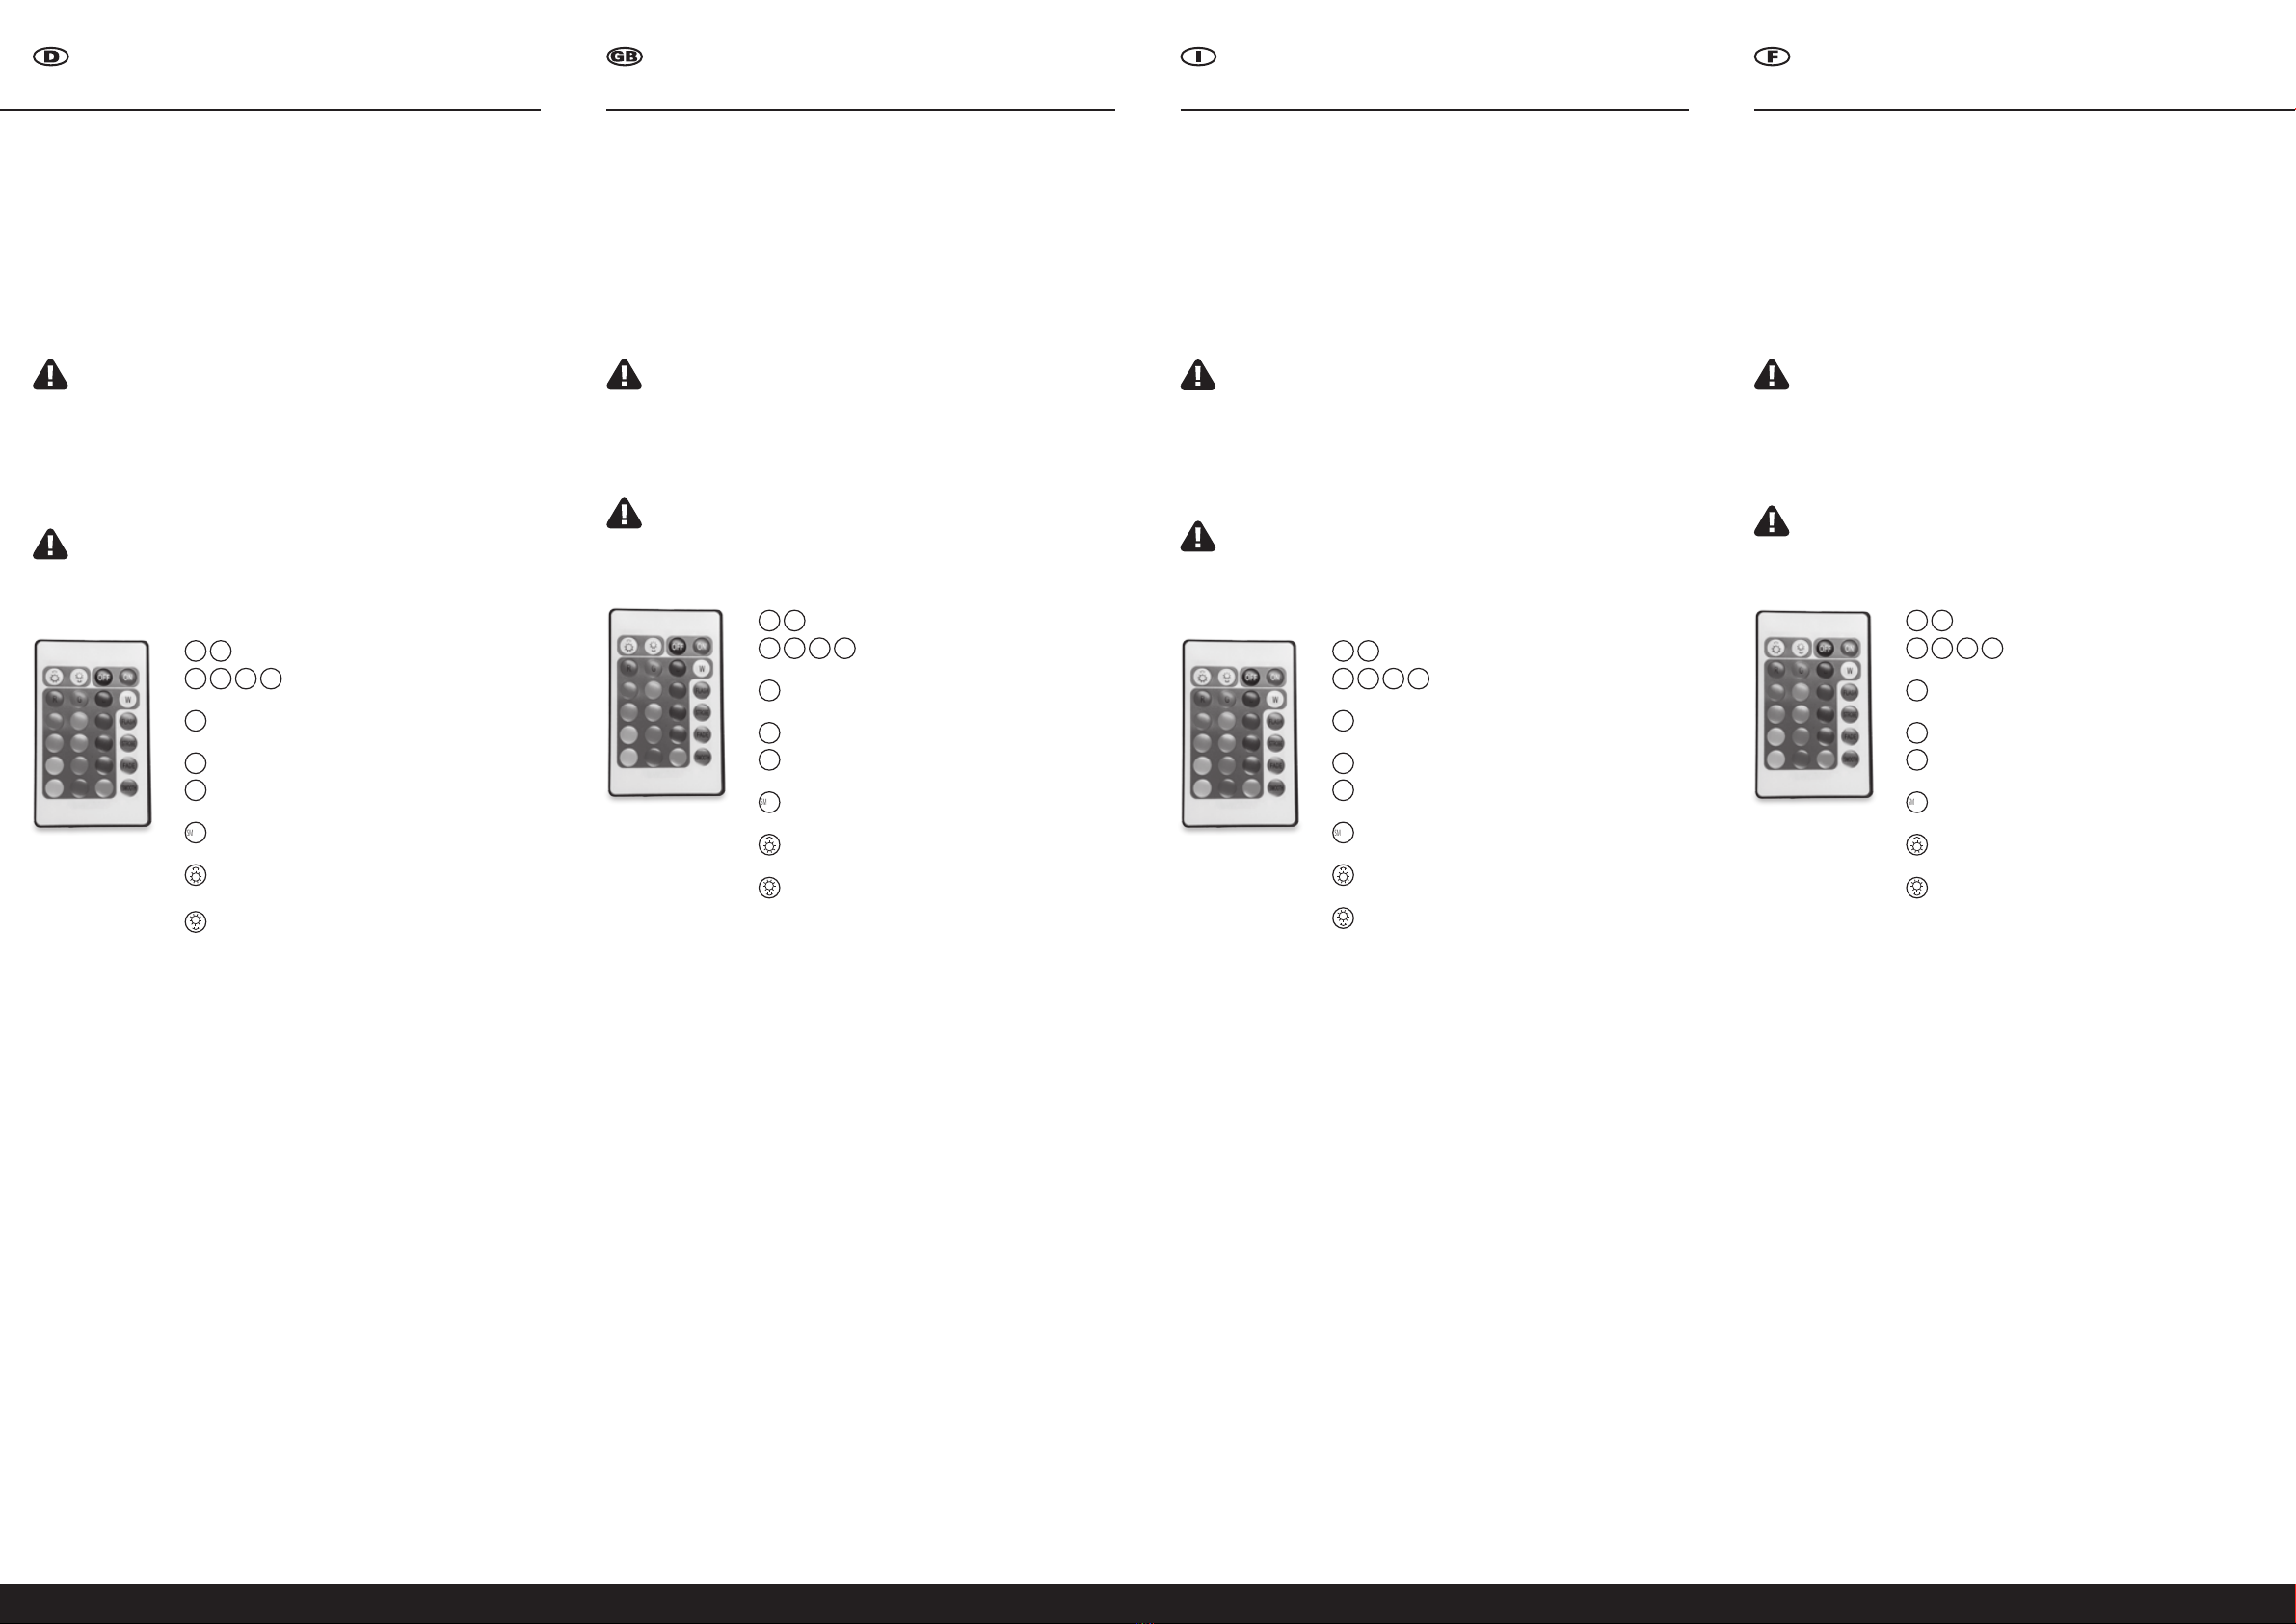
Im folgenden Abschnitt wird erklärt, welche Funktionen bei Druck der jeweiligen Tasten auf der
Fernbedienung ausgeführt werden:
= einschalten / ausschalten
= Farbauswahl rot / grün / blau + weiß
sowie 12 weitere Farben
= wechseln der Farbe während sie blinken
(langsamer als „Smooth“)
= LEDs blinken sanft weiß
= LEDs wechseln selbstständig mit sanftem
Übergang die Farbe
= LEDs blinken und wechseln automatisch die Farbe
(schneller als „Flash“)
= Leuchtkraft, Blink- und Farbwechsel
Geschwindigkeit erhöhen
= Leuchtkraft, Blink- und Farbwechsel
Geschwindigkeit vermindern
Sicherheitshinweise:
· Das Produkt darf nur in seiner bestimmungsgemäßen Art und Weise verwendet werden. Eine anderweitige
Verwendung führt eventuell zu Beschädigungen des Produktes und zum Erlöschen der Garantie.
· Öffnen Sie das Gerät niemals eigenmächtig, und führen Sie keine selbstständigen Reparaturen durch.
· Das Set ist kein Spielzeug für Kinder. Halten Sie das Set daher von Kindern fern.
· Das Produkt darf keinem mechanischen Druck ausgesetzt werden. Stöße, Schläge oder Fall aus bereits gerin-
ger Höhe können zu Schäden führen.
· Benutzen Sie die im Lieferumfang enthaltenen Geräte nicht weiter, wenn sie beschädigt sind.
· Schauen Sie niemals direkt in eine Lichtquelle, da dies Augenschäden verursachen kann.
· Achten Sie darauf, dass bei der Kabelverlegung niemand über diese stolpern kann. Es besteht Verletzungsgefahr.
· In Schulen, Ausbildungseinrichtungen, Hobby- und Selbsthilfewerkstätten etc. ist das Betreiben zu überwachen.
· Eine andere Verwendung als angegeben ist nicht zulässig! Für Sachschäden, die aus nicht bestimmungs-
gemäßer Verwendung entstehen, ist nicht der Hersteller, sondern der Betreiber selbst verantwortlich.
Reinigung und Wartung:
· Bei Wartungs- und Reinigungsarbeiten unbedingt den Netzstecker ziehen um den Stromkreislauf zu unterbre-
chen!
· Zur Reinigung verwenden Sie ein faserfreies, mit Wasser leicht angefeuchtetes Tuch.
· Das Öffnen des Controllers oder des Netzadapters ist nicht gestattet.
· Beim Austausch der Batterie entfernen Sie zunächst die verbrauchte Knopfzelle aus dem Batteriefach. Legen
Sie eine neue (CR2025) Batterie in das Fach und schieben Sie es wieder zu, bis es einrastet.
· Die alte Batterie muss fachgerecht bei einer Sammelstelle entsorgt werden. Als Endverbraucher sind Sie
gesetzlich (Batterien-Verordnung) zur Rückgabe gebrauchter Batterien und Akkus verpflichtet.
Problem und Lösung:
Das Gerät weist keine Funktion auf:
· Batterie der Fernbedienung ist leer. Wechseln Sie die Batterie wie oben beschrieben.
· Netzkabel ist nicht angeschlossen. Stecken Sie den Eurostecker am Netzkabel in eine funktionierende Netz-
steckdose (230V~ 50 Hz).
· LED Strip ist falsch angeschlossen.
Sollte das Gerät noch immer keine Funktion aufweisen, wenden Sie sich bitte an Ihren Händler.
Technische Daten:
Betriebsspannung: bis 240V~
Schaltnetzteil: 12V- max. 500 mA
Stromverbrauch Leiste: 21cm = 1W / 33 cm = 2W / 44 cm = 3 W
Schutzklasse: IP 68 (betrifft nur den tauchbaren Teil der Bubble Air LED Leiste)
Bubble Strip inclusive remote controlled
LED lighting
Thank you for choosing to purchase the Bubble Air LED.
These operating instructions are part of the product. They contain important information on set-up and use.
Please keep these operating instructions for future reference.
Items supplied:
The Bubble Air LED set includes one LED strip with 9 LEDs (21cm length) / 18 LEDs (33 cm length) / 24 LEDs
(44 cm length). One control unit with receiver and remote control incl. battery plus one 12V switching power
supply and one tube approx. 90 cm long. These components should only ever be used in combination with one
another.
Usage / Set-up:
The unit is designed for decorative lighting and aeration in the aquarium.
Attention: The set may only be used in enclosed spaces!
1. Connect the power supply unit to the control unit (white box).
2. Connect the Bubble Air LED strip to any diaphragm pump using the cable included.
3. Use the suction cups to position the Bubble Air LED strip at the desired place in the aquarium.
4. Now switch on your diaphragm pump and attach the Bubble Air LED connector.
5. Remove the protective film on the remote control to activate the battery.
6. You can now use the remote control to control the unit.
Attention: The infrared receiver on the white box must be within the range of the remote control!
The following section explains which operations can be carried out by pressing the relevant
buttons on the remote control:
= switch on / off
= color choices Red / Green / Blue + White
and 12 additional colors
= LEDs flash and automatically change color (slower
than „Smooth“)
= LEDs flash softly in white
= LEDs constantly change color with a smooth
transition
= LEDs flash and automatically change color
(faster than „Flash“)
= increases brightness,flashing speed,speed of color
change
= increases brightness,flashing speed,speed of color
change
Safety instructions:
· The product must always be used in the specified manner. Use in any other way may lead to damage to the
product and invalidate the warranty.
· Never open the product yourself nor carry out your own repairs.
· The set is not a children‘s toy. Please keep the set away from children.
· The product must not be exposed to mechanical pressure. Knocks, impacts or falling from even small heights
can cause damage.
· Do not continue to use the included equipment if any of it is damaged.
· Never look directly at a source of light as this can cause eye damage.
· When laying cable, ensure that nobody can trip over it. There is a risk of injury.
· In schools, educational establishments, hobby and self-help workshops etc., the operation of this product must
be supervised.
· Use other than as stated is not permitted! The operator, not the manufacturer, is responsible for damage
arising from improper use.
Cleaning and maintenance:
· Make sure that the unit is disconnected from the mains during maintenance and cleaning work!
· For cleaning, use a fibreless cloth lightly dampened with water.
· Opening the control unit or the mains adapter is not permitted.
· When replacing the battery, first remove the depleted coin battery from the battery compartment. Insert a new
(CR2025) battery in the compartment and slide it shut until it snaps into place.
· The old battery must be disposed of in an appropriate manner at a collection point.As a consumer you are
legally required to return used batteries and accumulators (Batteries Directive).
Troubleshooting:
If the unit is not functioning
· Tthe remote control battery may be depleted. Replace the battery as described above.
· The mains cable may be disconnected. Put the Euro plug on the mains cable into a functioning mains socket
(230 V~ 50 Hz).
· The LED strip could be attached incorrectly.
If the unit still fails to operate, please contact your dealer.
Technical data:
Operating voltage: up to 240V~
Switching power supply: 12V- max. 500 mA
Power consumption: 21 cm strip = 1W / 33 cm strip = 2W / 44 cm strip = 3W
Protection class: IP 68 (concerns only the submergible part of the Bubble Air LED)
ON
R
FLASH
STROBE
FADE
SMOOTH
B
OFF
G W
ON
R
FLASH
STROBE
FADE
SMOOTH
B
OFF
G W
Diffusore d‘aria incl. illuminazione
LED controllabile a distanza
Vi ringraziamo per esservi orientati verso l‘acquisto del prodotto Bubble Air LED.
Il presente manuale d‘uso è parte integrante del prodotto. Contiene avvertenze importanti relativamente alla
messa in servizio e all‘uso! Si prega di conservare il presente manuale d‘uso per future consultazioni!
Dotazione:
Il set Bubble Air LED è costituito da una barra LED con 9 LED di 21 cm di lunghezza / 18 LED di 33 cm di
lunghezza / da una barra con 24 LED di 44 cm di lunghezza. Contiene inoltre una centralina con ricevitore e
comando a distanza, batteria compresa, un alimentatore switching da 12V e un tubo flessibile da 90 cm circa
di lunghezza. Ognuno di questi elementi può essere utilizzato unicamente in combinazione con gli altri.
Utilizzo / Messa in servizio:
L‘apparecchio ha la funzione di illuminazione decorativa e di aerazione dell‘acquario.
Attenzione: Il set può essere utilizzato solo in locali chiusi!
1. Connettere l‘alimentatore alla centralina (scatolina bianca).
2. Collegare la barra Bubble Air LED con il tubo flessibile fornito in dotazione ad una pompa a membrana
qualsiasi.
3. Con l‘ausilio di una ventosa, collocare la barra Bubble Air LEDnel punto desiderato dell‘acquario.
4. Ora mettere in funzione la pompa a membrana, poi inserire la spina del Bubble Air LED.
5. Rimuovere la pellicola protettiva del comando a distanza per attivare la batteria.
6. Ora è possibile controllare l‘apparecchio attraverso il comando a distanza.
Attenzione: Il ricevitore a infrarossi nella scatolina bianca deve trovarsi nel raggio di portata del
comando a distanza!
La sezione seguente specifica quali sono le funzioni eseguite premendo i tasti corrispondenti sul
comando a distanza:
= attivazione / disattivazione
= selezione di colore rosso / verde / blu + bianco,
e 12 colori aggiuntivi
= alternanza dei colori mentre lampeggiano (più
lentamente della modalità „Smooth“)
= i LED lampeggiano di una delicata luce bianca
= i LED alternano autonomamente i colori con una
delicata transizione
= i LED lampeggiano ed alternano automaticamente i
colori (più velocemente della modalità „Flash“)
= intensificazione della luminosità e della velocità di
alternanza del lampeggio e dei colori
= attenuazione della luminosità e della velocità di
alternanza del lampeggio e dei colori
Avvertenze di sicurezza:
· Il prodotto è utilizzabile solo conformemente alla sua destinazione d‘uso. Un qualsiasi altro tipo di utilizzo
potrebbe comportare eventuali danneggiamenti al prodotto e l‘estinzione della garanzia.
· Non aprire mai il prodotto di propria iniziativa, né effettuare alcun intervento di riparazione autonomo.
· Il set non è un giocattolo per bambini, pertanto occorre tenerlo fuori dalla portata dei bambini.
· Il prodotto non deve essere esposto a carichi meccanici. Urti, colpi oppure la caduta già da un‘altezza minima
potrebbero comportare danni.
· Non continuare ad utilizzare gli apparecchi in dotazione se risultano danneggiati.
· Non fissare mai direttamente una sorgente luminosa, perché potrebbero risultarne danni agli occhi.
· Durante la posa del cablaggio, evitare che qualcuno possa incespicarvi. Sussiste il rischio di lesioni.
· L‘uso all‘interno di scuole, strutture di formazione, officine per hobby e self-service dovrà essere sorvegliato.
· Non sono consentiti impieghi diversi da quelli indicati! Risponde dei danni materiali, imputabili ad uso improp-
rio, lo stesso utente, non il produttore.
Pulizia e manutenzione:
· In caso di interventi di manutenzione e di pulizia staccare assolutamente l‘apparecchio dalla rete!
· Per la pulizia utilizzare un panno senza fibre, leggermente inumidito.
· Non è consentita l‘apertura del controller o dell‘adattatore di rete.
· In occasione della sostituzione della batteria rimuovere innanzi tutto la pila a bottone consumata dal vano
batteria. Inserire nel vano una batteria nuova (CR2025), poi risospingervi il coperchio fino allo scatto.
· La vecchia batteria dovrà essere smaltita correttamente presso un punto di raccolta. In qualità di utenti finali
si è soggetti all‘obbligo di legge (Ordinanza sullo smaltimento delle batterie) di conferire le batterie e gli
accumulatori usati.
Problemi e soluzione:
L‘apparecchio non presenta alcuna funzione:
· La batteria del comando a distanza è esaurita. Sostituire la batteria in base alla descrizione precedente.
· Il cavo di rete non è collegato. Inserire la spina europea del cavo di rete in una presa di corrente funzionante
(230V~ 50 Hz).
· Barra LED collegata erroneamente.
Se l‘apparecchio non dovesse presentare ancora alcuna funzione, è opportuno rivolgersi al proprio rivenditore.
Dati tecnici:
Tensione di esercizio: fino a 240V~
Alimentatore switching: 12V- max. 500 mA
Consumo della barra: 21cm = 1W / 33 cm = 2W / 44 cm = 3 W
Grado di protezione: IP 68 (riferito solo alla barra Bubble Air LED per immersione)
Bande de diffusion avec éclairage
LED télécommandé inclus
Nous vous remercions d‘avoir choisi le Bubble Air LED.
Ce mode d‘emploi fait partie du produit. Elle contient des informations importantes sur la mise en service et la
manipulation! Conservez ce mode d‘emploi pour un usage ultérieur en cas de besoin!
Etendue de livraison:
Le kit Bubble Air LED se compose d‘une bande LED avec 9 LED de 21cm,18 LED de 33 cm et 24 24 LED de
44 cm de long. un appareil de commande avec récepteur et télécommande sont fournis. Piles et une alimenta-
tion secteur 12V avec un tuyau d‘env. 90 cm de long. Ces éléments ne doivent être utilisés ensemble que dans
cette combinaison.
Utilisation / mise en service:
L‘appareil sert à l‘éclairage décoratif et à l‘aération de l‘aquarium.
Attention: Le kit ne doit être utilisé que dans des pièces fermées!
1. Raccordez le bloc d‘alimentation à l‘appareil de commande (case blanche).
2. Reliez la bande Bubble Air LED au tuyau fourni à n‘importe quelle pompe à membrane.
3. Placez la bande Bubble Air LED à l‘aide des ventouses à l‘endroit souhaité dans l‘aquarium.
4. Lancez votre pompe à membrane et branchez la prise mâle de la Bubble Air LED.
5. Retirez le film de protection de la télécommande pour activer la pile.
6. Vous pouvez commander l‘appareil par la télécommande.
Attention: Le récepteur infra-rouge sur le boîtier blanc doit être dans le champs de portée de la
télécommande!
La section suivante vous explique quelles fonctions sont exécutées en pressant
les différentes touches:
= marche / arrêt
= sélection de couleur: rouge/ vert / bleu + blanc
et 12 couleurs supplémentaires.
= changement de la couleur pendant qu‘elles cligno-
tent (plus lent que „Smooth“)
= les LED clignote doucement en blanc
= les LED changent automatiquement avec une
transition en douceur de la couleur
= les LED clignotent et changent automatiquement la
couleur (plus rapide que „Flash“)
= augmenter l‘intensité lumineuse, et la vitesse de
changement de clignotement et de couleur
= diminuer l‘intensité lumineuse, et la vitesse de
changement de clignotement et de couleur
Consignes de sécurité:
· Le produit ne doit utiliser que conformément à sa destination. Une autre utilisation peut causer des détériora-
tions du produit et annuler la garantie.
· N‘ouvrez le produit jamais vous-même et ne faites aucune réparation de votre propre initiative.
· Le kit n‘est pas un jouet pour enfants.Tenez-le hors de la portée des enfants.
· Le produit ne doit pas être exposé à aucune pression mécanique. Des coups, chocs ou chute même à faible
hauteur peuvent endommager l‘appareil.
· N‘utilisez plus les appareils fournis s‘ils sont endommagés.
· Ne regardez jamais directement une source de lumière, ceci peut être dangereux pour les yeux.
· Veillez à ce que les câbles ne soient pas dans le passage pouvant provoquer la chute de quelqu‘un. Il existe un
risque de blessure.
· Le fonctionnement doit être surveillé dans des écoles, des établissements de formation, et des ateliers de loisir
et d‘apprentissage.
· Une autre utilisation que celle indiquée est interdite! L‘utilisateur et pas le fabricant est pas responsable de
dommages matériels occasionnés par une utilisation non conforme à la destination.
Nettoyage et entretien:
· Débranchez l‘appareil avant chaque nettoyage et entretien!
· Utilisez un essuie-tout légèrement humide non fibreux.
· L‘ouverture du bloc de commande ou du bloc d‘alimentation est interdite.
· Pour changer la pile, retirez tout d‘abord la pile-bouton du compartiment. Insérez une nouvelle pile (CR2025)
dans le logement jusqu‘à son enclenchement.
· La pile usagée doit être amenée à un point de collecte. En tant qu‘utilisateur final, vous êtes obligé par la loi
(ordonnance sur les piles) de retourner les piles et batteries.
Problèmes et solutions:
Aucune fonction disponible sur l‘appareil:
· La pile de la télécommande est vide. Changez la pile comme décrit ci-dessus.
· Le câble secteur n‘est pas branché. Branchez la prise mâle Euro du câble dans une prise électrique femelle
opérationnelle (230V~ 50 Hz).
· La bande LED n‘est pas branchée correctement.
Si aucune fonction n‘est disponible sur votre appareil, veuillez-vous adresser à votre revendeur.
Données techniques:
Tension de service: jusqu‘à 240V~
Bloc d‘alimentation secteur: 12V- max. 500 mA
Consommation de la bande: 21cm = 1W / 33 cm = 2W / 44 cm = 3 W
Classe de protection: IP 68 (uniquement pour la bande Bubble Air LED)
ON
R
FLASH
STROBE
FADE
SMOOTH
B
OFF
G W
ON
R
FLASH
STROBE
FADE
SMOOTH
B
OFF
G W


