Dongcheng DCZC22 User manual

DCZC22 ADZC22 KDZC22
EN
DE
FR
ES
IT
2
×15
31
47
63
·········································································································
······································································································
······································································································
······································································································
······································································································

2
EN
Original instructions
General power tool safety
warnings
WARNING Read all safety
warnings and all
instructions. Failure to follow the
warnings and instructions may
result in electric shock, re and/or
serious injury.
Save all warnings and
instructions for future
reference.
The term “power tool” in the
warnings refers to your mains-
operated (corded) power tool or
battery-operated (cordless) power
tool.
1) Work area safety
a) Keep work area clean and
well lit. Cluttered or dark areas
invite accidents.
b) Do not operate power tools
in explosive atmospheres,
such as in the presence of
ammable liquids, gases or
dust. Power tools create sparks
which may ignite the dust or
fumes.
c) Keep children and
bystanders away while
operating a power tool.
Distractions can
cause you to lose control.
2) Electrical safety
a) Power tool plugs must match
the outlet. Never modify
the plug in any way. Do not
use any adapter plugs with
earthed (grounded) power
tools. Unmodied plugs and
matching outlets will reduce risk
of electric shock.
b) Avoid body contact with
earthed or grounded
surfaces, such as pipes,
radiators,ranges and
refrigerators. There is an
increased risk of electric shock
if your body is earthed or
grounded.
c) Do not expose power tools
to rain or wet conditions.
Water entering a power tool
will increase the risk of electric
shock.
d) Do not abuse the cord. Never
use the cord for carrying,
pulling or unplugging the
power tool. Keep cord away
from heat, oil, sharp edges
or moving parts. Damaged or
entangled cords increase the
risk of electric shock.
e) When operating a power tool
outdoors, use an extension
cord suitable for outdoor
use. Use of a cord suitable for
outdoor use reduces the risk of
electric shock.

3
EN
f) If operating a power tool in a
damp location is unavoidable,
use a residual current device
(RCD) protected supply. Use
of an RCD reduces the risk of
electric shock.
3) Personal safety
a) Stay alert, watch what you
are doing and use common
sense when operating a
power tool. Do not use a
power tool while you are tired
or under the inuence of
drugs, alcohol or medication.
A moment of inattention while
operating power tools may result
in serious personal injury.
b) Use personal protective
equipment. Always wear
eye protection. Protective
equipment such as a dust mask,
non-skid safety shoes, hard
hat or hearing protection used
for appropriate conditions will
reduce personal injuries.
c) Prevent unintentional
starting. Ensure the switch
is in the o-position before
connecting to power source
and/or battery pack, picking
up or carrying the tool.
Carrying power tools with
your nger on the switch or
energising power tools that have
the switch on invites accidents.
d) Remove any adjusting key
or wrench before turning the
power tool on. A wrench or a
key left attached to a rotating
part of the power tool may result
in personal injury.
e) Do not overreach. Keep
proper footing and balance at
all times. This enables better
control of the power tool in
unexpected situations.
f) Dress properly. Do not wear
loose clothing or jewellery.
Keep your hair and clothing
away from moving parts.
Loose clothes, jewellery or long
hair can be caught in moving
parts.
g) If devices are provided
for the connection of dust
extraction and collection
facilities, ensure these are
connected and properly used.
Use of dust collection can
reduce dust-related hazards.
4) Power Tool Use and Care
a) Do not force the power tool.
Use the correct power tool for
your application. The correct
power tool will do the job better
and safer at the rate for which it
was designed.
b) Do not use the power tool if
the switch does not turn it on
and o. Any power tool

4
EN
that cannot be controlled with
the switch is dangerous and
must be repaired.
c) Disconnect the plug from
the power source and/or
the battery pack from the
power tool before making
any adjustments, changing
accessories, or storing
power tools. Such preventive
safety measures reduce the
risk of starting the power tool
accidentally.
d)Store idle power tools out of
the reach of children and do
not allow persons unfamiliar
with the power tool or these
instructions to operate the
power tool. Power tools are
dangerous in the hands of
untrained users.
e) Maintain power tools. Check
for misalignment or binding
of moving parts, breakage of
parts and any other condition
that may aect the power
tool’s operation. If damaged,
have the power tool repaired
before use. Many accidents are
caused by poorly maintained
power tools.
f)Keep cutting tools sharp and
clean. Properly maintained
cutting tools with sharp cutting
edges are less likely to bind and
are easier to control.
g)Use the power tool,
accessories and tool bits
etc. in accordance with
these instructions, taking
into account the working
conditions and the work to be
performed. Use of the power
tool for operations dierent from
those intended could result in a
hazardous situation.
5) Battery tool use and care
a) Recharge only with the
charger specied by the
manufacturer. A charger that is
suitable for one type of battery
may create a risk of re when
used with another battery pack.
b) Use power tools only with
specically designated
batteries. Use of any other
batteries may create a risk of
injury and re.
c) When battery pack is not in
use, keep it away from other
metal objects like: paper clips,
coins, keys, nails, screws,
or other small metal objects
that can make a connection
from one terminal to another.
Shorting the battery terminals
together may cause sparks,
burns, or a re.
d) Under abusive conditions,
liquid may be ejected from
the battery; avoid contact. If

5
EN
contact accidentally occurs,
ush with water. If liquid
contacts eyes, additionally
seek medical help. Liquid
ejected from the battery may
cause irritation or burns.
6)Service
a) Have your power tool
serviced by a qualied repair
person using only identical
replacement parts. This will
ensure that the safety of the
power tool is maintained.
Hammer Safety Warnings
a) Wear ear protectors.
Exposure to noise can cause
hearing loss.
b) Use auxiliary handle(s), if
supplied with the tool. Loss
of control can cause personal
injury.
c) Hold the tool by the insulated
gripping surfaces when
performing operations where
the application tool or the
screw could contact hidden
wiring . Contact with a “live”
wire will also make exposed
metal parts of the power tool
“live” and shock the operator.
Battery safety warning
a) Do not dismantle, open or
shred secondary cells or
batteries.
b) Keep batteries out of the reach
of children Battery usage by
children should be supervised.
Especially keep small batteries
out of reach of small children.
c) Do not expose cells or batteries
to heat or re. Avoid storage in
direct sunlight.
d) Do not short-circuit a cell or
a battery. Do not store cells or
batteries haphazardly in a box
or drawer where they may short-
circuit each other or be short-
circuited by other metal objects.
e) Do not subject cells or batteries
to mechanical shock.
f) In the event of a cell leaking,
do not allow the liquid to come
in contact with the skin or eyes.
If contact has been made, wash
the aected area with copious
amounts of water and seek
medical advice.
g) Do not use any charger other
than that specically provided
for use with the equipment.
h) Do not use any cell or battery
which is not designed for use
with the equipment.
i) Do not mix cells of dierent
manufacture, capacity, size or
type within a device.
j) Always purchase the battery
recommended by the device
manufacturer for the equipment.

6
EN
k) Keep cells and batteries clean
and dry.
l) Wipe the cell or battery
terminals with a clean dry cloth
if they become dirty.
m) Secondary cells and batteries
need to be charged before use.
Always use the correct charger
and refer to the manufacturer’s
instructions or equipment
manual for proper charging
instructions.
n) Do not leave a battery on
prolonged charge when not in
use.
o) After extended periods of
storage, it may be necessary to
charge and discharge the cells
or batteries several times to
obtain maximum performance.
p) Retain the original product
literature for future reference.
q) Use the cell or battery only in
the application for which it was
intended.
r) When possible, remove the
battery from the equipment
when not in use.
s) Keep the cell or battery away
from microwaves and high
pressure.
t) Dispose of properly.
DESCRIPTION OF SYMBOLS
The rating plate on your power tool may show
symbols. These represent important information
about the product or instructions on its use.
Symbol
To reduce the risk of injury, user must
read instruction manual
WARNING
Conformity of EC
Wear ear protection
Wear dust mask
Conformity of UK
Do not burn
Do not charge a
damaged battery pack
Do not dispose of batteries.
Return exhausted batteries
to your local collection or
recycling point.
According to the European Waste Directive
2012 / 19 / EU on Electrical and electronic
equipment and the current national laws,
electric tools that are no longer available
must be collected separately and disposed
of properly.

7
EN
TECHNICAL DATA
Rated voltage 20 V
Battery Type Li-Ion
No-Load Speed 0-1400/min
Blows per Minute 0-4500/min
Max. Drilling Capacity
Steel Ø 13mm
Wood Ø 28mm
Concrete Ø 22 mm
Max.Clamping Capacity 22 mm
Net Weight Of The Machine(without battery) 1.8kg
Due to the continuing program of research and development, the specications herein are subject to change
without prior notice.
Noise information
A-weighted sound pressure level
LpA = 89.1 dB(A) KpA = 3 dB(A)
A-weighted sound power level
LWA= 100.1 dB(A) KWA = 3 dB(A)
wear hearing protection
Vibration information
Vibration total vales (triax vector sum) and uncertainty K determined according to EN 60745-2-6.
ah, HD= 21.278 m/s² uncertainty K= 1.5 m/s²
ah, CHeq=18.515 m/s² uncertainty K= 1.5 m/s²
The declared vibration total value(s) and the declared noise emission value(s) have been measured in
accordance with a standard test method and maybe used for comparing one tool with another.
The declared vibration total value and the declared noise emission value(s) may also be used in a preliminary
assessment of exposure.
A warning:
− that the vibration and noise emissions during actual use of the power tool can dier from the declared values
depending on the ways in which the tool is used especially what kind of workpiece is processed; and
− of the need to identify safety measures to protect the operator that are based on an estimation of exposure
inthe actual conditions of use (taking account of all parts of the operating cycle such as the times when the tool
isswitched o and when it is running idle in addition to the trigger time).
Intended use
The machine is intended for hammer drilling in concrete, bricks and masonry, as well as for light chiselling
work. It is also suitable for drilling without impact in wood, metal,
ceramics and plastic, as well as for screwdriving.
The light of this power tool is intended to illuminate the power tool’s direct area of working operation and is not
suitable for household room illumination.
Instructions for putting into use and Operation

8
EN
GENERAL DESCRIPTIONS
1.Locking Sleeve
2.Depth Gauge
3.Dust Cap
4.Operating Mode
Selector
5.LED Light
6.Battery Pack Button
7.Auxiliary Handle
8.Reversing Switch
Lever
9.Switch Trigger
1
8
9
2
3
4
5
6
7
CAUTION:
When installing or removing the battery pack, please
set the reversing switch lever to the center position
to lock the switch so as not to accidentally touch the
switch and cause safety problems.
The battery pack is only partially charged at delivery.
In order to ensure the maximum power of the battery ,
the battery pack must be fully charged in the charger
before the rst use.
● Installing or Removing the Battery
1.Installing the Battery
As shown in the gure below. When inserting the
battery pack, please pay attention to insert the battery
pack into the casing correctly, and be sure to insert
it until you hear the sound of “click”, indicating that
the battery pack is rmly installed on the machine.
Otherwise, the battery pack may accidentally fall o
from the case, causing injury to the operator or others.
Avoid using excessive force when inserting the battery
pack or knocking it in with other objects.
1
1.Battery Pack
Only the specied battery pack can be used. Use
of battery packs of other brands carries a risk of
injury and personal injury and property damage
due to battery packs exploding.
● Removing the Battery Pack
The battery pack is under the handle of the machine,
press the battery pack button, and then pull out the
battery pack.
Caution: Do not forcefully pull out the battery pack.
1
2
1.Battery Pack
Button
2.Battery Pack
● Battery Indicator
When you press the battery pack power button,
the battery indicator on the battery pack will show
the power of the battery pack, and the power level
is indicated by the state of the 4 red LED lights
(hereinafter referred to as a red light).
1
1.Battery Indicator
The power status is shown in the following table
Status of Red LED Lights Approx. Battery Power
Left
4 lights lit 75%-100%
3 lights lit 50%-75%
2 lights lit 25%-50%
1 light lit 10%-25%
● Continuous Use
When the battery is in continuous use until the battery
is exhausted. Cool the machine for 15 minutes before
continuing to use with a new battery pack.
● Switch Action
Before inserting the battery cartridge into the tool,
always check to see that the switch trigger actuates
properly and returns to the “OFF” position when
released.
*Do not operate the machine at a low speed for too
long, or the inside machine may be overheated.
To start the tool, simply pull switch trigger. Tool
speed is increased by increasing pressure on the
switch trigger and further pressure results in an
increase in speed. Release the switch trigger to
switch o the tool.

9
EN
1
1.Switch Trigger
2. Light Indicator
When the switch button is pressed, the white light is
lit to illuminate the operating position in a poorly lit
environment.
When the battery is running low. The white light
ashes about once a second. When the temperature
of the machine is too high, the white light will ash
twice a second.
1
1.LED Light
● Positive Inversion Operation
Positive Inversion Operation
Push the reversing lever from side B to side A, and
the machine will turn forward/clockwise (looking from
the end of the machine to the head).
Push the reversing lever from side A to side B,
reversing/counterclockwise (looking from the back of
the machine to the head).
When the reversing lever is in the middle position,
the switch is locked and the trigger cannot be pulled.
1
2
3
1.Reversing Switch
Lever
2.clockwise
3.Anticlockwise
CAUTION:
Before operation, always confirm the direction of
rotation; Be sure to use the reversing knob after
the machine has completely stopped. Changing the
direction of rotation before the machine has stopped
may cause damage to the machine.
● Installing or Removing tools
Apply a small amount (about 0.5-1g) of bit oil on the
drill shank in advance to ensure smooth operation
and prolong the service life of the machine.
CAUTION:
Before operation, the reversing lever must be placed
in the center position and the battery pack must be
removed, and it is absolutely forbidden to press the
switch button.
1.Installing the bit
Clean the bit handle and apply bit oil before installing
the bit. Insert the bit into the machine, turn the bit,
and push it in until it meshes. If the bit cannot be
pushed in, remove it. Pull down the sleeve several
times, then insert the bit, turn the bit and push it in
until it meshes.After installation, be sure to pull the bit
to make sure it is xed in place
1 2
1.Drill Bit
2.Locking Sleeve
2. Removing the bit
To remove the bit, just pull the locking sleeve back and
pull out the bit.
● Auxiliary Handle
For safety, use the auxiliary handle when operating.
Before operating the machine, please cover the
auxiliary handle in the specified position of the
machine and tighten it clockwise before operating the
machine.
Loosen the handle counterclockwise to adjust the
auxiliary handle to any Angle.
1
1. Auxiliary Handle
● Setting Operating Mode
1. Drill Mode
Turn the operating mode selector ( pressing the lock

10
EN
button), and align the triangle symbol with the
as shown in the gure, then the tool is set in drill
operation. Set like this when drilling on the wood,
metal, or plastic, and use twist bits or solid center
bits.
1
2
1.Operating
Mode Selector
2.Lock Button
2.Electric Hammer Mode
Turn the operating mode selector (pressing the lock
button), and align the triangle symbol with the
as shown in the gure, then the tool is set in hammer
operation. Set like this when drilling on the concrete
or stone with a carbide-tipped bit.
1
2
1.Lock Button
2.Operating Mode
Selector
3.Hammer Mode
Turn the operating mode selector (pressing the lock
button), and align the triangle symbol with the
as shown in the gure, then the tool is set in hammer
operation. It can be used for chiseling, stripping,
dismantling and other operations, which require the
use of a pointed drill, chise, rust chisel.
1
2
1.Operating
Mode Selector
2.Lock Button
CAUTION:
Only after the machine shut down can you change
the operation function, otherwise it will damage the
machine.
In order to avoid fast wear of the mode changing
mechanism, it is necessary to ensure that the
operating mode selector is always in one of the three
modes correctly.
When switch from drill mode or hammer mode to
impact mode. The operating mode selector may
not be successful. At this time, press the switch to
inching the machine and then rotate the function
button. Forcing the operating mode selector to rotate
may damage the machine.
● Drill Point Adjustment
When the machine is in hammer mode and the drill
point needs to be changed, press the lock button
and turn the operating mode selector to make the
aimed at , at this point the bit can be adjusted to
the desired angle. Adjust the angle before turning the
machine back into hammer mode.
1
2
1.Lock Button
2.Operating Mode
Selector
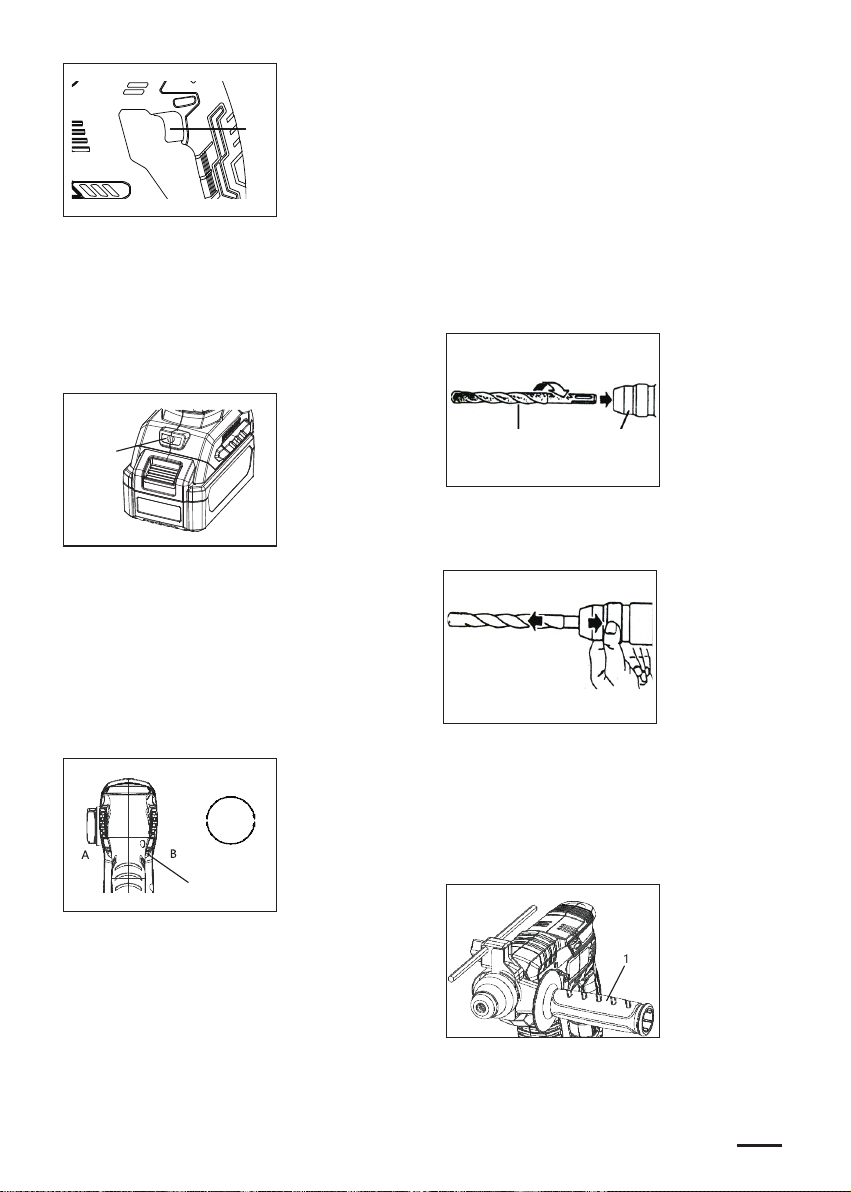
● Usage of depth gauge
The installation of the depth gauge is shown in the
gure.
1.Loosen the wing bolt, and insert the depth gauge
into the tting hole of the clip board.
2.Move the depth gauge to the desired depth and
secure it by rotating the wing bolt clockwise.
1
2
1.Wing Bolt
2.Depth Gauge
● Drill Operation
1.Hammer Drill Operation
Set the operating mode selector to the hammer
mode symbol, and position the bit at the desired
location for the hole, then pull the switch trigger.
CAUTION:
Applying more pressure will not speed up
the drilling. In fact, this excessive pressure
will damage the drill bit, decrease the tool
performance, and shorten the service life of the
tool.
There is a tremendous force exerted on the bit
at the time of hole break through. Be careful and
hold the tool rmly when the bit begins to break
through the workpiece.

11
EN
1
1.Dill bit
A stuck bit can be removed simply by setting the
reversing switch to reverse rotation in order to back
out. Hold the tool firmly before starting the tool to
remove the bit easily.
Do not drill in the material that may contain nails or
something that may hamper or destroy the drill bit.
2.Drilling on the steel or wood
When drilling on steel, wood or plastic, a SDS-
plus twist drill bit should be used to spin the drill
chuck into the connecting rod, tighten the screws
tightly, and then insert the connecting rod into the
machine, the method of which is the same as the drill
bit mentioned earlier and turn the operating mode
selector to the drill mode.
1 2 3 4
5
1.Lock Screw
2.Drill Chuck
3.Connecting Rod
4.Locking Sleeve
5.Twist Drill
CAUTION:
Do not set the tool to hammer mode when drilling
on the wood or metal, or the drill bit or the drill
chuck may be destroyed.
● Overload Protection
The motor will stop if it is overload during the
operation. Release the switch button then push it to
start the tool again.
● Over Temperature Protection
Overload is not allowed during the operation of the
tool. The electronic control system will stop the tool
when it is overload or the temperature is over 75℃℃℃°C.
● Deep Discharging Protection
The tool is equipped with a protective circuit to
protect the battery against deep discharging. When
the battery is near to be empty, the protective circuit
actuates to switch o the tool.
● Disposal of discarded battery packs
To protect natural resources, properly recycle or
dispose of battery packs. The battery contains a
lithium battery. Please consult your local authority for
information on recycling and/or disposal. Remove the
battery pack when it has run out of power and wrap
the pole port with strong tape to avoid short circuit
and leakage. Do not attempt to open or remove any
component.
Maintenance and servicing instructions
CAUTION:
Always be sure that the tool is switched off and the
battery is removed before attempting to perform
inspection or maintenance.
Cleaning Ventilation Slots
For safe and proper working, always keep the power
tool and its ventilation slots clean. Use a soft, clean
and dry brush to clean the ventilation slots regularly or
when they’re clogged.
Inspecting the Mounting Screws
Regularly inspect all mounting screws and ensure that
they are properly tightened. Should any of the screws
be loose, retighten them immediately. Failure to do so
could result in serious hazard.
Cleaning
Only use soft and dry cloth to wipe the body of the tool.
Do not clean the tool with wet cloth, thinner, gasoline
or other volatile solvents.
Disposal
The machine, rechargeable batteries, accessories
and packaging should be sorted for environmental
friendly recycling.
Do not dispose of power tools and batteries/
rechargeable batteries into household waste!
For battery tools:
Ambient temperature range during operation and
storage: 0°C - 45°C .
Recommended ambient temperature range during
charging: 5°C - 40°C .
Charger Battery Pack
Model FFCL20-02 FFBL2040

12
EN
1 Dustproof Cover 23 O Ring
2 Locking Sleeve 24 Guide Sleeve
3 Washer 25 Impact Bolt O Ring
4 Dustproof Cover Locating Ring 26 Damping Washer
5 Steel Ball 9/32 '(7.14) 27 Lockpin O Ring
6 Support 28 Fixing Ring
7Drill Clamping Ring 29 Roundwire Snap Ring for Hole
8 Drill Clamping Plate 30 Punch Hammer
9 Drill Compression Spring 31 O Ring
10 Roundwire Snap Ring for Shaft 32 Piston
11 Bearing 33 Piston Pin Washer
12 Damping Washer Assembly 34 Piston Pin
13 Air Cylinder Skeleton Seal Ring 35 Sleeve
14 Circlip for Shaft 36 Split Washer 6
15 Clutch Plate 37 Ball Bearing 627ZZ(LFB)
16 Gear (Large) 38 Spline Gear
17 Clutch Spring 39 Mode Switching Sleeve
18 Spring Gasket 40 Spline Shaft
19 Circlip for Shaft 41 Pendulum Bearing
20 Cylinder Retainer Sleeve 42 Needle Bearing K8×11×17
21 Thrust Ring 43 Helical Gear
22 Impact Bolt 44 Ball Bearing 608SS(NMB)

13
EN
45 Gearbox 67 Tapping Screw
46 Wool Seal Ring 68 Switch
47 Bearing Steal Washer 69 Controller Assembly
48 Ball Bearing 70 Left-Half Handle
49 Armature 71 LED Shade
50 Stator 72 Rubber Column
51 Pan Head Tapping Screw 73 Buttery Combonation Hub
52 Deep Groove Ball Bearing 626-2RS
(RB)74 Depth Gauge
53 Tapping Screw 75 Auxiliary Handle(M8 Internal Thread)
54 Washer 76 Trapezoid Square-Neck Bolt M8×40
55 Extension Spring 77 Compression Plate
56 Rigt Pick 78 Type I Hex. Nut M6
57 Lefe Pick 79 Steel Band Base
58 Pin Retainer 80 Steel Band
59 Mode Selector Switch 81 Tightening Screw
60 O Ring 82 Shaft Sleeve
61 Button Spring
62 Locked Button
63 Reversing Pole
64 Oil Seal
65 Right-Half Handle
66 Tapping Screw

14
EN

15
DE
Übersetzung der
Originalanleitung
Allgemeiner Sicherheitshinweis
für Elektrowerkzeuge
Warnung: Lesen Sie bitte
alle Sicherheitswarnungen
und Anweisungen. Die
Nichtbeachtung der Warnungen
und Anweisungen kann zum
Elektroschock, zum Brand und/
oder zur schweren Verletzung
führen.
Bewahren Sie alle Warnungen
und Anweisungen zum
späteren Nachschlagen auf.
Der Begri „Elektrowerkzeug“
in den Warnhinweisen bezieht
sich auf Ihr netzbetriebenes
(kabelgebundenes)
Elektrowerkzeug oder
akkubetriebenes (kabelloses)
Elektrowerkzeug.
1)Arbeitsplatzsicherheit
a)Halten Sie den
Arbeitsbereich sauber und
gut beleuchtet. Überladene
oder dunkle Bereiche können
zu Unfällen führen.
b)Betreiben Sie
Elektrowerkzeuge nicht
in explosionsgefährdeten
Bereichen, z.B. in der
Nähe von brennbaren
Flüssigkeiten, Gasen oder
Stäuben. Elektrowerkzeuge
erzeugen Funken, die den
Staub oder die Dämpfe
entzünden können.
c)Halten Sie Kinder und
umstehende Personen
beim Betrieb eines
Elektrowerkzeugs fern.
Ablenkungen können dazu
führen, dass Sie die Kontrolle
verlieren.
2)Elektrische Sicherheit
a)Die Stecker des
Elektrowerkzeugs müssen
mit der Steckdose
übereinstimmen.
Modizieren Sie den Stecker
niemals in irgendeiner
Weise. Verwenden Sie
keine Adapterstecker mit
geerdeten (geerdeten)
Elektrowerkzeugen.
Unmodizierte Stecker
und passende Steckdosen
verringern das Risiko eines
Stromschlags.
b)Vermeiden Sie Körperkontakt
mit geerdeten Oberächen
wie Rohren, Heizkörpern,
Herden und Kühlschränken.
Es besteht erhöhte Gefahr
eines Stromschlags, wenn Ihr
Körper geerdet ist.
c)Setzen Sie Elektrowerkzeuge
nicht Regen oder Nässe

16
DE
aus. Wasser, das in das
Elektrowerkzeug eindringt,
erhöht das Risiko eines
Stromschlags.
d)Missbrauchen Sie das Kabel
nicht. Verwenden Sie das
Kabel niemals zum Tragen,
Ziehen oder Trennen des
Elektrowerkzeugs. Halten
Sie das Kabel von Hitze,
Öl, scharfen Kanten oder
beweglichen Teilen fern.
Beschädigte oder verwickelte
Kabel erhöhen das Risiko eines
Stromschlags.
e)Verwenden Sie beim Betrieb
eines Elektrowerkzeugs
im Freien ein für den
Außenbereich geeignetes
Verlängerungskabel. Die
Verwendung eines für den
Außenbereich geeigneten
Kabels verringert das Risiko
eines Stromschlags.
f)Wenn der Betrieb eines
Elektrowerkzeugs an einem
feuchten Ort unvermeidbar
ist, verwenden Sie eine mit
Fehlerstromschutzschalter
(RCD) geschützte
Stromversorgung.Die
Verwendung eines RCD
verringert das Risiko eines
Stromschlags.
)Persönliche Sicherheit
a)Bleiben Sie wachsam,
beobachten Sie, was
Sie tun, und verwenden
Sie Ihren gesunden
Menschenverstand, wenn
Sie ein Elektrowerkzeug
bedienen. Verwenden Sie
kein Elektrowerkzeug, wenn
Sie müde sind oder unter
dem Einuss von Drogen,
Alkohol oder Medikamenten
stehen. Ein Moment der
Unaufmerksamkeit beim
Umgang mit Elektrowerkzeugen
kann zu schweren
Personenschäden führen.
b)Verwenden Sie persönliche
Schutzausrüstung.
Tragen Sie immer
einen Augenschutz.
Schutzausrüstung, wie
Staubmaske, rutschfeste
Sicherheitsschuhe, Schutzhelm
oder Gehörschutz, der unter
geeigneten Bedingungen
verwendet wird, verringert
Personenschäden.
c)Vermeiden Sie das
unbeabsichtigte Starten.
Stellen Sie sicher, dass sich
der Schalter in der Aus-
Position bendet, bevor
Sie das Werkzeug an die
Stromquelle und/oder den
Akku anschließen, das
Werkzeug aufnehmen oder
tragen. Das Tragen von

17
DE
Elektrowerkzeugen mit dem
Finger am Schalter oder das
Anschließen an die Stromquelle
von eingeschalteten
Elektrowerkzeugen führt leicht
zu Unfällen.
d)Entfernen Sie alle
Einstellschlüssel oder
Schraubenschlüssel, bevor
Sie das Elektrowerkzeug
einschalten. Ein
Schraubenschlüssel oder
Schlüssel, der an einem
rotierenden Teil des
Elektrowerkzeugs befestigt ist,
kann zu Verletzungen führen.
e)Greifen Sie nicht zu weit.
Achten Sie immer auf
den richtigen Stand und
das Gleichgewicht. Dies
ermöglicht eine bessere
Kontrolle des Elektrowerkzeugs
in unerwarteten Situationen.
f)Kleiden Sie sich richtig.
Tragen Sie keine weite
Kleidung oder Schmuck.
Halten Sie Haare und
Kleidung von beweglichen
Teilen fern. Lose Kleidung,
Schmuck oder lange Haare
können sich in beweglichen
Teilen verfangen.
g)Sind Vorrichtungen
für den Anschluss von
Staubabsaug- und
Staubsammeleinrichtungen
vorhanden sind, stellen
Sie sicher, dass diese
angeschlossen und
ordnungsgemäß verwendet
werden. Die Verwendung
einer Staubabsaugung kann
staubbedingte Gefahren
reduzieren.
4)Gebrauch und Pege von
Elektrowerkzeugen
a)Setzen Sie das
Elektrowerkzeug nicht mit
Gewalt ein. Verwenden Sie
das richtige Elektrowerkzeug
für Ihre Anwendung. Das
richtige Elektrowerkzeug
erledigt die Arbeit besser
und sicherer bei der
Geschwindigkeit, für die es
entwickelt wurde.
b)Verwenden Sie das
Elektrowerkzeug nicht, wenn
sich der Schalter es nicht ein-
und ausschalten lässt. Jedes
Elektrowerkzeug, das nicht mit
dem Schalter gesteuert werden
kann, ist gefährlich und muss
repariert werden.
c)Ziehen Sie den Stecker aus
der Stromquelle und/oder
entfernen Sie den Akkupack,
falls abnehmbar, aus dem
Elektrowerkzeug, bevor Sie
Einstellungen vornehmen,
Zubehör wechseln

18
DE
oder Elektrowerkzeuge
aufbewahren.
Solche vorbeugenden
Sicherheitsmaßnahmen
verringern das Risiko eines
versehentlichen Startens des
Elektrowerkzeugs.
d)Bewahren Sie unbenutzte
Elektrowerkzeuge außerhalb
der Reichweite von
Kindern auf und lassen
Sie keine Personen, die
mit dem Elektrowerkzeug
oder dieser Anleitung
nicht vertraut sind, das
Elektrowerkzeug bedienen.
Elektrowerkzeuge sind in den
Händen ungeschulter Benutzer
gefährlich.
e)Wartung von
Elektrowerkzeugen und
Zubehör. Prüfen Sie auf
Fehlausrichtung oder
Festsitzen beweglicher
Teile, Bruch von Teilen und
alle anderen Zustände,
die den Betrieb des
Elektrowerkzeuges
beeinussen können.
Falls das Elektrowerkzeug
beschädigt ist, lassen
Sie es vor dem Gebrauch
reparieren.Viele Unfälle
werden durch schlecht
gewartete Elektrowerkzeuge
verursacht.
f)Halten Sie Schneidwerkzeuge
scharf und sauber. Richtig
gewartete Schneidwerkzeuge
mit scharfen Schneidkanten
neigen weniger zum
Verklemmen und sind leichter
zu kontrollieren.
g)Verwenden Sie
Elektrowerkzeug, Zubehör
und Werkzeugeinsätze etc.
gemäß dieser Anleitung,
unter Berücksichtigung der
Arbeitsbedingungen und der
auszuführenden Arbeiten.
Die Verwendung des
Elektrowerkzeugs für andere
als die vorgesehenen Arbeiten
kann zu einer gefährlichen
Situation führen.
5) Gebrauch und Pege von
Akkuwerkzeugen
a) Nur mit dem vom Hersteller
angegebenen Ladegerät
auaden.
Ein Ladegerät, das für einen
Akkutyp geeignet ist, kann bei
Verwendung mit einem anderen
Akkupack eine Brandgefahr
darstellen.
b) Verwenden Sie
Elektrowerkzeuge nur mit
speziell dafür vorgesehenen
Akkus. Die Verwendung
anderer Akkus kann zu
Verletzungs- und Brandgefahr

19
DE
führen.
c) Wenn der Akku nicht
verwendet wird, halten
Sie ihn von anderen
Metallgegenständen wie
Büroklammern, Münzen,
Schlüsseln, Nägeln,
Schrauben oder anderen
kleinen Metallgegenständen
fern, die eine Verbindung
von einem Pol zum anderen
herstellen können. Ein
Kurzschließen der Batteriepole
kann zu Verbrennungen oder
einem Brand führen.
d) Unter missbräuchlichen
Bedingungen kann
Flüssigkeit aus der Batterie
austreten; vermeiden Sie
Kontakt. Bei versehentlichem
Kontakt, bitte mit Wasser
spülen. Wenn die Flüssigkeit
in die Augen kommt, suchen
Sie zusätzlich medizinische
Hilfe auf. Aus der Batterie
austretende Flüssigkeit kann
Reizungen oder Verbrennungen
verursachen.
6) Wartung
a)Lassen Sie Ihr
Elektrowerkzeug von einer
qualizierten Fachkraft
warten und verwenden Sie
nur identische Ersatzteile.
Dadurch wird die Sicherheit
des Elektrowerkzeugs
gewährleistet.
Sicherheitswarnungen für
Hämmer
a) Tragen Sie Gehörschutz.
Lärmbelastung kann zu
Hörverlust führen.
b) Verwenden Sie den/
die Hilfsgri(e), falls mit
dem Werkzeug zusammen
geliefert. Kontrollverlust kann
zu Verletzungen führen.
c) Halten Sie das
Elektrowerkzeug an den
isolierten Griächen,
wenn Sie einen Vorgang
ausführen, bei dem das
Einsatzwerkzeug oder die
Schraube mit versteckten
Kabeln in Berührung
kommen kann. Zubehör,
das ein „stromführendens“
Kabel berührt, kann
freiliegende Metallteile
des Elektrowerkzeugs
„stromführend“ machen
und dem Bediener einen
elektrischen Schlag versetzen.
Warnung zur Batteriesicherheit
a) Gebrauchte Batterien oder
Zellen dürfen nicht zerlegt,
geönet oder geschreddert
werden.
b) Bewahren Sie die Batterien

20
DE
außerhalb der Reichweite
von Kindern auf, die beim
Gebrauch beaufsichtigt
werden sollten.Bewahren Sie
insbesondere kleine Batterien
außerhalb der Reichweite von
Kindern auf.
c) Setzen Sie die Batteriezellen
oder Batterien nicht Hitze
oder Feuer aus.Vermeiden
Sie die Lagerung in direktem
Sonnenlicht.
d) Schließen Sie die
Batteriezellen oder Batterien
nicht kurz. Lagern Sie
die Batteriezellen oder
Batterien nicht in Kisten
oder Schubladen, wo sie
untereinander oder mit anderen
Metallen einen Kurzschluss
verursachen können.
e) Setzen Sie die Batteriezellen
oder Batterien keinen
mechanischen Stößen aus.
f) Wenn die Batterie oder die
Batteriepole verschmutzt
sind, wischen Sie sie mit
einem sauberen, trockenen
Tuch ab.
g) Verwenden Sie zum Auaden
kein anderes Ladegerät als
das, das speziell mit diesem
Gerät geliefert wurde.
h) Verwenden Sie keine
Batteriezellen oder Batterien,
die nicht für die Verwendung
mit dem Gerät vorgesehen
sind.
i) Mischen Sie keine Batterien
unterschiedlicher Marken,
Kapazitäten, Größen oder
Typen in einem Gerät.
j) Kaufen Sie immer die vom
Gerätehersteller empfohlenen
Batterien für das Gerät.
k) Halten Sie die Batteriezellen
und Batterien sauber und
trocken.
l) Wenn die Batterien oder
Batteriepole verschmutzt
sind, wischen Sie sie mit
einem sauberen, trockenen
Tuch ab.
m) Sekundärbatterien und
-zellen müssen vor dem
Gebrauch geladen werden.
Verwenden Sie immer das
richtige Ladegerät und lesen
Sie die Anweisungen des
Herstellers oder das Handbuch
des Geräts, um die richtigen
Ladeanweisungen zu erhalten.
n) Laden Sie den Akku nicht
über einen längeren Zeitraum,
wenn er nicht benutzt wird.
o) Nach längerer Lagerung
muss der Akku
möglicherweise mehrmals
geladen und entladen
werden, um eine optimale
Leistung zu erzielen.
p) Bewahren Sie die Original-
This manual suits for next models
2
Table of contents
Languages:
Other Dongcheng Drill manuals