dpnao YW-017 User manual

PLEASE READ BEFORE OPERATING THIS EQUIPMENT
Instruction Manual
WIRELESS PLAYER / FM RADIO /
ALARM CLOCK & WIRELESS CHARGING
Model: YW-017
CLK SET
PRESET
PAIR
SNOOZE
SLEEP/DIMMER
AL 1
VOL
AL 2
MODE
AL OFF
WIRELESS CHARGE
MINHOUR
FM
RADIO

FCC Warming
FCC ID: 2AOW9-YW-017
Warning: Changes or modifications to this unit not expressly approved by the
party responsible for compliance could void the user’s authority to operate the
equipment.
Note: This equipment has been tested and found to comply with the limits for
a Class B digital device, pursuant to Part 15 of the FCC Rules. These limits
are designed to provide reasonable protection against harmful interference in
a residential installation. This equipment generates uses and can radiate
radio frequency energy and, if not installed and used in accordance with the
instructions, may cause harmful interference to radio communications.
However, there is no guarantee that interference will not occur in a particular
installation. If this equipment does cause harmful interference to radio or
television reception, which can be determined by turning the equipment off
and on, the user is encouraged to try to correct the interference by one or
more of the following measures:
● Reorient or relocate the receiving antenna.
● Increase the separation between the equipment and receiver.
● Connect the equipment into an outlet on a circuit different from that to
which the receiver is connected.
● Consult the dealer or an experienced radio/TV technician for help.
This equipment complies with FCC radiation exposure limits set forth for an
uncontrolled environment.
This equipment should be installed and operated with minimum distance 20
cm between the radiator & your body.
This device complies with Part 15 of the FCC Rules. Operation is subject to
the following two conditions:
(1) This device may not cause harmful interference, and
(2) This device must accept any interference received, including interference
that may cause undesired operation.
1

Main Location Controls
2
CLK SET
PRESET
PAIR
SNOOZE
SLEEP/DIMMER
AL 1
VOL
AL 2
MODE
AL OFF
WIRELESS CHARGE
MINHOUR
FM
RADIO
FRONTVIEW
REARVIEW
TOP VIEW
1
2
3
4
5
6
7
8
9
10
11
12
13
14
15 17
18
5V 1A
19
16 9V
FOR CLOCKANDALARM BACKUPONLY
IN THE BOTTOM

Main Location Controls
3
1. WIRELESS CHARGING AREA
2. AL2 / VOL+ ( Alarm 2 set) Button
3. AL1 / VOL- ( Alarm 1 set) Button
4. POWER / MODE / AL OFF(Alarm Off) Button
5. SNOOZE / SLEEP / DIMMER Button
6. HOUR Button
7. MIN Button
8. WIRELESS CHARGING Indicator
9. PAIR / / CLK SET / PRESET(Radio) Button
10. SLEEP Indicator
11. PM (PM time) Indicator
12. LED DISPLAY
13. AL1 (Alarm 1 ) Indicator
14. AL2 (Alarm 2 ) Indicator
15. DC IN Jack
16. FM ANTENNA
17. AUX IN Input Port
18. USB CHARGING Port
19. BATTERY COMPARTMENT (For clock and alarm backup only)

Setup
Battery Operation
Connect power adapter
1. Connect power adapter follow
the figure.
2. After connection, the unit is in
clock mode.
NOTE: In any time, long press the
POWER button to clock mode.
Select sound source
Press the MODE button repeatedly to select different sound source below:
BT (Wireless) / RADIO (FM) / AUX In (Audio In / Line In)
Using volume
Press the VOL + or VOL - Buttons to increase or decrease the volume sound.
1. Remove the BATTERY door by carefully pushing batteries cover follow
OPEN direction. The battery door can then be lifted away.
2. Following the polarity diagram as shown on the bottom cabinet insert 2
batteries and close the door.
3. Use only the size and type of batteries specified. For battery performance
and longer operating time, we recommend the use of alkaline-type batteries.
4. Do not mix old and new batteries.
5. Do not mix alkaline, standard (carbon-zinc) or rechargeable
(nickel-cadmium) batteries.
6. If the unit is not to be used for an extended period of time, remove the
batteries.
7. Do not try to recharge batteries not intended to be recharged; they can
overheat and rupture.
8. Do not dispose of batteries in fire, batteries may leak or explode.
This unit operates on 2 X `AAA' size
(UM-4) batteries (not included) for
clock time / alarm setting backup only.
NOTE: The Battery not support the
unit main power.
4
CONNECT TO DC INPUT
JACK OF MAINUNIT
AC ADAPTER
PLUG THEADAPTER BODY TO AC OUTLET
BATTERY DOOR
DC 1.5 V X 2 PCS
UM-4 ( LR-03)OR“AAA”SIZE
BOTTOM OF MAIN UNIT

Automatic Scan radio station
1. Long press the POWER button to clock mode and press MODE button
repeatedly to select RADIO mode.
2. When unit turn to radio mode, the display will show radio frequency.
3. Press and hold the PRESET button 5 seconds to scan through the frequency
band and memory the station in preset.
Scan radio station
1. In radio mode, press and hold the or SKIP buttons to search
stations automatic forward and backward.
2. Press the or SKIP button to search stations manually forward and
backward.
NOTE: If FM reception is weak, fully extend the wire antenna and vary the
position and location of the antenna until you find the strongest signal
Using Radio Presets
You can preset up to 20 FM stations for easy access as follows:
1. Long press the POWER button to clock mode and press MODE button
repeatedly to select RADIO mode.
2. Tune the station you wish to preset.
3. Hold the PRESET button until “P01” appear and flash on the display.
4. Press the or SKIP button to select preset location and press the
PRESET button once to confirm.
5. Repeat steps 2 through 4 to preset up to 20 stations.
Recall preset station
1. Press the PRESET button once, the preset station show on display.
2. When preset station show, press the or SKIP button to search
store preset which you wish to play.
1. Long press the POWER button to clock mode and press MODE button
repeatedly to select AUX mode.
2. Plug the audio cable to AUX jack on the unit.
3. Plug the other end of audio cable to external device aux out / audio out / line
out / phone out jack.
4. After turn on power of your external device, the external device will sound
out from your unit speaker.
Radio Operation
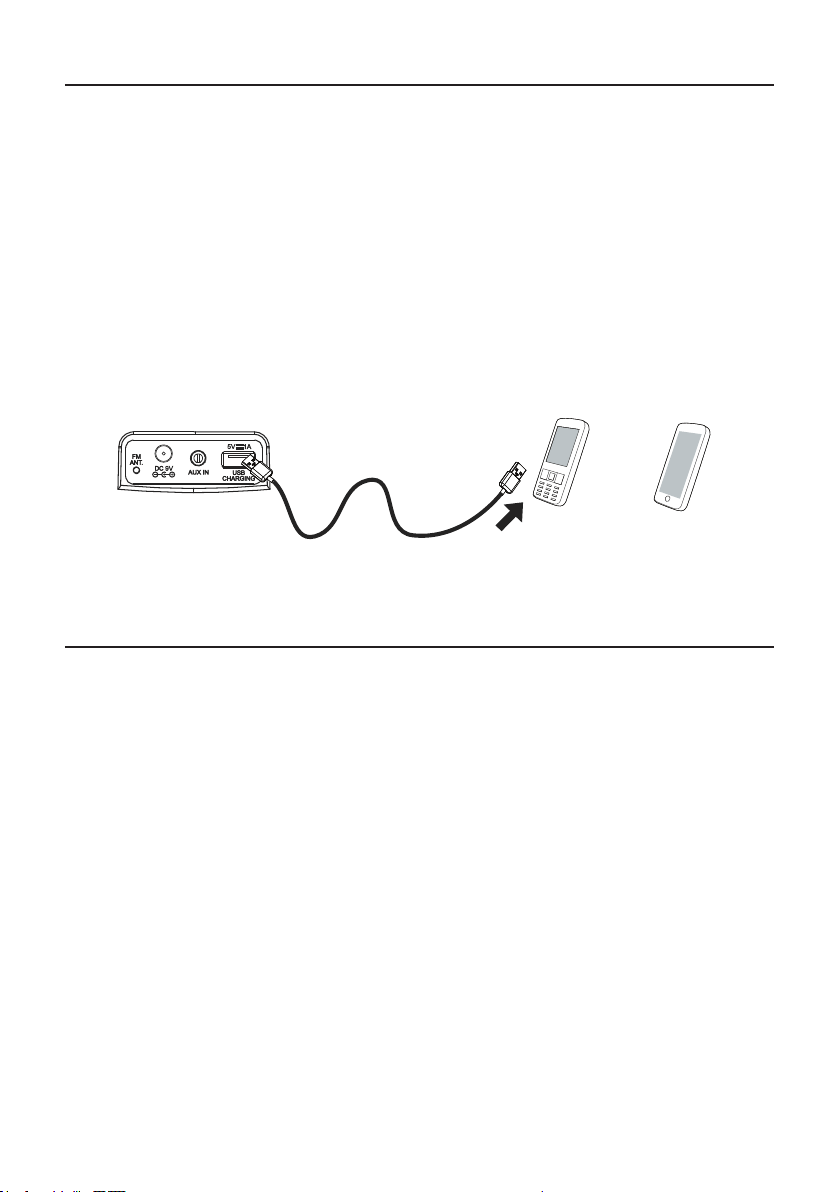
Using Aux In (Audio In / Line In) for Connect to external device
5
5V
9V
1A
or
REAR VIEW OF
MAIN UNIT
TO PHONES OR AUX OUT (AUDIO OUT)

After plug in the power, the unit show the clock time (in clock mode) on display.
1. Long press the POWER button to enter clock mode. The clock time will
be show on display.
2. Hold the CLK SET button until the display “12-hr” or “24-hr” digits blink
3. Press the or button to set the 12 / 24 hour time format and press
the CLK SET button once to confirm.
4. Press the HOUR button to set the hour time and press the MIN button to set
the minute time and press the CLK SET button to save all time setting.
Set the Actually Time
You can set 2 different alarm wakes up time on the unit.
1. Long press the POWER button to enter clock mode. The clock time will
be show on display.
2. Hold the AL1 button until the display alarm digit blink
3. Press the HOUR button to set the alarm hour time and press the MIN button
to set the alarm minute time.
4. After hour / minutes setting, press the AL1 button to confirm, the alarm sound
icons will flash show on the display. (bb-Alarm sound, F-FM radio)
5. Press or button to select the wake up option (Alarm or FM Radio).
6. Press the AL1 button to confirm and save all setting.
7. The AL2 setting procedures are same as AL1
8. When alarm coming, the alarm wake source will be sounding.
NOTE:
●Make sure the alarm 1/ alarm 2 source icon light on.
●Not set the Alarm 1 and alarm 2 on same wake time
Wake to FM Radio
1. Make sure your radio station is set to the one you want to wake up to. The
unit will play the last radio station you listened to when the wake time is
reached. The volume need to set to the desired sound level.
2. The Radio will automatically turn on when the alarm time is reached. The
corresponding AL1 or AL 2 icon will blink.
3. The alarm will sound for 60 minutes and then turn off automatically if the
SNOOZE button is not pressed
4. To stop the radio sound immediately, press the AL OFF (Alarm off) button
Set the Alarm Wake Up Time
6

Wake to Beeping Alarm
1. The Beeping Alarm will automatically turn on when the alarm time is
reached. The volume need to set to the desired sound level.
2. The corresponding AL1 or AL2 indicator will blink
3. The beep alarm will sound for 60 minutes and then turn off automatically if
the SNOOZE button is not pressed.
4. To stop the beep alarm sound immediately, press AL OFF (Alarm off) button
Stop the alarm sound
When alarm sound coming, press the AL OFF (Alarm off) button to stop the alarm
sound and it will be auto repeat to next day.
Deactivate the alarm - Cancel the alarm wake up time
1. Long press the POWER button to enter clock mode. The clock time will
be show on display.
2. Press more times the AL1 / AL2 button until the alarm indicator light off (the
alarm not coming).
3. If you want activate the alarm, press more times the AL1 / AL2 button until
the alarm indicator light on.
1. When the alarm wake up, press the SNOOZE button once.
2. After pressing, the alarm will be delayed for 9 minutes and then come again.
The clock indicator and AL1/AL2 indicator will flash for indication.
3. This manual snooze operation can be repeated again and again.
Using the Snooze Function
1. Whilst listening to the Radio, BT (Wireless) or AUX mode, press the SLEEP
button will continue to play the sound for the time set in sleep setting (the
SLEEP indicator will light and display show 15), the unit will then
automatically switch off after a certain time and it go from 15-00 minutes.
2. Set the sleep time timer: When sleep running, press the SLEEP button
repeatedly to select different sleep time (15, 30, 45, 60 min)
3. Cancel the sleep function: Press the SLEEP Button more times to select
OFF, wait for 3 seconds to confirm. The SLEEP indicator disappears.
Using SLEEP Function
7

Setting display brightness.
1. Long press the POWER button to enter clock mode. The clock time will
be show on display.
2. Press and hold the DIMMER button repeatedly to set High / Low / Off
brightness for display.
3. When the unit in off brightness, press any buttons to turn on the display at
Low brightness for 10 seconds.
Long press PLAY button 5 seconds when the unit first power up.
Dimmer Function
Reset the unit to factory setting
Pairing with mobile / tablet
1. Long press the POWER button to clock mode and press MODE button
repeatedly to select BT (Wireless) mode.
2. The word “bt” will flash quickly on the display and unit will enter pairing
mode.
3. When pairing, remain within 10 feet of the unit.
4. On your Wireless device, select the “YW-017” in your Wireless settings to
pair.
5. When successfully paired and connected, a chime will sound and the display
will show “bt” to solid on.
Playing Audio Wirelessly
1. After pairing successful, press / PLAY button of main unit or external
device to start playing music.
2. Press / buttons of unit or external device to other track to play.
3. After selection, audio played through the connected Wireless device will now
be heard through the speakers.
NOTE:
●When a phone call is received than the music will be stop playing until the
phone call is completed, the music will automatically resume. (If the unit
cannot play, press the / PLAY button again).
●After initial pairing, the unit will stay paired unless unpaired manually by the
user or erased due to a reset of the device. If your device should become
unpaired or your find it is unable to connect, repeat the above steps or press
and hold the PAIR button 3 seconds again.
Listening to Wireless
8

Connect a USB cord for external device battery charging (DC5V, 1000mA)
1. Install the adapter follow SETUP page
2. Insert plug of USB cable (not include) into USB charging port on the unit.
3. Connect other end charging USB socket of your external device (Personal
Player / Mobile Phone).
4. After connection, the external device batteries will start charging.
5. Disconnect the USB cable as soon as it is fully charged.
NOTES:
Don’t connect USB charging port of unit to computer USB sockets.
Don’t connect USB charging port of unit to other USB charger.
Using USB Charging Your Smartphone
The unit is compatible with mobile / devices which support the wireless charging.
1. Install the adapter follow SETUP page
2. Place the smart phone on the WIRELESS CHARGING AREA
3. WIRELESS CHARGING Indicator will be light. If indicator light off, you move
your mobile / device until indicator light on
4. Take away your smart phone from the WIRELESS CHARGING AREA as
soon as the smart phone is fully charged.
NOTE:
●Make sure your smart phone compatible wireless charging
●In order to get more effective for wireless charging, please take off the
protective case from the mobile phone.
●The above description is applicable to most wireless charging mobile phone,
but there may have discrepancies depending on the power consumption of
different mobile phones and versions of the operating system.
Using USB Charging Your Smartphone
9
5V
9V
1A
or
REAR VIEW OF
MAIN UNIT
TO DEVICE USB JACK FOR BATTERY CHARGING

Specifications are typical, individual units might vary. They are subject to
continuous improvement without notice and without incurring any obligation.
AC Power
Adapter Connect DC Jack
Wireless Charging
Loud Speakers Spec
Use included adapter
AC~ Input 100-240V 50/60 Hz , DC Output 9V ,
2000mA
Fast Charging (9W)
28 mm, 2 Watt , 8 Ohm
Specification
10
CLK SET
PRESET
PAIR
SNOOZE
SLEEP/DIMMER
AL 1
VOL
AL 2
MODE
AL OFF
WIRELESS CHARGE
MINHOUR
FM
RADIO
THE INDICATOR WILL
LIGHT WHEN MOBILE
CONNECT CORRECTLY.
PLACE THE MOBILE WITH
ITS DISPLAY UPWARD
Table of contents
Other dpnao Speakers manuals