manuals.online logo
Brands
  1. Home
  2. •
  3. Brands
  4. •
  5. Sonance
  6. •
  7. Speakers
  8. •
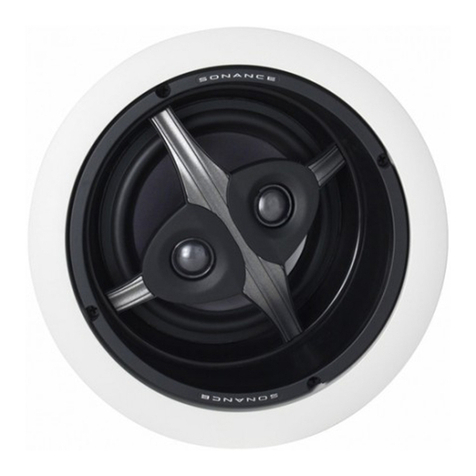
  9. Sonance ORIGINAL SERIES User manual

Sonance ORIGINAL SERIES User manual

Introduction
Thank you for purchasing Sonance Original Series Single Stereo
Technology (SST) speakers. When properly installed, these speakers will
give you many years of entertainment pleasure. To get the most out of
your new speakers, please read this manual thoroughly before you begin
installation.
This manual covers the 831R SST model.
To achieve the best performance, Sonance recommends that these speak-
ers be installed by a Sonance Authorized Dealer/Installer.
See
Installation
(page 2) for complete information about the FastMount
tabs.
(9;:0:;
Your Sonance Original Series SST speaker includes the following:
• (1) Sonance Original Series SST Speaker
• (1) Paintable Grille
• (1) Plastic paint plug to protect speaker during painting
• (1) Mounting cutout template (in packaging)
Speaker Placement
$ !!"
Sonance Original Series SST speakers are ideal for use in hallways, bath-
rooms, closets, or in any location where listeners will be moving around
and a pair of stereo speakers would be impractical.
The location of the speaker should be determined by considering the pri-
mary listening location as well as aesthetic values. Because a single
Original Series SST speaker reproduces both stereo channels from a sin-
gle location, they will deliver outstanding performance from an extreme-
ly wide variety of mounting locations.
For optimum results, contact your Authorized Sonance Dealer for advice.
0:;90)<;,+<+063(*,4,5;
Sonance Original Series speakers have very smooth and predictable off-
axis response, increasing placement options while providing excellent
coverage in distributed audio systems. The chart below shows how far
apart the speakers can be placed while still providing good coverage. The
distances are based on ear heights of 62” (157cm) for standing listeners
and 40” (102) for seated listeners.
Wire Gauge
Extra resistance in the speaker wire can make speakers sound
less dynamic and reduce definition of the bass frequencies. In
extreme cases, it can even attenuate high frequencies. Also,
amplifier power is wasted in wire with extra resistance, reducing
your system’s maximum output level.
To prevent degrading sound quality, the total wire resistance
should be less than 10% of the speaker’s impedance. This means
that for an 8-ohm speaker, the total resistance of the wire should
be less than 0.8 ohms.
Refer to the following table when selecting the proper wire gauge
for your system:
PREPARING THE INSTALLATION LOCATION
All Sonance speakers are designed to be relatively insensitive to
variations in enclosure volume. To achieve the ultimate perfor-
mance from your speakers, a section of the ceiling bay can be
sectioned-off to form a back box. Building such an enclosure will
create a dramatic improvement in your speaker’s bass perfor-
mance and power handling.
Ideal back box volume requ rements:
Original Series 831R SST 2.0 ft3 (.055 m3)
1
I N S T R U C T I O N M A N U A L
ORIGINAL SERIES SINGLE STEREO
TEC NOLOGY SPEAKER
!"' % 
TESE SP EAKERS AVE FASTMOUNT®TAB S T AT PREVENT T E
SPEAKER FROM FALLING OUT OF T E MOUNTING OLE DURING T E
INSTALLATION PROCESS.
"   !  " !" # " "!   $ ' ! 
#! #" %   " ! 
2
5:<3(;05.;/,,0305.(=0;@
You can reduce sound transmission to adjacent rooms and fur-
ther improve speaker performance by inserting a sheet of
unfaced fiberglass insulation over the back of the speaker. To
reduce noise produced by unsupported drywall, install fiberglass
insulation in the ceiling bays adjacent to the speaker location.
7;065(390.05(3!,90,: ,;96-0;5*36:<9,:
For installations where it is not possible to section-off the ceiling
bay to form a back box (such as when you are retrofitting the
speakers into an existing ceiling), you can effectively reduce
sound transmission into adjacent rooms by fitting the speakers
with Large Round and Square Retrofit Enclosures (part # 92243).
This enclosure will noticeably reduce sound “spillover” from the
rears of the speakers into adjacent rooms and spaces.
Installing the Speakers
For more information about flangeless installation contact your
Authorized Sonance Dealer or visit www.sonance.com.
,-69,5:;(33(;065,>65:;9<*;065
For installations in new construction, Sonance recommends using
a Flex bracket (part# 92247) to reserve a location for the speak-
er. The Flex bracket is nailed or screwed to the studs and serves
as a guide for the drywaller so that the speaker hole will be in
the desired location once the drywall is installed.
Flex brackets are compatible with the RotoLock™ mounting sys-
tem.
,-69,5:;(33(;065 ,;96-0;
1. Determine the location for the speaker (see
Speaker Placement
on page 1).
2. Perform an obstruction survey to be certain that there are no
studs, conduit, pipes, heating ducts or air returns that will
interfere with the speaker.
3. The cutout for Original Series SST speaker is 101
/8” (257mm).
There also must be at least 6” (152mm) depth within the ceil-
ing cavity for the speaker.
4. Position the included cutout template where the speaker is to
be located and pencil an outline on the ceiling.
• If you are unsure about obstructions, drill a small hole in
the center of the outline and insert a coat hanger wire into
the hole to feel-around for possible obstructions.
5. Cut the hole using a drywall saw, and run the speaker wires.
5:;(33(;065
Sonance Original Series SST speakers feature exclusive
FastMount™ tabs and an integral RotoLock® mounting system for
quick mounting directly into existing ceilings and walls.
% "/,,+.,:6-(:;6<5;;():(9,=,9@:/(97
#:,*(<;065>/,5/(5+305.;/,:7,(2,9
1. Remove the paint plug from the speaker. Connect the speaker
wire to the terminals on the speaker. Double-check that you
connected amplifier + to speaker + and amplifier – to speak-
er –.
2. Make sure all the RotoLock clamps are in the full clockwise
position so that they are tucked within the mounting hole’s
border. Insert the speaker into the hole in the ceiling. The
RotoLock system can accommodate a maximum ceiling mater-
ial thickness of 1¼” (32mm).
• The FastMount tabs will prevent the speaker from falling out
of the mounting hole, allowing the installer to let go of the
speaker to pick-up tools or other items (see
Figure 1
).
6;, "/,(:;6<5;;():(9, +,:0.5,+ -69 65,;04,
<:, 653@ - ;/, :7,(2,9 0: 9,46=,+ -964 ;/, 46<5;
05. /63, ;/, (:;6<5; ;(): >033 +0:*655,*; (5+
9,4(0505:0+,;/,>(33
3. Tighten the four screws on the front of the speaker baffle. The
RotoLock clamps will automatically rotate into position and
begin clamping the speaker (see
Figure 1
).
• When you notice resistance on the screws the speaker has
been clamped successfully.
6;,"/,:7,(2,9-3(5.,0:+,:0.5,+;6-3,?(5+*65
-694 ;6 (5@ :4(33 047,9-,*;065: 05 ;/, *,0305. :<9
-(*, 6 56; ;0./;,5 ;/, :*9,>: :6 4<*/ :6 ;/(; ;/,
-3(5.,)6>:6<;
4769;(5; 3>(@: <:, 36>;698<, :,;;05.: $
6=,9;0./;,5
4. Attach the grille after the speaker has been installed. Insert
about half of the grille into the groove at the edge of the
speaker. Gently fit the remaining half of the grille by working
around the speaker, fitting the grille into the groove as you go.
6;, '6< *(5 (+1<:; ;/, ;698<, (7730,+ ;6 ;/, 6;66*2
:*9,>:;6(*/0,=,(7967,9.9033,-0;
Painting The Speakers and Grilles
You can paint the speakers and grilles before installing them,
which will eliminate the “paint scar” if the speaker ever needs to
be removed for service. You can also paint the speakers after
installation, but before the grilles are attached. Original Series
SST speakers come from the factory fitted with a plastic ‘paint
plug’. Use the paint plug to protect the speaker drivers while the
flange is being painted along with the wall.
Sonance suggests always painting the grille separately from the
speaker. Before painting, carefully remove the under-grille cloth.
It is held in place with a light tacking glue that makes it easy to
remove.
Spray the grilles with thinned paint (5 parts thinner to 1 part
paint), being careful not to plug the holes. Too heavy a coat of
paint on the grille will adversely affect the sound of the speaker.
Once the grilles and flange are painted and dry, replace the
under-grille cloth, remove the paint plug from the speaker flange
and install the grille.
ORIGINAL SERIES SINGLE STEREO TECHNOLOGY SPEAKERS
Figure 1: Original Series SST Installation
Adjusting the
Speakers
0=6;05.%66-,9
Original Series SST speak-
ers have a pivoting woofer
assembly. These pivoting
drivers allow you to direct
sound toward or away
from the listening area,
depending on the require-
ments of the installation.
To pivot the woofer:
Apply pressure on the
outer edge of the Sonic
Eye support bracket, as shown in
Fiure 2
. Do not touch or apply
pressure to the woofer cone.
Specifications
$ !!"
Tweeter: Two ¾" (19mm) Silk domes, Ferrofluid cooled
Midrange: Two 3" (76mm) Polypropylene cones, rubber
surrounds
Woofer: 8" (203mm) Polypropylene cone, dual voice
coil, rubber surround, pivoting
Frequency Response: 45 z – 20k z ±3dB
Impedance: 8 ohms nominal; 6 ohms minimum
Power andling: 5 Watts minimum; 100 Watts maximum
Sensitivity: 89dB SPL (2.83V/1 meter)
Grille Material: Perforated Aluminum
Adjustments: None
Dimensions (Dia. x D): 119/16" x 57/8" (294mm x 149mm)
Cutout Diameter: 101/8" (257mm)
Shipping Weight: 8 lbs. (3.6kg) each
Technical Assistance and Service
-@6<(5@/(=,8<,:;065:()6<;;/,67,9(;0656905:;(33(
;065 6- ;/0: 796+<*; 73,(:, *(33 6<9 ",*/50*(3 ::0:;(5*,
,7(9;4,5; 65 (5@ )<:05,:: +(@ (;   69
-964 (4;6 74!"
If your speakers should need repair or service, contact your
Sonance Authorized Dealer for help, or use the following proce-
dure:
1. Prior to calling, note the product’s model number, serial num-
ber, purchase date, and the name and address of the dealer
where you purchased the product.
2. Contact our Technical Assistance Department at the above
number(s) and describe the problem the unit is experiencing.
If applicable, they will issue a Return Authorization Number.
IMPORTANT: YOU MUST AVE PRIOR AUT ORIZATION TO
RETURN YOUR SPEAKER TO SONANCE!
3. If you’re directed to return the unit to Sonance for repair, pack
the unit in its original shipping carton. If needed, you can
obtain replacement packaging from us for a small charge.
Note: it is best if you place the box into an additional outer
“overcarton” before shipment to minimize a chance of theft in
shipment. Please include a copy of the original bill of sale
inside the package.
4. Contact a package delivery service such as United Parcel
Service or Federal Express to arrange prepaid (not collect)
shipping. Do not use the U.S. Postal Service.
IMPORTANT: Freight collect shipments will be refused.
5. Write the Return Authorization Number on the outside of the
shipping carton.
6. Ship the packaged unit to:
Qual ty Assurance Department
Sonance
212 Aven da Fabr cante
San Clemente, CA 92672-7531
3
Figure 2: Pivoting the Woofer
ORIGINAL SERIES SINGLE STEREO TECHNOLOGY SPEAKERS
""% "'
Sonance warrants to the first end-user purchaser that this Sonance-brand product (“Product”), when purchased from an authorized
Sonance Dealer/Distributor, will be free from defective workmanship and materials for the life of the Product. Sonance will at its
option and expense either repair the defect or replace the Product with a new or remanufactured Product or a reasonable equivalent.
&#!!
TO T E EXTENT PERMITTED BY LAW, T E WARRANTY SET FORT ABOVE IS IN LIEU OF, AND EXCLUSIVE OF, ALL OT ER WAR-
RANTIES, EXPRESS OR IMPLIED, AND IS T E SOLE AND EXCLUSIVE WARRANTY PROVIDED BY SONANCE. ALL OT ER EXPRESS
AND IMPLIED WARRANTIES, INCLUDING T E IMPLIED WARRANTIES OF MERC ANTABILITY, IMPLIED WARRANTY OF FITNESS FOR
USE, AND IMPLIED WARRANTY OF FITNESS FOR A PARTICULAR PURPOSE ARE SPECIFICALLY EXCLUDED. No one is authorized to
make or modify any warranties on behalf of Sonance.
The warranty stated above is the sole and exclusive remedy and Sonance’s performance shall constitute full and final satisfaction of
all obligations, liabilities and claims with respect to the Product. IN ANY EVENT, SONANCE S ALL NOT BE LIABLE FOR CONSE-
QUENTIAL, INCIDENTAL, ECONOMIC, PROPERTY, BODILY INJURY, OR PERSONAL INJURY DAMAGES ARISING FROM T E PRODUCT,
ANY BREAC OF T IS WARRANTY OR OT ERWISE.
This warranty statement gives you specific legal rights, and you may have other rights which vary from state to state. Some states do
not allow the exclusion of implied warranties or limitations of remedies, so the above exclusions and limitations may not apply. If your
state does not allow disclaimer of implied warranties, the duration of such implied warranties is limited to period of Sonance’s express
warranty.
______________________________________________________________________________
Your Product Model and Description: Original Series Single Stereo Technology Speaker
Additional Limitations and Exclusions from Warranty Coverage: The warranty described above is non-transferable, applies only to
the initial installation of the Product, does not include installation of any repaired or replaced Product, does not include damage to
allied or associated equipment which may result for any reason from use with this Product, and does not include labor or parts caused
by accident, disaster, negligence, improper installation, misuse (e.g. overdriving the amplifier or speaker, excessive heat or cold or
humidity, outdoor installation), or from service or repair which has not been authorized by Sonance.
Obtaining Authorized Service: To qualify for the warranty, you must (1) contact your authorized Sonance Dealer/Installer or call
Sonance Customer Service at (800) 582-0772 within the warranty period, (2) obtain a return merchandise number (RMA), and (3)
deliver the Product to Sonance shipping prepaid during the warranty period, together with the original sales receipt, invoice or other
satisfactory proof of purchase.
©2010 Sonance. All rights reserved.
Sonance, Roto-Link, Sonic Eye, Sonafill, and FastMount are registered trademarks of Dana Innovations.
Due to continuous product improvement, all features and specifications are subject to change without notice.
For the latest Sonance product specification information visit our website: www.sonance.com
SONANCE • 212 Avenida Fabricante • San Clemente, CA 92672-7531 USA
(800) 582-7777 or (949) 492-7777 • FAX: (949) 361-5151 • Technical Support: (800) 582-0772
>>>:65(5*,*64

This manual suits for next models

1

Other Sonance Speakers manuals

Sonance CR101 User manual

Sonance

Sonance CR101 User manual

Sonance CRK10 User manual

Sonance

Sonance CRK10 User manual

Sonance Ellipse 2.0 LCR User manual

Sonance

Sonance Ellipse 2.0 LCR User manual

Sonance Visual Performance VP85S User manual

Sonance

Sonance Visual Performance VP85S User manual

Sonance Landscape Series RK63 User manual

Sonance

Sonance Landscape Series RK63 User manual

Sonance IS4 C User manual

Sonance

Sonance IS4 C User manual

Sonance Visual Perfomance LCR1 User manual

Sonance

Sonance Visual Perfomance LCR1 User manual

Sonance SRS1 User manual

Sonance

Sonance SRS1 User manual

Sonance VISUAL PERFORMANCE VP82R User manual

Sonance

Sonance VISUAL PERFORMANCE VP82R User manual

Sonance Silhouette I User manual

Sonance

Sonance Silhouette I User manual

Sonance Silhouette I Service manual

Sonance

Sonance Silhouette I Service manual

Sonance SM55 User manual

Sonance

Sonance SM55 User manual

Sonance Visual Perfomance VP66 SST/SUR User manual

Sonance

Sonance Visual Perfomance VP66 SST/SUR User manual

Sonance MARINER 54 User manual

Sonance

Sonance MARINER 54 User manual

Sonance Symphony S624T User manual

Sonance

Sonance Symphony S624T User manual

Sonance 521QR User manual

Sonance

Sonance 521QR User manual

Sonance Mariner 51 User manual

Sonance

Sonance Mariner 51 User manual

Sonance VP80R User manual

Sonance

Sonance VP80R User manual

Sonance Mariner 82 User manual

Sonance

Sonance Mariner 82 User manual

Sonance Cinema Ultra II THX Series User manual

Sonance

Sonance Cinema Ultra II THX Series User manual

Sonance Cinema Ultra II LCR User manual

Sonance

Sonance Cinema Ultra II LCR User manual

Sonance VISUAL PERFORMANCE VP82 Installation guide

Sonance

Sonance VISUAL PERFORMANCE VP82 Installation guide

Sonance VP38R User manual

Sonance

Sonance VP38R User manual

Sonance Mariner H2O User manual

Sonance

Sonance Mariner H2O User manual

Popular Speakers manuals by other brands

AudioBahn AW1004J owner's manual

AudioBahn

AudioBahn AW1004J owner's manual

Conquer CQL1592-B instruction manual

Conquer

Conquer CQL1592-B instruction manual

Denon SC-X1000 owner's manual

Denon

Denon SC-X1000 owner's manual

Montarbo MT160P instruction manual

Montarbo

Montarbo MT160P instruction manual

BLACKPOINT S32.1 user manual

BLACKPOINT

BLACKPOINT S32.1 user manual

Victrola WOODLAND VH-25 manual

Victrola

Victrola WOODLAND VH-25 manual

Yamaha YST-M45D owner's manual

Yamaha

Yamaha YST-M45D owner's manual

NHT SuperPower user guide

NHT

NHT SuperPower user guide

MAGNEPLANAR 1.7i instruction manual

MAGNEPLANAR

MAGNEPLANAR 1.7i instruction manual

Okayo Portable PA System user guide

Okayo

Okayo Portable PA System user guide

Polk Audio LSIM702F quick start guide

Polk Audio

Polk Audio LSIM702F quick start guide

Kanto YU6 user manual

Kanto

Kanto YU6 user manual

Bosch LHM 0606 Series quick start guide

Bosch

Bosch LHM 0606 Series quick start guide

Elipson ARCHITECT Infinite 8 manual

Elipson

Elipson ARCHITECT Infinite 8 manual

Yamaha PJP-25UR quick start guide

Yamaha

Yamaha PJP-25UR quick start guide

SPOT xp 575 user manual

SPOT

SPOT xp 575 user manual

Klipsch KL-6504-THX Specification sheet

Klipsch

Klipsch KL-6504-THX Specification sheet

Madison MAD-HIGHPOWER400 instruction manual

Madison

Madison MAD-HIGHPOWER400 instruction manual

manuals.online logo
manuals.online logoBrands
  • About & Mission
  • Contact us
  • Privacy Policy
  • Terms and Conditions

Copyright 2025 Manuals.Online. All Rights Reserved.