dr. Mercola Fluoride Removal Full Spectrum Under-Counter Water... User manual

User Manual
Fluoride Removal Full Spectrum
Under-Counter Water Filter

CONTENTS
1.
2.
3.
4.
5.
6.
7.
8.
9.
10.
11.
3
4
5
6
7
9
14
14
15
16
16
WATER FILTRATION SYSTEM
FEATURES
SPECIFICATIONS
PARTS
USAGE GUIDELINES AND PRECAUTIONS
INSTALLATION GUIDELINES
OPERATING INSTRUCTIONS
A. CLEANING THE FAUCET
EASY REPLACEMENT FILTER SYSTEM
REPLACING THE FILTER
A. INSTALLING AND REPLACING BATTERY
B. RESETTING LED FILTER LIFE INDICATOR
TROUBLESHOOTING
WARRANTY
17
18
19

Dr. Mercola's Fluoride Removal Full Spectrum Under-Counter Water Filter provides broad based contaminant removal.
Independently tested against 172 contaminants, with a reduction up to 99.9% including uoride! Includes a .01 micron
hollow membrane lter which targets microbial contaminants such as bacteria, viruses, cysts and fungi.
WATER FILTRATION SYSTEM
Removes larger particulate and sediment prolonging ow rate and lter life.
Sediment Shield
1
.5 Micron Carbon Block
Reduces a wide range of contaminants up to 99.9% including:
• Heavy Metals such as arsenic and chromium
• Pesticides and herbicides
• Pharmaceuticals
• Fluoride and Chlorine
2
Filter Media:
• Fluoride removal
• Wide range filtration while preserving essential minerals.
4
.01 Micron Filtration
Reduces virtually all micro-organisms such as viruses, bacteria and fungi.
3
User Manual | 3
1
2
4
3

FEATURES
CONVENIENT UNDER SINK DESIGN EASY REPLACEMENT FILTER SYSTEM
Comes with the lter pre-installed.
Once the lter needs to be replaced, re-installation is easy.
Use Full Spectrum Under-Counter Water Filter replacement
lters only.
LED FILTER LIFE INDICATOR OPTIONAL WALL MOUNT BRACKET
The Full Spectrum Water Filter has a built in LED lter
life indicator function reminding you to replace the
lter after 250 gallons.
The option to mount the water lter housing allows
for more space under the sink.
4 | User Manual
Looks great alongside any kitchen sink. The
under sink design allows you to enjoy ltered
water without a bulky lter system taking up
valuable real estate on your counter top.

SPECIFICATIONS
POTABLE WATER ONLY
The Full Spectrum Water Filter is intended for use
with treated (potable) water supply only.
User Manual | 5
Model Fluoride Removal Full Spectrum Under-Counter Water Filter
Weight Unit: 4.35 lb (1.97 kg)
Unit with Box: 5.75 lb (2.6 kg)
Dimensions (W x D x H) Faucet: 2.25" x 6" x 13.25" (58 mm x 153 mm x 337 mm)
Housing: 4.5" x 4.5" x 11.5" (115 mm x 115 mm x 293 mm)
Box: 14.75” x 12.5” x 5.5” (375 mm x 318 mm x 140 mm)
Flow Rate 0.4 - 0.66 GPM (1.5 - 2.5 LPM)
2 LPM with typical water pressure (35 psi to 60 psi)
Pressure Up to 90 psi (63,276.3 kgf/m)
Retains Essential Minerals Calcium, Magnesium, Potassium
Installation Type Under-counter direct connection to cold water
Nominal Water Pressure 14 psi (9,842.95 kgf/m)
Temperature Operating Range 33°F - 95°F (1°C - 35°C)
Filter Life and Method 250 gal (946 L) Change when LED lter life indicator ashes red
Optimal Water Pressure 20 - 60 psi (14,061 - 42,184.09 kgf/m)

PARTS
6 | User Manual
The following parts are shipped with your new Full Spectrum Under-Counter Water Filter.
Water Filter Housing
Full Spectrum Filter
(already inside housing)
Faucet
User Manual
Installation Hardware
Wall Mount Bracket
Wall Mount Screws (4)
3.8 ft/1.2 m White Inlet Hoses (2)
Housing Wrench
Angle Stop Adapter (T-Valve) with
1/2” x 3/8” Adapter
1
2
3
4
5
6
7
8
9
10
1
2
3
5
6
7
8
9
10
4

USAGE GUIDELINES AND PRECAUTIONS
WELCOME
We are interested in your safety while using Dr. Mercola's Full Spectrum Under-Counter Water Filter. We have included these general safeguards;
please take the time to carefully read them. They provide important information regarding safe use and general maintenance of the appliance.
Nonobservance of these safeguards may compromise the safety of the appliance, result in injury, and/or void the warranty.
IMPORTANT SAFEGUARDS
READ AND SAVE THESE INSTRUCTIONS
1. Keep this Owner’s Manual safe for future reference.
2. To avoid accidental injury, close supervision is necessary when appliance is used by or near children.
3. Do not operate appliance with any visible damage to the appliance itself, after appliance malfunctions,
or after the appliance has been dropped or damaged in any way.
4. The use of attachments not recommended or sold by Natural Health Partners, LLC may cause a re, electrical shock, or injury.
5. The Full Spectrum Under-Counter Water Filter is designed for household use only. Do not use outdoors.
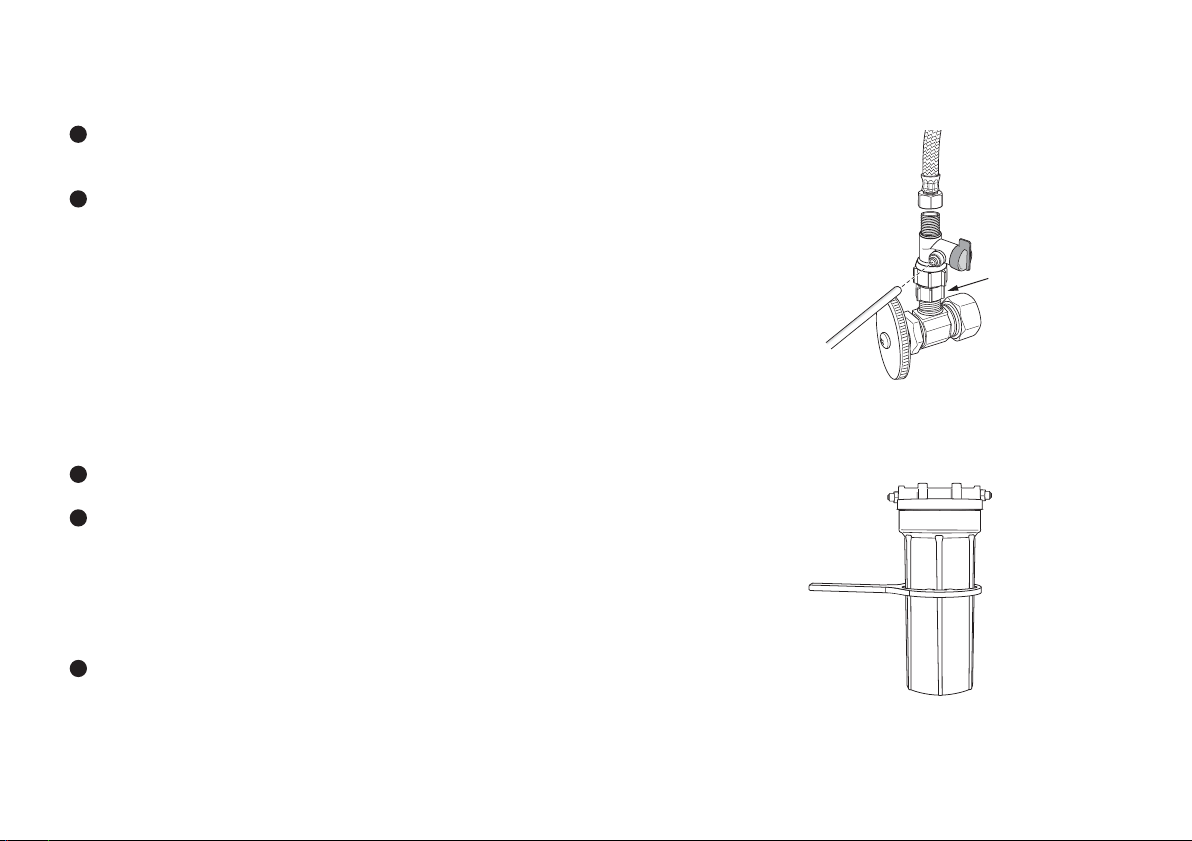
6. Only connect to a treated water supply (potable water).
7. For optimum ltration, connect to a water supply with normal household water pressure.
8. Do NOT use with hot water. Connect to a cold water supply only and install in an environment ranging between 33°F and 95°F only.
9. Protect the appliance and water lines from freezing temperatures.
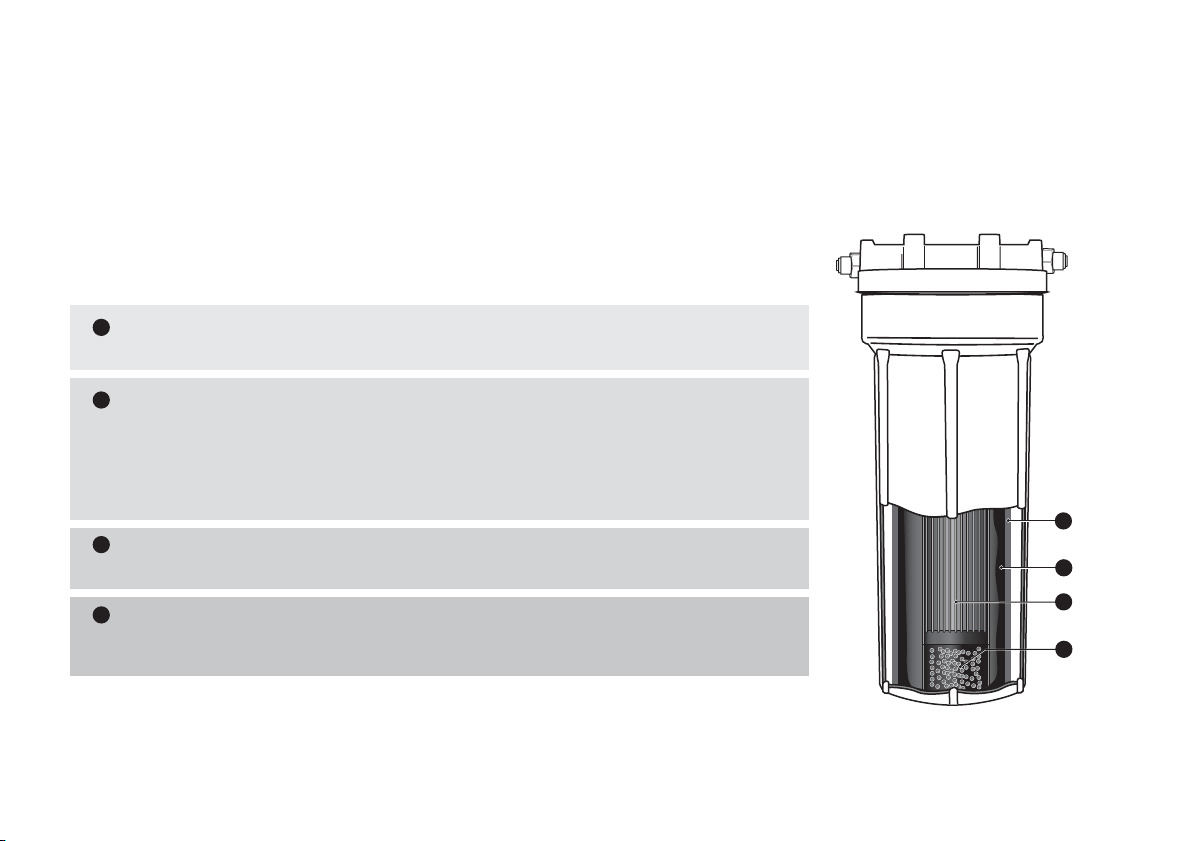
10. Do not attempt to clean the expired lter as this may cause water to be re-contaminated during continued use.
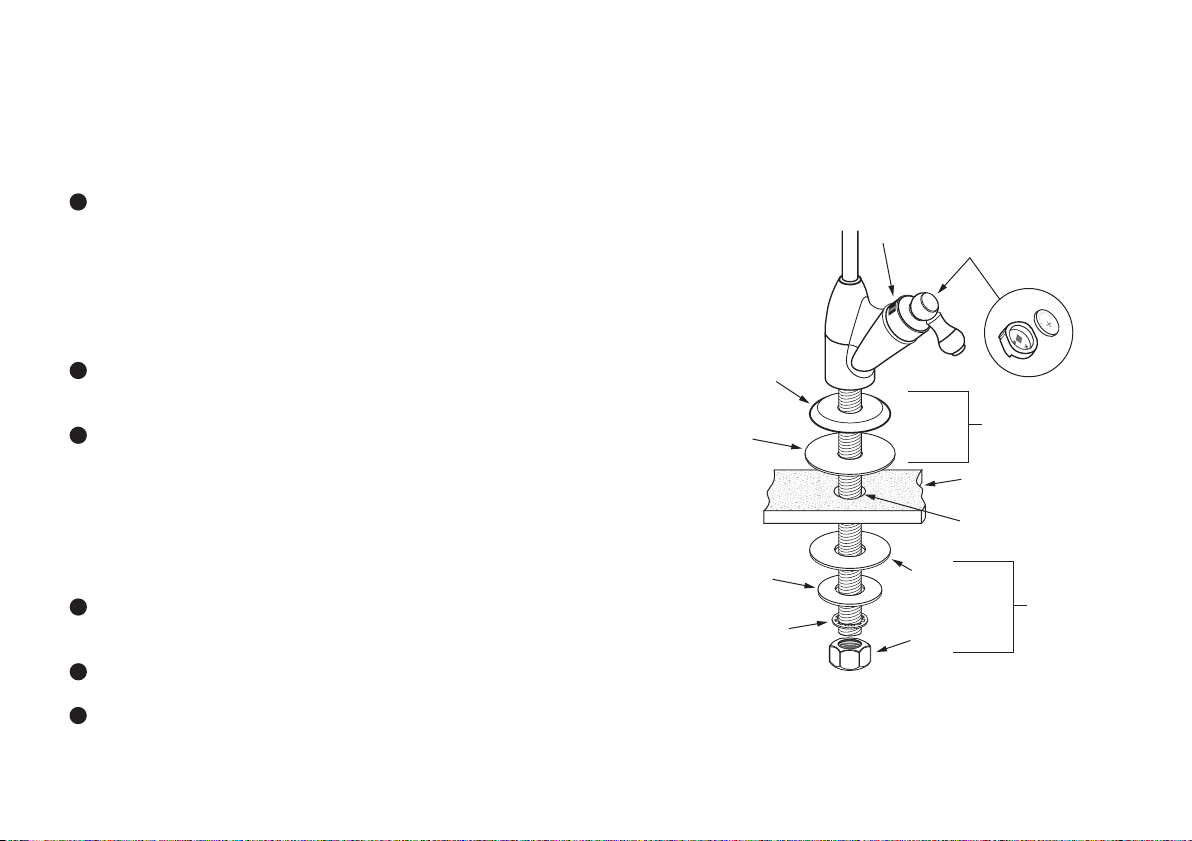
11. Only install as directed in the manual. A licensed plumber is recommended when plumbing to a cold water line using an Angle Stop Adapter or T-Valve.
12. Do not expose to force or shock. Do not place objects on top of the unit as to obstruct the unit in any way.
13. Do not close, bend, pinch, press or otherwise obstruct the inlet or output ports or hoses.
14. Do not interfere with lter during operation.
15. To clean the exterior, wipe surfaces regularly with a soft cloth or sponge using only warm, soapy water. Do not use harsh cleaners,
bleach or benzene-based solvents, as it may result in scratches to the nish.
16. If you plan on not using your Full Spectrum Under-Counter Water Filter for an extended period of time (more than 3 weeks), remove the lter,
let it drain, and then store it in a plastic bag in your refrigerator.
17. Do not place on or near a hot gas or electric burner, or in a heated oven.
User Manual | 7

IMPORTANT SAFEGUARDS
18. Never move the appliance when it is operating.
19. Follow the cleaning instructions in this manual.
20. STORE OUT OF THE REACH OF CHILDREN.
21. Do not use the Full Spectrum Under-Counter Water Filter for anything other than the intended use.
22. After unpacking the appliance, check unit to be sure that it has been received undamaged and that no parts are missing.
If you are in any doubt, contact Mercola Customer Service at (877) 985-2696.
23. Before installing, check the plumbing system and under sink area to ensure hardware is safely installed. It is the customer’s
responsibility to have the appliance installed properly. If lacking the appropriate tools for installation, we recommend using a
licensed plumber.
24. Do not use other hardware (screws, brackets, adapters, etc.) other than the ones provided with the unit for mounting to ensure
proper installation.
25. Household installation must be carried out in accordance with manufacturer's instructions. Mercola is not responsible for any
damage or injuries to persons, animals or objects caused by incorrect use or installation including but not limited to water damage
due to leakage.
26. To uninstall the appliance, we recommend using a licensed plumber.
8 | User Manual

INSTALLATION GUIDELINES
STEP 1 – FAUCET LOCATION
Use an existing soap dispenser hole or drill a 1/2” hole in the
sink or countertop where you plan on installing your faucet.
See Diagram to the right, Step 2
Slide the chrome plated metal ange and the large Rubber
Washer onto the threaded mounting shaft of the faucet.
Insert the threaded mounting shaft of the faucet through the
1/2” hole at the sink. (Faucet now resting in the 1/2” hole.)
STEP 2 – INSTALL THE FAUCET (ABOVE THE COUNTER)
See Diagram to the right, Step 3
From under the counter, install the plastic washer, then the
small rubber washer onto the threaded mounting shaft.
Thread the lock washer onto the threaded mounting shaft.
Thread the locking nut onto the threaded mounting shaft
and tighten to secure the faucet to the sink.
STEP 3 – SECURE FAUCET TO SINK (UNDER THE COUNTER)
1
1
2
1
2
3
User Manual | 9
Display Battery Holder
Located Here
Chrome Plated
Metal Flange
Large Rubber
Washer
Small Rubber
Washer
Lock Washer Locking Nut
Plastic Washer
12.5 mm
(1/2”) Hole
Counter Top
STEP 2
STEP 3

2
STEP 5 – INSTALLING THE FILTER
Skip this step if your lter is already installed
When installing the Angle Stop Adapter (T-Valve) to the cold water line,
you may need to use the 1/2” x 3/8” Adapter and Teon tape.
Turn o cold water, install T-Valve. Make sure T-Valve is turned to
“O” position. Leave cold water o until installation is complete.
STEP 4 – INSTALL THE ANGLE STOP ADAPTER (T-VALVE) TO COLD WATER LINE
1
1
2
2
3
10 | User Manual
Using the Housing Wrench loosen the housing canister and remove the lid.
After removing the plastic wrapper from the replacement lter, install the
Full Spectrum Water Filter replacement lter into the inside of the housing
canister. Ensure the top of the replacement lter is facing towards the housing
canister lid by following the direction of the sticker on the replacement lter
that says "This End MUST Face Lid". Remove this sticker prior to installing.
Replace the lid.
Tighten the housing canister by using the Housing Wrench. (It is very important
to ensure the lid is properly closed, but NOT over-tightened, to
prevent leaking and water damage.)
Adapter

User Manual | 11
Using the 1/4” tubing provided, cut the length of tubing needed
to connect the Full Spectrum Water Filter faucet.
Insert one end of the tubing into the Quick Connect Fitting on
the Full Spectrum Water Filter Housing lid labeled “OUT”.
Thread the Faucet Connector, included in the installation
hardware bag, onto the Faucet Shaft. Hand tighten it.
Grasp the end of the 1/4" tubing from the Full Spectrum
Water Filter Housing and insert tubing into the Quick
Connect Fitting of the Faucet Connector. Press rmly to
ensure proper connection. To test, give it a gentle tug.
STEP 7 – INSTALL TUBING FROM FULL SPECTRUM WATER FILTER HOUSING TO THE FAUCET
See Diagram to the right
Screw in Quick Connect Inlet Fittings into both sides of the Full Spectrum Water
Filter housing lid.
Using a sharp knife and the 1/4" tubing provided, carefully cut a length of tubing
to the proper length to connect the Angle Stop Adapter to the Full
Spectrum Water Filter canister.
Insert one end of the tubing into the Quick Connect Fitting on the
Angle Stop Adapter and the other end into the Quick Connect Fitting
labeled “IN” on the Full Spectrum Under-Counter Water Filter housing lid.
STEP 6 – INSTALL TUBING FROM ANGLE STOP ADAPTER (T-VALVE)
TO FULL SPECTRUM WATER FILTER HOUSING
1
2
1
2
3
3
4
REMOVAL: Hold Quick Connect Fitting
end with thumb and index nger.
Press in on the collet ring while pulling
out the 1/4” tubing in opposite direction.
NOTE: The tubing must be connected to the
cold water line and NOT the hot water line.
Threaded side connects
to Faucet Shaft
Faucet Connector
Quick Connect Fitting
side connects to
1/4” Tubing
1/4” Tubing
Connect to Filtered Water

Water may be cloudy from carbon dust when a new replacement lter is installed or when existing lter has not been used for an
extended period of time (3 weeks). This is normal and harmless. Be sure to suciently ush your new lter before ltering water to
drink by doing the following:
STEP 8 – FLUSHING THE FULL SPECTRUM WATER FILTER
The Full Spectrum Water Filter faucet comes with the battery pre-installed.
To activate the battery, simply pull the plastic tab on the faucet handle.
The battery is now activated and the LED will ash BLUE-YELLOW-YELLOW-BLUE.
STEP 9 – ACTIVATING THE BATTERY
Blue Valve
Quick Connect
Fitting
1
2
3
Turn the source of water on. Then open the blue valve on the Angle Stop Adapter (T-Valve).
Turn on the Full Spectrum Water Filter Faucet and allow water to run for 1-2 minutes to
ush the lter or until the water runs clear.
During this time, check all connections for leaks.
1
2
3
12 | User Manual
Pull To Activate

WALL MOUNT BRACKET INSTALLATION
Mounting the housing canister is optional. It can help save space, but will make changing the existing lter with the replacement lter
more dicult.
Using the included mounting bracket and screws, the housing canister can be hung on the cabinet wall. If the Full Spectrum Water
Filter unit is not being mounted, it can stand on the cabinet oor on the canister’s lid for more stability.
CAUTION! If mounting the lter, only mount onto a side wall of the cabinet. After ensuring there are no water lines running behind the
side wall of the cabinet, the wall mount bracket can be installed. DO NOT mount to the back wall of the cabinet as screws could
puncture water lines.
User Manual | 13
Removable Bracket
Faucet with Filter
Life Indicator
Threaded Mounting
Shaft
Filter Housing
Water Supply

OPERATING INSTRUCTIONS
Hold a glass, water bottle or container under the Full Spectrum Water Filter faucet and turn the handle to start the ow of water.
LED indicator ashes blue during operation.
Turn the handle on the faucet back to the resting position to stop the ow of water.
CLEANING THE FAUCET
It is important to use warm soapy water and a soft sponge or cloth for routine maintenance and care. If used with hard water,
it is necessary to clean and dry faucet immediately after every use. Avoid cleaning with chemicals, solvents, or harsh detergents,
as this may result in scratches to the nish.
1
2
14 | User Manual

EASY REPLACEMENT FILTER SYSTEM
When it is time to change the water lter, use Full Spectrum Under-Counter Water Filter replacement lters only. Do not try to clean or reuse expired lters.
This will cause ltered water to become re-contaminated with harmful bacteria. To place an order for Full Spectrum Water Filter replacement lters,
please visit www.shop.mercola.com or contact Mercola Customer Service at (877) 985-2696.
LED FILTER LIFE INDICATOR
• It is a good idea to change the battery when you replace the lter.
• LED ashing BLUE: Normal operation.
• LED ashing YELLOW: 25 gallons left until lter expires.
• LED ashing RED: Change the lter.
• LED not ashing: Change the battery.
For detailed instructions on replacing the battery see page 16.
IMPORTANT: IMPORTANT:
User Manual | 15
When replacing the battery alone, never press the Filter Life
Reset Button. The faucet has an internal memory and will
remember the life of the existing lter. Once the battery is
installed, the LED will ash BLUE-YELLOW-YELLOW-BLUE
to signal successful installation.
0 Gallons 250 Gallons225 Gallons
LED Not Flashing
BATTERY
Replace the Filter
Replace Battery
Filter Close to Expiration
FILTER
LED Flashing BLUE LED Flashing RED
LED Flashing BLUE
LED Flashing YELLOW

To replace the lter, use the Housing Wrench to twist open the lter’s housing canister. Slide the wrench up onto the housing
canister. Then hold the housing lid with one hand while turning the wrench clockwise, or towards you, with the other to open.
If the housing canister is mounted, range of motion may be limited.
Remove expired lter and install the new lter in its place. Position correctly by following the direction of the sticker on the
replacement lter that says "This End MUST Face Lid". Remove this sticker prior to installing. Replace the housing lid and tighten
with your hands rst, then use the lter wrench to properly close. DO NOT over tighten, but ensure it is properly closed to
prevent leaking and water damage.
If the 1/4” tubing was removed, reinstall by inserting the end of the tubing rmly into the Quick Connect Fitting.
Give it a tug to ensure proper installation.
REPLACING THE FILTER
INSTALLING AND REPLACING BATTERY
Remove battery holder by grasping the black rubber located
on the faucet handle with your ngers and pull out.
Remove old battery and dispose of properly.
Install a new battery ensuring that the positive side (+) is facing out. The LED
will ash BLUE-YELLOW-YELLOW-BLUE to signal successful installation.
Reinsert the battery holder into the faucet with the positive
side (+) of the battery facing out.
To test, turn the faucet on. LED should ash BLUE.
1
2
3
4
1
2
3
4
5
16 | User Manual
NOTE: When replacing the battery alone, never press the Filter Life Reset Button. The faucet has an internal memory and
will remember the life of the existing lter.
Replacement Battery Size:
CR2032
Reinsert Battery Holder
Battery Holder
Battery

RESETTING LED FILTER LIFE INDICATOR
To reset the LED after replacing the lter, remove the battery holder from the faucet and press and hold the reset button
labeled “SW1” for three seconds. The light will ash RED-BLUE-RED.
If the light does not ash when the Filter Life Indicator is reset, the battery may have died, or been improperly installed.
To replace the battery see Installing and Replacing Battery on page 16.
When the battery is replaced, the LED will ash BLUE-YELLOW-YELLOW-BLUE to signal successful installation.
When the faucet is running, the LED will ash blue.
NOTE: When replacing the lter, we recommend also replacing the battery at the same time; however, this is not always necessary.
User Manual | 17
Reset button for
Filter Life Indicator
(size of a pinhead)
Code SW1
R2
U2
U1
L1
LED1
C1
LED3LED2
R1
SW2
SW1
R2
U2
U1
L1
LED1
C1
LED3LED2
R1
SW2
SW1
Press and hold the lter reset button labeled SW1
for three seconds until it ashes RED-BLUE-RED
Reset button for Filter
Life Indicator
(size of a pinhead)
Code SW1

TROUBLESHOOTING
PROBLEM POSSIBLE CAUSE SOLUTION
If the lter has been sitting unused for multiple days at a time, the
lter may release some carbon dust into the water when it is rst
used again.
Black colored dust in the water A new lter may release some carbon dust into the water after
installation.
Flush the lter as directed on page 12. This will clear loose granulated
carbon from the lter.
Flush the lter as directed on page 12. This will clear loose granulated
carbon from the lter.
Slow water ow
Replace lter.Filter is blocked.
Replace lter.Filter has reached its capacity.
A hose may be bent. Check that all hoses are straight without kinks or bends.
Unusual taste, smell of chlorine or
other unpleasant odor
Filter has reached its capacity and ltration is compromised. Replace lter.
If not used for some time, water inside the unit may develop an
unpleasant odor.
Ensure inlet valve is open and ush for 5 minutes.
Water leak Housing may not be tightly closed.
Tubes or ttings not properly connected. Check all connections.
Use Housing Wrench to properly tighten the lter’s housing closed.
DO NOT over-tighten, but ensure it is properly closed to prevent
leaking and water damage.
After boiling or thawing frozen water, white
sediment is observed.
Hard water caused by high mineral content in the water. If no change in taste, likely cause is minerals aected by changing
temperatures. Dr. Mercola's Full Spectrum Water Filters do not remove
trace minerals in the water.
LED Indicator is not working Battery has died. Change the battery.
No water ow Source water or Angle Stop Adapter (T-Valve) is shut o. After installation or after replacing your lter, turn source water back
on and open the blue valve on the Angle Stop Adapter.
White substance suspended in ltered water Tiny bubbles can appear to make the water cloudy. Allow the water to sit a few minutes and check again.
Diculty opening the battery holder Secured tightly during manufacturing. Use tweezers to pull back the black rubber on the faucet handle to help
get a better grip and pull out.
18 | User Manual

Your Fluoride Removal Full Spectrum Under-Counter Water Filter is warranted to be free from all defects in material and
workmanship in normal household use for a period of 1 year from date of purchase. The warranty is granted only to the
original purchaser. The warranty is subject to the following provisions. This warranty does not cover normal wear and tear. Any
damages or malfunctions caused by negligence, abuse, improper use, improper installation, or use not in accordance with the
Owner’s Manual are not covered by this warranty. This warranty does not cover damage due to leakage or water damage. If
the unit is dropped, damaged, or immersed in liquids, these are not covered by this warranty. Likewise, any defects or
damages caused by unauthorized service are not covered. Using this unit for commercial purposes voids this warranty.
Natural Health Partners, LLC will, at its option, repair or replace the part which proves to be defective free of charge (excluding
shipping if applicable) that is covered by this warranty. As a matter of warranty policy, Natural Health Partners, LLC will not
refund the customer’s purchase price. To obtain warranty service you must return the defective Full Spectrum Under-Counter
Water Filter along with proof of purchase to Natural Health Partners, LLC. All delivery charges on parts, or units, submitted
under this warranty shall be borne by purchaser. Unless this Warranty is expressly renewed or extended by Natural Health
Partners, LLC, any repaired or replaced part of unit shall be warranted to the original purchaser only for the length of the
unexpired portion of the original warranty.
FURTHER LIMITATIONS AND EXCLUSIONS ARE AS FOLLOWS:
Any warranty that may be implied in connection with your purchase or use of the Full Spectrum Under-Counter Water Filter,
including any warranty of merchantability is limited to the duration of this warranty. Some states do not allow limitations on
how long an implied warranty lasts, so the above limitations may not apply to you. Your relief for the breach of this warranty is
limited to the relief expressly provided above. In no event shall Natural Health Partners, LLC be liable for any consequential or
incidental damages you may incur in connection with your purchase or use of the Full Spectrum Under-Counter Water Filter.
Some states do not allow the exclusion or limitation of incidental or consequential damages, so the above limitation or
exclusion may not apply to you. This warranty gives you specic legal rights, and you may also have other rights which vary
from state to state.
WARRANTY
ONE-YEAR LIMITED WARRANTY
User Manual | 19

Fluoride Removal Full Spectrum
Under-Counter Water Filter
DISTRIBUTED BY: NHP, 125 SW 3rd Place
Cape Coral, FL 33991 USA (877) 985-2696
20308-v102
Filter Unit Made in USA
Filter Cartridge Made in South Korea
Table of contents
Popular Water Filtration System manuals by other brands

ELECTROSEA
ELECTROSEA CLEARLINE CL-2000-X2.0 installation manual

PREMIER TECH
PREMIER TECH Rewatec Ecoflo EC-2.8 Quick reference guide

Vivreau
Vivreau PURITY 450 Quell ST manual

ENEKA
ENEKA Greasly-A Installation, operation and maintenance manual

platypus
platypus META instruction manual

Nederman
Nederman MFS user manual