STEP 2: Test the Static Function
To ensure that the Static Function works properly before using the collar on your
dog, it is recommended that you test the Static Function at least once before using.
Please follow instructions below for how to use the test light.
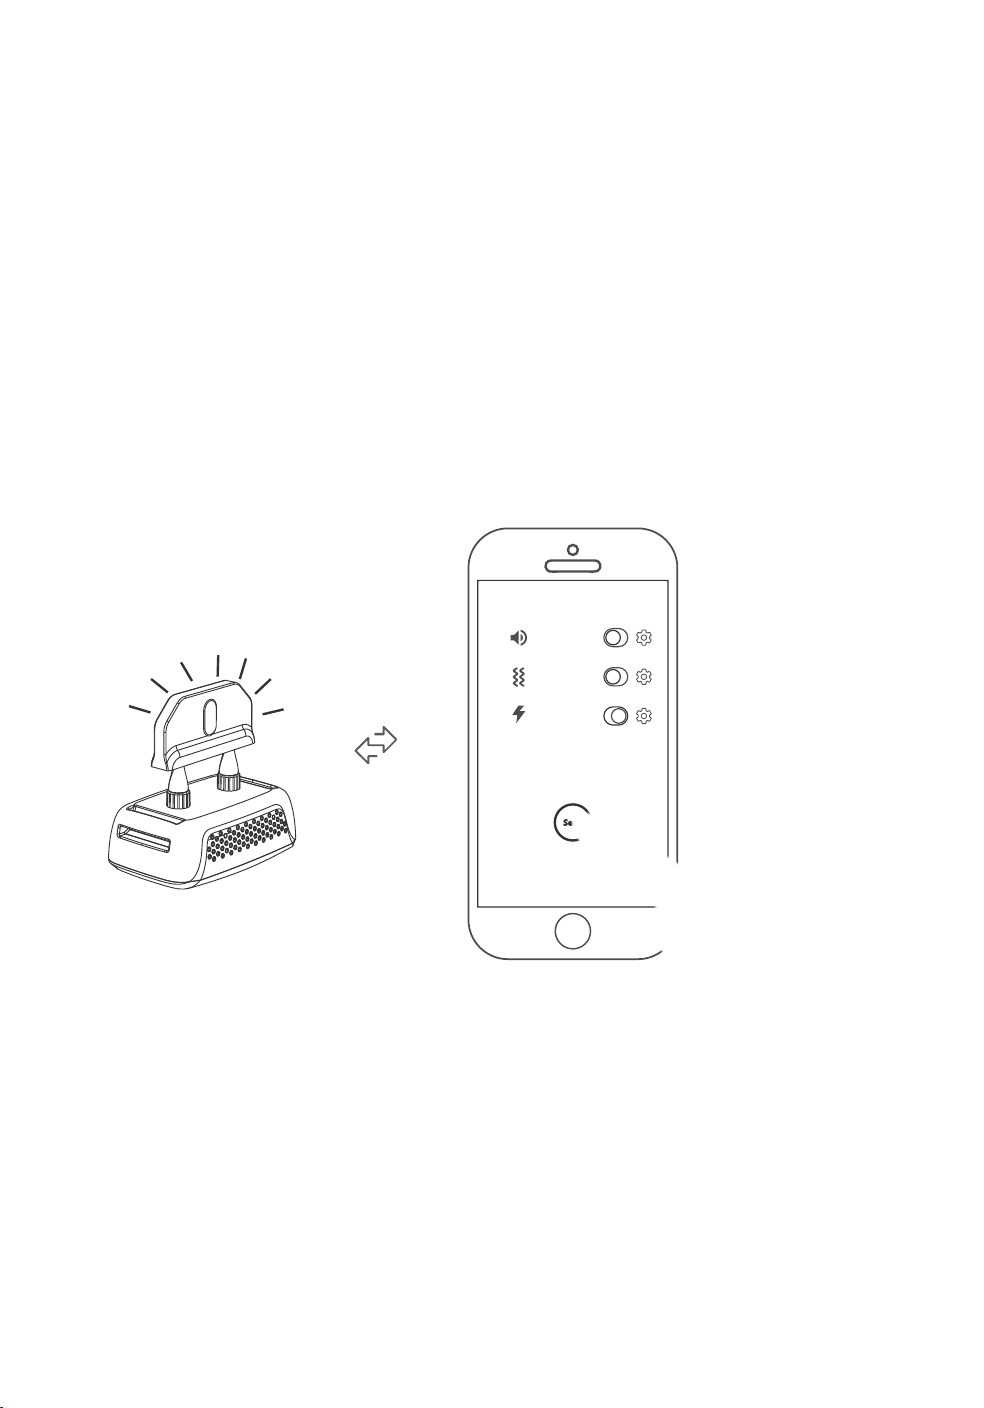
1.Turn the Smart Bark Collar on.
2.Place the Test Light above the Contact Points.
3.Open the App, press Send button on the Remote.
4.The Test Light will flash.
5.Turn the Bark Collar off. Store the Test Light for future testing.
Note: If the Test Light does not flash, recharge the battery and re-test.
Diagram
Thank you for purchasing the Dr.Trainer smart bark collar. We have
made every attempt to provide you with the most technologically
a d v a n c e d p r o d u c t , u s i n g t h e m o s t s t r i n g e n t q u a l i t y a n d
manufacturing standards. We are confident you will be pleased with
the results you’ll attain with your Dr.Trainer. Please remember, you
will get better results with the use of lower static levels combined with
consistent training techniques. The use of high levels of static should
only be used as a last resort, or in life-threatening situations. Good
luck with your training, and please feel free to contact us, should you
have any questions.
971-302-6642 or Service@DrTrainer.com
How does the Dr.Trainer Smart Bark Collar work?
Now, you can experience the difference a Dr.Trainer can make. Spend less time
training and more time enjoying your dog.
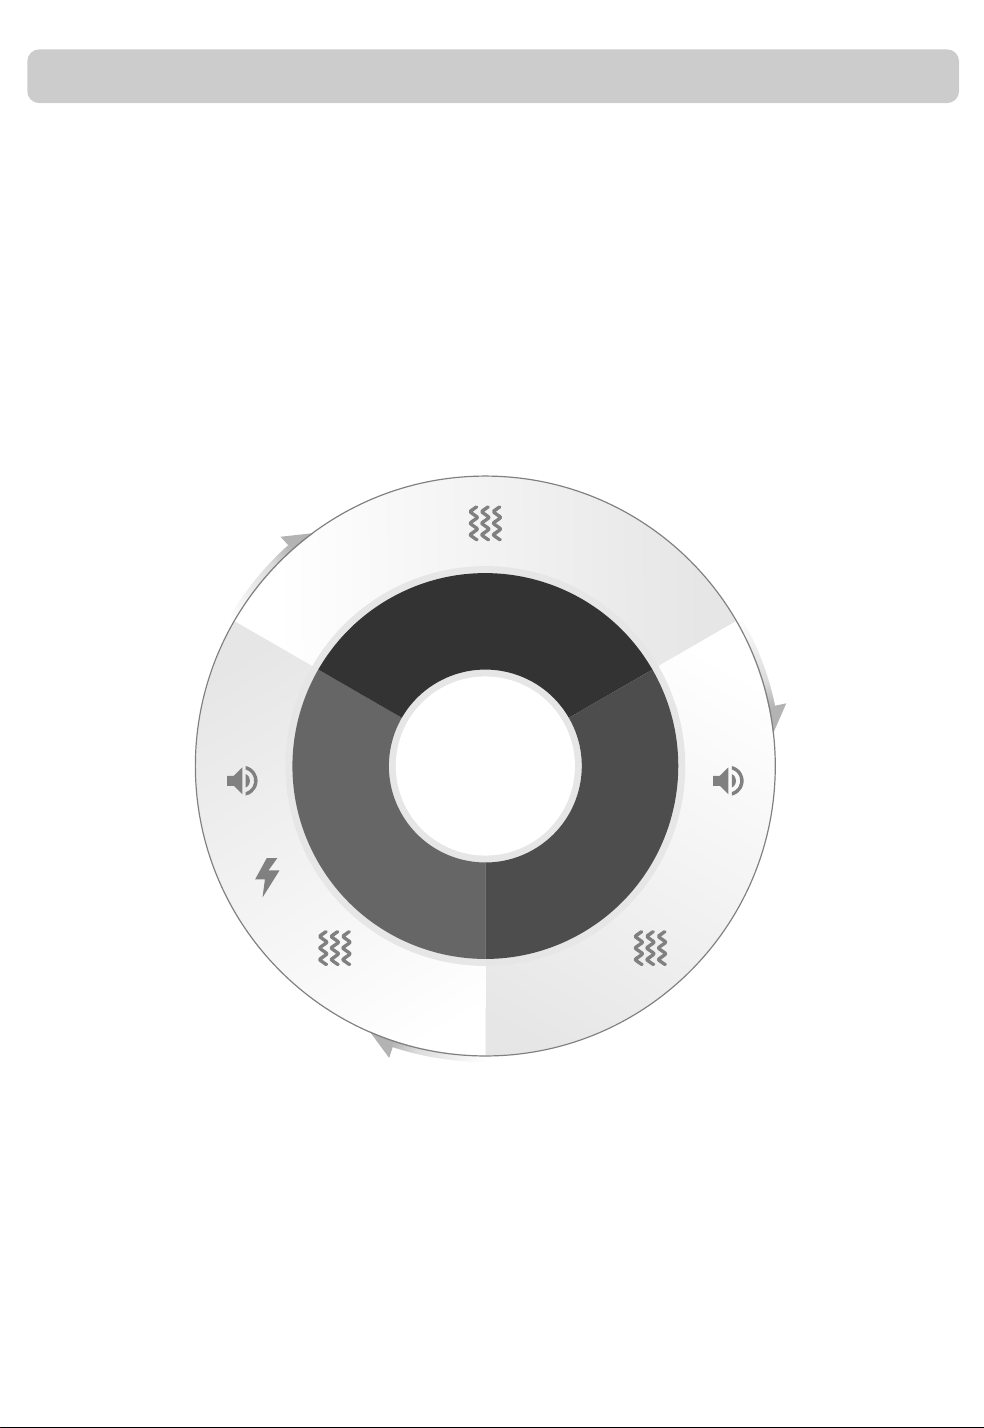
1. The Dr.Trainer smart bark collar has a progressive correction system. If your dog
continues to bark, the correction system automatically increases to the next level
until he stops. He will quickly realize that barking is not a good thing within the first
few days of wearing the collar.
2. The Dr.Trainer smart bark collar can also customize the correction settings with
the App. You can choose the combination of functions and intensity levels that suits
your dog. When the dog is barking, the smart bark collar will use your correction
setting to remind it not to.
B1s&B1sPro
Important Safety Information
Not for use with aggressive dogs. Do not use this product if your dog is
aggressive, or if your dog is prone to aggressive behavior. Aggressive dogs
can cause severe injury and even death to their owner and others. If you are
unsure whether this product is appropriate for your dog, please consult your
veterinarian or certified trainer.
Safety during on-leash training. It is vitally important that you and your
dog remain safe while learning during on-leash training. Your dog should be
on a strong leash, long enough for him to attempt to chase an object, but
short enough for him not to reach a road or other unsafe area. You must also
be physically strong enough to restrain your dog when he tries to chase
something.
Risk of skin damage. Please read and follow the instructions in this manual.
The proper fit of the collar is important. A collar worn for too long or
fastened too tightly on your pet's neck may cause skin damage, ranging from
redness to pressure ulcers. This condition is commonly known as bed sores.
ŸAvoid leaving the collar on the dog for more than 12 hours per day.
ŸWhen possible, reposition the collar on the pet's neck every 1 to 2 hours.
ŸCheck the fit to prevent excessive pressure; follow the instructions in this
manual.
ŸNever connect a lead to the electronic collar; it will cause excessive
pressure on the contacts. When using a separate collar for a lead, don't
put pressure on the electronic collar.
ŸWash the dog's neck area and the contacts of the collar weekly with a
damp cloth.
ŸExamine the contact area daily for signs of a rash or a sore.
ŸIf a rash or sore is found, discontinue use of the collar until the skin has
healed.
ŸIf the condition persists beyond 48 hours, see your veterinarian.
In shutdown state, press and
hold the power switch for 1
second
Blue light stays on 3 seconds, with short
vibration
In operating state,
press and hold the power switch
for 2 seconds
Lights off, with long vibration for 1 second.
Double-click the power button
(within 1.5 seconds)
Alternately flashes blue and green lights for
about 90 seconds
press the power button for
more than 15s
The device vibrates when you keep pressing
over 2 seconds, continue pressing for 15
consecutive seconds, then it will be recovered.
1.When Bluetooth is not connected to mobile phone, the Green LED flashes.
2.When Bluetooth is connected to mobile phone, the Blue LED flashes.
Green and blue lights flash alternately
Green light slowly flashes
Red light quickly flashes when battery capacity is less than 15%
STEP 3: Fit the Smart Bark Collar
Important: The proper fit and placement of your Bark Collar is important for effective
operation.
To ensure a proper fit, please follow these steps:
1. Make sure that the Receiver Collar is turned off.
2. Start with your dog standing comfortably.
3. Place the Bark Collar on your dog's neck close to the ears. Center the Contact
Points underneath your dog's neck.
4. Check the tightness of the Bark Collar by inserting one finger between the collar
and your dog's neck. The fit should be snug but not constricting.
Note: It is sometimes necessary to trim the hair around the Contact Points to make
sure that the contact electrodes delivers effective static.
FAQ's
Q: Is the static safe for my pet?
While the static is unpleasant, it is harmless to your pet. Electronic training devices
require interaction and training from the owner to achieve desired results.
Q: How old does a pet have to be before using the Dr.Trainer?
Your pet should be able to learn basic obedience commands such as “Sit” or
“Stay.” Pets should be at least 6 months old before using the Trainer.
Q: Is the Smart Bark Collar waterproof?
Yes. All of the Dr.Trainer Smart Bark Collars are waterproof.
Q: Can I use the Dr.Trainer on aggressive pets?
We do not recommend any of our products to be used on aggressive pets. We
recommend that you contact your local veterinarian or professional trainer to
determine if your pet might be aggressive.
Q: Why my pet is not responding when I press a button?
ŸCheck to see if the Collar has been turned on.
ŸYou can verify the Electronic Collar is delivering static to your pet by using the
Test Light, enclosed in your kit, on the Receiver Collar. Please refer to the “Test
the Static Function” section for details.
ŸIncrease the correction level.
ŸMake sure the Bark Collar's Contact Points are placed snugly, in contact with
your pet's skin.
Q: Why won't the Electronic Collar turn on?
Make sure the Electronic Collar has been charged.
Specifications and Performance
Product name:Smart Bark Collar
Mode: B1s & B1s Pro
Battery type:Li-Polymer
Battery capacity:500mAh
Input interface:Micro-USB
Input parameters:5V/1A Max.
Buletooth:BLE4.0
Vibration:3 Levels
Static:99 Levels
Automatic protection:If the static function is triggered 10 times in 1 minute, the
device will sleep 2 minutes for protection
Charging time:About 40 minutes(with 5V/1A charger)
Battery Life/Working time:About 2 weeks
Material:PC+ABS
Ingress protection: IPX7
Packing list:
1 x Device
1 x Adjustable Nylon Collar
1 x USB Charging Cable
1 x Test Light
1 x User Manual
1 x Quick Start Guide
4x Contact Points
Key Definitions
Q: Why does your dog bark, but sometimes there is no trigger correction?
In order to remain humane in your treatment of your dog, the bark collar performs
corrective actions only if the barking volume is beyond a certain level. You can also
customize the limit value of Loudness with the following steps.
Setting → Trigger condition → Loudness
1.If the barking has exceeded your acceptable range but no corrective action is
triggered, you can turn down the Loudness limit value in Settings to increase the
sensitivity.
2.If you want to relax the restrictions, allowing your dog to bark at a higher loudness
range, you can turn up the Loudness limit value to reduce the sensitivity.
IMPORTANT!
Please note that, the maximum static level can be detrimental to dogs that are
sensitive to electric static, and different breeds of dog react differently to the same
level of static stimulation. If you use the customized correction setting, it is highly
recommended that you always start from the lowest intensity level, i.e. Level 1, and
pay close attention to your dog's reaction when increasing the static level.
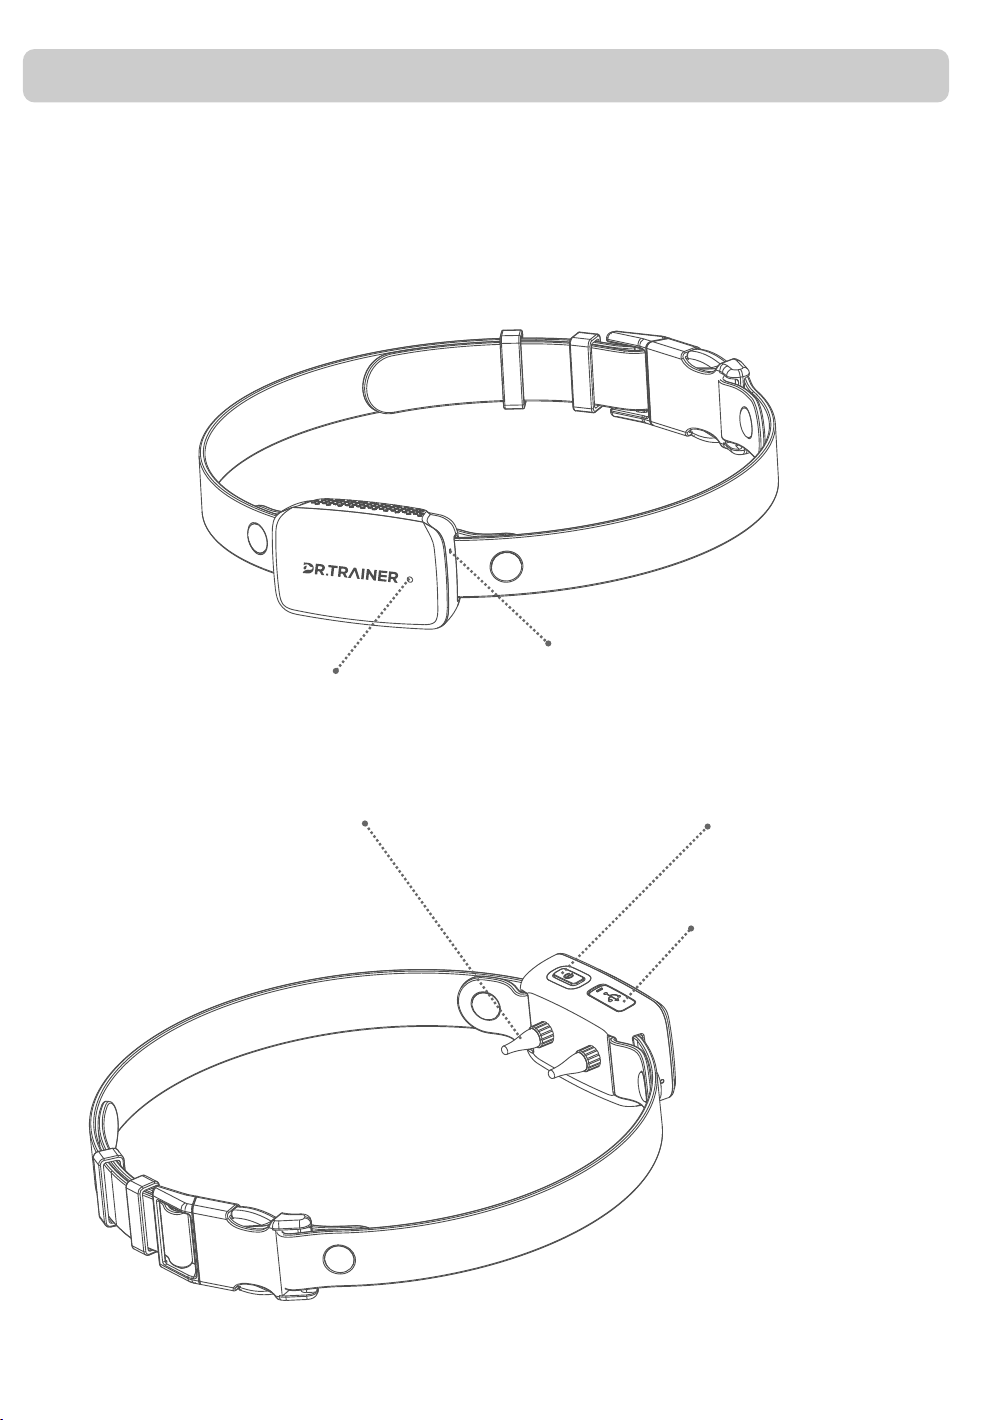
Indicator LED Mic
Power switch
Micro-USB
Contact points
01
BARK
02
BARK
03
BARK
PROGRESSIVE
CORRECTION
LED Indications
Please select
the device to conect to
connect
Double-click
目录
How Dr.Trainer Smart Bark Collar work?
Components
Specification and Performance
Diagram
Key Definition
Led Indication
Operating Guide
Step1: Pair your phone
Step2: Test the Static Function
Step3: Fit the Smart Bark Collar
FAQ
印刷颜色:单黑
Default
Weak
30
Send
Operating Guide
STEP 1: Pair the Smart Bark Collar with your phone.
1)Open Bluetooth and the APP on your phone, and follow the instructions.
2)Please turn on the collar first, by pressing the power button for more than 1
second.
3)Quickly double-click the power button of the device to enter pairing mode
(blue and green lights flash alternately).
4)After the device is detected by the App, please confirm the first connection
manually.