Dragon Touch E40 User manual

Please read this manual before operating your baby monitor,
and keep it for further reference.
USER MANUAL
Dragon Touch Baby Monitor E40
V1.0

What’s in the Box
Unit at a Glance
Getting Started
Button and Functions
Function Introduction
Installation
Monitor Maintenance
FAQ
Contact Us
1
1
3
5
6
11
11
12
12
CONTENTS

WHAT’S IN THE BOX
E40 Camera * 1 E40 Monitor * 1 Camera Power Adapter * 1
Monitor Power Adapter * 1 Monitor Mount Kit * 1 Mounting Screws * 4
Anchors * 4 Quick Start Guide * 1
DragonTouch Baby Monitor E40
UNIT AT A GLANCE
1. Camera Unit
2. Monitor Overview
11
12
Temperature Sensor
Antenna
Speaker
7
8
9
Micro USB Port
10
Pair Button11
1/4 Screw Hole
12
Infrared Light
Lens
IR Sensor
1
2
3
Microphone
4
Working Indicator
5
Mat
6
2
1
3
9
Brightness -/Down Button
Volume +/Right Button
Brightness +/Up Button
7
8
9
Volume -/Left Button
10
Lullaby Button/Press twice to
skip to the next lullaby
11
Two Way Talk Button
12
Power/Sleep Button
LCD Screen
Volume Level LED/Charging LED Indicator
1
2
3
Camera Switching Button
4
Menu Button
5
OK Button
6
4
5
11
12
7
8
6
10
2
1
4
5
6
7
8
10
9
3
English
01 02

GETTING STARTED
1. Powering the Camera Unit
①Connect the camera power adapter to the camera unit.
②Place the camera unit at least 3 feet away from your baby's crib. Make sure the
power cord is out of reach of your baby.
MIC
RESET
Microphone
Micro USB Port
Speaker
16
17
18
Reset Button
Tips: The mount kit included in the package allows you to mount your the camera
on a wall, ceiling or simply place it on a table.
Battery Compartment Cover
Antenna
13
14
15
2. Charging and Powering the Monitor Unit
For the best results, charge the monitor unit before use. After the initial charge,
recharge normally as required. The monitor unit works normally with the power
adapter plugged into the unit.
①Plug the USB power adapter into an electrical outlet. Connect the USB cable to
the micro-USB of the monitor unit.
②Press and hold the Power/Sleep button for 2 seconds to turn on the monitor unit.
The power LED indicator will turn blue to indicate the unit is ON.
③Once both the camera and monitor are switched on, the video captured by the
camera will be displayed on the monitor unit.
④ If there is no connection or the camera is out of range, the monitor will go off and
beep. Move the monitor closer to the camera until the link is re-established.
Note: The battery icon turns red on the LCD screen to indicate that the battery is
low, and it gives a beep periodically.
3. Pairing a New Camera Unit
The camera unit and monitor unit provided are already paired. You do not need to
pair it again unless the camera unit loses its link with the monitor unit. To re-pair
your camera unit, or pair a new camera unit, follow the procedures below:
① Press Menu button of the Monitor Unit choose the cam icon “ ”.
1
1
4:00
3:00
2:00
1:00
0:00
OFF
10:44AM
14
15
13
16
17
18
Note: The charging LED indicator is red while charging. When the red light turns off
or turns blue, it indicates that the battery is fully charged.
03 04

② Press the “-” left button or the “+” right button until the desired cam icon is
highlighted and press the OK button to start searching for a Camera Unit.
1
1
10:44AM
BUTTON AND FUNCTIONS
1. PowerSleep Button: Press and hold to turn the unit on/off. Press once to turn
off the screen after the unit is turned on.
2. OK Button: Press to confirm.
3. Pair Button: Press to pair with the monitor.
4. Menu Button: Press to open the main menu, or return from the submenu to the
previous menu.
5. Up Button: Press to scroll up in the menu. Press to increase screen brightness.
6. Down Button: Press to scroll down in the menu. Press to decrease screen
brightness.
7. Left Button: Press to move left in the menu. Press to decrease volume.
8. Right Button: Press to move right in the menu. Press to increase volume.
9. Two-way Talk Button: While viewing the image, press and hold to talk to your baby.
10. Camera Switching Button: Switch between cameras, lock a single camera for
monitoring, or cycle through two cameras for monitoring.
11. Lullaby Button: While viewing the image, press to quickly start or stop the
lullaby playing. When playing a lullaby, press once to switch lullabies.
12. Reset Button: If there is no response or the unit can’t work normally after
pressing and holding the Power button, please insert a thin needle (or other thin
objects that are as thin as the reset hole) into the reset hole and slightly press to
reset the unit.
FUNCTION INTRODUCTION
1. USING THE CAMERA UNIT
①This camera unit (baby unit) uses a DC 5V/1A power adapter.
②Power the unit on and the blue LED indicator lights on, indicating that the unit is
turned on and is working.
Note: Use only the supplied power adapter.
③Night vision: The baby unit has 10pcs infrared LEDs, which are used to
complement light in the dark, so the user can get a clear image.
④ Turn on and off the infrared lights: eIn working mode, the infrared lights
automatically turn on or off according to the brightness of the environment.
In dark scenes, the infrared lights will turn on to increase light for the camera and
achieve the supplemental lighting effect so that the user can view the best image.
⑤Please place this unit within the range of baby monitoring and aim the camera at
the area you want to monitor. Keep the unit and cords out of the reach of
children, so as to prevent strangulation and suffocation caused by cords.
⑥ If the image or sound interference occurs, try moving the unit to a different
location for the best effect.
2. USING THE MONITOR UNIT
①This monitor unit (parent unit) is powered by a 3.7v lithium battery or a DC 5V/1A
power adapter. The power adapter can be used for charging the battery.
Note: Use only the supplied power adapter.
②Connect the unit to power and press and hold the power button to enter the
initial system screen.
③This unit can monitor up to two cameras and cycle through them.
05 06

4. Screen icons are as follows: 5. Menu Option
The menu options are as follows:
Press the menu button to pop up the menu, which contains 6 settings:
Feeding reminder setting
Lullaby selection setting
Voice Activation (VOX) setting
Temperature unit setting
Camera setting
Time setting
Press the left or right button to select a setting option. Press the up or down button
to make the selection and press the OK button to confirm and save the setting.
Press the menu button to exit settings.
1
1
10:44AM
24℃
10:44AM
eSignal strength
Speaker volume
Room temperature (Change between Celsius and Fahrenheit in the menu)
Time (AM means morning, PM means afternoon)
Battery Status
Current camera (press the camera switching button to switch. 1 for the first
camera and 2 for the second camera)
Single camera monitoring (Press the camera switching button to switch.
Cycle through monitoring means monitoring by cycling through 2 cameras)
Lullaby. the device has 88 pieces of musiclullabies in totally. The number
indicates which lullaby is playing. indicates it will cycle through all lullabies.
1
1
24℃
1
1
4:00
3:00
2:00
1:00
0:00
OFF
10:44AM
①Breast-feeding reminder setting
Select the feeding reminder setting:
4:00
3:00
2:00
1:00
0:00
OFF
Press the up or down button to select the reminder time, then press the
OK button to confirm. (There are 6 suboptions for the feeding reminder
setting: OFF and 5 alarm clocks) The default is OFF.
07 08

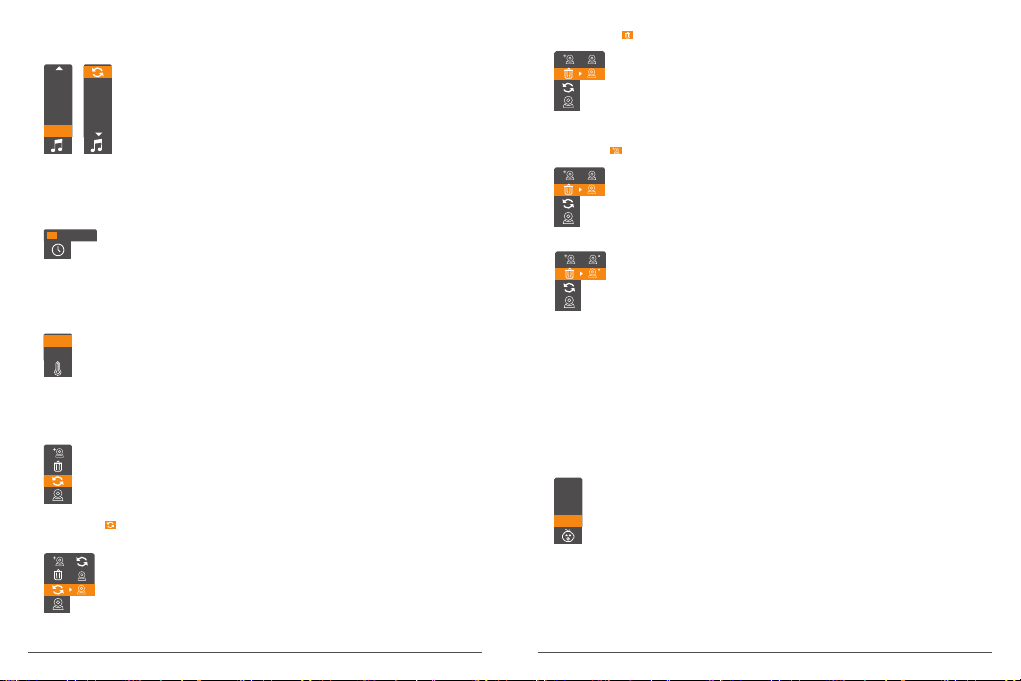
②Lullaby selection setting
Select the lullaby selection setting:
8
7
6
5
4
Press the up or down button to select the lullaby, then press the
OK button to confirm. (There are 10 suboptions: 8 lullabies, OFF,
and loop options) The default is OFF.
5
4
3
2
1
OFF
③Time setting
Select the time setting:
Press the up or down button to change values, and press the OK
button to move the cursor. Set the hours, minutes, seconds, and
AM or PM in sequence, and then press the OK button to confirm.
10:44:23 AM
④Temperature unit setting
Select the temperature unit setting:
℃
℉
Press the up or down button to select between Celsius and Fahrenheit,
then press the OK button to confirm. The default unit is Fahrenheit.
⑤Camera setting
Select the camera setting:
Choose from Cycle, Delete, and Add. Press the up or down button to
select, then press the OK button to confirm.
Press the up or down button to select, then press the OK button
to confirm. (Selecting camera 1 means the monitor will display the
footage of the camera 1 only. Selecting camera 2 means the
monitor will display the footage of the camera 2 only. Selecting the
cycle option means the monitor will cycle through the footage of
camera 1 and camera 2).
• Select Cycle , press the OK button, and three suboptions will pop up:
⑥Voice Activation (VOX) setting
Select the Voice Activation (VOX) setting:
There are 4 sub options: OFF, Low, Med, and High. Press the up or down
button to select, then press the OK button to confirm. The default is OFF.
(Note: When any of the three options of low sensitivity, medium sensitivity,
and high sensitivity is selected, its corresponding icon will appear at the
top of the display screen.)
Med
Low
OFF
High
1
2
Press the up or down button to select, then press the OK button
to confirm. (The Delete option is to delete a camera that has been
paired successfully). It indicates the deletion is successful when the
icon * on the top-right corner of the camera disappears.
• Select Delete , press the OK button and two suboptions will pop up:
1
2
Press the up or down button to select, then press the OK button
to confirm. (The Delete option is to delete a camera that has been
paired successfully). It indicates the deletion is successful when the
icon * on the top-right corner of the camera disappears.
• Select Add , press the OK button and two suboptions will pop up:
1
2
When the pairing is succeeded, the icon * will appear on the
top-right corner of the camera. Once the camera has been paired
successfully, it will be immediately viewable on the monitor. When
the camera is out of range, it will disconnect from the monitor.
When the camera and monitor are within range of each other again,
they will automatically connect.
Note: The camera that includes in the package is already paired.
There is no need to re-pair unless they are disconnected or out of
range.
1
2
09 10

Important Note for VOX Sensitivity: While viewing image, when the sound around
the camera unit is lower than a certain value, the monitor unit will turn the screen
and sound off; When the sound around the camera unit reaches a certain high
value, it will wake up the monitor unit.
VOX VOX VOX
INSTALLATION
• Place the camera unit on a table at an appropriate height and ensure that the
camera unit is no less than 3 feet away from your baby’s crib. Adjust the camera
as needed; or
• Secure the camera unit by using a tripod bracket with a strong grip. Adjust the
camera as needed.
MONITOR MAINTENANCE
• Keeping the lens clean can help you monitor the clearest picture. Gently wipe the
lens and LCD screen with a dry and soft gauze to remove fingerprints and dust.
• Wipe the surface of the unit with a clean, dry cloth. Don't use a rough cloth, which
will scratch the outer surface of the unit.
• To reduce the risk of electric shock, do not disassemble the unit or fix it by yourself.
• Keep the unit dry. Do not use the unit in a wet or high-humidity environment.
Otherwise, it may cause a malfunction.
Note: The design and specifications of this product are subject to change without
prior notice.
Q: Cannot connect to the camera.
A: 1. Please ensure the camera is connected to a power supply.
2. Please ensure the camera and monitor are within 900 feet (open area).
Q: The video is unclear.
A: 1. Please make sure that the camera is close to the monitor.
2. Please remove the obstacle between the camera and monitor.
Q: The baby monitor produces noise.
A: The monitor may be too close to the camera. Place the monitor at least 1 metre
away from the camera.
Q: Can I use the 220V?
A: The working voltage of this baby monitor is 110-240V.
Q: What is the standby time of this monitor?
A: After fully charged, the monitor's standby time is about 4 hours.
Q: Can I hear my baby’s voice when the screen is turned off?
A: Yes, Turn on the “VOX” function and press the sleep button to turn off the screen,
and you will hear your baby’s voice and alarm if there is any abnormal sound or
noise.
Q: Picture is black and white?
A: The camera auto switches to the night vision mode in low light and videos will be
displayed in black and white.
FAQ
For any inquiries with Dragon Touch products, please feel free to contact us, we will
respond within 24 hours.
E-mail: [email protected]
Tel: 888-811-1140 (US) Mon-Fri (except holidays) 9am-5pm (EST)
Official website: www.dragontouch.com
CONTACT US
English
11 12
Other manuals for E40
1
Table of contents
Other Dragon Touch Baby Monitor manuals