Installation/Operating Instructions
Spring-Roller Window Shades by Draper
Copyright © 2015 Draper Inc. Form SpringRollerWindowShades_Inst15 Printed in U.S.A.
Caution: Before mounting shades, verify measurements on the card
provided with the shade, and ensure the brackets are installed at the correct
width.
Mount brackets according to type of installation. Use appropriate fasteners (two
per bracket) for wall, jamb or ceiling (see Fig. 1). The installer is responsible
for selecting mounting hardware appropriate for site conditions.
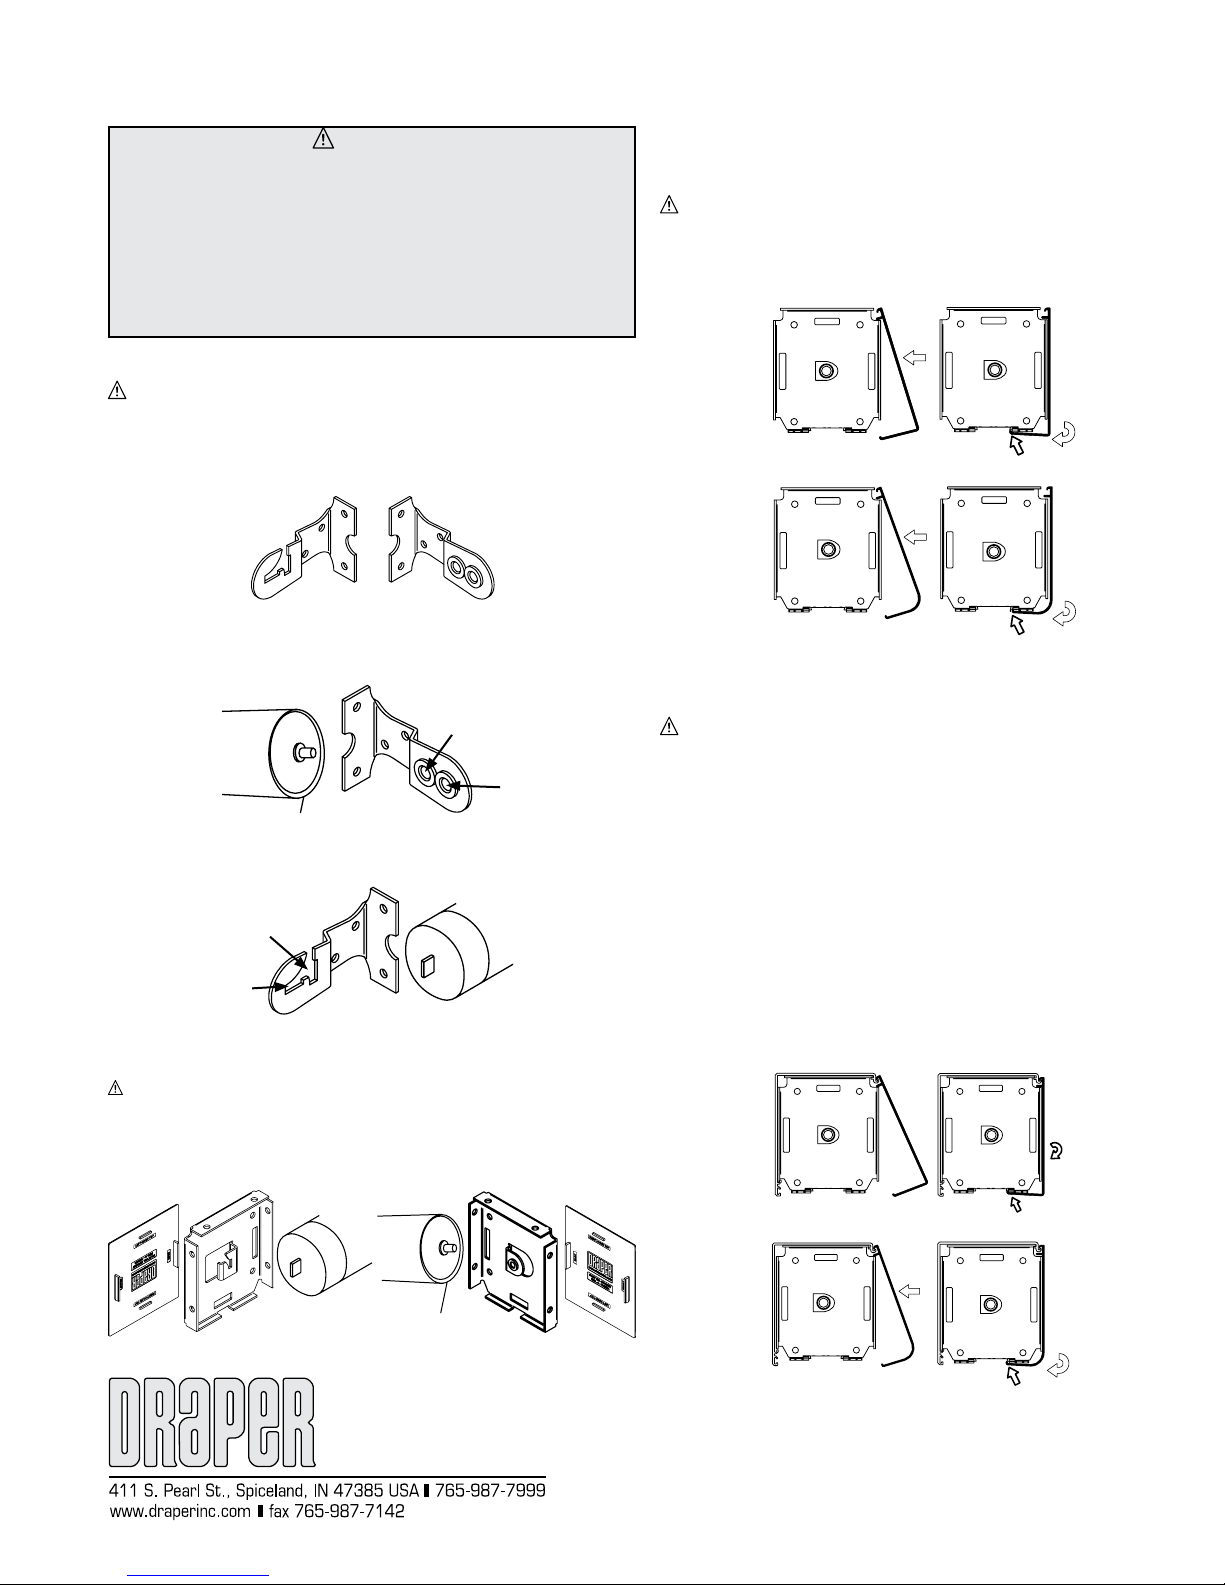
2Insert idler end into right bracket (see Fig. 2).
Caution
1Open carton along length, not at end. DO NOT use a knife to open.
2Each shade is tagged with the size. If fascia is included, each piece is
marked.
3Install all Draper window shades level. Check with carpenter’s level.
4Left and right brackets are different; be sure you are installing the proper
brackets in the proper opening.
5Please read the following installation guidelines thoroughly and follow
them carefully. Failure to do so may cause product to fall or otherwise
fail, and invalidates warranty.
NOTE: Left and right brackets are different; make sure you’re installing the proper
bracket.
Figure 1
3Lower spear on left end of roller into left bracket and rotate into locked position
(see Fig. 3). Note: The notch on the spring roller should be positioned down.
The spring has been pre-tensioned in the factory.
Figure 2
Caution: Before mounting shades, verify measurements on the card provid-
ed with the shade, and ensure the brackets are installed at the correct width.
4For installations with fascia, mount endcaps according to type of installation.
Use appropriate fasteners for wall, jamb, or ceiling (see Fig. 4). The installer is
responsible for selecting mounting hardware appropriate for site condi-
tions. Snap end covers onto endcaps.
Figure 4
5Install shade using steps 2 and 3 from above (see Fig. 4).
6Place fascia top lip over top edge of endcaps, then rotate down and snap into
place (see Fig. 5). NOTE: Make sure shade fabric does not retract completely
behind fascia.
Caution: Fascia is not fully seated until it clicks into place on both ends.
Once in place, check for secure fit. If not secure, secure with appropriate
fastener (not included).
Figure 5
Figure 3
With brackets—
With endcaps—
Please Note: If shade fabric is uneven, see “Field Adjustments”.
If you encounter any difficulties installing or servicing your Spring-Roller FlexShades, call
your dealer or Draper, Inc. in Spiceland, Indiana, 765-987-7999, or fax 765-987-7142.
For wall mounting,
place pin in this hole.
For wall mounting,
place spear in this slot.
For ceiling
mounting, place
pin in this hole.
For ceiling mounting,
place spear in this slot.
Headbox
Caution: Before mounting shades, verify measurements on the card pro-
vided with the shade, and ensure the unit is installed at the correct width.
1Snap endcap covers onto endcaps.
2Place endcaps into back/top portion of wall/ceiling headbox or into pocket
extrusion of pocket headbox. Using pre-drilled holes in endcaps, mark the
headbox for drilling.
3 Drill holes in back or top, depending on whether you will be mounting the
headbox to the wall, ceiling or pocket.
4Attach endcaps and wall/ceiling headbox back/top or pocket headbox extrusion
to wall, ceiling or pocket using mounting hardware appropriate for site conditions.
5Install shade (see "With Endcaps" section above).
6Attach headbox fascia or pocket closure (see Fig. 6 for pocket closure). Surface
Headbox fascia is not fully seated until it clicks into place on both ends.
Once in place, check for secure fit. If not secure, secure with appropriate
fastener (not included).
Surface Headbox (Small Shown)
Figure 6
Please Note: Small hardware shown. Large hardware will look slightly different, but
install and operate the same way.
Please Note: Small hardware shown. Large hardware will look slightly different, but
install and operate the same way.
STEP 2 Clicks into place
STEP 1
STEP 2 Clicks into place
STEP 1
Radius Fascia
STEP 1 STEP 2 Clicks into place
STEP 2
STEP 1
Radius Fascia
Clicks into plac
Figure 6 is continued on page 2, where you will find digrams of the large and
small pocket headbox.


