Draper GTP6 User manual


Fueling Instructions
Warning!
Fuel your engine in well-ventilated areas, outdoors. Al -
ways shut off the engine and allow it to cool before refu -
eling. Gasoline build up inside the fuel tank depending on
the fuel used, the weather conditions and the tank venting
system.
In order to reduce the risk of burns and other personal
injury from escaping gas vapor and fumes, remove the
cap while the engine is running. Select bare ground for
fueling and move at least 10 feet (3 m) from the
fueling spot before starting the engine. Wipe off any
spilled fuel before starting your machine.
Warning!
Check for fuel leakage while refueling and during opera -
tion. If fuel leakage is found, do not start or run the en -
wiped away. Take care not to get fuel onyour clothing. If
this happens, change your clothing immediately. Different
models may be equipped with different fuel caps.
Instead, the tool must be moved away from the petrol-
soaked area before startup.
Cap with grip
Warning!
an improperly tightened fuel cap, correctly position and
tighten the fuel cap in the fuel tank opening.
Screw cap
! Warning!
Unit vibrations can cause an improperly
off and spill quantities of fuel.
In order to reduce the risk of fuel spillage
as securely as possible.
Before Starting
Warning!
Always check your engine for proper condition and op -
eration before starting, particularly the throttle trigger,
throttle trigger interlock, stop switch and working tool.
The throttle trigger (if applicable) must move freely and
always spring back to the idle position. Never attempt to
modify the controls or safety devices.
Warning!
Never use a power tool that is damaged or not properly
maintained.
Check that the spark plug boot is securely mounted on
the spark plug loose boot may cause arcing that could
-
dles clean and dry at all times; it is particularly important
to keep them free of moisture, pitch, oil, grease or resin in
your engine.
Starting
Start the engine at least 10 feet (3 meters) from the
fueling spot, outdoors only.
-
face in an open area. Maintain good balance and secure
footing.
Warning!
Your engine is a one-person machine. Do not allow other
persons in the general work area, even when starting.
To reduce the risk of injury from loss of control, do not
attempt to “drop start” your power tool.
When you pull the starter grip, do not wrap the starter
rope around your hand. Do not let the grip snap back,
but guide the starter rope to rewind it properly. Failure to
follow this procedure may result in injury to your hand or
Important Adjustments
Warning!
To reduce the risk of personal injury from loss of control or
contact with the running working tool, do not use a power
tool with incorrect idle adjustment. At correct idle speed,
the working tool should not move.
During Operation
Holding and controlling the power tool
thumbs around the handles.
Your right hand should grip the rear handle. This also ap -
plies to left-handers.
Working conditions
Operate and start your power tool only outdoors in a well
ventilated area. Operate it under good visibility and day -
light conditions only. Work carefully.
Warning!
As soon as the engine is running, this prod -
uct generates toxic exhaust fumes containing
chemicals (such as unburned hydrocarbons and
carbon monoxide) known to cause respiratory
problems, cancer, birth defects, or other repro -
ductive harm. Some of the gases (e.g. carbon
monoxide) may be colorless and odorless. To
reduce the risk of serious or fatal injury/illness
from inhaling toxic fumes, never run the ma -
chine indoors or in poorly ventilated locations.
GB-4


These reactive forces may result in loss of control, which,
in turn, may cause personal injury. An understanding of
the causes of these reactive forces may help you avoid
the element of surprise and loss of control. Because of
the design of the chain saw, the reactive forces experi -
enced when working with it are generally not as severe as
those encountered with a chain saw. Nevertheless, you
should always maintain a proper grip and good footing to
control the power tool when you experience such forces.
The most common reactive forces are:
• kickback,
• pushback,
• pull-in.
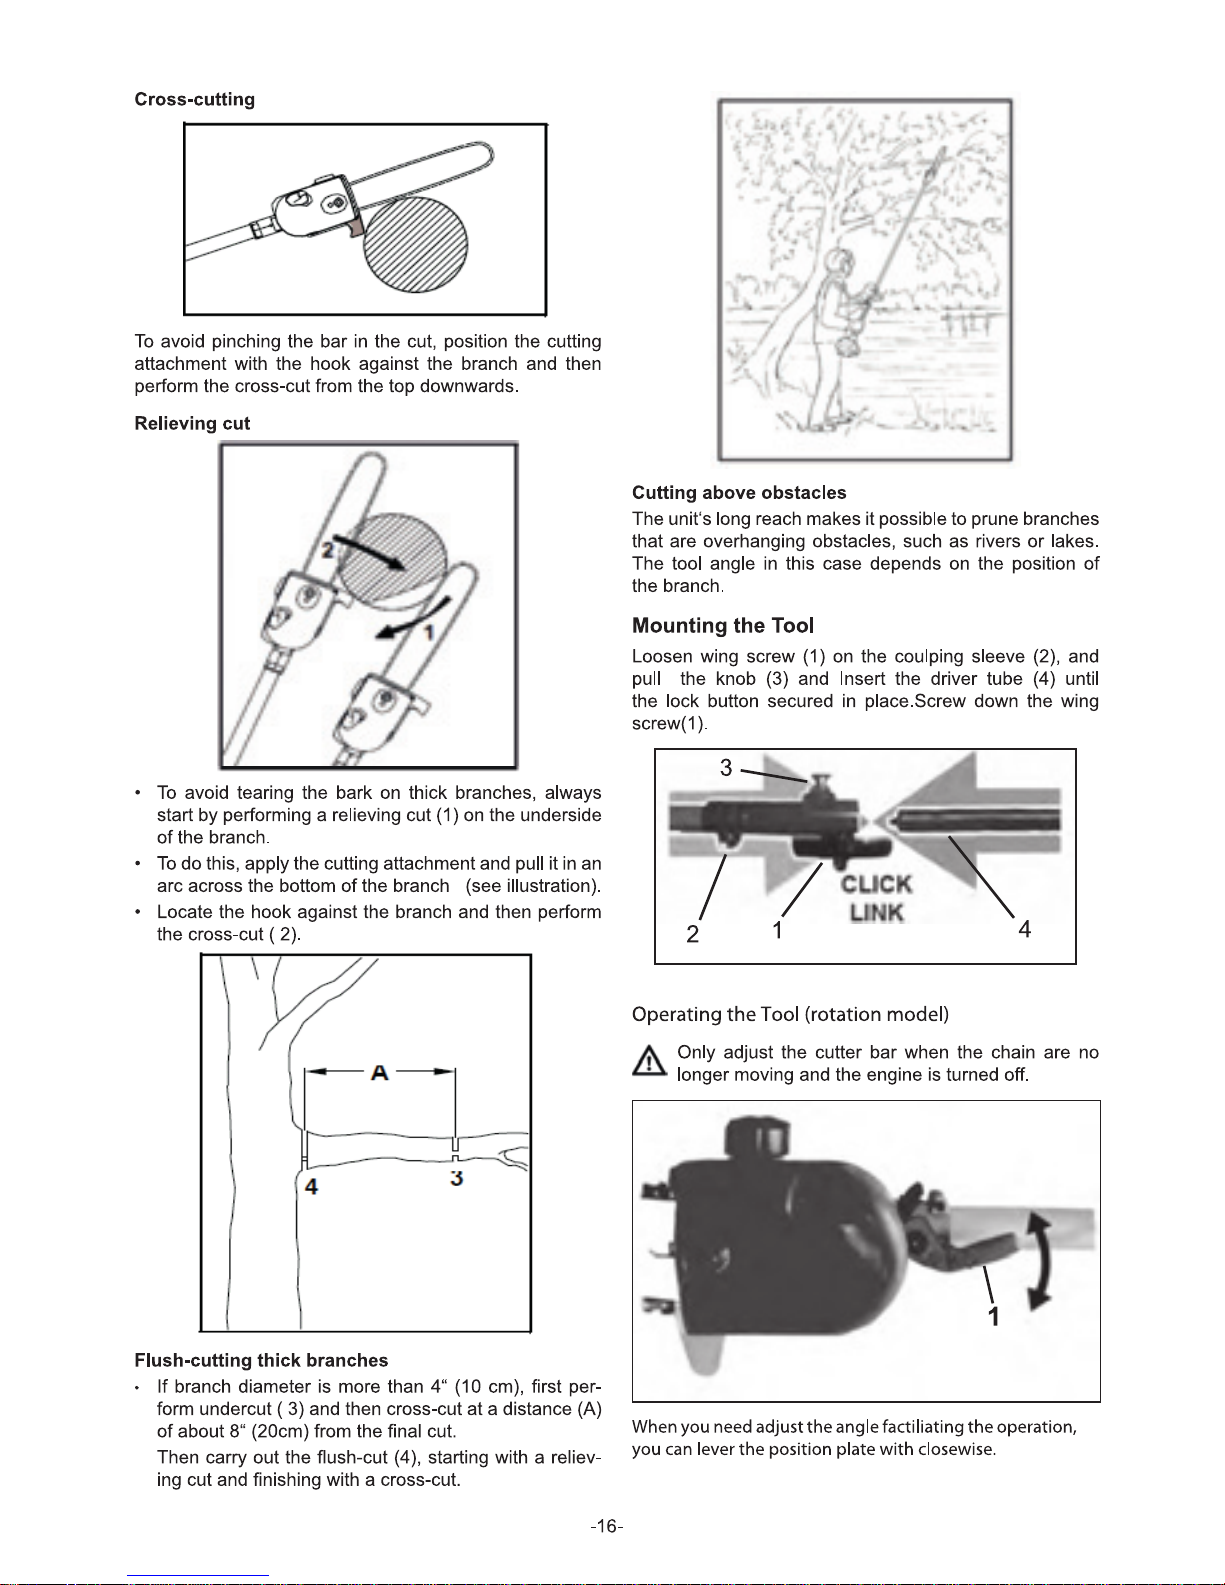
Kickback
Kickback may occur when the moving saw chain near the
upper quadrant of the bar nose contacts a solid object or
is pinched.
The reaction of the cutting force of the chain causes a
rotational force on the chainsaw in the direction opposite
to the chain movement. This may cause the bar to move
upward.
To avoid kickback
The best protection from kickback is to avoid kickback
situations:
1. Be aware of the location of the guide bar nose at all
times.
2. Never let the nose of the guide bar contact any object.
Do not cut limbs with the nose of the guide bar. Be
especially careful near wire fences and when cutting
small, tough limbs, which may easily catch the chain.
3. Cut only one limb at a time.
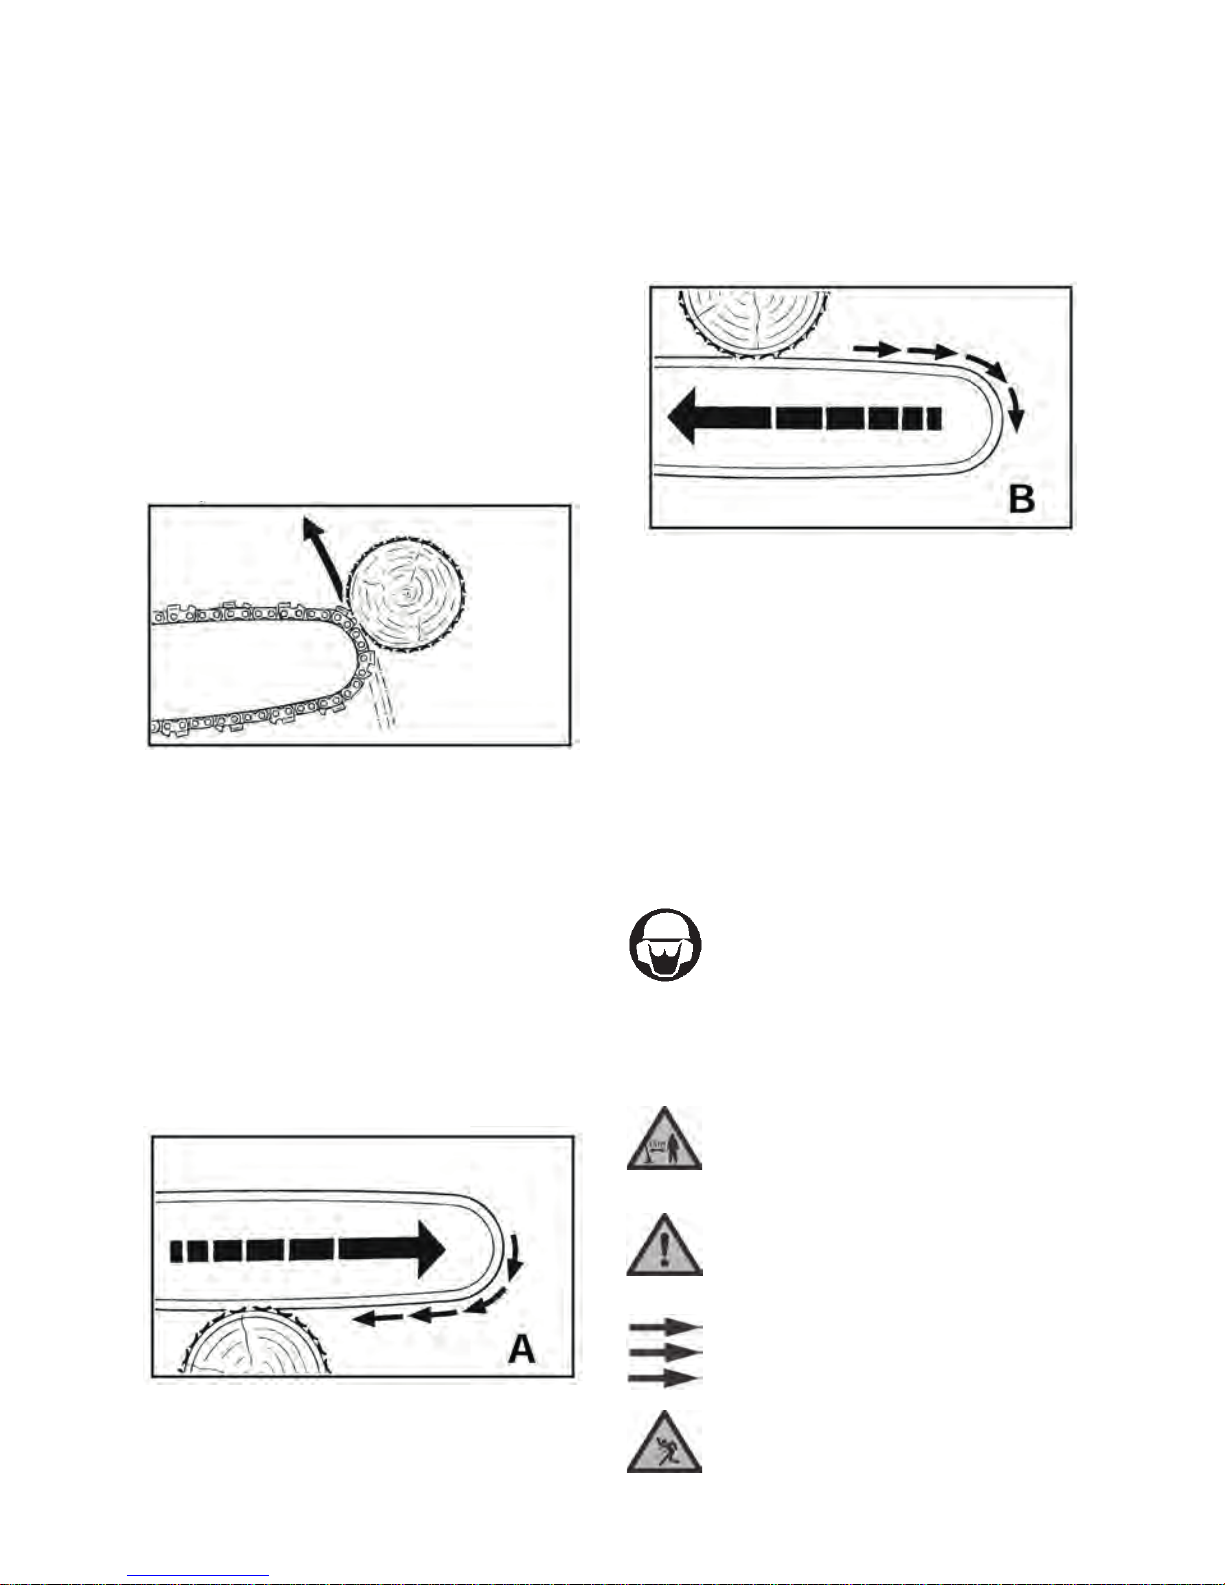
A = Pull-in
Pull-in occurs when the chain on the bottom of the bar
is suddenly stopped when it is pinched, caught or en -
counters a foreign object in the wood. The reaction of
the chain pulls the saw forward. Pull-in frequently occurs
when the chain is not rotating at full speed before it con -
tacts the wood.
To avoid pull-in
1. Be alert to forces or situations that may cause material
to pinch the chain at the bottom of the bar.
2. Always start a cut with the chain rotating at full speed.
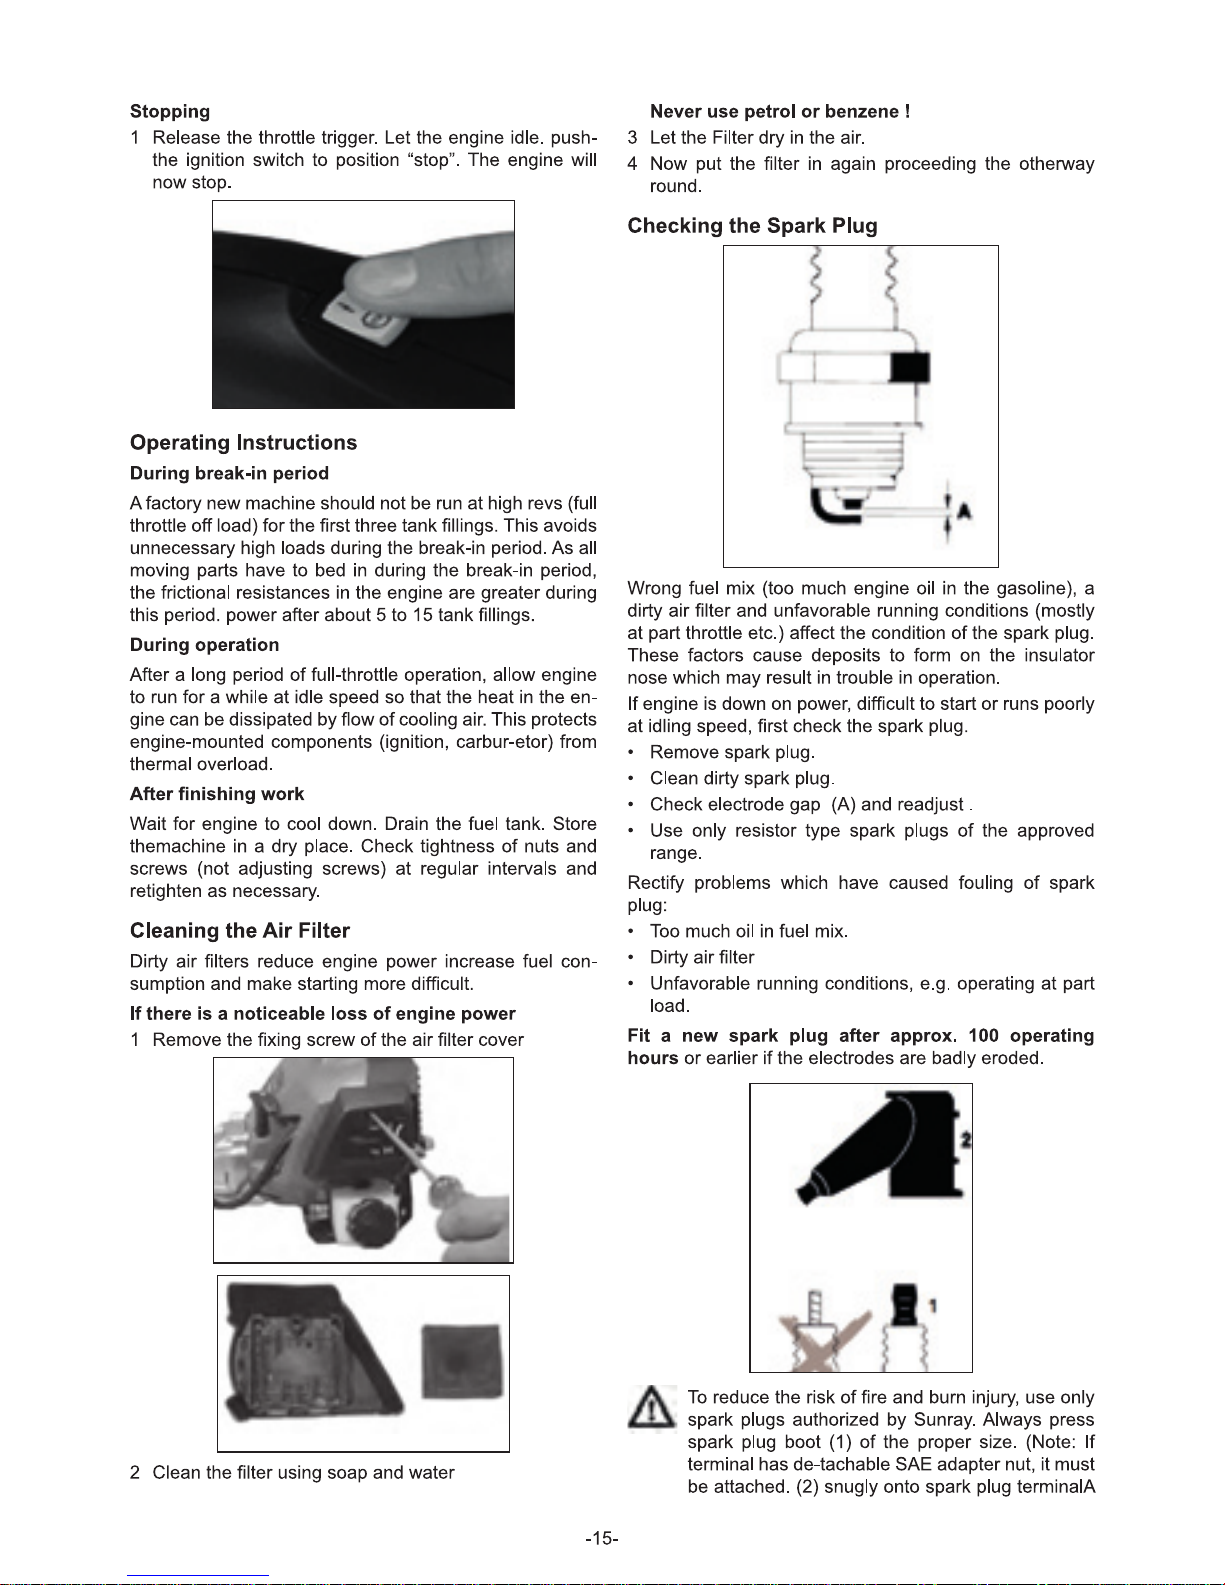
B = Pushback
Pushback occurs when the chain on the top of the bar
is suddenly stopped when it is pinched, caught or en -
counters a foreign object in the wood. The reaction of the
chain may drive the saw rapidly straight back toward the
operator. Pushback frequently occurs when the top of the
bar is used for cutting.
To avoid pushback
1. Be alert to forces or situations that may cause material
to pinch the chain at the top of the bar.
2. Do not cut more than one limb at a time.
3. Do not twist the bar when withdrawing it from an un -
derbuck cut because the chain can pinch.
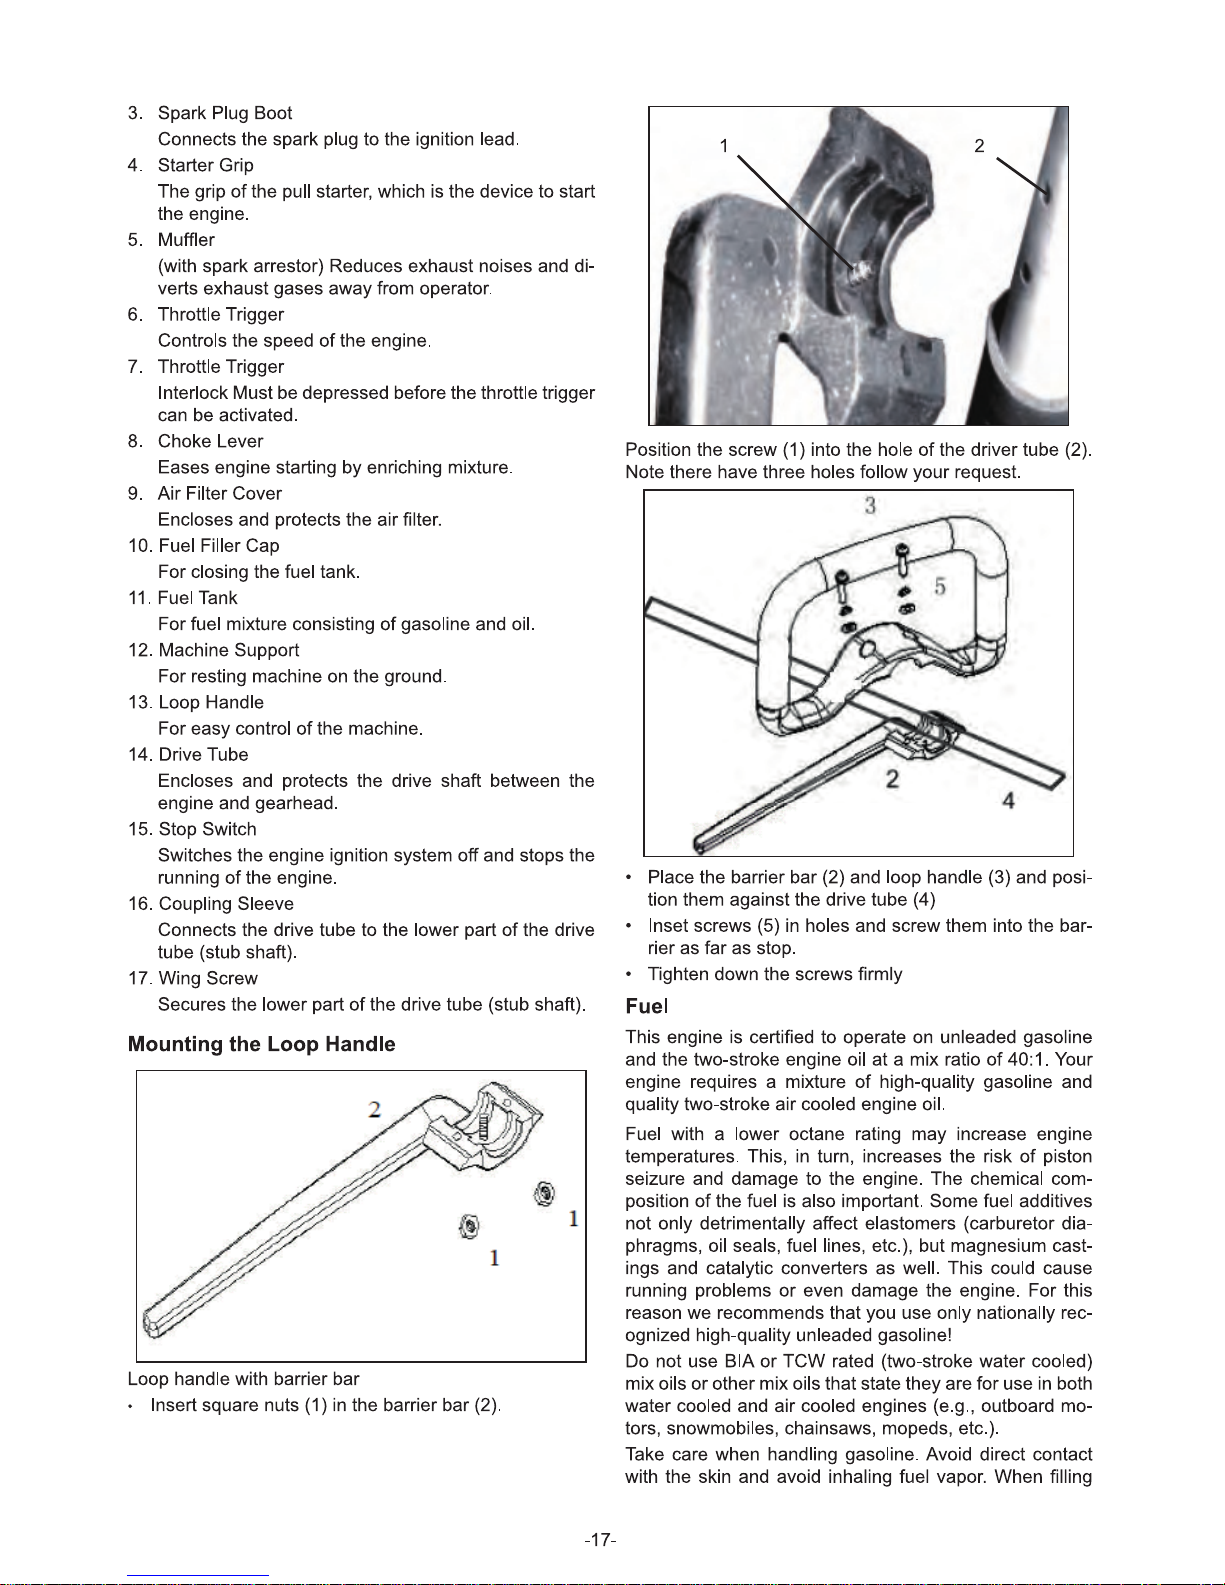
4. BRUSHCUTTER & TRIMMER
WEAR HEAD, EYE AND EAR PROTECTORS
WARNING: Hurled-away objects may lead to
serious injuries of the eyes, excessive noise
may result in deafness. Wear eye and ear
protection devices when operating this device.
Falling objects may cause serious injuries of the
head; wear a head protection when operating
this device.
KEEP OTHER PERSONS ON A DISTANCE
Take care that no other persons are standing
within a radius of 15m around your working
area. This particularly applies to children.
WARNING SYMBOL
May be used in connection with other symbols
or pictographs. Points to danger, warnings or
reasons for particular carefulness.
POSITION OF THE HANDLE
Direction of arrow shows how to install the han -
dle. Always keep the right position, you must
never remain under the required distance !
DANGER OF INJURY !
Beware of hurled-away objects.
GB-8

MAXIMUM SPEED
The maximum speed of the cutting unit. The
device must not be operated at a speed higher
than this.
MAXIMUM SPEED
The maximum speed of the cutting unit. The
device must not be operated at a speed higher
than this.
Warning!
When using metal cutting tools (thicket blade)
there is the danger of kickbacks if the tool gets
in touch with some solid object
DANGER OF INJURY !
Warning! Do not put hands under the
cover of the machine when it is running.
Caution! Rotating electrical too!
OPERATING ADVICE
If you are not familiar with the trimmer train the handling
of the device with the engine not running (AUS / STOP).
Always check the territory; soild objects as metal parts,
bottles, stones etc. may be hurled away and cause seri -
ous injuries or permanently damage the device. Should
you touch a soild object with the trimmer shut the engine
off immeditately and examine the trimmer for possibly
existing damages. Do not use the device when it is dam -
aged or shows sign of defects .
Always trim and cut with engine running in the higher
speed range. Do not let the engine running in the higher
speed range. Do not let the engine run at low speed at the
begining of or during the trimming.
Use the device for its provided purpose only i.e., trimming
and cutting grass and weeds.
Never hold the cutting head higher than your knees dur -
ing operation.
If working on a slope always stand with the cutting unit
above you. Only work on sloping sites if you stand on
USE OF TRIMMING
the trimmer - properly equipped with protection cover and
cutting head - trims high grass, brushwood and weeds
foundations and around three trunks. The trimmer may
also be used for cutting down to the ground (e.g., clean-
out works in the garden and in broken, thickly covered
areas).
Swing the trimmer in sickle-like movements from side to
side. Always hold the cutting head parallel to the ground.
Examine the territory and determine the desired cutting
height. Lead and hold the cutting head in the desired
height to achieve an even cutting result.
TIGHT TRIMMING
Lead the trimmer straight with a slight angle in forward di -
rection so that it moves just over the ground. Always trim
away from your body, never lead it towards the operator.
TRIMMER AT FENCES AND FOUNDATIONS
To trim at fences, posts, stone walls and foundations lead
the device slowly and carefully without letting the cutting
cord touch any obstacles. If the cutting tool encounters
any soild obstacle (stone, wall, log etc. ) there is the dan -
ger of a kickback and higher wear and tear of the cutting
cord.
TRIMMING AROUND TREE TRUNKS
Lead the trimmer carefully and slowly around tree trunks.
so that the cutting cord does not touch the bark. Cut
around trees from left to right. Capture grass and weeds
with tip of the cord and slightly tilt the cutting head in for -
ward direction.
THE USE OF BRUSHCUTTER
When mowing away, you capture the whole vegetation
down to the ground. To do so tilt the cutting head to the
left with an angle of 30 degrees. Adjust the handle to the
desired position. Be aware of the higher danger of injuries
for the operator, surrounding persons and animals, and
the danger of damages to property through hurled-away
objects.
CUTTING WITH THE CUTTING BLADE
When cutting with the cutting blade, always wear protec -
tion goggles, face protection, protection cloths, and use
the shoulder strap.
SCYTHING
Guide the device with the thicket blade like a scythe to cut
rank growth, felted grass and brushwood. Do not use the
thicket blade for stronger woods.
GB-9


• Never carry the belt diagonally across your shoulders
and chest, but rather only on one shoulder, so that you
can rapidly move away from the tool in case of danger.
Starting / Stopping the Engine
• Remove the chain guard (scabbard). Check that chain
is not touching the ground or any other obstacles.
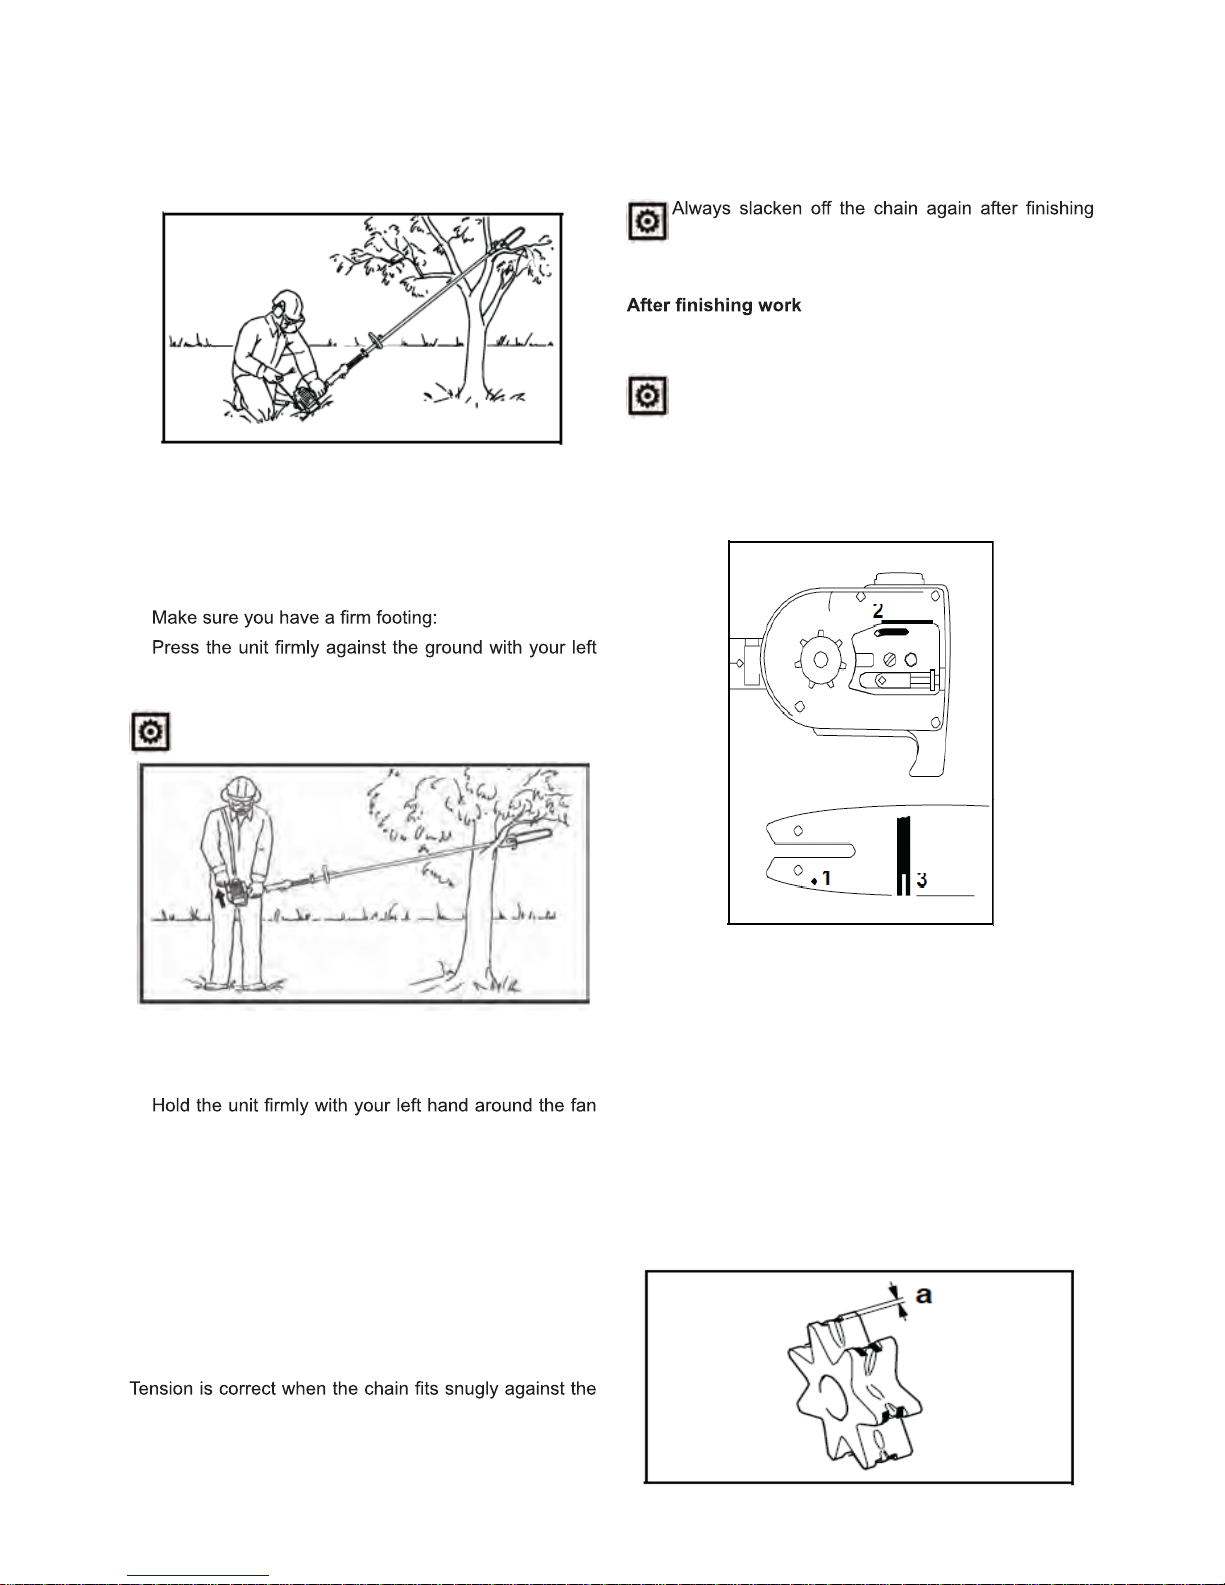
• Position the unit securely for starting: The powerhead
must rest on the engine support. Place the hook on the
cutting attachment on a raised support, e.g. a mound
or branch (see illustration).
•
hand on the fan housing. Your thumb should be under
the fan housing.
Do not stand or kneel on the drive tube.
Alternative method:
• Remove the chain guard. Hang the cutting attach-
ment on a branch so that it is held by the hook.
•
housing – your thumb under the fan housing.
The starting procedure is now as described in the Engine
instruction manual.
Operating Instructions
During operation
Check chain tension frequently!
Anew chain has to be tensioned more often than one that
has been in use for some time.
Cold chain:
underside of the bar and can still be pulled along the bar
by hand. Retension if necessary – see chapter “Tension -
ing the Saw Chain”. Chain at operating temperature: The
chain stretches and begins to sag. The drive links on the
underside of the bar must not come out of the bar groove
– the chain may otherwise jump off the bar.
Retension the chain – see chapter “Tensioning the Saw
Chain”.
work. The chain contracts as it cools down. If it is
not slackened off, it may damage the gear shaft and
bearings.
• Slacken off the chain if you have retensioned it at op -
erating temperature during cutting work.
The chain contracts as it cools down. If it is not
slackened off, it may damage the gear shaft and
bearings.
Storing for longer period:
See chapter „Storing the Machine“.
Taking Care of Guide Bar
Turn the bar over –
every time you sharpen the chain – and every time you
replace the chain – this avoids one-sided wear, especial -
lly at nose and underside of the bar.
Regularly clean
1 = oil inlet hole
2 = oil passage
3 = bar groove
Checking and Replacing the Chain Sprocket
• Remove the chain sprocket cover, chain and guide bar.
Replace the chain sprocket:
GB-18
Table of contents
Other Draper Lawn And Garden Equipment manuals


Popular Lawn And Garden Equipment manuals by other brands


Blumfeldt
Blumfeldt High Grow Straight manual

Oypla GARDEN
Oypla GARDEN 3459 user manual

Jewett Cameron Companies
Jewett Cameron Companies 2 in 1 KENNEL COVER Plus Assembly instructions

ZURN
ZURN Z83100-XL Series installation instructions

EarthQuake
EarthQuake 9800B Operator's manual

juwel
juwel PROFILINE 20295 Assembly instructions