Drive DeVilbiss AQUAJOY VALUE User manual

AQUAJOY VALU£ BATHLIFT
OPERATING INSTRUCTIONS
By

Table of Contents
AquaJoy VALU£ –Product description.............................................................................................................. 3
Scope.................................................................................................................................................................. 3
For your own safety............................................................................................................................................. 4
Important information........................................................................................................................................... 4
Notes concerning the storage battery, battery charger and hand control.............................................................. 4
Important safety rules .......................................................................................................................................... 5
Notes concerning Electromagnetic Compatibility (EMC).............................................................................................. 6
Installation and use.............................................................................................................................................. 6
Unpacking............................................................................................................................................................ 6
First installation in the bath .................................................................................................................................. 7
Attaching and removing the covers.....................................................................................................................10
Installing the headrest (optional).........................................................................................................................11
Hand control.......................................................................................................................................................12
Operating the AquaJoy VALU£ in the bath..........................................................................................................13
Removing the lift from the bath ...........................................................................................................................14
Maintenance and care.........................................................................................................................................16
Maintenance of the bathlift................................................................................................................................16
Cleaning ...........................................................................................................................................................16
Maintenance of seat covers..............................................................................................................................16
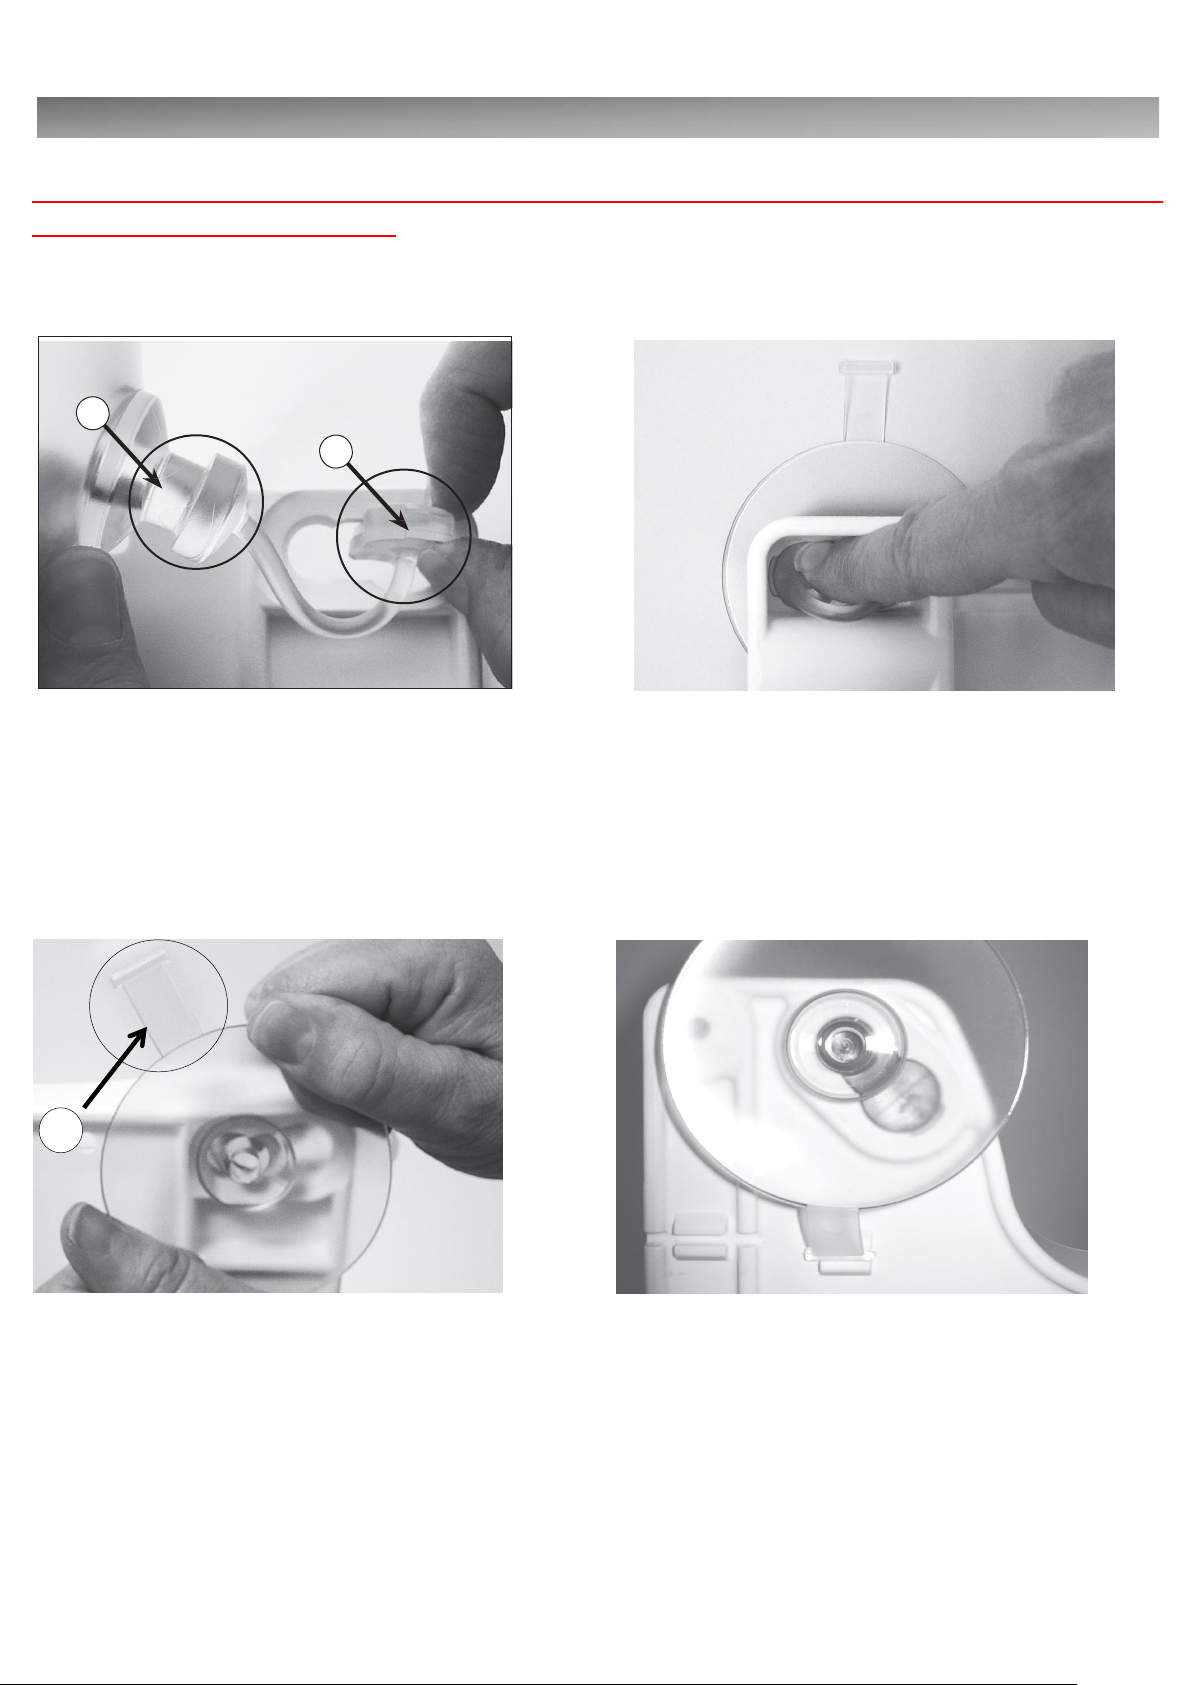
Assembly of new cushion plugs for the bathlift covers ......................................................................................16
Maintenance of the battery charger...................................................................................................................17
Charging the storage battery.............................................................................................................................17
Transport / mobile use........................................................................................................................................18
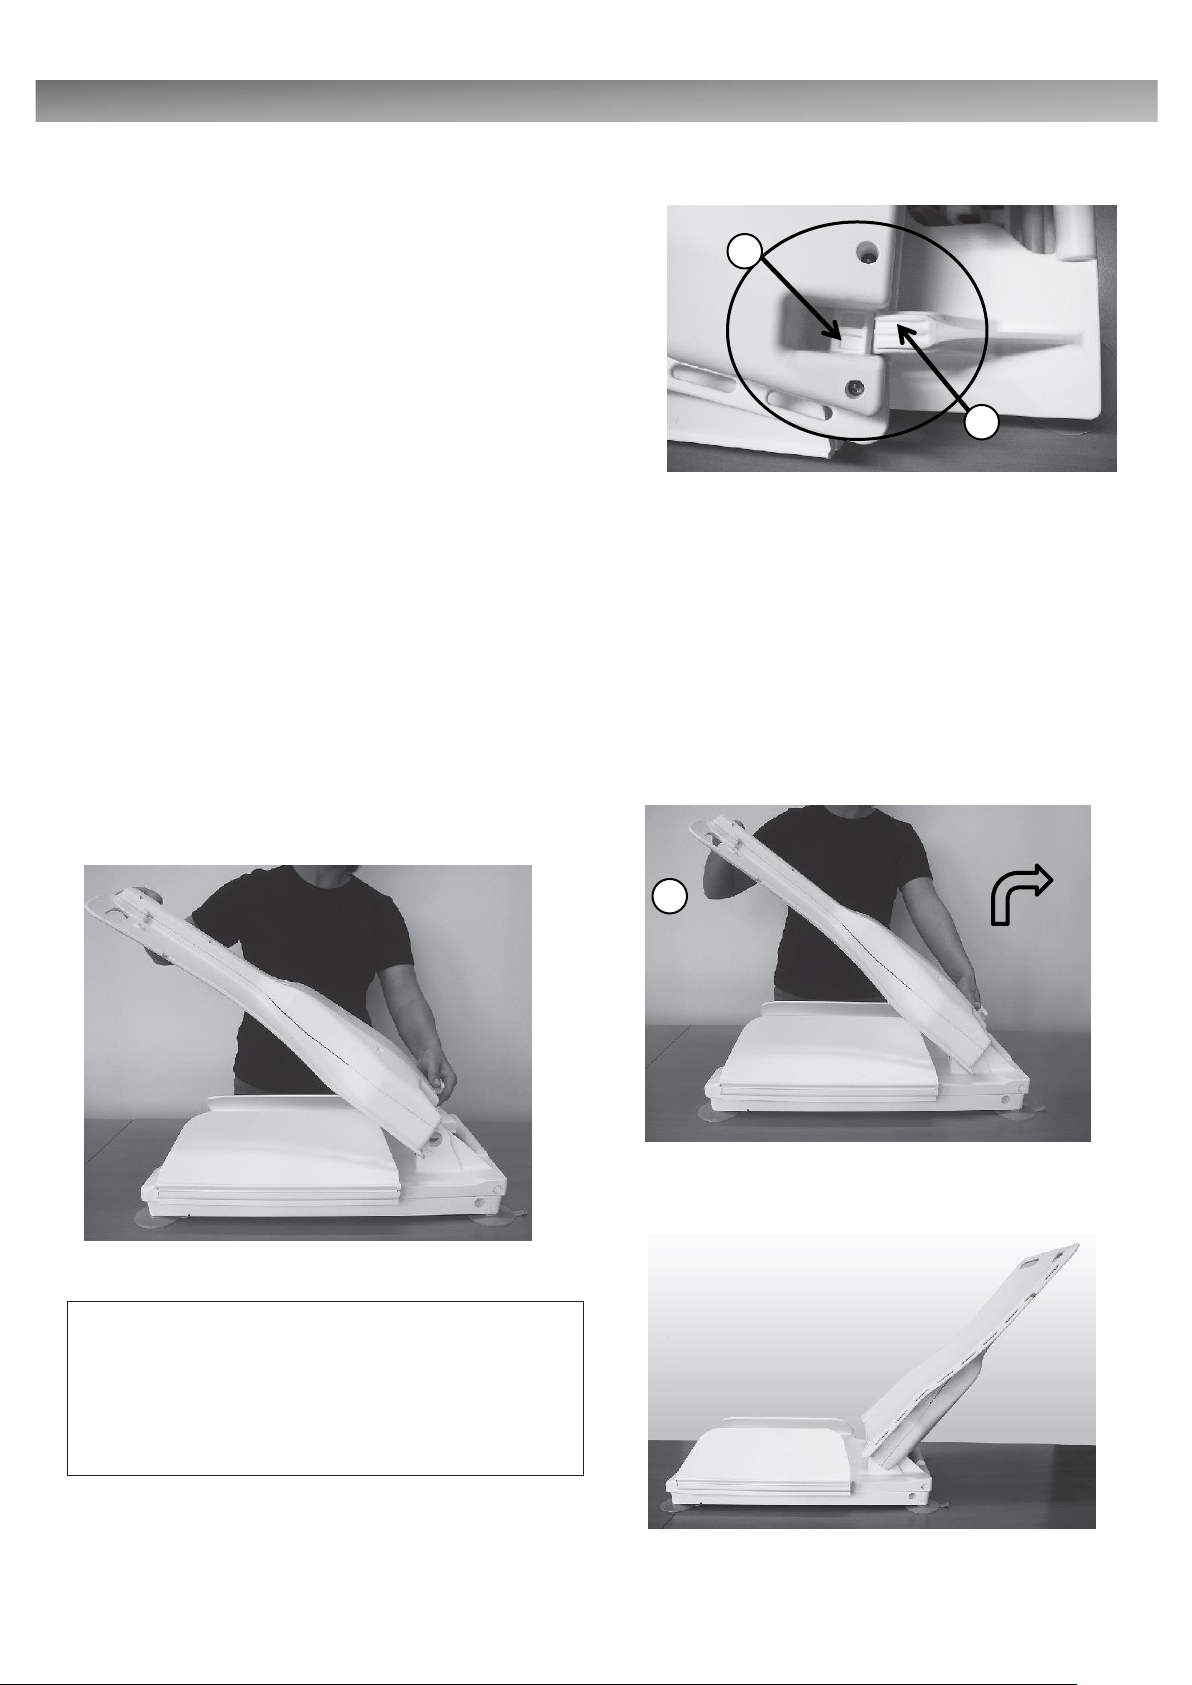
Transport as two separate units........................................................................................................................18
Transport in an interlocked condition ................................................................................................................18
Appendix..............................................................................................................................................................19
Technical Data AquaJoy VALU£ bathlift............................................................................................................19
Troubleshooting................................................................................................................................................21
Notes concerning the disposal..........................................................................................................................21
Re-use/Recycling..............................................................................................................................................21
Warranty.......................................................................................................................................................... 22
Accessories and spare parts............................................................................................................................ 23
Explanation of symbols.....................................................................................................................................24
Type labels .......................................................................................................................................................24
Notes concerning these operating instructions..................................................................................................24

Thank you for deciding to buy a product made
For AquaJoy By Drive. From now on, this
lightweight,
high-quality bathlift will make it a lot
easier for you to get in and out of your bath.
This bathlift conforms to the legal standards DIN
EN ISO 10535:2006 and DIN EN 60601-1:1996.
The AquaJoy VALU£ is built with high-quality,
recyclable lightweight plastic. This makes our
product easy to transport and stow away –and
ideally suited for use in the home or away.
The lithium-ion battery is located in the hand
control. The hand control itself can float in the
water.
The drive motor and control electronics
are completely water tight, so you can use the
AquaJoy VALU£ even with the shower on.
The sturdy frame dismantles, enabling the seat to
be raised or lowered from 6 cm to 48 cm (2.4 to
18.9 in) height. The lifting rod lifts and lowers the
seat surface when the user pushes the up and
down buttons.
The drive unit with integrated backrest can be
folded down for removal and automatically locks
in to the seat base when the lift is raised. This
prevents unintentional tilting of the backrest.
Intelligent power control ensures that the lift can
only be lowered if sufficient power is available to
raise it again.
AquaJoy VALU£ - Product description
Scope
Bathing aids assist users with their daily hygiene.
These aids compensate, in whole or in part,
for
restricted or lost physical functions. The goal of
using such aids is to enable their users to be
independent of help and to give them more
privacy.
Bathlifts are used to lower and raise a user in the
bath. Their use is recommended if the physical
mobility of a person’s upper and/or lower
extremities is significantly reduced making it difficult
to get into or out of the bath or to sit down and
stand up safely. In these cases, the use of a bathlift
is a great help to re-gain independence and privacy
in the bathroom.
3

➤
➤
➤
➤
➤
➤
➤
➤
For your own safety
Important information
* Never use the AquaJoy VALU£ to climb in or out of
the bath. Never use it as a stand, lifting device,
ladder, support, or for any similar purposes outside
of the bath. The lift is to be used only in order to
take a bath.
* ALWAYS keep animals and children away from the
bathlift.
* In the event of malfunction or damage, please
contact your specialist dealer immediately. Do not
perform any makeshift repairs or
modifications. Repair work has to be carried out by
authorised specialist workshops or by the
manufacturer only. Non-adherence to this
provision will render our guarantee invalid.
* Only raise or lower the lifting rod when the
back- rest is in an upright position and fully locked.
* Do not use height adapters for this product.
* Do not store the product in the vicinity of heat
sources.
* Before transporting the bathlift please makesure
that the hand control is disconnected.
* If the lift has been exposed to low
temperatures for a long period of time (e.g. pro-
longed storage in a vehicle during winter),
allow it
to warm up to room temperature be- fore using it,
so as to avoid damage.
* When using bath oils or salts, please observe the
recommended dosage –such additives may affect
the gliding behaviour of the crossbar mechanism.
* Do not use any acetic acid cleaners or deter-
gents for cleaning the AquaJoy VALU£!
Notes concerning thebattery,
battery charger and hand control:
* Use the hand control only to operate the bath-
lift.
* The bathlift must only be used with an original
hand control made for AquaJoy By Drive.
* Never throw the hand control into an open fire or
store it in the vicinity of fire or strong heat
sources.
* Do not open the hand control.
This will invalidate
theguarantee.
* Use only the supplied battery charger tocharge
the battery.
* Do not use the hand control if the housing shows
any signs of damage.
* Use the battery charger only in dry rooms out-
side of the bathroom. Use the charging unit only for
charging the supplied storage battery.
* It is vital that the battery be fully
charged
before the first use of the AquaJoy
VALU£ - there- after, it should be charged
after each use.
ATTENTION –VITAL INFORMATION
Fully read the instructions in this
manual prior to use. Failure to do
this may result in injury or damage
Please keep these
operating instructions
in a safe place!
4

For your own safety
If the device is not used for long periods of time,
the battery should be re-chargedevery 3 months in
order to increase the longevity of the device.
Do not insert any conductive objects (e.g. need- les,
metal pins, etc.) into the jack socket of the hand
control.
Always disconnect the mains plug from the socket
before cleaning the battery charger.
Clean the battery charger with a dry cloth only.
The AquaJoy VALU£, battery charger and battery,
are built in a very robust way, but should not be
dropped. If you should find any visible and/or
audible signs of damage, do not use the bath- lift
and notify your specialist dealer immediately.
We
recommend entering the address of your nearest
representative on the last page of these operating
instructions.
For further information, technical details and
addresses, please read the complete operating
instructions.
In the event of a malfunction, please read our
“Troubleshooting” Chapter in the Appendix to
these operating instructions. Please observe the
information and instructions given there. For your
own safety, please do not use the bathlift
until any
defect or malfunction is remedied.
Important safety rules
a) Always sit down in the middle of the lift with your
back against the backrest, with your legs stretched
slightly forward and place your free hand either on
the edge of the bath or on your lap. Use the other
hand to operate the hand control to raise or lower
the lift.
b) Whilst raising or lowering the lift, do not place your
hand between the bath edge and the lift or
underneath the seat as this may cause injury.
c) Persons with severe or mental disabilities must
never
be left unattended in the bath. Onlytake a bath
without any help if your ability allows you to do so –
otherwise, ask someone to assist you.
d) Before using the bathlift a test run should be
carried out to check for the correct raising,
lowering and EMERGENCY STOP functions.
e) If a malfunction has occurred, do not operate
the bathlift and ask your specialist dealer to
remedy the problem.
f) Do not use any objects that could get stuck in
the mechanism (e.g. brushes, etc.) whilst using
the bathlift!
5

Notes concerning Electromagnetic Compatibility
(EMC)
This product is compliant with the protection
requirements set forth in the Council Directive for
the Harmonization of Legal Stipulations of
the
Member States concerning Electromagnetic
Compatibility (EMV, IEC 60601-1-2) (89/336/
EWG).
However, the occurrence of electrical interference
cannot be ruled out completely under certain
conditions, i.e. in particular, if
mobile phones or
other electrical devices are used.
In the vicinity of the bathlift, do not operate any
life-preserving or life-supporting devices or any
devices that may cause health hazards for users in
the event of malfunction. Such devices may be
subject to electrical interference under certain
conditions, or they may adversely affect the proper
functioning of the bathlift.
If you should detect any malfunctions or unusual
behaviour with your bathlift or in the vicinity or
during the operation of other electrical devices,
please make the bathlift inoperative and notify your
specialist dealer.
For your own safety
Installation and use
Unpacking
Please check the shipping carton for completeness
–it should contain the following parts:
1. AquaJoy VALU£ unit with integrated backrest
and hand control (with integrated battery)
2. Seat unit with side flaps
3. Battery charger
4. Operating Instructions
5. 4 x suction cups, 75mm diameter for assembly
on baseplate NB –if larger 130mm suckers are
ordered these will be assembled prior to
despatch.
6.
If one of these parts should be missing or
damaged, please inform your specialist dealer.
Unpack the charging unit first, then the remaining
parts. The shipping carton may be kept for later use
(i.e. transportation or storage of the bathlift).
Prior to using the device for the first time
we recommend charging the storage
battery.
Please follow the information given
in Chapter “Charging the Battery”.
6

Installation and use
NB. Please follow these instructions if standard 75mm suckers are ordered –if 130mm (Large) suckers are ordered
then they will already be assembled.
First installation in the bath
1
[
T
y
p
e
a
q
u
o
t
e
f
r
o
m
t
h
e
d
o
c
u
m
e
n
t
o
r
t
h
e
s
u
2
[
T
y
p
e
a
q
u
o
t
e
f
r
o
m
t
h
e
d
o
c
u
m
e
n
t
o
r
t
h
e
s
1 –Mushroom Head –2 –Stopper
1) First insert the rear suction cups with
the movable stoppers in front into the
underside of
the baseplate.
3) Press the stopper flush into the opening
in the plate from the top.
1
1 - Aeration Flap
2) Move the mushroom head of the suction cup
towards the small opening into its end position
by turning slightly. Ensure that the aeration
flaps point towards the rear.
4) Insert the front suction cups in the same
way,
but also press the aeration flaps into
the re- cesses in the baseplate. The front
suction cups are thus automatically aerated
when taken out.
7

Installation and use
Important note:
The suction cups hold the bathlift firmly in place on
the bottom of the bath. Therefore, the suction
cups at the underside of the AquaJoy VALU£ must
be clean and dry. The bath itself must also be clean
and dry. We recommend cleaning the suction cups
and bathtub regularly with commercial cleaning
agents, so as to achieve highest possible suction.
1. Make sure that the bottom of the bath is empty
and clean (remove anti-slip mats or similar, if
necessary).
2. Place the seat unit with the suction cups
attached to the baseplate into the empty bath.
Make sure that the rear suction cups are
located close to the bevelled edge of the bath.
3. Now insert the drive unit with integrated back
rest into the bearing blocks of the seat unit (see
illustration).
Attention! It is very important
that both guide pins are inserted
into the bearing blocks!
2
1
1 –Bearing Block –2 –Guide Pin
Please make sure that the red stop lever is in the
correct position.
4. Now hold the backrest at the hand grips and
using the other hand tilt it backwards (see
illustration) until the drive unit rests against the
baseplate.
1 –Hand Grip
1
8

Installation and use
5. Connect the hand control to the bathlift. To do
this, plug the jack socket onto the jack plug until it
catches in and the red ring at the jack is unseen.
The bathlift is now ready for movement.
Note: if there is a risk of the backrest
colliding with the back of the bath,
reposition the base further away from
the end of the bath.
6. Make sure that the lifting rod is positioned
correctly in the unlock ramp.
Correct
Incorrect
9

Installation and use
Attaching and removing the covers
The covers can be attached and removed very
easily.
To attach the cover, place it correctly on the surface
of the backrest and press the fastening buttons
completely into the holes provided in the backrest
and seat (or seat and side flaps see illustration).
Backrest Cover
Backrest Cover
Seat Cover (Comfort Cover Shown)
Seat Cover
To remove the covers, lift the two fastening
buttons with two fingers; then pull them out.
The bathlift can also be used without covers.
10

Installation and use
Installing the headrest (optional) Insert the two rods of
the headrest into the openings at the top of the
backrest plate. The head- rest can be effortlessly
adjusted to the desired height.
11

Installation and use
Hand control
Depending on the weight of the person bathing,
the capacity of the fully charged battery is for a
maximum of 6 baths. During the bathing process
the green control lamp of the hand control is lit up
green.
When the charging level of the battery falls to a
factory-defined level, the lamp colour changes to
orange and the lamps starts to blink slowly. This
indicates that there is enough energy for 1 (one)
bath and the battery should be charged according
to the operating instructions.
If you continue to use the lift whilst the lamp is lit
yellow, the lamp colour may change from yellow to
red and start to flash at fast intervals. In this case,
the lift will only move upwards to ensure that you
can leave the bath safely. The battery must now be
charged immediately using the battery charger
supplied.
GREEN lamp: Lift is ready for operation
ORANGE lamp: Limited readiness foroperation
–sufficient for one (1) more
bath. The battery should be
charged.
RED lamp: Lift no longer ready for
operation –lift will only move
up- wards. Battery must be
charged immediately.
EMERGENCY-OFF button (red):
Should an emergency situation occur, all the
functions of the bathlift must be brought to a
standstill by pressing the red EMERGENCY OFF
button.
To re-activate the bathlift, press the green
ON button once again.
The bathlift switches off automatically after
approx. 30 minutes. If you wish to switch it off
manually, please press the red button on the hand
control (the control lamp will go out).
1. Down button (blue)
2. EMERGENCY-Off button (red)
3. Control lamp (LED)
4. Up button (yellow)
5. On button (green)
2
3
4
5
1
12

Installation and use
Operating the AquaJoy VALU£ in the bath
1. Before using your bathlift, make sure that the
hand control is connected properly via the plug-
type connection on the bathlift. The red ring at
the jack is now unseen. Press the ON button
(green) on the hand control. The green control
lamp is illuminated.
2. Now press the UP button (yellow). The back-
rest moves to an upright position first; then
the lift rises to its end position and switches
off automatically. The lift can be raised to any
height in between, by releasing the button once
the required height is achieved.
3. Fold out the side flaps until they rest on the
sides of the bath. Raise the seat until the seat
surface is at the same level as the upper edges of
the bath and the side flaps are in a horizontal
position
Important: The side flaps must rest flat on
the
side surfaces of the bathtub.
4. Sit down on bathlift. If this is not possible
without help, ask for assistance.
5. To lower bathlift, press the Down button (blue).
The lift lowers until it reaches its end position,
then the backrest is tilted back automatically.
The drive switches off automatically in the end
position. However, the backrest can be rec- lined
to an angle in between by simply releasing the
button once the required angle has been
achieved.
Attention: if the backrest pushes against the
wall of the bath release the blue button
immediately!
13

Installation and use
6. After bathing, press the UP button (yellow) on
the hand control to move the lift to a convenient
height (max. upper stop position).
Make sure that the side flaps do not get caught
on bath fittings or handles.
7. Now the person bathing can leave the bath by
sliding sideways from the seat surface.
The AquaJoy VALU£ switches off automatically
after approx. 30 minutes. If you wish to switch off
the bathlift manually, press red button on the hand
control (the control lamp will go out).
Notes:
When moving up or down, lean against the
backrest and leave your hands on your lap.
If the lift has to remain in the bath, the hand
control should be disconnected to prevent the
battery from discharging.
Removing the lift from the bath
Using the hand control, first move the bathlift to its
bottom position and allow the backrest to tilt
back
until the drive stops automatically in its end
position. Take note that the backrest does not
touch the wall of the bathtub. Now disconnect the
hand control.
1. Fold in the side flaps, so that they rest on
the seat surface.
2. Use the handles of the drive unit to fold
the drive unit down.
14

Installation and use
3. Make absolutely sure that the lifting rod is
always retracted completely.
Correct
Incorrect
4. Now the drive unit can be removed from the
seat unit in the direction of the arrow (see
illustration)
Note: The drive unit can only be removed at a
specific angle. When it is completely folded down
and locked, it cannot be removed from the seat
unit. Bring the backrest into the position shown in
our illustration; then remove the drive unit in
the
direction of the arrow
5. Remove the two rear suction cups by pulling the
tongues. Then lift off the rear part of the
baseplate. This action will loosen the front
suction
cups, which are self-venting. The seat
unit can now
be removed from the bathtub.
15

Maintenance and Care
Maintenance of the bathlift
The AquaJoy VALU£ is equipped with maintenance
free bearings and does not need any lubrication.
A periodic maintenance check of the bathlift has to
be conducted at least every 12 months. This check
includes a visual inspection of all parts in particular
load-bearing parts. It also includes all the necessary
function tests. If the inspection reveals any defects,
wear or other signs of damage, which might affect
the safety of the bathlift, the bathlift has to be
made inoperative until the defects are remedied.
All inspections have to be carried out by qualified
and trained personnel who have sufficient skills and
practical experience to perform such safety-
relevant work in an appropriate manner. These
qualified personnel have to remain independent
with regard to the tests and inspections being
carried out.
Please ask your bathlift specialist to arrange for
periodic inspections.
Your bathlift specialist has the necessary spare
parts lists and documentation available for you.
Please have repair work carried out by authorised
specialist dealers only.
Attention: The hand control must only be
opened by the bathlift manufacturer!
Cleaning
To keep the bathlift in a perfect condition it must
be
cleaned immediately after use (preferably by
showering it with hot water).
Carefully clean the bathlift under the shower after
each use. To clean the bathlift (without covers),
please use commercial disinfectants or bath
cleansers.
Maintenance of seat covers
The material of the removable covers is very
hygienic due to its smooth surface and antibacterial
properties.
The maintenance of the covers requires regular
cleaning, either by hand or in the washing machine
at 60°C (140° F). Please use a non-bio deter- gent
without any enzyme additives. Please note that
bath oils or other additives containing oils may lead
to discoloration of the covers. Discoloration can
also occur if the covers are not cleaned regularly.
Note: Discolorations of the covers are caused
by normal wear and are excluded from the
warranty.
The covers can be removed very easily for
cleaning.
Do not dry the covers in the tumble dryer, but
hang them on a line to dry.
In addition, the use of a commercial disinfectant
is recommended.
Please observe the manufacturer’s instructions!
Assembly of new cushion plugs for the
bathlift covers
First guide the new cushion plug through the
opening in the cushion (from top to bottom); then
press it into the washer at the underside.
16

Maintenance and Care
Maintenance of the battery charger
The charging unit does not require any
maintenance. The housing must only be cleaned
with mild detergents that are free from solvents, or
by means of a damp cloth. Make sure that no liquid
enters into the charging unit. Before using the
charging unit again, always make sure that the unit
is completely dry. If necessary, store the unit in a
dry, ventilated place for several hours without
connecting it to mains power.
Attention:
Before cleaning the battery charger it must
be
completely disconnected from the mains
power
(always make sure to pull the mains
power plug).
Charging the storage battery
Make sure that the battery is fully charged before
use! The voltage rating on the charging unit has to
be compatible with the voltage of your power
supply. (e.g. 220V –240V in Europe, and 110V in
USA).
1. Plug the jack plug of the battery charger into
the socket on the spiral cord of the hand
control until the jack plug is locked in.
2. Insert the mains plug of the battery charger in-
to a socket. The red control lamp on the hand
control will be light up until the battery is
charged –after that, it will change to green.
If you want to charge the battery
completely, leave it connected to the charging
unit. The control unit of the battery charger will
terminate the charging process after approx. 4
hours. This prevents that the battery from
being over- charged.
3. Remove the mains power plug from the
socket.
4. Remove the jack plug of the battery charger
from the socket on the hand control.
Important information:
If the control lamp is not lit up after connecting the
hand control, please check the following:
Connections (is the jack plug fully plugged into the
charging socket?)
Use the battery charger only in closed rooms and
protect it against water and humidity.
Do not
use the battery charger in the bath- room.
Note:
If the battery charger is damaged, please
return it to the supplier for inspection.
17

Transport/Mobile Use
Please observe the following instructions for mobile
use:
1. Remove the hand control from the bathlift
and transport separately.
2. Always protect the bathlift against sliding or
slipping during the transportation (e.g. in a car).
3. If the battery is subjected to low temperatures
(e.g. storage in a car in the winter), always al- low
the battery to warm up to room temperature and
charge as necessary.
4. When lifting the units, please note that the seat
unit weighs approx. 5.5 kg (12.1 lb) and the drive
unit (without hand control) weighs approx. 3.8 kg
(8.37 lb).
Transport as two separate units
The seat and drive units can be transported
easily with two hand grips.
Transport in an interlocked condition
The bathlift can also be transported as a
complete unit in an interlocked condition.
18

Appendix
Technical Data AquaJoy VALU£ bathlift
Overall length (with backrest in a reclined position) approx. 830 mm (32.7 in)
Overall width (seat incl. side flaps) approx. 700 mm (27.6 in)
Width of seat approx. 350 mm (13.8 in)
Depth of seat approx. 420 mm (16.5 in)
Overall length of seat approx. 570 mm (22.4 in)
Sitting height min. approx. 60 mm (2.4 in)
Sitting height max. approx. 480 mm (18.9 in)
Height of backrest approx. 640 mm (25.2 in)
Width of backrest approx. 320 –360 mm (12.5 –14.2 in)
Backrest adjustment 10° –max. 50°
Width of baseplate approx. 310 mm (12.2 in)
Length of baseplate approx. 560 mm (22.1 in)
Load capacity max. 140 kg
Total weight (excl. hand control) approx. 9,3 kg (20.5 lb)
Total weight (incl. hand control) approx. 9,7 kg (21.4 lb)
Weight of hand control incl. battery approx. 0,4 kg (0.88 lb)
Weight of drive unit approx. 3,8 kg (8.37 lb)
Weight of seat unit approx. 5,5 kg (12.1 lb)
Duration of lifting/lowering movement, each approx. 50 seconds under load
Operating voltage 12 V
Storage battery (lithium-ion) 12 V / 1,3 Ah re-chargeable
(see designation on housing)
Automatic shutdown max. 30 minutes
Power input 90 W max. 12 V
Type of application part (B)
Protection class IP X7
Power to push the button of the hand control 3 N
General Operating Conditions
Ambient conditions for operation:
Temperature
+ 10° C ......+ 50°C
(+ 50° F....... + 122° F)
Relative Air Humidity
10…………… 100%
Air Pressure 700 hPa….1060hPa
Ambient conditions for transport and storage:
Temperature –10° C …... + 40° C (- 50° F ….....+ 104° F)
Relative Air Humidity
10…………… 100%
Air Pressure 700 hPa….1060hPa
Sound Pressure Level 54 dB A
19

Appendix
10° - max. 50°
Backrest
Adjustment
Sitting height min.
60mm (2.4in)
Overall Length
(with inclined backrest) 830mm (32.7in)
Width of backrest
320-360mm
(12.5 –14.2in)
Width of Baseplate
310mm (12.2in)
Width of Seat
350mm (13.8mm)
Overall Width 700mm (27.6in)
Depth of set
420mm (16.5in)
Height of backrest
640mm (25.2in)
Overall length of seat
570mm (22.4in)
Length of baseplate 560mm (22.1in)
Max. sitting height
480mm (18.9in)
20
Table of contents
Popular Bathroom Aid manuals by other brands

aidapt
aidapt Solo VY397A Fixing and maintenance instructions

TERMA
TERMA DIS TGSBI001 Installation instruction

agape
agape ASEN0922 Assembly instructions

Drive Medical
Drive Medical Benny operating instructions

Sunrise Medical
Sunrise Medical Coopers 10211C manual

Hewi
Hewi 801.51CH11033 Installation and operating instructions