drive mobil Doormatic Product information sheet

1
User Manual >> Doormatic >> Automatic Door Opener
1
BEDIENUNGSANLEITUNG UND
SICHERHEITSHINWEISE
OPERATING INSTRUCTIONS AND
SAFETY PROVISIONS
AUTOMATISCHER TÜRÖFFNER
AUTOMATIC DOOR OPENER
POWERED BY EXCLUSIVELY DISTRIBUTED BY

2
Bedienungsanleitung >> Doormatic >> Automatischer Türöffner
3. Ausgabe (März 2013)
3. Release (March 2013)

3
User Manual >> Doormatic >> Automatic Door Opener
Inhalt / Contents
Inhaltsverzeichnis
Table of contents
Geräteübersicht _______________________________________________________ 4
Device overview
Menü-Bedienung ______________________________________________________ 6
Menu operation
Bestimmungsgemäße Verwendung ______________________________________ 7
Intended use
Vorbereitung _________________________________________________________ 8
Preparation
Installation ___________________________________________________________ 9
Installation
Installation Türhalter und Türband _____________________________________ 11
Installation of door stay and door hinge
Anpassung _________________________________________________________ 12
Customisation
Betrieb _____________________________________________________________ 13
Operation
Flexible Nutzung ____________________________________________________ 16
Flexible use
Individuelle Einstellungen, Menü-Übersicht _____________________________ 17
Individual settings, Menu overview
Menü—Schnelleinstellungen __________________________________________ 18
Menu—Quick settings
Menü—Meine Einstellungen __________________________________________ 19
Menu—My settings
Menü—Service _____________________________________________________ 23
Menu—Service
Wartung und Reinigung ______________________________________________ 24
Maintenance and Cleaning
Mögliche Fehlerquellen, Häufige Fragen _______________________________ 25
Possible error sources, Frequently asked questions
Sicherheitshinweise _________________________________________________ 26
Safety provisions
Haftung und Konformität _____________________________________________ 31
Liability and conformity

Geräteübersicht / Device overview
4
Bedienungsanleitung >> Doormatic >> Automatischer Türöffner
Rückansicht
Back view
Frontansicht
Front view
Designcover
Design cover

Geräteübersicht / Device overview
5
User Manual >> Doormatic >> Automatic Door Opener
Linke Gerätseite
Left hand side of the device
Akku
Battery
Türhalter
Door stay
Akkufach
Battery compartment
Programmierbuchse
Programming socket Ladebuchse
Charging socket
Klebestreifen
Adhesive tape
Rechte Gerätseite
Right hand side of the device
Führungsschiene
Guide rails
Türband
Door hinge

6
Bedienungsanleitung >> Doormatic >> Automatischer Türöffner
Menü-Bedienung / Menu-Operation
So bedienen Sie die Doormatic
You can operate Doormatic as follows
An der Vorderseite des Gerätes, unter dem Designcover finden Sie das Display mit der Ein-/
Ausschalt sowie den Navigationstasten.
At the front part of the device, you will see the display with On and Off buttons as well as
the navigation buttons just under the design cover.
Die Displaybeleuchtung aktiviert automatisch bei Tastendruck. Wird keine Taste gedrückt,
schaltet sich die Beleuchtung nach einiger Zeit aus. Nach weiteren Minuten wird auch die
Displayanzeige deaktiviert. Zum Aktivieren drücken Sie eine beliebige Taste.
The display backlight is activated automatically at the press of a button. If no button is
pressed, the backlight will disappear after some time. After a few minutes, the display will
switch off. Press any Button to activate.
Gerät Ein bzw. Ausschalten
Switch the device on or o
Nach oben navigieren bzw. Wert erhöhen
Navigate upwards / increase the value
Nach unten navigieren bzw. Wert verringern
Navigate downwards / reduce the value
Zurück, ohne Einstellungen zu speichern
Return without saving the settings
Auswahl bestätigen bzw. Einstellungen speichern
Confirm selection and save the settings

7
User Manual >> Doormatic >> Automatic Door Opener
Bestimmungsgemäße Verwendung / Intended Use
Die Doormatic ist für die Automatisierung von Standard Drehflügeltüren mit Anschlag im
Innenbereich mit einem Türflügelgewicht von max. 50 kg bestimmt.
Doormatic is designed for automatisation of standard Interior swing doors with rabbet and a
door leaf weight of 50 kg max.
Die Doormatic dient zur Unterstützung beim Öffnen und Schließen dieser Türen.
Eine andere beziehungsweise darüber hinausgehende Verwendung ist nicht
bestimmungsgemäß, Drive Mobil haftet nicht für daraus resultierende Schäden. Das Risiko
hierfür trägt der Betreiber.
Doormatic supports with opening and closing these doors. Drive Mobil will not be liable for
any damage caused due to any other use beyond what is specified. The operator bears the
risk for this.
Das Antriebsrad haftet auf ebenen und trockenen Böden. Diese müssen frei von Schmutz,
Staub, Öl, Fett und sonstigen Verunreinigungen sein. Beim Einsatz auf nassen oder
verschmutzten Böden kann unter Umständen der einwandfreie Betrieb beeinträchtigt werden.
The traction wheels will work on even and dry floor surfaces. These must be free from any
dirt, dust, oil, grease and other impurities. On wet or dirty floors, performance will be reduced.
Die doormatic ist geeignet für Standard-Drehflügeltüren mit Anschlag
im Innenbereich
• Türblattgewicht bis max. 50 kg
Doormatic is suitable for standard interior swing doors with rabbet
• Door leaf weight up to 50 kg
Verwenden Sie die doormatic nicht an Türen mit speziellen
Anforderungen, wie etwa:
• Brandabschnittstüren
• Rauchabschnittstüren
• Fluchttüren
Do not use doormatic for doors with specific requirements, e.g.:
• Fire doors
• Smoke compartment doors
• Escape doors

8
Bedienungsanleitung >> Doormatic >> Automatischer Türöffner
Vorbereitung / Preparation
Hier kann die Doormatic installiert werden
Here, Doormatic can be installed
Bitte beachten Sie folgende Punkte bevor Sie mit der Installation beginnen:
Please pay attention to the following points before beginning with the installation process:
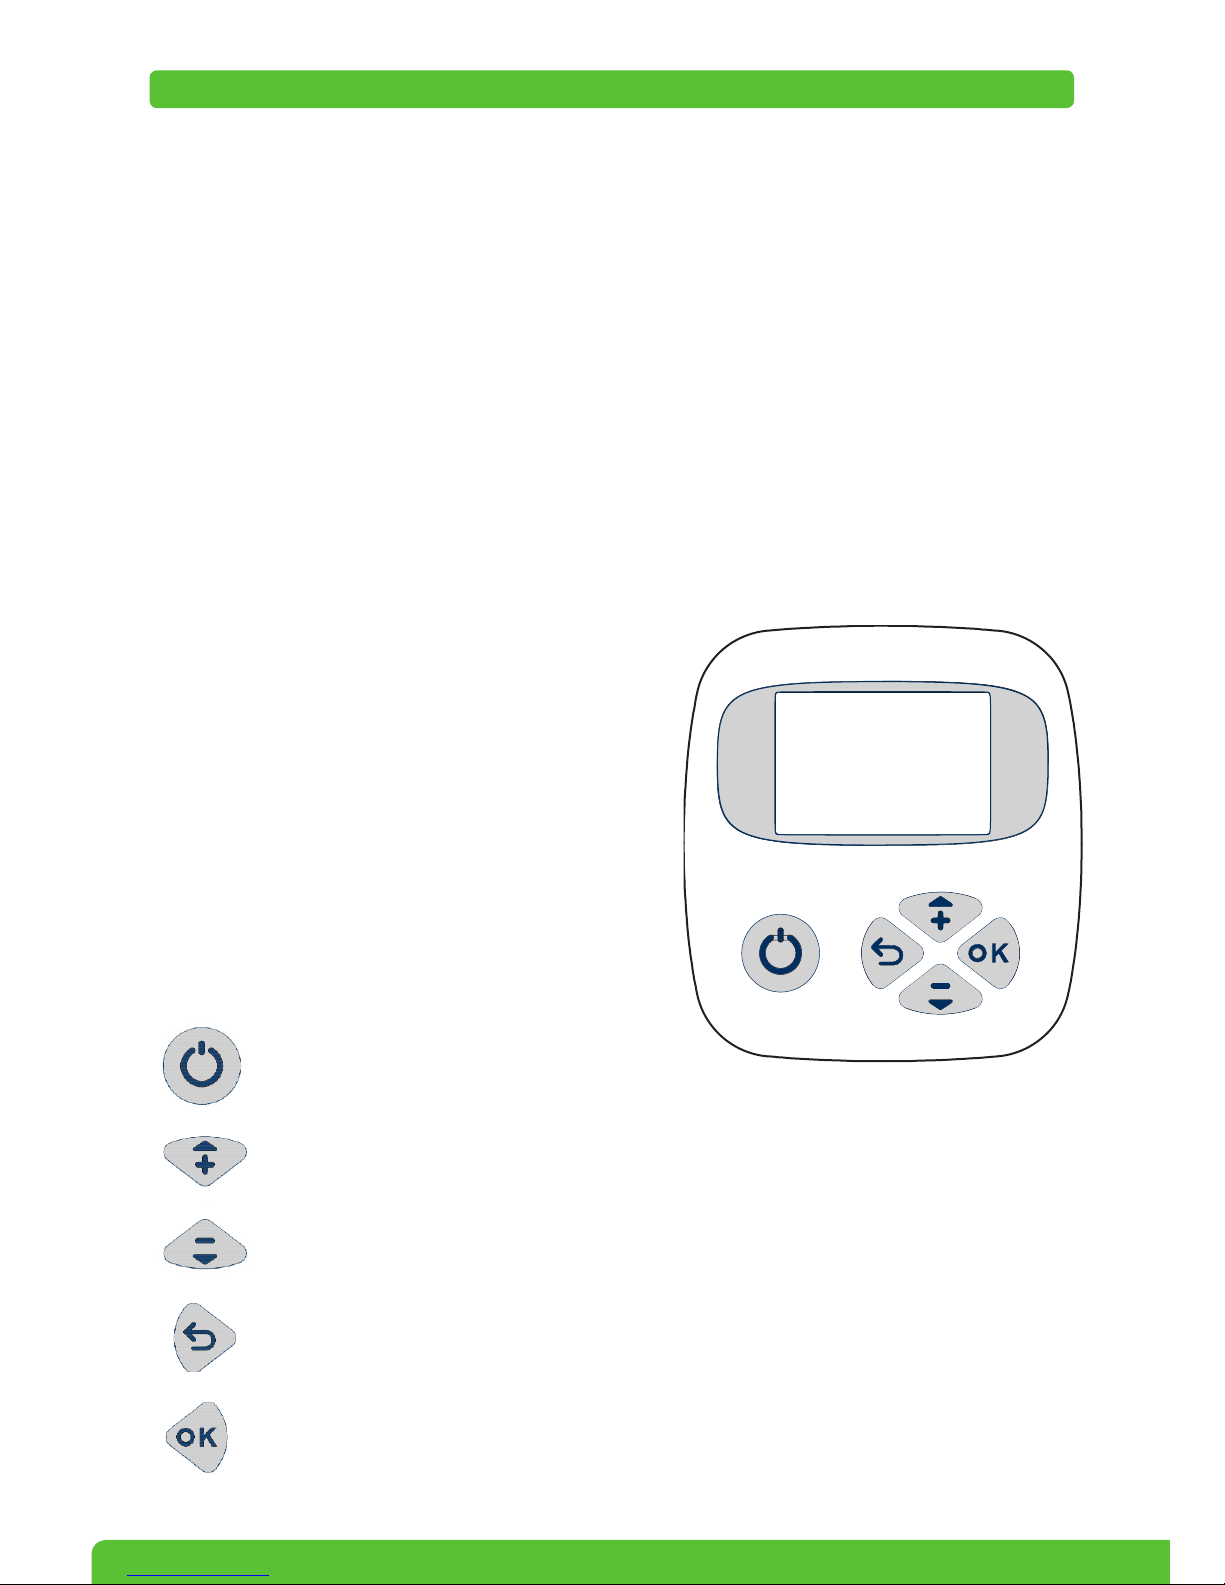
Sie können die Doormatic auf vielen
Böden sowie Türoberflächen einsetzten.
Bei antihaftbeschichteten Türen schrauben Sie
die Führungsschiene bitte an die Tür.
You can use Doormatic on different
floors and door surfaces.
For non-stick coated doors, screw
the guide rails on the door.
Die Doormatic kann nur auf ebenen
Türflächen installiert werden.
Doormatic can only be installed on
even door surfaces.
Türblattseite wählen
Select the door leaf side
Bei ebenen Türschwellen kann die Türblattseite frei gewählt
werden. Wir empfehlen jene Seite, die bei geöffneter Tür
nicht in den Durchgangsbereich zeigt.
On even door sills, the door leaf side can be freely chosen.
We recommend that side that does not point to the corridor
area when the door is opened.
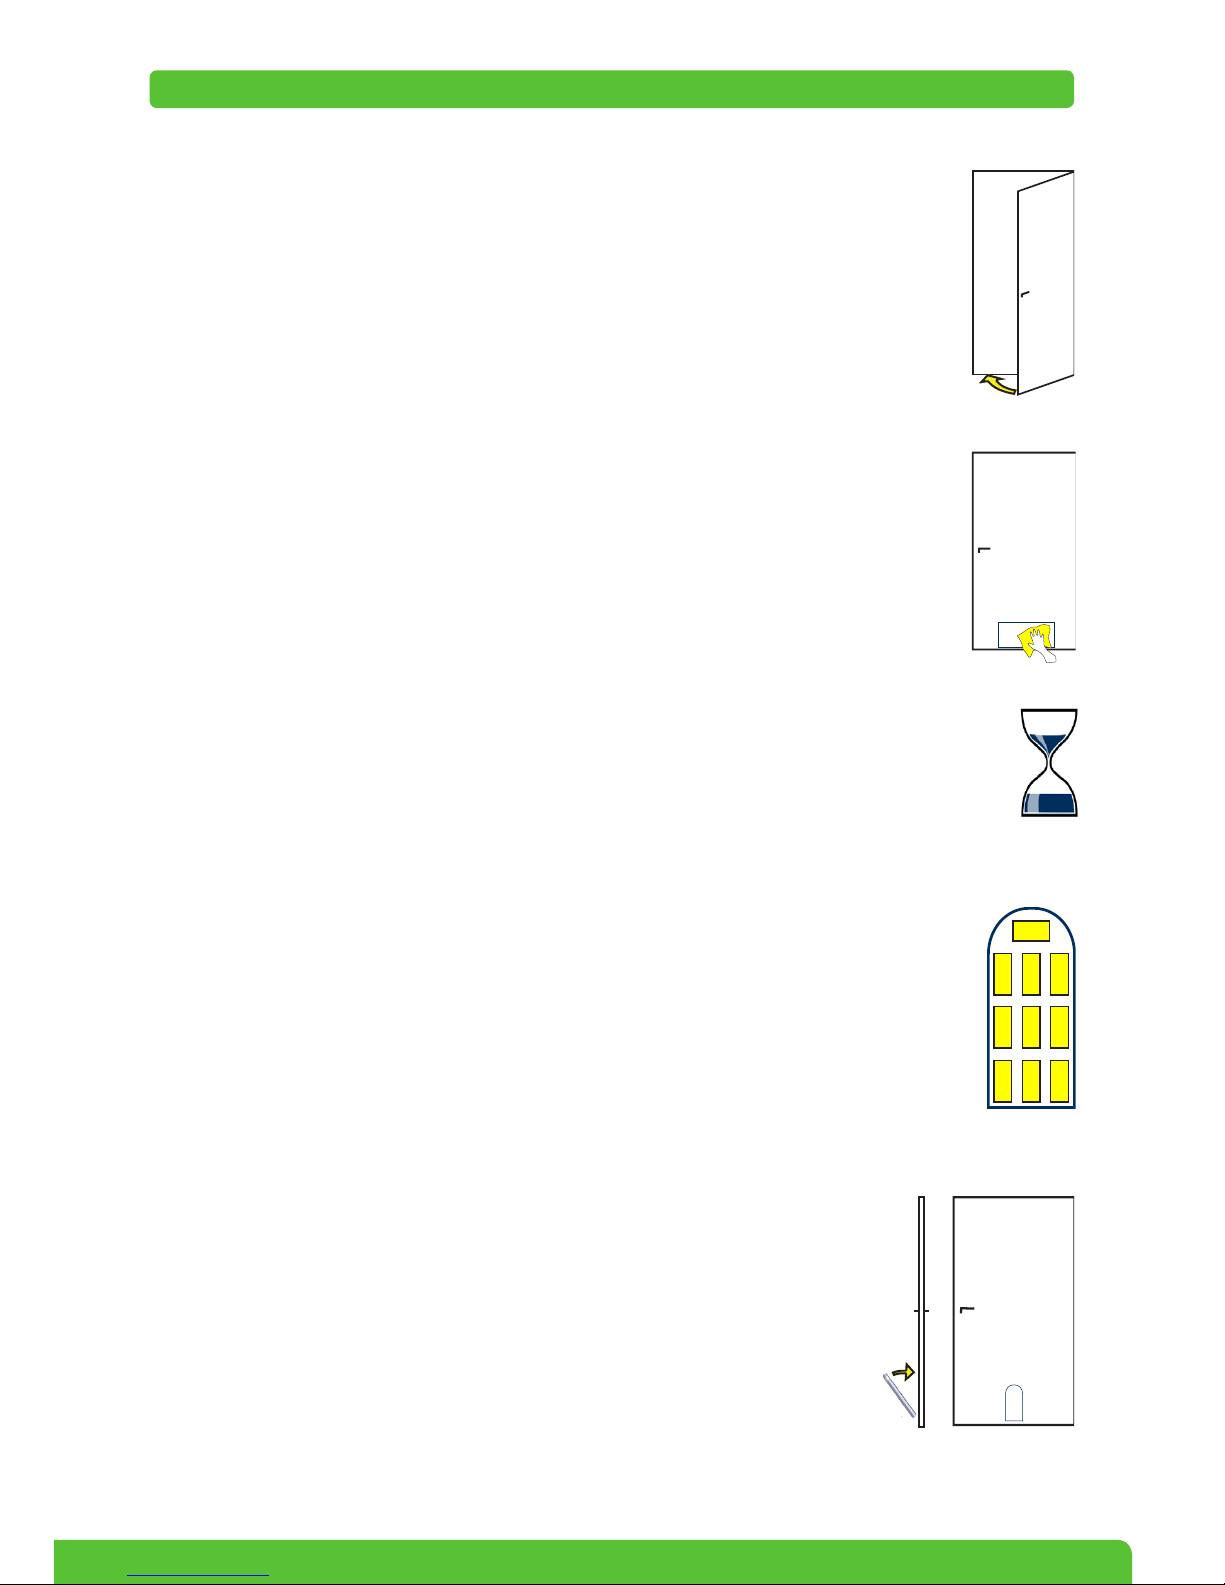
Bei einer Stufe (Höhenunterschied zwischen beiden Räumen),
wird das Gerät an der niedrigeren Bodenseite installiert.
At one level (height difference between both rooms), the
device will be installed at the lower bottom side of the floor.
Position am Türblatt
Position on the door leaf
Wir empfehlen die Installation in der Mitte des Türblatts.
We recommend installation in the centre of the door leaf.
Alternativ:
Sollten der Platz zwischen Tür und z.B. Wand, Schrank etc.
kleiner als die Gerätetiefe sein, so installieren Sie das Gerät
weiter zur Außenkante der Türe.
Alternative:
If the space between door and the wall or cupboard for example
is smaller than the depth of the device, the device shall then be
installed at the outer edge of the door.

9
User Manual >> Doormatic >> Automatic Door Opener
Installation / Installation
Die Installation in 7 Schritten
Installation in 7 steps
(1) Schließen Sie die Tür und achten Sie darauf,
dass diese während der Installation geschlossen bleibt.
Eventuell Tür versperren.
(1) Close the door and make sure that its remains closed
during installation.
You may lock the door (If possible).
(2) Reinigen Sie den unteren Türbereich mit
beigelegtem Reinigungstuch.
(2) Clean the lower door area with the
enclosed cleaning cloth.
(3) Warten Sie bitte mind.1 Minuten,
bis das Reinigungsmittel verdampft ist.
(3) Wait for at least 1 minutes,
until the detergent vaporises.
(4) Kleben Sie die Klebestreifen wie abgebildet auf die
Führungsschiene und ziehen Sie die Schutzfolien ab.
(4) Stick the adhesive tape to the guide rails as illustrated
and remove the protective foil
(5) Kleben Sie die Führungsschiene ca. 1 cm über der Unterkante
der Türe an. Die abgerundete Seite der Führungsschiene zeigt
nach oben. Achten Sie auf eine gerade, senkrechte Montage,
damit Ihre Doormatic optimal funktioniert. Drücken Sie die
Führungsschiene min. 1 Minute fest an die Türe.
(5) Attach the guide rails around 1 cm above the lower edge of
the door, with the rounded end of the guide rail pointing upwards.
Make sure that it is mounted straight and vertically so that your
Doormatic works optimally. Press the guide rails firmly on the
door for at least one minute.
Optional kann die Führungsschiene angeschraubt werden.
Verwenden Sie hierbei die vorgesehenen Bohrungen.
Optionally, the guide rails can be screwed on.
Use the specified drill holes for this purpose.
>1 min

10
Bedienungsanleitung >> Doormatic >> Automatischer Türöffner
Installation / Installation
(6) Setzen Sie die Doormatic von oben in die Führungsschiene ein.
Das Gerät wird durch die Führungsschiene an der Tür gehalten.
(6) Insert Doormatic from the top into the guide rails.
The device will be held to the door on the guide rails.
(7) Nehmen Sie das Designcover der Doormatic ab.
Halten Sie dafür das Designcover mit beiden Händen an der
linken und rechten Seite fest. Ziehen Sie das Designcover zu sich.
(7) Remove the design cover from Doormatic. For this, hold it firmly
with both the hands on the left and right hand sides and pull it
towards yourself.
Stromversorgung anschließen
Connecting the power supply
Akkubetrieb
Battery operation
Setzen Sie den vollen Akku in eines der beiden Akkufächer
ein. Die Kontakte zeigen nach oben, der Haltering zeigt vom
Gerät weg.
Insert the fully charged battery into one of the battery compartments.
Insert the end of battery into the compartment with the battery´s contacs pointing upwards.
Sie können das Ladegerät dauerhaft oder auch nur bei Bedarf mit der Doormatic
verbinden. Die Ladebuchse finden Sie an der rechten Geräteseite.
You may connect the charging unit with Doormatic permanently or simply just when
required. You will find the charging socket at the right hand side of the device.
Netzbetrieb
Mains supply operation
Bei Geräteversionen ohne Akku schließen Sie bitte das
Netzgerät an. Die Buchse für den Netzanschluss
befindet sich an der rechten Geräteseite.
Please connect the mains supply for devices without battery.
The socket for the mains connection is present at the right hand side of
the device.
Achten Sie darauf, dass das Kabel nicht im Schwingbereich der Türe
liegt oder in irgendeiner Weise eine Gefahr darstellt.
Ensure the cable cannot pose an entrapment or other hazard when the
Doormatic is idle or operating.
Verwenden Sie den vorgesehenen Kabelkanal an der Vorderseite des
Gerätes, um das Kabel nach links bzw. rechts zu führen.
Use the prescribed cable duct at the front part of the device in order to
lead the cable towards left or right hand side as required.

11
User Manual >> Doormatic >> Automatic Door Opener
Türhalter und Türband / Door stay and door hinge
Installation des Türhalters und Türbandes
Installation of the door stay and door hinge
Türhalter
Door stay
(1) Setzen Sie beide Hälften zusammen. Halten Sie den
Türhalter in Ihren Händen und simulieren Sie das
Einschnappen der beiden Hälften. So können Sie einfach
feststellen welche Hälfte an die Türe bzw. an die Wand befestigt wird.
(1) Assemble both the halves together. Hold the door stay in your hands and simulate the
snapping process of both the halves. In this way, you can easily determine which half
has to be fixed to the door and which to the wall.
(2) Kleben Sie die Klebestreifen wie
abgebildet auf und ziehen Sie die
Schutzfolien ab.
(2) Apply the adhesive tape as illustrated
and remove the protective foil.
(3) Kleben Sie den Türhalter im oberen
Türbereich auf die Schließkante. Eine Hälfte
wird an die Türe, die andere Hälfte an den
Türstock bzw. an die Wand geklebt.
3) Fix the door stay to the closing edge at the
upper door area. One half will be fixed to the
door and the other to the doorframe or wall.
(4) Falls die Tür zuvor versperrt wurde, sperren
Sie diese wieder auf.
(4) If the door was locked, you may unlock
it now.
Türband
Door hinge
(1) Öffnen Sie die Tür.
(1) Open the door.
(2) Ziehen Sie die Schutzfolie vom Türband ab.
(2) Remove the protective foil from the door hinge.
(3) Kleben Sie das Türband über die obere Aussparung im Bereich
der Türklinke auf der Seite des Türstocks, sodass diese vollständig
abgedeckt wird.
(3) Attach the door hinge over the upper recess of the door handle
on the side of the doorframe so that it is completely covered.
(4) Schließen Sie die Tür wieder.
(4) Close the door once again.
Eck-Montage im Türstock
Corner mounting
the door frame
Bündige Montage
Flush mounting

12
Bedienungsanleitung >> Doormatic >> Automatischer Türöffner
Anpassung / Adjustment
Anpassung auf Knopfdruck
Configured at the click of a button
(1) Schalten Sie die Doormatic
durch Drücken der Ein- / Aus-Taste ein.
(1) Switch off Doormatic by pressing
the On/Off button.
(2) Öffnen Sie vorsichtig die Türe ca. 5 cm – kurz warten,
die Doormatic startet die Lernfahrt.
(2) Open the door up to ca. 5 cm (2") - just wait,
the Doormatic start the test walkthrough automatically.
(3) Ihre Türe wird vollständig geöffnet und anschließend
wieder geschlossen.
Bei der nächsten Aktivierung öffnet sich die Türe
ca. 2 cm weniger weit als bei der Lernfahrt erfasst wurde.
(3) Your door will be completely open and then close.
When activated next time, the door will open 2 cm less
than during the test walkthrough.
Tipp / Tip
Falls Sie mehrere, räumlich nahe Türen, automatisieren möchten,
drücken Sie bereits während der Lernfahrt den Funksender, um das
Zubehör zu koppeln. Siehe Seite 18.
If you want to automate several closely located doors, press the radio
transmitter button during the test walkthrough in order to couple the
accessory. See page 18.
(4) Nach erfolgreicher Lernfahrt wird am Display das Drive Mobil-Logo angezeigt.
Setzten Sie das Designcover wieder auf die Doormatic.
(4) After a successful test walkthrough, the Drive Mobil logo will be shown on the display
screen. Put the design cover back on the Doormatic.
Gratulation, die Doormatic ist vollständig angepasst und betriebsbereit.
Congratulations, the Doormatic has been completely configured and is now ready
to operate.
Weitere Einstellungsmöglichkeiten finden Sie ab Seite 17 beschrieben.
Other Settings have been described on page 17.

13
User Manual >> Doormatic >> Automatic Door Opener
Betrieb / Operation
So aktivieren Sie die Doormatic
You can activate Doormatic in this way
Per Push & Go / Through Push & Go
Aktivieren Sie die Doormatic direkt an Ihrer Tür, durch leichtes Aufdrücken oder Aufziehen.
Wenige Zentimeter genügen um das Gerät zu aktivieren. Falls vor dem Öffnen bzw. vor
dem Schließen eine Wartezeit abgewartet werden soll, kann dies mit „Wartezeit auf“ und
„Wartezeit zu“ eingestellt werden. Weitere Informationen zu finden Sie auf Seite 18.
Activate Doormatic directly on your door by pushing or pulling it open. A few centimetres
will suffice to activate the device. A waiting period before the door is opened or closed can
be set through the menu items ‘‘waiting period OPEN and ‘’waiting period CLOSE“.
Further information regarding the waiting periods has been provided on page 18.
Sie können Ihre Türe immer, auch während der Fahrt, mit der Hand stoppen oder in die
Gegenrichtung bewegen Ihre Türe ist jederzeit frei bewegbar.
You can stop or move your door in the opposite direction even during when walking
through, your door is always movable.
Per Funk / Through radio
Steuern Sie Ihre Doormatic bequem mittels Funk-Fernbedienung und Funk Bewegungs-
melder.
Control Doormatic using a remote control device or motion detector.
Bitte beachten Sie, dass bei Funkaktivierung die „Wartezeit auf“ deaktiviert ist. Die Türe wird
unmittelbar bei einem Funksignal geöffnet.
Please note that in case of radio activation, the ‘‘waiting period OPEN’’ function is disabled.
The door will be opened immediately after the radio signal is received.
Funk-Fernbedienung / Radio remote control
Per Tastendruck wird die Türe geöffnet und nach der eingestellten Wartezeit wieder
geschlossen. Um das Gerät zu stoppen, drücken Sie während der Fahrt nochmals die
Fernbedienung.
At the press of a button, the door will open and then close after the waiting period has
lapsed. In order to stop the device, press the button on the remote control again during
when walking through.
Funk-Bewegungsmelder / Radio motion detector
Zum berührungslosen Aktivieren verwenden Sie den Funk-Bewegungsmelder.
Bei Annäherung wird die Türe automatisch geöffnet. Die Schließfahrt erfolgt 10 Sekunden
nach Verlassen des Erfassungsbereiches des Bewegungsmelders. Eine höhere Wartezeit
kann in den Einstellungen ausgewählt werden.
For contactless activation, use the radio motion detector.
On nearing, the door will automatically be opened. The closing cycle takes place 10
seconds after leaving the detection area of the motion detector. A longer waiting period can
be set in the settings.
Für diese Funktion muss sowohl die Funkverbindung wie auf Seite 18, sowie die
Funkaktivierung unter „Verhalten“ auf Seite 21 beschreiben, aktiviert sein.
For this function, the radio connection must be activated as described on page 18, and on
page 21 under the heading ‘‘properties’’.

14
Bedienungsanleitung >> Doormatic >> Automatischer Türöffner
Bei geringem Akkustand ertönt ein Signalton während der Öffnungs– bzw. Schließfahrt.
Die Doormatic kann noch ca. 20 Mal aktiviert werden. Ihre Türe kann jederzeit, auch bei
leerem Akku, wie gewohnt manuell bewegt werden.
When the battery level is low, a signal tone will be heard during the opening or closing
cycle. Doormatic can still be used about 20 times. Your door can be manually closed or
opened at any time as usual even with an empty battery.
Akku laden
Charging the battery
Sie können den Akku im Gerät oder extern aufladen. Verbinden Sie das Ladegerät mit einer
Netzsteckdose. Den Ladestecker am Ende des Kabels verbinden Sie mit der Doormatic.
Die Ladebuchse befindet sich auf der rechten Geräteseite.
You can charge the battery inside the device as well as externally. Connect the charging
unit with a power socket and the charging plug to the Doormatic. The charging socket is
located at the right hand side of the device.
Ist das Ladegerät angeschlossen, wird dieses Symbol am Display angezeigt:
If the charging unit has been connected, this symbol will be shown on the display screen:
Zum externen Aufladen entnehmen Sie den Akku
aus der Doormatic und verbinden den Ladestecker
mit dem Akku.
To charge externally, remove the battery from the
Doormatic and connect the charging plug with
the battery.
Der Ladevorgang dauert bei leeren Akkus ca. 12 Stunden pro Akku.
The charging process takes around 12 hours for each battery from flat.
Betrieb / Operation
Akku und Stromversorgung
Battery and Power supply
Akkustand und Akkuanzeige
Battery status and battery indicator
Am Display wird der aktuelle Akkustand durch Symbole , angezeigt.
On the display screen, the current battery status is indicated through symbols.
Der Akku ist voll / Battery is full
Laden Sie den Akku demnächst auf / Charge the battery soon
Laden Sie den Akku auf / Charge the battery immediately

15
User Manual >> Doormatic >> Automatic Door Opener
Betrieb / Operation
Hinderniserkennung und Kraftbegrenzung
Hindrance recognition and force limitation
Die Doormatic ist mit einer automatischen Hinderniserkennung ausgestattet. Bei Kontakt
mit einem Hindernis stoppt das Gerät sofort die Türbewegung.
The Doormatic is equipped with an automatic hindrance recognition system. On contact
with an obstacle, the device immediately stops door movement.
Hindernis bei der Öffnungsfahrt
Hindrance in the opening cycle (when the door is opening)
Erkennt die Doormatic beim Öffnen ein Hindernis wird die
Öffnungsfahrt sofort gestoppt und die Türe wieder geschlossen.
If Doormatic recognises a hindrance while the door is being opened, the
opening cycle will immediately stopp and the door will close again.
Hindernis bei der Schließfahrt
Hindrance in the closing cycle (when the door is closing)
Wird während der Schließfahrt ein Hindernis erkannt, wird die Schließfahrt sofort gestoppt
und die Türe vollständig geöffnet. Nach eingestellter Wartezeit wird die Türe geschlossen.
Sollte erneut ein Hindernis auftreten, wird die Türe wieder geöffnet und bleibt geöffnet.
Das Gerät wird aus Sicherheitsgründen deaktiviert. Zum Aktivieren prüfen Sie zuerst, ob
sich kein Hindernis im Türraum befindet. Anschließend aktivieren Sie per Push & Go oder
per Funk. Die Türe wird wieder wie gewohnt geschlossen. Alle Einstellungen bleiben
unverändert.
If a hindrance is recognised while the door is being closed, the closing cycle will
immediately stopp and the door will reopen. The door will close according to the waiting
period set. If the hindrance arises again, the door will open and will remain open. The
device will be disabled for safety reasons. Before activating it again, check for any
hindrance at the doorway. Then activate it through Push & Go or radio. The door will
close again as usual. All settings remain unchanged.
Autokorrektur
Auto-correction
Die Doormatic ist mit einer Autokorrektur-Funktion ausgestattet.
Hierbei wird die Türe bis zum maximal möglichen Öffnungswinkel geöffnet und wieder
geschlossen. Die Autokorrektur wird von der Doormatic während einer Öffnungsfahrt
selbstständig bei Bedarf durchgeführt.
Doormatic is equipped with an auto-correction feature.
The door is opened up to the maximum possible opening angle and then closed again.
Auto-correction is carried out by the Doormatic during an opening cycle when required.

16
Bedienungsanleitung >> Doormatic >> Automatischer Türöffner
Flexible Nutzung / Flexible use
So lösen Sie die Doormatic von der Türe
You can remove the Doormatic from the door as follows
(1) Schließen Sie die Türe und achten Sie darauf,
dass diese während der Installation geschlossen bleibt.
Eventuell Türe versperren.
(1) Close the door and make sure that it remains closed during
the removal process. You may lock the door.
(2) Nehmen Sie das Designcover ab und
schalten Sie das Gerät aus.
(2) Remove the design cover and
switch off the device.
(3) Führen Sie das Gerät mit beiden Händen entlang
der Türfläche nach oben und heben Sie es aus
der Führungsschiene.
(3) Move the device upwards along the door surface
using both hands and lift it out of the guide rails.
(4) Durchschneiden Sie vorsichtig, mit leichten
Sägebewegungen von unten nach oben, den Schaum
der Klebestreifen. Verwenden Sie hierfür einen dünnen
Draht oder einen kräftigen Faden.
(4) Remove the adhesive strip foam carefully with light saw movements
from the bottom to the top, using a thin wire or a hard string.
(5) Die Kleberückstände können einfach von der Türe ohne
Reinigungsmittel oder Scheuermittel abgelöst werden.
(5) The adhesive remains can simply be removed without any detergent
or scouring agent.
(6) Falls die Türe zuvor versperrt wurde, können Sie diese nun wieder
aufsperren.
(6) If the door was locked earlier, you may unlock it now.

17
User Manual >> Doormatic >> Automatic Door Opener
Individuelle Einstellungen / Personal settings
Passen Sie die Doormatic individuell an
Customise the Doormatic according to your personal needs
Alle notwendigen Einstellungen wurden bereits automatisch erfasst. Optional können Sie
Ihre Doormatic noch individueller an Ihre Wünsche anpassen. Auf den folgenden Seiten
werden alle Menüpunkte und deren Funktion beschrieben. Zum Navigieren und Auswählen
der Menüpunkte verwenden Sie Tasten auf der Frontseite.
All the essential settings are automatically made. Optionally, you can customise the settings
according to your individual desires. On the following pages, all menu items and their
functions have been described. For navigating and choosing the menu items, use the
buttons on the front side.
Die Menü-Übersicht finden Sie in nachstehender Tabelle:
An overview of the menu items has been provided in form of a table below:
Meine Einstellungen / My settings Service / Service
ÄWartezeit / Waiting period ÄWerkseinstellungen / Factory settings
» Wartezeit auf / Waiting period OPEN ÄSprache ändern / Change language
» Wartezeit zu / Waiting period CLOSE ÄEinstellungsstatus / Settings status
ÄFunk / Radio ÄInformationen / Information
» Funkaktivierung / Radio activation ÄSoftwareversion / Software version
» Funkzubehör koppeln / Coupling the radio
accessory
ÄSoftware Update / Software update
» Funk trennen / Disconnect the radio
ÄSchließverhalten / Closing process
» Schließkraft / Closing force
» Sensibilität / Sensitivity
ÄFahrweg ändern / Changing the
walkthrough path
» Lernfahrt wiederholen / Repeating the test
walkthrough
» Manuell / Manual
» Feineinstellung / Fine adjustment
ÄGeschwindigkeit / Speed
» Tempo auf / Tempo OPEN
» Tempo zu / Tempo CLOSE
ÄSignalton / Signal tone
ÄVerhalten / Properties
» Hinderniserkennung / Hindrance recognition
» Aktivierung / Activation
» Betriebsmodus / Operating mode

18
Bedienungsanleitung >> Doormatic >> Automatischer Türöffner
Menü - Meine Einstellungen / Menu - My settings
Ä Wartezeit / Waiting period
Bestimmen Sie die Zeit, die vor dem Öffnen bzw. Schließen verstreichen soll.
Determine the time that shall elapse before opening or closing the door.
Wartezeit auf / Waiting period OPEN
Stellen Sie die Zeit ein, die vor dem Öffnen der Türe verstreichen soll.
Beachten Sie, dass die „Wartezeit auf“ nur bei Push & Go Aktivierung
abgewartet wird. Bei Funkaktivierung wird die Türe sofort geöffnet.
Note that ‘‘Waiting period OPEN“ only applies to Push & Go
activation. In case of radio activation, the door is opened immediately.
Set the time period that shall elapse before the door is opened
Ä Funkverbindung / Radio link
Aktivieren Sie Ihre Doormatic bequem per Funk.
Activate your Doormatic comfortably through a radio link
Funkaktivierung / Radio activation
Aus / Off Funk ist deaktiviert. Falls kein Funk-Zubehör verwendet
wird, kann so die Akkulaufzeit verlängert werden.
Radio is inactivate. If no radio accessories are being used,
the battery will last longer between charges.
Ein / On Das Gerät reagiert auf gekoppelte Funk-Sender.
Zum Koppeln wählen Sie den Menüpunkt:
„Funkzubehör koppeln“.
The device responds to coupled radio transmitters. For
coupling, choose the menu item: ‘‘Couple radio accessories’’
Funkzubehör koppeln / Coupling of radio accessories
Wählen Sie aus, ob Sie die Fernbedienung oder den Bewegungsmelder koppeln. Drücken
Sie die Fernbedienung bzw. bewegen Sie den Bewegungsmelder, sodass die rote LED
aufleuchtet. Wird ein Funksignal erkannt, ertönt ein Signalton.
Choose whether you want to couple the remote control device or motion detector. Press
the remote control device or move the motion detector such that the red LED lightens up. If
a radio signal is recognised, a single tone will be heard.
Funk trennen / Disconnect the radio
Das gekoppelte Zubehör wird getrennt. Wurde Fernbedienung bzw. Bewegungsmelder
falsch gekoppelt, können Sie so diese Kopplung wieder trennen.
The coupled accessory is disconnected. If the remote control device or motion detector is
not coupled properly, you may remove it again

19
User Manual >> Doormatic >> Automatic Door Opener
Menü - Meine Einstellungen / Menu - My settings
Ä Schließverhalten / Closing process
Ermöglicht das Schließverhalten optimal an Ihre Türe anzupassen.
The closing process can be customised according to your door.
Schließkraft / Closing force
Dieser Wert wirkt sich auf die 10 cm, bevor die Türe geschlossen ist, aus. Falls Ihre Türe
nicht vollständig geschlossen wird, erhöhen Sie die Schließkraft. Wird die Türe zu laut
geschlossen, verringern Sie die Kraft.
This value relates to the 10 cm of space available before the door is closed. If your door
cannot be completely closed, increase the closing force. If a loud noise is produced when
the door is closed, reduce the force.
schwach > mittel > stark
weak > medium > strong
Ä Sensibilität / Sensitivity
Die einstellbare Empfindlichkeit der Hinderniserkennung wirkt sich auf die 10 cm, bevor die
Türe geschlossen ist, aus. Verringern Sie die Sensibilität nur falls Ihre Türe nicht vollständig
geschlossen wird.
The adjustable sensitivity of the hindrance detection system relates to the 10 cm of space
available before the door is closed. Reduce the sensitivity only if the door cannot be closed
completely.
Ä Fahrweg ändern / Changing the walkthrough path
Sie können jederzeit den Fahrweg, jene Strecke über welche Ihre Türe automatisch
geöffnet bzw. geschlossen wird, individuell einstellen.
You can adjust the walkthrough path, the distance over which your door is automatically
opened or closed.
Lernfahrt wiederholen / Repeating the test walkthrough
Wiederholt die Lernfahrt wie bei der Erstinbetriebnahme. Vorhandene Funkkopplungen
werden getrennt und während der Lernfahrt neu verbunden. Alle weiteren Einstellungen
bleiben unverändert. Beachten Sie die Anweisungen am Display.
Repeat the test walkthrough at the time of initial commissioning. Any radio couplings will
be disconnected and reconnected during the test walkthrough. All other settings will remain
unchanged. Please pay attention to the instructions displayed on the screen.
Manuell / Manual
Alle Einstellungen sowie Funkverbindungen bleiben unverändert. Beachten Sie die
Anweisungen am Display.
All settings as well as radio connections remain unaffected. Please pay attention to the
instructions displayed on the screen.
Feineinstellung / Fine adjustment
Hier können Sie den Fahrweg in cm-Schritten sehr genau einstellen. Verwenden Sie die
+ / - Tasten um die cm Werte zu erhöhen bzw. zu verringern.
Here, you can adjust the walkthrough path in cm steps very precisely. Use the + / - buttons
in order to increase or reduce the cm values.

20
Bedienungsanleitung >> Doormatic >> Automatischer Türöffner
Menü - Meine Einstellungen / Menu - My settings
Ä Geschwindigkeit / Speed
Passen Sie die Geschwindigkeit der Doormatic an Ihr persönliches Tempo an. Es stehen
fünf Geschwindigkeitsstufen zur Auswahl:
Adjust the speed of Doormatic to your personal tempo. There are five speed options to
choose from:
sehr langsam > normal
very slow > normal
Tempo auf / Tempo OPEN
Passen Sie hier die Öffnungsgeschwindigkeit an.
Adjust the opening speed here.
Tempo zu / Tempo CLOSE
Passen Sie hier die Schließgeschwindigkeit an.
Verletzungsgefahr!
Höhere Tempoeinstellungen können zu Verletzungen und Unfällen
führen. Wählen Sie aus Sicherheitsgründen ein möglichst niedriges
Tempo.
Risk of injury!
High tempo settings may lead to injuries and accidents. Select the
lowest possible tempo for safety reasons.
Adjust the closing speed here.
Signalton / Signal tone
Als zusätzliche Hinweis– und Sicherheitseinrichtung kann ein Signalton aktiviert werden.
Bei der Einstellung „Alles ein“ ist auch während der Öffnung– und Schließfahrt ein
Signalton hören.
As an additional safety feature, a signal tone can be activated. For the setting ‘‘Everything
On’’, a signal tone can be heard when the door is opened as well as when it is closed.
Aus > EIN
CLOSE > OPEN
Ä Verhalten /Properties
Wählen Sie hier aus unterschiedlichen Aktivierungsmöglichkeiten und Betriebsmodi aus
und passen Sie die Hinderniserkennung optimal an.
Choose from different activation options and operating modes and adjust the hindrance
recognition optimally.
Hinderniserkennung / Hindrance recognition
Passen Sie die Empfindlichkeit der Hinderniserkennung an unterschiedliche
Böden an. Bei einem unebenen Boden (z.B. Fließenboden) senken Sie die
Empfindlichkeit. Bei einem glatten Boden wie Laminat können Sie die
Empfindlichkeit erhöhen.
Adjust sensitivity of the hindrance recognition feature to different floors.
For uneven floors (e.g. flow floors), reduce the sensitivity.
For a floor with smooth surface such as laminate, you can increase the sensitivity.
Other manuals for Doormatic
1
Table of contents
Other drive mobil Door Opening System manuals
Popular Door Opening System manuals by other brands

SUGATSUNE
SUGATSUNE Aileron Lift-Assist manual

Assa Abloy
Assa Abloy SARGENT Powerglide 281 Series installation instructions

Falcon
Falcon Ferme-Porte SC60 series installation instructions

Assa Abloy
Assa Abloy DC700G-FMS-K installation instructions

Schartec
Schartec Prime 600 Installation and operating instructions

Häfele
Häfele XL Pocket Door Slide System Mounting instructions