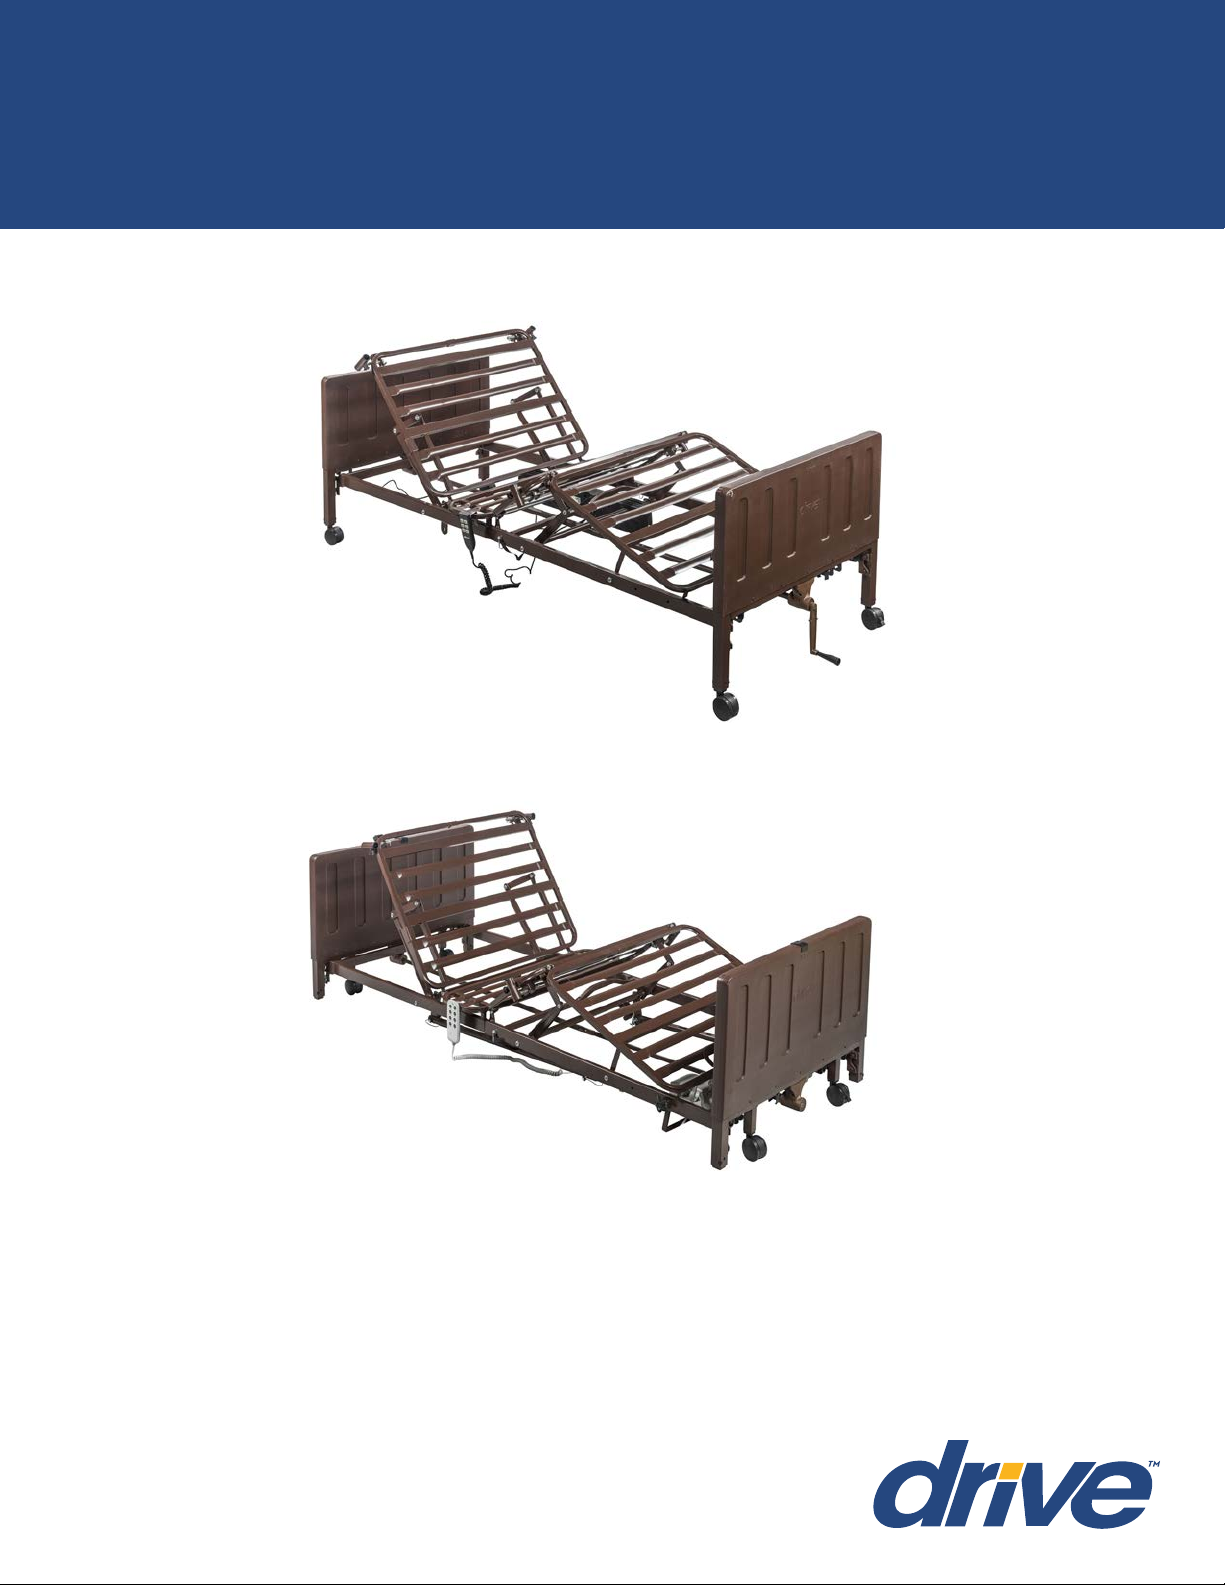
Drive DELTA PRO 15030N User manual

OWNER’S ASSEMBLY AND OPERATING MANUAL
DRIVE DELTA PRO BED SYSTEM
Semi and Full Electric Bed Designs
Model # 15030N / 15033NC / 15235N / 15003PN / 15004PN / 15005LPN
Semi- Electric Dual motor (15030N)
Full Electric Low Linear Motor (15005LPN)
Additional Congurations Available
This manual must be given to the Owner/User of this bed and
should be read carefully before putting this product into use.
Keep manual in an accessible location for future reference.
Series manual VER.A.3.21

TABLE OF CONTENTS
Document Symbols & Warning Labels.............................................................................................. 1-3
General Safety ........................................................................................................................................ 4
Intended Use and Contraindications.................................................................................................... 8
Overview & Mattress Recommendations ............................................................................................ 8
Packaging and Handling........................................................................................................................ 9
Assembly Instructions......................................................................................................................... 10
Frame Assembly................................................................................................................................... 14
Motor Installation.................................................................................................................................. 17
- Installation Method A & B ............................................................................................................. 17
- Dual Motor Congurations : Bed Kit #15030N, 15033NC, and 15235N ..................................... 18
- Linear Motor Congurations: Bed Kit #15004PN and 15005LPN .............................................. 20
Headboard Assembly........................................................................................................................... 22
Bed Operation....................................................................................................................................... 23
- Dual Motor Congurations : Bed Kit #15030N, 15033NC, and 15235N ..................................... 24
- Linear Motor Congurations: Bed Kit #15004PN and 15005LPN .............................................. 25
Bed Rail Installation ............................................................................................................................. 27
Manual Hi/Lo Adjustment Crank & Mattress Retainer ...................................................................... 29
Additional Accessories........................................................................................................................ 30
Maintenance & Warranty...................................................................................................................... 32
Parts and Service ................................................................................................................................. 33
Additional Warning .............................................................................................................................. 34
Electromagnetic Emissions & Immunity............................................................................................ 36
Troubleshooting ................................................................................................................................... 40
Appendix: A Guide to Bed Safety Bed Rails ...................................................................................... 41
PLEASE READ: The Delta Pro Bed System is a Class 2 medical device that must be installed and operated in
the manner for which it was intended. The user is responsible for reading and understanding the product user
manual. Drive DeVilbiss Healthcare is not responsible for any injuries resulting from failure to comply with the
instructions and precautions in this manual.

1
STANDARD SYMBOLS USED IN THIS MANUAL
DANGER
Information that appears under the DANGER symbol concerns the protection of personnel from direct and
pending hazards that, if not avoided, will result in immediate, serious personal injury or death in addition to
damage of the equipment.
DANGER SHOCK HAZARD
Information that appears under the DANGER SHOCK HAZARD symbol concerns the protection of personnel
from possible hazards related to electrical shock.
FIRE HAZARD
Information that appears under the FIRE HAZARD symbol concerns the protection of personnel from possible
hazards related to re and ammability.
WARNING
Information that appears under the WARNING symbol concerns the protection of personnel from possible
hazards that can result in injury or death in addition to damage of the equipment.
CAUTION
Information that appears under the CAUTION symbol concerns the protection of personnel from possible
hazards that may result in minor injury or damage of the equipment.
CRUSH HAZARD
Information that appears under the CRUSH HAZARD symbol concerns the protection of personnel from
possible hazards related to reduce clearances.
!
This manual includes important information about the safety of personnel and equipment. As you read through this
manual be aware of the symbols and their meanings.
!
!
NOTE:
Information that appears with the NOTE text gives added information, which helps in understanding the item
being described.

2
Symbols Description Symbols Description
Type BF applied part equipment.
IEC 60601-2-52: The applied part includes all
parts of the medical bed that are within reach
of the patient, even if they are underneath
the mattress support surface. Applied parts
list: Mattress, Bed frame, Side Rail, Head
Board and Foot Board, Mattress retainer.
Recycle the item in accor-
dance with local regulations.
According to IEC 60529. Rating for dust-
protection and identied as equipment that is
protected against splashing water.
IEC 60601-1
IEC 60601-1-2
A product bearing the IEC
listed Mark is determined
to have met the minimum
requirements of prescribed
product safety standards.
Class II equipment
The owner’s manual needs to be read before
operating the bed.
Maximum patient weight and
safe working load
PRODUCT SYMBOLS
PRODUCT HANDLING SYMBOLS
Do not remove motor cover or repair yourself. Contact
your local Provider or Dealer for technical assistance.
Do not stack more than 5 cartons high
Do not step
Keep Dry
Do not exceed 104 degrees F
Do not leave in direct sun light for extended period of
time
Handle with care
IPX4
5
40oC
104oF

3
WARNING LABELS

4
GENERAL SAFETY
NOTE: In this manual, the terms patient and resident refer to a resident in a homecare environment.
WARNING
- Do not operate this equipment without rst completely reading and understanding these instructions
and any additional supplemental material provided with this equipment.
- Do not use this product if any of the components received are damaged or malfunctioning.
- NEVER allow any individual or objects be placed under the bed at any time.
- DO NOT let any body parts protrude or extend over the side or between parts, especially when the
bed is being operated.
- Damage or injury may result from improper use of this product.
!
WARNING
- Never exceed the safe working load capacity of this bed. The safe working load capacity of this bed is 450lbs (205kg).
This includes all accessories and options (not all accessories and options can be used at the same time). Once a
patient’s weight is known (X), subtract that from 450 lb total safe working load (Y) and the remainder is the allowable
weight for mattress, accessories and optional equipment (Z). (Z = Y-X)
Example: Patient Weight : 350lbs
Accessory equipment that may be used (Z) , Z= 450-350= 100
If the patient weighs 350lbs, it is safe you use 100 lbs total of accessories, i.e. * Half rail pair (25lbs),
Mattress weight (30lbs) and trapeze (26 lbs)
*these are accessory weight estimates
- This homecare bed should be left in its lowest position, except when care is being provided, in order to reduce risk of
injury due to falls.
- The bed MUST be connected to an appropriate power source. Unless equipped with battery backup, this bed will not
operate when not plugged in. Mains cable and proper function must be checked regularly.
- Possible Injury or Death may occur if bed is pushed over abrupt thresholds while bed is occupied.
- This bed is not intended for patient/resident transport. Please use an approved resident transport device
when moving a resident.
DANGER SHOCK HAZARD
- Possible injury or Death may occur if accessories are not provided and therefore tested by Drive DeVilbiss Healthcare.
Please contact Drive DeVilbiss Healthcare for accessory parts that are compatible with this bed.
- Possible injury or Death may occur if replacement parts are not provided and therefore tested by Drive DeVilbiss
Healthcare. Please contact Drive DeVilbiss Healthcare for replacement parts compatible with this bed.
!

5
DANGER SHOCK HAZARD
- DO NOT plug anything into the control box of bed (i.e. pendants or motors) while main cable (power cord) is plugged
into the wall outlet.
- Any cords or tubing used on or with this bed MUST be routed and secured properly to ensure that they do NOT
become entangled, kinked or severed during normal operation of the bed.
- DO NOT roll the bed over any power or pendant cords.
- DO NOT open any motors, control boxes, or pendants. Service and repair must only to be performed by authorized
service personnel. Unauthorized service of any of these components nullies the warranty.
- Inappropriate handling of power supply cords can create a shock hazard.
- When routing cables from other equipment while using this homecare bed, precautions should be taken to avoid
squeezing/capturing those cables between parts of the bed.
- DO NOT allow the cord, electrical outlets, and electrical control box or hand pendant to become wet or submerged in uid.
- DO NOT operate the bed if any electrical component such as the power cord, electrical outlet, connections, motor/
actuator or mechanical component has malfunctioned or has been damaged in any way.
- The bed MUST be connected to an appropriate power source. Unless equipped with the optional battery backup, this
bed will not operate when not plugged in. Main cable and proper function must be checked regularly.
- Possible injury or Death may occur due to pendant cord being a source for entangling patient/resident. Patients/
residents with decreased mental acuity should NOT have access to pendant.
- Be sure to unplug the equipment prior to any servicing or cleaning.
FIRE HAZARD
- DO NOT use near open ame or explosive gases.
- Possible Fire Hazard if used with nasal mask in 1/2 bed tent oxygen administering equipment. If oxygen tent is being
used it should not fall below the mattress deck. The pendant should not be placed in an oxygen enriched environment
such as an oxygen tent.
- This bed should not be placed in an oxygen rich environment.
CAUTION
- It is recommended to use Drive DeVilbiss Healthcare compatible lifts with this homecare medical bed. Patient lifts
should not be used to transport patients to different locations of the home.
- Do NOT use side rails as handles for moving the bed.
- Keep all moving parts, including the mattress deck (sleep surface), main frame, motors and moving components free
from obstructions.
- Ensure that the individual using this bed is properly positioned, particularly when the bed is being operated.
- Body weight should be evenly distributed over the sleeping surface of the bed. Avoid situations where entire body
weight is on a raised head or foot surface. This includes during assistance in patient repositioning, patient ingress
(transferring in) or egress (transferring out) of bed.
- Supervision is required when this product is operated by or near children, individuals with disabilities or individuals with
diminished mental acuity.
- Do not modify this bed without authorization of the manufacturer. If unauthorized service is performed on any
components the warranty is nullied.
- This bed frame complies with EMC requirements of IEC 60601-1-2. Radio transmitting equipment, cell phones or
similar electronic devices, used in proximity of the bed, may affect the beds performance.
!

6
CRUSH HAZARD
- Possible crush or pinch hazards exist between the bed deck and frame. Keep hands and feet out from under the bed
deck at all times while operating the bed.
- Possible injury may occur when lowering or raising the bed. Keep hands and feet clear of the bed frame when in
operation.
- Do not put hands or ngers into any of the angles while frame is articulated. Pinch points may cause injury.
!
WARNING
- Entrapment issues can arise when components and accessories are not properly installed.
- If a resident/patient’s mental or physical condition could lead to resident/patient entrapment, the mattress deck
- (sleep surface) should be left in the at position when unattended. Failure to do so could result in injury or death.
- Incompatible mattress and side rails can create hazards. Only compatible Drive DeVilbiss Healthcare side rails may
be used on this bed. Make sure mattress is the correct size for bed frame and the Side rails are secured to frame to
decrease the risk of entrapment.
- If bed frames have been serviced or any other adjustments have been made, you must ensure all parts are securely
back in place before operating the bed.
- The risks associated with these devices used in conjunction with specialty mattresses and mattress overlays have not
been evaluated. When these specialty mattresses and overlays are used, the resident/patient’s facility must take steps
to ensure that the therapeutic benet outweighs the risk of entrapment.
DANGER
- Patient entrapment may occur with the use of bed side rails which may lead to serious injury or death. To avoid patient
entrapment:
- Monitor patient frequently.
- Use appropriately sized Drive mattresses when using this bed. The mattress must t rmly against the bed frame
and bed side rails.
On March 10, 2006 the U S Food and Drug Administration (released guidelines for reducing the risk of hospital bed
entrapment entitled, “Hospital bed System Dimensional and Assessment Guidance to Reduce Entrapment” This guidance
document identies potential entrapment areas within the bed frame, rails and mattress and identies thosebody parts
most at risk for entrapment It also provides manufacturers with basic design criteria to consider whendeveloping hospital/
convalescent beds; recommends specic test methods to recommends specic test methods to assess the conformance
of existing hospital/convalescent bed systems; and answers frequently asked questions about entrapment issues.
The FDA Guidance document identies specic dimensional dimensional criteria on potentially injury-threatening
gaps and spaces that can can occur between bed system components, such as side rails when improperly installed.
Drive DeVilbiss Healthcare’s DeVilbiss Healthcare’s beds and approved accessories are manufactured to be in be in
conformance with these guidelines.
Please be aware be aware that entrapment issues can still arise when components and accessories are not properly
installed on the bed. It is important for the for the provider or facility staff to recognize they have an equal have an equal
responsibility in complying with the FDA guidelines to help ensure resident safety and avoid injuries.
Copies of this document can can be obtained from the FDA website: http://www.fda.gov/medicaldevices/
deviceregulationandguidance/guidancedocuments/ucm072662.htm
!
!
ENTRAPMENT WARNINGS

7
WARNING
Incompatible mattress and side bars/rails can create hazards. Read instructions for use.
SIDE RAIL WARNINGS
WARNING: Side rails/bars serve as a passive reminder to help keep patient from falling out of the bed. The side
rail is not an assist device for getting into or out of bed.
- Although side rails are not rated to any specic weight limitation, the side rails may become deformed or broken if
excessive side pressure is exerted on the bed rails. Side rails are used for the purpose of preventing an individual
from inadvertently rolling out of bed. Side rails are NOT intended nor may be used for restraint purposes. If an
individual can injure himself/herself, a physician or a healthcare professional should be consulted for alternative
means of safe restraint.
- DO NOT use the side rails as push handles when moving the bed. Always test to make sure that the side rails are
properly and securely in place before using the bed.
- DO NOT install the optional side rails without reading and understanding all of the instructions in the instruction sheet
that accompanies the bed rail kit.
- Other manufacturer side rails may not be compatible and can lead to entrapment issues or harm to patients/residents.
Only Drive DeVilbiss compatible side rails may be used with this bed. Make sure rails are properly secured to frame
to decrease the risk of entrapment.
!
!

8
INTENDED USE AND CONTRAINDICATIONS
The Delta Pro Bed system is intended to be used as a mattress support device. This bed offers patient care exibility
by allowing for articulation of the head and foot sections of the bed frame to improve comfort or assist with treatment
and/or mobility.
Contraindications for this bed include use with individuals who exceed the listed safe working load weight capacity.
OVERVIEW
Congratulations on purchasing the most innovative and inventory efcient homecare medical bed in the market! The
Delta Pro Bed System by Drive DeVilbiss Healthcare allows you the freedom to assemble varying bed congurations
based on your individual needs. Depending on the components you have purchased, you can enjoy the versatility of
building up to 6 bed designs. For your convenience, the Delta Pro Bed System components have been color coded and
the chart below can guide your understanding of which components are needed for your desired assembly.
Bed Package
Kit # Descripon
Bed
Frame Bed Ends
Main
Motor
Frame
Adjustment
Height
Adjustment
15030N Standard, Semi (Dual Motor) 15545 15546 15550MOHC15550MOHC Manual
15033NC Standard, Full (Dual Motor + Hi/Lo) 15545 15546 15551
15235N Low, Full (Dual Motor + Hi/Lo) 15545 15547 15551
15003PN Standard, Manual 15545 15546 No motor 15555 Manual
15004PN Standard, Semi (Linear Motor) 15545 15546 15553 15552 Manual
15005LPN Low, Full (Linear Motor + Hi/Lo) 15545 15547 15553 15552 15554
MATTRESS RECOMMENDATIONS
WARNING
Possible ENTRAPMENT Hazard may occur if you do not use the recommended specication mattress. Resident
entrapment may occur leading to injury or death.
A mattress may not be included with this bed. It is recommended that a standard 36” wide mattress that is made to t an
80”or 84” (extension) length bed frame is used, such as a Drive DeVilbiss Healthcare standard inner spring, foam, ber, or
pressure redistribution mattress. Mattress height must be a minimum of 5-1/2 inches.
Visit https://www.drivemedical.com/Products/Therapeutic-Support-Surfaces/Mattress-Replacements/ to learn more
about Drive DeVilbiss Healthcare’s assortment of foam mattresses, overlays and Low Air Loss and alternating pressure
mattress replacement systems.
COMPLIANCE INFORMATION
Matching the correct bed components to meet regulatory specications can be complicated. Drive DeVilbiss Healthcare
offers a wide variety of compliance options and we can assist your facility in selecting components or accessories that are
recommended for the specic bed model.
!

9
PACKAGING and HANDLING
TOOLS REQUIRED
• Wire Cutters • Utility Knife
CAUTION
Unpack the bed in an area with sufcient room to work. Do not allow residents/patients near the bed until it has been
completely set up and the work area has been cleared of all debris.
UNPACKING
1. Check cartons for any obvious damage to packaging or contents. If damage is evident, contact your local Drive
Medical dealer/provider.
2. Remove any loose packaging from the cartons.
3. Carefully remove all components from the cartons.
LIST OF COMPONENTS
Below is a list of all available components for the Delta Pro Bed System giving you the versatility to assemble up to 6
different bed congurations. Depending on the Delta Pro model(s) you have selected you may receive some or all of the
below components. Your Delta Pro Bed System components are color coded (check shipping label) for your convenience.
Refer to Fig (chart above) to identify which components are needed for your desired bed conguration.
SKU # Item # Descripon (40 CHARACTERS MAX)
Shipping
Weight
(lbs)
Box Dimensions
Length
(Inch)
Width
(Inch)
Height
(Inch)
SKU#1 15545 Delta Pro Bed Frame w/Sha 99 35.43 8.46 46.06
SKU#2 15546 Delta Pro Standard Bed Ends w/Casters 52.4 38 5.51 26.77
SKU#3 15547 Delta Pro Low Bed Ends w/Casters 55.11 38 5.51 25.98
SKU#4 15550MOHC15550MOHC Delta Pro Dual Motor w/pendant 11.38 29.25 8.19 6.48
SKU#5 15551 Delta Pro Dual Motor w/HiLo & Pendant 17.42 29.79 16.61 7.79
SKU#6 15552 Delta Pro Bed Linear Actuator Hardware 7.22 6.3 3.35 37
SKU#7 15553 Delta Pro Bed Linear Motor w/Pendant 14.41 25.35 11.22 5.86
SKU#8 15554 Delta Pro Linear HiLo Motor 6.13 12.6 11.41 5.91
SKU#9 15555 Delta Pro Bed Manual Crank Kit 15.25 10.04 2.76 46.85
INSPECTION
1. Examine each component carefully for damage, scratches, dents or any other visual damage.
2. Carefully remove tie wraps holding power cord, hand pendant and drive shaft.
3. Inspect power cord and plug for cuts or damage.
4. Inspect the motors for damage, loose connections, cuts or damage to the wires.
5. Ensure motor connection to pendant are connected correctly and secure.
!

BA
C
C
D
D
E
E
F
F
G
G
J
JK
I
I
H
H
BA
10
STORAGE
1. If the bed is not assembled immediately, retain cartons and packaging for storage until assembly is completed.
2. Store the packaged bed in a dry area.
3. DO NOT place other objects on top of the packaged bed cartons.
ASSEMBLY INSTRUCTIONS- Delta Pro Bed Kits
CAUTION: DO NOT attempt to operate bed controls until completion of assembly as damage to bed components
and/or personal injury may occur.
Refer to Fig (color chart) to determine if you have the correct components to assemble the desired bed design.
Bed Kit # 15030N – Semi Electric Standard Dual Motor
Conrm that all parts are present:
A. Headframe Assembly
B. Foot frame Assembly
C. Drive Shaft
D. Fixed Pin(s)
E. Headboard Assembly
F. Footboard Assembly
G. Hand Crank
H. 4 Casters (2 locking, 2 unlocking)
I. Dual Motor
J. Hand Pendant
Bed Kit # 15033NC- Standard Full Electric Dual Motor w/ Height Adjustment
Conrm that all parts are present:
A. Headframe Assembly
B. Foot frame Assembly
C. Drive Shaft
D. Fixed Pin(s)
E. Headboard Assembly
F. Footboard Assembly
G. Hand Crank
H. 4 Casters (2 locking, 2 unlocking)
I. Dual Motor
j. Hi/Lo Motor
k. Hand pendant
!

L
J
M
K
C
C
K
D
D
E
E
F
F
G
G
J
I
I
H
H
BA
BA
11
Bed Kit # 15235N- Full Electric Low Dual Motor
Conrm that all parts are present:
A. Headframe Assembly
B. Foot frame Assembly
C. Drive Shaft
D. Fixed Pin(s)
E. Low Headboard Assembly
F. Low Footboard Assembly
G. Hand Crank
H. 4 Casters (2 locking, 2 unlocking)
I. Dual Motor
j. Hi/Lo Motor
K. Hand Pendant
Bed Kit # 15003PN- Manual Bed
Conrm that all parts are present:
A. Headframe Assembly
B. Foot frame Assembly
C. Drive Shaft
D. Head Actuator Bar
E. Foot Actuator Bar
F. Extension Bar
G. Motor Protection shaft
H. Fixed Pin(s)
I. Twist Knobs
J. Headboard Assembly
K. Footboard Assembly
L. Hand Crank
M. 4 Casters (2 locking, 2 unlocking)

C
G
P
D
N
OEE
M
D
IJ
K
FH
L
BA
12
Bed Kit # 15004PN- Semi Electric Standard Linear Motor
Conrm that all parts are present:
A. Headframe Assembly
B. Foot frame Assembly
C. Drive Shaft
D. Fixed Pins x 4
E. Twist knobs x 4
F. Head Actuator Bar
G. Foot Actuator Bar
H. Motor Protection shaft
I. Headboard Assembly
J. Footboard Assembly
K. Hand Crank
L. Casters (2 locking, 2 unlocking)
M. Linear Head Motor
N. Linear Foot Motor
O. Control Box
P. Hand Pendant*
* The hand pendant included in this kit includes buttons for height adjustment. To utilize this function component #15554-
Delta Pro Linear HiLo Motor is needed. Component 15554 is not included in this bed kit but is included in Bed Kit #
15005LPN.
NOTE- The height adjustment feature on the pendant will not work unless you order component #15554

C
G
P
D
N
OEE
M
Q
D
IJ
K
FH
L
BA
13
Bed Kit # 15005LPN- Full Electric Low Linear Motor
Conrm that all parts are present:
A. Headframe Assembly
B. Foot frame Assembly
C. Drive Shaft
D. Fixed Pins x 4
E. Twist knobs x 4
F. Head Actuator Bar
G. Foot Actuator Bar
H. Motor Protection shaft
I. Low Headboard Assembly
J. Low Footboard Assembly
K. Hand Crank
L. Casters (2 locking, 2 unlocking)
M. Linear Head Motor
N. Linear Foot Motor
O. Control Box
P. Hi/Lo Motor w/bracket and twist knobs
Q. Hand Pendant

14
A) FRAME ASSEMBLY
1. Place both ends of the frame/sleep surface on their side and align the ange with the receptacle as shown.

Figure A
15
2. To attach the head and foot sections, interlock the two sides together by sliding the frames toward each other.
3. Secure the frame assembly and lock each end into position by inserting the cotter pin as shown (Figure A). Secure
the cotter pin with the attached clasp.
4. Repeat on the opposite side.

Figure B
16
To disassemble the head and foot section, remove cotter pin and clasp and separate sections.

17
B) MOTOR INSTALLATION
There are two general methods for the installation of motors to your Delta Pro Bed System. Utilize whichever method is
more comfortable for you to assemble.
Note- Images below are examples of dual motor installation only.
A) INSTALLATION METHOD A - Installing while bed frame is on its side with no bed ends.
The motor may be installed on the bedframe when the frame is standing
on its side prior to bed ends attachment. Labels on the motor will indicate
which end goes toward the head section and foot section.
NOTE* Be careful to not damage the motor when placing at on the ground.
B) INSTALLATION METHOD B- Installing while attached to bed ends.
The motor may be installed from underneath the bed frame (horizontal to the ground) after the bed ends are attached.
Labels on the motor will indicate which end goes toward the head section and foot section.
With both hands, lift the motor and insert into the actuator and frame as shown. With the palm of your hand snap the
motor ush to actuator bar.
NOTE- To utilize Method B, you must rst assemble the head and foot boards onto the frame. If selecting this method,
proceed to Headboard Assembly on page 22 PRIOR to proceeding with Motor installation instructions below.

CORRECT INCORRECT
Figure C
Figure D
Actuator
Bar
Flange
18
Bed Kit # 15030N, 15033NC and 15235N – Dual Motor Congurations*
1. Before installing motor, ensure hand pendant cable is plugged into motor as shown in Fig C.
2. To prepare motor for installation, remove locking caps on the top of the motor by sliding them off.
3. Prior to installation, make sure that the 2 white motor blocks within the motor casing are in the retracted position. If the
white motor block is not in the retracted position, plug the power cord into a power outlet and retract motor block by
depressing the down buttons on hand pendant until motor block is fully retracted. See Figure D.
*NOTE- Although Installation Method A is being illustrated, the installation instructions are the same for both methods.
4. Align the opening on the head end of the motor with the ange on
the head section of the bed and insert the ange into the motor
compartment.
This manual suits for next models
5
Table of contents
Other Drive Indoor Furnishing manuals

Drive
Drive 13067 User manual

Drive
Drive Park House Heathcare PRELUDE 1002070001 User manual

Drive
Drive Twin Top Owner's manual

Drive
Drive 13008 Quick reference guide

Drive
Drive Med Aire Plus 8 User manual

Drive
Drive 13085L User manual

Drive
Drive RTL10360 User manual

Drive
Drive Restwell User guide

Drive
Drive 15230 User manual

Drive
Drive 13085L User manual