Drobo iSCSI SAN User manual

Drobo How-To Guide
Cloud Storage Using Amazon Storage Gateway with Drobo iSCSI SAN
www.drobo.com | Cloud Storage Using Amazon Storage Gateway with Drobo iSCSI SAN
1
The Amazon Web Services (AWS) Storage Gateway uses an on-premises virtual appliance to replicate
a portion of your local Drobo iSCSI SAN (Drobo B1200i, left below, and Drobo B800i, right below) to cloud-
based storage. This solution provides an option for redundant backup and disaster recovery in the cloud for
critical data, particularly for users that may not have a secondary site with IT equipment.
The AWS Storage Gateway is installed on a VMware host that is linked to an AWS account—providing an
on-ramp to cloud storage. Volumes of up to 1TB in size (12 volumes per gateway maximum) are created and
mounted by on-premises servers as iSCSI devices. Based on functionality available in the Beta version of
AWS Storage Gateway, data written to your gateway-stored volumes is recorded on Drobo storage and
asynchronously stored in Amazon S3 (Simple Storage Service) in the form of Amazon EBS (Elastic Block
Store) snapshots.
This guide provides the tested steps to sync data on Drobo iSCSI storage to the cloud for offsite backup
using gateway-stored volumes. The information in this guide can be the foundation for leveraging other
Amazon Web Services (AWS) for recovery in the cloud. For example, Amazon Route 53 service enables DNS
updating so that users are pointed to the instance running in the cloud. It is also possible to create an
Amazon EBS instance from an S3 backup, mount it with an Amazon EC2 instance, and restart the
application completely from the cloud.

Drobo How-To Guide
Cloud Storage Using Amazon Storage Gateway with Drobo iSCSI SAN
www.drobo.com | Cloud Storage Using Amazon Storage Gateway with Drobo iSCSI SAN
2
Topics
Deploying the AMS Storage Gateway appliance
Configuring the AMS Storage Gateway appliance
Activating the AWS Storage Gateway appliance
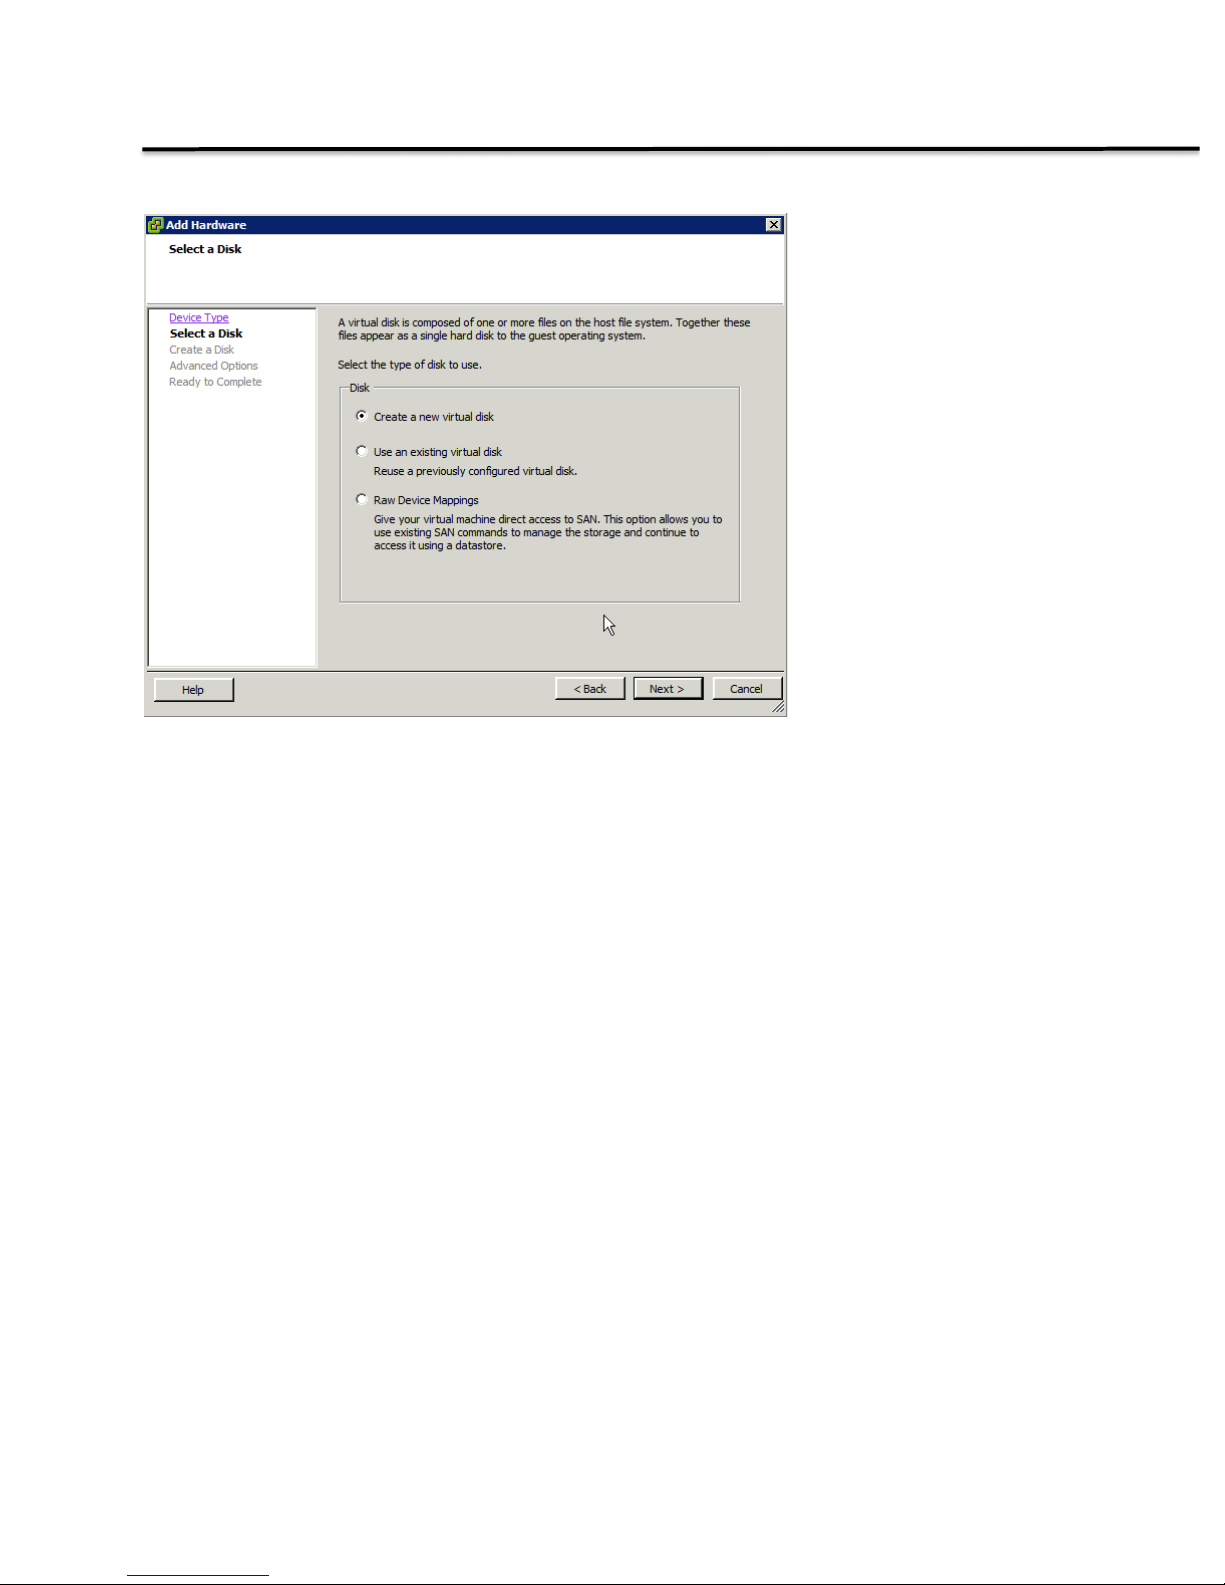
Creating AWS storage volumes
Mounting Storage Gateway volumes
Restoring storage volume snapshots
What You Will Need
•Drobo iSCSI SAN B800i or B1200i
•Drobo Dashboard management software (latest version)
•Amazon Web Services account: sign up @ http://aws.amazon.com
•AWS Storage Gateway virtual machine (VM) image, available from the AWS Management Console
•Sufficient Internet connectivity to support file synchronization to the cloud
•VMware ESXi Hypervisor v4.1 or above (can work with the free vSphere Hypervisor (ESXi))
•Gateway appliance resources: at least 7.5GB of RAM, 4 virtual processors, and 75GB of disk space
oDisk space for OVA appliance and system data can be stored on a Drobo iSCSI volume
Prerequisites
This document assumes that the Drobo iSCSI storage has been deployed and that a datastore has been
configured in your VMware virtualization infrastructure. If not, to do so, read How To Deploy VMware and
Drobo as a Complete and Cost-Effective Virtualization Solution @ www.drobo.com/downloads/how-to/HT-
0045-00_vmware_drobo_virt_solution.pdf].

Drobo How-To Guide
Cloud Storage Using Amazon Storage Gateway with Drobo iSCSI SAN
www.drobo.com | Cloud Storage Using Amazon Storage Gateway with Drobo iSCSI SAN
3
Deploying the AWS Storage Gateway Appliance
STEP 1
Log in to the AWS
Management console:
http://aws.amazon.com
Navigate to the
Storage Gateway
tab from the AWS
Management console.
STEP 2
To begin the Storage
Gateway activation
wizard, click Set up
and Activate a New
Gateway at the
bottom of the screen.
STEP 3
Click Download to
save the Storage
Gateway OVA
Package.
NOTE: The OVA
appliance package is
over 500MB and may
take some time to

Drobo How-To Guide
Cloud Storage Using Amazon Storage Gateway with Drobo iSCSI SAN
www.drobo.com | Cloud Storage Using Amazon Storage Gateway with Drobo iSCSI SAN
4
download.
STEP 4
Load the vSphere
client and log into the
ESXi host or vCenter
server that will be
used to deploy the
appliance.
Once authenticated,
select File > Deploy
OVF Template.
STEP 5
Provide the path to the AWS
Storage Gateway OVA package
and click Next.
On the next screen the details of
the appliance are shown. Click
Next to continue.

Drobo How-To Guide
Cloud Storage Using Amazon Storage Gateway with Drobo iSCSI SAN
www.drobo.com | Cloud Storage Using Amazon Storage Gateway with Drobo iSCSI SAN
5
STEP 6
Enter a name for the VM that
will be displayed within the
vSphere client and click Next.
The name provided will only be
used in the VM inventory list
within VMware.
STEP 7
Enter a name for the VM that
will be displayed within the
vSphere client and click
Next.
The name provided will only
be used in the VM inventory
list within VMware.

Drobo How-To Guide
Cloud Storage Using Amazon Storage Gateway with Drobo iSCSI SAN
www.drobo.com | Cloud Storage Using Amazon Storage Gateway with Drobo iSCSI SAN
6
STEP 8
Select the datastore on the
Drobo that will be used to
store the appliance VM.
Typically this store will also
be used to store all disk
images associated with the
appliance.
STEP 9
Select Thick Provision
Lazy Zeroed to allocate the
disk storage immediately
and click Next.

Drobo How-To Guide
Cloud Storage Using Amazon Storage Gateway with Drobo iSCSI SAN
www.drobo.com | Cloud Storage Using Amazon Storage Gateway with Drobo iSCSI SAN
7
STEP 10
If multiple networks are
configured on the ESXi
server, select the
appropriate network and
click Next.
STEP 11
Click Finish to complete the
wizard and deploy the VM to
the host server.

Drobo How-To Guide
Cloud Storage Using Amazon Storage Gateway with Drobo iSCSI SAN
www.drobo.com | Cloud Storage Using Amazon Storage Gateway with Drobo iSCSI SAN
8
Configuring the AWS Storage Gateway Appliance
STEP 1
Once the appliance has been
deployed, select it from the
inventory list.
On the summary pane for the
gateway virtual machine select
Edit Settings to modify the
properties of the VM.
STEP 2
In the Options tab, select
VMware Tools on the left,
check the box Synchronize
guest time with host in the
Advanced section at the right
bottom, and select the
Hardware tab.

Drobo How-To Guide
Cloud Storage Using Amazon Storage Gateway with Drobo iSCSI SAN
www.drobo.com | Cloud Storage Using Amazon Storage Gateway with Drobo iSCSI SAN
9
STEP 3
A minimum of two disks must be created for use by the gateway appliance. The first disk will store
application data and the second will be used as buffer space for data waiting to be synchronized to AWS.
In the hardware tab, click
Add to create the disk that
will be used by the gateway
for data storage.
STEP 4
Select Hard Disk and click
Next.

Drobo How-To Guide
Cloud Storage Using Amazon Storage Gateway with Drobo iSCSI SAN
www.drobo.com | Cloud Storage Using Amazon Storage Gateway with Drobo iSCSI SAN
10
STEP 5
Select Create a new virtual
disk and click Next.
STEP 6
The size of the data disk to be replicated to the AWS should be sufficient to store all data but without being
so large there will be a very large amount of unused space. AWS storage is billed per gigabyte and is not
thinly provisioned like a Drobo. Data is billed on the size provisioned.
Enter the size for the data
disk to be replicated to AWS.
Storage volumes can be any
size between 1 and 1000GB.

Drobo How-To Guide
Cloud Storage Using Amazon Storage Gateway with Drobo iSCSI SAN
www.drobo.com | Cloud Storage Using Amazon Storage Gateway with Drobo iSCSI SAN
11
NOTE: Data can only be restored from AWS in bulk and no granular restoration option is available. When
creating data disks, do not store all data in one large volume. Since there is no additional cost, create
multiple volumes to break data into manageable chunks.
For example, if you are using the appliance to synchronize file shares, create a volume for each department
or group drive. When a snapshot needs to be restored to the on-premises appliance, this will provide the
most efficient utilization of limited Internet bandwidth and lower recovery times for higher priority data.
STEP 7
Leave all of the Advanced
options set to the default
values and click Next.
The next screen displays a
summary of hardware
changes. Click Finish to
complete the wizard.
STEP 8
Repeat the steps above to create a second disk that will be used as a buffer by the storage gateway.
Configure its size relative to the amount of data backed up and the capacity of your upstream Internet
connection. The lower the bandwidth, the larger the buffer needs to be. As network outages and
degradation can occur, allow sufficient additional buffer space to accommodate unexpected network
performance issues.
In this example, 20% is used for the daily changes of the data disk, or 2GB.
NOTE: If the size of the initial dataset to be synchronized is very large, the buffer disk may need to as large
as the dataset until the initial push can be completed over time. Once the initial synchronization is
complete, the buffer volume can be resized to represent the average working state.

Drobo How-To Guide
Cloud Storage Using Amazon Storage Gateway with Drobo iSCSI SAN
www.drobo.com | Cloud Storage Using Amazon Storage Gateway with Drobo iSCSI SAN
12
STEP 9
The newly created disks must be configured to use the VMware paravirtualized SCSI controller.
Select New SCSI Controller
under devices and then select
Change Type to modify the
controller type.
STEP 10
Under the SCSI Controller
Type, select VMware
Paravirtual from the drop-
down menu and click OK.

Drobo How-To Guide
Cloud Storage Using Amazon Storage Gateway with Drobo iSCSI SAN
www.drobo.com | Cloud Storage Using Amazon Storage Gateway with Drobo iSCSI SAN
13
STEP 11
Verify that the two additional
hard drives and the new
paravirtualized SCSI controller
have been added properly.
Click OK to save the hardware
changes.

Drobo How-To Guide
Cloud Storage Using Amazon Storage Gateway with Drobo iSCSI SAN
www.drobo.com | Cloud Storage Using Amazon Storage Gateway with Drobo iSCSI SAN
14
Activating the AWS Storage Appliance
STEP 1
Power on the gateway virtual
appliance and record the IP
address assigned to the virtual
machine.
It may take several minutes
after powering on the
appliance for the IP address to
appear in the summary tab.
STEP 2
Enter the IP address of the
gateway VM in the AWS
wizard and click Proceed to
Activation.
NOTE: Your browser must
have network connectivity to
the gateway VM. If the
activation process fails, verify
connectivity between your
computer and the gateway
VM.

Drobo How-To Guide
Cloud Storage Using Amazon Storage Gateway with Drobo iSCSI SAN
www.drobo.com | Cloud Storage Using Amazon Storage Gateway with Drobo iSCSI SAN
15
STEP 3
The AWS Region is the location your data and snapshots will be stored. This cannot be changed once the
gateway is deployed. Pricing varies between regions.
The Gateway Name is the name referenced in the AWS Console. This can be changed after deployment.
To complete the setup
process, complete the
activation form.
Once the activation process is
complete, the new gateway is
displayed in the AWS
management console.
NOTE: Deployed gateways
are displayed by region. If no
gateways are displayed,
verify that the correct region
is selected from the drop-
down menu.

Drobo How-To Guide
Cloud Storage Using Amazon Storage Gateway with Drobo iSCSI SAN
www.drobo.com | Cloud Storage Using Amazon Storage Gateway with Drobo iSCSI SAN
16
STEP 4
To define the disk to be used
as a buffer when
synchronizing data with
AWS, select the Gateway
tab and then select
Configure Local Working
Storage.
STEP 5
Select the buffer storage from
the available disks and click
Next.
STEP 6
Click Confirm to verify that
you understand that the disk
will be formatted for use by
the gateway and all data will
be lost.
(This disk was configured
specifically for the appliance
so no data will be lost.)
The AWS storage appliance setup is now complete and you are ready to provision storage.

Drobo How-To Guide
Cloud Storage Using Amazon Storage Gateway with Drobo iSCSI SAN
www.drobo.com | Cloud Storage Using Amazon Storage Gateway with Drobo iSCSI SAN
17
Creating AWS Storage Volumes
The AWS Storage Gateway is now configured and ready to map storage to appliance servers.
STEP 1
Click Create Volumes to
create a storage volume.
In the next step, the Disk drop-down menu lists all drives available to the storage gateway. In this example
only the 10GB storage disk is listed.
STEP 2
Select the drive from the Disk
drop-down menu.
Enter an iSCSI target name,
which can be any combination
of lowercase letters, numbers,
periods, or hyphens.
Leave the Based on
Snapshot ID field blank.
Click Create Volume to
activate the volume.
The storage volume is now
active and linked to the
storage gateway.
Any data written to this
device will be replicated to
cloud-based AWS storage.

Drobo How-To Guide
Cloud Storage Using Amazon Storage Gateway with Drobo iSCSI SAN
www.drobo.com | Cloud Storage Using Amazon Storage Gateway with Drobo iSCSI SAN
18
Mounting Storage Gateway Volumes
To access the AWS storage volumes on a Windows client, the iSCSI imitator must be configured to connect
to the gateway VM.
On the start menu of the client, type “iscsicpl.exe” in the start menu to launch the iSCSI imitator.
Alternatively, the iSCSI imitator can be found in the control panel.
STEP 1
Once the iSCSI initiator loads,
select the Discovery tab and
click Discover Portal to add
a target portal.

Drobo How-To Guide
Cloud Storage Using Amazon Storage Gateway with Drobo iSCSI SAN
www.drobo.com | Cloud Storage Using Amazon Storage Gateway with Drobo iSCSI SAN
19
STEP 2
In the IP address or DNS
name field, type the IP
address of the gateway VM
(the IP address displayed in
the virtual machine summary
tab of the vSphere
management console).
Verify that the port is set 3260,
and click OK.
STEP 3
Select the Targets tab and
look under Discovered
targets for a list of available
storage targets.
If no targets are listed, click
the Refresh button. It may
take several minutes before
the initiator detects the newly
created target.
Select the target (targets
available for mapping are
listed as Inactive), and click
Connect to map the storage
to the server.

Drobo How-To Guide
Cloud Storage Using Amazon Storage Gateway with Drobo iSCSI SAN
www.drobo.com | Cloud Storage Using Amazon Storage Gateway with Drobo iSCSI SAN
20
STEP 4
Check the box for Add this
connection to the list of
Favorite Targets and then click
OK to map the storage.
The target should now be
listed as Active and you can
close the iSCSI initiator.
STEP 5
On the start menu type
diskmgmt.msc to open the
Disk Management console.
Once the console displays, you
will see the option to
Initialize Disk for the newly
created disk.
Select MBR (Master Boot
Record) for the partition style
and click OK to continue.
STEP 6
Verify that the new disk is
displayed as Online. If the
disk is offline, right-click on
the drive and select Online.
STEP 7
To create a partition, right-
click on the disk and select
New Simple Volume.
Other manuals for iSCSI SAN
1
Table of contents
Popular Gateway manuals by other brands

ArtDio
ArtDio IPC 1000 user manual

Medic4All
Medic4All MiniGate VMG03 product manual

Grandstream Networks
Grandstream Networks GXW-410x Quick installation guide

Sinapsi
Sinapsi equobox SIN.EQRPT868XT quick start guide

ZyXEL Communications
ZyXEL Communications 400 user guide

UfiSpace
UfiSpace GEE810E-868U user manual