DSI LIGHTING HD6153A1 User manual

USE AND CARE GUIDE
Item # 0000 000 000
Model # HD6153A1
Questions, problems, missing parts? Before returning to the store,
call Design Solutions International Customer Service
Mon-Fri 9:30 am to 3:00 pm EST
1-800-388-6141 ext. 216
For customer service support and the fastest response, please email us at
1
LED WALL SCONCE

Table of Contents
Safety Information
Warranty
READ AND SAVE THESE INSTRUCTIONS.
Table of Contents ........................................................... 2
Safety Information ......................................................... 2
Warranty ......................................................................... 2
Three (3) Year Warranty ............................................................. 2
What is Covered ....................................................................... 2
What is Not Covered ................................................................. 2
Pre-Installation .............................................................. 3
Planning Installation ................................................................ 3
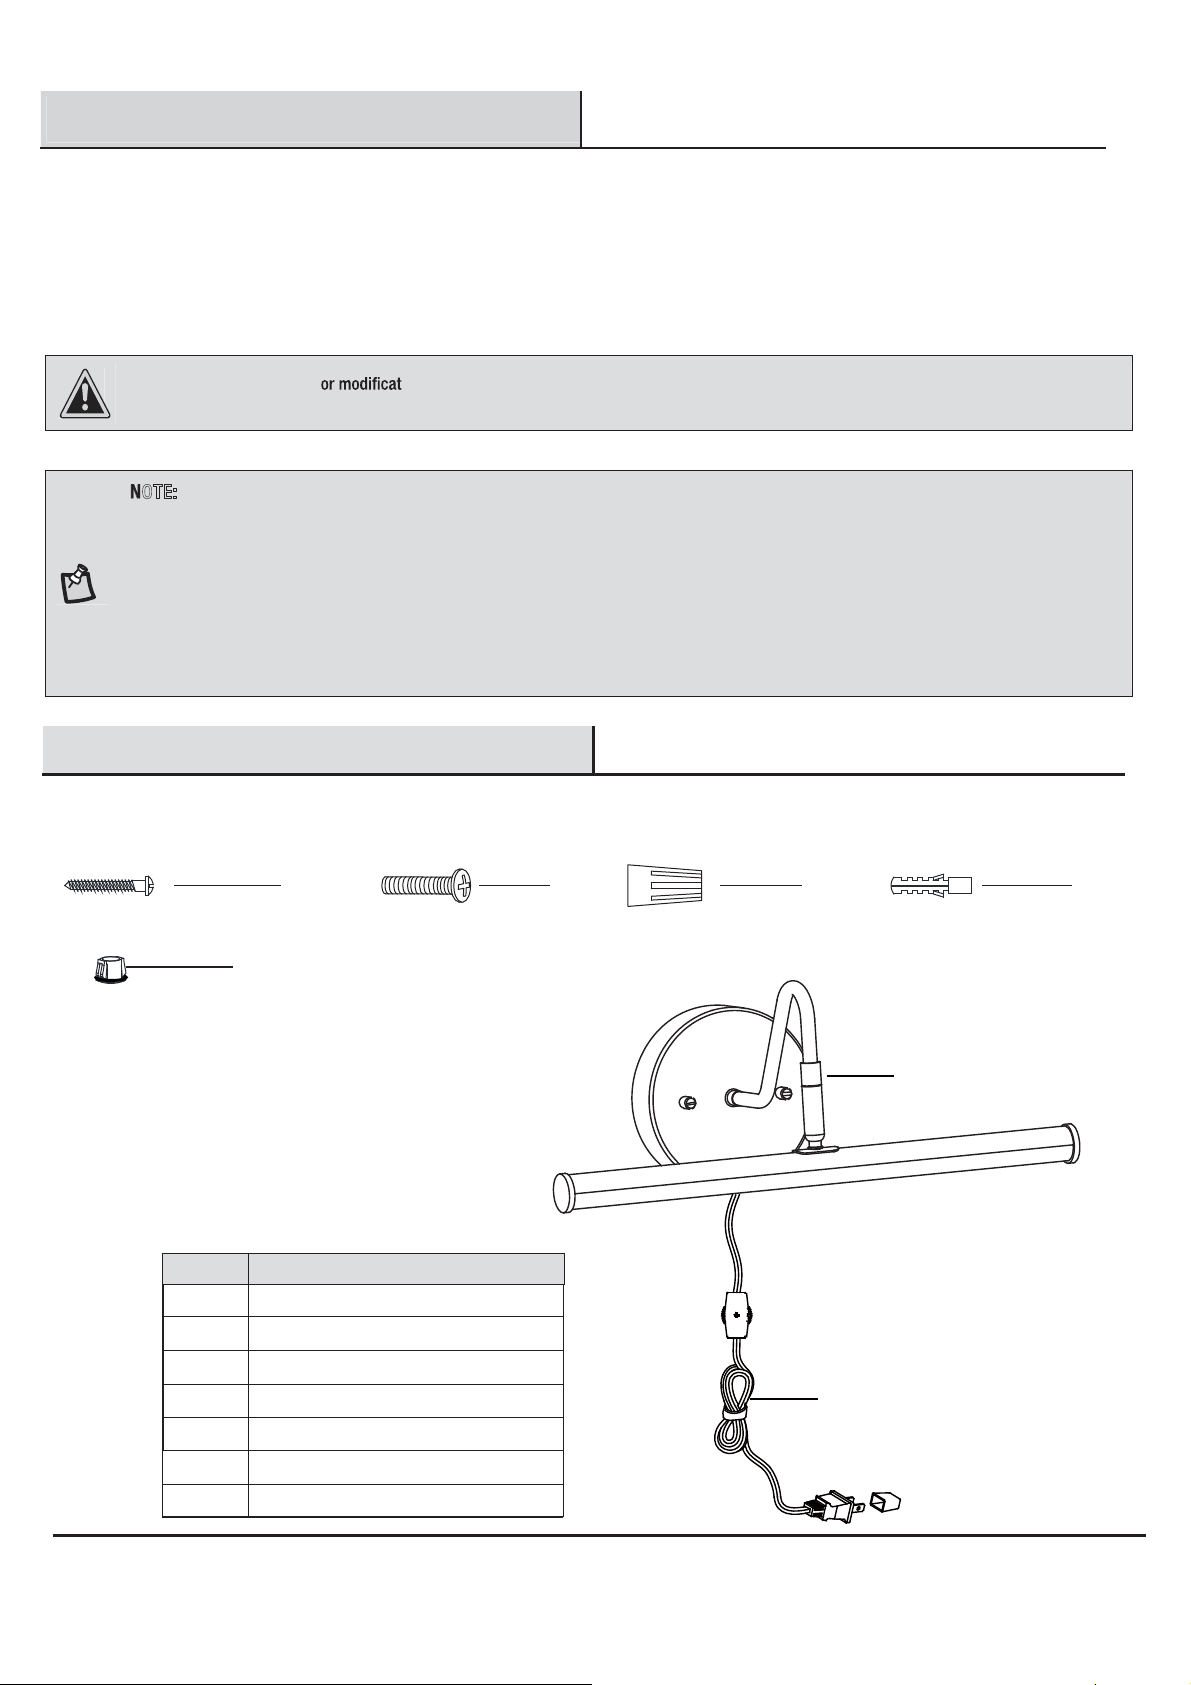
Tools Required ......................................................................... 3
Hardware Included .................................................................... 3
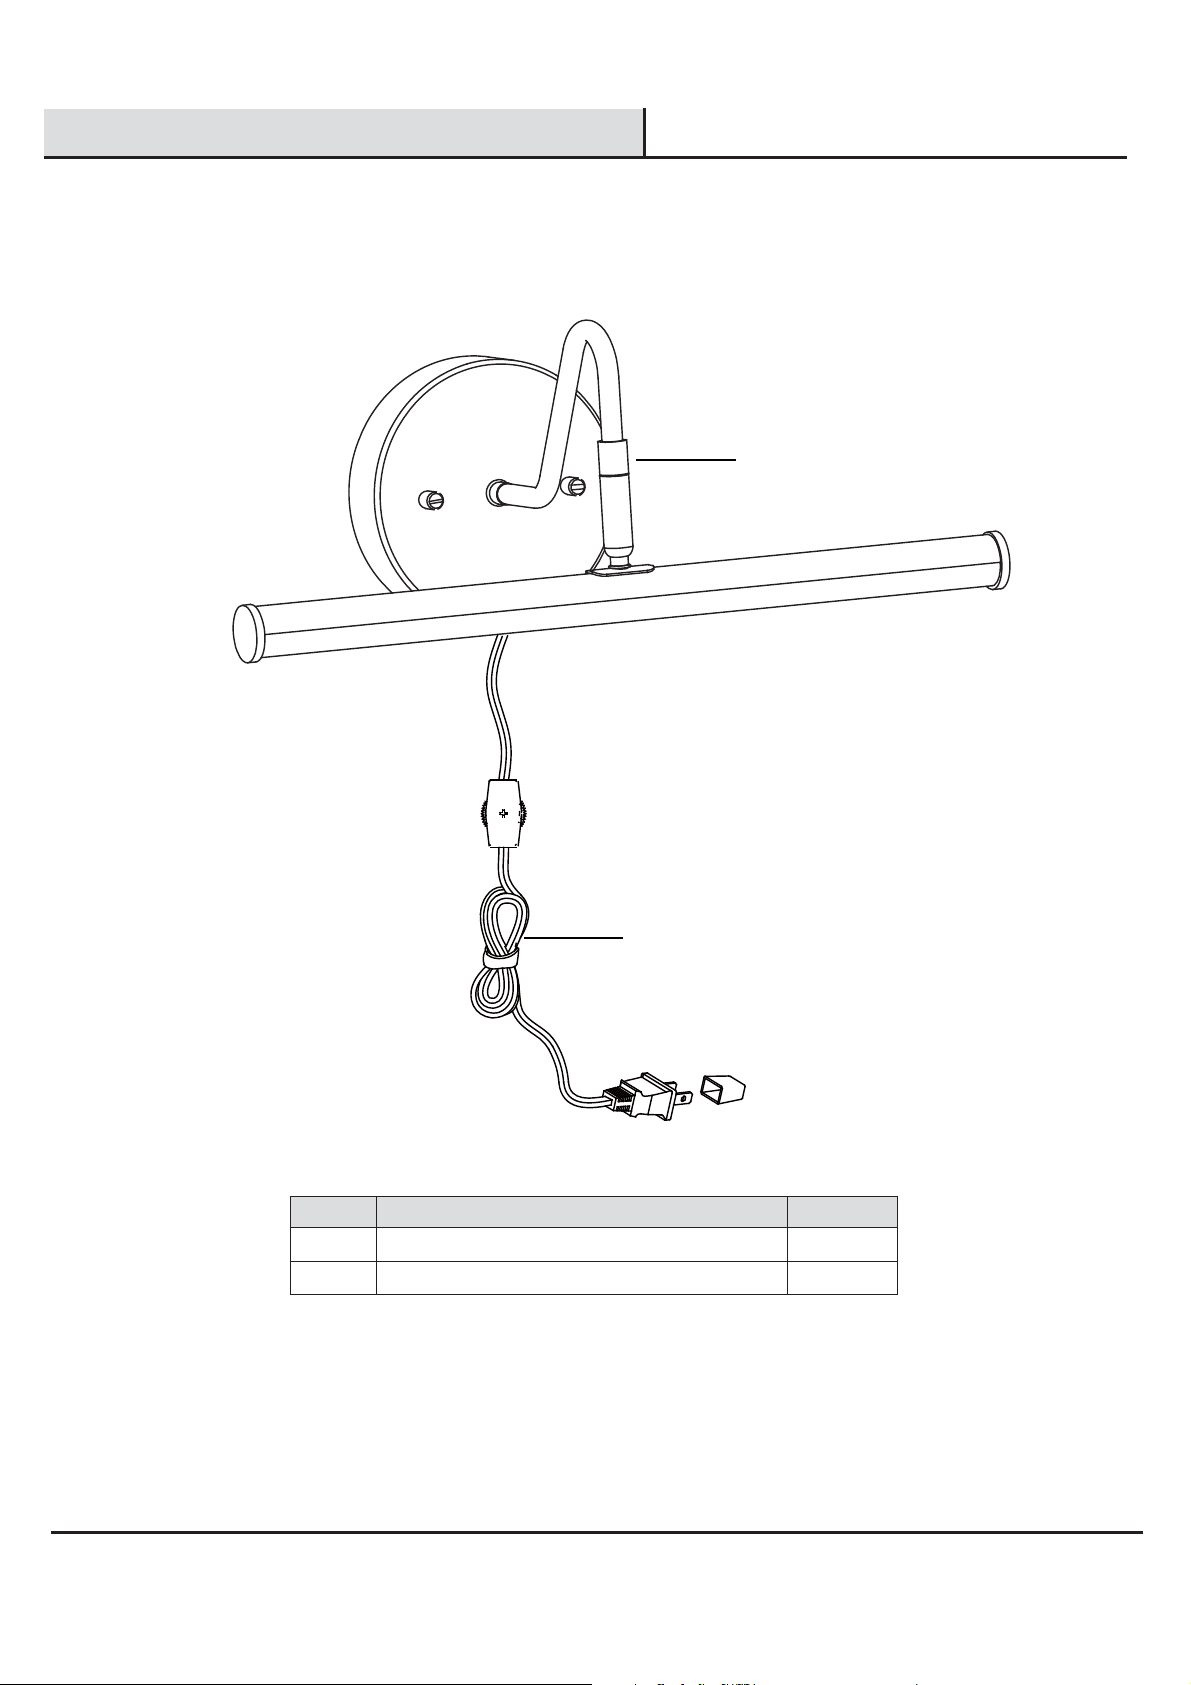
Package Contents ..................................................................... 4
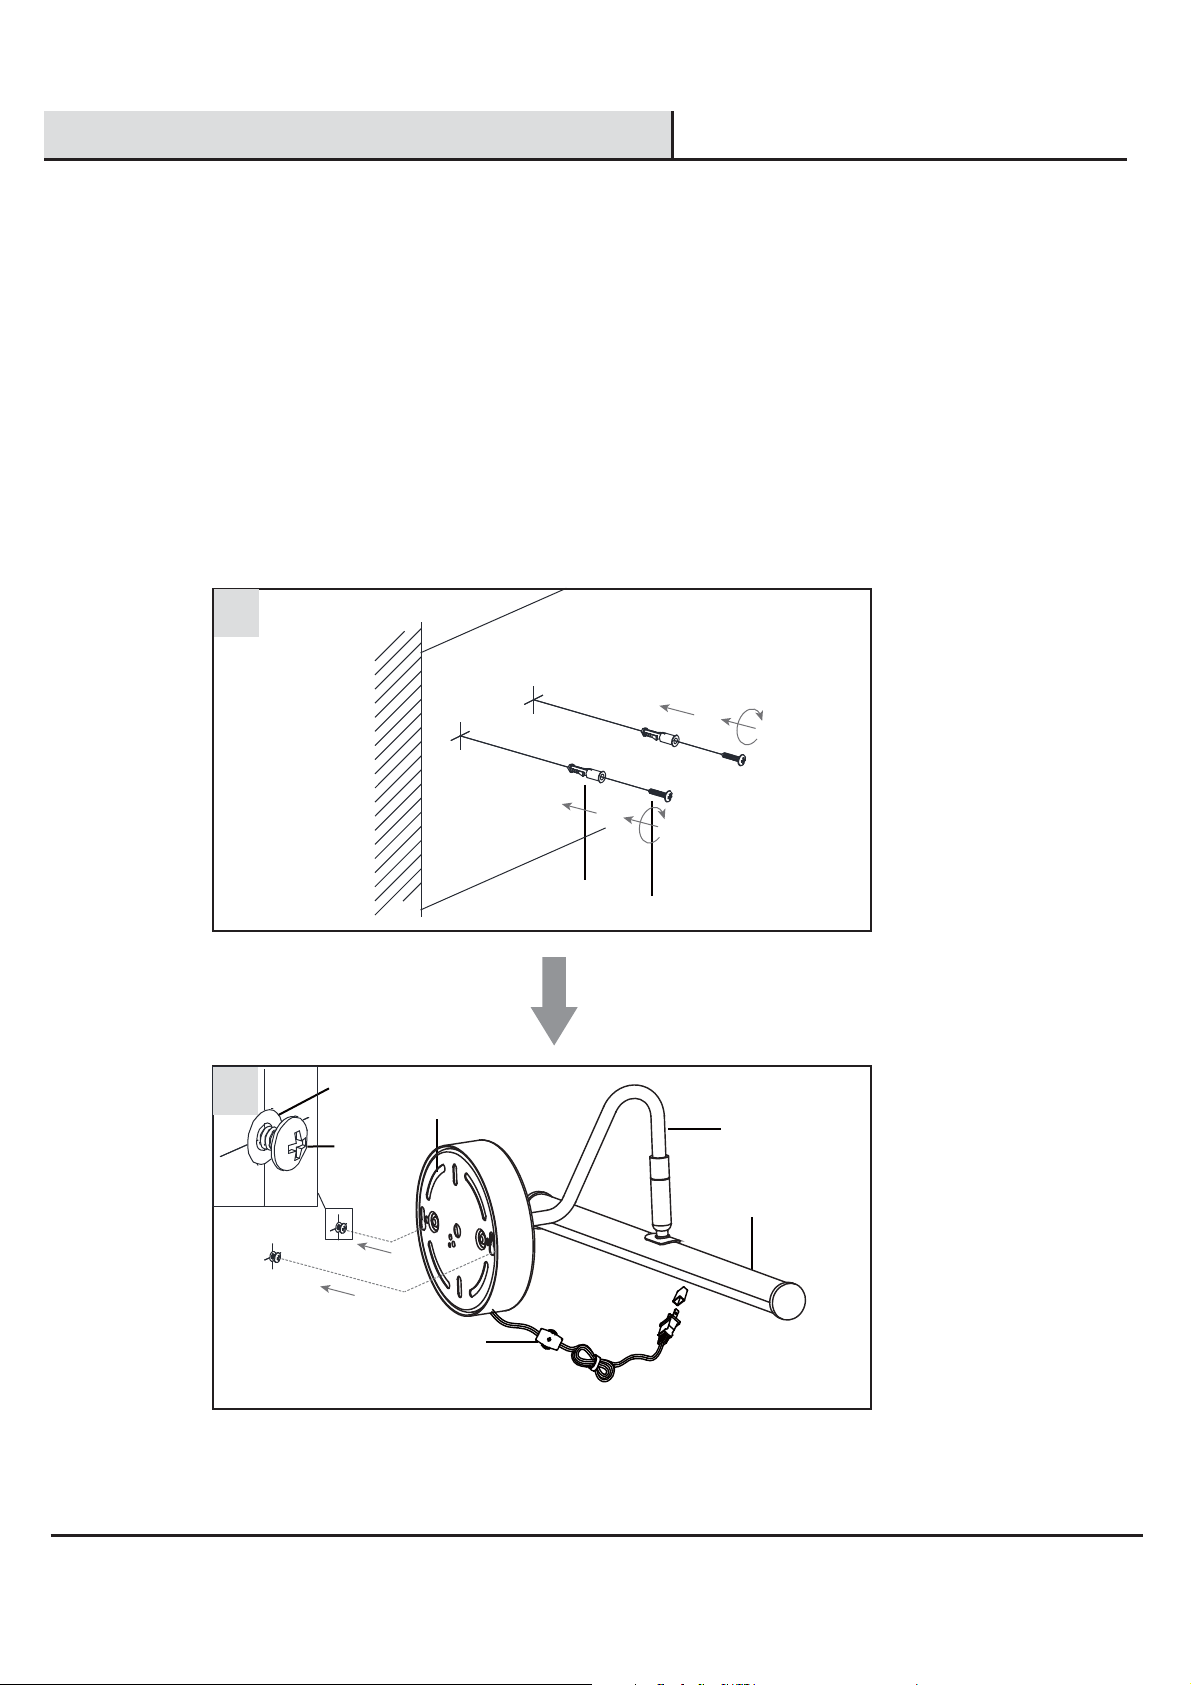
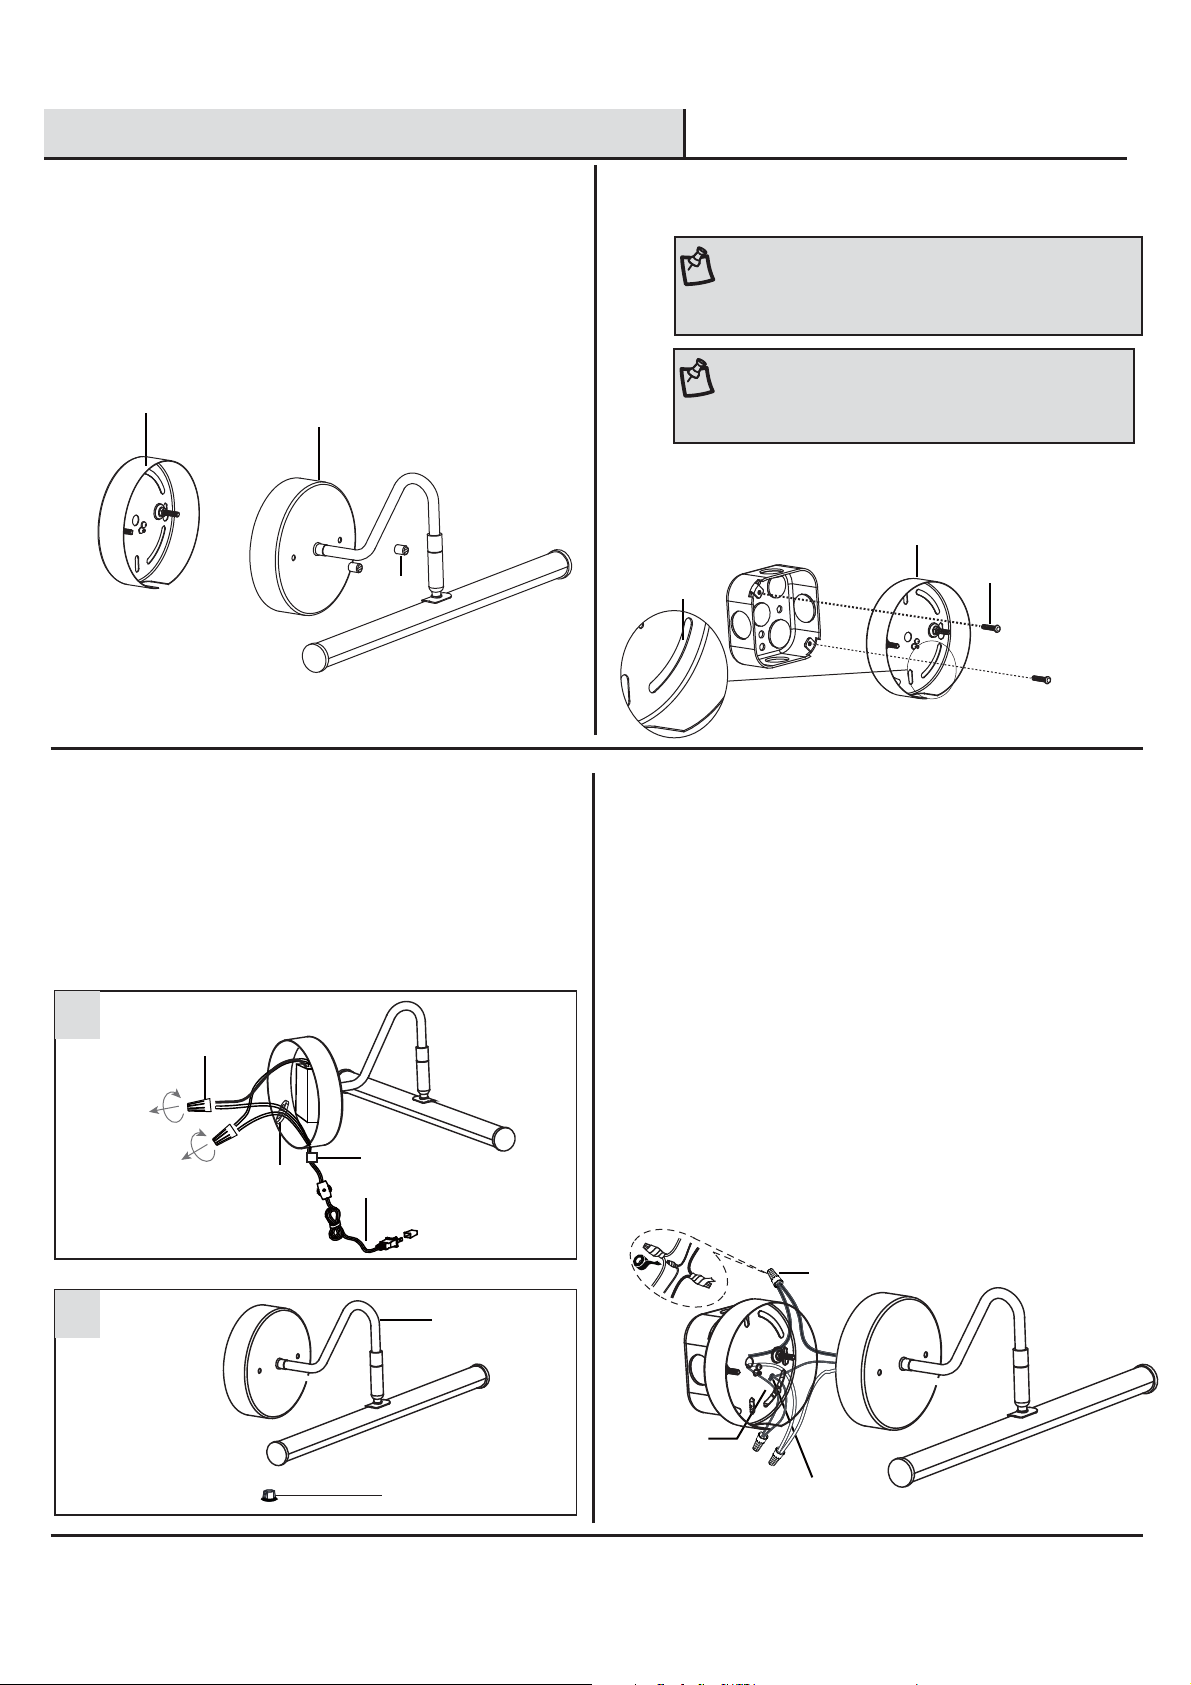
Plug in installation.......................................................... 5
Hardwire installation...................................................... 6
Care and Cleaning ......................................................... 7
Troubleshooting ............................................................. 7
FCC Statement ...............................................................8
Service Parts .................................................................. 8
2
□
□
□
□
□
THREE (3) YEAR WARRANTY
WHAT IS COVERED
WHAT IS NOT COVERED
For your protection and safety, carefully read and understand
the information provided in this manual completely before
attempting to assemble, install, or operate this product. Failure
to do so could lead to electrical shock, re, or other injuries
that could be hazardous or even fatal.
The manufacturer warrants this xture to be free from defects in materials and workmanship for a period of three (3) years from the date of
purchase. This warranty applies only to the original consumer purchaser and only to products used in normal use and service. If this product
is found to be defective, the manufacturer’s only obligation and your exclusive remedy, is the repair or replacement of the product at the
manufacturer’s discretion, provided that the product has not been damaged through misuse, abuse, accident, modications, alteration,
neglect, or mishandling. This warranty shall not apply to any product that is found to have been improperly installed, set up, or used in any
way not in accordance with the instructions supplied with the product. This warranty shall not apply to a failure of the product as a result of
an accident, misuse, abuse, negligence, alteration, faulty installation, or any other failure not relating to faulty material or workmanship.
This warranty shall not apply to the nish on any portion of the product, such as surface and/or weathering, as this is considered normal
wear and tear
The manufacturer does not warrant and specically disclaims any warranty, whether expressed or implied, of tness for a particular
purpose, other than the warranty contained herein. The manufacturer specically disclaims any liability and shall not be liable for any
consequential or incidental loss or damage, including but not limited to any labor/expense costs involved in the replacement or repair of said
product
Contact the Customer Service Team at 1-800-388-6141 ext 216 Eastern Time, Mon-Fri 9:30 am to 3:00 pm EST. For customer service
DANGER: Before starting installation of this xture
or removal of a previous xture, disconnect the power
by turning off the circuit breaker, removing the fuse at
the fuse box, or tripping the breaker that controls that
circuit. Tape a sign to the panel warning others to
leave the circuit alone while you work.
CAUTION: CONSULT A QUALIFIED ELECTRICIAN IF YOU
HAVE ANY ELECTRICAL QUESTIONS. If you have any
non-electrical questions about this xture, please
call our Customer Service Team at 1-800-388-6141 ext
216. Please reference item (0000 000 000) or UPC
(802513198126).
Before touching any wire, use a voltage tester to make sure it
is not live.
When replacing fuses, turn off the main power rst. Make sure
your hands and feet are dry, and place one hand behind your
back to prevent electricity from making a complete circuit
through your chest. Touch the plug fuse only by its insulated
rim. Remove the cartridge fuses with a fuse puller.
Use tools with insulated handles and ladders made of wood or
berglass.
To protect children, place a safety cover over any unused
outlets.

Pre-Installation
PLANNING INSTALLATION
Screwdriver
Safety
Goggles
Electrical
Tape
Pliers
TOOLS RECOMMENDED (NOT INCLUDED)
HARDWARE INCLUDED
3
IMPORTANT: Inspect the wire insulation for any cuts,
abrasions, or exposed copper that may have occurred
during shipping. If there is a defect in the wire, do not
attempt installation. Please call the Customer Service
Team at 1-800-388-6141 ext 216. For customer service
support and the fastest response, please email us at
NOTE: Hardware is not shown to actual size.
AA
2
BB
2
3
CC
DD
2
Part Description Quantity
□
□
Read all instructions before installing.
To avoid damaging this product, place it on a soft, non-abrasive surface, such as carpet or cardboard.
Ladder
NOTE: The LED has been permanently installed in this
lamp. The LED does not need to be replaced. Do not
attempt to remove or replace the LED. Do not touch the
LED or electrical connection directly with hands.
AA CC DD
EE
BB
Outlet box screw
Wire connector
Plastic anchor
1
EE Bushing with Rubber Washer
Wood screw
Drill Hammer
Pencil

Pre-Installation (continued)
PACKAGE CONTENTS
A
4
B
Part Description Quantity
A Fixture body 1
B1
Power cord

Plug in installation
5
Installing the xture body
DD AA
AA
DD 1
2
A
□
□
□
□
□
□
□
Measure the distance between the two key holes on the crossbar assembly (1).
Mark the location of the two key holes on the wall with a pencil (not provided), making sure the holes line up horizontally in the
correct position.
Drill a small hole (6 mm) on each mark and nail the plastic anchors (DD) into the wall using a hammer.
Insert the two wood screws (AA) in the plastic anchors (DD) as shown.
Place the two key holes on the xture body's (A) crossbar assembly (1) onto the two wood screws (AA). Make sure the two key
holes are secure on the two wood screws (AA) before letting go of the xture body (A).
Adjust the shade (2) on the xture body (A) to your desired location.
Plug the power cord (B) into the outlet, then turn on the switch and enjoy.
Wall
1
Switch
1
2

□
□
□
□
4Making the electrical connections
Hardwire installation
6
* Use wire connectors (CC) to connect the wires.
Ground Wire:
1. Wrap the supply ground wire around the green ground screw
on the crossbar assembly (1), no less than 2 in. from the end of
the wire. Tighten the ground screw.
2. Connect the xture ground wire to the supply ground wire
with a wire connector (CC).
Supply Wire:
1. Connect the supply white wire to the white xture supply
wire with a wire connector (CC).
2. Connect the supply black (or red) wire to the black xture
supply wire with a wire connector (CC).
3. Wrap each connection with approved electrical tape and
carefully insert all of the connected wires into the outlet box.
1A
3
4
B
A
56
EE
□
Installing the crossbar assembly
1
4BB
2
Remove the power cord
3
Secure the crossbar assembly (1) to the outlet box (not
included) with the outlet box screws (BB) as shown. Tighten
until snug.
NOTE: Use screwdriver (not provided) to remove
the iron sheet (4) from the mounting holes on the
crossbar assembly (1) as shown.
NOTE: Prior to installation, close or cover the sink
drain and/or any vents near the installation site to
prevent loss of mounting hardware if dropped.
Preparing the crossbar assembly
1
□
□
Unscrew the two mounting balls (3) from the xture body (A).
Remove the crossbar assembly (1) from the xture body (A) and
keep the crossbar assembly (1) and two mounting balls (3) for
later use.
Unscrew the two wire connectors (4) and remove the power
cord (B), the bushing (6) and the insulatingbushing (5) from
the xture body (A). (Refer to image 1)
Insert the bushing with rubber washer (EE) in the hole (DD) on
the backplate on the xture body (A). (Refer to image 2)
1
CC
Green ground screw
1
2

Hardwire installation (continued)
Care and Cleaning
Troubleshooting
□
□
Do not use any cleaners with chemicals, solvents, or harsh abrasives. Use only a dry, soft cloth to dust or wipe carefully.
To clean the xture, disconnect power by turning off the circuit breaker or by removing the fuse at the fuse box, and use a dry or
slightly dampened, clean cloth to wipe the exterior surface of the xture.
Discontinue use of the lamp. Check the wire connections.
Contact a qualied electrician or call the Customer Care
Service Team at 1-800-388-6141 ext 216. For customer
service support and the fastest response, please email us
Problem Possible Cause Solution
The power is off. Ensure the power supply is turned on.
There is a faulty switch. Test or replace the switch.
Check the wiring.
There is a faulty wire connection.
The fuse blows, or the circuit breaker
trips, when the light is turned on.
There are crossed wires, or the power
wire is grounding out.
The LED light(s) will not light. The LED is burned out. Discontinue the use of the lamp.
7
3
A
A2
1
□
□
□
5Installing the xture body to the outlet box
Reattach the backplate on the xture body (A) to the crossbar assembly (1).
Secure with the previously removed mounting balls (3).
Adjust the shade (2) on the xture body (A) to your desired location.
1 2

8
Service Parts
MODEL: HD6153A1
A
B
AA CC DD
EE
BB
Part Description
A Fixture body
B
AA
BB
CC
DD
Outlet box screw
Wire connector
Plastic anchor
EE Bushing with Rubber Washer
Wood screw
Power cord
FCC Statement
This device complies with part 15 of the FCC Rules. Operation is subject to the following two conditions:
Design Solutions International Inc.
Model: HD6153A1
Address: 6 Corporate Parkway Goose Creek SC 29445
Telephone: 800-388-6141
(1) This device may not cause harmful interference, and
(2) this device must accept any interference received, including interference that may cause undesired operation.
CAUTION: Any changes ions not expressly approved by the party responsible for compliance could void the user’s authority to
operate the equipment.
NOTE: This equipment has been tested and found to comply with the limits for a Class B digital device, pursuant to part 15 of the FCC Rules.
These limits are designed to provide reasonable protection against harmful interference in a residential installation. This equipment generates,
uses and can radiate radio frequency energy and, if not installed and used in accordance with the instructions, may cause harmful interference
to radio communications. However, there is no guarantee that interference will not occur in a particular installation. If this equipment does cause
harmful interference to radio or television reception, which can be determined by turning the equipment off and on, the user is encouraged to try
to correct the interference by one or more of the following measures:
Reorient or relocate the receiving antenna.
Increase the separation between the equipment and the receiver.
Connect the equipment into an outlet on a circuit different from that to which the receiver is connected.
Consult the dealer or an experienced radio/TV technician for help.

Questions, problems, missing parts? Before returning to the store,
call Design Solutions International Customer Service
Mon-Fri 9:30 am to 3:00 pm EST
1-800-388-6141 ext. 216
For customer service support and the fastest response, please email us at
Retain this manual for future use.
9

GUÍA DE USO Y MANTENIMIENTO
1
Artículo # 0000 000 000
Modelo # HD6153A1
¿Tiene alguna pregunta o algún problema? ¿Le faltan piezas?
Antes de volver a la tienda, llame al Servicio de atención al cliente de
Design Solutions International De lunes a viernes, de 9:30 a 15:00 EST.
1-800-388-6141 ext. 216
Para obtener ayuda de nuestro Servicio de atención al cliente y la respuesta más rápida,
envíenos un correo electrónico a
2 LUCES DE MONTAJE AL RAS

ÍNDICE
Información de seguridad
Garantía
LEA Y GUARDE ESTAS INSTRUCCIONES
Índice............................................................................... 2
Información de seguridad.............................................. 2
Garantía........................................................................... 2
Tres (3) años de garantía............................................................. 2
Lo que está cubierto.................................................................... 2
¿Qué no está cubierto?................................................................ 2
Antes de la instalación................................................... 3
Se necesitan herramientas.......................................................... 3
Planicación de la instalación..................................................... 3
Aditamentos incluidos................................................................. 3
Contenido del paquete................................................................ 4
Instalación...................................................................... 5
Cuidado y limpieza........................................................ 7
Solución de problemas................................................. 7
Declaración de la FCC ................................................. 7
Piezas de recambio....................................................... 8
2
□
□
□
□
□
TRES (3) AÑOS DE GARANTÍA
LA GARANTÍA CUBRE
LO QUE NO CUBRE LA GARANTÍA
Por su propia protección y seguridad, lea atentamente y
comprenda la información de este manual en su totalidad
antes de intentar ensamblar, instalar o usar este producto.
No hacerlo podría provocar descargas eléctricas, incendios u
otras lesiones que podrían ser peligrosas o incluso fatales.
El fabricante garantiza que esta lámpara no presentará defectos en los materiales ni en la mano de obra por un período de tres (3) años
desde la fecha de compra. Esta garantía se aplica solo al comprador original y a los productos que se usen bajo condiciones de uso y
servicio normales. Si se nota alguna falla en el producto, la única obligación del fabricante y el único recurso disponible para usted será
reparar o reemplazar el producto según el criterio del fabricante, siempre y cuando dicho producto no se haya dañado como resultado del
uso incorrecto, maltrato, accidentes, modicaciones, alteración, negligencia o manipulación incorrecta. Esta garantía no se aplicará a los
productos que se hayan instalado, congurado o utilizado incorrectamente y de un modo que no cumpla con las instrucciones que se
proporcionan con el producto. Esta garantía no se aplicará a las fallas de los productos que se produzcan como resultado de accidentes,
usos incorrectos, abuso, negligencia, alteración o instalaciones mal hechas, o como resultado de cualquier otro tipo de fallas que no estén
relacionadas con el material defectuoso o con la mano de obra. Esta garantía no se aplicará al acabado de ninguna parte del producto,
como los daños en la supercie o deterioros que se produzcan debido a las condiciones climáticas, ya que estos daños se producen como
consecuencia del uso o los desgaste normales.
El fabricante no garantiza y rechaza especícamente toda garantía, ya sea expresa o implícita, de idoneidad para un n en particular que
no sea el de la garantía que se incluye en la presente. El fabricante rechaza especícamente toda responsabilidad y no se hará cargo de
ningún tipo de pérdida o daño resultante o accidental, entre otros, los costos de mano de obra para el reemplazo o la reparación de dicho
producto.
Comunícate con el Equipo de Servicio al Cliente al 1-800-388-6141, ext. 216, hora del este, de lunes a viernes, de 9:30 a 15:00 EST. Para
obtener ayuda de nuestro Servicio de atención al cliente y la respuesta más rápida, envíenos un correo electrónico a
PELIGRO: Antes de comenzar la instalación de esta
lámpara o la extracción de una anterior, desconecte la
alimentación. Para ello, apague el interruptor de circuito,
retire el fusible de la caja de fusibles o apague el
interruptor que controla ese circuito. Pegue un letrero en
el panel para advertir a otras personas que no toquen el
circuito mientras usted trabaja.
PRECAUCIÓN: PÓNGASE EN CONTACTO CON UN
ELECTRICISTA CALIFICADO SI TIENE ALGUNA PREGUNTA
SOBRE ELECTRICIDAD. Si usted tiene alguna otra
pregunta acerca de esta lámpara, por favor contacte a
nuestro Equipo de Servicio al Cliente al
1-800-388-6141 ext. 216. Proporcione el artículo (0000
000 000) o UPC (802513198126).
Antes de tocar el cable, use un medidor de voltaje para
asegurarse de que no tenga corriente.
Utilice herramientas con mangos aislados y escaleras de
madera o de bra de vidrio.
Para proteger a los niños, coloque una cubierta de seguridad
sobre los tomacorrientes que no se usen.
Al reemplazar los fusibles, primero desconecte el suministro
principal de electricidad. Asegúrese de que sus manos y pies
estén secos y coloque una mano detrás de su espalda para
evitar que la electricidad haga un circuito completo a través
de su pecho. Toque el fusible de un enchufe solo en el borde
aislado. Retire los fusibles del cartucho con un extractor de
fusibles.

Antes de la instalación
Planicación de la instalación
Lea todas las instrucciones antes de realizar la instalación.
Coloque este producto sobre una supercie suave y no abrasiva, como una alfombra o una base de cartón, para evitar dañarlo.
Destornillador Phillips
Gafas de seguridad Cinta aislante
Pinzas
HERRAMIENTAS NECESARIAS (NO SE INCLUYEN)
Aditamentos incluidos
3
Pieza Descripción Cantidad
AA 2
2
BB
3
CC
DD
2
IMPORTANTE : Revisa que el aislamiento de los
cables no haya sufrido ningún corte, abrasión ni tenga
lamentos de cobre expuestos debidos al envío. Si hay
un defecto en el cable suspende el ensamblaje. Por
favor llama a nuestro Equipo de Servicio al Cliente al
1-800-388-6141, ext. 216, hora del este, de lunes a
viernes, de 9:30 a 15:00 EST. Para obtener ayuda de
nuestro Servicio de atención al cliente y la respuesta
más rápida, envíenos un correo electrónico a
Tornillo para la caja de salida
Conector de cables
NOTA: Las herramientas no se muestran a escala
□
□
Escalera
NOTA: El LED en esta lámpara ha sido instalado de
forma permanente. No necesita reemplazar el LED. No
trate de remover o reemplazar el LED. No toque el LED o
las conexiones eléctricas directamente con las manos.
AA CC DD
BB
Perceuse Marteau
Crayon
Ancrage en plastique
1
EE Ancrage en plastique
Vis à bois
EE

Antes de la instalación (continuación)
CONTENIDO DEL PAQUETE
4
1Cuerpo de la lámparaA
1Cable de alimentaciónB
Pieza Descripción Cantidad
A
B

Plug in installation
5
Installing the xture body
□
□
□
□
□
□
Measure the distance between the two key holes on the crossbar assembly (1).
Mark the location of two key holes on the wall with a pencil (not provided).
Drill a small hole (6 mm) on each mark and push the plastic anchors(DD) into the wall using a hammer.
Attach the two wood screws (AA) in the plastic anchors(DD) as shown.
Adjust shade (2) on the xture body (A) to your desired location.
Plug the power cord (B) into the outlet, turn on the switch and enjoy.
1
DD AA
AA
DD 1
2
A
Wall
Switch
1
2

Hardwire installation
6
□
□
4Realización de las conexiones eléctricas
* Utilice los conectores de cables (CC) (incluidos) para conectar
los cables.
Cable de tierra:
1. Enrolle el cable de tierra de la alimentación alrededor del
tornillo de toma a tierra verde en el ensamble de la barra
transversal (AA), no menos de 5cm desde el extremo del cable.
Apriete el tornillo de toma a tierra.
2. Conecte el cable de tierra de la lámpara con el cable de tierra
de la alimentación mediante un conector de cables (CC).
Cable de la fuente de alimentación:
1. Conecte el cable de alimentación blanco con el cable de
alimentación blanco de la lámpara mediante un conector de
cables (CC).
2. Conecte el cable de alimentación negro (o rojo) con el cable de
alimentación negro de la lámpara mediante un conector de
cables (CC).
3. Envuelva cada una de las conexiones con cinta eléctrica
homologada e introduzca con cuidado todos los cables conecta-
dos en la caja de distribución.
A
Tornillo verde de
puesta a tierra
1
3
1
CC
□
□
Remove the power cord
3
Unscrew the two wire connectors (4) and remove the power
cord (B) and insulatingbushing (5) from the xture body (A).
Attach the bushing with rubber washer (EE) in the hole (DD) on
the backplate on the xture body (A) as shown.
1
□
Preparación del ensamble de la
barra transversal
□
Desenrosque las dos esferas de montaje (3) del cuerpo de la
lámpara (A).
Retire el ensamble de la barra transversal (1) del cuerpo de la
lámpara (A) y guarde el ensamble de la barra transversal (1) y
las dos esferas de montaje (3) para su uso posterior.
□
Instalación del eensamble de la
barra transversal
2
Fije la barra transversal (1) a la caja de salida (no incluida)
con los tornillos para la caja de salida (BB). Apriete hasta que
queden ajustados.
NOTA: Los tornillos de montaje preensamblados
en la placa perforada deben sobresalir.
NOTA: antes de la instalación, cierre o cubra el
desagüe del fregadero o cualquier abertura
cercana al lugar de instalación para evitar perder
la tornillería de montaje si se cae.
1
4BB
4
B
A
56
EE
1
2

Hardwire installation (continuación)
Cuidado y limpieza
Solución de problemas
□
□
Problema Causa posible Solución
Las luces no se ENCIENDEN La bombilla está quemada. Reemplace las bombillas.
No hay alimentación.
Asegúrese de que el suministro de electricidad esté encendido.
El interruptor está defectuoso. Pruebe o reemplace el interruptor.
Revise el cableado.
La conexión de los cables no es la correcta.
Cuando se enciende la luz, el
fusible se quema o el interruptor
de circuito se dispara.
Hay conductores cruzados o el conductor
de fuerza no tiene puesta a tierra.
7
No use limpiadores que contengan agentes químicos, solventes o abrasivos fuertes. Use solo un paño suave y seco para desempolvar o
limpiar cuidadosamente el producto.
Para limpiar la lámpara, desconecte la alimentación apagando el interruptor de circuito o retirando el fusible de la caja de fusibles y use
un paño limpio seco o levemente húmedo para la supercie exterior de la lámpara.
Deje de usar la lámpara. Revise las conexiones de cable.
Contacte a un electricista calicado o llame al equipo de
Servicio al Cliente al 1-800-388-6141, ext. 216, hora del
este, de lunes a viernes, de 9:30 a 15:00 EST. Para obtener
ayuda de nuestro Servicio de atención al cliente y la
respuesta más rápida, envíenos un correo electrónico a
□
□
□
5Instalación del cuerpo de la lámpara en la caja de salida
Fije nuevamente la placa posterior del cuerpo de la lámpara (A) al ensamblaje de la barra transversal (1).
Asegure con las esferas de montaje (3) que se retiraron previamente.
3
A
A2
1
1 2

8
Piezas de recambio
Modelo: HD6153A1
A
B
AA CC DD
EE
BB
Pieza Descripción
AA
BB
CC
DD
Cuerpo de la lámpara
A
Cable de alimentación
B
Tornillo para la caja de salida
Conector de cables
Ancrage en plastique
EE Ancrage en plastique
Vis à bois
Declaración de la FCC
Este dispositivo cumple con la Parte 15 de las reglas de la FCC. Su operación está sujeta a las siguientes dos condiciones:
Design Solutions International Inc.
Modelo: HD6153A1
Dirección: 6 Corporate Parkway Goose Creek SC 29445
Teléfono: 800 -388 -6141
(1) Este dispositivo no causará interferencia dañina y
(2) este dispositivo acepta cualquier interferencia recibida, incluyendo interferencia que cause alguna operación no deseada.
PRECAUCION: Cualquier cambio o modi cación no expresada como aprobada por la parte responsable del cumplimiento puede
anular la autoridad del usuario para operar el equipo.
Nota: Este equipo ha sido probado y cumple con los límites de la Clase B dispositivos digitales, pertinentes a la parte 15 de las reglas de la
FCC. Estos límites están diseñados para proveer protección razonable en contra de alguna interferencia dañina a la instalación residencial.
Este equipo genera, usa e irradia energía de frecuencia radial si se instala y se usa inadecuadamente de acuerdo a las instrucciones.
Puede causar interferencia dañina a las radiocomunicaciones. No hay garantía que esta interferencia no ocurrirá en una instalación
particular. Si este equipo causase alguna interferencia dañina a la recepción de la radio o la televisión, la cual puede ser comprobada
apagando y encendiendo el dispositivo se recomienda que el usuario corrija la interferencia usando una de las siguientes medidas:
Reoriente o relocalice la antena receptora.
Incremente el espacio entre el equipo y el receptor.
Conecte el equipo en un tomacorrientes que tenga un circuito diferente al que el receptor esta conectado.
Consulte el distribuidor o un técnico experimentado de radio/TV para mas ayuda.

8
¿Tiene alguna pregunta o algún problema? ¿Le faltan piezas?
Antes de volver a la tienda, llame al Servicio de atención al cliente de
Design Solutions International De lunes a viernes, de 9:30 a 15:00 EST.
1-800-388-6141 ext. 216
Para obtener ayuda de nuestro Servicio de atención al cliente y la respuesta más rápida,
envíenos un correo electrónico a
Conserve este manual para futuras consultas.
Table of contents
Languages:
Popular Lighting Equipment manuals by other brands

Red lightning
Red lightning PIXEL SPOT IP65 user manual

Robert Juliat
Robert Juliat 1015 B Technical file

DTS
DTS SCENA COMPACT LED 50 user manual

Kino Flo
Kino Flo FreeStyle T42 LED Operation manual

Larson Electronics
Larson Electronics IND-RL-HDB-BX9-120V instruction manual

RPS Studio
RPS Studio RS-SP600 instructions

Chauvet
Chauvet TRACKSCAN 250R user guide

Whelen Engineering Company
Whelen Engineering Company TN Series installation guide

Philips
Philips Varilite VLX user manual

RSA Lighting
RSA Lighting C900 Specification sheet

Hayward
Hayward ProLogic troubleshooting guide

Clas Ohlson
Clas Ohlson 36-5862 quick start guide